Close
0%
0%

FDMProperties

Developing a simple, accurate model for the mechanical strength of 3D-printed material.

Similar projects worth following
The project aims to characterise the mechanical strength of 3D printed parts.
Project steps were conducted as below:
- Research conducted to determine factors influential to the mechanical strength.
- Mechanical strength model of the 3D printed material was developed from this research.
- Python-based G-code program produced to control the printer pathing.
- ASTM D3039 tensile coupons printed to test the effects of each influential factor.
- Coupons tensile tested to gather stress-strain and failure strength data.
- Experimental data compared to the developed mechanical strength model (spoiler: it's pretty accurate!).

Designing a 3D printed part for structural use is currently done by guesstimation, as there are no accurate models for the material strength. This leads to overengineering at best, or part failure at worst. So, lets fix that! I'll cut straight to the juicy bit: this project showed some pretty promising results in predicting the mechanical strength of 3D printed parts.
As I'm sure everyone on Hackaday knows, FDM (Fused Deposition Modeling) 3D printing produces components by progressively extruding layers of plastic fibre.
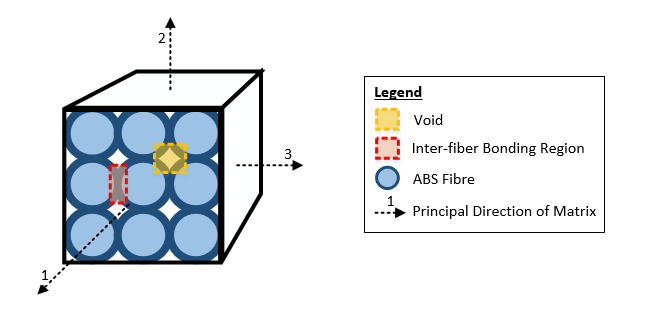
These extrusions only bond to each other partially; voids form in the resulting material which compromise the material strength. Due to these voids, the mechanical strength cannot be simply modelled isotropically (as per engineering materials such as steel, aluminium, etc).
The project is detailed in the four project logs, which should be read in the order below:

  1. Influential factors on material strength
  2. Modelling the material strength
  3. Testing the developed model
  4. Future research and contributions

The errors between the prediction and experiment were actually quite small, given that strength prediction of the FDM material has never been done before! This is promising for future work into characterising the properties of FDM material - or perhaps it's simply useful on it's own. Based on the research conducted here, stronger prints can be made by having a more negative air-gap, as interfibre bonding increases.

We can also make rough predictions about the strengths of the printed material - it seems reasonable to assume about 25 MPa tensile strength, 10 MPa intralaminar shear strength and 15 MPa transverse tensile strength for ABS under the same conditions - though definitely conduct your own testing before using these values.


If you are interested in this project, I highly recommend reading the full report in the Hackaday files section. Mechanical designers of 3D printed parts may also benefit from the knowledge summary in the report.

This project would not have been possible without prior contributions from others, especially the brilliant minds of academics Ahn, Barbero, Bellehumeur, Li, Sun, Gu, Rodriguez, Renaud, Thomas, Ziemian, Azzi and Tsai. See the research notebook report file for a full reference list.

Note: This project is released as copyleft open source under the GNU General Public License v3. This project was completed as an independent research project as part of an engineering degree.
I release the project, which I alone own full copyright of, as open source for the purposes of entering the Hackaday 'Citizen Science' competition.


data.zip

Tensile test data, microscopy images, test coupon images.

x-zip-compressed - 28.14 MB - 06/30/2016 at 03:19

Download

prints.zip

G-code used to print the samples.

x-zip-compressed - 8.78 MB - 06/30/2016 at 03:08

Download

FDMProperties-report.pdf

Full report detailing research, methodology and analysis.

Adobe Portable Document Format - 3.95 MB - 06/30/2016 at 03:02

Preview

analysis.zip

Scripts automating analysis calculations.

x-zip-compressed - 359.66 kB - 06/30/2016 at 02:58

Download

  • 1 × Solidoodle 3 Printer
  • 1 × Chi-Mei Polylac ABS PA-747 Filament
  • 1 × Instron 5500R Tensile Testing Machine

  • Influential factors on material strength

    Sam Barrett07/03/2016 at 08:09 0 comments

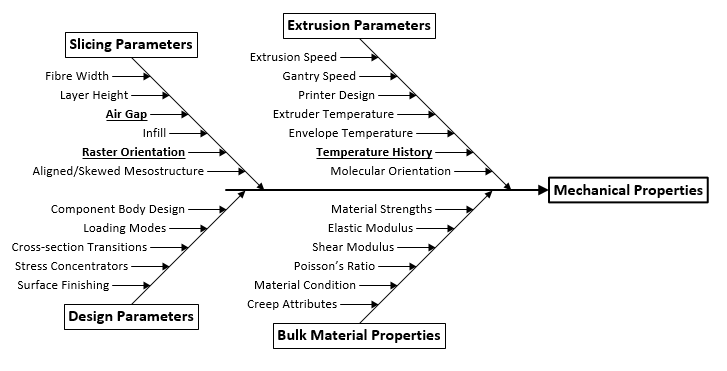
    Research conducted during the project found that the material strength is a strong function of several controllable factors:

    Of these, the underlined parameters were varied to determine their influence on the mechanical strength:

    Air Gap:

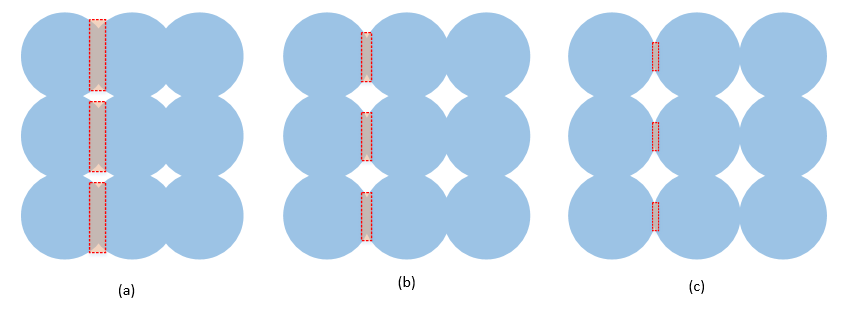
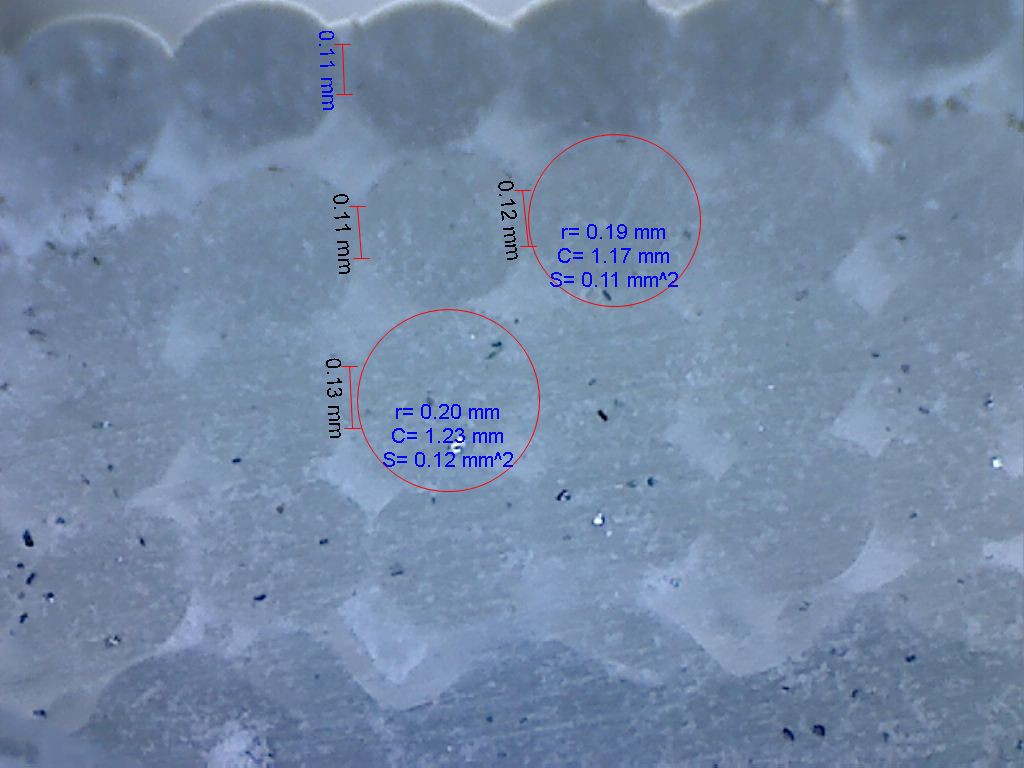
    Defined as the distance between adjacent extruded fibres. For example, if adjacent fibres of width 0.4 mm are deposited with 0.36 mm axis to axis distance, the air gap is -0.04 mm. Setting a negative air gap in this manner will increase the transverse and intralaminar shear strength of the print, as the air gap directly alters the bond area between adjacent fibres. Figure above shows decreasing bonding area with increasing air gap.

    Raster Angle:

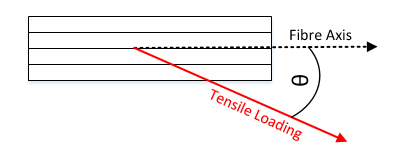
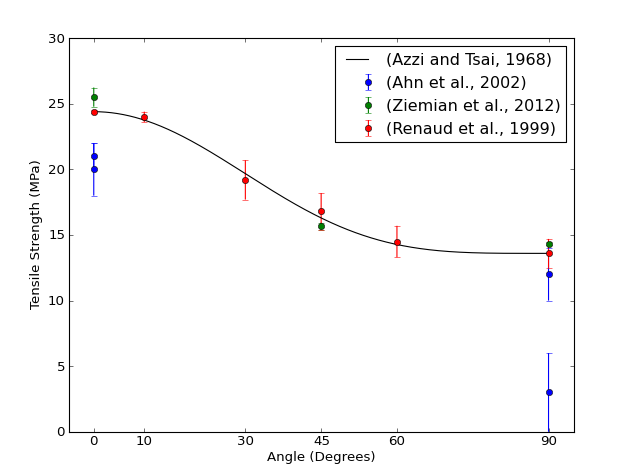
    Raster angle is simply the angle between the loading direction and the fibre axis. The plot below shows a meta-analysis confirming that tensile strength is a strong function of raster angle:

    Temperature History:

    Early in the project, it was predicted that the interfibre bonding strength could be increased by annealing the printed tensile test coupons. The temperature histories were varied in time duration (0,30,90,120) at 125 deg C.
    Basically, this doesn't work: the specimens shrink when annealed, and there wasn't any observable increase in shear strength. My (untested) hypothesis is that annealing would make the material strengths more consistent (but not greater) as the bond areas between the fibres would be more consistent - however this would likely not be worth the considerable part shrinkage.

    Controlled Build Parameters

    The build parameters in the table below were held constant throughout the experiment.

    ParameterValue
    PrinterSolidoodle 3
    FilamentChi Mei Polylac PA-747 ABS
    Density 1.03 g/cc
    Melt Flow Rate 13g/10mins (load 10kg, temp 220C, ISO-1133)
    Yield Tensile Strength 31.0 MPa
    Stored with dessicant in cool dark area
    Natural colour (no composition-altering colourants)
    Layer Height0.4 mm
    Air Gap-0.04 mm (10% of layer height)
    InfillUnidirectional Rectilinear Infill
    MesostructureAligned (ie. not skewed)
    Extrusion Speed2700 mm/min
    Extruder Temp.210 deg C
    Envelope Temp.70 deg C
    Test CouponASTM D3039
    185mm x 25mm x 2mm
    Tensile TesterInstron 5500R Tensile Testing Machine
    Single axis loading with attached extensiometer

  • Modelling the material strength

    Sam Barrett07/03/2016 at 08:09 0 comments

    Note: To save pages of mathematical formulae and reasoning, derivations and full explanations are not reproduced here. See the attached research notebook files for full details of the analysis.

    Simplifying assumptions allowed representing material stiffness matrix from the 36-parameter fully-anisotropic state to the much simpler case of transverse isotropy.

    The following models use measurements of the cross-sectional properties of the produced specimen to predict the mechanical strength - meaning the mechanical strength can be predicted using only a cheap USB microscope!

    Using a cheap USB microscope to measure the material bonding lengths and bonding area.

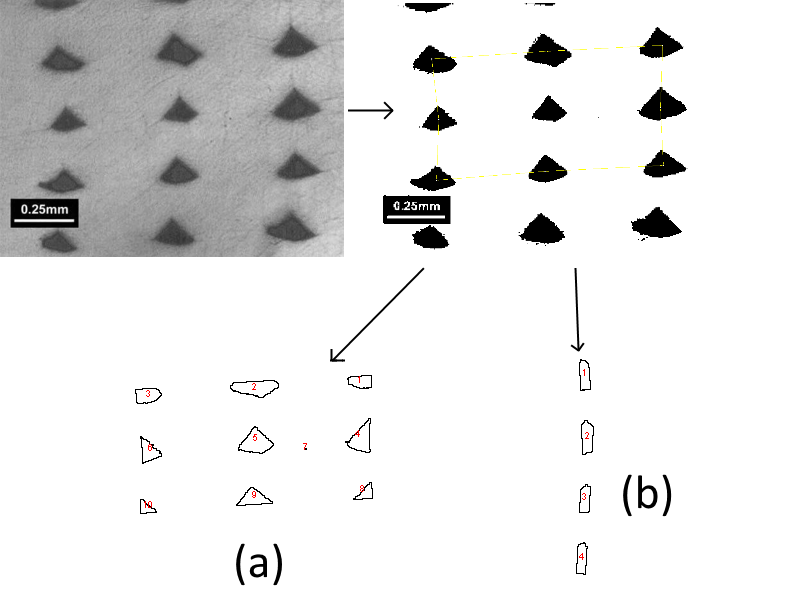
    A freely available program such as ImageJ can then be used to find the void density of the material as shown below. The void density, the ratio of air volume to the final part volume, is an important measure and can be used to predict the mechanical properties as discussed below.

    Composite Strength Modelling

    As derived in the attached research notebook, the multiaxial failure criterion was selected for predicting failure of the specimen. First, some notation

    Longitudinal tensile strength is basically the tensile strength along the fibre; intralaminar shear strength is the strength relevant to shearing between the fibre bonds; transverse tensile strength is the tensile strength across the fibre.

    This criterion states that failure occurs when the following equation is satisfied:


    In simple terms, this means that all that is required to characterise the strength is the three material strengths. These were found to be easily and accurately predictable from void density measurements.

    Longitudinal Tensile Strength

    If the void density is measured, the longitudinal tensile strength can simply be approximated by the equation

    The subscript 'ty' denotes the material tensile yield strength, which is a property of the bulk material (31.0 MPa for PA-747 ABS).

    Intralaminar Shear Strength

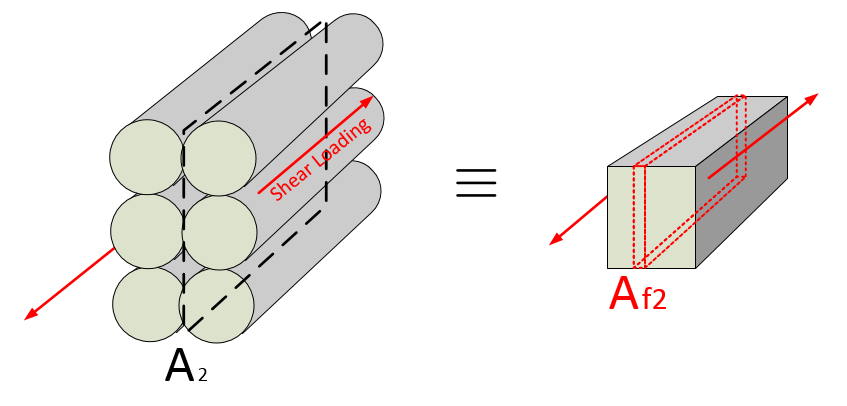
    To produce a simple model for the intralaminar shear strength, the effective shear-load carrying area was found:

    The intralaminar shear strength is simply related to the void density as:


    Transverse Tensile Strength

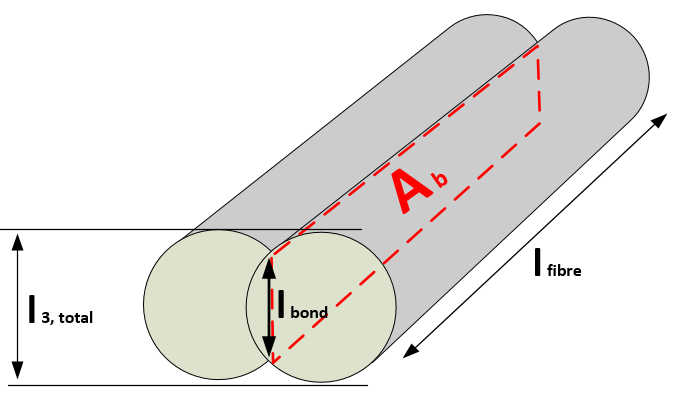
    The transverse tensile strength was found to be a function of the interfibre bonding length ratio:

    Let
    The transverse tensile strength was then found to be a very basic function of this bonding length ratio:

    Summary

    We have developed a very simple strength model based on cross-sectional measurements.

    Calculating these S values means that we can predict loading required to satisfy the multiaxial strength criterion - and thus predict when the material will fail!

  • Testing the developed model

    Sam Barrett07/03/2016 at 08:08 0 comments

    Note: Experimental design is discussed at length in the research notebook.

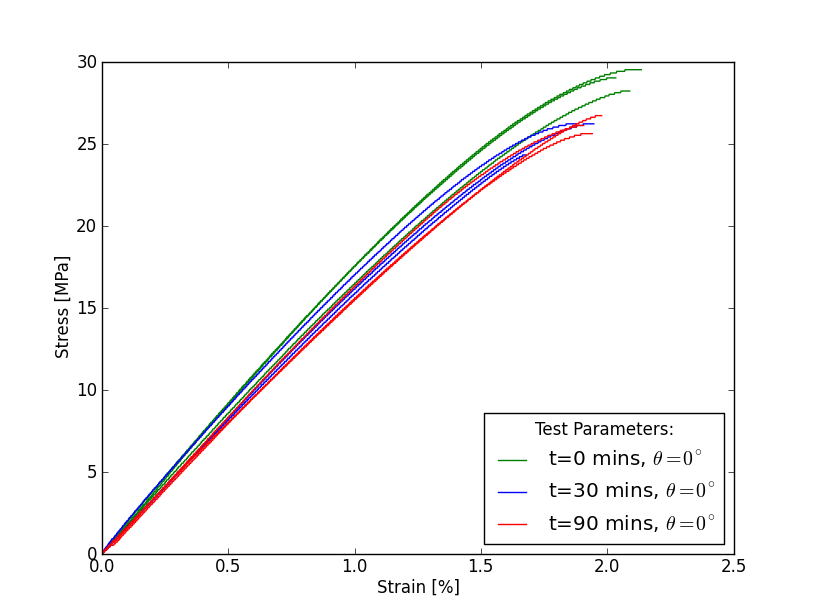
    Tensile testing of the produced test coupons showed that the material properties between printed specimens were remarkably similar when loading was along the fibre:

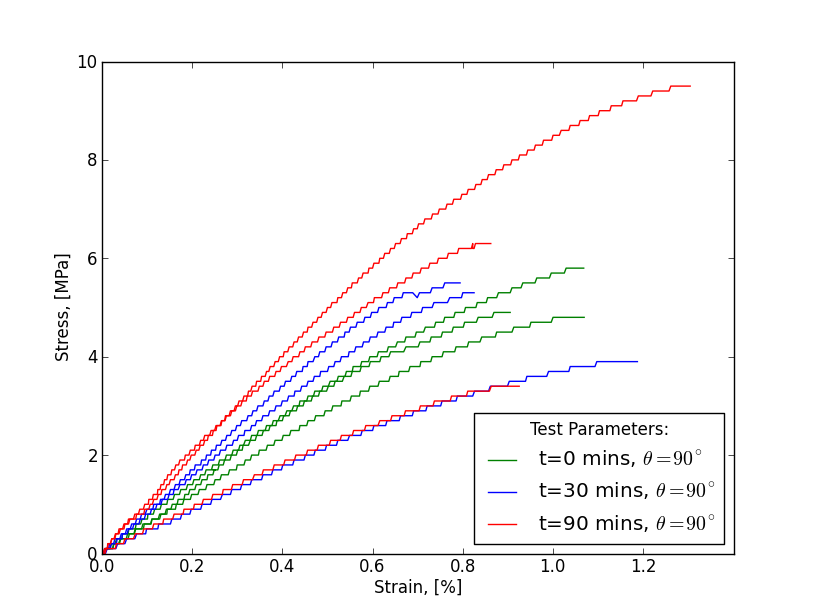
    The transverse strengths, however, were not nearly as consistent:

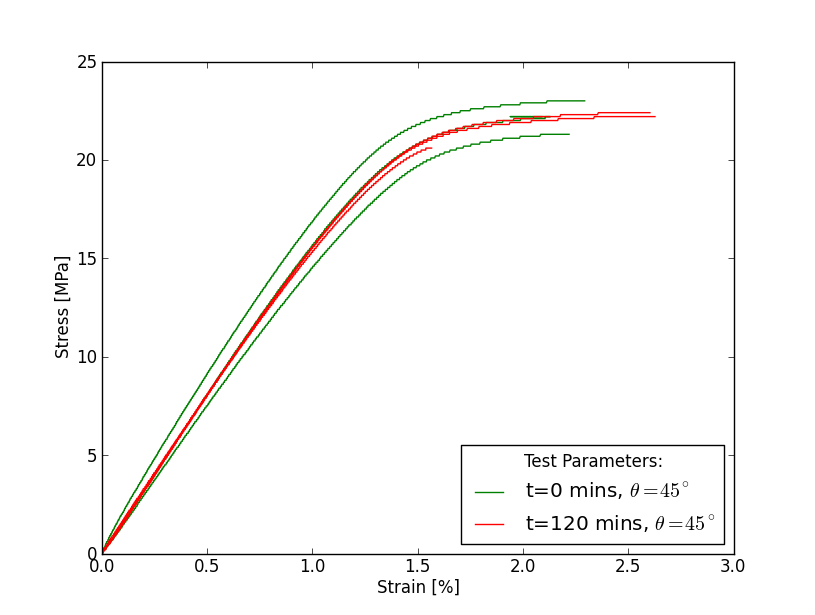
    The 45 degree orientation test interestingly showed ductility near the failure region:

    Some interesting properties of the FDM material can be observed from the above plots:

    • Low strength - transverse strengths above are on the order of 1% of the strength of steel.
    • Inconsistent tranverse strength - this is almost certainly due to the inconsistent transverse bonding area causing a 'weakest link' phenomenon.
    • Remarkably linear-elastic behaviour until close to the failure point.

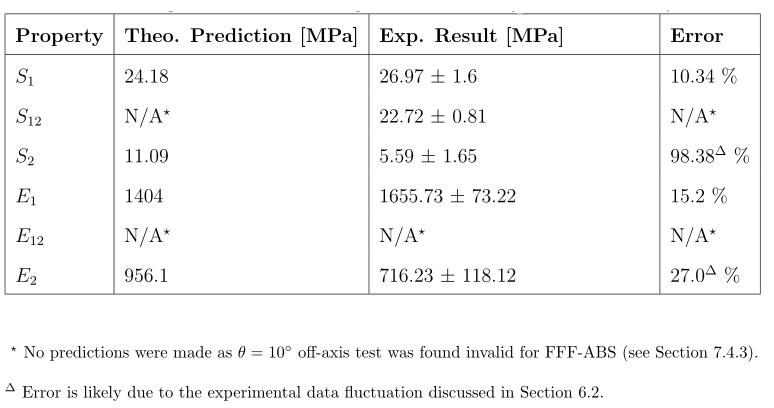
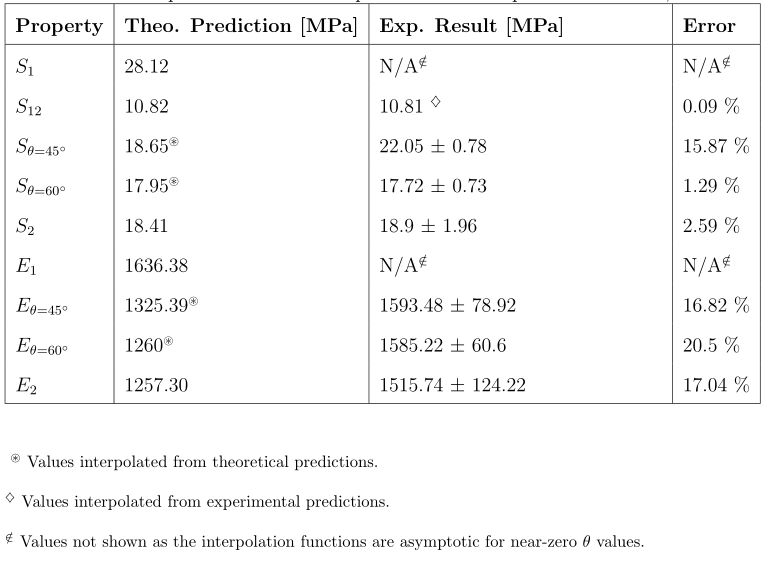
    Two tensile test sessions gave experimental data for the material tensile/transverse/intralaminar strengths, which were compared to the predictions as below:

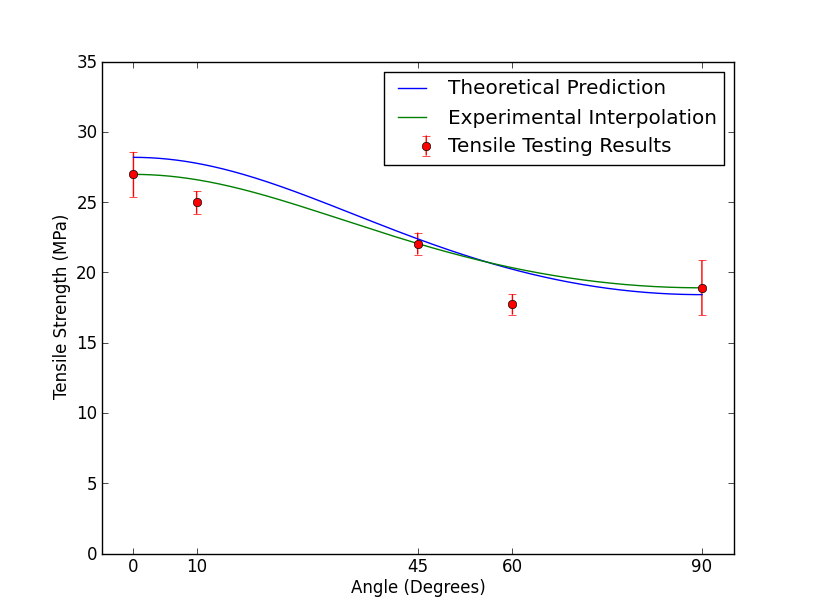
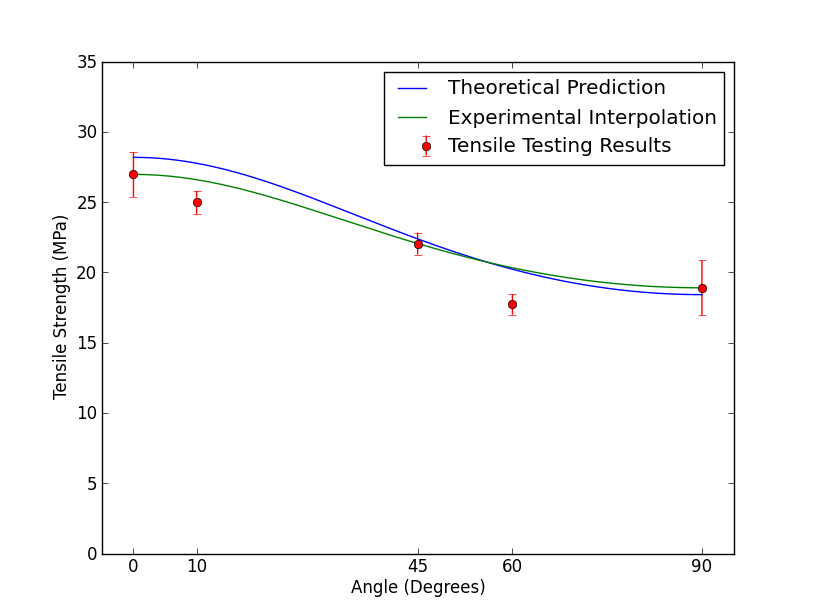
    Graphing the predicted strength against the experimental data shows reasonable accuracy of the estimation method:

    The errors between the prediction and experiment were actually quite small, given that strength prediction of the FDM material has never been done before! This is promising for future work into characterising the properties of FDM material - or perhaps it's simply useful on it's own. Based on the research conducted here, stronger prints can be made by having a more negative air-gap, as interfibre bonding increases.

    We can also make rough predictions about the strengths of the printed material - it seems reasonable to assume about 25 MPa tensile strength, 10 MPa intralaminar shear strength and 15 MPa transverse tensile strength for ABS under the same conditions - though definitely conduct your own testing before using these values.

  • Future research and contributions

    Sam Barrett07/03/2016 at 08:07 0 comments

    Further research and contributions can be found in the files attached to this project:

    • data.zip - Tensile test data, microscopy images and test coupon images.
    • prints.zip - g-code used to print the test samples.
    • FDMProperties-report - full report detailing research, methodology and analysis.
    • analysis.zip - scripts to automate the analysis calculations.

    If you would like to get involved with this project, or have an idea about where to take it, shoot me a message at hackaday!

View all 4 project logs

  • 1
    Step 1

    Method used to fabricate test samples

    A Solidoodle 3 printer was used to produce the test specimens. An aftermarket glass build plate was installed on the device, though this is in line with manufacturers recommendations. The fabrication method is outlined below:

    • Filament kept in airtight container with desiccant sachets prior to use; kept in plastic bag with desiccant sachets during use.
    • Filament measured at 10 locations along the cord to find the average filament diameter.
    • Printer calibrated as per Solidoodle recommendations, print bed levelled and filament loaded.
    • 'ABS Glue' painted in a thin layer on to print bed to ensure specimen-to-bed adhesion.
    • Repetier-Host software used to send data to printer.
    • Print bed heated to 70 degrees C, ABS glue allowed to dry.
    • Extruder heated to 210C. Extrusion chamber pressure allowed to reach approximately ambient pressure by waiting for excess material to ooze from nozzle.
    • OGCode-generated g-code loaded into control software.
    • Control software relays g-code to printer, fabricating the part.
    • Print bed heating turned off, allowing component to reach ambient temperature.
    • After ambient temperature is reached, component is carefully removed.

View all instructions

Enjoy this project?

Share

Discussions

Similar Projects

Does this project spark your interest?

Become a member to follow this project and never miss any updates