Close
0%
0%

Light sensing LED flashlight

SMART LED FLASHLIGHT - a tiny personal emergency Light sensing LED flashlight, made from available components and very simple for replicate

Similar projects worth following
How it works:

The flashlight turns on automatic for 60 seconds when it senses that the room is dark enough.
To turn on manual light for additional 60 seconds you need to push the RST button.
The Light sensing LED Flashlight is invaluable for emergencies such as power failures or blackouts.

Specifications:
Number of flashlight components: 15
Color of LED’s light: white
Number of LEDs: 3
Light Distance: 2-3 meters
Size of flashlight : 26.25mm x 20mm x 5mm
Current consumption :
LEDs turn ON: 4-5mA
LEDs turn OFF: 30-45uA
Battery capacity: 140mAh
Battery voltage: 3V
Battery life : up to 6 months (if flashlight turns on 2 times for 60 sec in 24 hours)
Required skills : knowledge of soldering SMD components
I ordered wholesale quantity of all components.
For myself, I made 4 flashlights and the rest of my Flashlight components put in plastic boxes and shared in

I have assembly several Flashlight, and have several dozen spear PCB board and components that I can share with any one who wish to make the flashlight.

The instructable contains:

  • Flashlight schematic,
  • PCB Assembly drawing,
  • BOM - Components KIT cost less than $5
  • Tools list
  • Detailed step-by- step assembling instructions.

Specifications:

  • Number of flashlight components: 15
  • Color of LED’s light: white
  • Number of LEDs: 3
  • Light Distance: 2-3 meters
  • Size of flashlight : 26.25mm x 20mm x 5mm
  • Current consumption :
  • LEDs turn ON: 4-5mA
  • LEDs turn OFF: 30-45uA
  • Battery capacity: 140mAh
  • Battery voltage: 3V
  • Battery life : up to 6 months (if flashlight turns on 2 times for 60 sec in 24 hours)
  • Required skills : knowledge of soldering SMD components
Complited.jpg

Specifications: Number of flashlight components: 15 Color of LED’s light: white Number of LEDs: 3 Light Distance: 2-3 meters Size of flashlight : 26.25mm x 20mm x 5mm Current consumption : LEDs turn ON: 4-5mA LEDs turn OFF: 30-45uA Battery capacity: 140mAh Battery voltage: 3V Battery life : up to 6 months (if flashlight turns on 2 times for 60 sec in 24 hours) Required skills : knowledge of soldering SMD components

JPEG Image - 140.93 kB - 07/10/2016 at 05:48

Preview

  • 1 × U1 MSP430G2230ID Capacitors / CeramicUltra-low-power 16-bit Mixed Signal Microcontroller
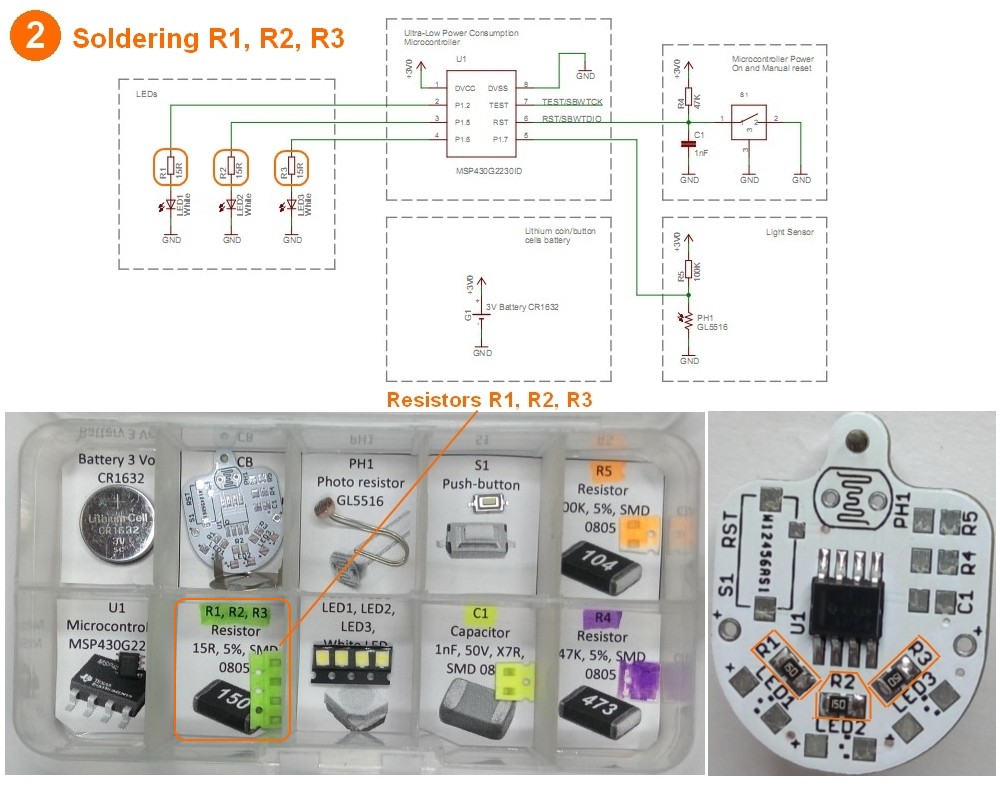
  • 3 × R1, R2, R3 Resistors - SMD 0805 15ohms 5%
  • 3 × LED1, LED2, LED3 LED SMD1208 White Light Emitting Diode
  • 1 × C1 CapacitorCapacitor, SMD 0805 1000pF 25volts X7R 10%
  • 1 × R4 Resistors (Fixed) / WirewoundResistors - SMD 0805 47kohms 5%

View all 11 components

  • 1
    Step 1

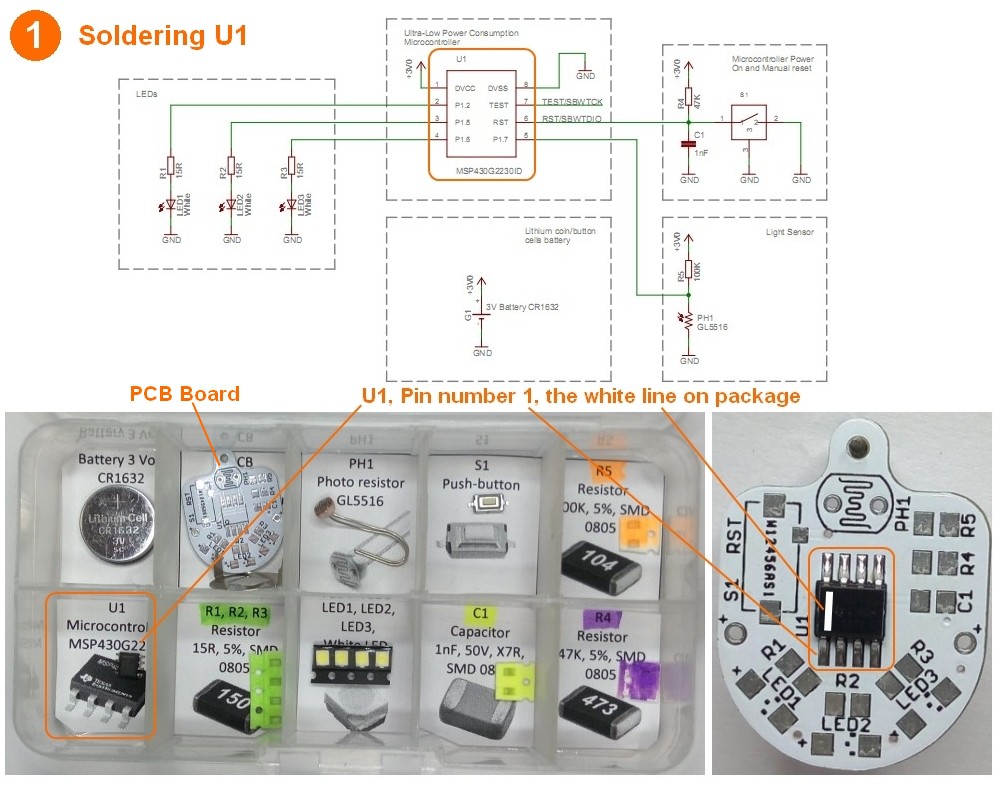
    Step 1: Soldering ultra low power micro-controller MSP430 - U1

    It is important to solder only in a well ventilated area.

    Work areas must be kept free of static generating materials including styrofoam, vinyl, plastic, fabrics and so on.

    Pay attention the white line of the U1 should be placed as showed in the Picture. U1 first pin should be close to R1.

  • 2
    Step 2
  • 3
    Step 3

    Step 3: Soldering White Light Emitting Diodes LED1, LED2, LED3

    Pay attention to LED direction. The blunt (catted) angles of LEDs should be placed exactly as showed in picture.

    The LEDs have a plastic package that that very sensitive to overheating.

    Don’t overheat the LEDs.

View all 10 instructions

Enjoy this project?

Share

Discussions

Similar Projects

Does this project spark your interest?

Become a member to follow this project and never miss any updates