-
1Step 1
Overview
The following instructions will help you copy from GitHub, install, configure and run the software. The software isn't very processor intensive and will run fine on a lower spec'd Windows machine with 2Gb memory although the more Node.JS plugins added, the more memory required (each plugin takes approximately 20Mb as they are run in their own process space for isolation reliability reasons).
Source files are on GitHub
- HAConsole for the automation engine
- HAClient for the HTML5 dashboard framework
- PluginMgr for the plug-in framework
Other components required to be installed on the hub server:- SQLite for the database
- Node.JS and Express
- Visual Studio to modify and compile any changes needed
- Various NPM modules as required by plugin Manager and plug-ins.
Nothing required on the client except a modern HTML5 browser. To access the client site, connect to:
http://My_Server_Name/HAClient.htmlConsider this software to be beta quality, there are a number of bugs, mostly in the HTML5 client with browsers other than Internet Explorer - The software was tested against Internet Explorer mostly as it is well integrated into Visual Studio although the latest HTML5 code on GitHub now works with Chrome, Firefox and Edge although some smaller formatting issues remain.
If you find bugs, do note them down and tell me (via the project comments section), I'll keep a running tab to fix them, even better if you fix them in your forked code then send me a pull request to merge the changes, additions and fixes back into the master branch. Also if you add new plugins or widgets, or add new functionality to the core framework please share them back.
When I have more time I'll write up better install with pictures and use instructions including a video. These instructions should get you going in the interim - I have started with a fresh machine and built a running server with these instructions but if I have missed out a step, something not working or something is ambiguous let me know and I'll adjust the instructions. Any questions please ask in the comments section.
Not completed:
- To do list
- Zip / Installer package to make it easier to install (instructions below are for a developer build)
- Some formatting bugs with Chrome and Firefox
-
2Step 2
Installing Pre-Requisites
- Prepare a Windows machine (client or server) on an internet connected network to act as a hub, preferably Windows 10 although older versions should also work. It can be a multi-use machine, CPU loading is very low although disk IO can be high on certain actions involving historical data (eg. graphing). The machine can be multi-use but should be left on 24 hours.
- Install the latest version of Visual Studio (Community edition is free) and choose the customize option and install the GitHub extension option and optionally the GitHub desktop client (makes for easier cloning). Start up Visual Studio and follow the registration process. link
- Install Node.JS v6.x.x (use defaults when installing) link.
- Close Visual Studio then install the latest beta Node.JS tools for Visual Studio (compatible with Visual Studio 2015). link.
-
3Step 3
Cloning or Forking the source code from GitHub
If you are interested in modifying the source code to improve it, then fork the 3 modules on GitHub, make modifications, test them then make a pull request for me to pull the modifications back into the master branch. If you just want to play with the code without modification then choose the clone option for all 3 modules (If you have installed the GitHub Desktop there is an option to clone directly into Visual Studio) and copy down to your local GitHub repository. More info on forking here.Run 2 instances of Visual Studio and have one open the HAConsole solution (.sln file) and the other the PluginMgr solution using the Team Explorer toolbox in Visual Studio.
-
4Step 4
Installing Dependencies
First go to the PlugInMgr local GIT repository and remove the plugins from the plugin directory that you won't be using (as all my plugins are included in the GitHub repository and you are unlikely to have all my sensors...), else the unconnected plugins will crash and restart every 3 seconds due to missing NPM dependencies (doesn't matter - the plugin manager & console will still work fine). I suggest you keep the plugins that connect to the cloud like the shares and weather plugins so you can see them operating. Or edit the plugin .ini files for each plugin and set the ''enabled'' entry to false.
Next setup the Node.JS dependencies for the plug-in Manager. Even if you don't want to run Node.JS plugins the plugin manager is still needed as the REST, Sockets, MQTT and Web server are managed by Node. The following are the minimum dependencies needed to be installed by the NPM package manager in Visual Studio (use the Visual Studio instance with the PluginMgr solution opened to access NPM from the Visual Studio Solution Explorer toolbox). Select the Install new NPM packages from the NPM branch of the Solution Explorer toolbox by right clicking all of the modules named below and install the latest versions for all these modules:
- Ini,
- Express,
- Compression,
- MQTT-packet,
- WS, and the ws module tries to compile a binary and fails but the binary isn't needed, install anyway...
Or a quick way is just to restore the missing NPM packages option in the NPM right click menu but you will get all the packages I use for all my plugins as well as the ones used by the system.All the VB.NET dependencies are automatically installed by NuGet when you first run the server console. If they don't, open up the NuGet package manager for the HAConsole project using the Visual Studio Solutions Explorer toolbox and install PowerJSON, System.Data.SQLite.Core and SuperWebSocket latest versions. The Commons project will also need FastJSON NuGet package installed (select the Commons project in Solutions Explorer and NuGet package manager) if you get JSONInclude errors from the Commons modules.
-
5Step 5
Starting....
Press the run button in Visual Studio with the HAConsole solution open and it should build and run, hopefully with no errors and you should see the HAConsole logging messages and a second console window for Node.JS plugin messages. If there are errors the error messages are fairly descriptive to help with debugging. No need to run the pluginMgr in Visual Studio, the HAConsole will launch Node & PluginMgr automatically (we had to use Visual Studio in the previous step to install the Node dependencies).Once everything is up and running you don't need to continue to use Visual Studio to run the hub software, you can just run the HAConsole.exe executable from the bin\debug (or release if you have built for release) directories below the HAConsole\HAConsole master directory.
If this is the first time you use Node.js, you may see a warning from the Windows Firewall. Click allow access as you likely will be connecting to/from other machines.
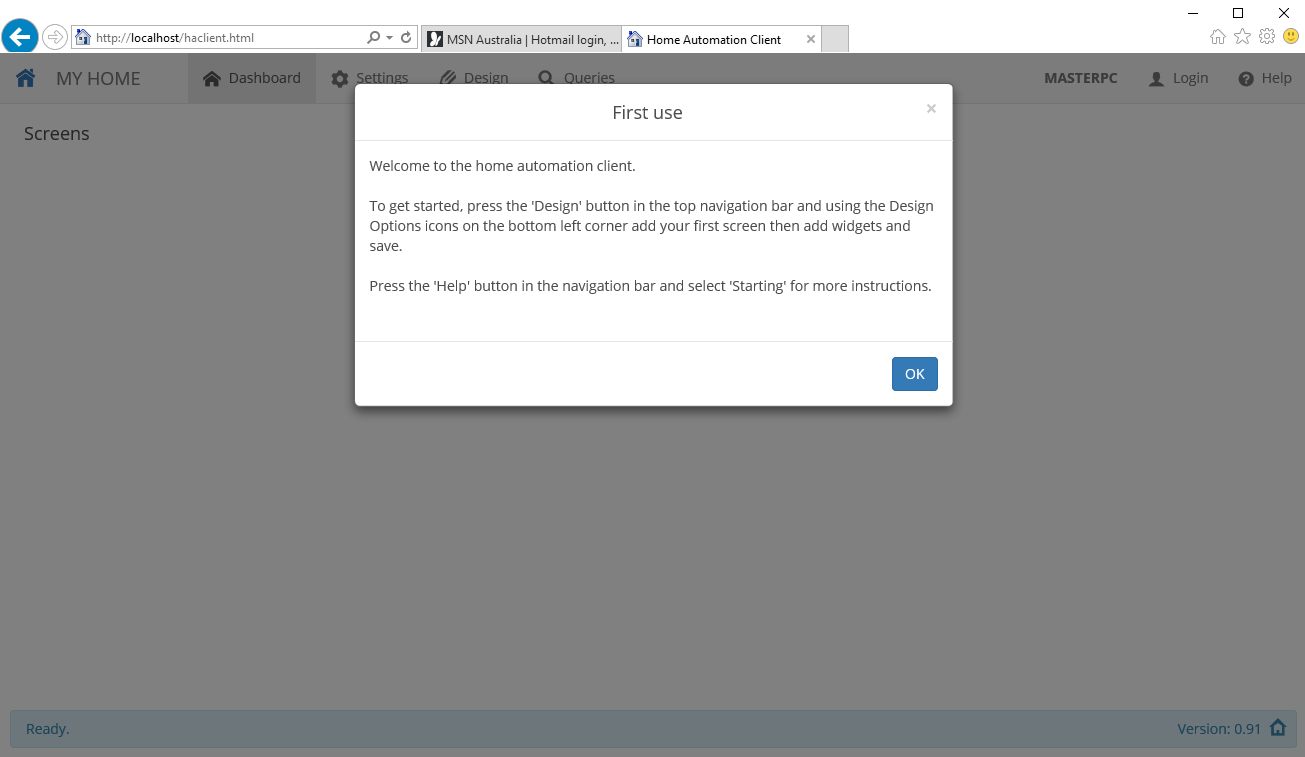
Now you are ready to run up the client. Open a browser tab and browse to the HAClient.html URL on the hub server (http://My_Server_Name/HAClient.htlm or http://localhost/HAClient.html for the server browser). If all is working you should see the client toolbar and footer on the screen and a welcome message as below.
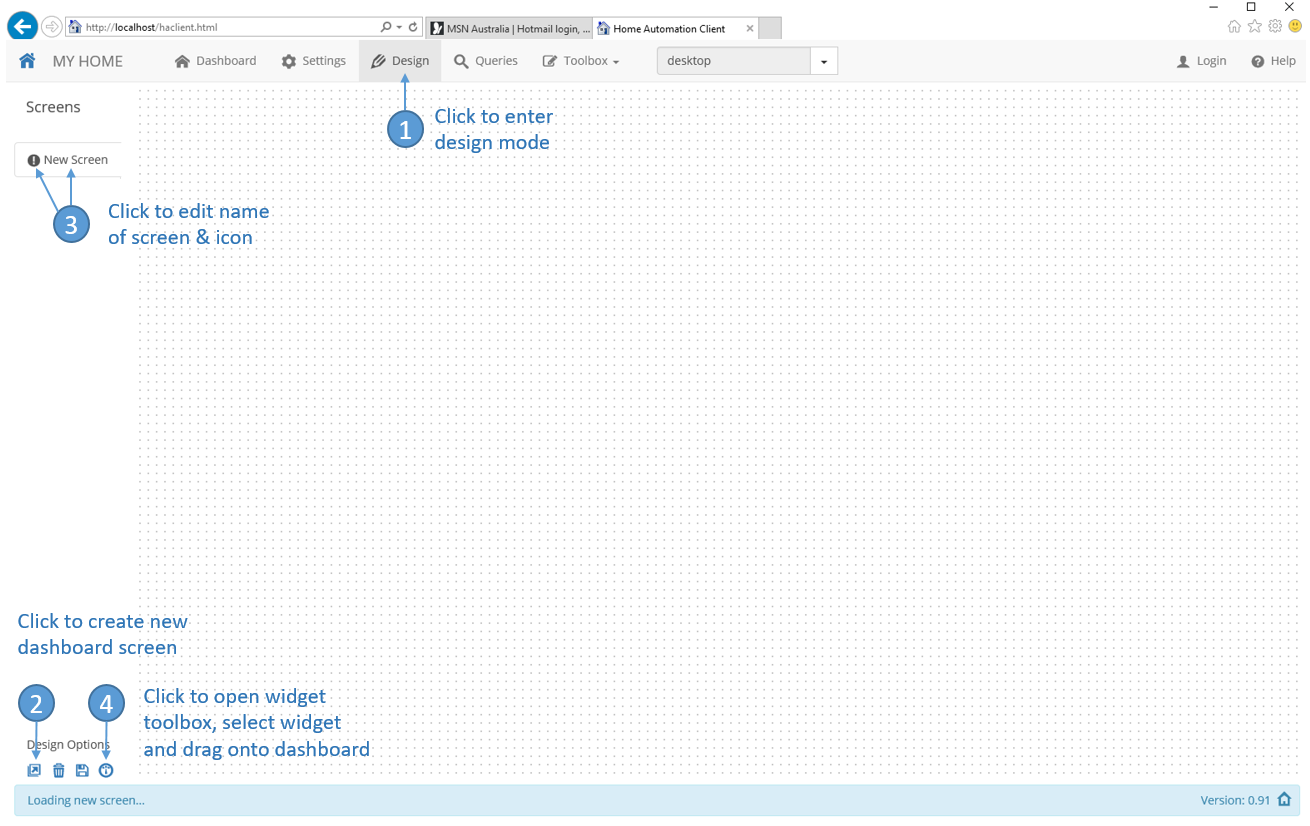
Select the design option on the top toolbar, then select the bottom far left 'add' icon to create a new tab, click on the 'New Screen' text on the tab just created on the left to edit in the name of the tab (eg. 'Summary') and click on the tab exclamation icon to select a nice icon for the tab from the icon toolbox. Click on the picture below for a higher resolution view of client configuration steps.To see the widgets press the bottom left widgets icon to display the widgets menu, then select one and drag & drop it onto the design surface, move it around by selecting the widget (left clicking) and dragging it around, rescale by selecting the widget then scale horizontally or vertically (bottom and right grey blocks on the widget outline, or both horizontally and vertically with the bottom right grey block). Right click to edit the widget attributes.
Play with it - using the design mode to layout the screens should be pretty obvious for anyone who has used a drawing package like Microsoft PowerPoint or AutoCAD. Once finished editing click the bottom left 'save' icon in the Design Options icons and then select the Dashboard setting on the top toolbar to interact with the screen (or reload the browser page as currently some widgets won't reload changes without a reload).
Debugging tips - Server
- Ensure there are no other processes on your server controlling port 80 like another web server.
- If there is old versions of software like Node.JS or SQLite already installed, then either remove them or update them.
Debugging tips - Client
If you want to debug the client software in Visual Studio, set the start page in solution explorer by right clicking HAClient.html and make it the start page. Alternatively use F12 client debugging tools. -
6Step 6
18th September - Many updates and bugfixes posted to GitHub, including better HTML5 compatibility for Chrome, Edge and Firefox (still a bug with viewing subscribed text with the label widget in chrome).
HomePortal
Home Automation software hub that unifies home sensors and cloud services with a flexible and easy to use browser interface


Discussions
Become a Hackaday.io Member
Create an account to leave a comment. Already have an account? Log In.
OK, I have successfully built the project in VS 2017.
When it ran in VS no errors other than the plugin errors you said would occur.
It shows in the console that it is accepting connections on 10.0.0.80, I'm assuming port 80.
When I go to http://localhost/caclient.html IIS gives me a 404 error?
Are you sure? yes | no
Try http://localhost/HAClient.html instead.
Are you sure? yes | no