Andrew Lee
-
Project Complete 100%
01/15/2018 at 00:56 • 0 commentsDear people,
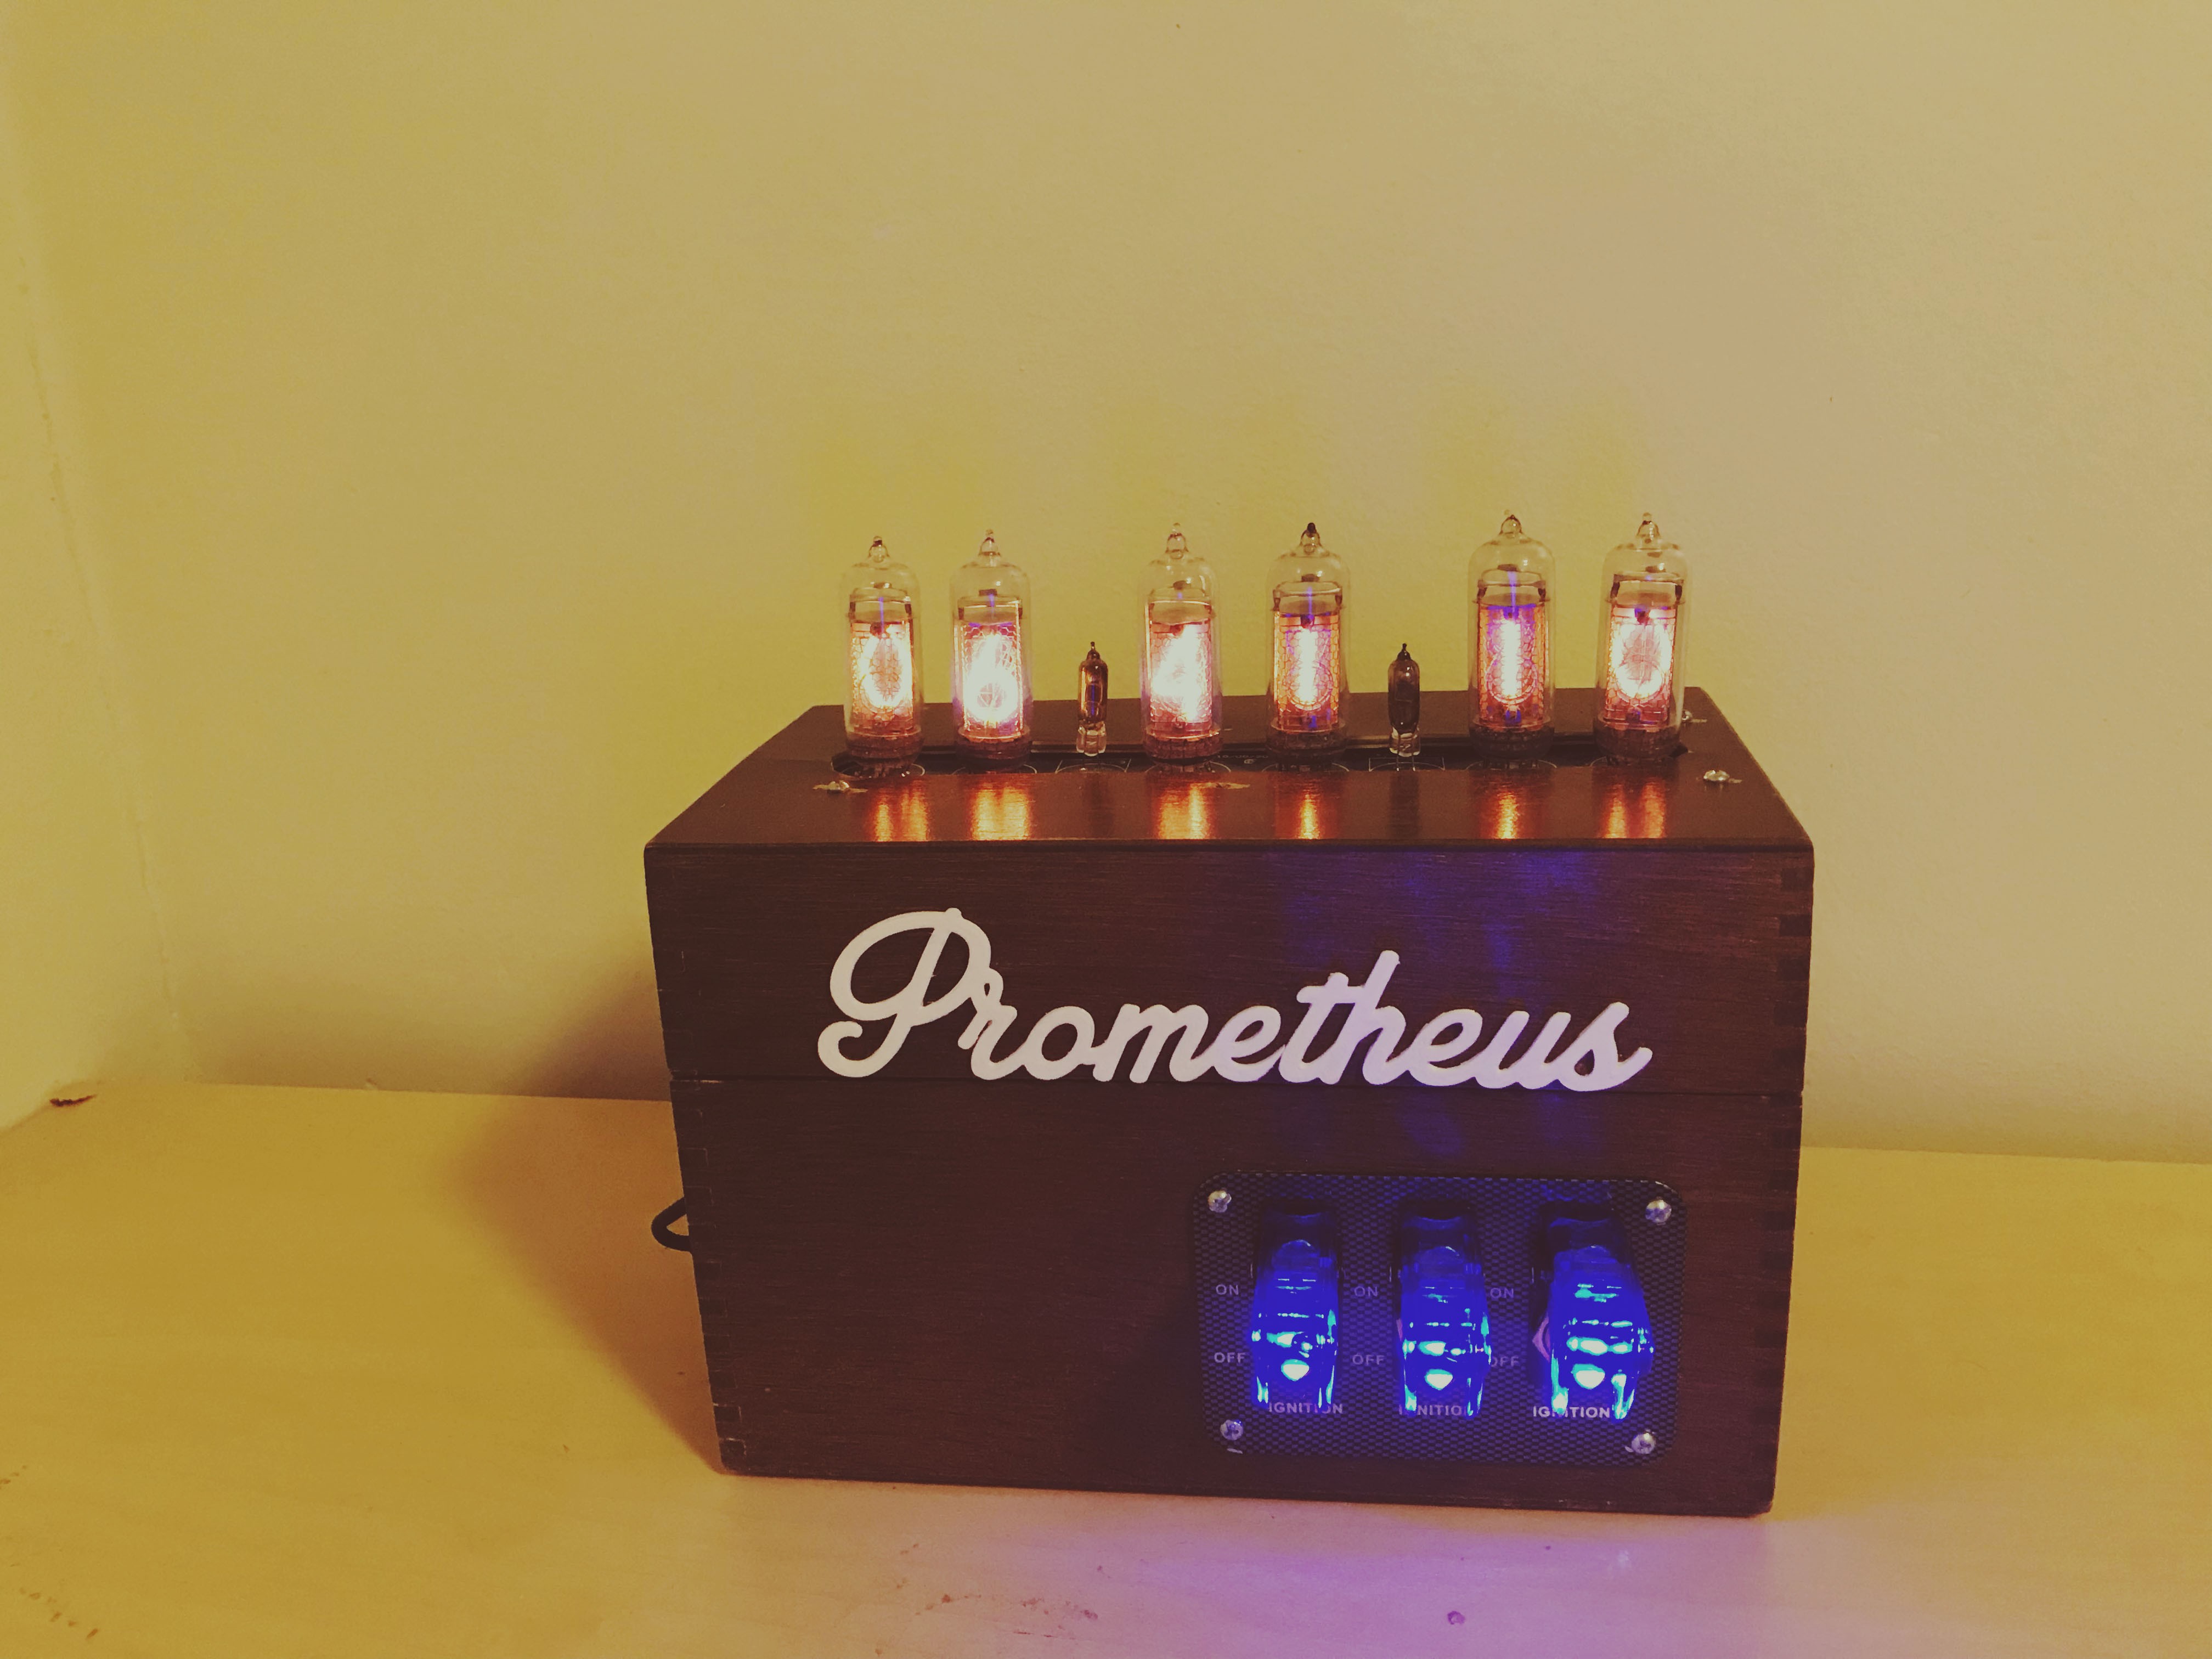
I finally printed the name of the clock (Prometheus), and super glued it on the front of the clock.
![]()
I am very happy the way it turned out.
Thanks for your continue interest in my progress.
Also, I added a new demo video to update the old one that showcases the new functionality of the clock.
Enjoy!
-
Prometheus Version 2 Complete
01/08/2018 at 07:58 • 0 commentsFirst, I wanted to thank you for your interest in this project.
Over the course of the last few months, I finished soldering and drilling arbitrarily into components and wood until I was able to upgrade Prometheus to be a single piece wooden enclosed system.
In addition to this, I also added racing toggle switches to independently control the circuits for the nixie displays, the Raspberry Pi (running my alarm program), and the bed shaker.
The sound output now relies on a HifiBerry Digi+ Pro sound card to output high quality S/PDIF digital output via I2C the sound port on the Raspberry Pi. In addition to playing the alarm sound, I am using the Pi as a AirPlay media server (using shairport-sync).
Because the NCS314 clock came with a super inaccurate RTC module, I decided to send the correct time from the Pi (which gets accurate time via NTP) via serial USB. Since the wooden enclosure I used was too narrow to plug-in the standard Arduino USB and power supply, I soldered those wires directly underneath the Arduino.
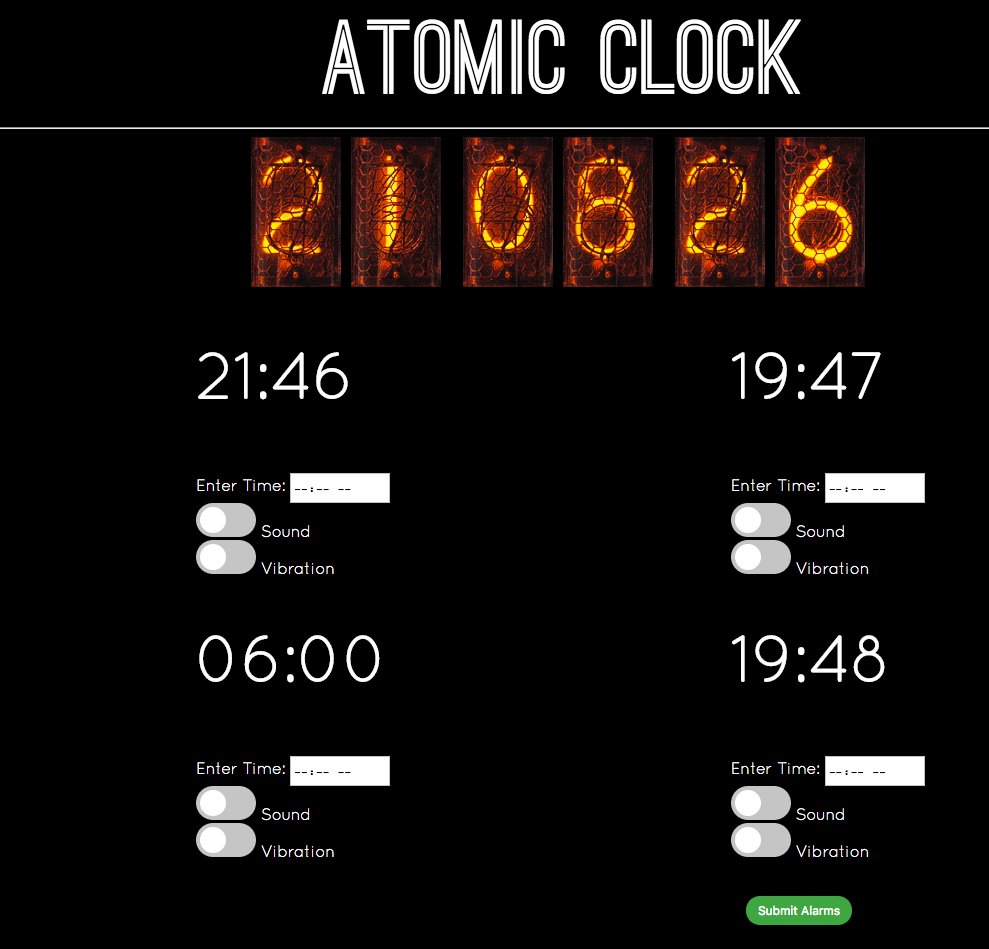
Furthermore, I made further improvements to the Web UI to make it super stable and added some new features. First of all, I separated the UI into tabs (Home and Settings), so that there is less clutter. The user now also has the ability to change the LED colors of the clock directly from the UI. Furthermore, I added some extra bells and whistles which are as follows:
-Ability to notify the user about an IP change (via email) so that the user doesn't have to physically connect a keyboard and a screen to the Pi just to get the new IP address when the IP gets changed by the DHCP server
-Ability to control the sound playing function to accomodate for a custom sound card
-An about page that lists how to use the front-end UI to set the alarms.
Finally, I took alot of time to overhaul and improve the build instructions on my wiki so that anyone who wants to implement this project can have the resources they need to get started.
The only thing I can really think of to improve this project is to 3D print the letters "Prometheus" and attach it to the front of the clock.
However, I believe the this project has succeeded in all of the core goals I envisioned in its inception and will forever be one of my favorite devices that I own. I learned so much from this project, and I am grateful for all of the people that helped me along the way. From this point, I will only update the pictures of the clock (once I get the 3D printed name on the clock). Any other updates can be found on Github.
Again, please feel free to contact me if you have trouble making a similar system (after looking at the set-up instructions located at my wiki.
-
Prometheus 1.1.1 Complete
11/15/2017 at 18:44 • 0 commentsMy Pi went to poop the other day because I did `sudo apt upgrade`, and my default shell (fish) had a bunch of dependencies: Can't start shell, can't use shell to change default shell, can't ssh, can't use standard login *Note to self, add an escape account with bash as default shell to make sure this doesn't happen again*
Anyways, I took this opportunity to refractor my code as well as improve.
1. Broke up the large single main.go file into more manageable packages
2. Added a function to automatically restart network interfaces if the Pi loses network conenctivity (wlan0, beware if you are using a LAN line to connect Pi)
3. Fixed the jQuery front-end which cached the json files pulled from the server. I disabled this behavior since the front-end controller needs to be getting the most recently reflected update every time from the server.
4. Instead of relying on relative `./` paths, I put in a component that checks the exact path the executable is located on to locate the `/public/` folder.
Now that I'm living in a college honor house dedicated to the MAKER movement, I will be working on converting my clock from a prototype to a single-piece functioning unit. Be on the look out!
-
Working hard to finalize Golang webserver/hardware controller
06/13/2017 at 15:28 • 0 commentsThe updated version of the software component of my project is on the dev branch of my github repository.
Furthermore, I changed the name from Atomic Clock to Prometheus (due to the numerous inventors cup type events I applied to as Prometheus Clock Project).
In this version, golang fully takes over the tasks of both the Node web server and the Python hardware controller. The reason I did this is on the previous project log, but to summarize, there are 2 main reasons: 1) golang is faster by a huge margin over python (due to it being statically compiled much like C or C++). Also, but having one executable, it makes it alot easier to package the program, and to set up boot time loading of the program and whatnot.
Some added features:
-Every input/button has been converted to ajax calls so that the page doesn't have to reload on the client side (Except the Snooze button [the virtual Nixie Clock at the top of the UI] since the calculation to add 10 minutes to the currently running alarm needs to be done on the server side anyways).
-Using Vue.js to control the elements of the page much more efficiently (mainly vue-bind and vue-model calls to ensure that the client side only pulls the necessary data initially at load time, and the rest of the time, can recycle the already loaded elements in the vue instance). If you haven't checked out Vue, I highly recommend it. Its a solid front end framework without alot of baggage from 1.x, or a religious adherence to a specific type of application abstraction model.
-One huge issue I was having was that for some reason, my IP (on the Pi) was getting reassigned every 2 months or so. And since I keep the clock right by my bed, it was a rather tedious task to connect my Pi to hardware display and input devices just to get the new IP. Hence, I implemented an email via smtp task to send the user an email notifying them of an IP change, and the address of that IP. Although the credentials for the sender is saved in plaintext in the main.go file, it is not a huge issue for me since it is a testing account I made specifically for this purpose.
-Before, the server saved the file as "alarm.mp3" by default. Hence, the only compatible files were mp3 and m4a files that were correctly encoded. However, in the new program, I implemented a regex search to seek out the actual file name,. Hence, when an alarm sound plays, it is format agnostic, and can play most sounds (flac, wma, fla) since the sound player is implemented via the CVLC media player.
Future fixes
-Sound is still not working properly. If I hit snooze when sound is playing, the second alarm 10 minutes after does not play sound. This could be an issue regarding how I am calling CVLC and not killing the process thoroughly
-I haven't not had enough time to test whether the IP emailing functionality will work (since this happens about once every 2 months). Will update when this becomes more clear
Future Updates (additive, not fixes)
-Created soldered PCB as well as running the programs on Pi Zero W. I want to use the money I received as part of Hackaday's Seed Funding to purchase the materials to make this a single component electronic system rather than a myriad of sub-components strung together by a breadboard.
-Incorporate a voltage regulator to be able to use the same power supply to power both the Pi, and the rest of the system.
-Refractor golang code (At this point in time, I have no special training in golang, and wrote the entire thing using stackoverflow and the api reference (The entire thing is in one main.go file and its a huge mess to try to debug). I believe I can write much better (cleaner) code by learning golang in its entirety (as well as its philosophy on package hierarchies)
-
Reprogram the code in Golang
04/08/2017 at 19:22 • 0 commentsHey guys and gals!
So in order to be able to play music on my speakers through my Pi, I am installing and running a program called Shairport-Sync (Github). It hosts a Airplay server on the Raspberry Pi, and allows the playback of music via the network interfaces on the Pi. (I dropped the idea of using Bluetooth since the technologies didn't play too well on my Raspberry Pi).
However, then I started getting problems where my server wouldn't stay up for more than 24 hours. Initially, I thought it was my code (although today I figured out it was Shairport-Sync that was causing the issues since I was using the wireless interface to host both the UI for the clock and the Airplay server, and the server was preventing me from using any ssh/http/vnc services through whatever interface it was enabled for. Hence, the quick fix was to disable Shairport-Sync from using wireless connections and make it wired connection only, and now all wireless functionality is restored on my project while retaining the ability for me to play music via an ethernet cable. One caveat is that now I can't use SSH/VNC using a wired connection which is really unfortunate, but a worthy sacrifice)
Hence, through this misunderstanding, I decided to recode this project in golang. First a background for those of you that don't know about golang. It's a statically compiled modern language invented and used by Google since 2007. And all I can say is that it is AWSOME! Being used to the idiosyncrasies of C++, I was under the impression that all languages that are fast require idiomatic and low level handling. However, golang really removes alot of the formalities associated with compiled languages, and natively supports concurrency, easy syntax, and garbage collection (memory management) built in.
Hence, I was able to recode both the server functionality was well as about 80% of the hardware functionality in about a day!
Although I am having some issues, these are probably from my lack of understanding of the language, and I believe in due time I will be able to complete the project.
If you doubt the speed of golang versus a Python + Node.js setup, here are some benchmarks between the three languages.
Although Golang and Node's performances are comparable (Golang is about 3x faster in most cases) the real kicker is how much faster Go is compared with Python 3 (for most tasks Go is 20x-100x faster than Python!!). Now node is actually also compiled at runtime (Node being another brainchild of Google), but Golang's real performance increases come from the fact that it is compiled to machine code and uses native data types (much like C or C++) which is why an interpreted language like Python never had a chance!
Furthermore, although my previous code was "good", it was using 2 different programs to do 1 thing. Hence, by combining the functionality into one program, there would also be a performance boost. (In my previous set up, I used JSON files as the intermediate communication medium between 2 programs. Currently, I am only using the JSON files to save the alarm states when the program closes).
Although I am sure it is possible to write low level code to directly access the GPIO pins, to make my life a little easier, I utilized a package that creates GPIO structs that I can send High and Low commands to (corresponding to outputting true or false).
Furthermore, I modified the UI to have separate post calls on each On/Off toggle (rather than having to submit all changes in the bottom of the page).
Overall, I think this efficiency is a good thing (as it would allow me to use the limited computing resources of the Pi for other things on top of running the alarm clock).
-
Modified User Interface
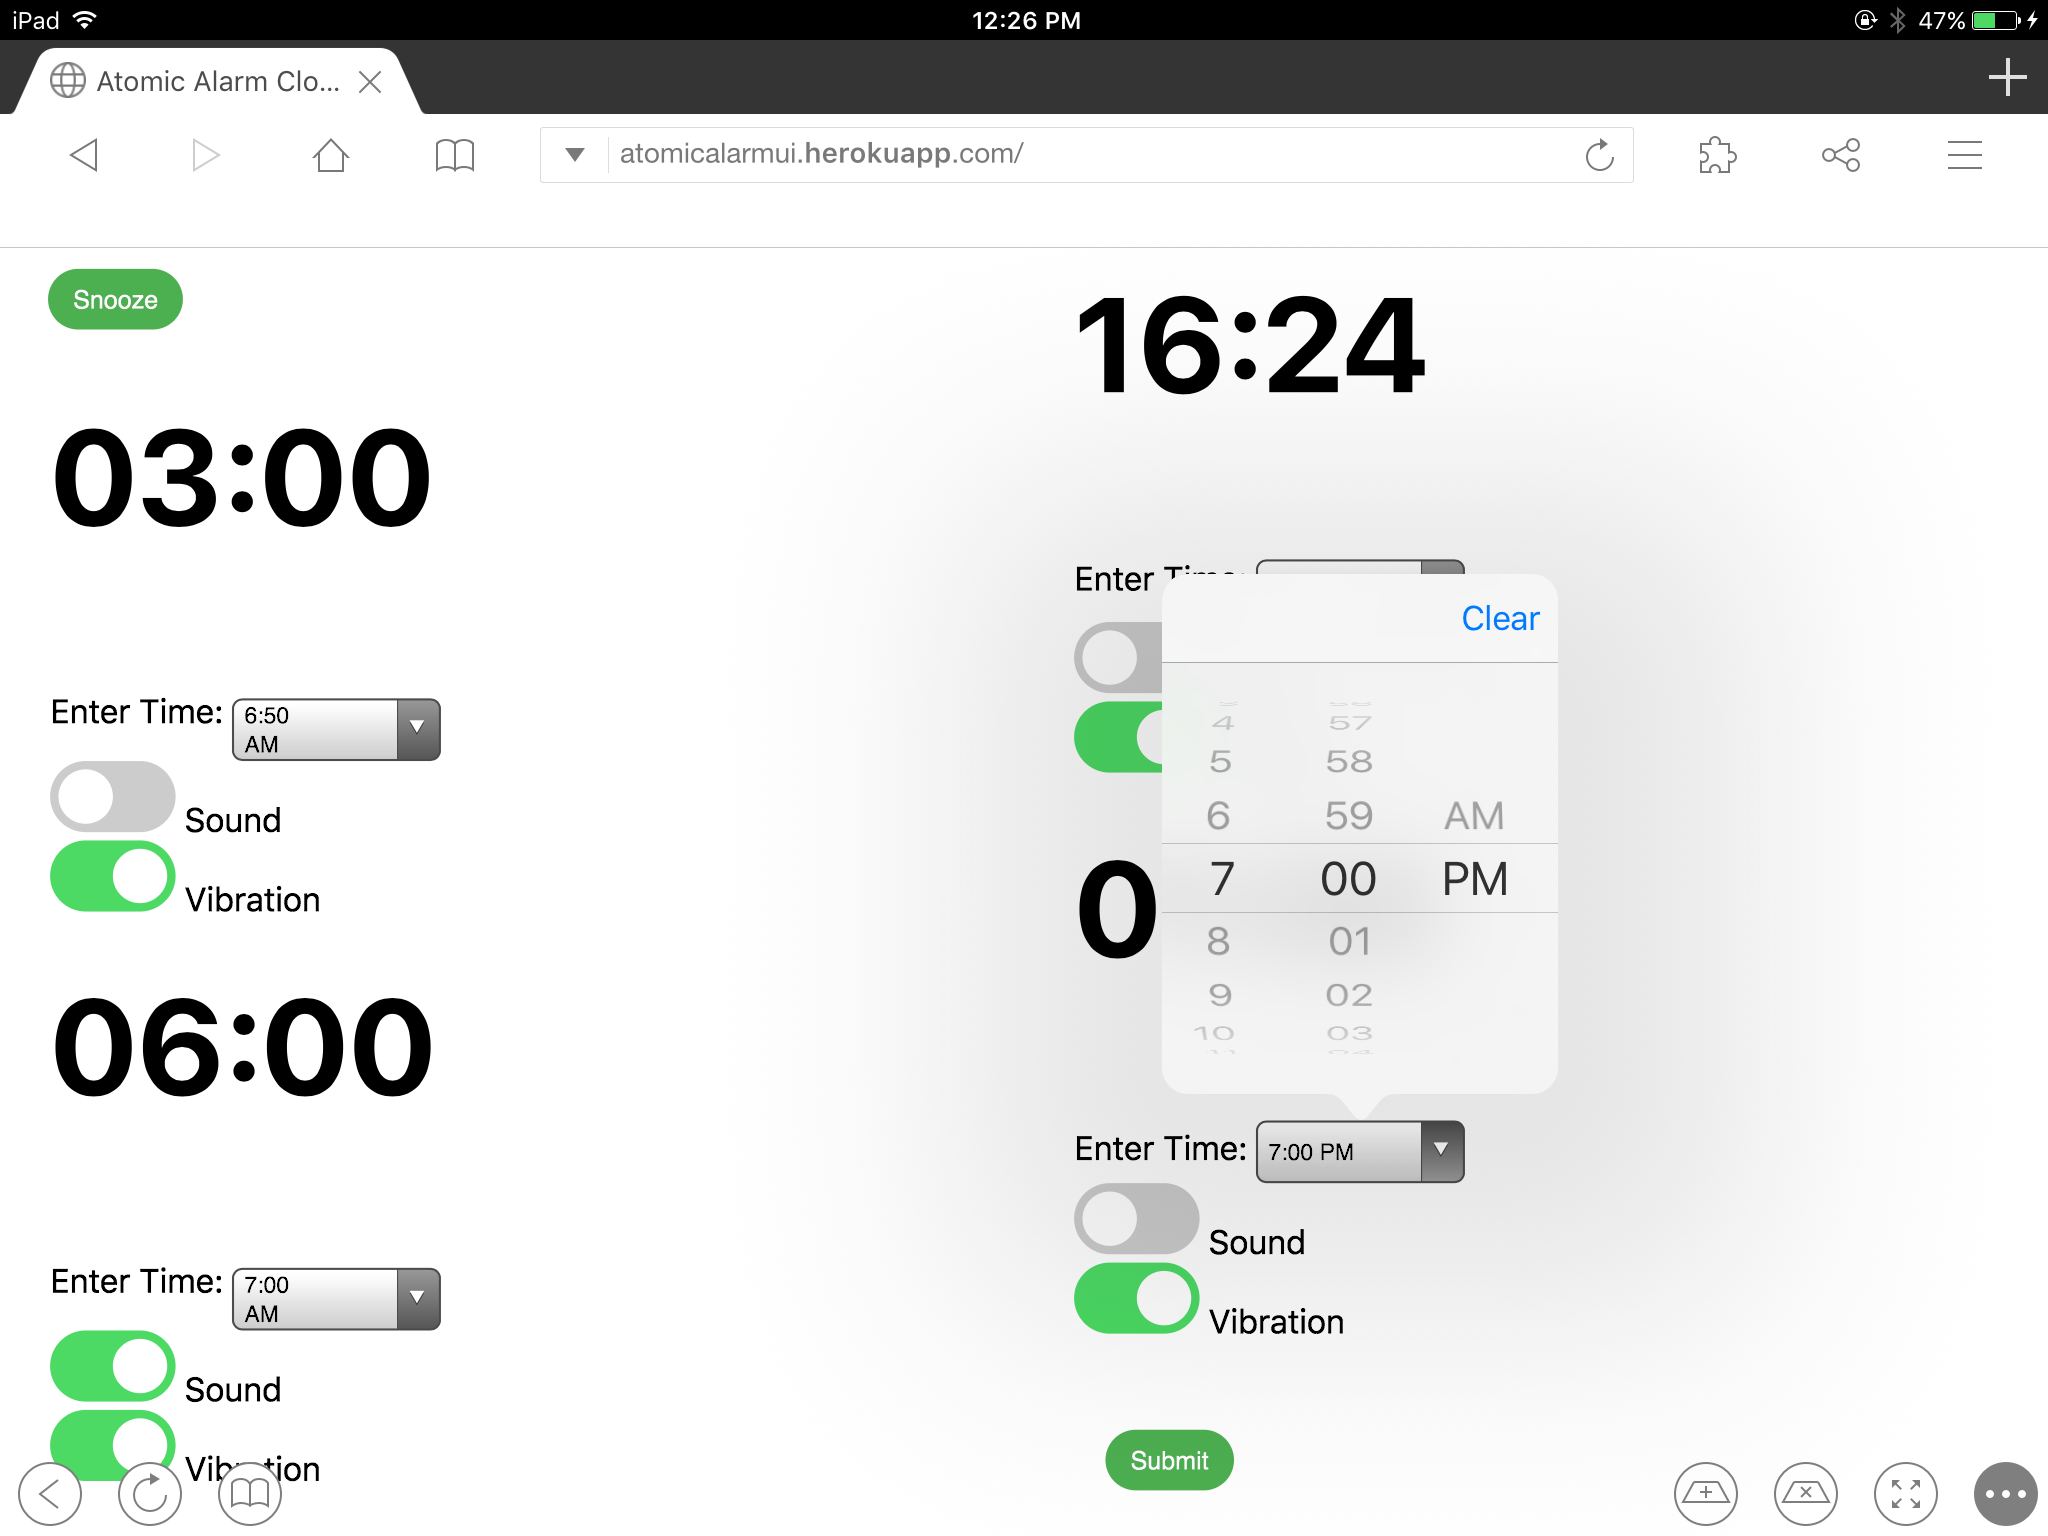
03/24/2017 at 02:06 • 0 comments![]()
I modified the user interface quite a bit. The overall functionality remains the same, but I added a virtual Javascript clock by Čestmír Hýbl (http://cestmir.freeside.sk/projects/dhtml-nixie-display/) [as required, all the source code to run the clock is saved as is on both the Heroku server that the mockup code is running on as well as the Github repo, under /projectroot/source/webinterface/public/nixie/]
I removed the standalone "snooze" button, and instead made the virtual nixie clock itself the snooze button. (more aesthetically pleasing, plus it makes sense that the largest button be the snooze button)
Anyways, check out the new interface at https://atomicalarmui.herokuapp.com/
-
Project Complete
03/22/2017 at 23:34 • 0 commentsDear readers,
If you have been following, thanks for patience through my hiatus through my busy school schedule. I took it upon myself to finish this project to a usable state with all the main components finished. In this usable "prototype," I have added most of the main features I wanted:
1) usable web interface to control the clock
2) program to selectively play sound on my soundsystem and or run the bed vibrator (via GPIO) based on the config files that I modified using the web interface
3) Reliably keep time (via NTP rather than a hardware clock module)
Hence, all these components are present and I can say that at least the alarm clock portion of the project is complete.
There are some portions of the projects that I hope to update and work on in the future including:
4) setting up the Pi as a Bluetooth Audio Receiver so it can both function as the Alarm driver as well as a Media Receiver so I don't have to manually switch inputs on my sound system
5) Communicating with the NCS 314 Nixie Cathode Clock to receive accurate time from NTP rather than rely on hardware as well we being able to display alarm set/snooze/unset messages to have a hardware feedback system rather than just the web interface.
I did not complete 4) because despite my efforts, setting up the Pi as a bluetooth audio receiver is combersome to say the least, and although I did get it to work (albeit temporarily), there was no consistent solution that would survive a system reboot, and all the libraries required to accomplish this (Bluez, A2DP, ALSA Audio Routing) do not work very well in harmony, and since I already have a standalone bluetooth audio receiver, I decided I will just merge the audio receiver audio out and the pi audio out into a single Mono stream using cables, then feed that single audio signal into my speakers.
With 5, I am definitely interested in completing this, but the hardware implementation (written in C by GRA and AFCH from Ukraine) is very complex in itself, and until I have the chance to sit down and really dissect the internal structure of their logic, various call patterns, and what parts are event based and which parts are sequentially executed, I have no way to implement any type of communication between the Pi and the Nixie Clock. Furthermore, this is a minimal issue since the clock itself is pretty much self contained and even contains a hardware clock module that keeps the clock accuracy within a margin of a few minutes every month. Hence, although this is something I plan to do, I believe the clock runs fine without this since the alarm control/alarm running program is completely independent from the clock display mechanism.
As an added todo, I think it would be cool to implement a virtual nixie cathode clock as the title of the web interface (possibly implemented in Javascript).
But I just want to thank everyone who has helped me on this awsome project including Hberg32, AFCH, the amazing people at SonicAlert Alarms (from which I used the bed vibrator hardware) for their insights.
Later today, I will post a video of running the Atom Alarm Clock so you can see what you can do with it.
But with that, with much love, I am signing out. I hope so see you in my next project.
![]()
-
UI Portion of the Project Complete
11/27/2016 at 19:14 • 0 commentsHappy Thanksgiving everyone!
So over the course of this week (Since I had some time off from school), I finished the Web UI Portion of the Project.
Here is a working model of the web server that will run on the Pi: WebUIIt is a express node.js server that serves an html form file initially. Then the client side javascript modifies the values in the html form to match that of the 4 configuration JSON files. Then if the user submits the form with different values, the web server edits the JSON files, then reloads the page.
Running on the iPad, the website looks like this:
![]()
Read more about it here: Github For Atom Clock UI
In other news, I have been steadily working on wiring up the components. I have figured out that I have everything I need, I just need to read more about the Ll293D motor driver (I've fried 3 already! LOL), which will be a struggle because hardware was never my strongsuite. However, I think I am close and I will update you guys as soon as I finish this part.
Finally, Afch from GRA & AFCH Industries has been helping me modify their Arduino Sketch to include Serial USB communication functionality to display when an alarm is set, or unset. I will be incorporating this into my project, and will keep you guys updated as soon as I get working parts of it done.
Thanks for staying tuned.
-
Got the standalone clock portion to work
11/17/2016 at 20:16 • 0 commentsI just got the standalone clock portion to work. Now I need to find a way to use RPi to control the clock.
-
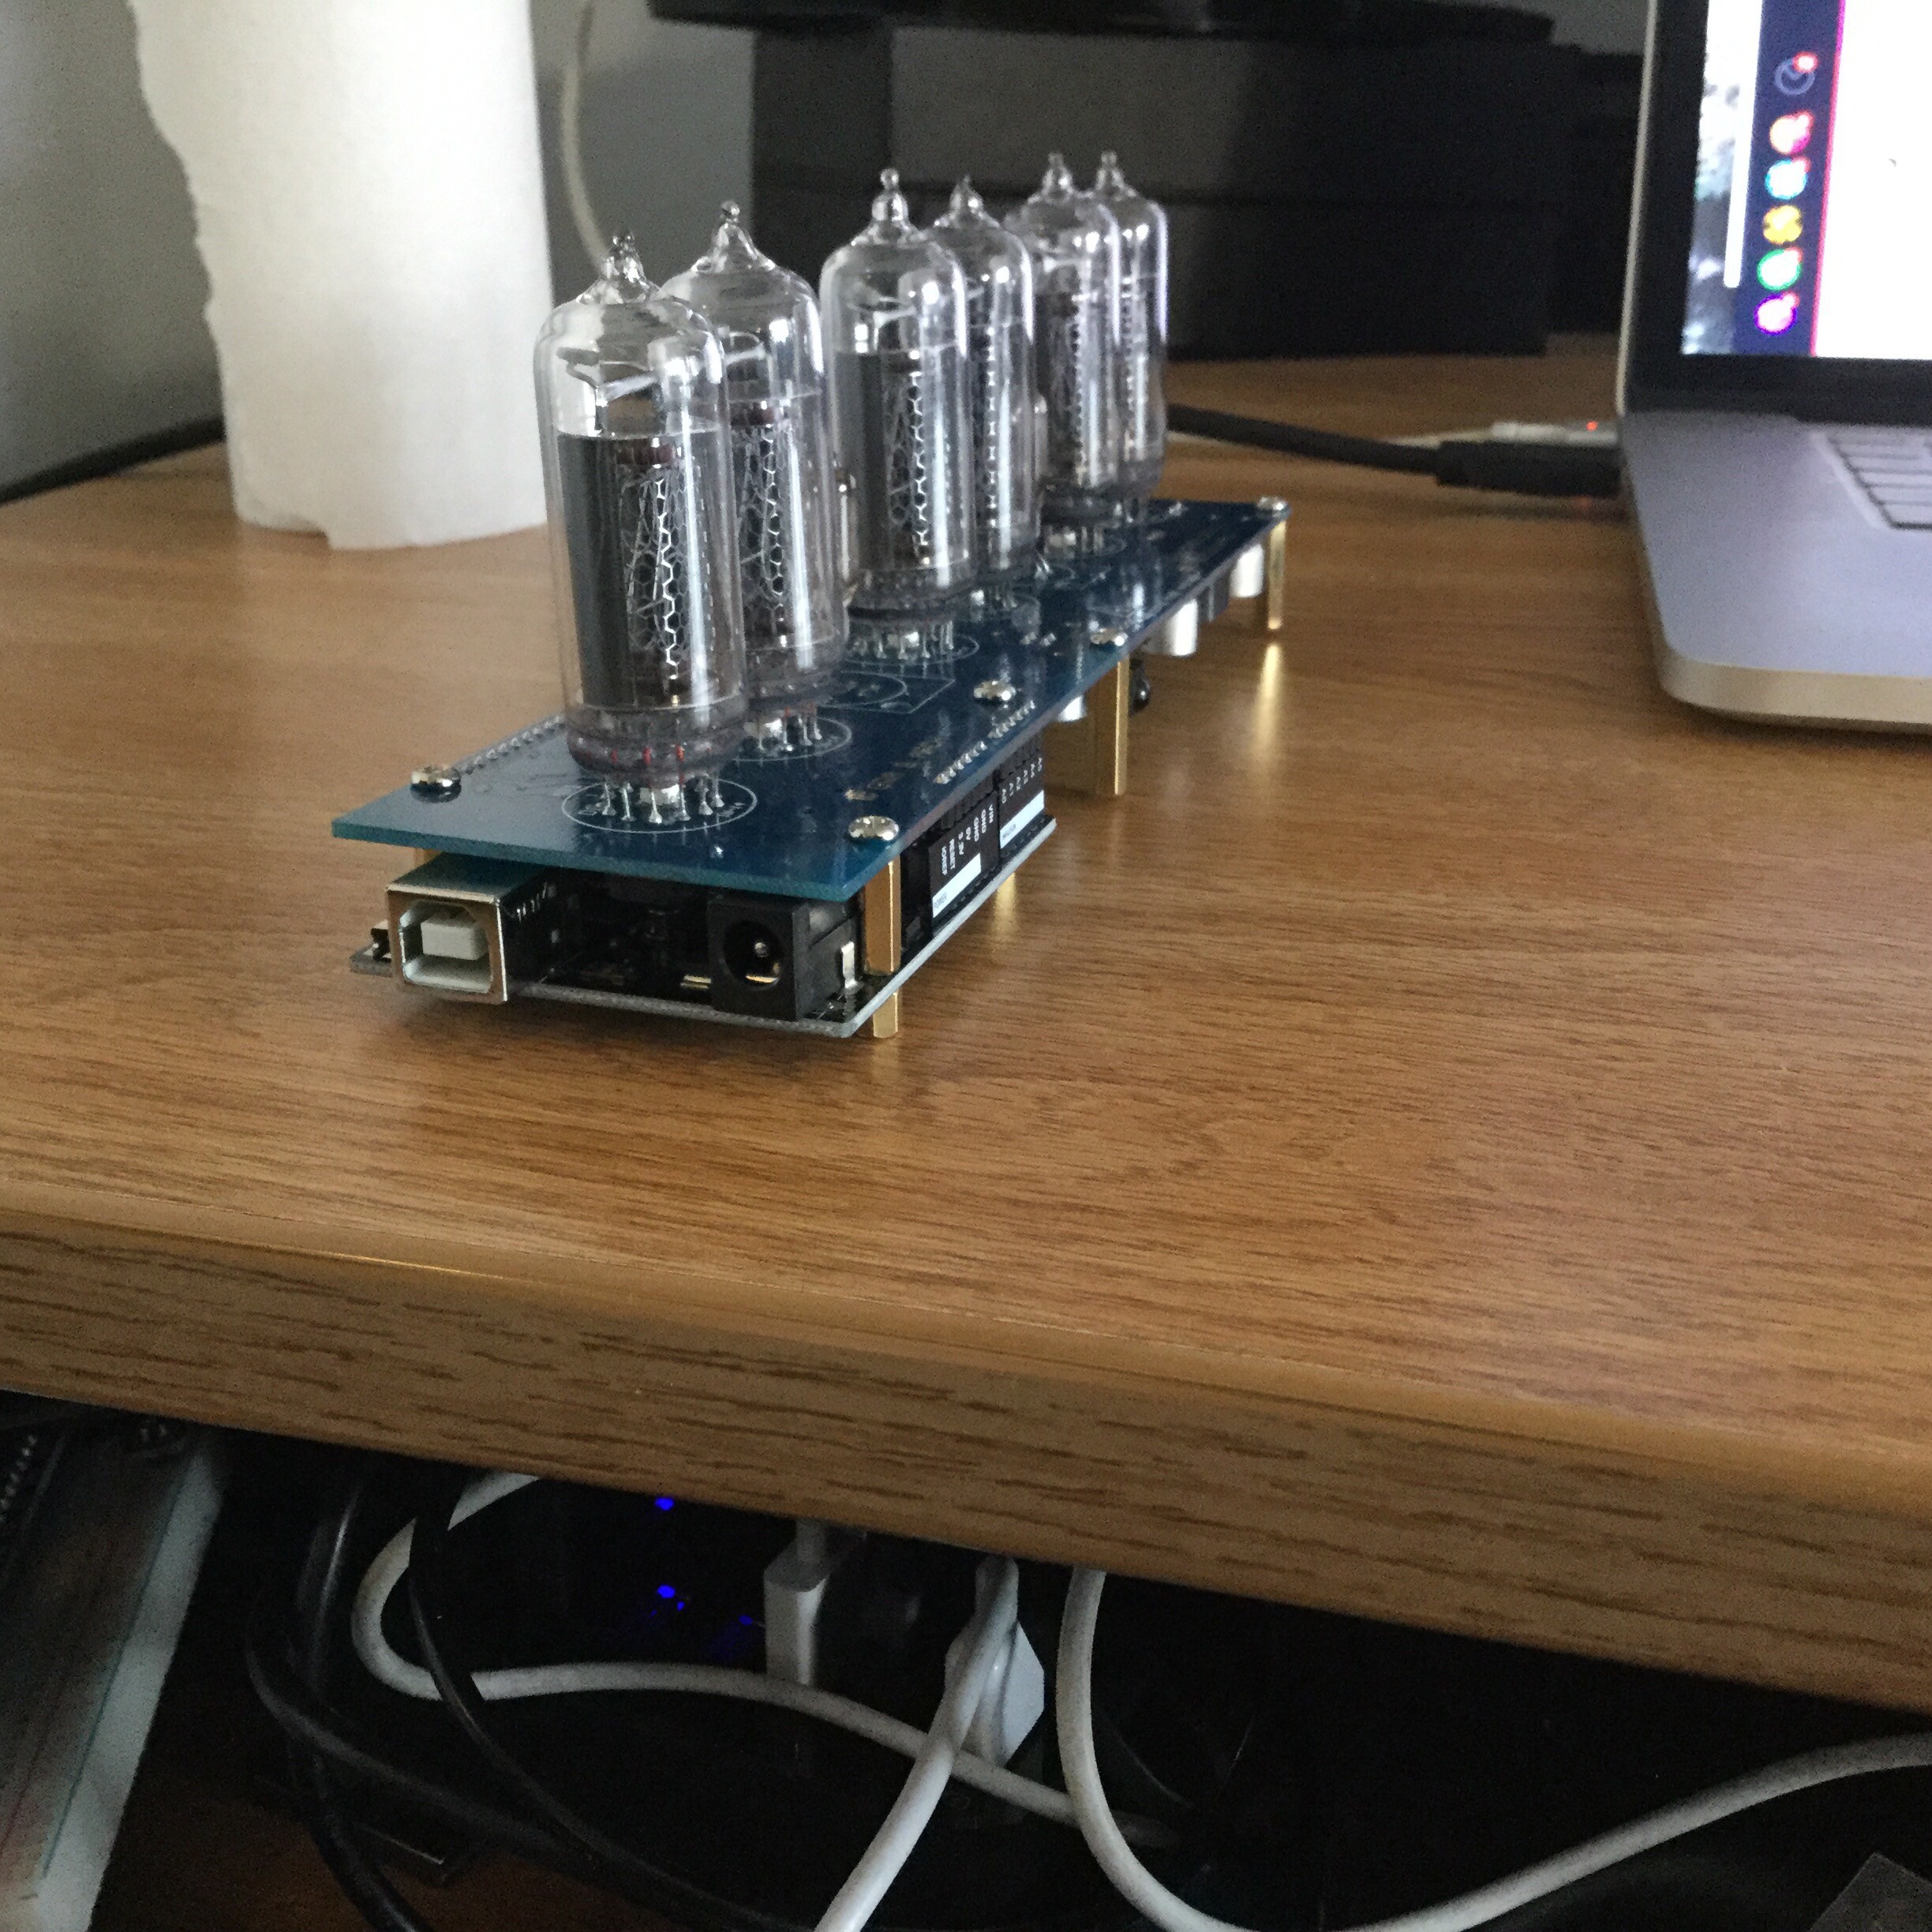
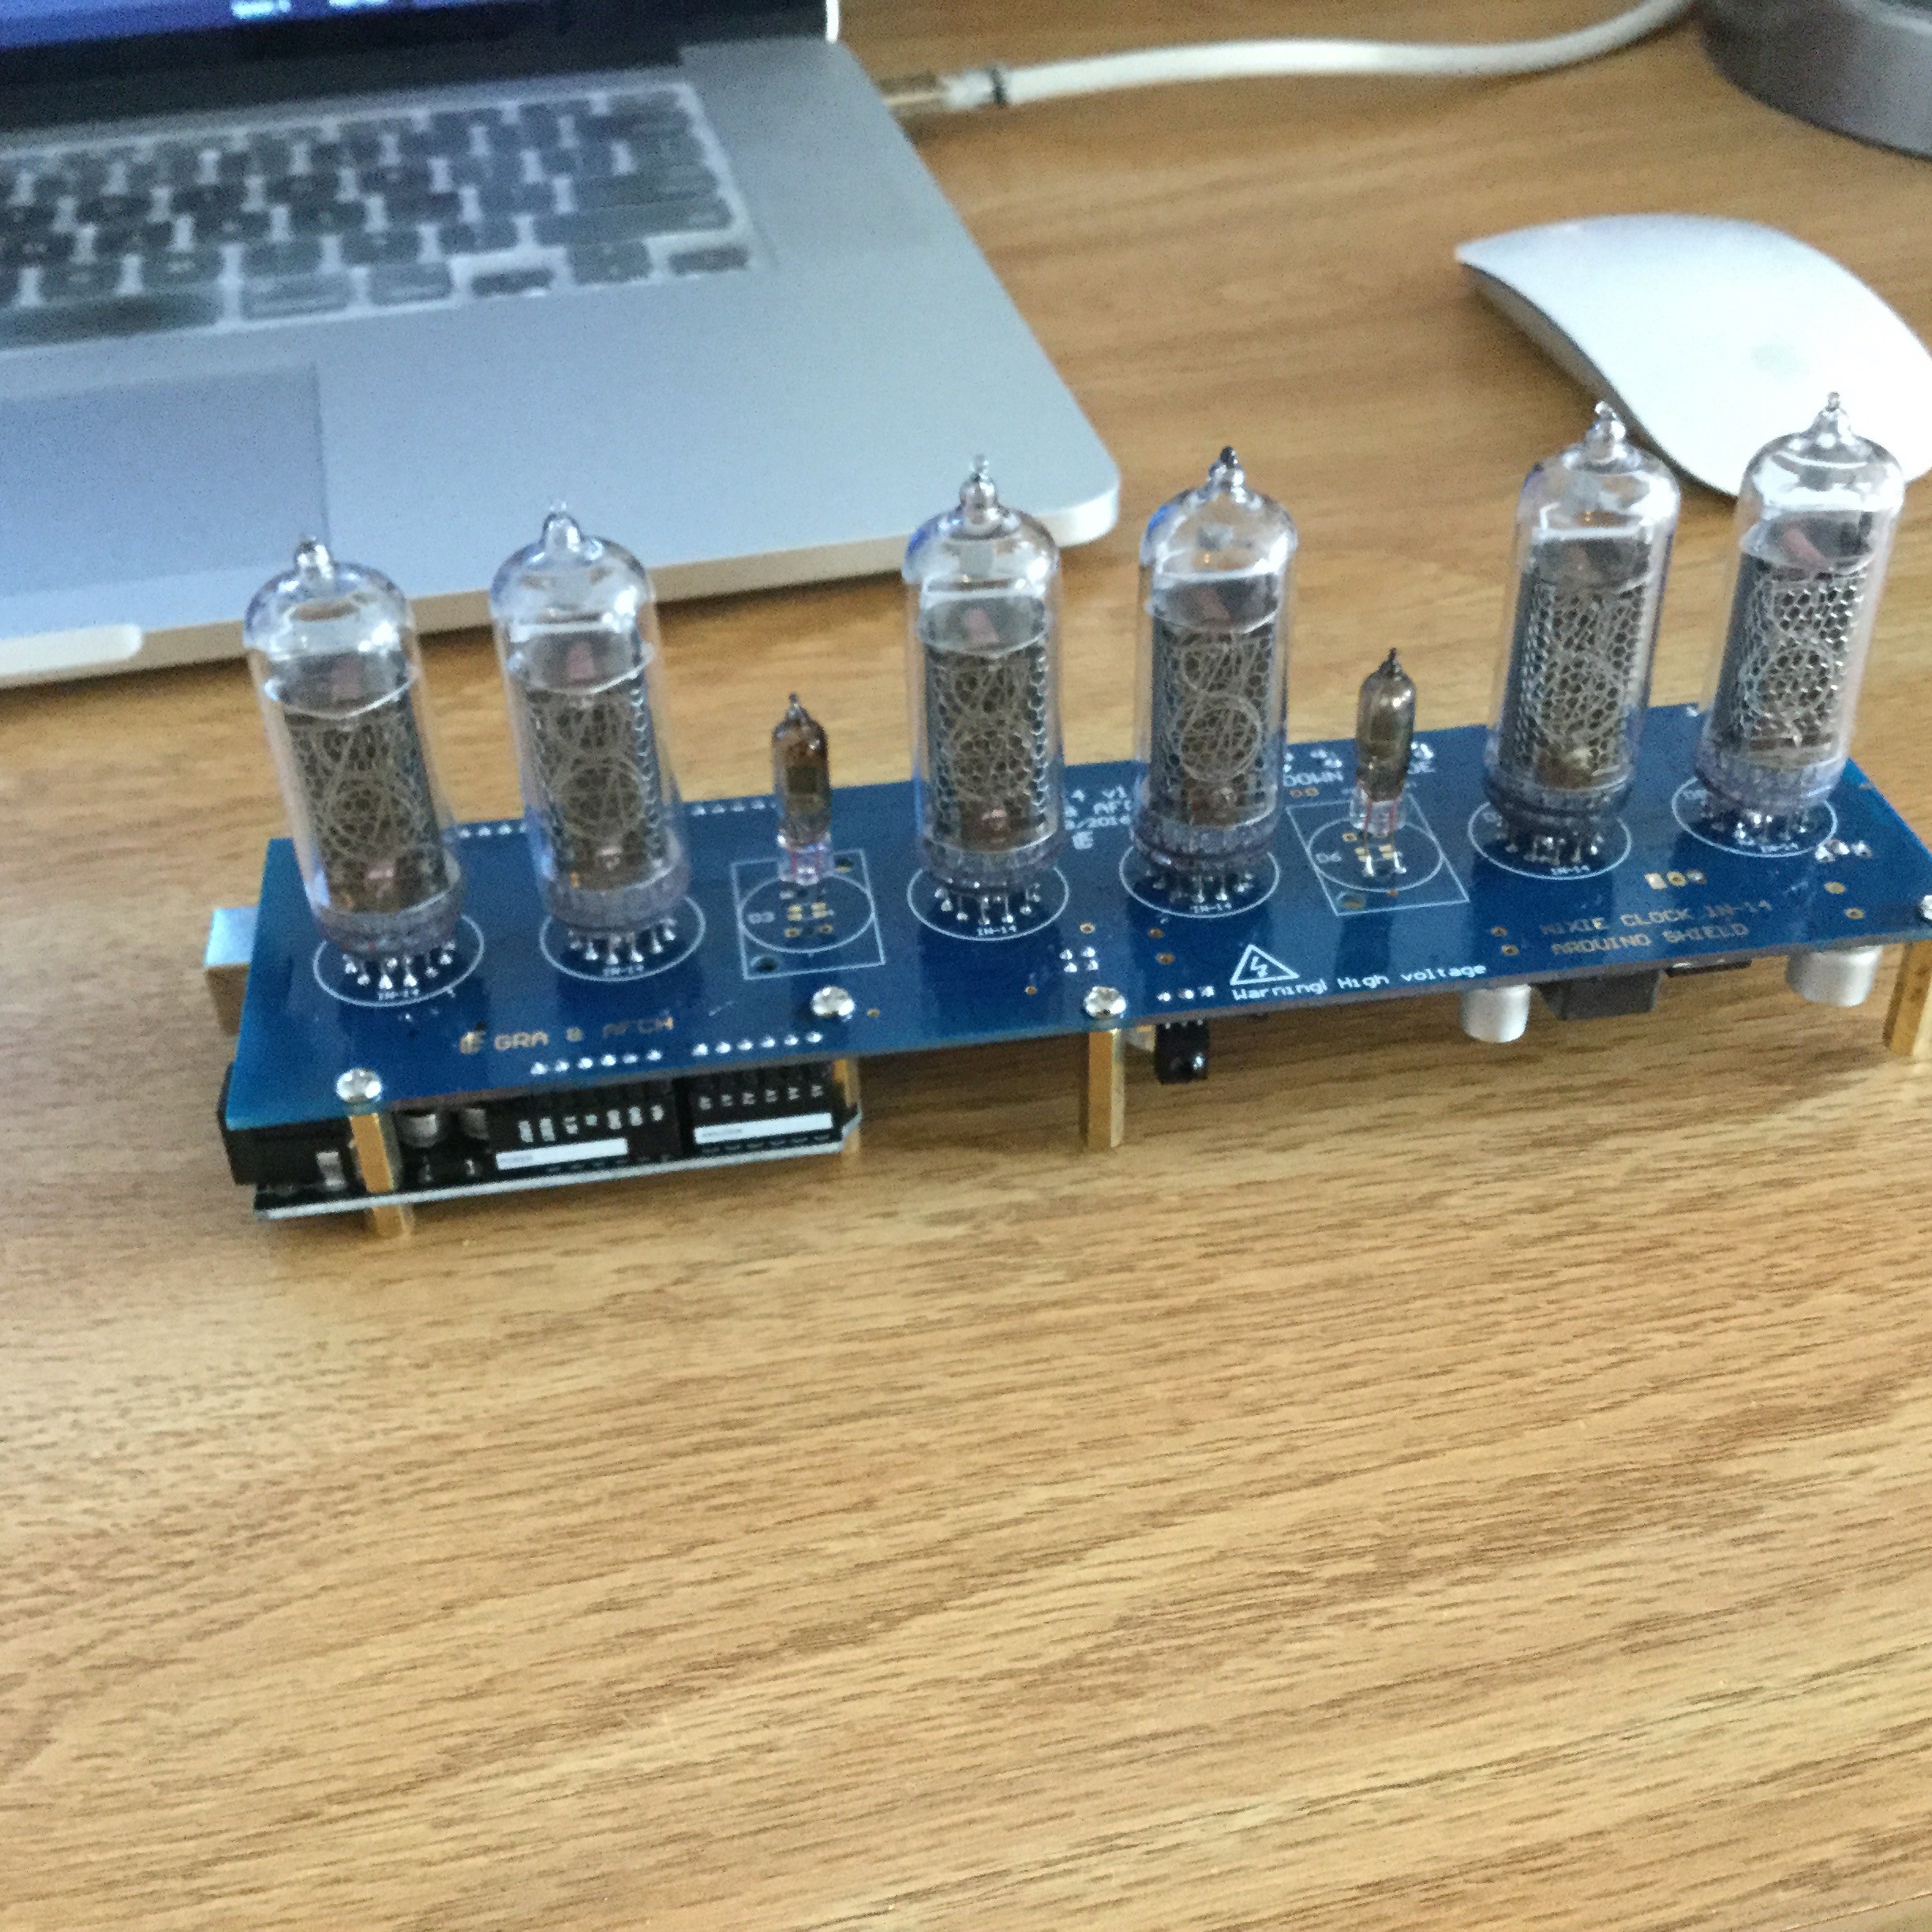
Nixie Clock Kit Finally Here!
11/15/2016 at 21:51 • 0 comments![]()
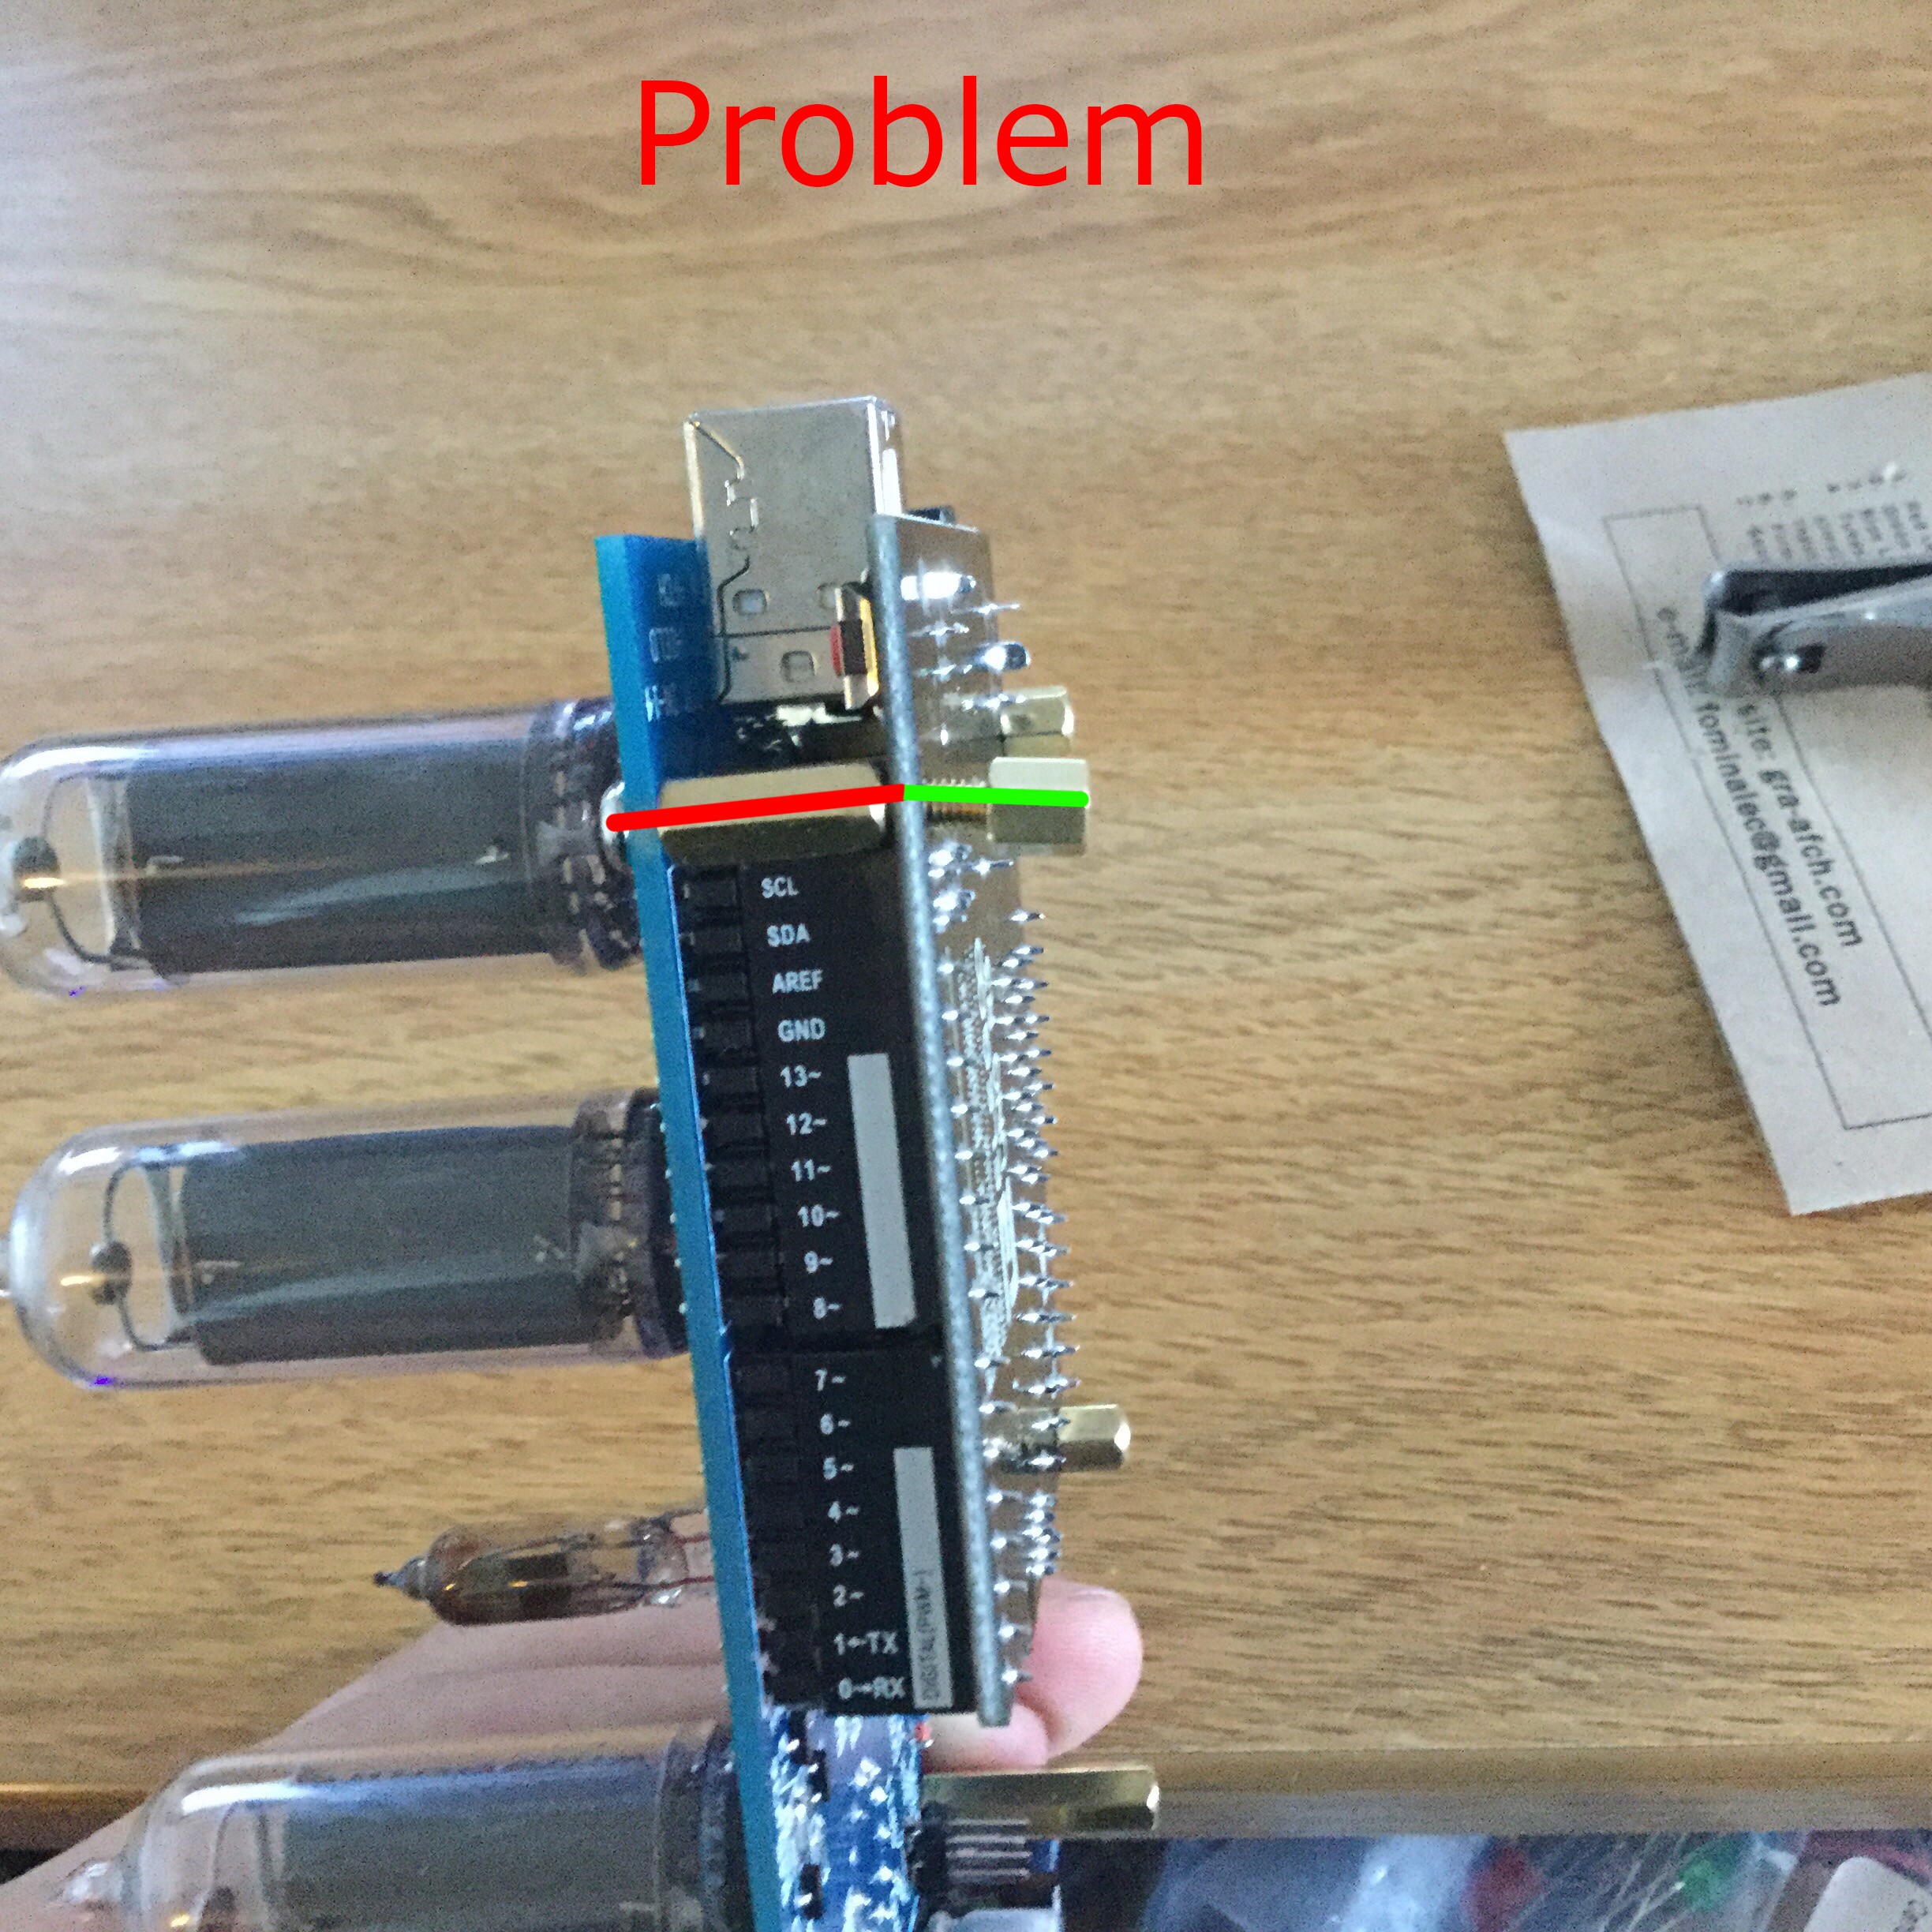
Hey guys! It's me Gilgamesh. I just got the main components of the Nixie Clock portion. I ordered the NCS314 Adruino Shield Nixie Clock kit from GRA & AFCH on ebay on October 29 of this year, and Just received it today. I also had to buy a Adruino board (I settled with ELEGOO's Arduino board because it was $10 cheaper than the "official" board and had very positive reviews) from Amazon, which arrived in 2 days (so you can imagine the anticipation I had for receiving the rest of the clock).
The only issue I see is that the kit does not seem fully compatable with the board i bought and one of the screws does not screw on![]()
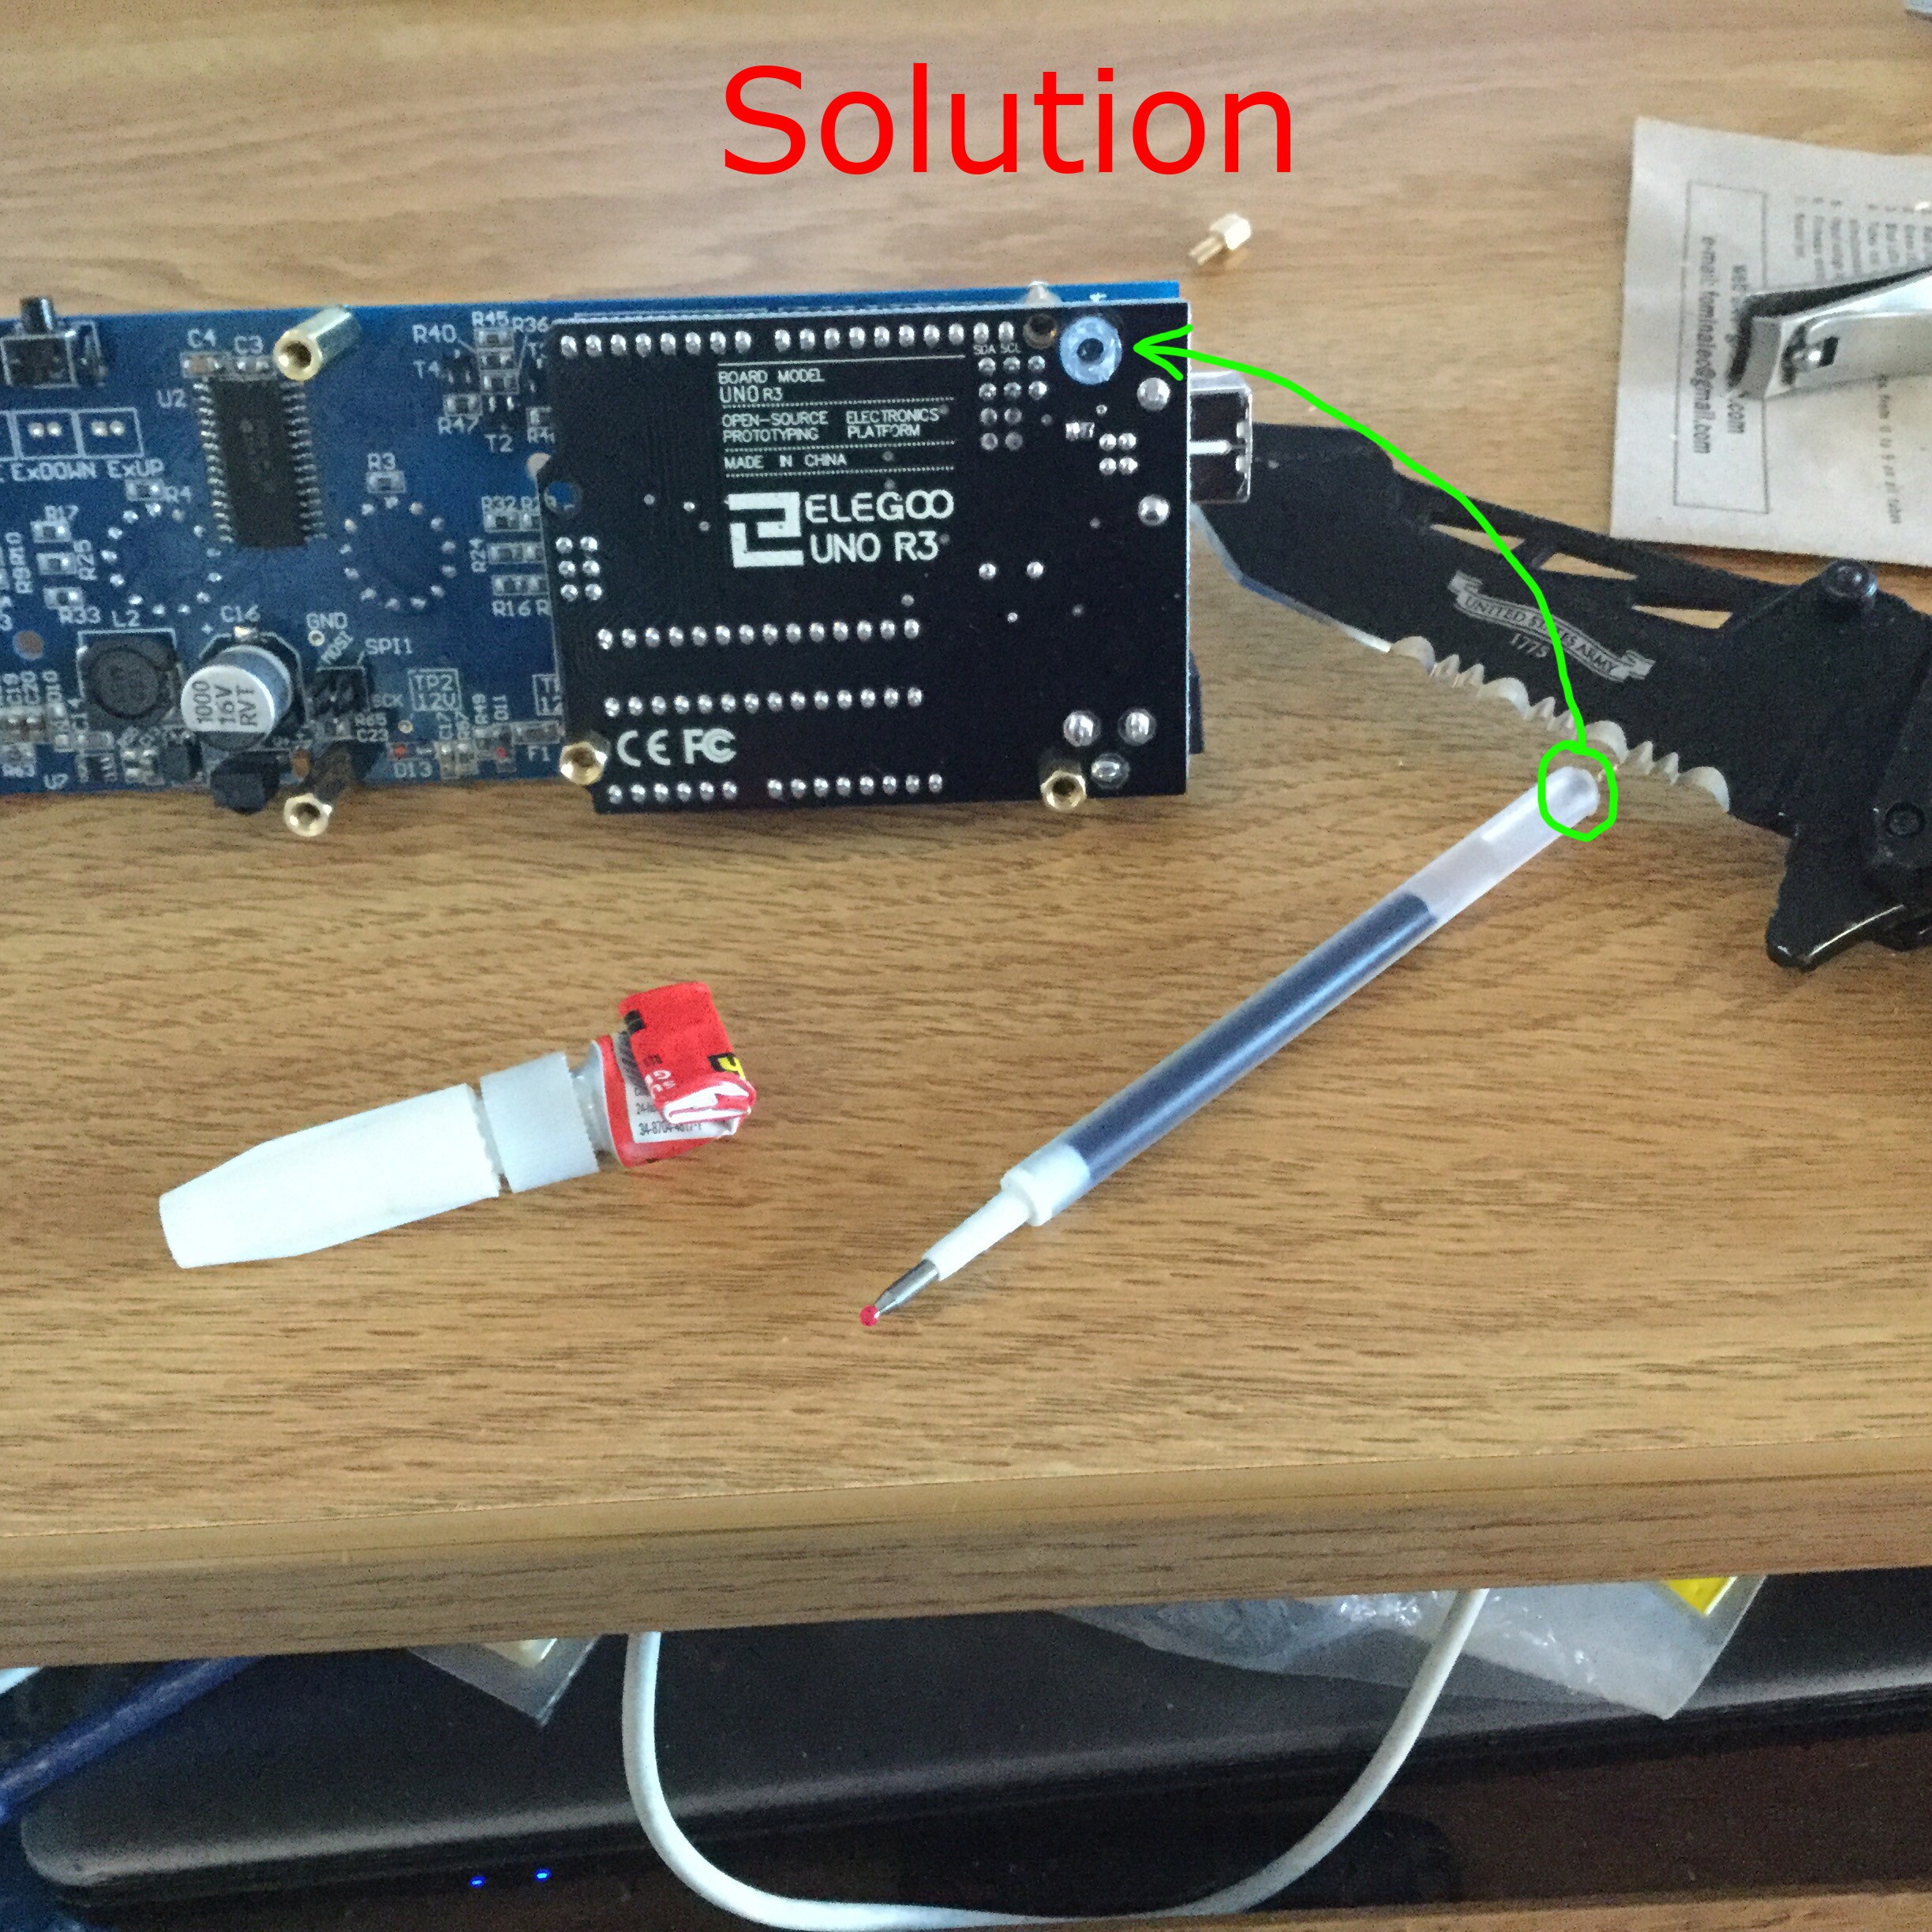
However, this is not so so much of an issue because I was able superglue the end of a ballpoint pen plastic core to the corner so all 4 corners of the clock had support.![]()
However, I have been trying to get a 12V 1A power source separately to power the Arduino board (which in turn, powers the clock), but got ripped off by an Amazon 3rd party vendor. (Note to my readers: Buying a component in the section labeled "Often bought together" does not always guarantee the product listed is a legit product, so please beware). However, Since the Bed vibrator must also be powered by a 12V 1A current, I plan to just use the same breadboard powering scheme that I will use to power the bed shaker in order to power the nixie clock as well.
Overall, I am very satisfied with the Nixie Kit as well as the shipping time (it shipped all the way from Ukraine and it only too 2 weeks! The marvels of modern transportation never ceases to amaze me.)
![]()
Prometheus Alarm Clock
Possessing both the beauty of the bygone analog age and the convenience of cutting edge tech, Prometheus is the ultimate alarm clock!