aerospark
-
Aerospark.co
08/21/2014 at 04:23 • 0 comments![]()
Figure 1: Aerospark Website Splashpage
As mentioned in the system overview, I would be making a user-friendly web application to communicate with the payload (through the RockBLOCK servers). I really got into web development earlier this year, and had been eyeing the MEAN stack
![]()
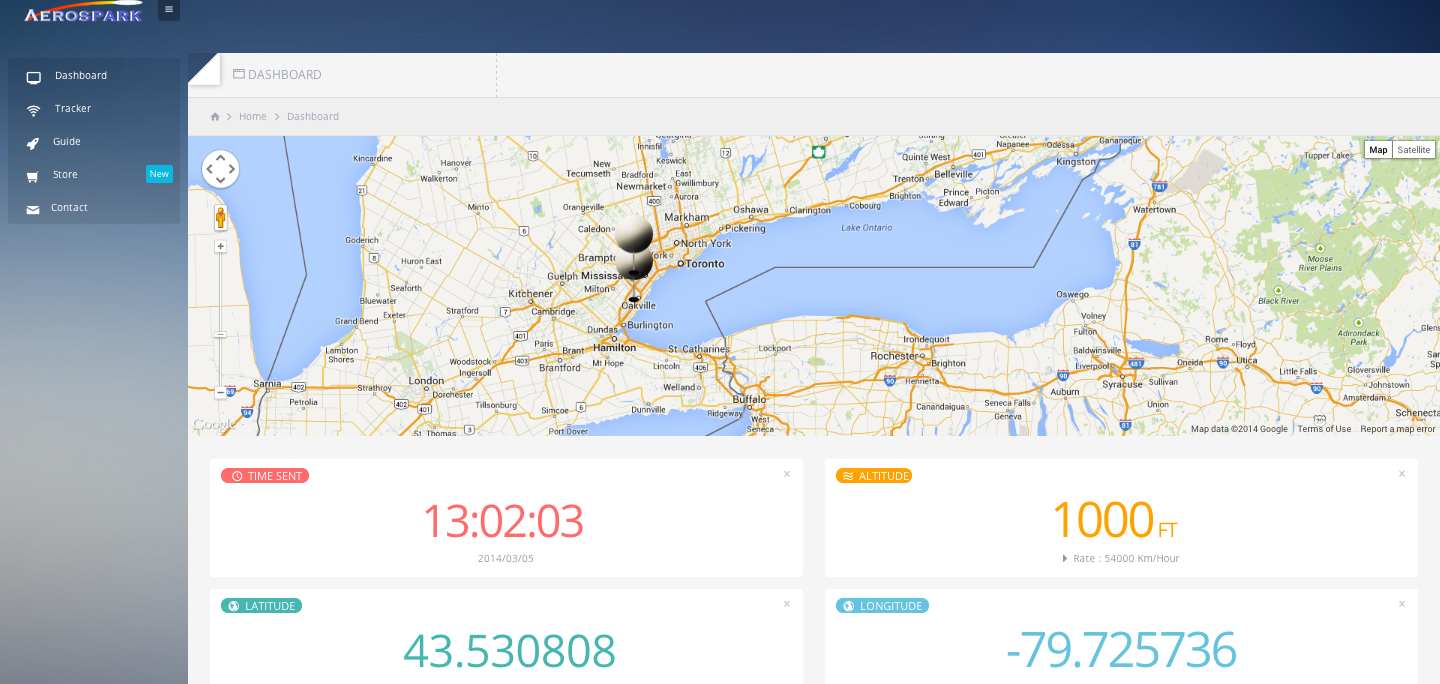
Figure 2: Aerospark Website Dashboard
(MongoDB, Express, Angular.js, and Node.js) for a few months. So I decided to jump in and use this project to teach myself how to build a real-time webapp using this stack, and see what all the fuss was about. This is my first time using angular, and I only recently go into Node, so the learning curve was a bit steep and a bit frustrating at times. But it's a really cool stack for web development, especially considering the last website I built was back in 2009 using PHP and MySQL... I was very surprised with how quickly things have changed since then.
Once the user clicks anywhere on the splashpage, they are directed straight to the "Mission Control Dashboard". This might be confusing at first because it doesn't look like a traditional website, but I did it on purpose so that it felt like an app. There is very little written content on the website on purpose, that is because the site has one purpose: mission control.
If you are a guest, but wish to view updates for a certain payload, you can enter the payload's unique IMEI number. This is found on the back of your RockBLOCK unit. If it is registered and online, you will should be able to watch the status of that payload in real time. The latest data point will be shown on the dashboard (time, altitude, lat, long, # of sats, and temperature) and plotted on google maps. If you are logged in, you will have additional options to send commands to the payload.
This works through a RESTful API connected to the RockBLOCK servers to send/recieve user inputs. If RockBLOCK sends data to our servers, we save the data for our users and respond with a 200, OK. Any user viewing the corresponding tracker will receive an updated view through socket.io, and if they are offline it will be stored in our servers anyways so they can view it later. Pushing data to your payload works the same way, but only registered users have access to this feature.
It is still some work that needs to be done (i.e. the how-to-guide) but the core functionality is there for me to start doing some the full system shakedown tests.
Check it out for yourself at www.aerospark.co. Any feedback or comments are appreciated!
-
Circuit Design
08/21/2014 at 04:01 • 0 comments![]()
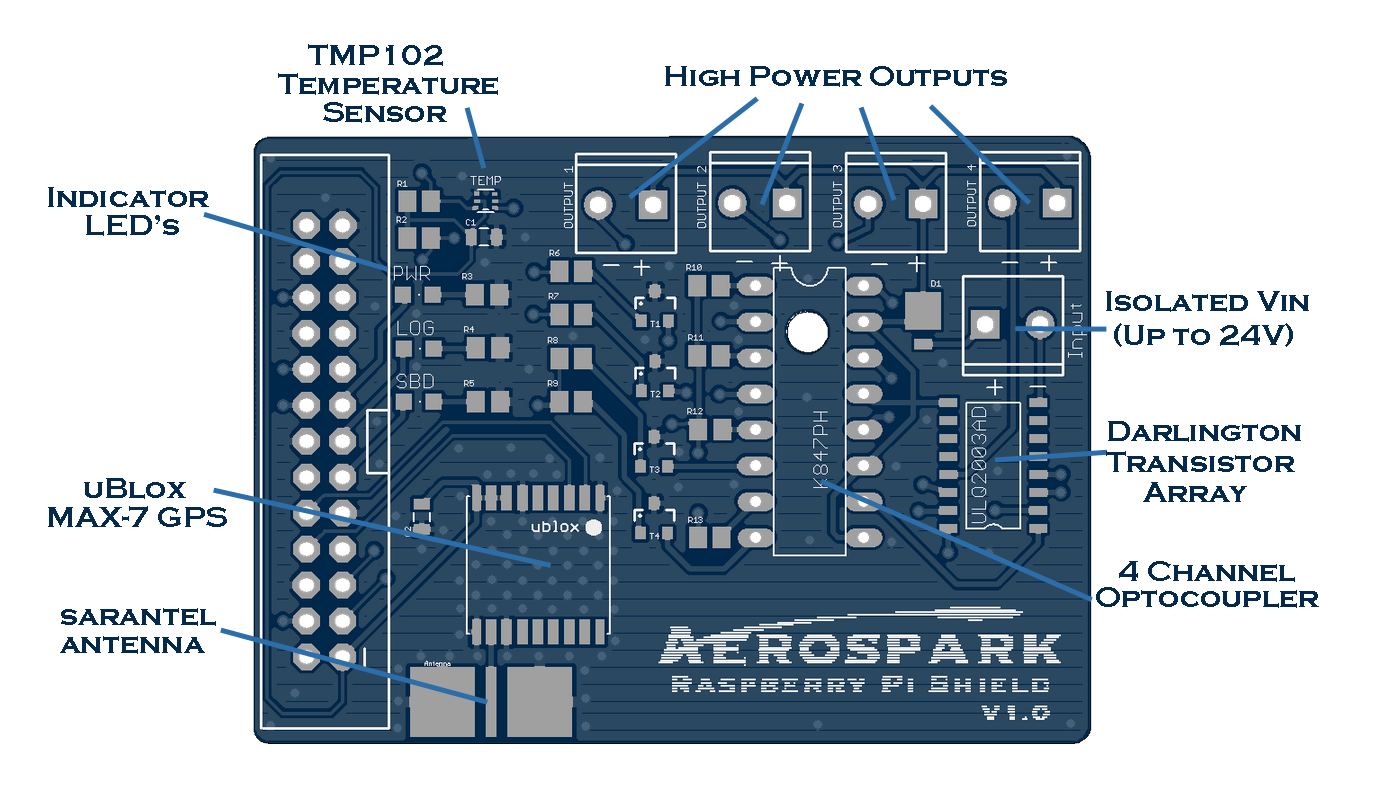
Figure 1: Aerospark Raspberry Pi Shield
In order to have reliable real-time tracking for our payload, there needs to be a better GPS onboard other than the one inside the RockBLOCK unit. The Iridium unit can estimate position, however it is way to inaccurate to be used for HAB (~10km off when I tested it).
The uBlox-MAX series has been used by HAB enthusiasts for several years and is rated for up to 50km altitude I ultimately decided to go with the newer uBlox MAX-7 for the PCB because it boasted improved accuracy of +/- 2m, and the MAX-6 we used last summer worked great. The Sarantel antenna makes the whole unit nice and compact, without the need of hanging external wires.
I threw some LED's in as well just to make it easy for testing/debugging as well as making sure everything is in working order before launch. The PWR LED will be on when the program is running, the LOG LED blinks every time data is logged to the Raspberry Pi's SD card, and the SBD LED will blink every time there is an SBD request to the Iridium Satellite Network.
The temperature sensor was added in to provide some more useful data to the users dashboard. It will be very useful if temperature sensitive equipment is placed inside the payload, and the user would like to heat the payload remotely from the website. For example, I will probably trigger a payload heater until I see the payload go back to near zero right before launching the rocket.
The rest of the circuit is for the optoisolator circuits. These were added to isolate any devices that may require higher power, without using the main battery or damaging the Pi. Personally, I will be using them for the ignition of a rocket, an optional cable cut down (for mission abort), deploying a parachute, and heating the payload. Some other ideas could be to power high power servos for a suborbital glider, etc. The circuit uses a 4 channel optocoupler with a darlington transistor array rated up to 24V. So if you use all four circuits are once and have 24V going into the input terminal, each output will get 24V/4 = 6V, or you could use one at a time to get the full voltage.
![]()
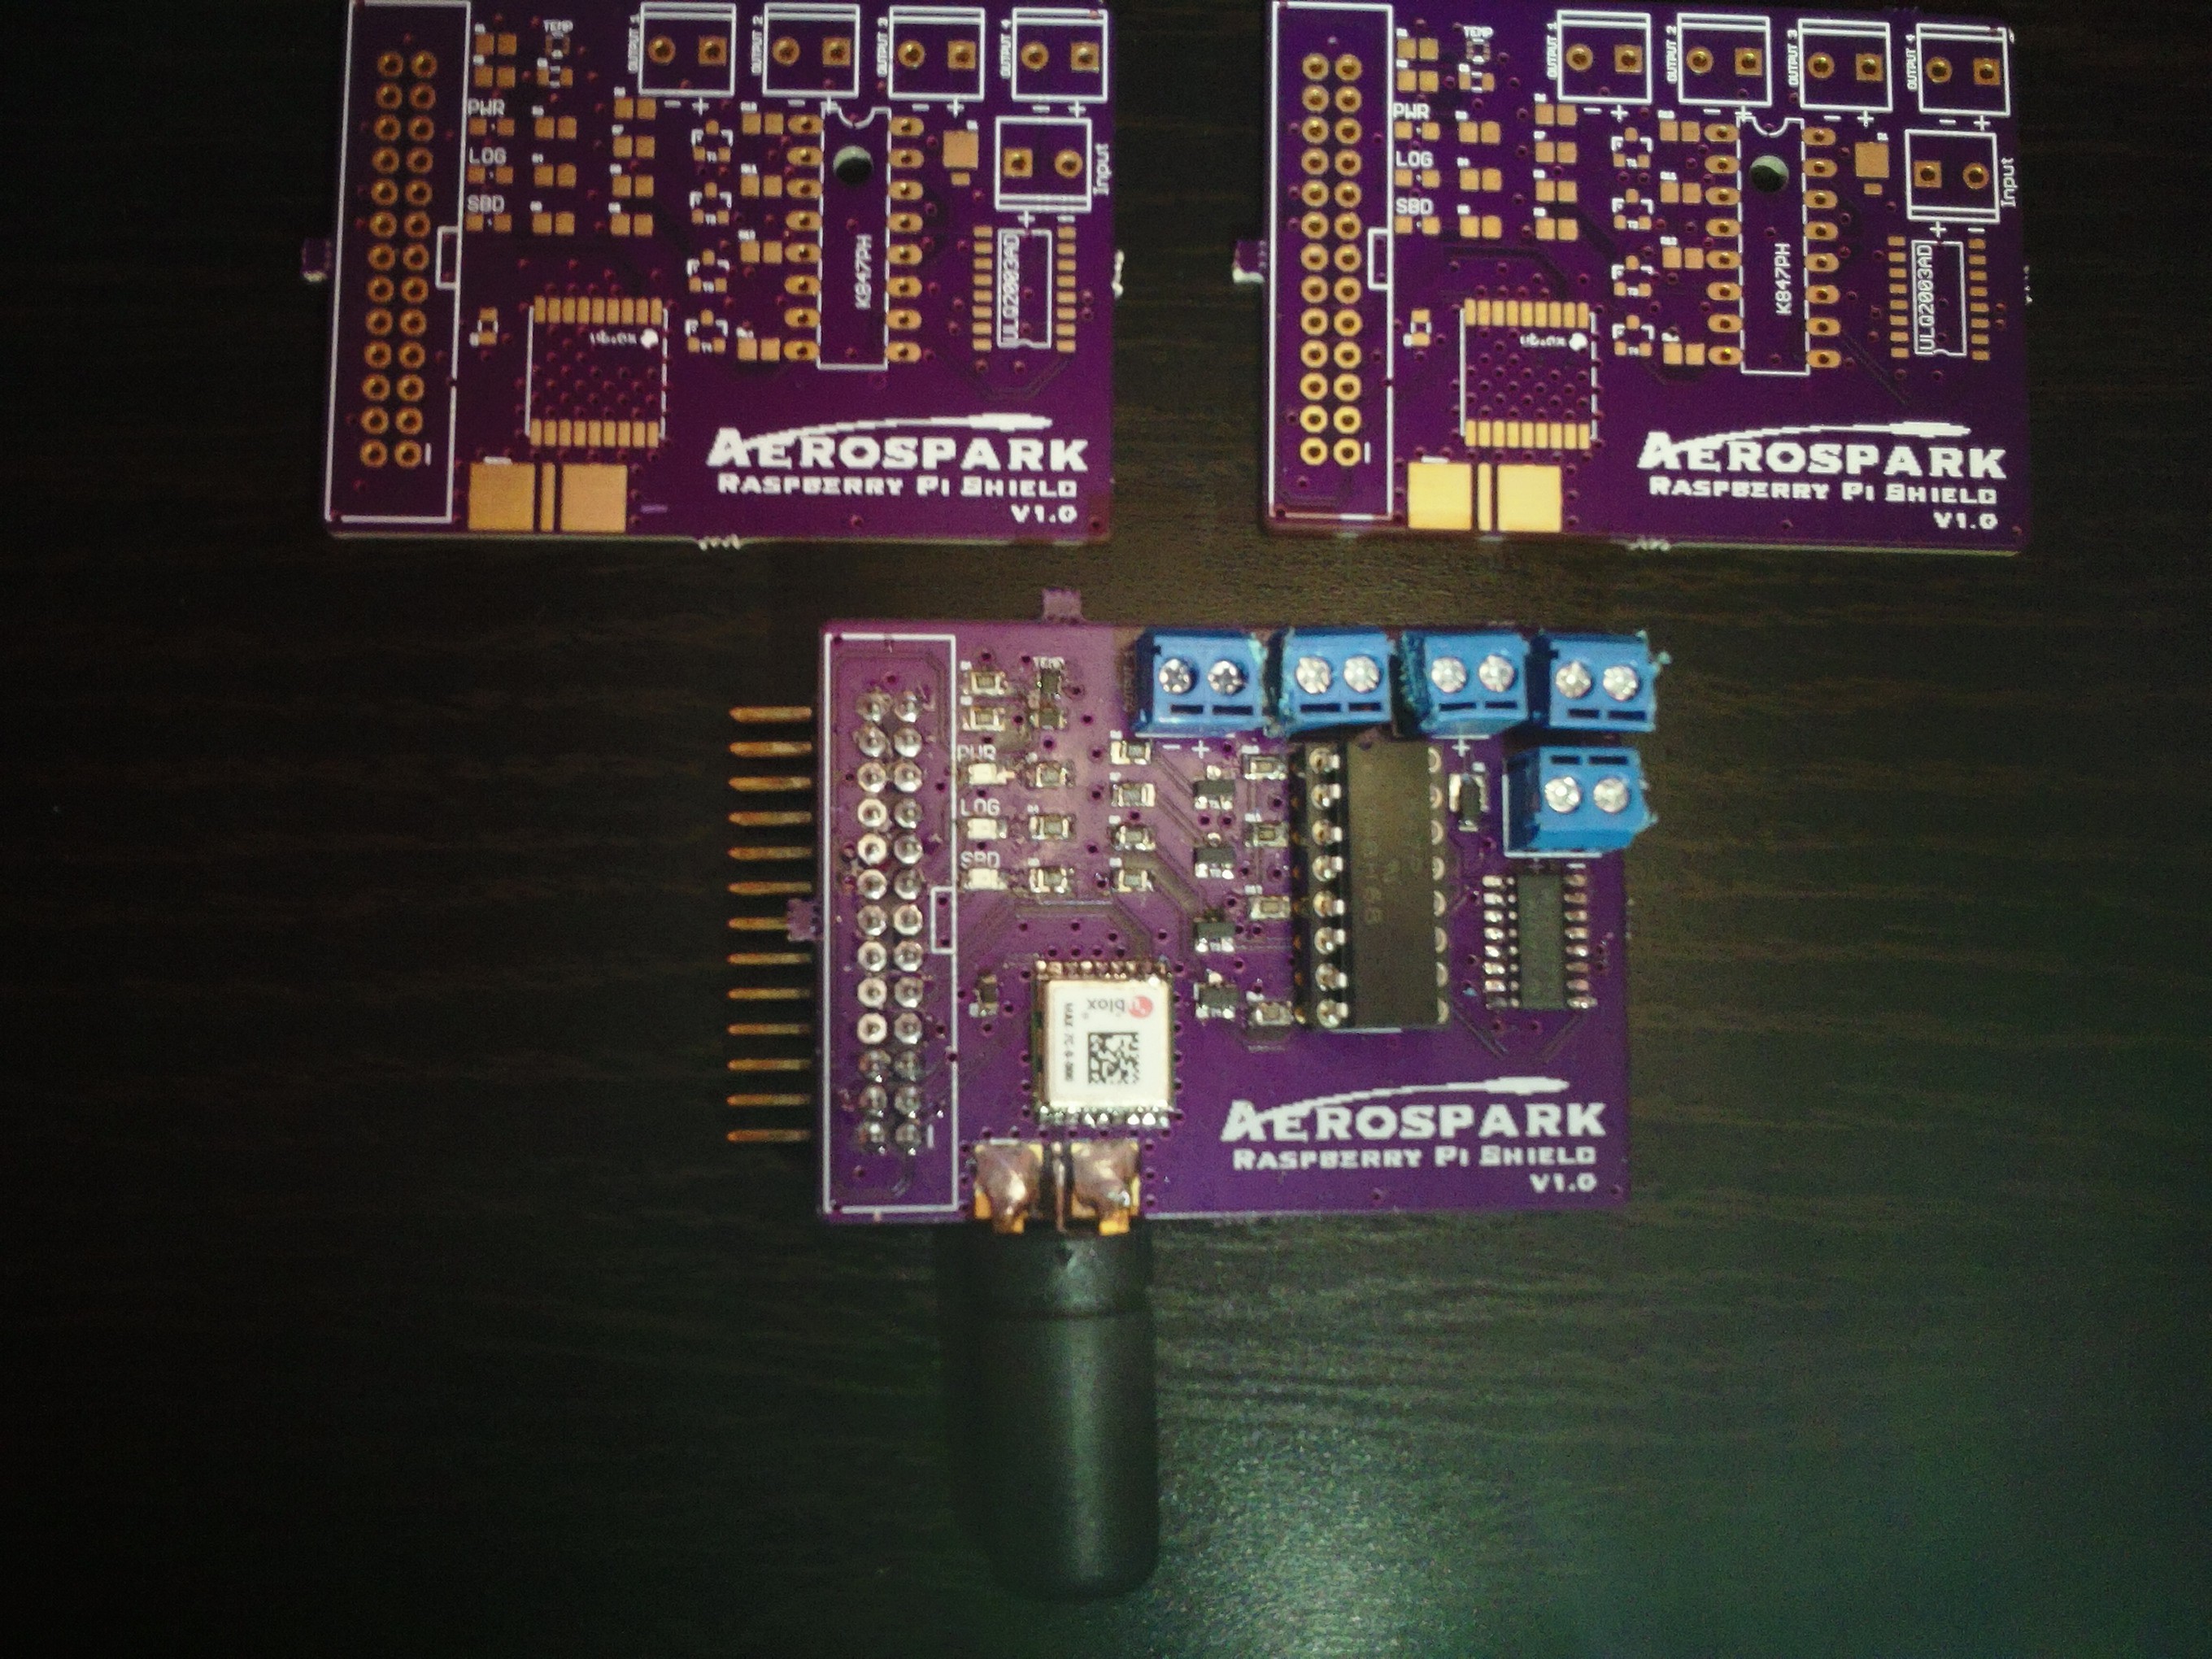
Figure 2: Manufactured PCBs
The circuit was designed using EagleCAD, and sent to OSH Park for manufacturing which took about 3 weeks to arrive. All components were purchased from element14 except for the uBlox and antenna. I had to pay quite a bit for those components because they were shipped from the UK, but the guy who runs the store was very helpful and even gave me some tips on the PCB design, thanks Anthony. On that note, I should also thank all the people on #highaltitude and #hackvana who gave me some tips on the PCB as well. I probably did atleast 3 full redesigns until all the feedback I got was satisfied.
The soldering was a bit of a challenge because I had never soldered SMD before. Originally I had hoped to use a reflow skillet, but I couldn't find the solder paste at any store and the people who worked at the stores all looked confused when I told them what I was looking for. Eventually, I decided to bite the bullet and just try hand soldering it. The TMP102 was fun, but I think it turned out alright (minus hacking away the wrong size terminals). Now for the testing...
-
System Choices
08/20/2014 at 01:04 • 0 comments![]()
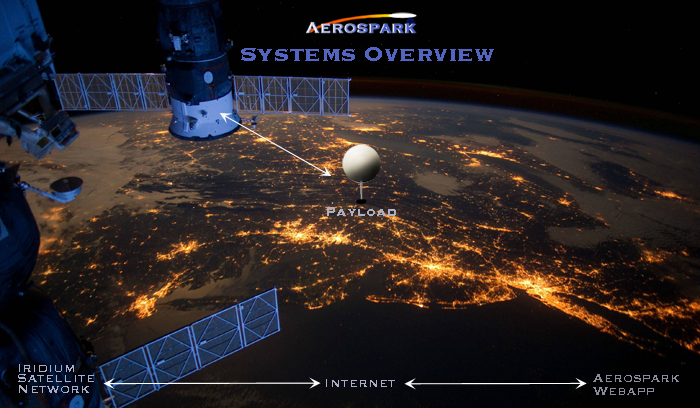
Figure 1: Major Systems Overview Graphic
This log is just to provide an overall description of why I decided to select the systems in Figure 1 for this project.
Payload: When I started my first HAB project last summer, it was partly to just do a fun project with a microcontroller, and the Raspberry Pi has always been quite pleasant to work with. I'd like to eventually use this project to promote STEM education to public school students, so the Raspberry Pi seems like a good fit for the job.
Another realization I made last summer, was that an amateur radio licence is required for a majority of high altitude balloon projects. The ones that don't are very simple and don't really have much functionality unless you add your own microcontroller anyways. So by using the RockBLOCK Iridum Unit, Aerospark Pi Shiel, Batteries (2x 9V), Camera, and Rocket. One battery charges the Pi/RockBLOCK/Camera, and the other is used for auxiliary power (i.e. payload heating, rocket ignition, cable cutdown, parachute deployment charge, etc.). The RockBLOCK Iridium Unit is plugged into the Raspberry Pi's USB port and allows for communication with the Iridium Satellite network (approximately every 1 minute for up to 350 bytes of data).
Iridium Satellite Network: I really spent a lot of time debating the merits of Iridium vs. APRS, but it came down to the ground station. I knew I was going to have to spend a couple hundred on some ground equipment for APRS, or i could throw that down upfront on an Iridium based tracker and build a nice website to read the data in.
Aerospark WebApp: The pleasure of pushing a button to control some physical object is awesome, and if you have every launched a rocket with one of those big red buttons, you know what i'm talking about! I really wanted to bring this feature into HAB, and make tracking/monitoring as easy as possible by interfacing google maps and sensor data to the website.
-
Preliminary Research
07/15/2014 at 05:24 • 0 commentsI completed a paper which overviews the history of rockoon technology, and ran some simulations on the feasibility of using rockoons as a vehicle for space exploration. A link to the paper is available here:
https://github.com/Sanghera/Aerospark/blob/master/Design%20%26%20Analysis%20Of%20A%20Lunar%20Mission%20Launched%20From%20A%20HAB.pdf
** Spoiler alert: **
The results don't look very promising for the amateur community. The largest single stage rocket, that is available to amateur rocket enthusiasts, barely makes a dent on the deltaV budget required for lunar orbit insertion. This analysis is by no means complete. I still believe that the technology may be used someday for sending small payloads to suborbital altitudes, cleaning up space junk, or maybe even launching cubesats into Earth orbit.
The Rockoon
A dedicated HAB platform with 2-way communications via www.aerospark.co that can be used to experiment low cost space launch technologies.