Luis Ayuso
-
Software ~layer~ hell
06/30/2018 at 08:53 • 0 commentsToday I gave a fresh try to the tandem networkboot-customiso.
As the network boot is already working, I will try to explain the steps to create the iso and make it available over tftp boot.
- Create an ISO I can boot: (ideally with pre-installed compilers and stuff)
- boot from that ISO -> fight again the UEFI vs BIOS monster.
- add filesystems to my ISO, (ideally I would like to have home in the network, but a local scratchpad mount using the node hdd)
First attemptAs my ISO is based in Ubuntu16 (don't look at me like that, the man has constraints) I found a compresive list of steps to follow here: https://help.ubuntu.com/community/LiveCDCustomizationFromScratch
Nevertheless one must fill the gaps when following this document:prepare the host
The following code creates some sort of fake filesystem and then we can "boot" the fresh system inside:
mkdir -p work/to_be_sysfs
cd work
sudo debootstrap --arch=amd64 xenial to_be_sysfs
sudo mount --bind /dev to_be_sysfs/dev
sudo cp /etc/hosts to_be_sysfs/etc/
sudo cp /etc/resolv.conf to_be_sysfs/etc/
sudo cp /etc/apt/sources.list to_be_sysfs/etc/apt/
cat /etc/apt/sources.list
sudo chroot to_be_sysfs/I copied some network configuration and the package manager configuration. no issues here as the target ISO is the same distro version as the host machine.
Inside the Fake Linux:
And then after chroot we are like in a fresh system (so fresh that does not have anything)
inside of chroot:
mount none -t proc /proc
cat /proc/cpuinfo mount none -t sysfs /sys
mount none -t devpts /dev/pts
export HOME=/root
export LC_ALL=C
sudo add-apt-repository ppa:ubuntu-desktop/ppa
sudo apt-key adv --keyserver keyserver.ubuntu.com --recv-keys 399B698EEA9EF163B6F9A0F62CC98497A1231595 apt-get update
apt-get install --yes dbus
dbus-uuidgen > /var/lib/dbus/machine-id
cat /var/lib/dbus/machine-id
dpkg-divert --local --rename --add /sbin/initctl
apt-get --yes upgrade
apt-get install --yes ubuntu-standard casper lupin-casper
apt-get install --yes discover os-prober
apt-get install --yes linux-generic apt-get install --yes grub2here the problems begin, first whit finding out what PPA GPG key to use... but a fast google came out with that one that seems to work, because it downloads stuff.
Then, installing GRUB. it asked questions that were not described in the web, I got pretty scared that I was flashing the boot partition of the host system, I closed my eyes and selected one of the options. Everithing seems to work fine in the host, so it was a success
Back to the host
Now is time to unmount dev partition... but guess what! it does not.. I can not locate which process keeps the resource busy. But this was fixed with a system reboot (although if the resource was blocked, there should be a reason for it).
reboot
cd work/
sudo umount to_be_sysfs/dev
sudo apt-get install syslinux squashfs-tools genisoimage
mkdir -p image/{casper,isolinux,install}
cp to_be_sysfs/boot/vmlinuz-4.4.0-128-generic image/casper/vmlinuz
sudo cp to_be_sysfs/boot/vmlinuz-4.4.0-128-generic image/casper/vmlinuz
sudo cp to_be_sysfs/boot/initrd.img-4.4.0-128-generic image/casper/initrd.lz
ls to_be_sysfs/boot/
ls /usr/lib/syslinux/isolinux.binAnd here is where we stop. there is not memtest, and not isolinux... everithing points out that the tutorial was based on some old livecd... and it requires some magic knowledge of the bootstrap process to update it to new distros...
Lets try something else :(
Second attempt:I found something else: this seems to be a little more updated:
https://www.hiroom2.com/2016/06/10/ubuntu-16-04-create-customized-livedvd/
This code is basically the same series of steps, but this time a tool called systemd-nspawn. It is similar to chroot but in this case the new system is booted. I guess we are running in a new process space now, somehow this gives me a better feeling.Everything runs smoothly until the ISO is generated (I skipped the Japanese keyboard layout as I don't see myself using that).
There was a difference when comparing this method grub script with the one I currently use in PXE or the grub first from the first method. it defines the boot argument of the kernel as live... ok, this is new.... the other one used casper. I may have to learn what is all of this about:
# this one from the live CD
menuentry "Try Ubuntu without installing" {
set gfxpayload=keep
linux /casper/vmlinuz.efi file=/cdrom/preseed/ubuntu.seed boot=casper quiet splash ---
initrd /casper/initrd.lz
}# this one from my PXE live cd
menuentry "Ubuntu 16 live cd" {
linux ubuntu-16.04.4-desktop-amd64/casper/vmlinuz.efi root=/dev/nfs boot=casper netboot=nfs nfsroot=10.1.0.1:/srv/tftp/ubuntu-16.04.4-desktop-amd64 splash --initrd ubuntu-16.04.4-desktop-amd64/casper/initrd.lz
}# and this one from this second method
serial --speed=115200 --unit=0 --word=8 --parity=no --stop=1
terminal_input console serial
terminal_output console serialmenuentry 'boot the thing' {
linux /boot/vmlinuz-4.4.0-128-generic boot=live console=tty1 console=ttyS0,115200
initrd /boot/initrd.img-4.4.0-128-generic
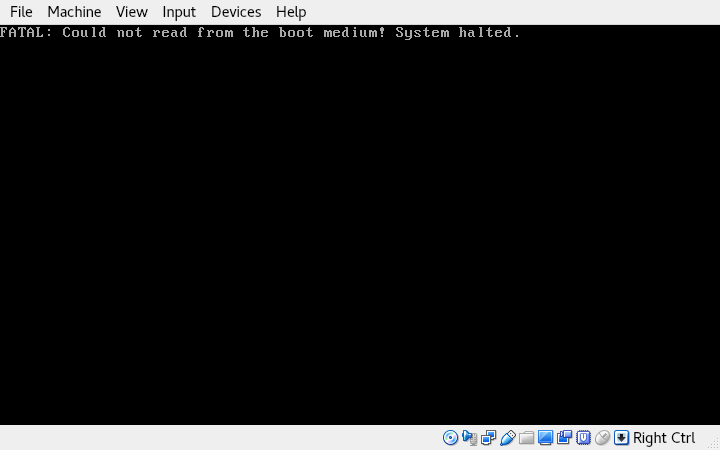
}the outcome of this one last method was the following:
![]()
maybe not quite there yet...
Conclusion
From here I have some options:
- tweak method 2 to use casper, whatever this means.
- find some other tutorial to follow.
- learn to debug the bootloader.
- boot in a virtual machine first and then move into pxe.
- get myself a cold beer.
-
Measuring and imagining the new housing
06/25/2018 at 11:43 • 0 commentsLast week I have been doodling how the new case would work. Still an outgoing project to decide what and how to build it.
![]()
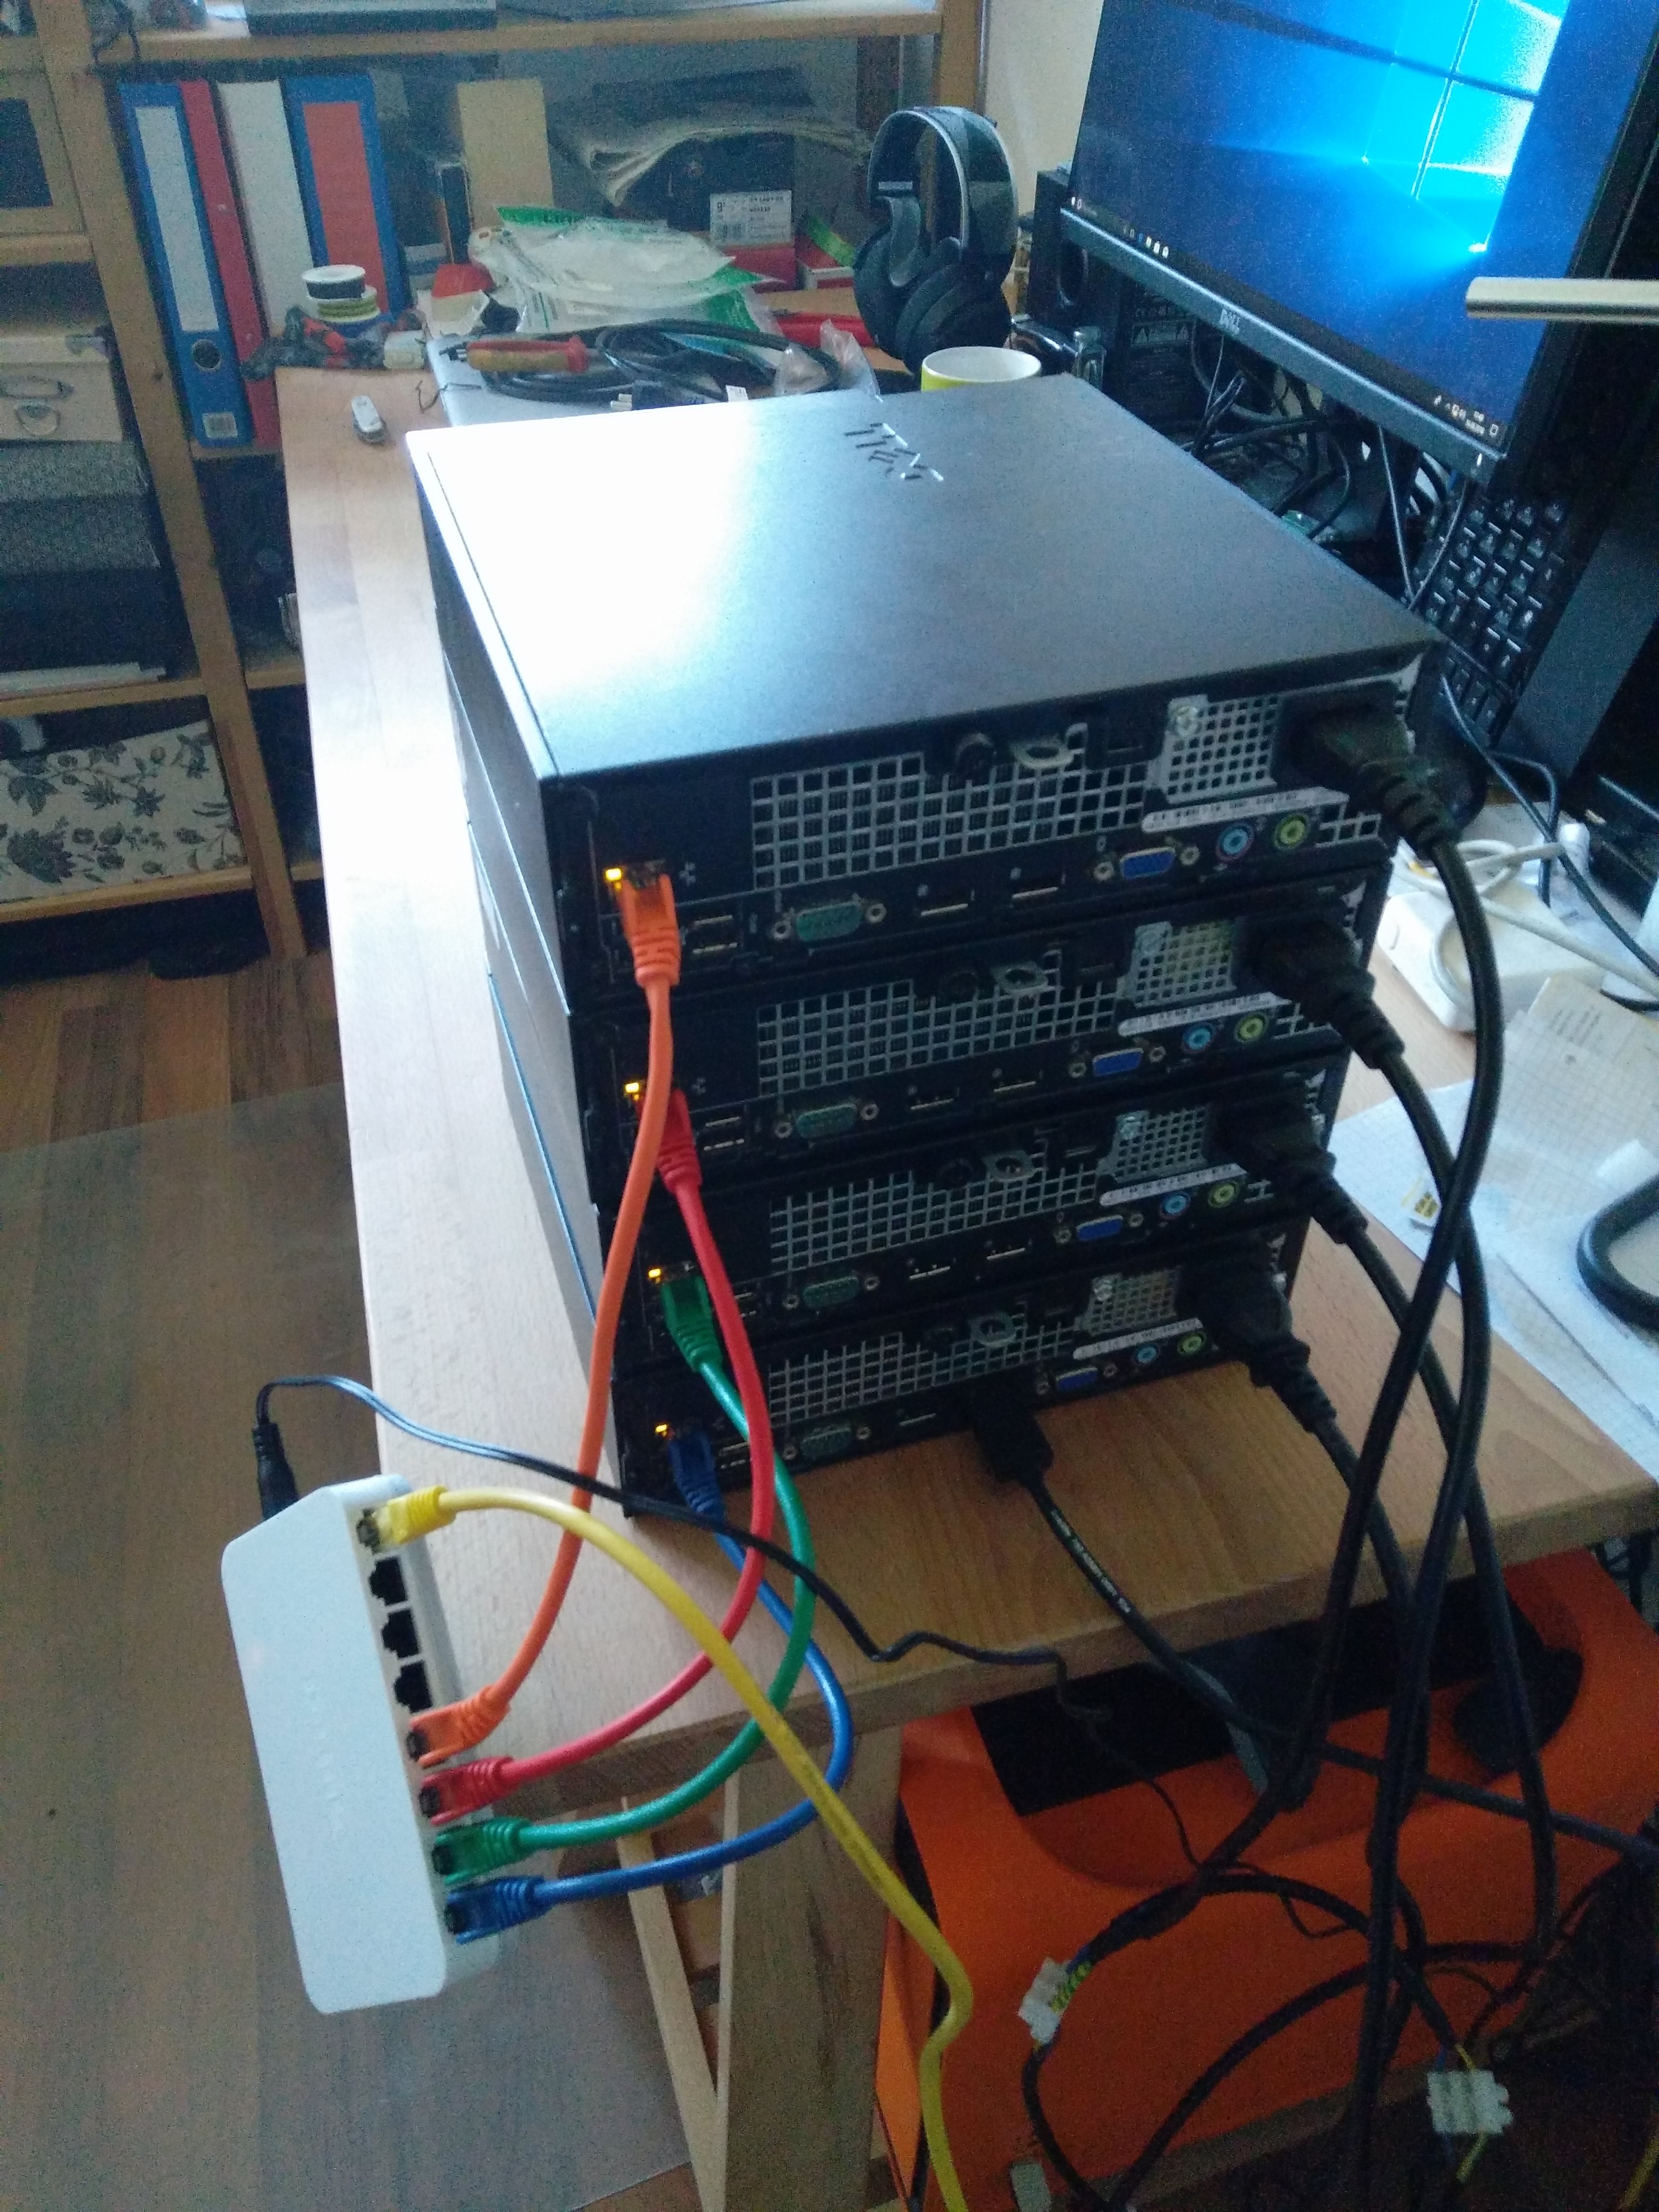
The Optiplex cases are pretty neat, they stack on each other, they have a good ventilation system and can be placed vertically or horizontally. They are not easy to replace because in the first place you may not need to do so. This project started with the need of building something, so reusing the cases is out of the equation: sorry to all those dell engineers that did such a great job squeezing all this components in 24x24x7 (specially to that one guy who cut a square off the motherboard to fit the system fan).
![]()
The collective arrangement presents new challenges that were never addressed in the original case. Like for example hiding all the wiring that feeds the nodes. Reducing the size of all this 220 Volts power cords into some other system that feeds all the nodes would be pretty nice to have as well. Talking about power cords... I would had never though that those are such an expensive thing. If this is because the price of copper, I could resell the copper cooler pipes if this project does not work out and maybe break even.
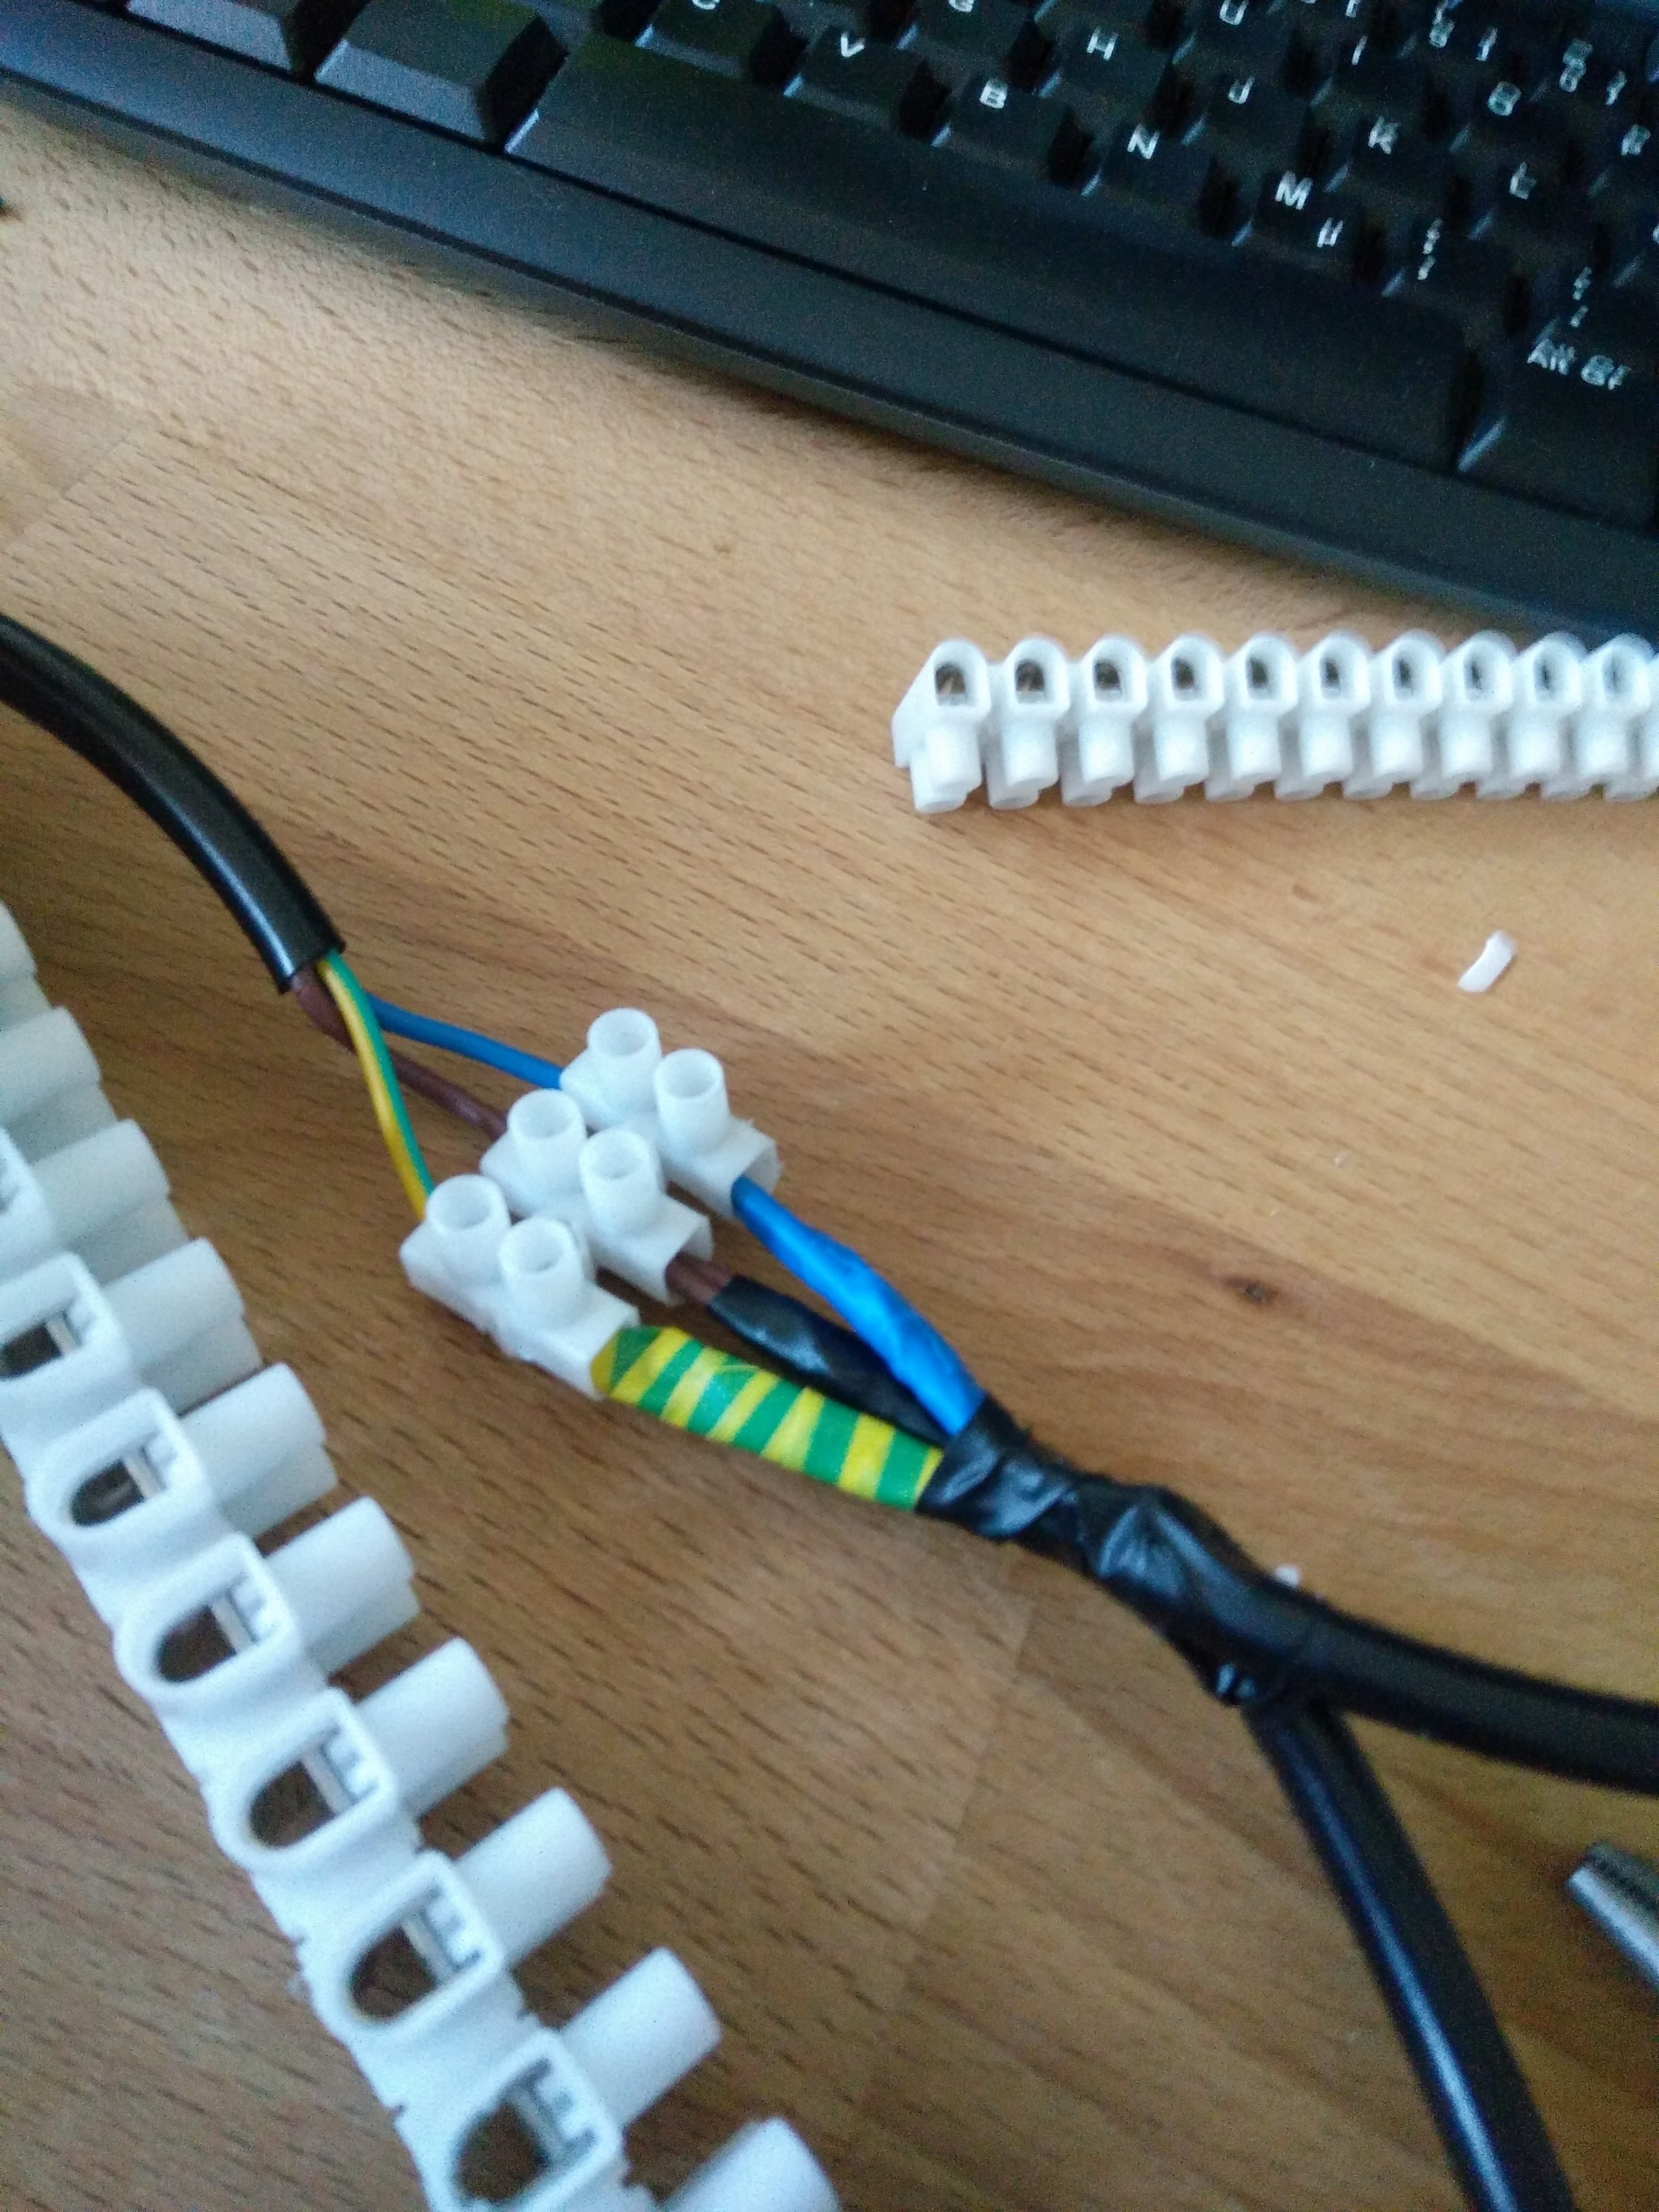
The solution for the power distribution currently looks like:
![]()
-
The arrival
06/06/2018 at 19:55 • 0 commentsToday I received the first lot. A pair of optiplexes with 4Gb ram each. I was surprised of how heavy each of this tinny guys is: the package containing both was 20 kilos!
![]()
Almost a challenge to get them home.
Installing the network boot.
In a near future I would like the nodes to boot from a network image, so I minimize configuration to be done. I though I would be a good idea to install some linux distro on the hard drives to partition and have a fail-safe boot in the machines. At the same time this will serve me as sparing to learn everything about this network booting thing.
This way i started setting up my network boot infrastructure. And the first problem was the nomenclature: boot from NIC, PXE, NBP file....
I found a nice tutorial I tried to follow not very successfully:
https://wiki.debian.org/PXEBootInstall
During the first configuration step I already found issues with the DHCP server: first, you need to have a an static IP assigned to the interface it listens to... and then IPv6 does not want to configure... I get all kind of errors and finally, and when I am close to give up for the day I read in the screen that the node is getting an IP, and is asking for the boot image. This was unexpected because the DHCP daemon was running even when he just told me that he could not boot!
Then It comes the problem with the boot image: it seems to be that you need a different image if you want to boot BIOS or UEFI... Not much documentation found there. I tried to use the legacy boot: not much more luck there, still getting unfriendly messages.
I call in the day.. Sleep it over.... Start over again.
I decided to expand my point of view and see if I find other options: and I found this:
https://wiki.ubuntu.com/UEFI/PXE-netboot-install
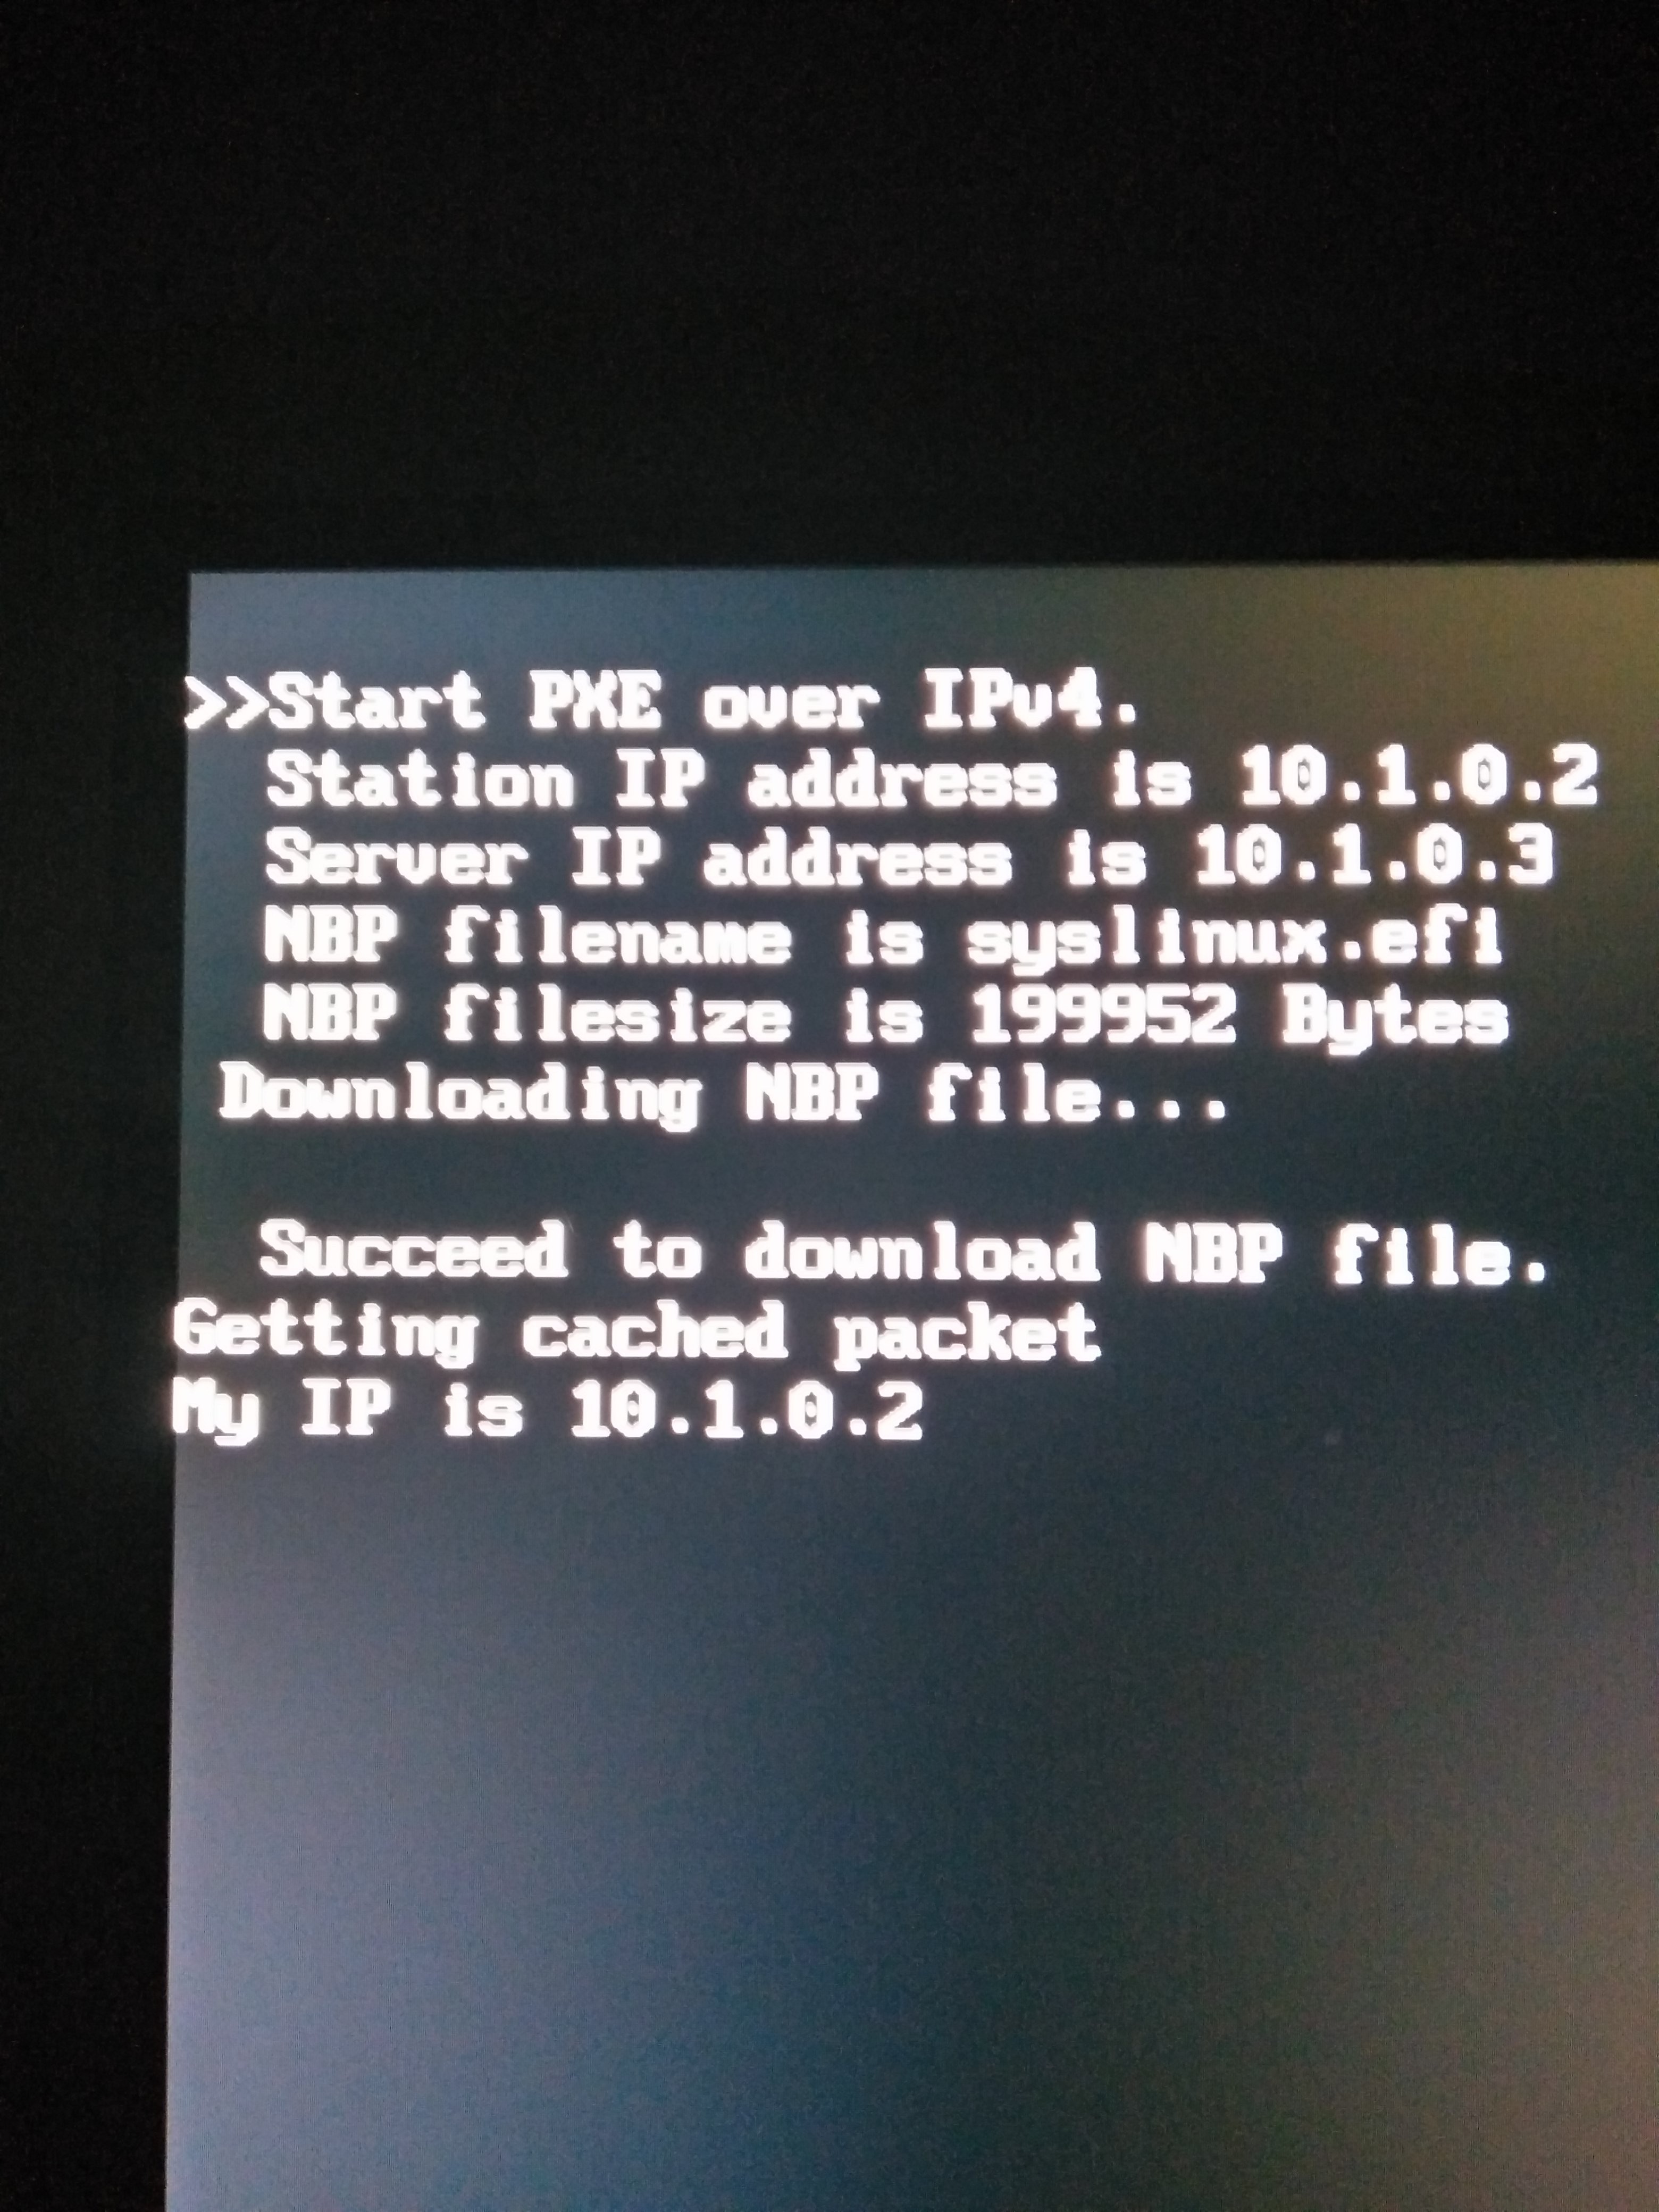
Once downloaded the new bootstrap image, all of a sudden, it works! It boots from the network and it even loads Grub that allows me to choose between different images. Huge success.
![]()
Next episode: the design of the case: CNC blade center. -
Getting Started
06/01/2018 at 21:33 • 0 commentsFor several months now I play with the idea of buying a new computer. My laptop is 8 years old and refuses to die, my rig is 5 and just got a brand new video card. I would need to really justify the investment with something that raises the bar. A truly nerd project.
I have seen uncountable Raspberry (and similar) clusters, and I doubt of their real utility: I tried to compile llvm in one of those boards and the installed ram was just not enough to keep the thing running. Since I am (mostly) a C++ developer, I would like to have a whole gigabyte of memory per processor, ideally two. And even if I would love to support the ARM platform, this one time I guess I will stick to the x86 family.
At the same time, I am not working against the clock, and I would like this thing to look damn good, in a DIY way. This means acrylic panels, cnc or laser cut case, cable management and a little bit of color. The case will include all the nodes, plus power supply and networking.
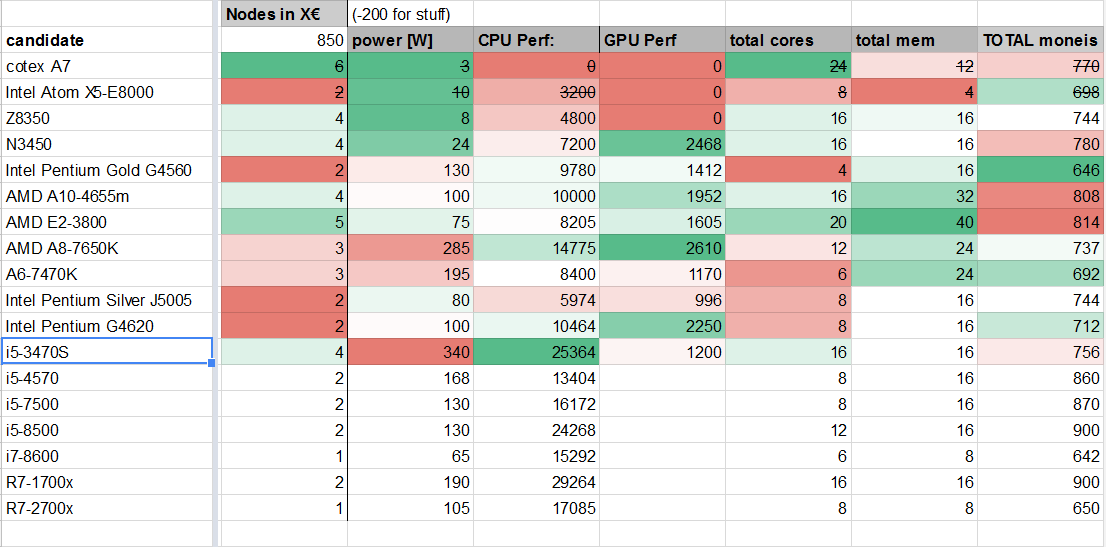
With this concerns in mind, I started my research about what could we use:
![]()
One of my favourite candidates was to use the brand new Biostar A68N-5600, that packs a 25W A10-4655m with 4 cores. This board has a pretty reasonable price for new hardware and it has a very modern look for the aesthetics of the whole system. Although the processor does not have a top performance, it packs a small but decent GPU which can be used to test some OpenCL programming. Unfortunately the rising prices of DDR memory and the need to add hard drives and power supply made my nodes over the 150€ . I even considered using >span class="J-JK9eJ-PJVNOc" data-g-spell-status="2" id=":1p2.16" tabindex="-1" role="menuitem">usb drives to boot the OS to save in costs.
A second favorite was to get some ultra small form factor second hand desktop PCs, the kind of stuff that uses your dentist secretary. Big companies use hundreds of this modests pcs, and some of them pack quite some performance. Talking about performance: since I can not test the hardware before it is shipped, and they wont ship before I pay... I have very little means to do objective performance assessments. For this reason I have developed a very un-scientific and un-recommended technique: get the score in www.cpubenchmark.net and multiply by the number of nodes. I presume that the real score is under this metric, as we will be introducing latencies in the networking and software layer. In other words: This whole computer could be faster by using one of the new high end processors. We could even buy one with a lot of cores, but it would not be as fun, or would it?
I managed to find some Dell Optiplex 7010 USFF (ultra small form factor) which come already with 8Gb DDR3, some hard drive of some kind and a gold-rated power supply each, for little less than 150 each. They come with a i5 third generation that scores 6341 in the benchmarks, giving me enough muscle to feed most of my software projects.
I budgeted 200€ for the switch, wires and materials for the boxing, and while we wait for the delivery I started doodling the case.
AySC
Create yet another Beowulf cluster with x86 architecture that can deal with some workload.... just some.