 Roddy "Rags" Read
-
1Motivation Instructions
Build a Kite Turbine
Simple as that. It's fun, It's got power comes out. Not only that ... You might be doing a really good thing.
We build Kite Turbines because the world needs clean affordable energy.
We all know wind turbines are amazing right.
Yes - but no. They're so heavy they can't scale.
Wind power is not yet as amazing as it's going to become.
Looking down on wind turbines from an airplane, you realise, they are tiny compared to the airspace they could be extracting from, and that airspace has more powerful and consistent wind away from the surface.

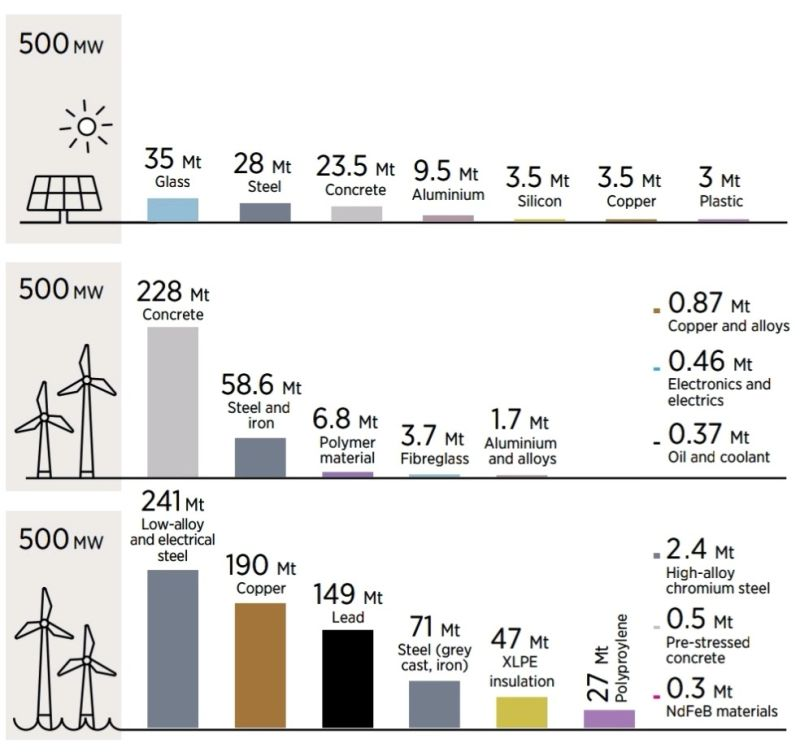
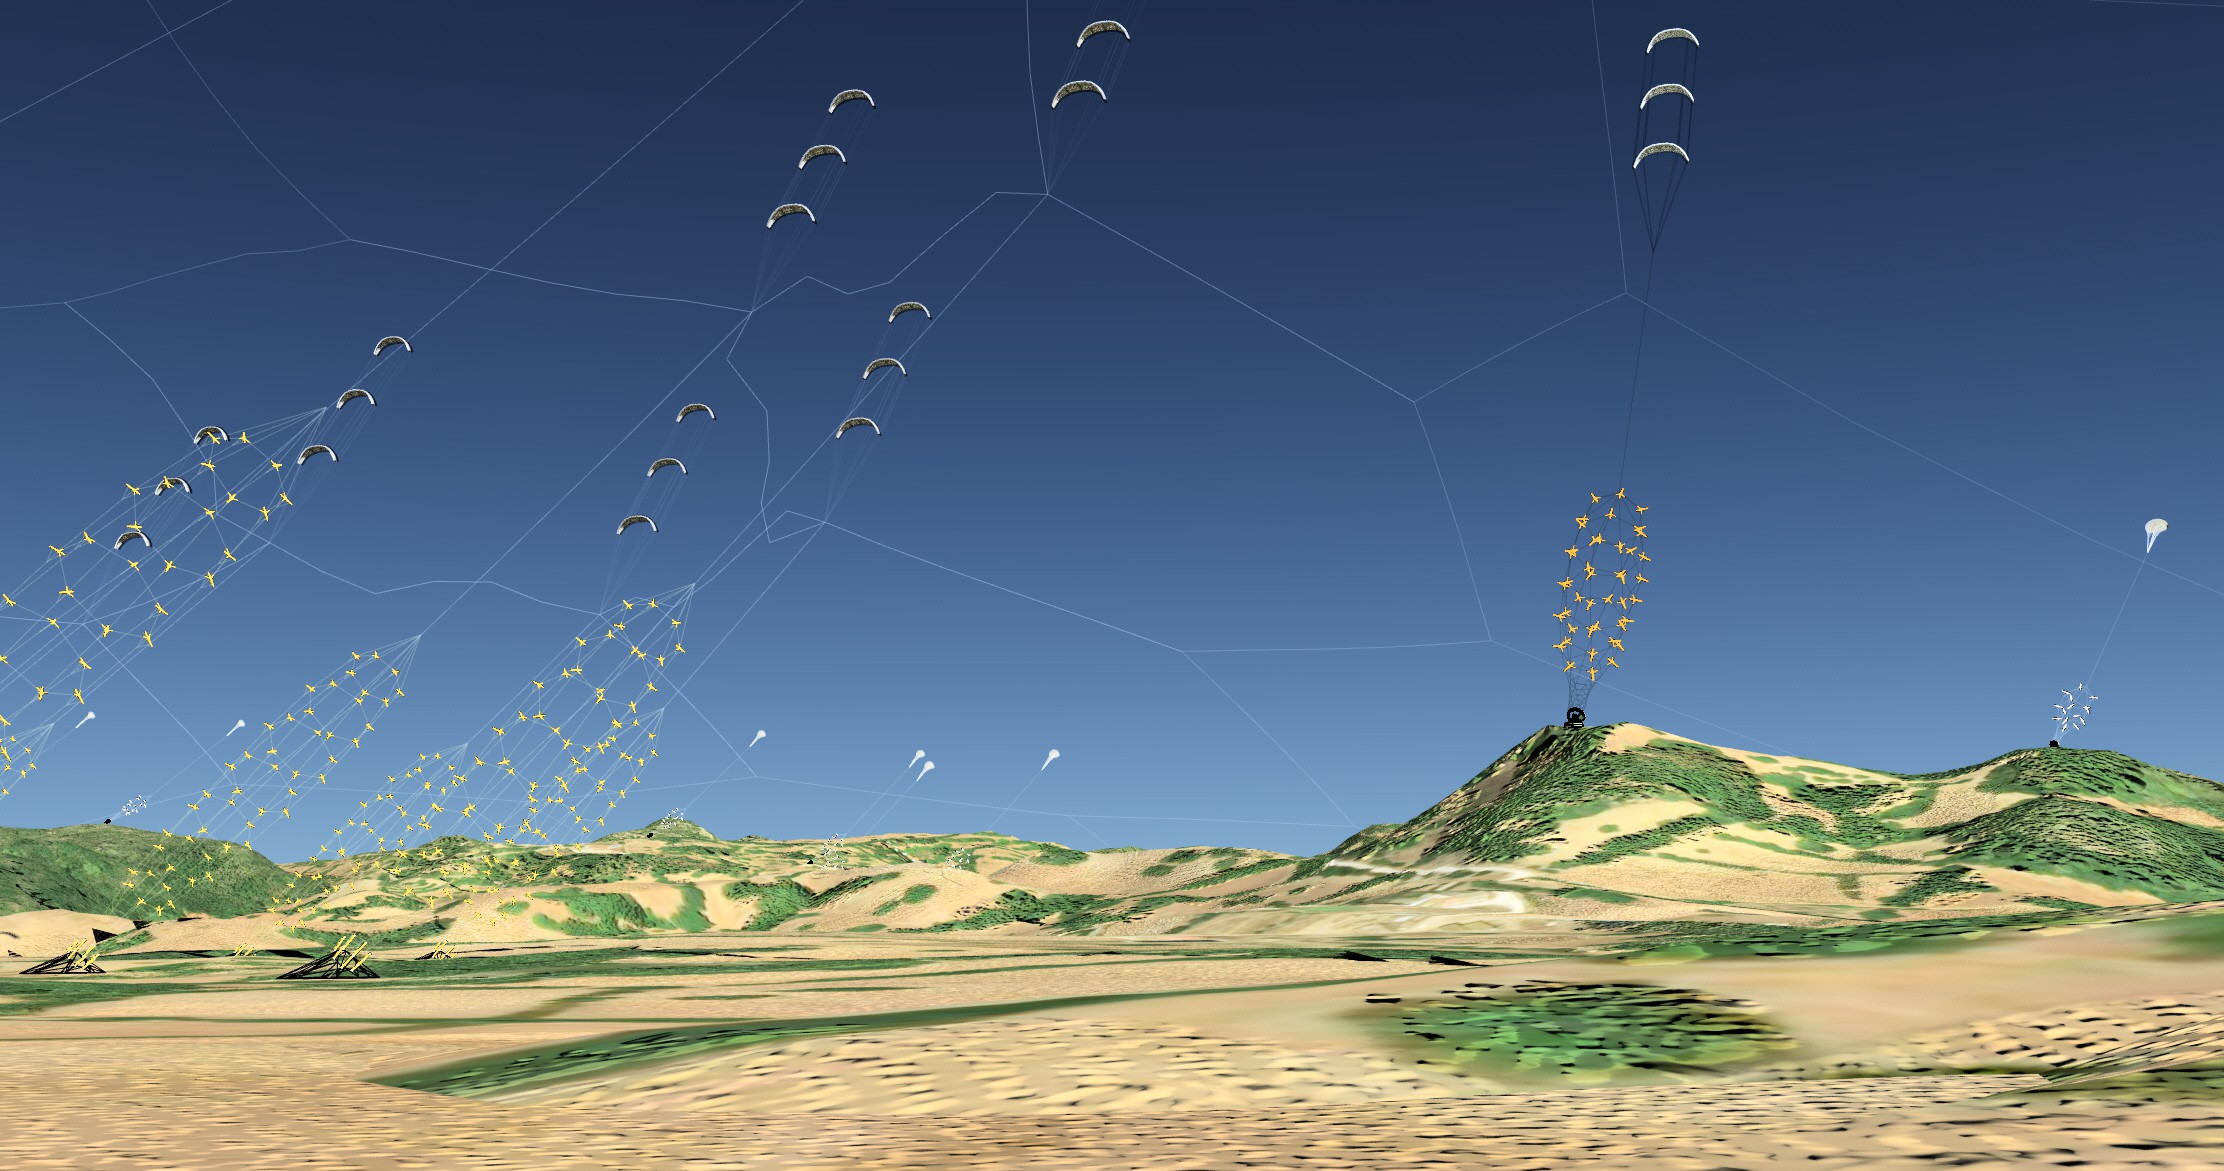
A Network of kites high above a wind turbine farm Here's why Wind turbines aren't as high as kites yet. They're seriously heavy. See this IRENA graphic.
Wind turbine towers are massive rigid steel structures. Strong enough to resist the cantilever bending, head mass loading and generation torque. These towers have to follow cubic mass scaling (To the power of ~2.63)
Onshore, the tower is fixed to a huge concrete foundation to prevent it toppling over.
A road has to be built up a hill. Giant blades have to be made so that the tips (the efficient part) can sweep further at high speed.
This is not an efficient design yet. Material is not aligned with the force.
Like a suspension bridge, Kite Turbines use efficient design to align the loads (blade aerodynamic forces) with efficient tensioned lines.
Kite Turbines don't need the tower, the foundation, or the road.
Even most of the blade is cut from a Kite Turbine. These blades only fly the outermost ring. The most efficient part.

Generic 3 layer x 5 blade rotors Kite Turbine design, Let's say ~ 10kW The power to weight ratio of standard wind turbines is dreadful, which means it takes them longer to pay back the carbon equivalent emissions embodied in their manufacture. Endurance E3120 50kW = power-to-weight ratio of only 0.02kW/kg (And that's a good one it's only wee)
Kite Turbines Power-to-Weight tested 1kW/kg (Airborne) 0.2kW/kg (total)
You've seen how basic our Kite Turbines were... We are quite certain we can increase this to >2kW/kg (airborne) >.8kW/kg (total)
When I walk up to a wind farm, Standing right up underneath a giant wind turbine, I look at the stairs leading to the tower access door. I estimate the mass of just the handrail (not the balusters) is the same mass as an entire >3kW Kite Turbine.
That 3kW is a magic number... Your modern kettle is up to 3kW. 3kW is ~ the average (24/7) power demand of a UK home. It's also the speed your domestic plug will charge an EV car. And this Kite turbine fits in the back of your car ... oh
Here's the thing, this could be BIG
We suspect kite turbines are going to be very scalable
![]()
And we're going to assess how offshore capable they are.
There are further positive effects of designing wind turbines (Kite Turbines) this way. The modular blade elements can all be swapped out very quickly on the ground (no crane or rope access experts needed)
Here's how we reckon Kite Turbines can reduce the cost of energy to <5p/kWh
Improvements in Financing include
- Recoverable Assets
- Low Engineering Cost Barrier with Mechanical Autonomy in flight
- Insurable Safe Network and safety line Design
- Consenting demand lower than legacy AWES 1.0 altitude
- Easier Environmental & NIMBY consent
- Diverse Deployment Locations
- Estimates from short deployments
- ESG compliance
Improvements in Capital Investment Include
- Rapid Modular Production from Minimal Facility
- Tensile Turbine Array modular configuration options
- Simple System Autonomy via ground control sets
- Low footprint & Lightweight ground generation
Improvement in Annual Energy Production Include
- Low cut-in ~3.5m/s
- Fast Modular Servicing
- Constant Autogyro Output
- Redeploy to match resource (accross town / west hill / fallow field / island/ mountain / adventure...)
- Naturally runs in Perfect Kite Window Position
- Back-drive mode to stay aloft through Lull (Eventually for launch)
- Line Fairing enhancements for low drag avoid flutter on short transmission line segments
- Stacking efficiency gives Low line drag/blade
Improvement in Operating Expense Include
- Lightweight modular deployment = no road
- Deployment from ground level = No crane
- Servicing at ground level = No rope access risks or costs
- Modular servicing = minimal downtime
- “Disposable” blade costs
- Low tech repairs
- Simple automated deployment device for easy training and safer operation
- Transportable & Relocatable
- Smooth common network array flight control
- No running line wear
- Tensile overspeed tolerance
- Storm shelter recovery mode
- Offshore-able
In a similar way
Here's how we reckon Kite Turbines can reduce the embodied carbon emissions of wind energy to <1gCO2e/kWh
Improved Construction effects include
- Rapid Modular Production from Minimal Facility
- Tensile Turbine Array components are lightweight low cost fabric
- Ground anchor replaces foundation for tensile minimal footprint ground station
- Modular configuration makes easier to deployment match or change to appropriate turbine configuration without needing years of wind survey data
- Simple System Autonomy via lines networking the kite to ground control sets
- Low footprint & Lightweight ground generation (no peat digging, no road building)
- Structure and capability from wind pressure not steel
Improved Lifetime and end of life effects include
- Servicing at ground level
- Fast Low tech modular repairs
- Azimuth alignment from form
- Low ground use
- Recoverable asset
- Relocatable modules
- Lightweight & recyclable material
Improved energy supply through generation period effects include
- Large wind range with Low cut-in ~3.5m/s and storm spill, yaw, lofted or Grounded Survival mode
- Back-drive mode to stay aloft through lulls
- Rings matched to shear profile with lower blades bank optimised to increase transmission capacity
- Constant autogyro output (The only AWES to do this)
- Redeploy to match resource. Seasonal re application, travelling or adaptation capability.
- Runs in perfect kite window. Constantly in the "Kite Power Zone"
- Rotor stacking efficiency via low line drag per blade area
- Low control mass overhead improves production capacity
- Tensile network scaling means access to new higher altitude wind resources
- High deployment density especially when using Network of lift kite Networks designs
- Large swept area per blade length at high speed
- Good wake recovery pattern at tops of rotor loops encourages high Lift/Drag
Improved self efficiency through generation period effects include
- Lightweight network deployment doesn't waste energy keeping controls aloft
- Operations at ground level keep machinery requirements low
- Modular servicing small blade elements for quick swap out and remote or local repair
- Less material per kW than higher altitude AWES
- Modular deployment matches shear profile top rotor blades drive harder lower blades expand more for transmission
- Stacked rotor blades Banked to plane of rotor in upper section - the blades provide high Lift in clean air
- Stacked rotor blades Banked to plane of rotor in lower section - the blades have less pull down
- Low mass multi blade deployments match wind energy capacity For AWES extraction
- Efficient array smoothed network control
- Low blockage hollow axis stacking
They're really good eh?
-
250 Deployment Instructions for the Scout Turbine trip
Our local scouts took a Kite Turbine to Jamboree in Austria. These were their instructions.
This whole Hackaday writeup was originally inspired when our local scout troupe asked me if they could take a kite turbine to a Jamboree in Austria. Why Not?
I had entered Daisy-kite-turbine in the 2014 Hackaday prize.
After significant improvements in power, weight, portability, strength, control, data collection, deployment, smoothing, scalability, designs, efficiency ... Merit an update. The new power to mass ratio (>300W/kg flying material) meant these turbines can be incorporated into transportation, enabling energy independent vehicles. Lets do that.
I blogged my kite power adventures on windswept-and-interesting blog where I post progress on kite turbine powered transport, including e-camping, kite kayaking, e-bike cycling, e-car driving.
The kite powered e-car challenge is already going on. It's a big scary amount of power to be working with. For this project, I'm going to concentrate on something safer and more accessible.
By adding a kite turbine, I'll have an energy independent e-bike and a useful power source. Something suitable for powering a camping adventure. E-bikes have all the electro-techno-gubbins we need, a motor for regen (Yes geared hub motors too) a controller, a battery and power distribution.
Instructions
- Check your weather forecast (windy app) shows a consistent direction of wind at a safe speed (Below 12m/s or 27 miles an hour) for the whole time you intend to run the kite turbine.
- Find a good open space. Try to avoid having buildings or trees upwind of your site. They cause wind turbulence, which will considerably diminish generating performance. Setting up in short grass is a lot easier.
- Check the equipment is in good order.
- Coordinate your plan with camp organisers and communicate with base (Whats app message)
- You will be using 1 tree (Or pole) to hoist the top end of the kite turbine into Clear Air.
- Choose a good tree. It should be safe to climb and have space upwind to “fly” the hoisted kite turbine. If necessary, a hoisting line can be slung in the space between 2 trees.
- Tie the strop around a good branch and attach the hoisting line & pulleys. Ensure there is a place at the bottom of the tree to tie off the end of the hoisting line. On the ground, walk the hoisting line upwind from the branch, to a hoisting point, clear of the tree canopy.
- From this hoisting point, walk a further 17 paces (at least) upwind (toward the wind) and drive a suitable stake angled into the ground (Down end = downwind, Top = upwind)
- Drive a screw anchor into the ground about 1.5m further upwind from the stake.
- Strap the clamp (with generating wheel) to the top of the stake, with the wheel facing the tree.
- Tie the top of the stake back to the anchor with the spare length of strap.
- Plug the control cable into the motor / generator (The two arrows have to be aligned)
- Find a secure place to keep the control box while the turbine is running.
- Open the tube, remove the rods and sail bag.
- Lay the rods and sail bag on the ground near the base of the stake.
- Unroll the net of rods. Closest to stake = 1 rod then, 1 rod, 1 rod, 2 rods then 3 rods.
- Firmly hold the first single rod at both ends. Bend the rod into a ring. Make sure to plug 5cm of the thinner rod end into the socket end.
- Pull the black sleeve tight around the rod, then close the sleeve with the Velcro.
- Check the black lines are on the inside the sleeve.
- Make each of the following rings in turn. 1 rod, 1 rod, 2 rods , 3 rods.
- For the 2 and 3 rod rings, it may help to remove rods before reinserting, to make sure the sockets and plugs fully engage.
- Check the rings are free of twists, all 6 black lines run neatly between the rings.
- Connect the small end ring onto the generator wheel using 6 larks head knots.
- Remove the top lifting hoop from its bag, and make the 2 rod hoop as before.
- Check the top lifting hoop has a top cone and 6 lines for the kite ring.
- Now for the kite ring. Yay.
- Remove the kite set from the bag. Lay the kites on the ground in a radial pattern. Remove the connecting sleeves from the kite pockets and stretch the kites out, as a ring on the ground.
- Find the break and connector in the sleeve. Push the first of 6 carbon tubes into the sleeve. (These tubes will not bend as much as the rods. Carbon can be brittle when handled rough. Take extra care where you step near these tubes.)
- Inset the 2nd tube into the first and continue until all 6 tubes are in the sleeve.
- Fit the end of the first tube into the 6th tube to make the ring.
- Tighten and close the sleeve together with the fastener.
- Make sure the ring of kites is the right way up. (bridles to the bottom)
- Remove the kite line from a kite pocket and stretch it out to make sure there are no tangles in the bridling. Attach this kite line end of one of the 6 attachment points on the large ring (3 rod)
- Repeat this for the next 2 kite lines. Remember to fit the kite line onto every second attachment point. (3 kite lines won’t go onto 6 attachment points. Making sure to leave a gap)
- Bring the top lifting hoop over and lay it on top of the ring of kites.
- Attach the 6 light lines onto the 6 short white lines on the top of the ring of kites.
- Now is a good time to pull back the hoisting point, to stretch out the whole kite, so you can check each line is run smoothly and there are no twists in the hoop sleeves.
- If there is a twist, remove it. You may need to open a ring, or even remove a rod to remove the twist. Then reassemble as before without twists.
- Stretch out the central lift line. Attach the bearing end of the central lift line to the hoisting line.
- Thread the central lifting line through the top hole. Tie a figure 8 stop knot at the red mark nearest to the bearing.
- Thread the rest of the central lifting line through all of the centre disk holes.
- At the bottom, tie another figure 8 knot at the red mark near the end of the central lift line.
- Use a larks head knot to attach the central lift line to the centre of the generating wheel.
- Make sure the battery is in and turned on.
- When you are happy, and with everyone aware and standing clear; Hoist the kite with the Hoisting line. Tighten and secure the end of the hoisting line.
- The kite should now be turning cleanly in the air without any impacting.
- Congratulations, You’re one of the few people on the planet to ever have made kite power.
- Keep bags and tubes tidy. Cover the electronics with the tub. Secure the tub.
- Be methodical and tidy when reversing this procedure to put the kite away. This will help your next launch greatly by avoiding tangles.
- If Austria has insufficient winds for generation, The kite turbine can be removed from the generating wheel, repacked and replaced by the cranking handle. This will allow you to generate electricity from Scout Power.

 Wind turbine towers are massive rigid steel structures. Strong enough to resist the cantilever bending, head mass loading and generation torque. These towers have to follow cubic mass scaling (To the power of ~2.63)
Discussions
Become a Hackaday.io Member
Create an account to leave a comment. Already have an account? Log In.