Dan Julio
-
[Finally] starting to look at accuracy!
03/29/2021 at 18:56 • 0 commentsOne of my many goals with this project is to characterize the Lepton's performance and see if I can improve the stated +/- 5 - 10°C accuracy. I have finally started to make some progress in that direction.
The Black Body radiator is a gold standard for measuring an imager's performance and providing a known temperature for calibration. Unfortunately, commercial units are often very expensive limiting their availability to hobbyists. Fortunately older devices can be had - and repurposed - from places like ebay.
A collection of very knowledgeable thermal imaging enthusiast exists on Dave Jones' wonderful eevblog website and a couple of them put me onto the idea of repurposing an old calibrator designed for in-ear temperature monitors.
![]()
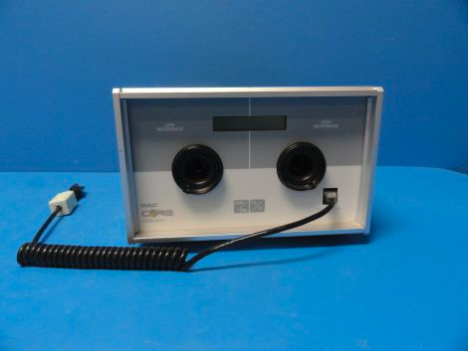
The IVAC 9000 probably sold, originally, for thousands of dollars but go for a fraction of the price in the used market. It contains two radiators precisely temperature controlled using Thermoelectric Controllers (peltier) at 26°C and 38°C. The user plugs a cable into the battery compartment of the thermometer and sticks its tip into a plastic receptacle in front of one of the radiators and the device will read the thermometer and upload appropriate calibration data. The two temperatures are picked for calibrating a device designed to measure human temperature but aren't really far enough apart for a thermal imaging camera visualizing a much larger range.
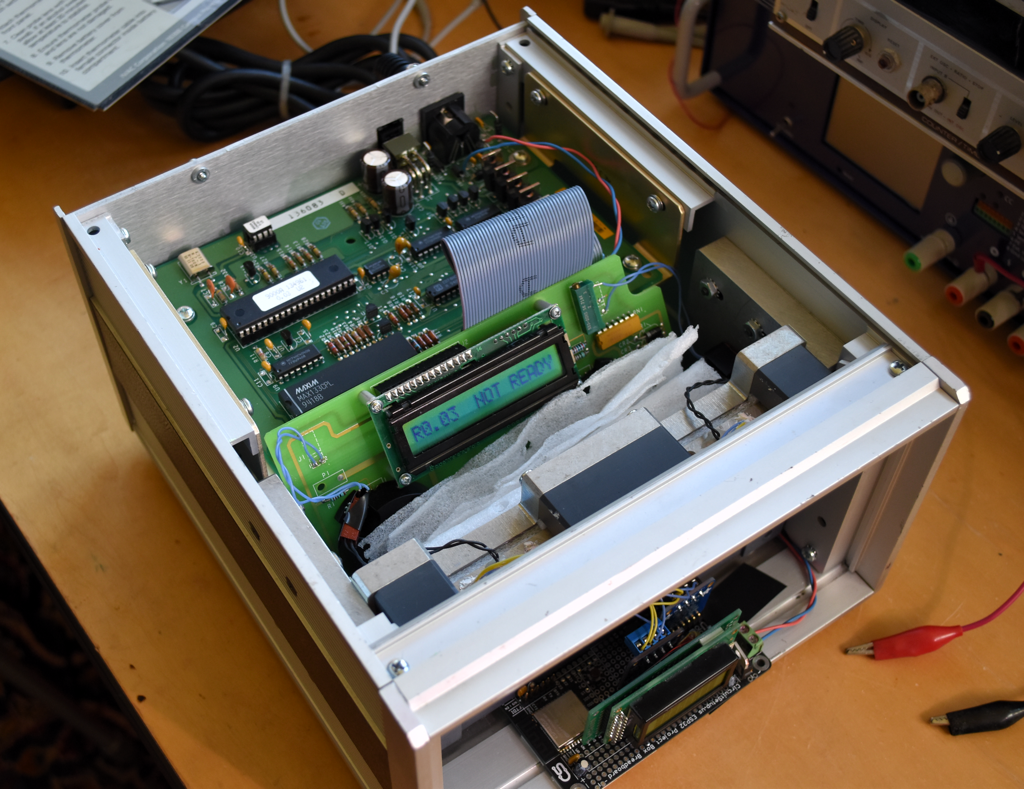
The radiators are made up of two blocks of aluminum with the TEC sandwiched in between. The front block is painted with a very high emissivity (0.97-0.99) paint and contains a thermistor. The IVAC 9000 controller uses an H-bridge to control heating and cooling of the TEC to maintain a very precise temperature.
Originally I was going to try to replace the controller with my own but another smart hacker experimented with simply adding a series resistance to one of the thermistors to trick the existing controller into maintaining a different set point. Using a multi-turn pot allows dialing in a higher temperature on the "high" side of the unit. Unfortunately adding a parallel resistor to the "low" side thermistor didn't successfully result in a lower temperature so there's probably some limit in the firmware or the physics of cooling the low side. I decided to take this tact as it was MUCH easier and to also add a precision temperature monitor that I could access remotely via Bluetooth for use in a calibration process if possible.
![]()
![]()
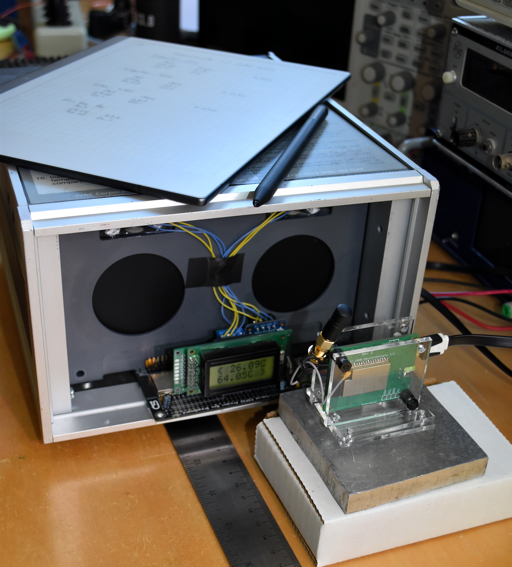
I stripped off the front panel to get a view of the entire radiator (the two circular regions in the photo above) and put the old control panel PCB inside the unit. The temperature monitor goes in front. My unit can sustain 26 and 64°C as the two temperatures which, at least, is a start.
Measuring some Leptons
With the unit up and running it was time to see how some Leptons performed. I took some quick readings of two tCam-Minis, the tCam prototype and a Flirone Pro connected to my phone.
![]()
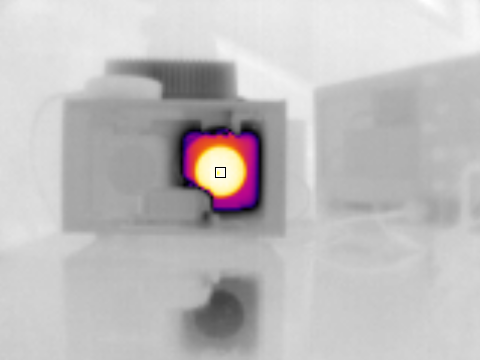
All cameras were placed about 10cm from the radiator with the spotmeter in the center of the image aimed at about the center of the radiator. Emissivity for the tCam cameras was set to 0.97 and the Flirone Pro set to "Matte" (they don't give the user precise control over the actual value). The cameras were running for at least 30 minutes before taking a measurement.
Camera Low-side (26°C) High-side (64°C) tCam-Mini-CB49 27.4 67.8 tCam-Mini-B132 25.4 64.1 tCam-62F1 25.1 63.3 Flirone Pro 26.7 67.2 Exciting to finally get data and to see it make some sense. All the cameras were well within the specified range but it will be interesting to see if a calibration can be figured out. To do that will may take the ability to more easily measure at a larger range of temperatures and to that end I'm also working on another radiator using an off-the-shelf TEC controller.
First distance measurements too
Many other conditions affect the accuracy of a measurement including humidity and distance to the object being measured. I'm not sure, for the fairly low resolution of the Lepton 3.5, that humidity plays a huge role (the camera's resolution makes imaging at the distance where humidity affects the readings hard). However distance does affect the readings as a very quick test on my lab bench illustrates.
Measurements were taken with one camera against the high-side set to 64°C.
![]()
Distance (cm) Measurement 10 68.4 30 66.4 50 65.4 70 64.4 100 63.7 ![]()
More experiments are necessary to see if this is simply energy fall-off vs. distance or if atmospheric effects are a significant part (I don't expect them to be for short distances. I also want to add some software/firmware support to improve measurements (for example controlling the Lepton's FFC since its output varies significantly after a FFC).
Overall though, I am happy to finally be at this stage of the project, where I'm not only worrying about the mechanism of a camera but about making it a more useful device by characterizing and perhaps improving its accuracy.
-
Laser-cut front/back plates for tCam-Mini
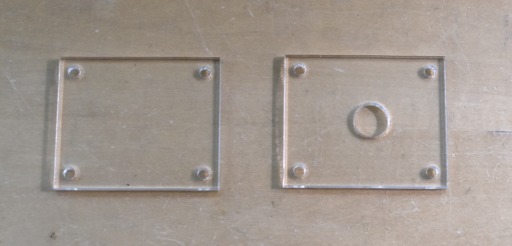
03/29/2021 at 02:40 • 1 commentA super simple set of SVG and DXF drawings have been uploaded to my github that can be used on a laser cutter to cut a pair of front and back plates out of a piece of plastic. They can be mounted with ~8mm stand-offs for the front plate and ~5mm/ stand-offs for the rear plate.
![]()
![]()
-
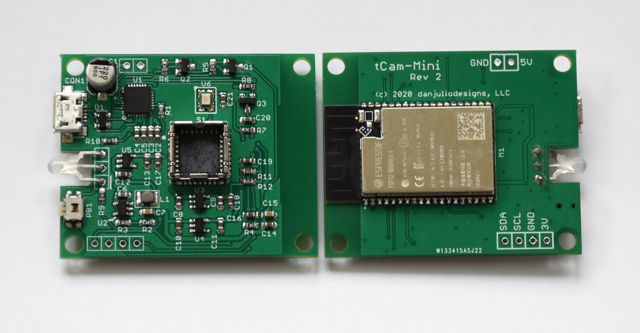
Rev 2 PCB testing
03/11/2021 at 19:19 • 0 commentsI received and tested the Rev 2 PCB design. The very minor revision was an attempt to improve Wifi performance and make it easier to mount the LED. As shown below Wifi performance is about the same.
![]()
I tested Wifi performance with three setups. One with the tCam-Mini acting as an Access Point and my laptop connected to it in the same room. A second with tCam-Mini configured as a client connected to a OpenWrt router in the same room and a third with the camera configured as a client connected to a Netgear router in a different room. I streamed data for three minutes to compute an average fps and I ran each test twice. The average values are shown below, including a board with an external antenna. There is some variability, even with three minute runs, due to Lepton FFCs that occurred while measuring.
Setup Rev 1 - internal antenna Rev 2 - internal antenna Rev 1 - external antenna Access Point 4.36 fps 4.48 fps 5.94 fps Client - OpenWrt router 4.68 fps 4.19 fps 6.34 fps Client - Netgear router 4.86 fps 4.89 fps 6.05 fps Clearly an external antenna improves performance. Interestingly the Netgear router in another room performed better than the Openwrt (fairly old mips-based chipset) in the same room.
Firmware Revisions
Rev 1.2 firmware fixes two issues that have come up during testing and board bring-up. The first was a bug where the board would not connect to an AP if its first attempt failed (it would reconnect later with no problems). The second was a hardware issue where I found the Lepton was not being left in a good condition if its external crystal oscillator took too long to startup. I found this testing alternate crystals since currently the crystal I specified is unobtanium.
I have an idea about how to improve the camera's performance in firmware. Right now a single task handles converting the Lepton data into a json string with Base64 packed data and pushing into the ESP32's network stack for transmission. If pushing the data causes the task to block then I may be able to increase performance by splitting the process into two tasks so the next frame can be converted to a json string while the previous frame is loaded for transmission.
-
tCam Web prototype
02/25/2021 at 20:10 • 0 commentsOne long-standing goal I have had for my thermal cameras was to record events such as a wildlife in our driveway at nights (we think it's pretty busy out there) by detecting parts of the image in certain temperature ranges. Sort of like a very souped up PIR detector. The cameras would act like a security webcam.
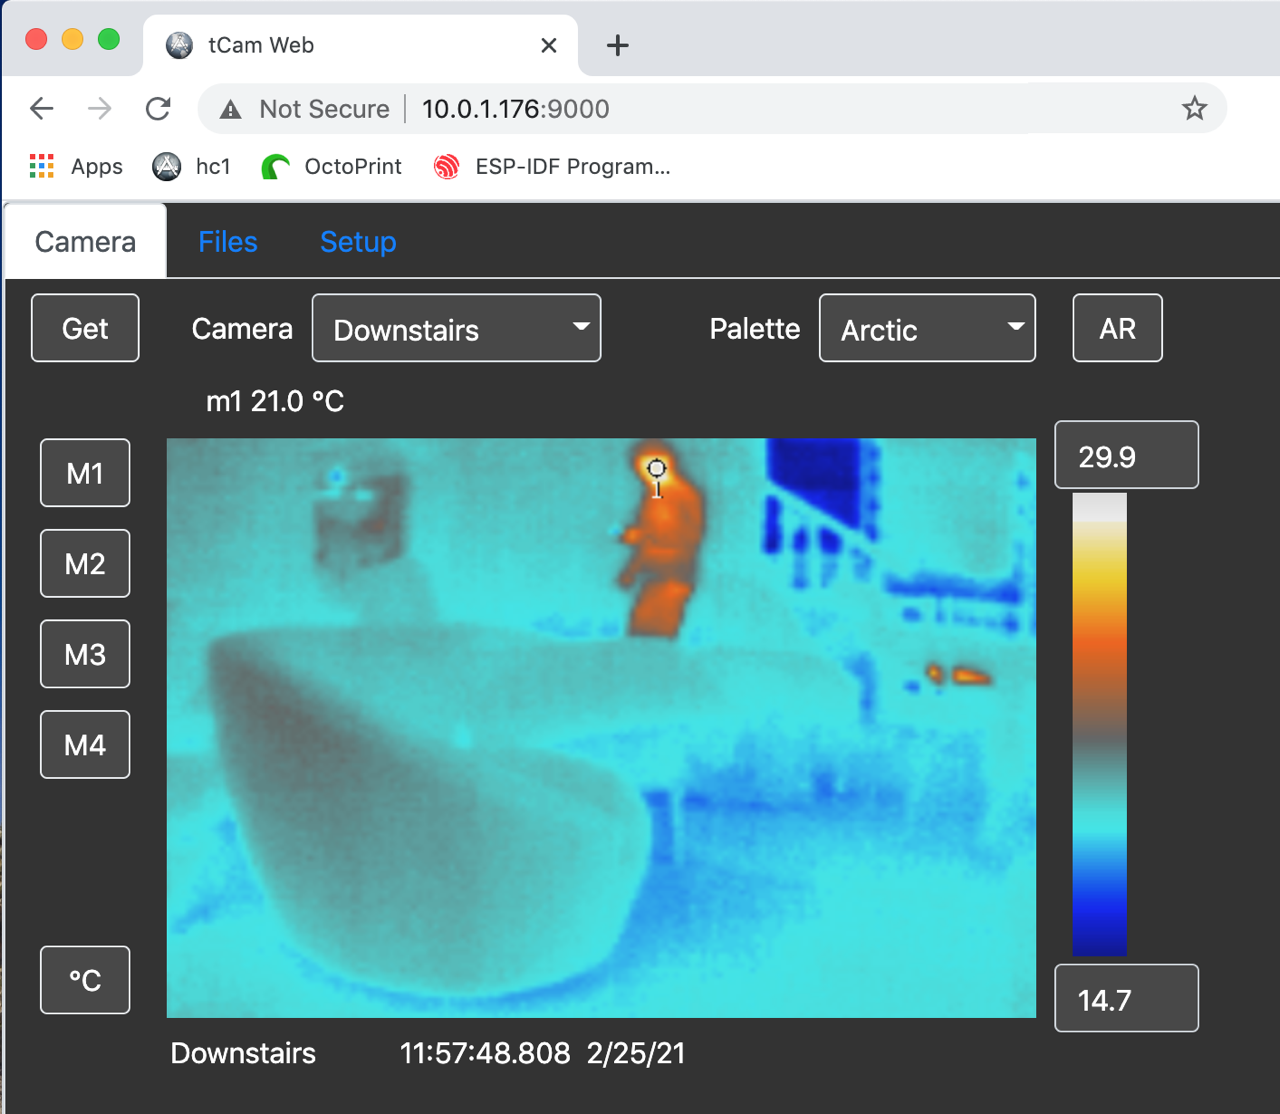
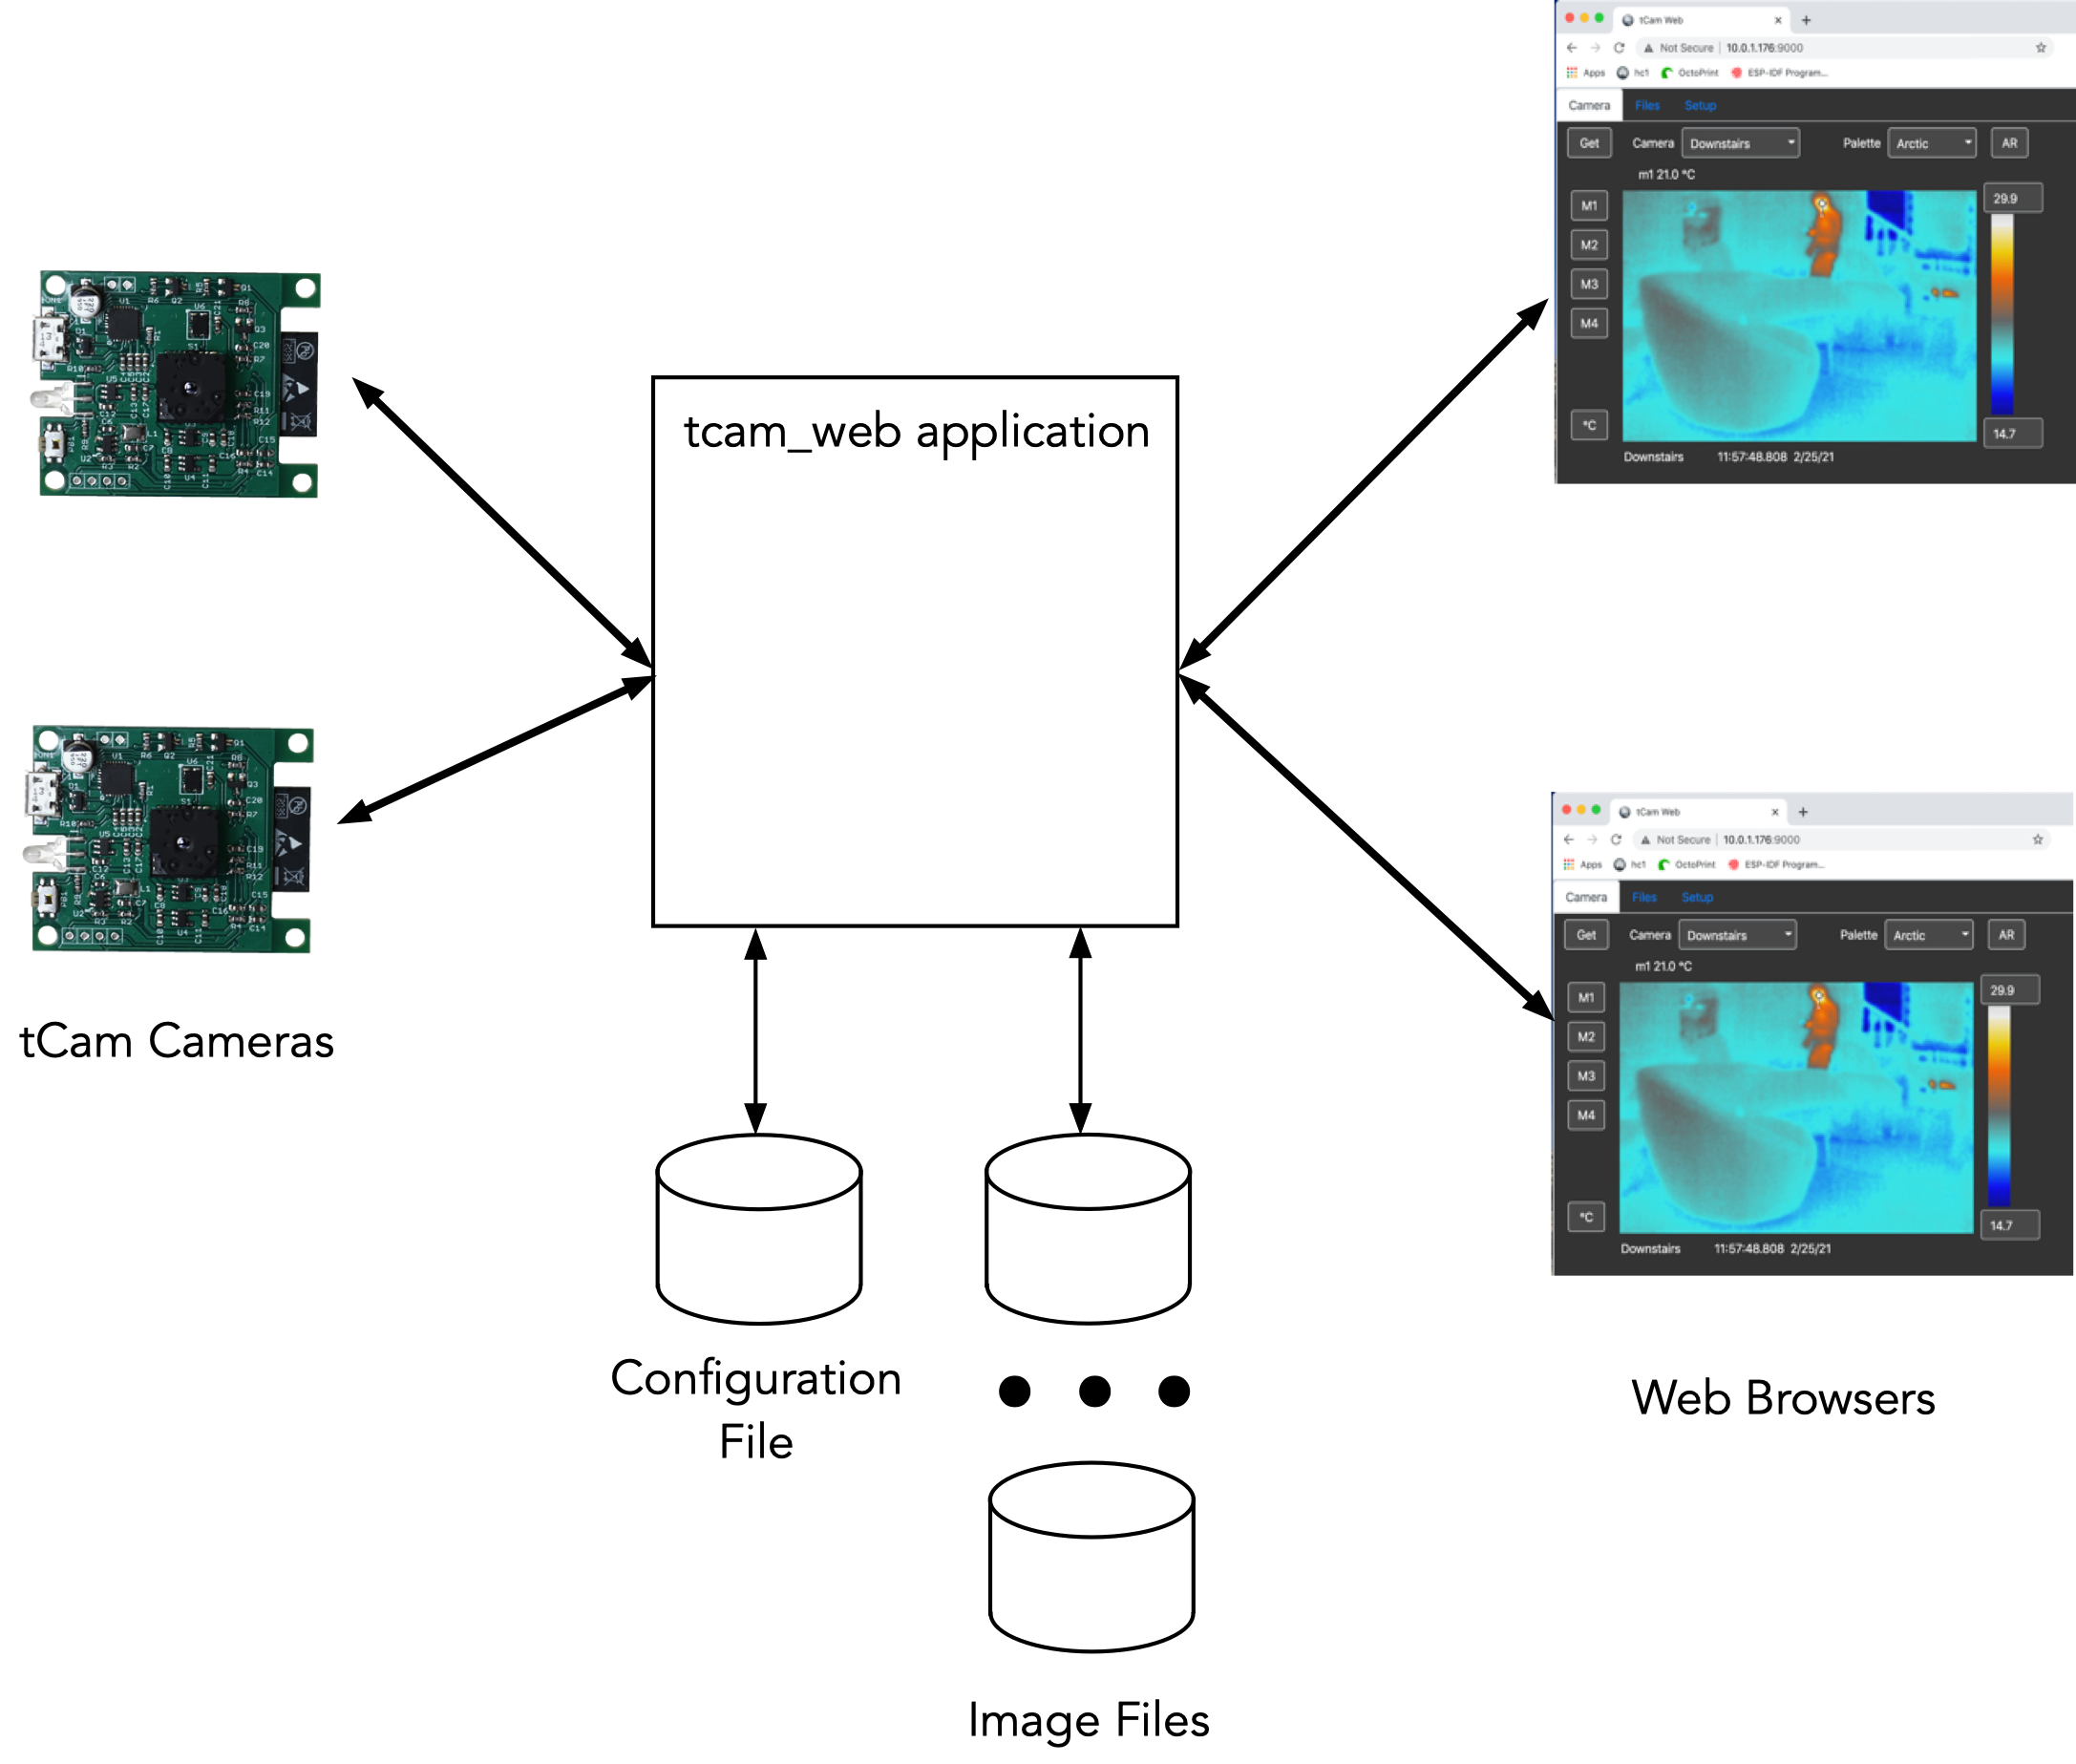
I've taken the first steps toward this vision with a prototype of tcam_web, a recording web server for tCam cameras. It's written in xojo (which has some limitations described below) and can run on OS X, Windows and either x86 or ARM7 Linux hosts (my ultimate server will be a RPi 4).
![]()
It can connect with one or more tCam cameras via a socket interface and one or more browsers via its web server interface.
![]()
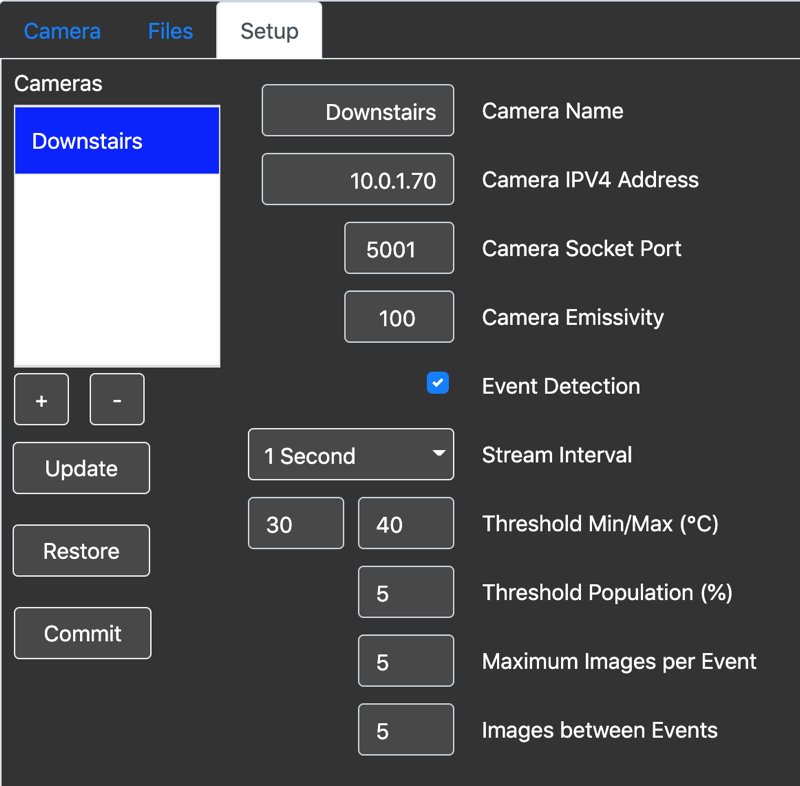
It can display an image from a camera or be configured to record images that meet certain detection criteria. To do this it enables the cameras into streaming mode and analyzes the images it receives. Right now the detection criteria is very simple. It will record an image if at least certain percentage of pixels are within a specified temperature range. I did try, unsuccessfully, to create a fast blob detector and hope to return to that at some point. The detection criteria, along with some parameters limiting how many images can be stored based on a detection event, the streaming interval and camera configuration may be setup through the web interface.
![]()
The program also allows viewing images it has stored. I intend for this application to be used in conjunction with the desktop tcam application. The desktop application can be used to analyze example images to determine the selection criteria for tcam_web as well as view and analyze images it has recorded.
The xojo development environment allowed me - someone who is not skilled in web techologies at all - to write this application fairly quickly and reusing code originally created for the desktop application. Awesome! Unfortunately while xojo is very mature and effective for writing desktop applications, its new "Web 2.0" API is still slow and a little buggy. The way it renders may be good for controls but is not so good for images. I had hoped to be able to stream images from the camera to the web browser but without learning a bunch of web stuff and digging into their Web SDK that doesn't seem possible. It takes a significant fraction of a second (and, apparently a couple of communication trips back and forth between the browser and application) to load a single image. So right now you can just manually load one image at a time. Also the code is currently single threaded and I suspect to handle more than a couple of cameras I will have to break that task into its own thread or process using their worker class.
Eventually I want the application to be able to email or text (via twillio probably) an image when it has a detection event.
Once the application has been debugged for a bit I will post binaries for the different platforms to github.
I also plan to marry a tCam-Mini with my Solar MPPT charger for deployment in our lower driveway as soon as some snow melts. I'll have the tCam-Mini report the charger's status as its own battery status.
-
tCam-Mini is a Group Gets campaign!
02/18/2021 at 20:13 • 0 commentsInterested in a tCam-Mini and don't want to wire one up yourself? I've been working with the folks at Group Gets and tCam-Mini is a campaign! If successful then they'll build a run of boards with their US-based CM for the backers. If super successful then it might become an on-going product available in their store.
Work continues on software support including a simple web server that can detect images with certain temperature ranges and record images and a python library to make interfacing with the tCam cameras easy. -
Protecting the Lepton Outdoors
02/14/2021 at 00:20 • 0 commentsI have been researching lenses for thermal imaging cameras recently because one goal is to put a camera outdoors in a weatherproof enclosure streaming to software looking for heat signatures of wildlife crossing in front of the camera. But because traditional glass and plastic materials are opaque to LWIR radiation the thermal imaging camera senses, other materials must be used. Expensive materials! Searching for lenses made with the materials Flir recommends in the data sheet such as Germanium and Gallium Arsenide return results that cost far more than the Lepton itself. Many of these lenses also can magnify or change the focal length, capabilities that may not be needed for simple applications where all one wants to do is protect the sensor.
Further research took me to the EEVblog forums and some of the incredibly smart members there. They were discussing this stuff way back in 2013 and 2014 if not sooner. There I learned that materials like Polyolefin (shrink-wrap) film and even common kitchen materials such as cling wrap or plastic sandwich bags are very transparent to LWIR.
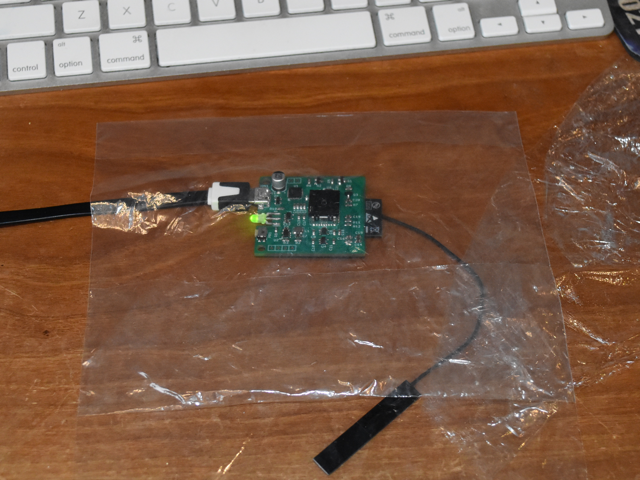
A very quick experiment was somewhat promising. My "super scientific" setup is shown below.
![]()
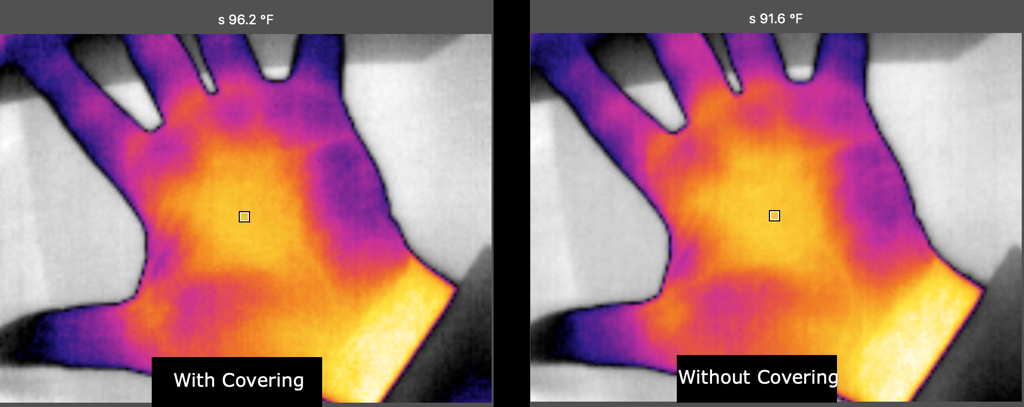
The camera can still take a good image but computes a different radiometric temperature. I suspect reflection from the camera's own internal heat from the plastic bag. The more expensive lenses have anti-reflective coatings.
![]()
A single layer of cling wrap resulted in a slightly smaller difference, less than 4°F.
Obviously one wouldn't want to use cling wrap to protect against flying debris but with some kind of shroud or other structure could be quite useful for an outdoor thermal camera.
I didn't test but read that Flir sells Polyolefin protectors. I plan to obtain and test some Polyolefin sheets as well, preshrinking them over a frame that could be mounted in front of the sensor.
Finally, an interesting link I found while researching.
https://infraredtraininginstitute.com/thermograpahy-information/
-
Easier to build tCam-Mini
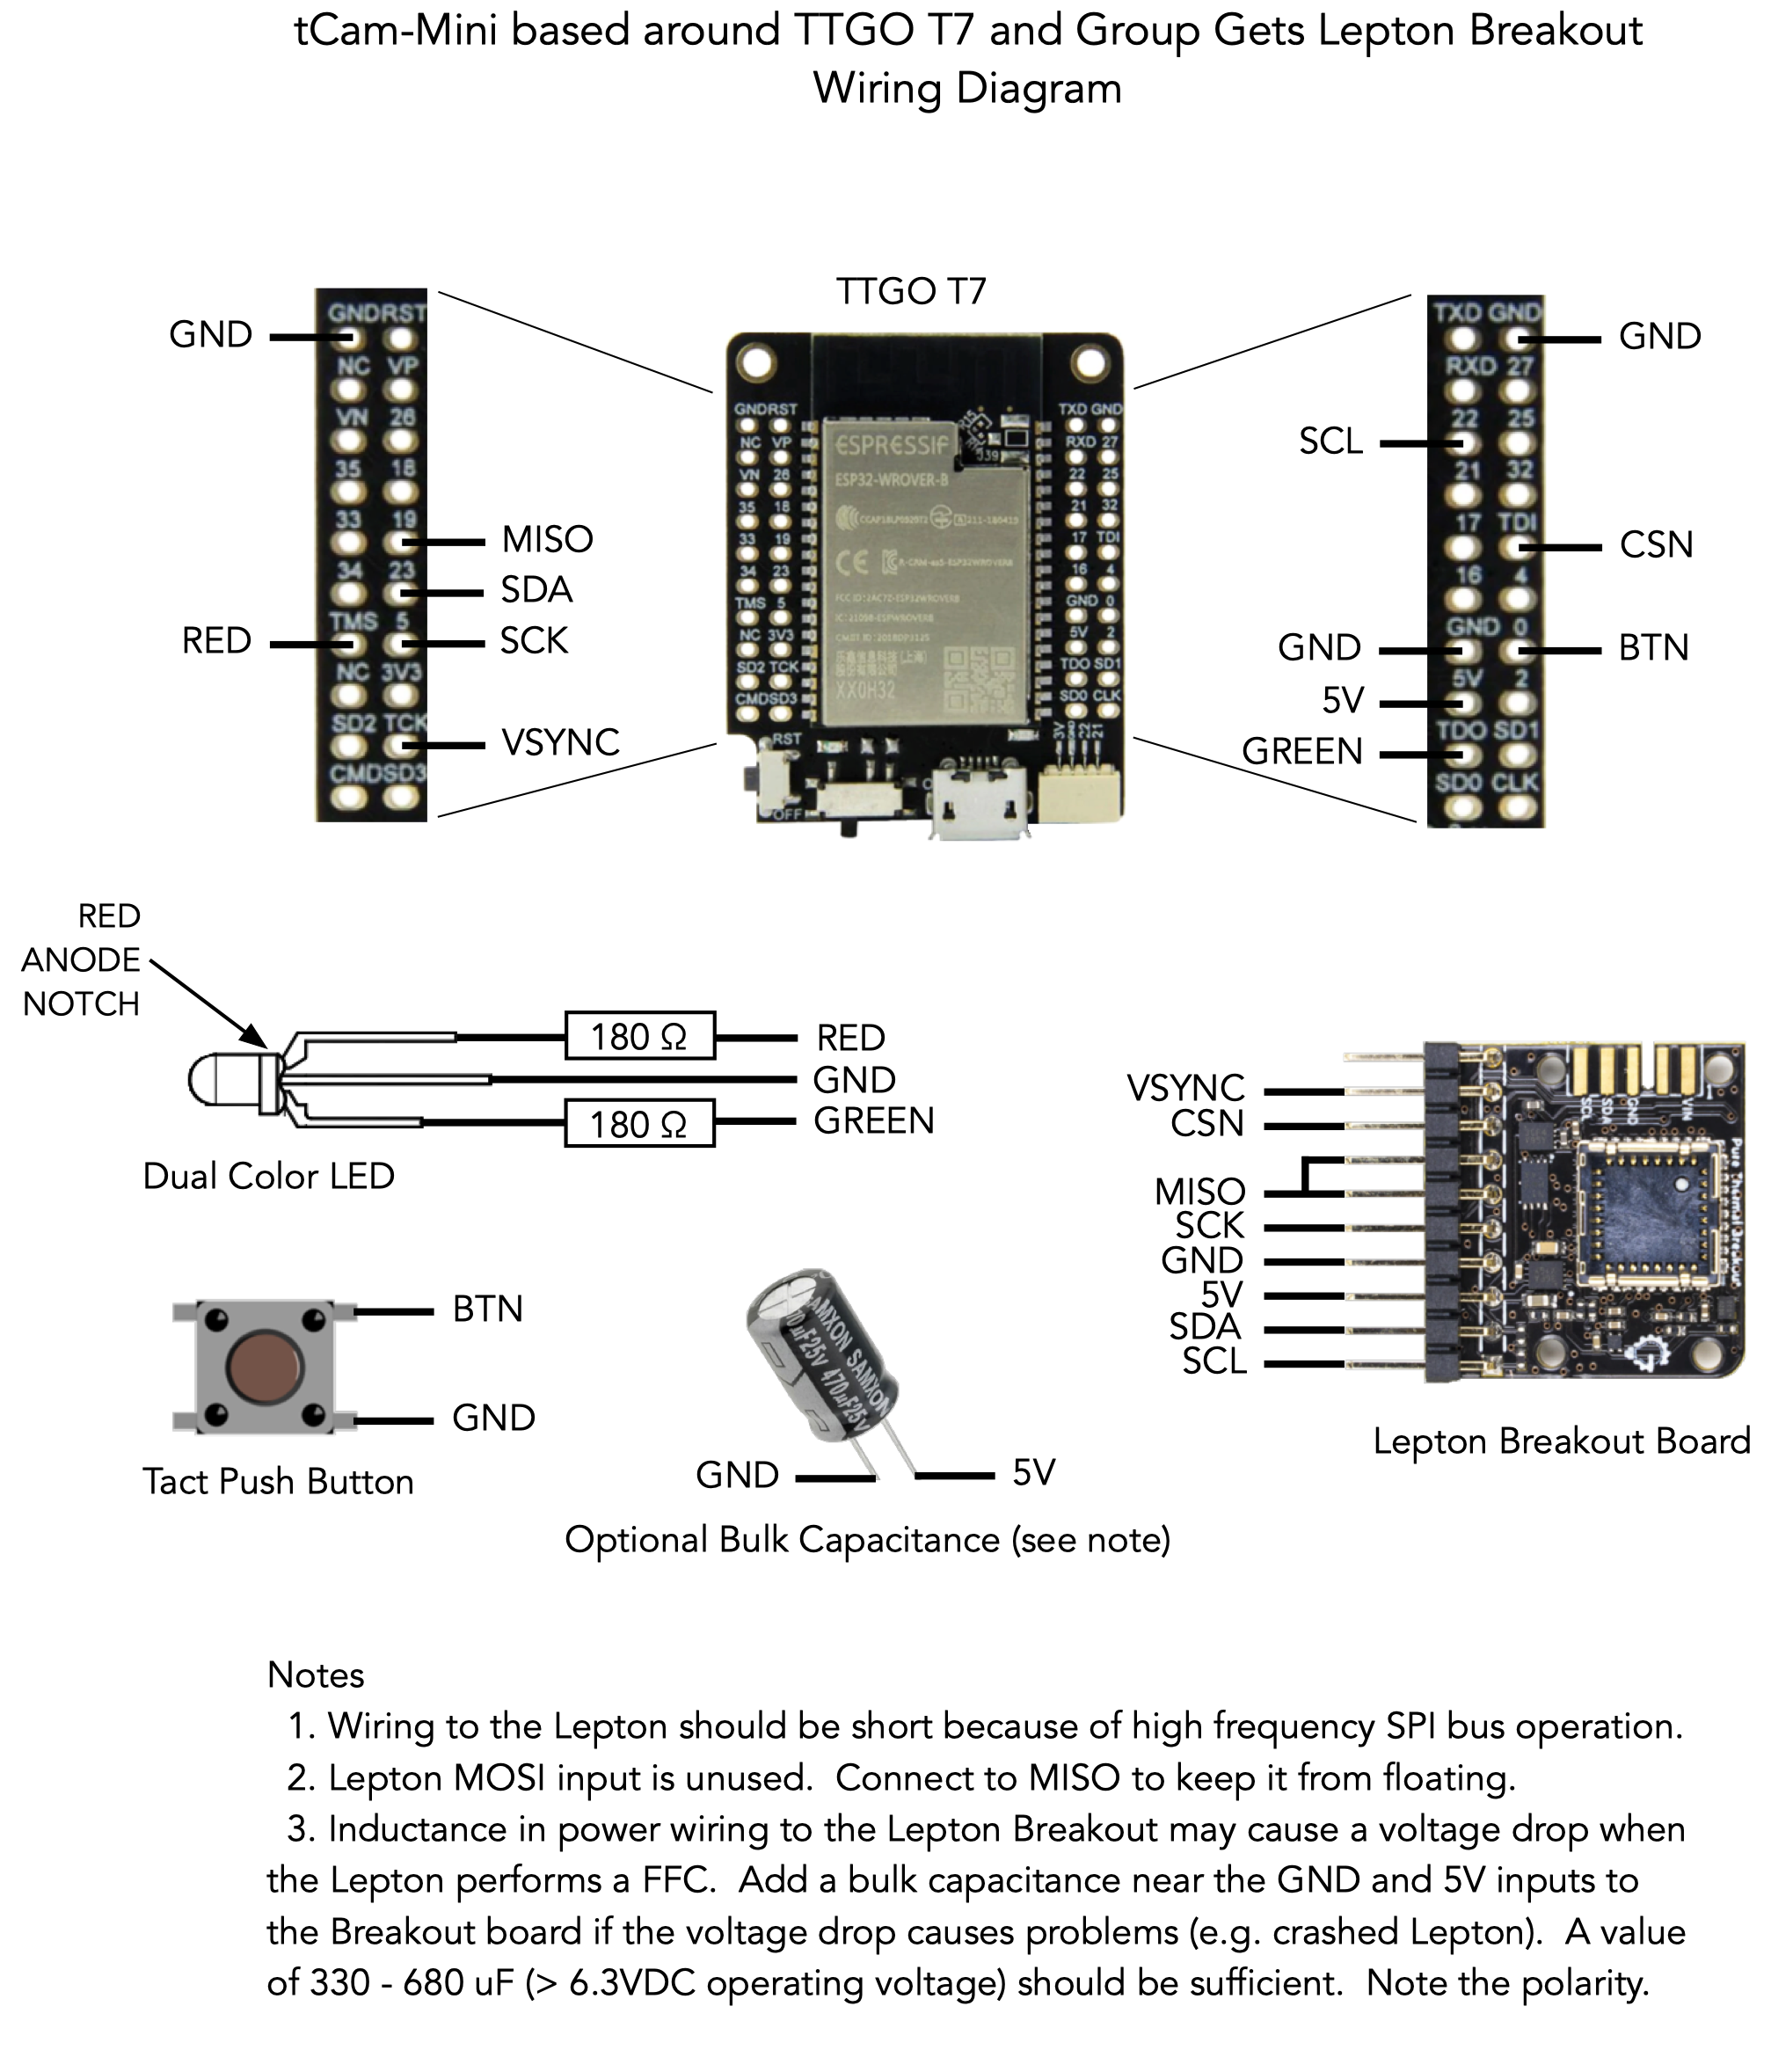
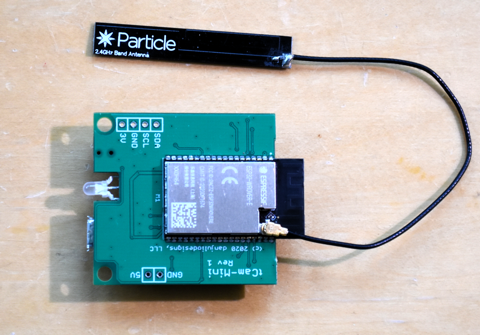
02/07/2021 at 18:42 • 0 commentsI found the TTGO V7 V1.4 ESP32 WROVER based development board long after I started tCam-Mini but it's a good way, along with a Lepton Breakout from Group Gets, to even more easily build a camera without having to make and load a PCB. The PSRAM is already part of the WROVER module simplifying the build considerably. Just need to add a button, dual-color LED, pair of resistors and an electrolytic capacitor.
![]()
Wiring is very straight forward.
![]()
Two things to note about using the TTGO board.
- It may have only 4 MB of Flash. This is sufficient for the code but I use an 8 MB version on the PCB. If you use the Espressif Programming tool to load precompiled firmware you will need to correctly specify the Flash size (see instructions in the "programming" directory on github).
- It may have an older revision ESP32 chip. My TTGO board had a Rev 1 chip. I specified a module for the PCB that has a Rev 3 chip and I built for that revision. If the board won't boot (you can see an error message in the serial output) then you can try the version of the precompiled firmware I made for the Rev 1 chip also in the "firmware/precompiled" directory at the github repository.
-
tCam-Mini and Desktop App pushed to GitHub
02/04/2021 at 22:02 • 0 commentsBig news today. I pushed the design and code for tCam mini to the github repository (new section: ESP32).
I've also been busy putting the finishing touches on the companion desktop application and binaries for it are also available. Lots of bug fixes and three useful new features.
- Support for video files comprised of multiple radiometric images from the camera. The tCam stream function can now stream at different rates enabling time lapse thermography.
- Radiometric markers to monitor temperature in more than one location in a scene.
- Graphing of the spotmeter and radiometric markers over time.
The menu bar on the main window also got a slight layout change so it looks better on Linux (the app runs on OS X, Windows and Linux).
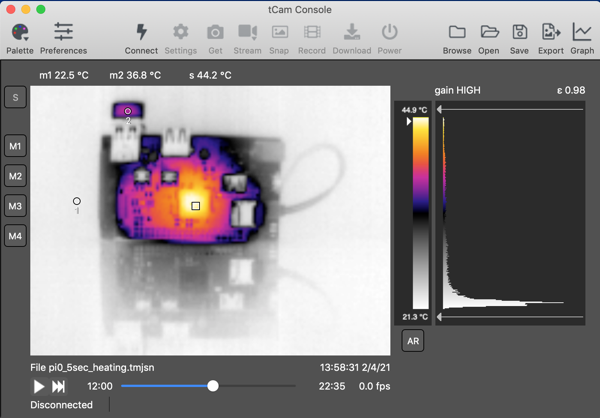
![]()
Graphs can be made from real-time streaming data coming from a camera or they can be made from a video file. In this case from the file "pi0_5sec_heading.tmjsn" that was created from a streaming session with an image every 5 seconds of a Pi 0 mounted on my Pi Platter heating up and then cooling down.
![]()
Finally I added a U.FL connector to my prototype board and tested with an external antenna. It provides better performance (higher streaming rates). I can now get between 6-7 frame-per-second which may be near the limit of the ESP32 WiFi/network stack.
![]()
-
Software progress & Antenna questions
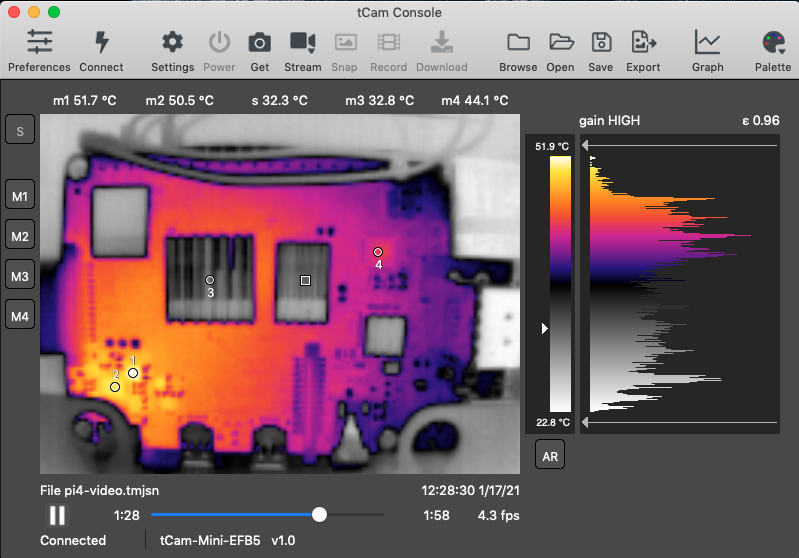
01/17/2021 at 20:09 • 0 commentsSome time over the holiday let me make quite a bit of progress with the tCam-mini firmware and desktop application software. A little more testing and I'm ready to post the v1.0 tCam-mini firmware to github, along with the rev 1 hardware design. Along with some cleanup the main change was to add the ability for the streaming enable command to include a mSec period between images and a maximum number of images. This change was made to facilitate the upcoming graph function in the desktop application.
The desktop application got a lot of work. Aside from slight UI modifications and various bug fixes the main changes include
- Support for radiometric data file vides and a new video file format (.tmjsn extension) that allows real-time playback of series of radiometric images.
- Up to four radiometric markers allowing sampling the temperature in more places than just the spot meter alone. These will also be used for the graphing function.
- A more accurate frames-per-second readout for streaming and video playback.
- Application and file icons
- Filetype registration with the OS so double-clicking an image or video file opens the application and displays the file.
- Drag and drop support. Dragging an image or video file onto the application automatically opens it.
![]()
I hope to be able to add a graphing function over the next couple of weeks that will complete the version 1.0 release of this application so that the temperature of multiple points can be plotted over time.
I also did a lot of analysis of the firmware running on tCam-mini to try to understand why streaming performance varied so much. I moved the Lepton readout task to be the only task running on the the APP (CPU 1) processor. I also had to increase its priority but it is capable of keeping up with the Lepton's ~9 fps output rate with no problem. The command processing and response tasks running alongside the WiFi stack on the PRO (CPU 0 processor do not require a lot of processing time. The largest chunk of time is spent converting the binary radiometric and telemetry data to Base64 for inclusion the the json packet sent over the interface but that's only a few tens of milliseconds.
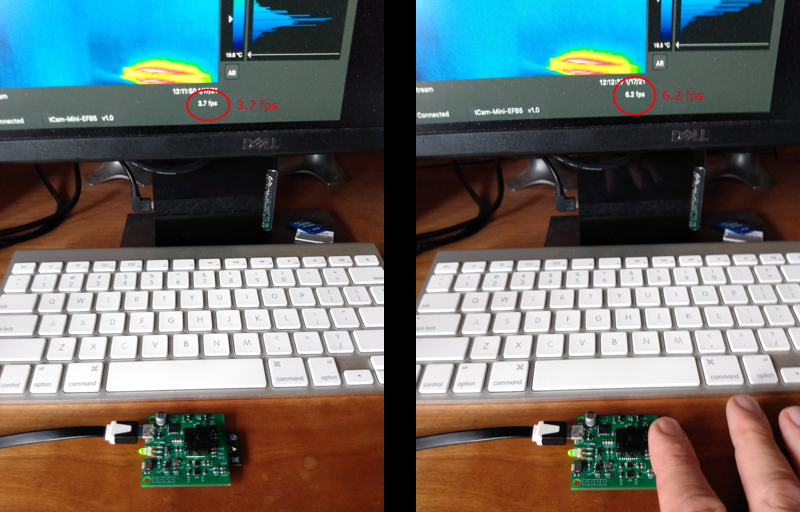
The biggest variability comes from the system as it tries to send the data over the WiFi interface. I see times from about 100-400 mSec per image (~55k). This lead me to wonder about the antenna on the ESP32 module. Sure enough things like position of the device in space and my finger touching the module made huge differences.
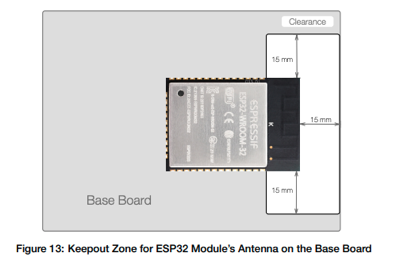
The ESP32 hardware design guide has this to say about PCB layout.
![]()
I had knowingly violated that spec with my layout to keep the board size down. However chopping off the two little PCB wings designed to help mount the board had no effect - unlike my finger as can be seen in the almost double frame rate shown below.
![]()
I am still at a loss but think that I will use an external antenna in the future connected via a U.FL connector on the ESP32 module.
Up next is to try to finish version 1.0 of the desktop app, more testing and then upload everything to github in case anyone also wants to build a tCam-mini. I will also have a couple of extra assembled PCBs that I'll either sell directly or on tindie.
-
Lepton flat-field measurements
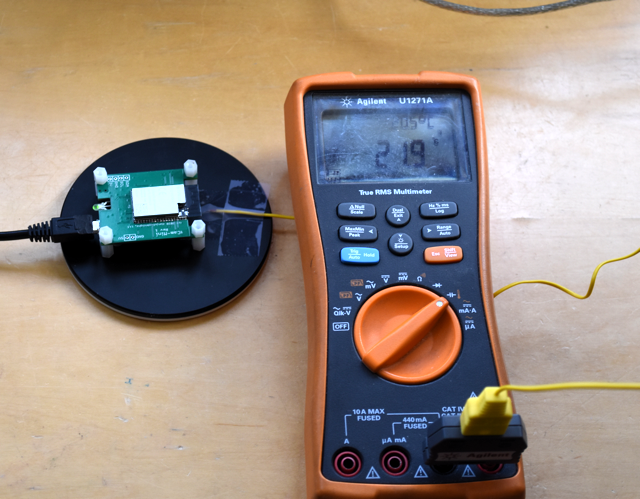
12/26/2020 at 18:56 • 0 commentsThe histogram output lets us look a little at the Lepton 3.5's internal operation. I put the sensor just above a flat black metal surface (emissivity approaching 1.0) that has a reasonably constant temperature (~21.9°C at the time of measurement).
![]()
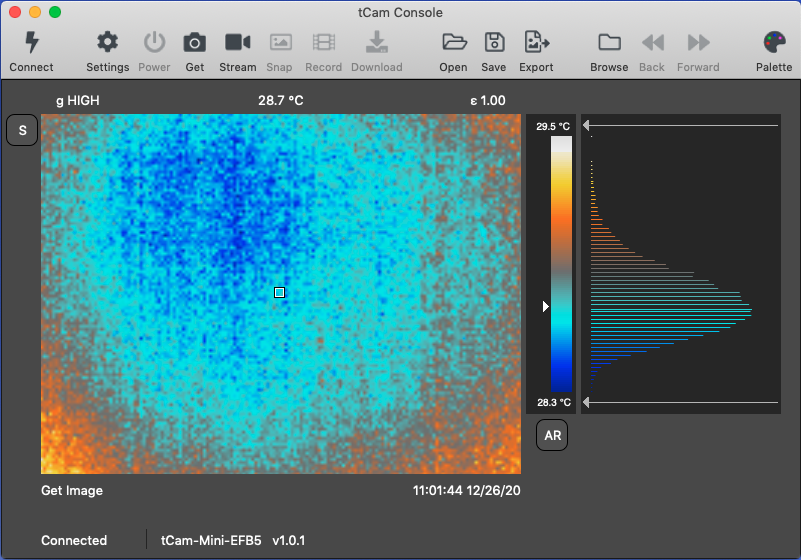
The default operation is Radiometry enabled - TLinear output so that every pixel value from the Lepton is an absolute temperature with resolution of 0.01 K. After letting the sensor run for about 30 minutes the output looks like this.
![]()
There appears to be a temperature gradient across the surface of the sensor. Perhaps the outer areas are prone to absorb radiant heat being generated by the Lepton and the ESP32 module on the other side of the board. I won't claim that this setup is incredibly accurate but the temperature measured by the thermistor on the surface is different than the temperature reported by the Lepton by more than the +/- 5°C accuracy claimed in the spec sheet. At some point I'd like to make a temperature controlled black-body radiator for some more precise accuracy measurements. This might allow additional calibration factors to be applied on a per-sensor/camera basis for improved accuracy.
The software's data processing algorithm scales the radiometric data to 8-bits to simplify display through the various look-up tables. This accounts for some of the quantized look of this histogram data as the 120 possible radiometric values for a 1.2°C delta between minimum and maximum pixel temperatures is being displayed in a 256 point field. However it appears the Lepton's internal algorithm may be slightly reducing the resolution as we only see 60 bin values.
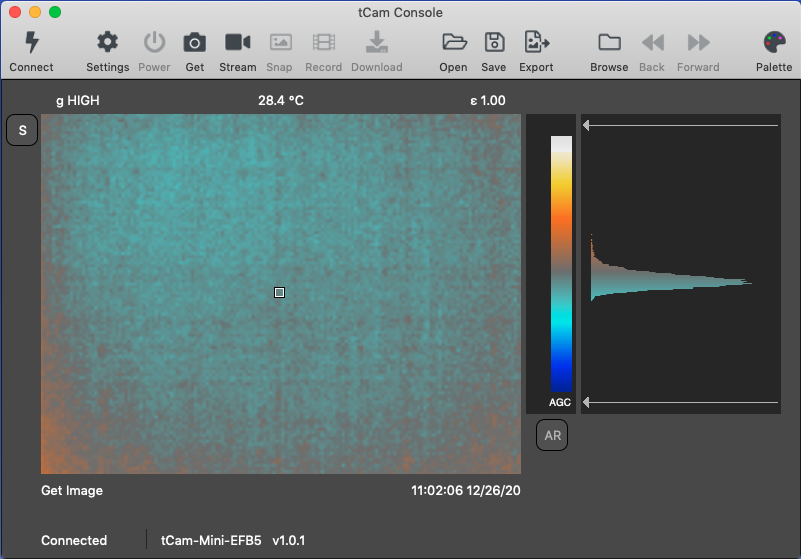
The placement of the ESP32 behind the Lepton maybe a source of error in this design if it causes a thermal gradient to appear across the camera. I'm not sure this is the case however because over the course of many images I have not seen a constant gradient and usually the coldest part of the image is more-or-less centered.Interesting, also, to see what effect AGC has on the output data. This image was taken only seconds after the one above.
![]()
Lepton 3.5 Thermal Imaging Camera
Documenting my experiments with the FLIR Lepton 3.5 thermal imaging camera.