Close
0%
0%

Talking Glove

Human-computer interface to help non speaking people to actually talk!

Similar projects worth following
My human-computer interface project is a simple yet useful lifehack. It was taught to be a way to help nonspeaking people, to take advantage of day life technologies and actually talk!. Eye contact is essential when talking. Multiple methods for mute people to express themselves are outside, devices of US$100+, that are not easily accessible to people in many different communities. Even in developing countries, It’s easier to have access to a cell phone than to dignified health. with that in mind I made a keyboard glove which connects to a cell phone, and an app to receive the keyboard inputs and reproduce it louder. Also, to have some predefined, common and repetitive phrases to reproduce them with a single touch, and finally, to help deaf people too, a functionality to convert to text what other people are saying.

A project for the Human Computer Interface Challenge hosted by Hackaday, to help mute and deaf people to talk

Presented by Alexander Fuentes, on 8/26/2018

My human-computer interface project is a simple yet useful lifehack. It was taught to be a way to help nonspeaking people, to take advantage of day life technologies and actually talk!

This also allows to have a phone or virtual meeting conversation by connecting it to a computer. In searching for a single word to define it, the world leads me to thing in “inclusiveness” given into account that this is one of multiple approaches to help despaired people.

Even in this social network connected world, people seems to be not aware of problems like muteness. Would it be because the main way to communicate in social networks is through texting? Or because the majority can just speak? Remembering a great story that I found on a blog, the author says: “At the end of the day, I’m still a person, I just can’t speak, treat us as people, not glass or pariahs.”(A).

Eye contact is essential when talking. Multiple methods for mute people to express themselves are outside, devices of US$100+, that are not easily accessible to people in many different communities. So, how can I use simple materials and cheap technologies to make an accessible solution? Even in developing countries, cell phone access is massive. According to GSMA Mobile Economy report of 2018, the mobile phone penetration rate in Latin America is 76% (B). It’s great but in other side it’s sad because it reveals a truth: It’s easier to have access to a cell phone than to dignified health, and it includes good devices to help despaired people. While some gets excellent attention, most depends on others to have at least the basic.

With that in mind, a working solution may be one that uses a cell phone.

I can actually type something in my cell phone and have it reproduced louder, but since I can’t assume the other person will fully understand my efforts to express myself, what if I need to talk to someone?

I can use my cell phone to reproduce louder what I type, but I ‘ll have to use both hands and restrict the essential contact needed on a conversation, so what if I can have a keyboard at a single hand that I don´t need to keep an eye to? If so, I can type to my cell phone with that hand and with the touch of a button, have it reproduced, while my other hand is free to do anything.

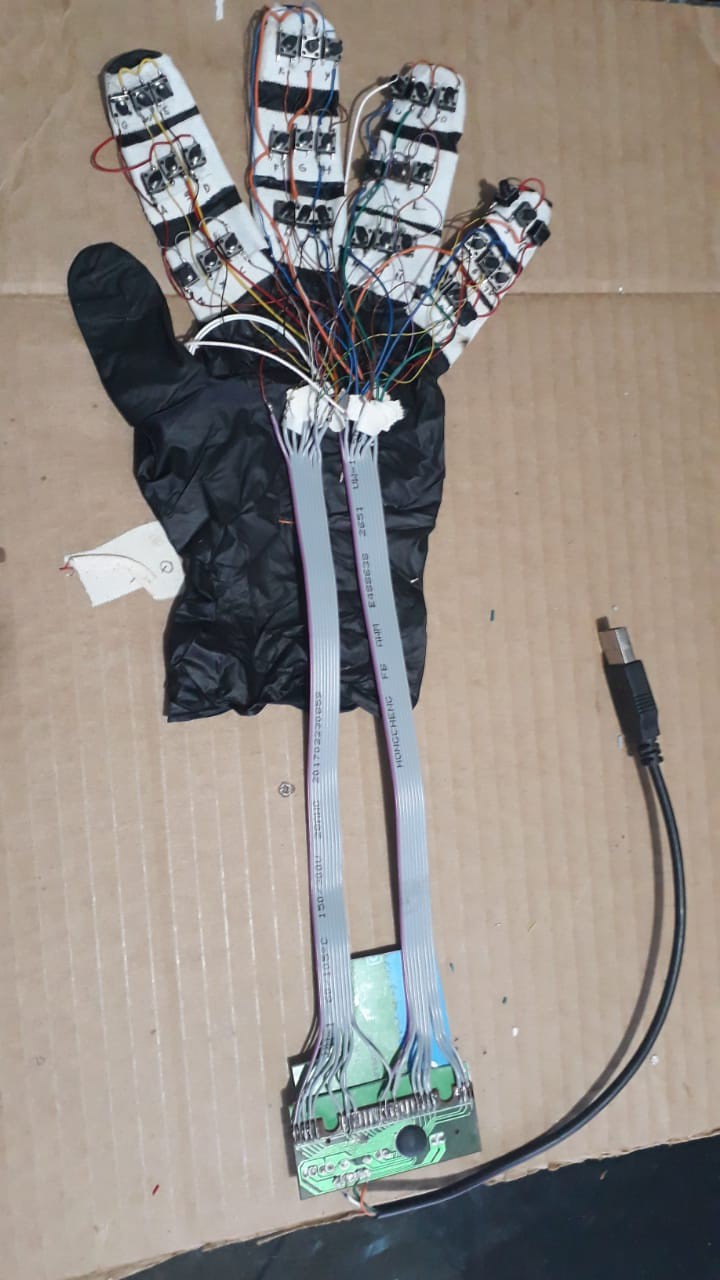
With that idea and solution, I grab a computer keyboard, a glove, some cables and my cell phone. Dismounted the keyboard and mapped the characters needed, wired the terminals of the keyboard PCB and soldered them to a bunch of buttons and glued the buttons to a glove. Connected the keyboard’s USB cable to my cell phone and opened an app. It works! I can type with a single hand!

Making use of MIT App Inventor(C), I created an app to receive the keyboard inputs and reproduce it louder. Also, to have some predefined, common and repetitive phrases to reproduce them with a single touch, and finally, to help deaf people too, a functionality to convert to text what other people are saying.

My prototype talking glove is working normally, but I don’t want to stop here, I’d love to have the opportunity to improve and produce it, since it has a great potential and is not all that expensive. I made it with recycled parts. I know it can be way helpful for people with that necessities and for many creative people who can find new ways to use it. I just have in mind what I would do if me or my family lose the voice one day, I’d surely look or do something like this.

Reference to external sources:

A: https://silenceoftwoworlds.wordpress.com/life-as-a-mute/

B: https://www.gsma.com/mobileeconomy/latam/

C: http://ai2.appinventor.mit.edu/about/termsofservice.html

D: https://source.android.com/legal

Talking Glove - Design File.fzz

Design File (Made in Fritzing)

fzz - 62.43 kB - 08/27/2018 at 21:29

Download

talking_glove_v1.apk

Android application

Android Package Archive - 2.61 MB - 08/27/2018 at 21:17

Download

  • 1 × Nitryle Glove
  • 32 × Cable Thin and multi colored cables; 20 cm each
  • 40 × Pushbutton (For prototype only; can be changed for an even smaller button)
  • 1 × Flat flex wire with 20 contacts; 20 cm
  • 1 × OTG Connector

View all 6 components

  • Protection

    Alexander Fuentes08/27/2018 at 21:51 0 comments

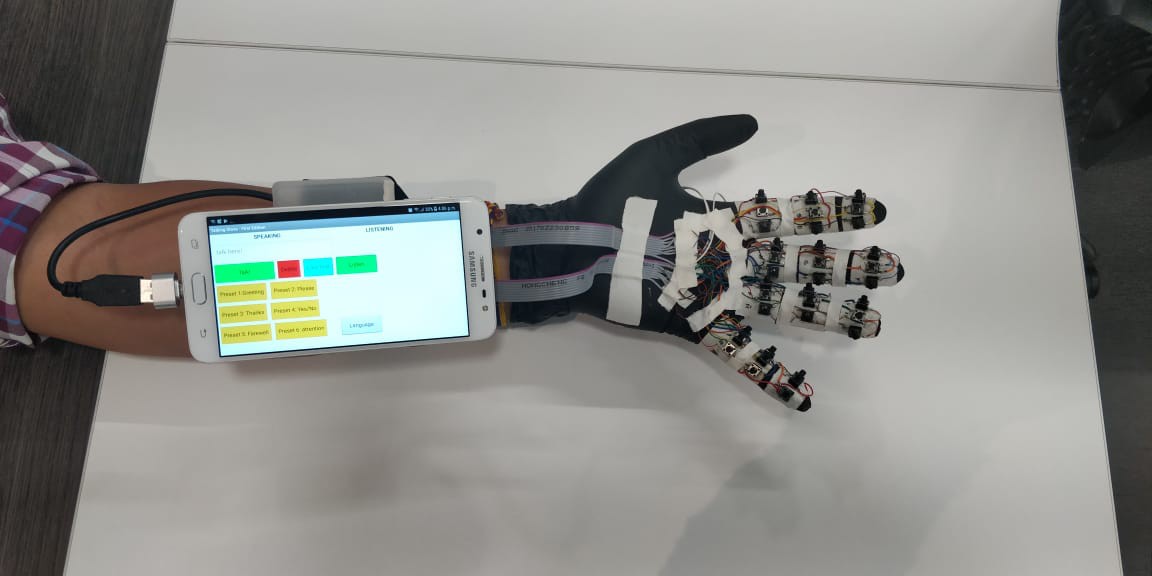
    The keyboard PCB should be protected from accidental movements as most times it’s a cheap piece and will break easily and the soldered contacts will be easily detached, so I protected it on a small box.

    This box should be tied to a wristband, to fix it in the arm, and it should have a way to secure the cell phone above it. I used a popsocket which is easily detachable and will hold the phone secure.

    If the keyboard PCB is wired or not, then an OTG connector should be used to connect the cable to the cell phone’s micro USB port. If wireless, the keyboard will bring a little dongle which should be connected to the OTG.

  • ​ Glove buttons positioning

    Alexander Fuentes08/27/2018 at 21:49 0 comments

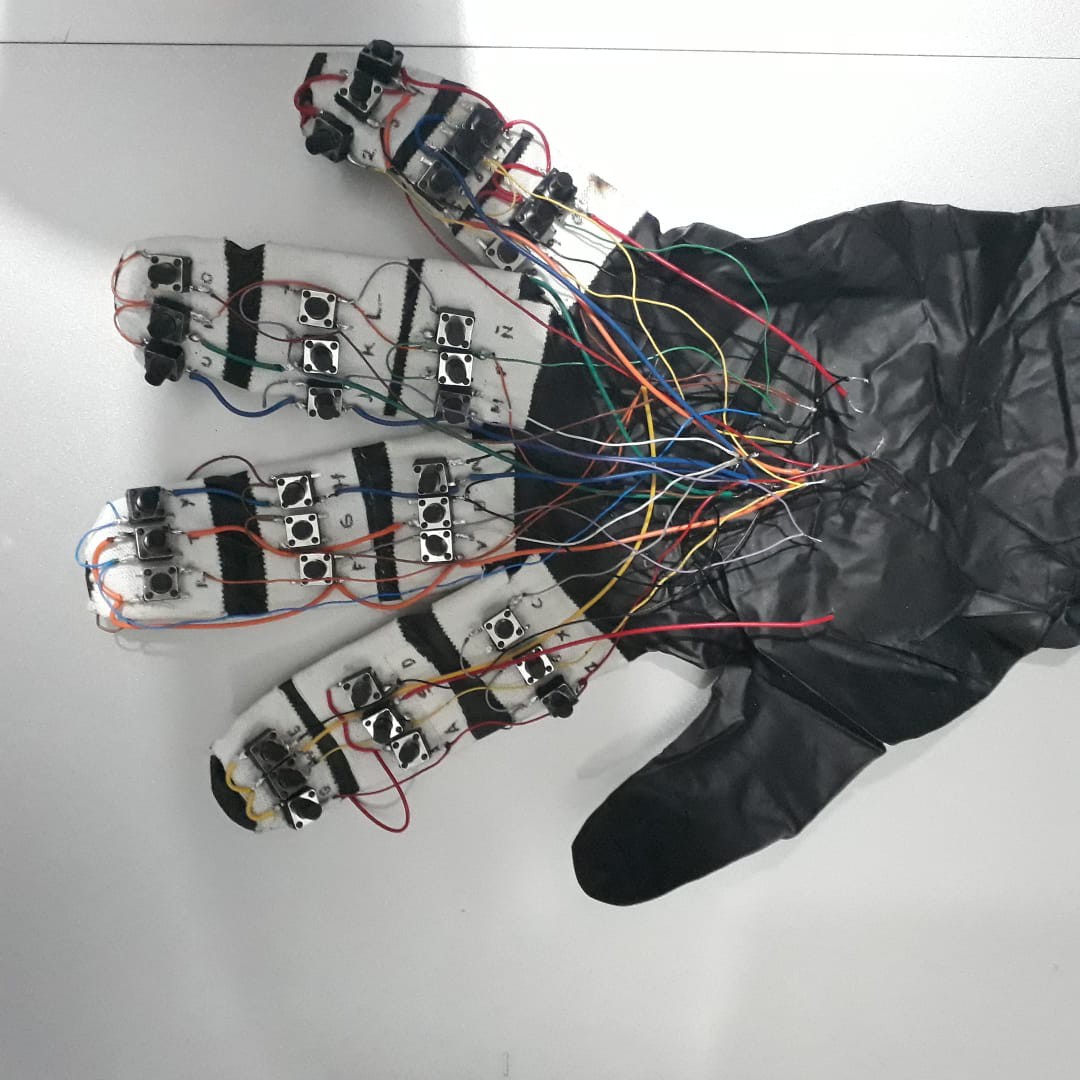
    Glove buttons positioning: The button positioning on the working prototype was according the size and shape of it and how much I’ll have to move my thumb to press them. A standard can be set for final models hoping that smaller buttons can be used.

    Buttons were not glued directly to the glove, to avoid damages when soldering, also because I used instant glue which can crystalize the glove and make it breakable easily.

    The length of the wires coming from the buttons should be set at a point close to the wrist, then soldered to the cables coming from the keyboard PCB.

  • Keyboard Character Distribution

    Alexander Fuentes08/27/2018 at 21:47 0 comments

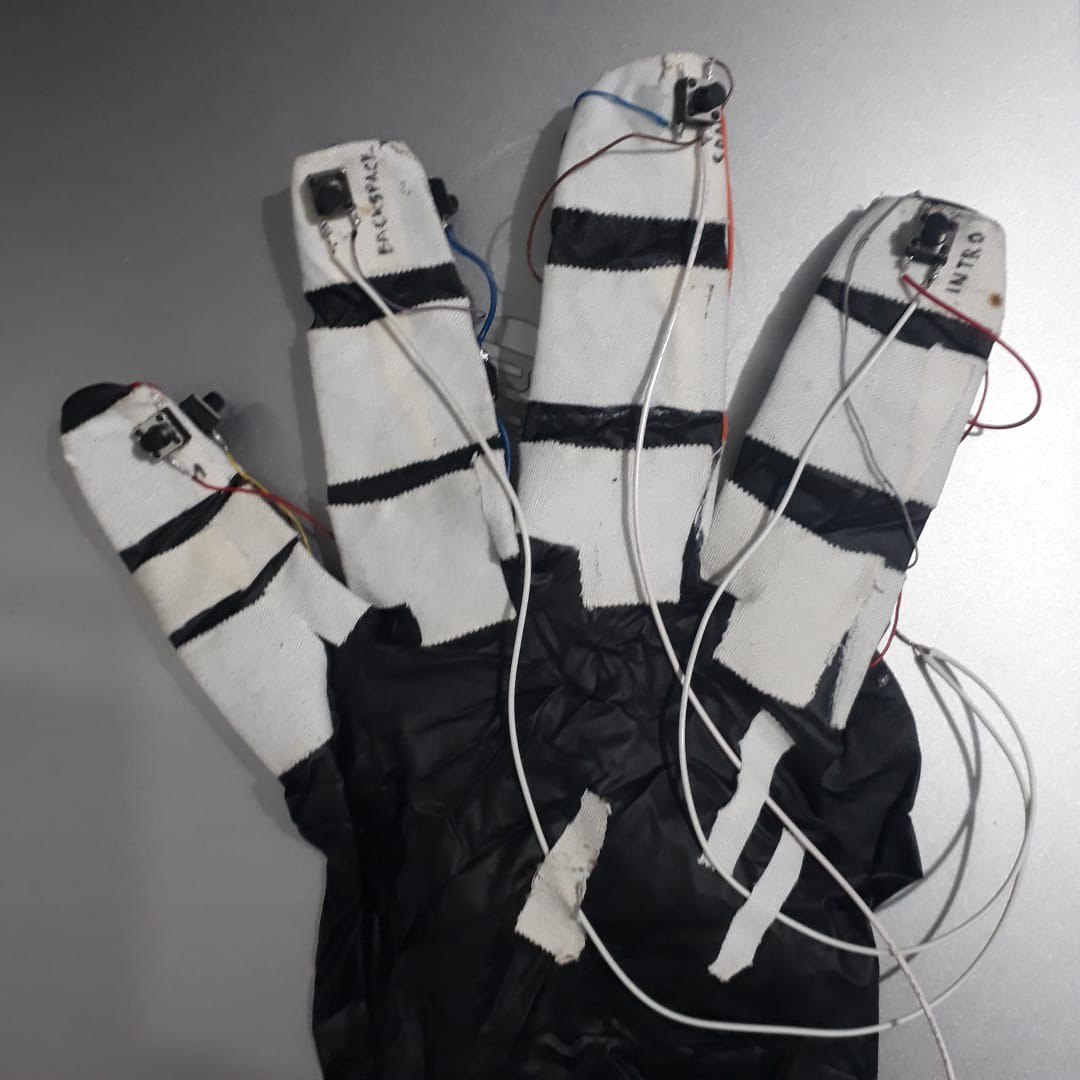
    Keyboard Character Distribution: In looking for a comfortable way to distribute the buttons in the glove, I set the quantity of 9 buttons per finger in the palm side (excluding the thumb) and 1 per nail in the fore palm side. The thumb will be the actioning finger. For comfort, I set the quantity of resulting wires as a common factor for the key order distribution decision.

    I tested distributing from A to Z in the first three fingers and the numbers in the last one, then I tried with the COMAC and DVORAK distributions but the one that uses the less wires is QWERTY, for obvious reasons, it was like reducing the keyboard’s foil matrix to the size of the palm.

  • Mapping and wiring the keyboard key matrix

    Alexander Fuentes08/27/2018 at 21:43 0 comments

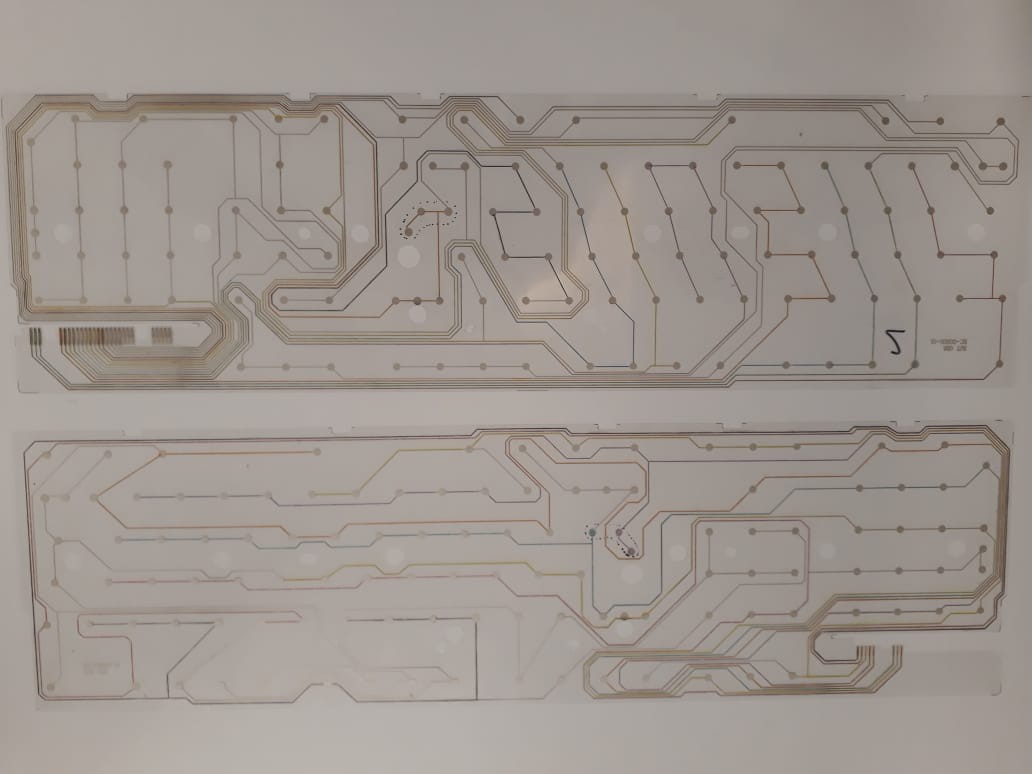
    Mapping and wiring the keyboard key matrix: A cheap keyboard have two pieces of transparent plastic foils with the wirings and contacts printed. In order to get the correct contacts in the PCB, I had to paint the printed wires with different colors and then did a list with the corresponding contacts per character. I noticed that there is a main set of contacts and a secondary set. The foil with less contacts is the main.

    In order to check functionality, I connected the PCB to the computer and some wires to a breadboard according to the aforementioned distribution, then checked two characters sharing one single secondary line and a different main line (1 and Q) and it worked. Then I checked two characters sharing one single main line and two different secondary lines (1 and 2). It worked too! So, the thickness of the cables I was using won’t affect the result (obviously I would use the thinnest ones possible).

  • Application

    Alexander Fuentes08/27/2018 at 21:42 0 comments

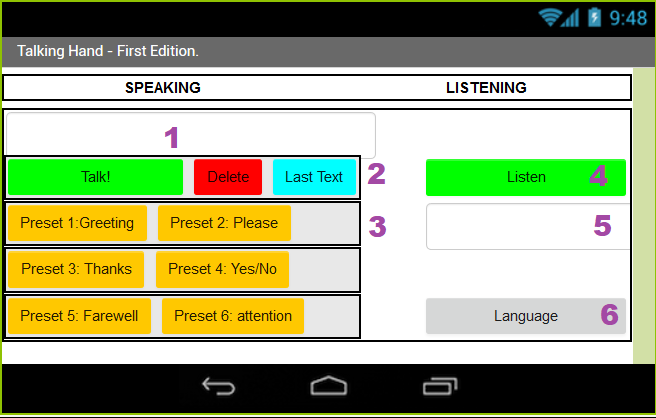
    Mobile App: I choose to use MIT App Inventor, due to the ease of use, and because it’s easily customizable. Android phones have also the particularity to be easier to program than other models and have some functionalities that can be well exploited from a single app.

    The app visual has the following:

    Speaking section:

    • Textbox1: Where the user will type with the Talking Glove
    • Action Buttons: “talk” to reproduce what has been typed, “delete” to delete text and “last text” to repeat the last text typed
    • Preset buttons: Divided in 6 categories, they store common phrases, so they are not typed with the glove.
    • Listen: Button to be pressed when the user will “hear” what other people are saying. It starts the Google’s voice functionality found in all Android phones.
    • Textbox2: non-editable field which will display the text taken from the voice functionality.
    • Language: Button to select voice output and buttons text language.

    Listening section:

    The app has the following core non-visible components:

    Text to speech: Used to convert what is typed with the glove to sounds

    Speech Recognizer: To convert voice to text

    Other components are used to give useful functionalities:

    Clock: used to calculate the time of the day so when the user touches the greeting button, it will create the phrase with the right moment and reproduce it

    Notifier and TinyDB: Used to store user name and help on the selection of output language

    MIT App Inventor apps are made in blocks, which is like doing a code puzzle instead of typing it. I divided the blocks in 3 parts:

    Initialization: Blocks that will start the following functions:

    - User name entering: Needed to store the desired user name, this will be used for the greeting button, by concatenating the pieces of code with text and day time calculation.

    Buttons: Pieces of code which will activate the non-visible components functions.

    - Language: Blocks that will process the language change. Since is not a common functionality, I made use of lists in which the pieces of text are stored.

    Language set blocks, which will operate the change by calling the items in the lists. In order to be organized, I divided the function in “language”, “listName” and “String”.

    - Language: a number which identifies the language to be chosen. I assigned 1 for Spanish and 2 for English

    - ListName: Global variable containing a list of strings. There should be variables for language, buttons, and titles.

    - String: corresponding number of the string to be used. The strings are stored in a list inside a list. The main list defines the listname and the inside lists are created with independent pieces of text according to the languages available. In this case, for example, I have a global list called “buttons”. This list contains 2 other lists, one for English and other for Spanish, and inside each list, there are 10 words which will determine the text on the app buttons.

View all 5 project logs

  • 1
    Prototype; Hand Glove with QWERTY distribution

    Keyboard PCB:

    - Disassemble the keyboard; detach the USB cable; get the 2 plastic foils, name them and mark the letters, numbers, space, backspace and enter button contacts.

    - Detach the keyboard PCB; Map the letters, numbers, space, backspace and enter button terminals at it

    - Solder the flat cable to each PCB terminal; glue the flat cable and the PCB to a piece of plastic of the same width and two times the length of the PCB

    Arm Phone Holder:

    - make a rectangular cut to one of the sides of the plastic box, the cut will be of the width of the soldered flat cable leaving enough room to pass it through.

    - Make a hole at the opposite side of the plastic box with enough room for the USB cable; cut the SB cable to the necessary length to have it connected to the cell phone without excess cable; pass the cable and solder it to the corresponding terminals.

    - fix the soldered PCB to the inside bottom of the box, making sure that the cables go straight to the wrist direction

    - fix the wristband to the outside bottom of the box

    Glove:

    - With the glove put in the desired hand, stick 3 strips of adhesive tape in each finger at the palm side (except the thumb). Make sure that the finger articulations are not covered by the finger. Leave between 3 to 5 mm of space between each strip. The strip at the tip of the finger should cover the nail side too.

    - Glue the tactile buttons in groups of 3 per strip, totalizing 9 per finger and 36 at the palm side. Glue 1 button on each nail. Make sure the contacts are facing the wrist.

    - Using the key wiring map, solder the cables. Start from the ones that shares the most quantity of characters and finish with the ones that shares no characters.

    - Solder the cables coming from the glove to its corresponding cable coming from the keyboard PCB; Fix the cables with tape to the glove in a way that it’s organized and allows to move the hand freely

    Cell Phone:

    - Download the “Talking Glove” app from HERE and install it to the cell phone. Make sure the cell phone allows the installation of non- market applications.

    - Attach the cell phone to the cover of the plastic box using the popsocket (or any other attaching device); connect the OTG connector to the cell phone and the USB cable to it.

  • 2
    Application

    **PLEASE REFER TO THE PROJECT LOG "Mobile App" to guide through the blocks creation; the application can be also downloaded and editted"

    The app has the following core non-visible components:

    Text to speech: Used to convert what is typed with the glove to sounds

    Speech Recognizer: To convert voice to text

    Other components are used to give useful functionalities:

    Clock: used to calculate the time of the day so when the user touches the greeting button, it will create the phrase with the right moment and reproduce it

    Notifier and TinyDB: Used to store user name and help on the selection of output language

    MIT App Inventor apps are made in blocks, which is like doing a code puzzle instead of typing it. I divided the blocks in 3 parts:

    Initialization: Blocks that will start the following functions:

    - User name entering: Needed to store the desired user name, this will be used for the greeting button, by concatenating the pieces of code with text and day time calculation.

    Buttons: Pieces of code which will activate the non-visible components functions.

    - Language: Blocks that will process the language change. Since is not a common functionality, I made use of lists in which the pieces of text are stored.

    Language set blocks, which will operate the change by calling the items in the lists. In order to be organized, I divided the function in “language”, “listName” and “String”.

    - Language: a number which identifies the language to be chosen. I assigned 1 for Spanish and 2 for English

    - ListName: Global variable containing a list of strings. There should be variables for language, buttons, and titles.

View all instructions

Enjoy this project?

Share

Discussions

Similar Projects

Does this project spark your interest?

Become a member to follow this project and never miss any updates