 Alexander Fuentes
-
1Prototype; Hand Glove with QWERTY distribution
Keyboard PCB:
- Disassemble the keyboard; detach the USB cable; get the 2 plastic foils, name them and mark the letters, numbers, space, backspace and enter button contacts.
- Detach the keyboard PCB; Map the letters, numbers, space, backspace and enter button terminals at it
- Solder the flat cable to each PCB terminal; glue the flat cable and the PCB to a piece of plastic of the same width and two times the length of the PCB
Arm Phone Holder:
- make a rectangular cut to one of the sides of the plastic box, the cut will be of the width of the soldered flat cable leaving enough room to pass it through.
- Make a hole at the opposite side of the plastic box with enough room for the USB cable; cut the SB cable to the necessary length to have it connected to the cell phone without excess cable; pass the cable and solder it to the corresponding terminals.
- fix the soldered PCB to the inside bottom of the box, making sure that the cables go straight to the wrist direction
- fix the wristband to the outside bottom of the box
Glove:
- With the glove put in the desired hand, stick 3 strips of adhesive tape in each finger at the palm side (except the thumb). Make sure that the finger articulations are not covered by the finger. Leave between 3 to 5 mm of space between each strip. The strip at the tip of the finger should cover the nail side too.
- Glue the tactile buttons in groups of 3 per strip, totalizing 9 per finger and 36 at the palm side. Glue 1 button on each nail. Make sure the contacts are facing the wrist.
- Using the key wiring map, solder the cables. Start from the ones that shares the most quantity of characters and finish with the ones that shares no characters.
- Solder the cables coming from the glove to its corresponding cable coming from the keyboard PCB; Fix the cables with tape to the glove in a way that it’s organized and allows to move the hand freely
Cell Phone:
- Download the “Talking Glove” app from HERE and install it to the cell phone. Make sure the cell phone allows the installation of non- market applications.
- Attach the cell phone to the cover of the plastic box using the popsocket (or any other attaching device); connect the OTG connector to the cell phone and the USB cable to it.
-
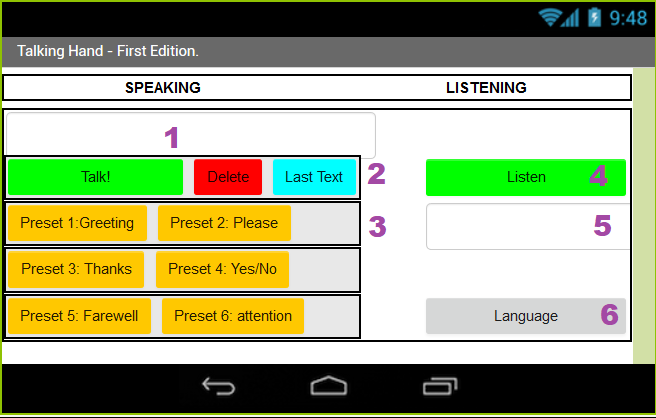
2Application
**PLEASE REFER TO THE PROJECT LOG "Mobile App" to guide through the blocks creation; the application can be also downloaded and editted"
![]()
The app has the following core non-visible components:
Text to speech: Used to convert what is typed with the glove to sounds
Speech Recognizer: To convert voice to text
Other components are used to give useful functionalities:
Clock: used to calculate the time of the day so when the user touches the greeting button, it will create the phrase with the right moment and reproduce it
Notifier and TinyDB: Used to store user name and help on the selection of output language
MIT App Inventor apps are made in blocks, which is like doing a code puzzle instead of typing it. I divided the blocks in 3 parts:
Initialization: Blocks that will start the following functions:
- User name entering: Needed to store the desired user name, this will be used for the greeting button, by concatenating the pieces of code with text and day time calculation.
Buttons: Pieces of code which will activate the non-visible components functions.
- Language: Blocks that will process the language change. Since is not a common functionality, I made use of lists in which the pieces of text are stored.
Language set blocks, which will operate the change by calling the items in the lists. In order to be organized, I divided the function in “language”, “listName” and “String”.
- Language: a number which identifies the language to be chosen. I assigned 1 for Spanish and 2 for English
- ListName: Global variable containing a list of strings. There should be variables for language, buttons, and titles.
Talking Glove
Human-computer interface to help non speaking people to actually talk!
Discussions
Become a Hackaday.io Member
Create an account to leave a comment. Already have an account? Log In.