See it in action
Startup
When you plug in the emonica, the pressure sensor will be calibrated to the environment. So, don't blow into the emonica, when you start up.
Slider calibration
Since there are no reference points for the slider, the slider must be moved right and left once. A little animation shows the whole thing. After this, the emonika is ready for use.
Button assignment & menu structure
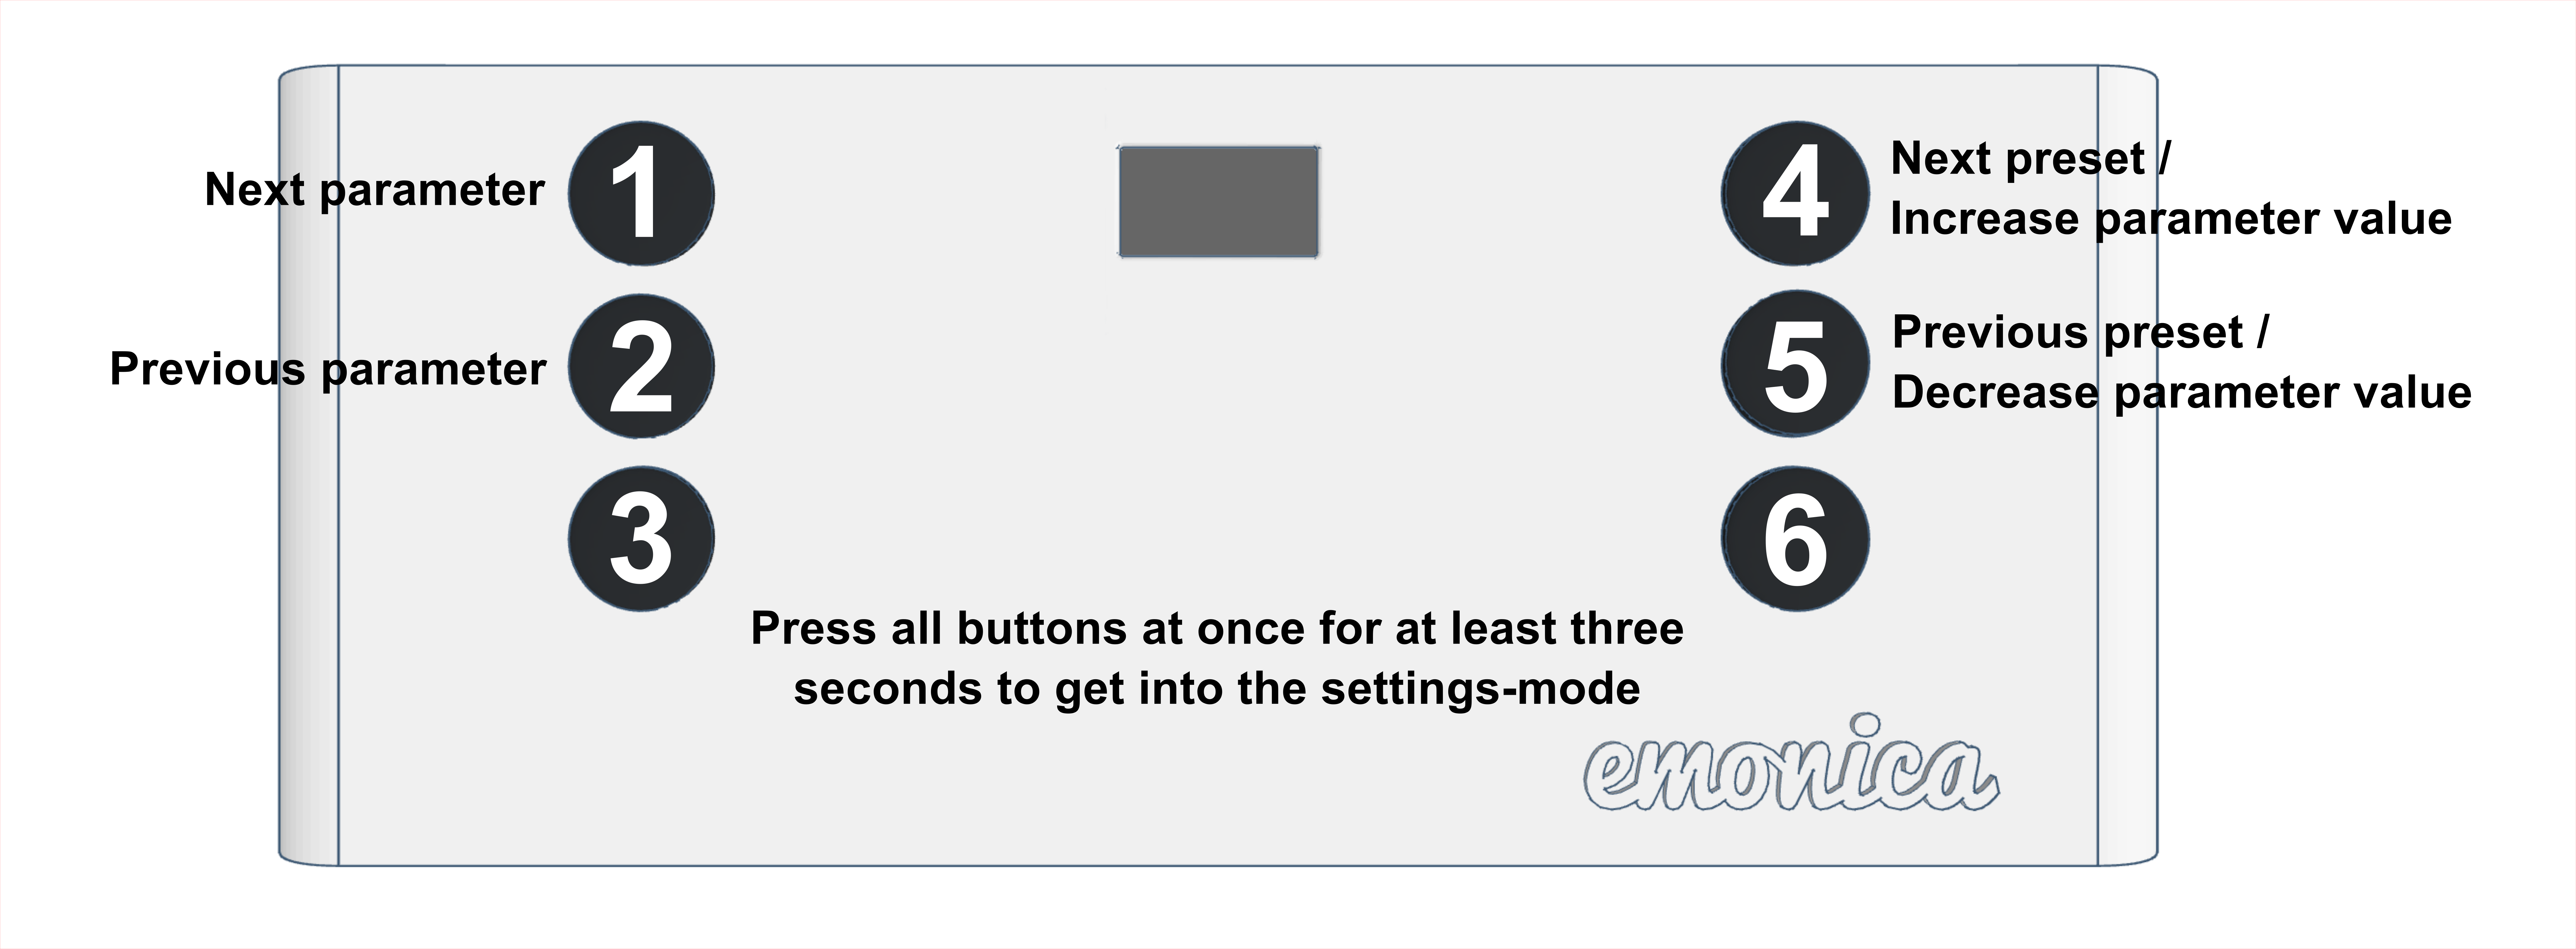
Here you see an image of the buttons. Each button can be assign to a special function (see menu structure).
Menu structure
When you start the emonica you are on the main screen, where you can see the current preset, current note and the blow in/out level of the pressure sensor.

If you press all six buttons for more than three seconds, you get into the setting mode.
At the first , you can select the preset. There are eight presets, but the maxium number is changeable in the source code. Use Buttons 4 and 5 for selecting the current preset.
If you now use the buttons 1 and 2 you can navigate through the parameters for the selected preset.
Parameter description
Pressure threshold
- With the pressure parameter, you determine from which pressure the emonica should react. If you are over this value, the emonica sends out a MIDI-Note and if set, a CC-Value.
Maximum pressure
- This value sets the upper range for the blow in/out level.
CC Midi-Channel for blow
- This value defines the Midi-Channel for the controller change.
CC Midi Controller for blow
- This value defines the Midi-Contoller number for the CC event. E.g. you want to change the cut off filter on a synth dynamically or the expression.
CC MIDI minimum value for blow
- If you exceed the threshold, this value will be sent as the smallest Midi-Value.
CC MIDI maximum value for blow
- This is the MIDI-Value, which will be send when you reached the maximum pressure value.All values between will be mapped between the pressure threshold and the maximum pressure.
Note MIDI-Channel
- This value sets the MIDI-Channel where the note will be send, when you hitting the thresold.
Low/(Root) Note
- Here you can select the first note on the emonica (on the left). E.g. select the "A3" for the first note.
Highest Note
- On the highest note you can select the last note on the right side of the emonica. All notes between will be calculated, depending of the scale you use. (See parameter: Tone scale)
Tone scale
- This is the most important settings and requires a little music theory.
Here is a short example. Let's say you have a piece of music that is played in A minor.
As a root note you can then choose an A3 and as the highest note the A4.
If you now set "minor" on the Tone Scale, the emonica will calculate all appropriate tones for the minor scale. This has the advantage that the notes that are not normally played in a minor harmony are suppressed.
It becomes even easier if you use the pentatonic tone scales.
Of course, you can also adjust the whole scale to chromatic, then you'll have all 12 tones of the scale available, but that requires a lot of practice. :-)
Dynamic Expression
- With the dynamic expression parameter you can select if you want to have a dynamic or static value for the expression (volume). When you select dynamic expression, the value depends of the pressure when you blow in/out.
Dynamic expression minium value
- If you're using the dynamic expression, you have to define the lowest value of the expression when the blow-threshold is exeeded.
Dynamic expression maximum value
- This value...
 John Lassen


 Holman Buenaventura
 jonHickam
 morecat_lab
I may have found the answer.. It appears in the USA we call a Fork Light Sensor a T Slot photo interrupter. Is there a link where I can make sure I get the right size ?