Dan Julio
-
FW 2.0 update instructions
05/09/2023 at 18:28 • 0 commentsA quick log entry to note that I added instructions to the repo detailing how to update firmware using a Silicon Labs USB Debug Adapter.
![]()
-
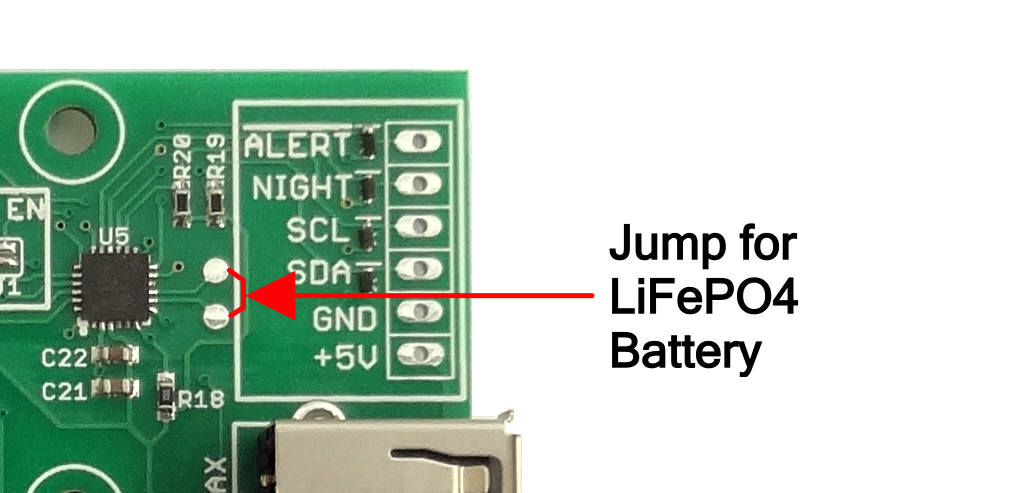
New firmware supports LiFeP04 batteries
02/17/2023 at 18:45 • 0 commentsI'm happy to announce that I just finished testing a new release of the firmware that supports 4-cell LiFePO4 batteries. Although these batteries can't charge in environments as cold as lead acid batteries can (min of 0°C instead of -20°C), and are more expensive they have much longer life spans and can take many more charge/discharge cycles. They're much lighter too!
The new firmware version 2.0 supports LiFePO4 batteries by detecting a jumper soldered between two previously unused test points on the top of the PCB.
![]()
Adding support was a little tricky as I am almost out of flash storage on the EFM8 micro-controller. With the new LiFePO4 features below I now have something like a whopping 40-50 bytes of unused flash!
- Float/Bulk initial charge state threshold set to 13.2V
- Bulk Voltage set to 14.4V
- Power On charge voltage set to 13.6V
- Temperature Compensation disabled
- Charge temperature range between 0°C and 50°C
The github repo has been updated and I also updated the mppt_dashboard app using the current version of Xojo, signing the OS X version and extending the current range on the graph from 0 - 2000 mA to 0 - 2500 mA.
Future orders from my tindie store will have the new firmware. I'll think about how I could create a simple way for people to update their existing firmware if they want. Please contact me if you are interested in this.
-
Coda
02/28/2020 at 02:00 • 0 commentsThe Crowd Supply boards have [finally] been delivered after various hangups with their distribution partner. The board is available from tindie as well. The manufacturing partner is setup so if there is demand I can make more.
I wish I could say my experience with Crowd Supply had been better. Birthing this board with them was painful. I certainly appreciate some of the people there I worked with. This project is pretty small potatoes for them and I'm sure that with limited staff they had to prioritize and I got the short end of the stick. I am a typical engineer and not great with the self-promotion and marketing. My biggest disappointment was that for the additional percentage I gave them I was hoping to have gotten better exposure.
Onwards and upwards. I still think this is a great little device and I'll continue to try to find places where it helps people.
I also hope anyone who read this set of articles found something helpful in them.
-
Finally!!!!
10/22/2019 at 17:18 • 0 comments![]()
It has been a long arduous task to get here but I finally have some production boards. After slow progress with Crowd Supply, I got caught up in the trade-war between the US and China and my parts were stuck in customs. $600USD to get $2100 worth of parts out. Ouch. This is partly my responsibility though because my Contract Manufacturer told me to use FedEx to ship parts to him but the cost was so much more (hundreds more) than USPS that I went the cheaper route. He said there would have been no import levied had I used FedEx. Later we learned that using his FedEx account would be cheaper than paying in the US. These are strange times we live in.
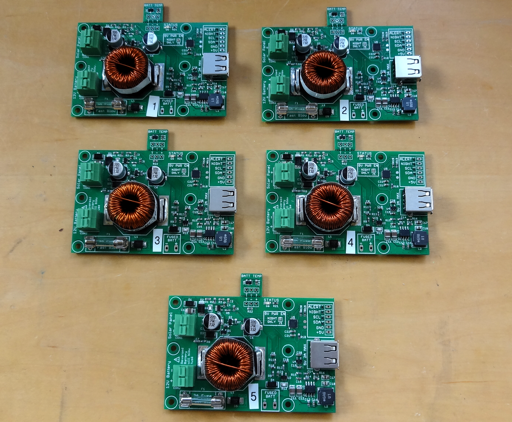
I received a total of 50 untested boards from the CM that I used to validate test manufacturing test fixture. I didn't want to ship a test fixture to the CM that didn't work when exposed to a larger variety of boards. But it works fine and all 50 boards were tested, programmed and calibrated.
Now the test fixture will go to China and I should receive completed board assemblies in the future. Or ship them to Crowd Supply for distribution there. Yeah!
In celebration I'm making the initial production run available to the tindie customers who have been patiently waiting. Thank you. -
Firmware on github
08/31/2019 at 17:17 • 0 commentsNew Feature
With firmware v1.2, the watchdog functionality has been extended to allow a new capability. A new 16-bit unsigned register called WDPWROFF is added that controls the length of time power is disabled when the watchdog timer expires. It specifies time in units of seconds allowing power to be disabled for up to 65535 seconds (18 hours, 12 minutes, 15 seconds). This means that the watchdog function can also be used to switch off power for a period of time, for example to turn off the user's system overnight. The default value of WDPWROFF is 10 seconds like the previous firmware versions and the default value is restored every time the watchdog timer expires or is disabled.
Documentation and the arduino library have been updated.Firmware Release
The v1.2 firmware source has also been uploaded to github. This is the intended production release code. I used Silicon Lab's Simplicity Studio as the IDE and compilation environment. This code runs on the EFM8SB10F8 micro-controller and currently requires 7904 bytes (almost full!) and uses 140 bytes of xdata memory and 86.1 bytes of data memory.
Campaign Status
The Crowd Supply campaign is almost finished. The parts are in China but unfortunately being held in customs. My Contract Manufacturer is attempting to get them released. I am exploring some options in case this becomes a long-term problem.
-
Campaign launched
07/30/2019 at 16:57 • 0 commentsIt has taken far longer than I hoped but the crowd funding campaign has finally launched at Crowd Supply. I have parts for 250 boards in my possession and will be sending them to my CM in China this week. This was a worry because of ongoing parts shortages. The plan is to build an initial run of 50 boards and send them to me for testing on the manufacturing test fixture to work out any remaining issues with it. Then the fixture will go to the CM for use on the remainder of the boards. After the campaign ends I will write-up my experiences with this crowd funding effort.
-
Slow progress - but a new name
04/25/2019 at 17:52 • 0 commentsIntroducing "makerPower MPPT Solar Charger"
Engaging with Crowd Supply has been interesting. They see this device from a fresh perspective and that has resulted in some changes. One is the name. To me "Solar MPPT Charger" (or "MPPT Solar Charger" as I changed to over time) made a lot of sense since it describes what the device does fairly succinctly. Of course from the perspective of a product to be searched for and found by prospective buyers, its generic nature it is almost useless. They suggested a picking a new name. They would brainstorm and I would brainstorm. Lots of ideas revolved around words like "Pi" and "Solar" and "Sun" were proposed. Although this device is very well paired with Raspberry Pi SBCs I don't want to limit its appeal to just those devices so I proposed "makerPower" as either a stand-alone name or in conjunction with "MPPT Solar Charger". Slowly I have been updating various references.
Bundles and searching ChinaMy idea was to sell only the board but Crowd Supply also encouraged the creation of bundles to make putting together a system easier. This is still a work-in-progress but I am thinking of three bundles.
- Board only (along with a 6-pin header and spare fuse).
- Board plus 4-wire female-female cable for 5V+I2C connection and 2-wire battery cable with spade connectors.
- Board plus cables + 9 Ah battery + 35W solar panel.
I guess I already knew that making a system easy to put together will make it easier to buy but it is a pain to source all the other parts. I have huge numbers of tabs open to Alibaba, AliExpress and Global Sources product pages and feel almost paralyzed by the choices and possible risks. Boulder CO USA feels very far away from these choices.
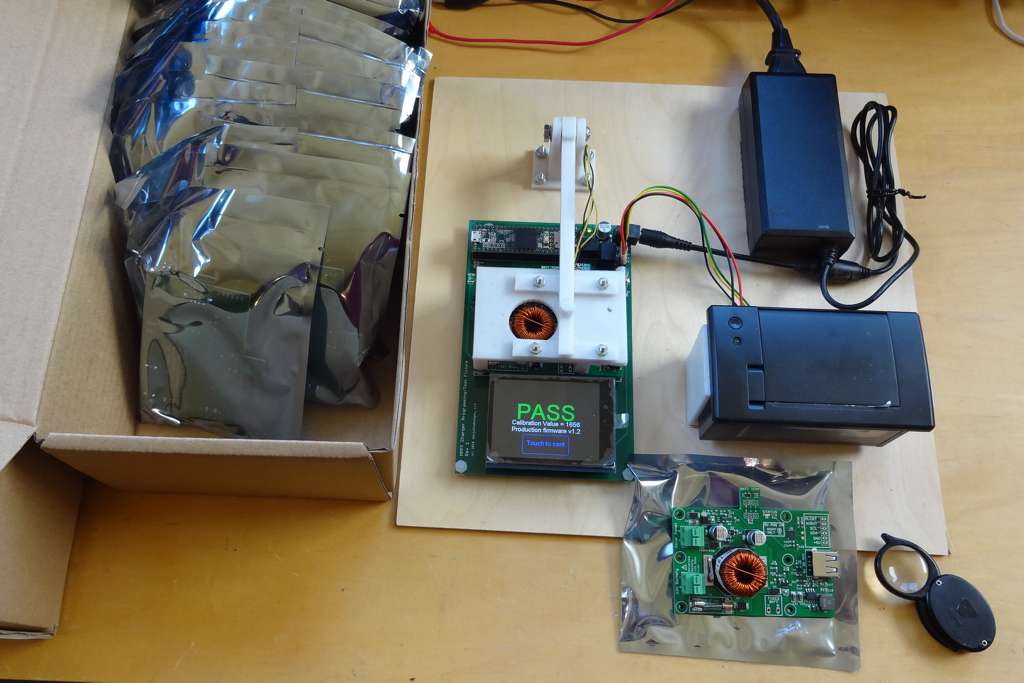
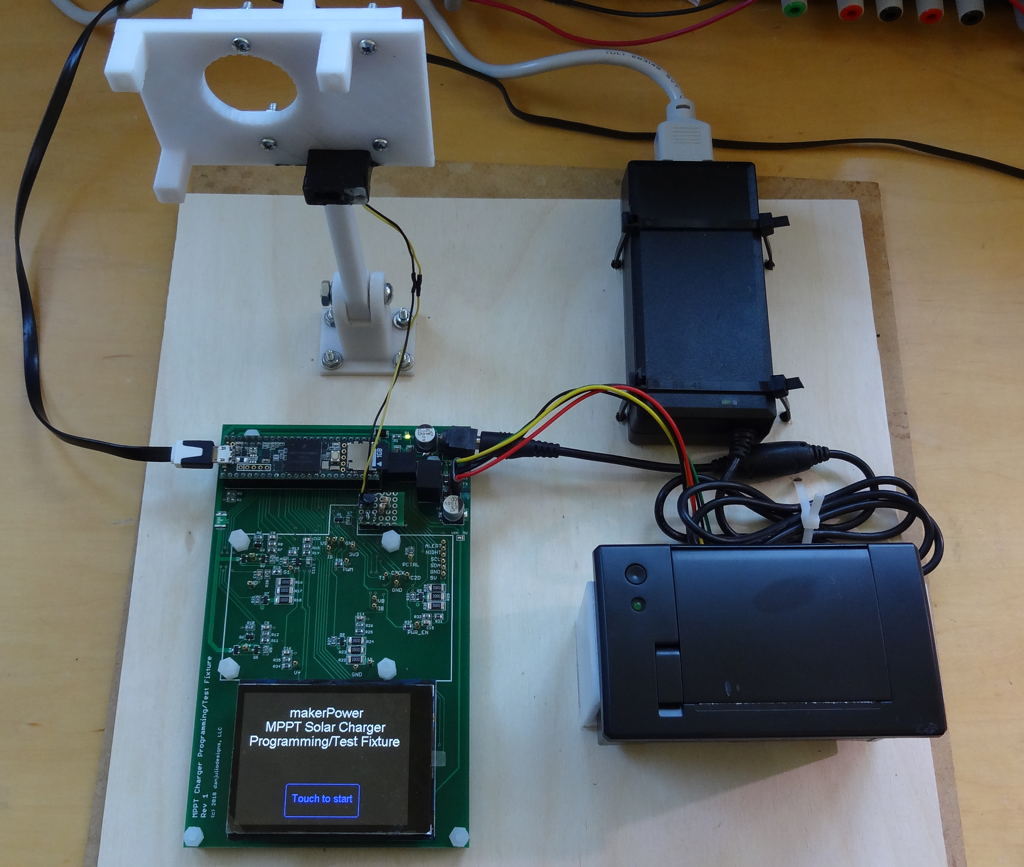
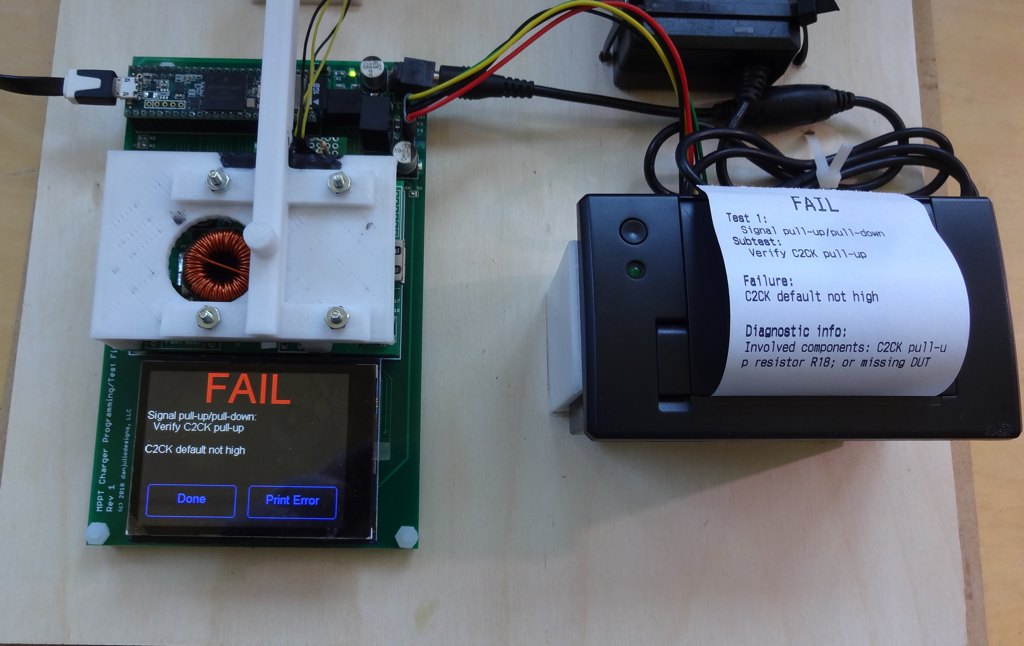
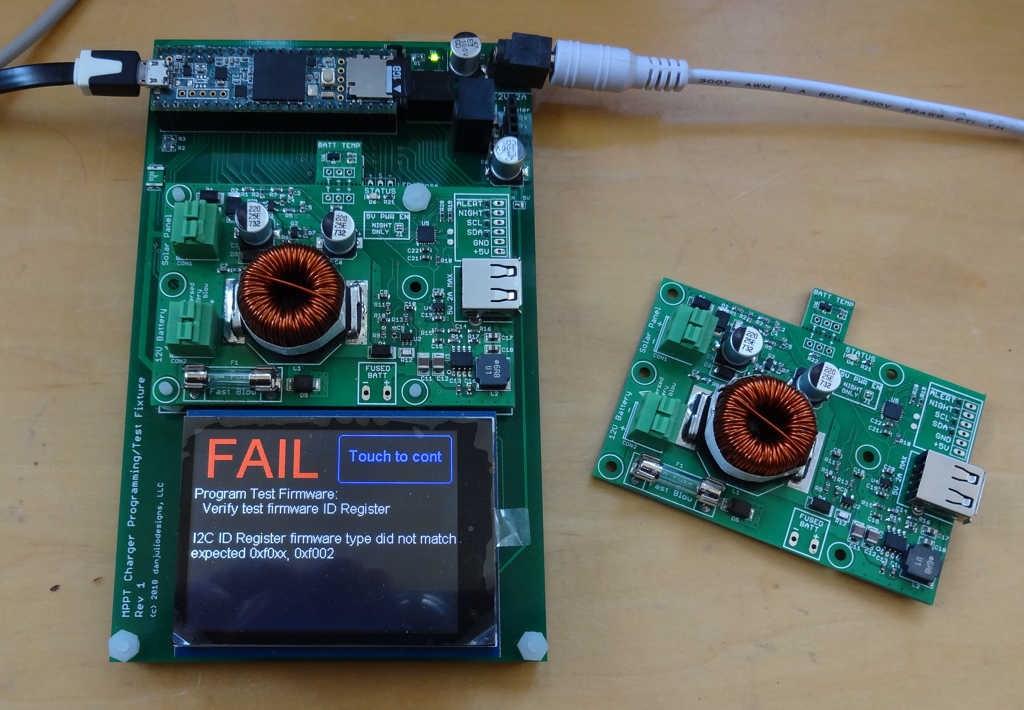
Test Fixture
The test fixtures are ready to go. It tests, programs and calibrates a charger in about 8 seconds per board. The printer prints out a failure record that also identifies the parts of the circuit being tested to help a technician fix failing boards. The idea is that the print-out will accompany any board that fails to the bone pile and eventually repair bench.
![]()
![]()
Coding was reasonably straight-forward and I 3D printed some components to make testing efficient (and to hold a photo-transistor for the charger LED verification). The big issue I had was the resistance of solder flux. These boards were hand-built by yours truly. I use a little flux to help reflow the SMT parts and this caused a lot of problems. I clean my boards using pure isopropyl alcohol and/or a quick soapy wash using a soft toothbrush, rinse and dry. However I still had problems making the two test fixture accurately measure voltages from the device-under-test (DUT).![]()
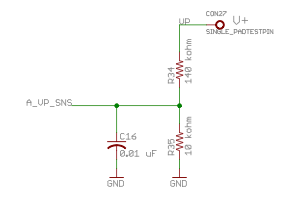
The test fixture measures voltages using the Teensy 3.5's ADC and an external precision 1.25 V reference. Higher voltages from the DUT are scaled using a voltage divider made up of two precision resistors. These resistors had to be fairly high resistance to not impact the circuitry under test.
Unfortunately flux under the resistors and between the soldered headers on the teensy and testfixture added measurable resistance and threw the resistance ratio off. The boards looked clean to me but still didn't measure correctly. It took a while before I found every source of error and managed to clean it up.
![]()
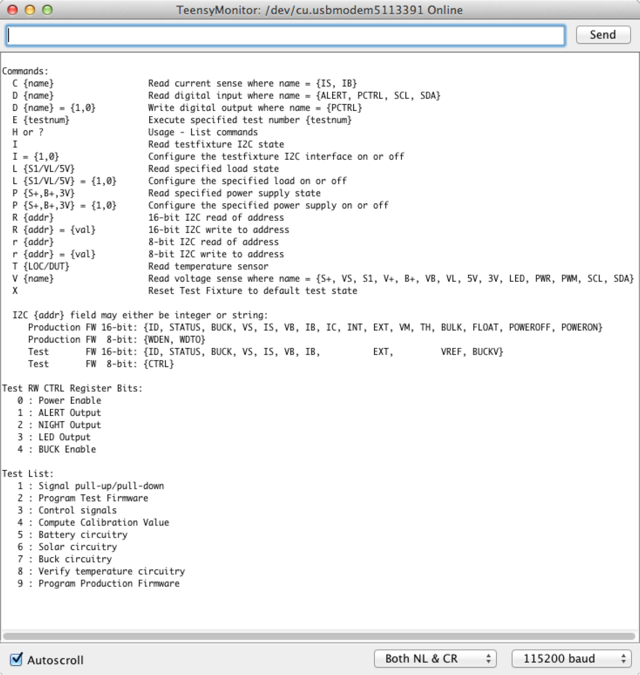
The test fixture also sports a simple command interface to enable manual control of the test fixture or running of individual tests. The command interface is not used during normal operation (no computer is connected to the test fixture).
-
Pre-production units!
03/19/2019 at 20:15 • 0 commentsThe last couple of weeks have been productive. I executed the final firmware validation testing and released v1.0, and completed the user manual and uploaded that to the github repository. The manufacturing programming/test fixture is also up and running. This project is ready to go!
Edit: I've also now listed them on tindie.
Edit 2: The day after I put them on tindie I heard from Crowdsupply that they were interested in running this device as a crowd-funding campaign. I had originally submitted it to them in the fall of 2018. One of their requirements is that the device not be for sale anywhere else until the campaign ends. So I have temporarily taken it down from tindie and here. If you think you might be a good beta customer then let me know. it may be possible for you to get a board if you will commit to sharing information about its use.
![]()
-
Quickie: working on manufacturing fixture
03/05/2019 at 22:37 • 0 commentsThe manufacturing programming/test fixture is a fair bit of code running on a PJRC Teensy 3.5. Over the last few weeks I have worked on various subsystems
- Arduino library for the test fixture hardware itself
- Silicon Labs C2 programmer for the Teensy
- Hex File utilities
- Simple display support for the cap touch control LCD screen
- A custom test firmware to first program on the Charger's SI EFM8 micro-controller to allow detailed testing and calibration
And finally I have gotten them all stitched together along with a test sequencer and am writing test code. It's tedious because for every test I have to figure out what's right and what the limits for valid measurements may be. But I see the light at the end of the tunnel now.
![]()
-
Some winter testing data
02/19/2019 at 04:11 • 0 commentsTwo systems have been braving the [not so bad] Colorado winters for a couple of months now with good success while my progress on the test fixture has been very slow due to other project commitments.
![]()
The system above the house with the 25 watt panel with no obstructions has remained up pretty much non-stop with only a couple of low-battery shut-downs. I even try to run the Christmas lights on it most nights for an hour or two.
The system near the house, sitting on the ground in the trees, with a 40 watt panel and oldish battery, has gone down with a low-battery four times since Christmas and rebooted, if only for part of a day the next day in all cases.
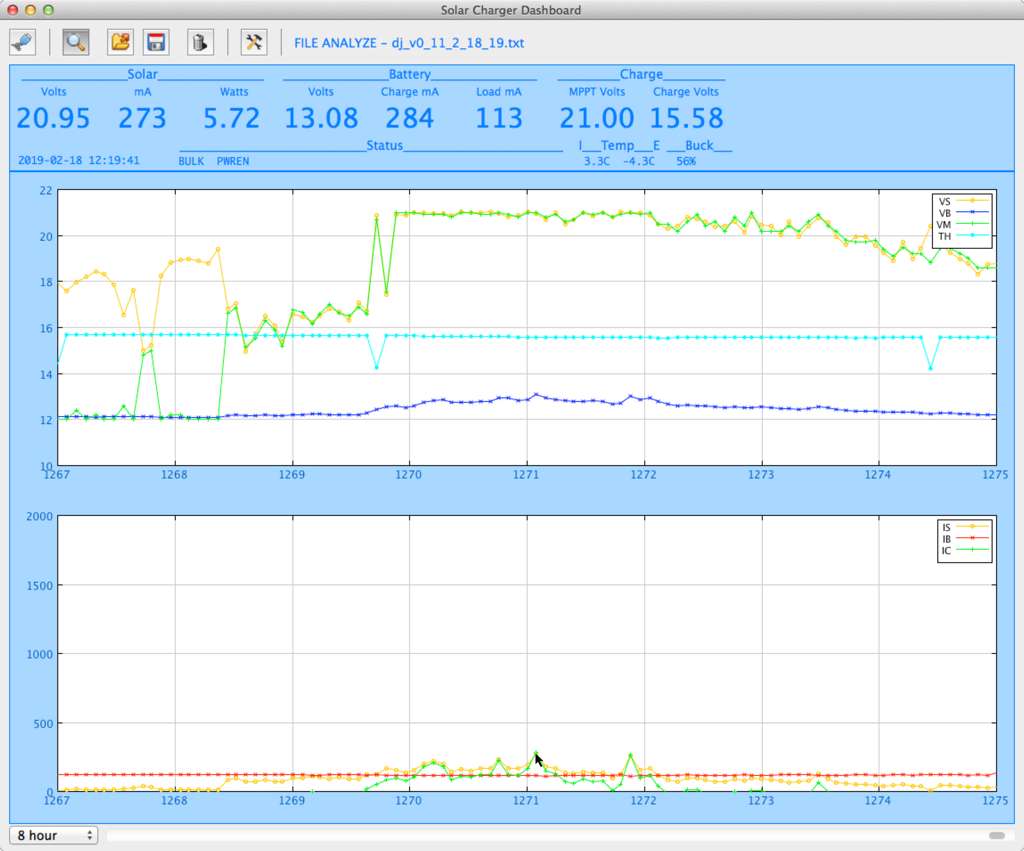
Both systems require about 2.6-2.9 AH per day and seem to be able to remain operational even in mostly overcast days when panel production is pretty low. Snow on the panels is the worst and results in almost no solar production at all. The graph below shows a typical overcast week with low production that resulted in a low-battery shutdown. The X-axis shows days. As you can see the charge cycle was often not able to complete the Bulk charging phase (terminated with the battery reaches the higher threshold value).
![]()
Zooming in on a typical low-production day shows the system barely holding its own during the day (X-axis in units of hours).
![]()
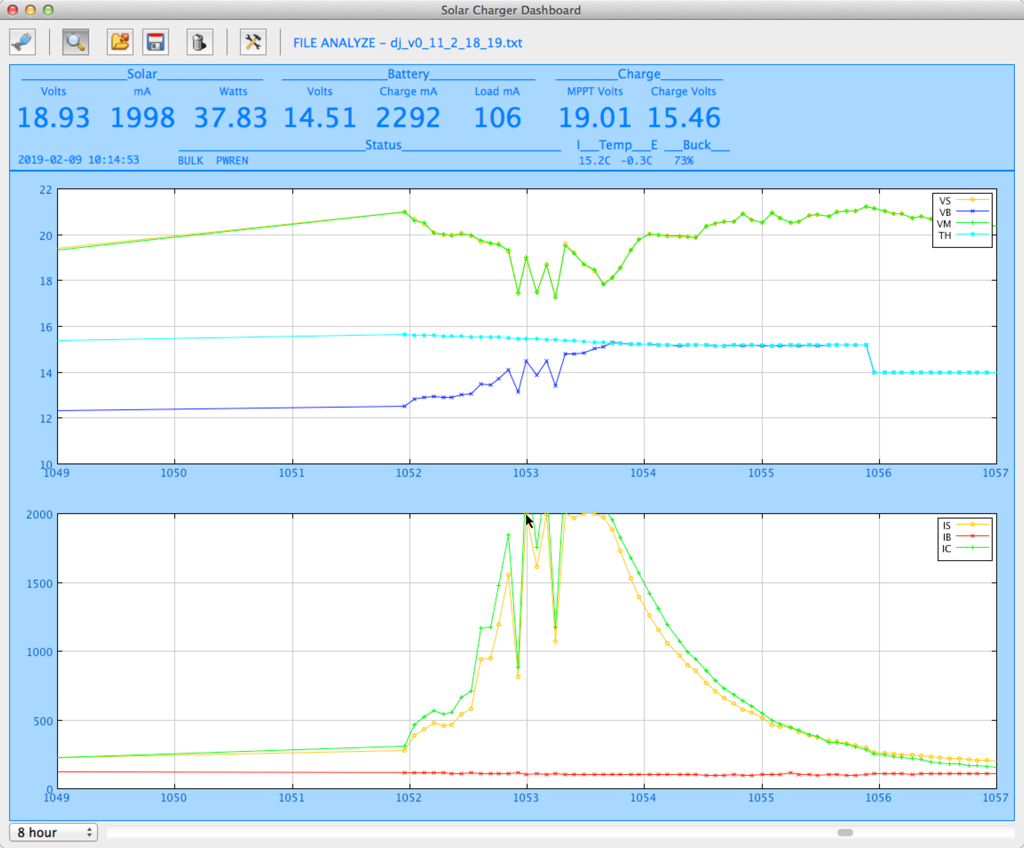
However a sunny day can produce a lot of power as shown below where the system (40 watt panel) started off shut-down and was able to fully charge the battery in about four hours. This graph shows the system limiting current taken from the panel to 2A. The step in the battery and threshold voltage at about hour 1056 is the transition from Absorption charge to Float charge when the battery was fully charged.
![]()
The MPPT algorithm holds the panel voltage lower when it can't supply enough current (for example the system in Bulk charge phase but there isn't much light) and it lets it float higher when limiting solar input (for example when in Absorption charge phase and the buck is limiting). This makes sense and looking over days of output shows the algorithm behaving.
Now to finish the test fixture and start building this damn thing...
Solar MPPT Charger for 24/7 "IOT" devices
An inexpensive charge controller and 2A 5V power supply designed to supply remote power for devices ranging from Arduino to Pi 3 class.