Fluxly
-
Making a Fluxamasynth
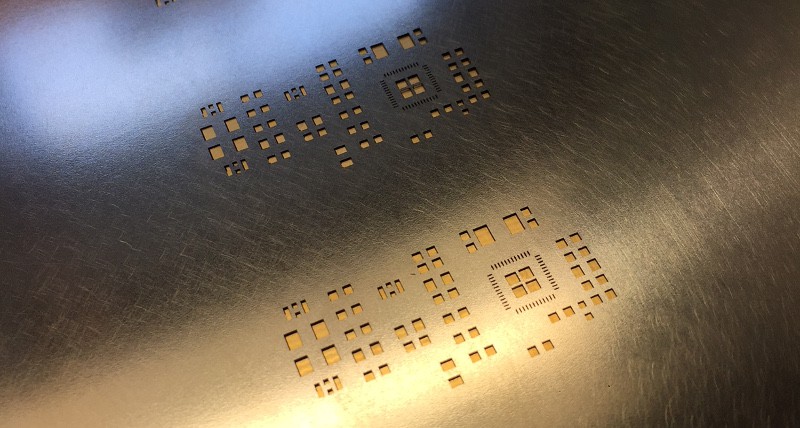
10/21/2018 at 03:38 • 0 commentsMost of the components on the Fluxamasynth boards are filters on the power, inputs and outputs of the processor. The SAM2695 is a surface mount component in the QFN44 package. It has 11 pads on the bottom of each side of the chip that are spaced about 1/5 mm apart.
I normally make solder mask stencils on the AS220 Fab Lab's Epilog laser cutter by etching the paste layer pattern out of mylar. It is possible to make a laser cut mylar stencil for the QFN44 package but because the pitch is so fine it does not last more than a couple of uses. Most PCB houses offer very affordable ($10 or so) metal stencils with a PCB order these days, so that's the way to go with this particular board.
![]()
Laser cut metal stencil for the Fluxamasynth Pi.
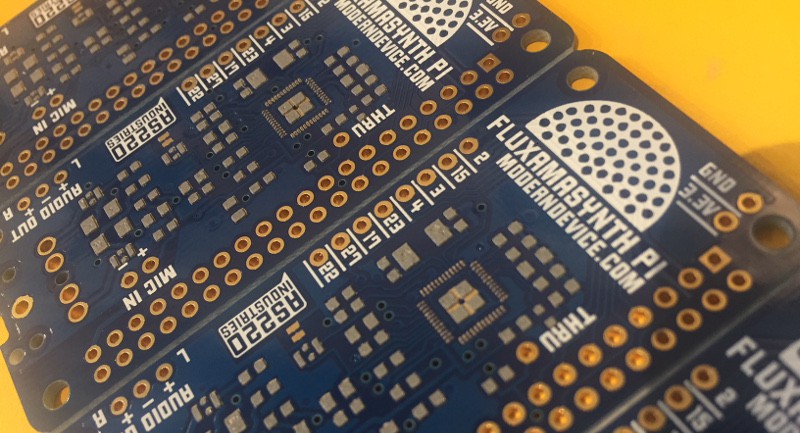
All of the Fluxamasynth parts are placed by hand. For these boards I used Kester NXG1 no-clean solder paste from Techni-tool.com. The trick to successfully hand placing QFN44 parts is a combination of solder paste quality (new paste, heated and let cool to room temperature) and close inspection and rejection of any paste pulls that aren't right on the pads. With hand placing some footprints you have a little bit of wiggle room, where the surface tension of the solder can pull the part into alignment. The QFN44 part is pretty unforgiving, however.
![]()
Fluxamasynth Pi boards with paste, ready to be hand-populated. These boards are made to support the Fab Lab of the non-profit AS220 community arts center.
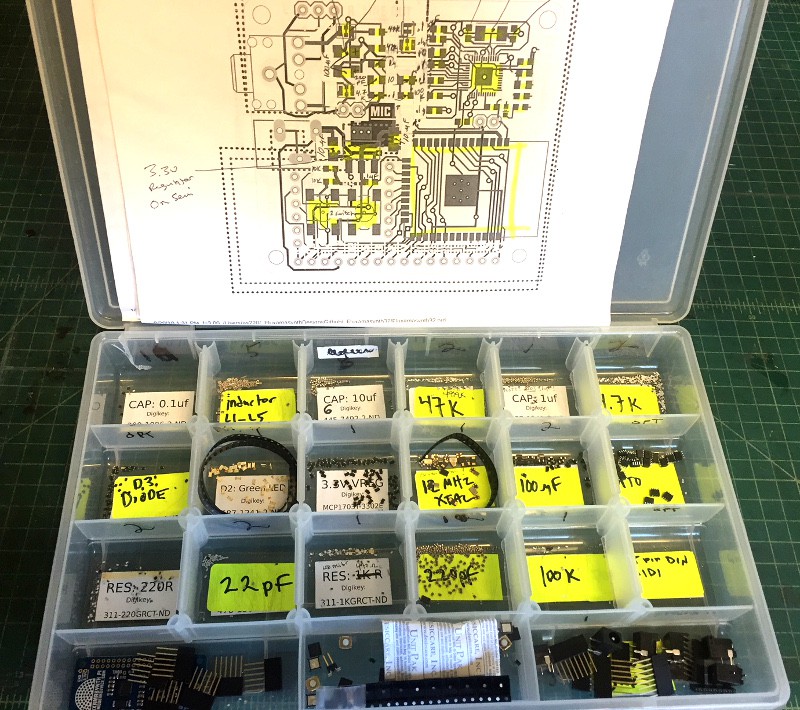
When you're doing hand placement of surface mount components, fishing around through bags of components can be a time killer. If you're doing any more than three of something it is worth setting up a production bin for your components, along with a map and a BOM.
![]()
Bin for bespoke Fluxamasynth production.
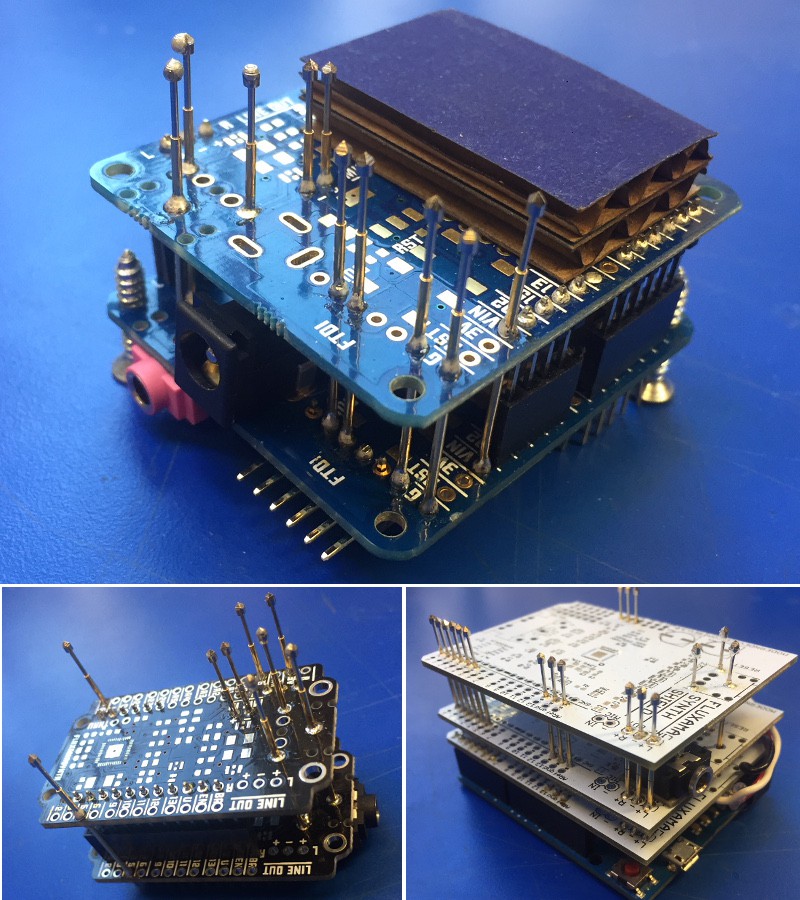
Once the boards are populated and cooked they need to be tested. Here are three pogo pin-based testing jigs for the Fluxamasynth:
![]()
-
Using Bytebeat Expressions for Deterministic Chaotic Variation
10/19/2018 at 22:36 • 0 commentsRandomness is all well and good but you still need a editor's guiding hand on the rudder as you explore chancespace. A more deterministic approach to programming a composition involves using something like Bytebeat to introduce chaotic variation that is repeatable.
Bytebeat is a genre of 8-bit music that involves evaluating a single expression at a fixed frequency to generate the next sample of audio. The end result is kind of like looking at a cellular automata through a one byte window; the aliasing effects generate interesting patterns that repeat over different periods depending on the complexity and values of the expression.
For example, if you take the expression:
v = t
and evaluate it at 8000 times a second and take just the low byte you'll get a triangle wave at about 31 Hz. A more complicated and difficult-to-predict expression might be:
v = (t>>6|t|t>>(t>>16))*10+((t>>11)&7)In Bytebeat the expressions are used to generate waveforms, but you can use the same idea to generate repeating unpredictable sequences of bits for visuals or (in the case of the example below) generating noteOns and offs.
This script sets up 24 channels with piano instruments, each assigned a different note. The bytebeat expressions are evaluated at a frequency determined by the step variable. The low 3 bytes are used to toggle each of the 24 channels, and a timer changes the state and controls the score.
Each performance is the same, but you can play with the step and increment variables to explore alternative compositions. These particular values were chosen and tweaked to make something inspired by Julius Eastman.
// deterministic Bytebeat rule-based

#include <Fluxamasynth.h>

#define maxInstruments 24
#define totalLength 60000    // should be 120000

int numInstruments = 8;
Fluxamasynth synth;

boolean noteIsOn[maxInstruments];
int note[maxInstruments];

int step = 1000;
int increment = 1000;
int tempo = 10;
long startTime;
long v = 0;
long t = 0;
int choice = 0;

void setup() {
  startTime = millis();
  Serial.begin(9600);

  synth.setMasterVolume(75);

  // Set up the individual instruments
  for (int i=0; i<numInstruments; i++) {
    synth.programChange(0, i, 1);
    note[i] = 64+i*3;
    synth.pan(i,127/numInstruments*i);
    synth.setReverb(i, 3, 127, 25);
  }

  for (int i=0; i < numInstruments; i++) {
    noteIsOn[i] =  false;
  }
  synth.setChannelVolume(9,0);  // Turn off the percussion channel
  startTime = millis();
}

void loop() {
  iterate();
  for (int i=0; i < numInstruments/8; i++) {
    iterate();
    for (int j = 0; j < 8; j++) {
      if (((v>>j) & 0x01) == 1) {
        if (!noteIsOn[i]) {
          noteIsOn[i] = true;
          synth.noteOn(j*i, note[j*i], 127);
        } else {
          if (noteIsOn[i]) {
            noteIsOn[i] = false;
            synth.noteOff(j*i, note[j*i]);
          }
        }
      }
    }
  }
  delay(step/8);

  if (millis() > startTime+5000) {
    startTime = millis();
    numInstruments =  4 + (numInstruments + 4) % maxInstruments;
    Serial.print(numInstruments);
    choice = (choice + 1) % 6;

    if (choice == 5) {
      for (int i=0; i < maxInstruments; i++) {
        note[i] = (40 + i*7) % 100;  // fifths
      }
    }
    if (choice == 3) {
      for (int i=0; i < maxInstruments; i++) {
        note[i] = (64+i*4) % 100;    // thirds
      }
    }
  }
  if (millis() > totalLength) {
    while (1) { ; }
  }
}

void iterate() {
      t += increment;

      // Bytebeat expressions
      switch (choice) {
         case 0:
            v = t;
            break;
         case 1:
            v = ((t<<1)^((t<<1)+(t>>7)&t>>12))|t>>(4-(1^7&(t>>19)))|t>>7;
            break;
         case 2:
            v = t/32;
            break;
         case 3:
             v = ((-t&4095)*(255&t*(t&(t>>13)))>>12)+(127&t*(234&t>>8&t>>3)>>(3&t>>14));
             break;
         case 4:
             v=(t>>6|t|t>>(t>>16))*10+((t>>11)&7);
             break;
          case 5:
             v=(t>>7|t|t>>6)*10+4*(t&t>>13|t>>6);
             break;
      }
}
Here's what it sounds like for step and increment = 1000:
-
Rule-based Generative Music Scripts
10/19/2018 at 22:35 • 0 commentsThere are many approaches to writing programs to generate music. For example, you can use Markov Chains, or you could hook up a Recurrent Neural Network to the Fluxamasynth Python module to compose new songs based on trained material. I'm less interested in the open-ended approaches to generative music, and more interested in rule sets, programmed choreographies, algorithmic enhancements to composing, and the combination of randomness, rules, and interactive inputs.
The WRND generative radio station project described previously is a script that uses randomness to generate songs governed by a series of rules. In general this can be used to help a composer explore chancespace within a set of constraints.
For WRND the rule system consists of parts, measures, and notes that are arrays of numbers randomly generated with contraints. Playback is with four MIDI channels with a separate percussion channel.
First choose the parts:
void chooseParts() {
  parts[0] = random(254)+1;
  parts[1] = random(255);
  parts[1] = parts[1] & (parts[1]^parts[0]);
  parts[2] = random(255);
  parts[2] = parts[2] & (parts[2]^(parts[0]|parts[1]));
  parts[3] = ~(parts[0]|parts[1]|parts[2]);
}
Each repetition of a song has 8 sections, each of which is an A, B, C, or D part. How parts are repeated is selected by choosing a random number from 1-255. The individual bits of this first number are the "slots" in the 8 sections that will be an A part. For example:
Part A: 88 = 0 1 0 1 1 0 0 0Another random number is selected for part B, which is ANDed with the exclusive OR of part A so that each "slot" only has one unique part:
Part A: 88  = 0 1 0 1 1 0 0 0
Part B: 176 = 1 0 1 0 0 0 0 0
The same is done for part C, and part D fills the remaining slots:
Part A: 88  => 0 1 0 1 1 0 0 0
Part B: 176 => 1 0 1 0 0 0 0 0
Part C: 140 => 0 0 0 0 0 1 0 0
Part D:     => 0 0 0 0 0 0 1 1
               B A B A A C D D
So the four parts repeat in the order:
BABAACDD
and a song may be 10-100 repeats of this sequence. The measures array tells whether a note is on or off on a particular beat for a particular part:
void chooseMeasures(int p) {

  measures[0+p] = random(254)+1;
  measures[1+p] = random(255);
  measures[1+p] = measures[1+p] & (measures[1+p]^measures[0+p]);
  measures[2+p] = random(255);
  measures[2+p] = measures[2+p] & (measures[2+p]^(measures[0+p]|measures[1+p]));
  measures[3+p] = ~(measures[0+p]|measures[1+p]|measures[2+p]);
}
So if one beat is an sixteenth note, a sequence of
1 1 1 1 0 0 0 0
would represent a quarter note followed by a quarter note rest. The way that noteOn/noteOff is chosen means only one note will sound for each "slot". However, when the song is finally run or "performed" there is a dynamic binaryChoice function that determines whether a 1 or 0 means noteOn (and the other noteOff).
For each part, only one note is played in each of the four channels. The chooseNotes() function assigns a baseNote for the A part and the B, C, and D are all multiples of 3rds and 5ths of the baseNote for that part:
void chooseNotes(int p) {
  int baseNote = random(40)+50;
  noteName[p] = baseNote;
  noteName[p+1]=baseNote + (random(3)-1)*7;
  noteName[p+2]=baseNote + (random(3)-1)*4;
  noteName[p+3]=baseNote + (random(4)-2)*12;
}
The rhythm and percussion variables generate a beat on the percussion MIDI channel 9.
A generated song sounds something like this:
or this:
-
Exploring the Upper Range
10/19/2018 at 22:35 • 0 commentsHere's a fun experiment that explores the very top of the range of the various instruments. One of the things the Fluxamasynth enables is for you to create Black MIDI-like clusters of sound. Many other MIDI playback chips don't perform well in the highest (120-127) range of notes; this example shows how the Fluxamsynth performs.
//Exploring the upper range of the instrument

#include <Fluxamasynth.h>
#include <PgmChange.h>

Fluxamasynth synth;
int count = 0;
int count2 = 0;
int s = 120;

void setup() {

  synth.midiReset();
  synth.setMasterVolume(50);
  int instrument = 2;
  randomSeed(millis()+analogRead(1));
  for (int i=0; i<4; i++) {
    synth.programChange(0, i, instrument);
    synth.setReverb(i, 1, 127, 25);
    synth.pan(i, 127/(i+1));
  }
}

void loop() {
  int d = random(75)+75;
  for (int i=0; i<5; i++) {
    synth.programChange(0, i, random(127));
  }
  for (int i=1; i<4; i++) {
    section(s, 100);
  }
  s = random(10)+117;

}

void section(int n, int d1) {
for (int i=n; i < n+8; i++) {
    count++;
    count2+=3;
    synth.noteOn(0, i, 127);
    if ((count2 % 2) ==0) synth.noteOn(1, i-3, 127);
    if ((count % 2) ==0) {
       synth.noteOn(2, i-2, 127);
    }
    if ((count % 3) ==0) {
       synth.noteOn(3, i-5, 127);
    }
   if ((count2 % 6) ==0)synth.noteOn(4, i+2, 127);
    delay(100);
    synth.noteOff(0, i);
    synth.noteOff(1, i-3);
    synth.noteOff(2, i-2);
    synth.noteOff(3, i-5);
    synth.noteOff(4, i+2);
  }
}
Here's a sample of how it sounds:
-
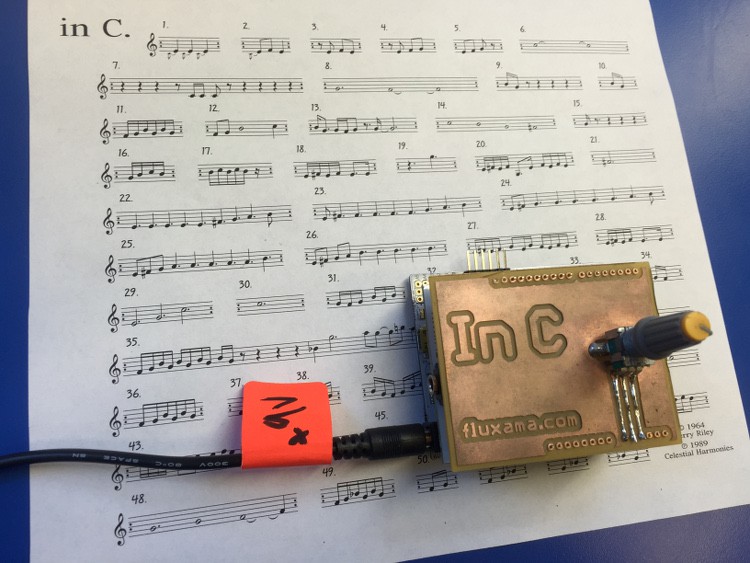
A Composition in a Box (with a Pot): Terry Riley's In C
10/19/2018 at 22:33 • 0 commentsOne of the example programs bundled with the Fluxamasynth Arduino library is an interpretation of Terry Riley's 1964 algorithmic composition In C. It shows one way of encoding a composition with multiple parts and an adjustable master tempo.
In C was written for 20 to 35 players. Each player works their way through 53 short phrases, listening to the other players and following the rules of the score. The basic structural rules are that a player repeats a phrase as long as they like before moving to the next. Players always move forward through the score, and the piece is finished when everyone reaches the end, which usually takes around 40 minutes at the recommended tempo.
![]()
A single potentiometer attached to analog in 1, on top of a Fluxamasynth Arduino shield.
The original score is available under a Creative Commons license.
One thing the Fluxamasynth allows is to play with different physical interfaces to algorithmic music like In C. When played by human musicians the tempo is determined by a pulse on the piano, and players listening to each other. In the Fluxamasynth version a single potentiometer controls the tempo and allows you to speed up the 40 minute performance to 3 minutes or so if you want.
// Terry Riley's In C
// This code expects an analog input on A1 to control tempo

#include <Fluxamasynth.h>
#include <PgmChange.h>

#define numInstruments  13
#define numParts 53

Fluxamasynth synth;

// The PgmChange.h header defines all of these instrument names
int instrument[numInstruments] = {
  BANK0_Vibraphone,
  BANK0_Marimba,
  BANK0_ElPiano1,
  BANK0_Vibraphone,
  BANK0_ElPiano1,
  BANK0_ElPiano1,
  BANK0_Vibraphone,
  BANK0_Marimba,
  BANK0_ElGrd_Piano3,
  BANK0_Vibraphone,
  BANK0_Marimba,
  BANK0_SynthBass1,
  BANK0_Grand_Piano1
};

// An array containing the score. The first element is a MIDI note 0-127
// followed by a duration in sixteenth notes. Each part ends with a 255
//
byte score[] = {
  0, 1, 255,                                             // part 0
  60, 1, 64, 3, 60, 1, 64, 3, 60, 1, 64, 3, 255,         // part 1
  60, 1, 64, 1, 65, 2, 64, 2, 0, 3, 255,                 // part 2
  0, 2, 64, 2, 65, 2, 64, 2, 255,                        // part 3
  0, 2, 64, 2, 65, 2, 67, 2, 255,                        // part 4
  64, 2, 65, 2, 67, 2, 0, 2, 255,                        // part 5
  72, 16, 72, 16, 255,                                   // part 6
  0, 14, 60, 1, 60, 1, 60, 2, 0, 18, 255,                // part 7
  67, 24, 65, 16, 65, 16, 255,                           // part 8
  71, 1, 67, 1, 0, 14, 255,                              // part 9
  71, 1, 67, 1, 255,                                     // part 10
  65, 1, 67, 1, 71, 1, 67, 1, 71, 1, 67, 1, 255,         // part 11
  65, 2, 67, 2, 71, 16, 71, 4, 255,                      // part 12
  71, 1, 67, 3, 67, 1, 65, 1, 67, 2, 0, 3, 67, 7, 255,   // part 13
  72, 16, 71, 16, 67, 16, 66, 16, 255,                   // part 14
  67, 1, 0, 15, 255,                                     // part 15
  67, 1, 71, 1, 72, 1, 71, 1, 255,                       // part 16
  71, 1, 72, 1, 71, 1, 72, 1, 71, 1, 0, 1, 255,          // part 17
  64, 1, 68, 1, 64, 1, 68, 1, 64, 3, 64, 2, 255,         // part 18
  0, 6, 79, 6, 255,                                      // part 19
  64, 1, 66, 1, 64, 1, 66, 1, 57, 3, 64, 1, 65, 1,
  64, 1, 65, 1, 64, 1, 255,                              // part 20
  66, 12, 255,                                           // part 21
  64, 6, 64, 6, 64, 6, 64, 6, 64, 6, 66, 6, 67, 6,
  69, 6, 71, 2, 255,                                     // part 22
  64, 2, 66, 6, 66, 6, 66, 6, 66, 6, 67, 6,
  69, 6, 71, 6, 255,                                     // part 23
  64, 2, 66, 2, 67, 6, 67, 6, 67, 6, 67, 6,
  67, 6, 69, 6, 71, 2, 255,                              // part 24
  64, 2, 66, 2, 67, 2, 69, 6, 69, 6, 69, 6,
  69, 6, 69, 6, 71, 6, 255,                              // part 25
  64, 2, 66, 2, 67, 2, 69, 2, 71, 6, 71, 6, 71, 6,
  71, 6, 71, 6, 255,                                     // part 26
  64, 1, 66, 1, 64, 1, 66, 1, 67, 2, 64, 1,
  67, 1, 66, 1, 64, 1, 66, 1, 64, 1, 255,                // part 27
  64, 1, 66, 1, 64, 1, 66, 1, 64, 3, 64, 1, 255,         // part 28
  64, 12, 67, 12, 72, 12, 255,                           // part 29
  72, 24, 255,                                           // part 30
  67, 1, 65, 1, 67, 1, 71, 1, 67, 1, 71, 1, 255,         // part 31
  65, 1, 67, 1, 65, 1, 67, 1, 71, 1, 65, 13, 67, 6, 255, // part 32
  67, 1, 65, 1, 0, 2, 255,                               // part 33
  67, 1, 65, 1, 255,                                     // part 34
  65, 1, 67, 1, 71, 1, 67, 1, 71, 1, 67, 1, 71, 1,
  67, 1, 71, 1, 67, 1, 0, 14, 70, 4, 79, 12,
  81, 2, 79, 4, 83, 2, 79, 6, 79, 2, 76, 12,
  79, 2, 78, 14, 0, 10, 76, 10, 77, 24, 255,             // part 35
  65, 1, 67, 1, 71, 1, 67, 1, 71, 1, 67, 1, 255,         // part 36
  65, 1, 67, 1, 255,                                     // part 37
  65, 1, 67, 1, 71, 1, 255,                              // part 38
  71, 1, 67, 1, 65, 1, 67, 1, 71, 1, 72, 1, 255,         // part 39
  71, 1, 65, 1, 255,                                     // part 40
  71, 1, 67, 1,                                          // part 41
  72, 16, 71, 16, 69, 16, 72, 16, 255,                   // part 42
  77, 1, 76, 1, 77, 1, 76, 1, 76, 2, 76, 2, 76, 2, 77,
  1, 76, 1, 255,                                         // part 43
  77, 2, 76, 4, 76, 2, 72, 4, 255,                       // part 44
  74, 4, 74, 4, 67, 4, 255,                              // part 45
  67, 1, 74, 1, 76, 1, 74, 1, 0, 2, 67, 2, 67, 2, 0,
  2, 67, 2, 67, 1, 74, 1, 76, 1, 74, 1, 255,             // part 46
  74, 1, 76, 1, 74, 2, 255,                              // part 47
  67, 24, 67, 16, 64, 16, 64, 4, 255,                    // part 48
  65, 1, 67, 1, 70, 1, 67, 1, 70, 1, 67, 1, 255,         // part 49
  65, 1, 67, 1, 255,                                     // part 50
  65, 1, 67, 1, 70, 1, 255,                              // part 51
  67, 1, 70, 1, 255,                                     // part 52
  70, 1, 67, 1, 255                                      // part 53
};

unsigned long  startTime;
int chance;
int max = 0;
int spread = 0;
int targetVolume=127;
int startPart = 1;
int partIndices[53];
int partBeats[53];
int index[numInstruments];
int part[numInstruments];
int beat[numInstruments];
int startDelay[numInstruments];
int note[numInstruments];
int volume[numInstruments];
int prevNote[numInstruments];
int noteCount[numInstruments];
boolean playNote[numInstruments];
boolean hitEnd[numInstruments];
boolean started[numInstruments];
boolean finished[numInstruments];
int numFinished = 0;
int tempo = 30;     // 30 to 150, center is 90

void setNextNote(int j) {
  // Sets up the next note to be played
  if (index[j] > 0) {
    prevNote[j] = score[index[j]-1];
  }
  else {
    prevNote[j] = 0;
  }
  note[j] = score[index[j]];
  if (j == 11) {
    note[j] -= 24;
  }
  noteCount[j] = score[index[j]+1];
  playNote[j] = true;
}

void setup() {
  // The tempo is determined by a potentiometer on Analog 1.
  pinMode(A0, OUTPUT);
  pinMode(A2, OUTPUT);
  digitalWrite(A0, LOW); // pot is powered by A0 and A2
  digitalWrite(A2, HIGH);
  // Calculate number of beats in each part
  int beatCount = 0;
  int c = 3;
  partIndices[0] = 0;
  for (int i=1; i<53; i++) {
    partIndices[i]=c;
    while (score[c] != 255) {
      c++;
      beatCount+=score[c];
      c++;
    }
    c++;
    partBeats[i] = beatCount;
    beatCount=0;
  }
  synth.setMasterVolume(75);

  // Set up the individual instruments
  for (int i=0; i<numInstruments; i++) {
    synth.programChange(0, i, instrument[i]);
    pan(i,127/numInstruments*i);
    volume[i] = targetVolume;
    synth.setChannelVolume(i, volume[i]);
    synth.setReverb(i, 3, 127, 25);
    //synth.setChorus(i, 3, 64, 25, 25);
  }
  randomSeed(analogRead(3));
  for (int i=0; i<numInstruments; i++) {
    index[i] = 0;
    part[i] = 0;
    note[i] = 0;
    noteCount[i] = 0;
    startDelay[i] = random(1, 20) * partBeats[1];
    playNote[i] = true;
    started[i] = false;
  }
  synth.setChannelVolume(9,0);  // Turn off the percussion channel
}

void loop() {
  tempo = map(analogRead(A1), 0, 1024, 30, 150);

  startTime = millis();
  Serial.print(startTime);
  Serial.print(" ");
  for (int i=0; i< numInstruments; i++) {
    if ((!started[i]) && (startDelay[i] == 0)) {
      started[i] = true;
      part[i]+=startPart;
      index[i] = partIndices[part[i]];
      setNextNote(i);
    }
    else {
      startDelay[i]--;
    }

    if ((started[i]) && (!finished[i])) {
      if (playNote[i]) {
        synth.allNotesOff(i);
        synth.noteOn(i, note[i], 127);
        playNote[i] = false;
      }
      beat[i]++;
      noteCount[i]--;
      if (noteCount[i] == 0) {
        if (beat[i] >= partBeats[part[i]]) {
          beat[i] = 0;
          // Add a spread to hold back the lead if it gets too far ahead
          if ((max-part[i] > 4)) {
            chance = 50;
          } else {
            chance = 90;
          }
          if ((max == part[i]) && (spread > 4)) {
            chance = 99;
          }
          if ((random(1, 100) > chance)) {
            part[i]++;
            if ((i==9) || (random(1, 100)>90)) {
              synth.setChannelVolume(i, 0);
            }
            else {
              synth.setChannelVolume(i, volume[i]);
            }
            max = 0;
            spread=0;
            for (int j=0; j<numInstruments; j++) {
              if (part[j]> max) {
                max = part[j];
              }
              if ((max-part[j])>spread) {
                spread = max-part[j];
              }
            }
            if (part[i]>numParts) {
              finished[i] = true;
              numFinished++;
            }
          }
          index[i] = partIndices[part[i]];
        }
        else {
          index[i] = index[i]+2;
        }
        setNextNote(i);
      }
    }
  }

  delay(tempo-(millis()-startTime));

}

void pan(int channel, int value) {
  // TODO: Add this to library
  byte command[3] = {
    (0xb0 | (channel & 0x0f)), 0x0A, (value)   };
  synth.fluxWrite(command, 3);
}
Here's the full length song at normal tempo (a bit rushed in the part changes for brevity):
Here's the 4 minute version with the tempo pot all the way up:
-
A Python library for the Fluxamasynth Pi
10/19/2018 at 22:32 • 0 commentsThe Raspberry Pi version of the Fluxamasynth can't use an Arduino library, so I ported that library to Python. Python libraries are called modules which at their simplest are a collection of function definitions in a file fluxamasynth.py:
import serial
port = "/dev/ttyS0"
serialPort = serial.Serial()

def setPort(p):
    port = p

def init():
    serialPort.baudrate = 31250
    serialPort.port = port
    serialPort.open()
    serialPort.flushInput

def noteOn(channel, pitch, velocity):
    packet = [ 0x90 | (channel & 0x0f), pitch, velocity];
    serialPort.write(bytearray(packet))

def noteOff(channel, pitch):
    packet = [ 0x80 | (channel & 0x0f), pitch, 0x00 ];
    serialPort.write(bytearray(packet))

...
To us the module, call import at the beginning of your script:
import fluxamasynth
from time import sleep
import random

fluxamasynth.init()

while (1):
    note = random.randint(0, 127)
    fluxamasynth.noteOn(0, note, 127)
    sleep(float(random.randint(0, 250))/1000)
    fluxamasynth.noteOff(0, note)
The Fluxamasynth Python library code is hosted on Github. You can clone or download the code from there, but I also packaged the module so a user can install the Fluxamasynth module using pip from the command line:
pip install fluxamasynthThe pip utility will grab the latest version of the Fluxamasynth module from the Python Package Index, a central repository for Python modules. It will also install the pyserial module dependency.
To package your module for distribution you need to create a README and LICENSE file, and a setup.py script that provides some metadata and points at your module's source code:
import setuptools

with open("README.md", "r") as fh:
    long_description = fh.read()

setuptools.setup(
    name="fluxamasynth",
    version="1.0",
    author="Shawn Wallace",
    author_email="fluxama@gmail.com",
    description="A library for the Raspberry Pi variant of the Fluxamasynth board.",
    long_description=long_description,
    long_description_content_type="text/markdown",
    url="https://github.com/fluxly/fluxamasynthPi",
    packages=setuptools.find_packages(),
    classifiers=(
        "Programming Language :: Python :: 3",
        "License :: OSI Approved :: MIT License",
        "Operating System :: OS Independent",
    ),
)
After that you need to create an account on the Python Package Index. Follow the full instructions for using pip and the Python setup tools in the Packaging Python Modules tutorial.
-
Soundboxen Examples
10/01/2018 at 21:28 • 0 commentsThe Fluxamasynth is well suited for making musical appliances. One example is from a series of Soundboxen; this one is inspired by Brian Eno's Music for Airports tape loops. For this appliance the length of each loop is determined by one of the potentiometers. The Arduino code for Fluxamasynth is here:
// Inspired by Eno's Music for Airports #2:
// F2 G#2 C3 C#3 D#3 F3 G#3
// Reads poteniometers on A0-A5

#include "Fluxamasynth.h"
Fluxamasynth synth;

int tones[6] = { 29, 32, 36, 37, 39, 41 };
int instruments[6] = { 55, 55, 55, 55, 55, 55 };
int tapeLength[6] = { 30, 31, 32, 33, 34, 35  };
int startingPoint[6] = { 0, 1, 2, 3, 4, 5 };
int length[6] = { 100, 110, 120, 130, 140, 150 };
int lengthCount[6] = { 0, 0, 0, 0, 0, 0 };
int tempo[6] = { 1000, 2000, 3000, 4000, 5000, 6000 };
int tempoCount[6] = { 0, 0, 0, 0, 0, 0 };
long int startTime = 0;

void setup() {
  Serial.begin(9600);
  int seed = 0;
  for (int i=0; i<6; i++) {
    seed += analogRead(i);
  }

  randomSeed(seed);
  delay(100);
  for (int i=0; i<6; i++) {
    synth.setChannelVolume(i, 255 );
    synth.allNotesOff(i);
    synth.setReverb(i, 5, 64, 0);
    synth.pan(5-i,127/(6*(i+1)));
  }
  changeProgram();
  startTime = 0;
}

void changeProgram() {
   for (int i=0; i<6; i++) {
      synth.programChange(0, i,random(127));
   }
}

void loop() {
  if (millis() > (startTime + 5000)) {
    changeProgram();
    startTime = millis();
    Serial.println("changeProgram");
  }
  int ledTempo = 0;
  for (int i=0; i<6; i++) {
    int val = analogRead(i);
    tempo[i] = 5100 - map(val, 0, 1023, 100, 5000);
    tempoCount[i]++;
    if (tempoCount[i] > tempo[i]) {
      if (lengthCount[i] == 0) {
        synth.noteOn(i, tones[i], 127);
      }
      lengthCount[i]++;
      if (lengthCount[i] > length[i]) {
        synth.noteOff(i, tones[i]);
        lengthCount[i] = 0;
        tempoCount[i] = 0;
      }
    }
  }
  delay(1);
}
Here's the result:
Here's one more example of a musical appliance: a radio station broadcasting generative music using Orff instruments on 102.5. This uses the Adafruit FM transmitter module and a Fluxamasynth to generate the music.
And the Arduino code:
#include <Wire.h> #include <Adafruit_Si4713.h> #include <fluxamasynth.h> #include <pgmchange.h></pgmchange.h></fluxamasynth.h> #define RESETPIN 12 //#define FMSTATION 8830 // 10230 == 102.30 MHz #define FMSTATION 10250 Adafruit_Si4713 radio = Adafruit_Si4713(RESETPIN); Fluxamasynth synth = Fluxamasynth(); #define numInstruments 4 byte parts[4]; int measures[16]; int notes[16]; int rhythm[16]; int percussion[16]; char partName[4] = {'a','b','c','d'}; int noteName[16]; int binaryChoice[16]; int noteOn[4] = {0, 0, 0, 0}; int rhythmOn[4] = {0, 0, 0, 0}; int tempo=30; // Limit instrument choice int instrument[numInstruments] = {13, 13, 13, 13}; void setup() { randomSeed(millis()+analogRead(0)); Serial.begin(9600); chooseParts(); synth.setMasterVolume(127); for (int i=0; i<numInstruments; i++) { synth.programChange(0, i, instrument[i]); pan(i,127/numInstruments*i); //synth.setChannelVolume(i, volume[i]); synth.setReverb(i, 3, 127, 25); } synth.setReverb(9,5,255,100); //Plate reverb delay(1000); Serial.println("Adafruit Radio - Si4713 Test"); if (! radio.begin()) { // begin with address 0x63 (CS high default) Serial.println("Couldn't find radio?"); while (1); } } void chooseParts() { parts[0] = random(254)+1; parts[1] = random(255); parts[1] = parts[1] & (parts[1]^parts[0]); parts[2] = random(255); parts[2] = parts[2] & (parts[2]^(parts[0]|parts[1])); parts[3] = ~(parts[0]|parts[1]|parts[2]); } void chooseMeasures(int p) { measures[0+p] = random(254)+1; measures[1+p] = random(255); measures[1+p] = measures[1+p] & (measures[1+p]^measures[0+p]); measures[2+p] = random(255); measures[2+p] = measures[2+p] & (measures[2+p]^(measures[0+p]|measures[1+p])); measures[3+p] = ~(measures[0+p]|measures[1+p]|measures[2+p]); } void chooseNotes(int p) { int baseNote = random(40)+50; noteName[p] = baseNote; noteName[p+1]=baseNote + (random(3)-1)*7; noteName[p+2]=baseNote + (random(3)-1)*4 + random(3)-1; noteName[p+3]=baseNote + (random(3)-1)*random(8); } void chooseRhythm(int p) { rhythm[0+p] = random(254)+1; rhythm[1+p] = random(255); rhythm[1+p] = rhythm[1+p] & (rhythm[1+p]^rhythm[0+p]); rhythm[2+p] = random(255); rhythm[2+p] = rhythm[2+p] & (rhythm[2+p]^(rhythm[0+p]|rhythm[1+p])); rhythm[3+p] = ~(rhythm[0+p]|rhythm[1+p]|rhythm[2+p]); } void choosePercussion(int p) { //percussion[p] = 36; //percussion[p+1]=38; //percussion[p+2]=42; //percussion[p+3]=44; percussion[p] = random(127); percussion[p+1]=random(127); percussion[p+2]=random(127); percussion[p+3]=random(127); } void loop() { // New Song for (int i=0; i<numInstruments; i++) { synth.allNotesOff(i); } tempo = random(200)+10; for (int i=0; i<4; i++) { instrument[i] = 13; synth.programChange(0, i, instrument[i]); } int numSections = random(20)+60; for (int m=0; m<4; m++) { choosePercussion(m); } for (int sections=0; sections<numSections; sections++) { chooseParts(); for (int m=0; m<4; m++) { chooseMeasures(m); chooseNotes(m); chooseRhythm(m); } for (int i=0; i<16; i++) { if (random(100)>50) { binaryChoice[i] = 1; } else { binaryChoice[i] = 0; } } tempo = tempo-random(tempo/160); // TODO: Add four time channels: triplet, quad, // quintuplet, septuplet while(random(100)<10) { for (int i=0; i<8; i++) { Serial.println(); for (int part =0; part<4; part++) { if ((parts[part]>>i) & 0x01) { Serial.print(partName[part]); for (int beat =0; beat<8; beat++) { delay(tempo); for (int voice=0; voice<4; voice++) { if (((measures[part+voice]>>beat) & 0x01)==binaryChoice[part+voice]) { if (noteOn[voice]!=noteName[part+voice]) { if (noteOn[voice]==0) { Serial.print(voice); synth.noteOn(voice, noteName[part+voice], 127); noteOn[voice] = noteName[part+voice]; } else { synth.noteOff(voice, noteOn[voice]); synth.noteOn(voice, noteName[part+voice], 127); //Serial.print("PrevOff"); //Serial.print("On"); noteOn[voice] = noteName[part+voice]; } } else { //Serial.print("Hold"); } } else { if (noteOn[voice]) { synth.noteOff(voice, noteOn[voice]); noteOn[voice]=0; } } if (((rhythm[part+voice]>>beat) & 0x01)==binaryChoice[part+voice]) { if (!rhythmOn[voice]) { rhythmOn[voice]=1; synth.noteOn(9, percussion[voice], 100) ; synth.noteOff(9, percussion[voice]) ; } } else { rhythmOn[voice]=0; } } } } } } } } delay(2000); } void pan(int channel, int value) { // TODO: Add this to library (done) byte command[3] = { (0xb0 | (channel & 0x0f)), 0x0A, (value) }; synth.fluxWrite(command, 3); } -
Fluxamasynth Software
10/01/2018 at 21:28 • 1 commentThere are two interfaces for communicating with the SAM2695; a simple serial line and a parallel interface. The Fluxamasynth uses the serial interface; all you have to do is send the chip the right MIDI commands in the right order.
![]()
The SAM2695 datasheet has several tables of MIDI commands that the SAM2695 recognizes.
The first iteration of the library had all of the basics: noteOn, noteOff, reverb, chorus etc. The latest iteration added access to some of the extras and lower-level capabilities, like the 4 channel equalizer, envelope tweaking, and special percussion modes.
With the new hardware variations the library has to pick the correct communication pins based on the target hardware. These can be determined from the compiler flags passed to the library when the Arduino IDE compiles it in to your code. Here's how to set an environment variable in the library header based on the incoming flags:
IMAGE screenshot of arduino compiler flags
#define FLUXAMASYNTH_ESP32 1 #define FLUXAMASYNTH_SHIELD 2 #define FLUXAMASYNTH_FOR_FEATHER 3#if defined(ESP_PLATFORM) #define FS_PLATFORM FLUXAMASYNTH_ESP32 #elif defined(ARDUINO_AVR_FEATHER32U4) #define FS_PLATFORM FLUXAMASYNTH_FOR_FEATHER #elif defined(ARDUINO_SAMD_FEATHER_M0_EXPRESS) || defined(ARDUINO_SAMD_FEATHER_M0) #define FS_PLATFORM FLUXAMASYNTH_FOR_FEATHER_M0 #elif defined(ARDUINO) #define FS_PLATFORM FLUXAMASYNTH_SHIELD #endif #ifndef FS_PLATFORM #define FS_PLATFORM FLUXAMASYNTH_SHIELD #endifThe latest library is available on Github. It provides these functions:
- noteOn(channel, pitch, velocity);
- noteOff(channel, pitch);
- programChange (bank, channel, v);
- pitchBend(channel, int v);
- pitchBendRange(channel, v);
- midiReset();
- setChannelVolume(channel, level);
- allNotesOff(channel);
- setMasterVolume(level);
- setReverb(channel, program, level, delayFeedback);
- setChorus(channel, program, level, feedback, chorusDelay);
- pan(int channel, int value);
- setEQ(channel, lowBand, medLowBand, medHighBand, highBand, lowFreq, medLowFreq, medHighFreq, highFreq);
- setTuning(channel, coarse, fine);
- setVibrate(channel, rate, depth, mod);
- setTVF(channel, cutoff, resonance);
- setEnvelope(channel, attack, decay, release);
- setScaleTuning(channel, v1, v2, v3, v4, v5, v6, v7, v8, v9, v10, v11, v12);
- setModWheel(channel, pitch, tvtCutoff, amplitude, rate, pitchDepth, tvfDepth, tvaDepth);
A simple Fluxamasynth program using the Arduino IDE and library looks like this:
#include <Fluxamasynth.h> Fluxamasynth synth; void setup() { synth.setMasterVolume(255); } void loop() { for (int note=60; note<85; note++) { synth.noteOn(0, note, 100); delay(200); synth.noteOn(0, note, 0); } } -
Hardware Variations
10/01/2018 at 21:27 • 0 comments![]()
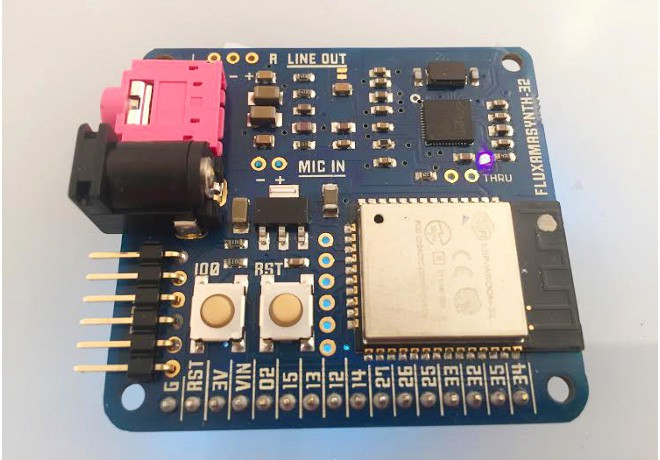
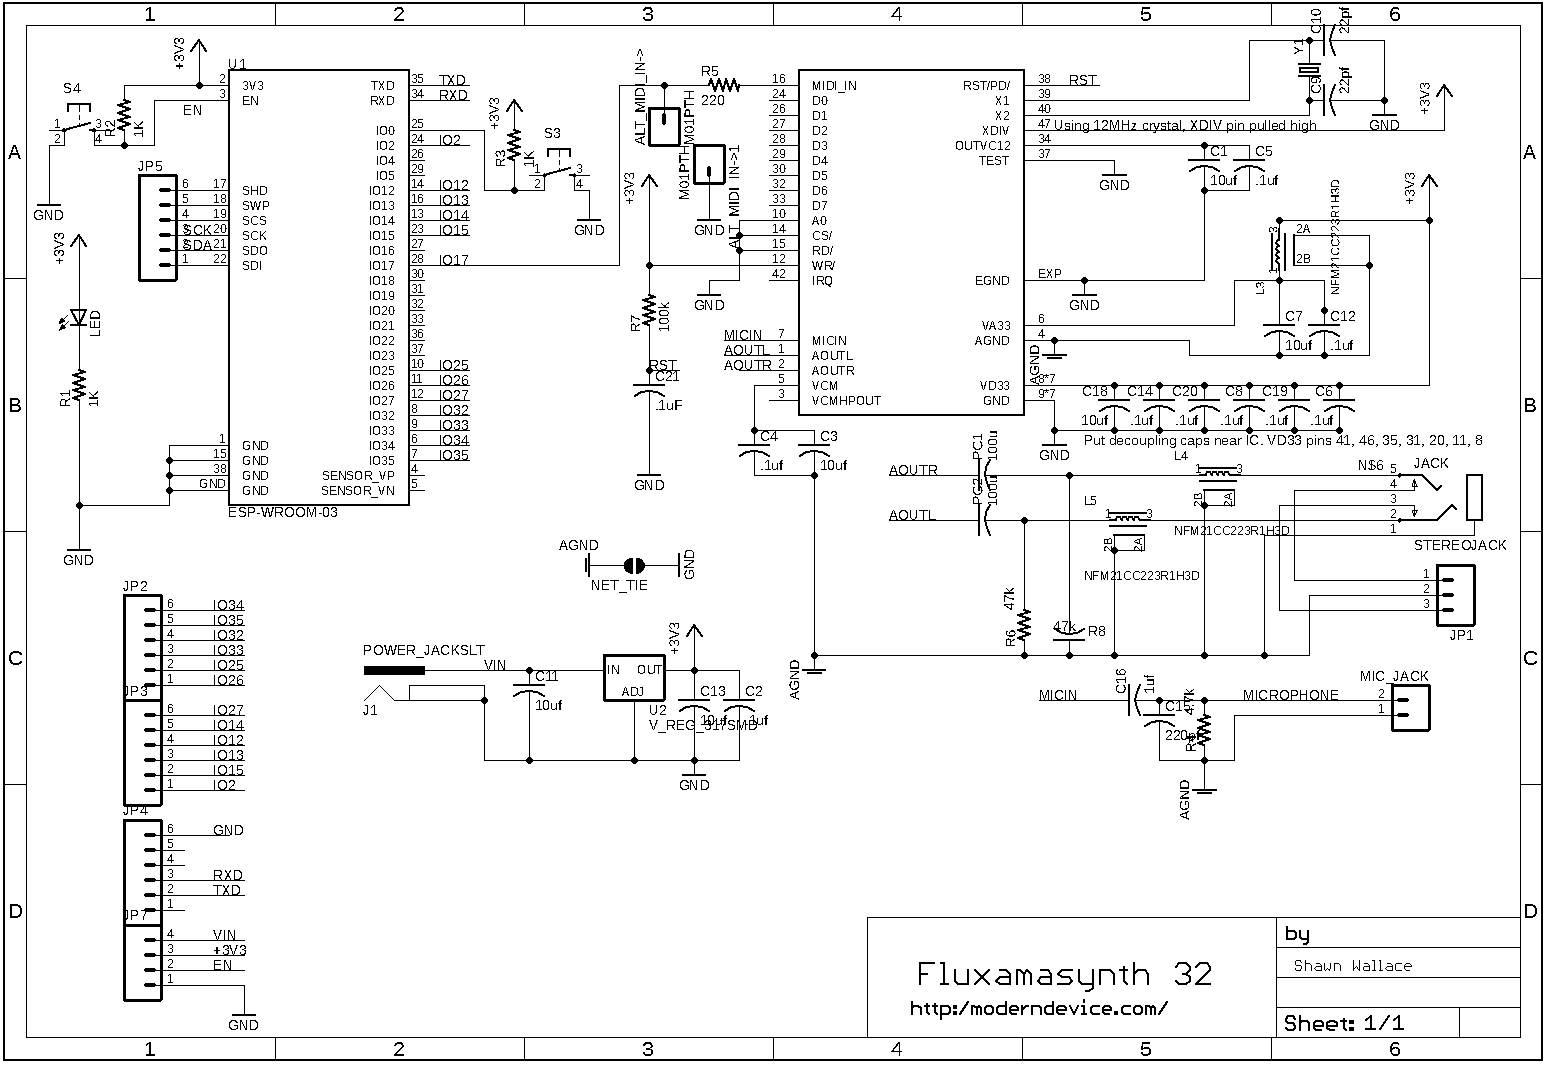
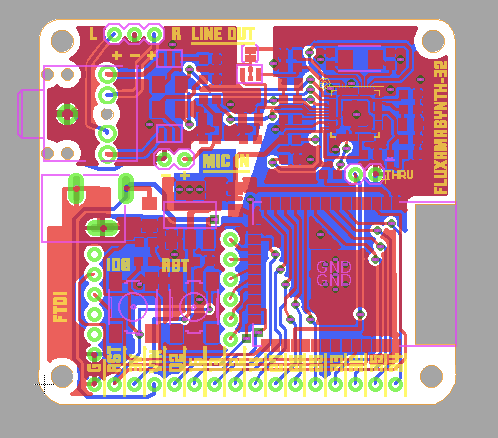
The first new variation is the Fluxamasynth-32, an all-in-one module with an ESP32 on board. I wanted something that could be programmed using the Arduino IDE but didn't require a separate Arduino board. The ESP32 also provides Wifi and BLE features, so Fluxamasynth-32 modules can speak to a server or each other.
![]()
![]()
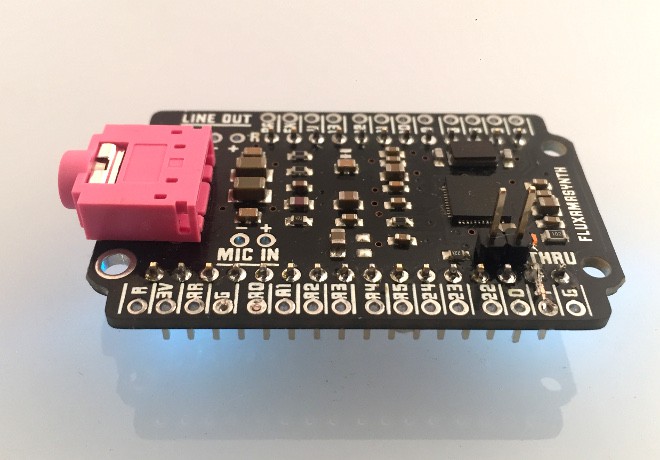
When making the new board design I tightened up the layout of the traces. Around the same time Kingbright announced a new line of pastel LEDs so all the new Fluxamasynth's have pink LEDs.
![]()
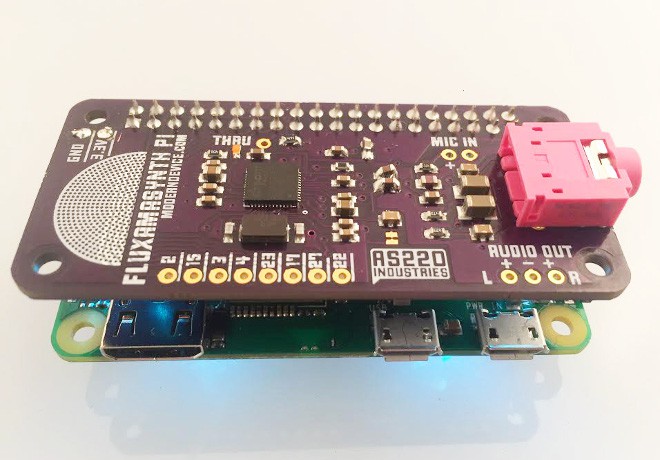
Once I had the layout it was easy to make a version for the Raspberry Pi. In the first iteration I gave it a separate 3.3V regulator that was fed by the 5V pin on the Pi header. It turns out that supply is very noisy (especially when USB is used) and it was much cleaner to just run it off of the Pi's regulated 3.3V supply.
![]()
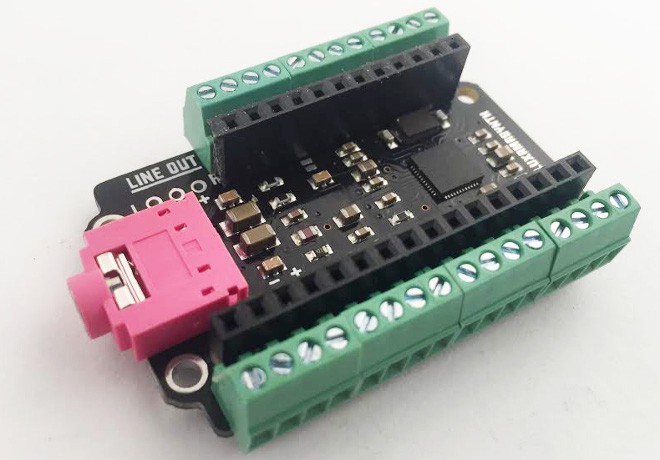
Finally, I had been using a few of the different Adafruit Feather development boards and they seemed like a popular solution for when you need a combination of small form factor and battery recharging. The Fluxamasynth for Feather fits the form Factor.
![]()
It can go on top or on the bottom but is probably better on the bottom since some of the ARM Feathers need access to the reset and bootloader buttons on top. The breakout pins on the outside are spaced slightly off grid to accommodate the 1x4 screw terminals that I was using.
![]()
I already had a Fluxamasynth library, with code contributed by Fluxamasynth user R. McGinnis. Next step was to update the library for the new boards and expose some more of the lower level functionality of the chip with the library.
Fluxamasynth Modules
The Fluxamasynth is a module that makes it easy to add high quality MIDI sound to any Arduino or Raspberry Pi project.