Voja Antonic
-
Hackaday BASIC Interpreter
10/16/2018 at 16:21 • 1 commentThe Hackaday BASIC interpreter is based on the uBASIC project by Adam Dunkels. This provided a tokenizer and the most rudimentary words needed for the language to operate. From there, Jaromir Sukuba greatly expanded the word set to take advantage of the best the badge hardware has to offer.
We are also testing out an advancement in the tokenizer written by @ziggurat29 which shows a speed-up of as much as 40x!
The reference for all of the words is listed below. You may also see examples of these words in use by viewing the example code project log.
Of Note:
- Code in the program buffer can be viewed one page at a time by typing
more. You can overwrite lines just by typing the line number at the prompt along with your new commands. It is recommended that you number every 10 lines or more so that you can add commands in between them as you develop your code. - The
memclrword will clear the code currently in the program buffer. - Always save before running in case you have to reset the badge.
save 0will save to the first of 16 slots,load 0will load the saved code. - Press the BRK key to break out of a running program
- Typing a line number without anything after it will delete that line from your program
- There are two print commands.
printwill not include a line feed,printlnwill include a line feed
BASIC Word List:
Standard Words:
printprintlnifgotogosubreturnfornextendletrem
Badge Custom Words
led X,Y- control LED, X[0..2] RGB, Y[0..1] on/offtune A,B,C,D- plays tones A, B, C for duration Dclrscr- clear screensetxy X,Y- set cursor at X,Ywait X- wait for X mscolor X,Y- X=Foreground, Y=Background using EGA 16-color palettechr X- prints character with ASCII representation Xtermt X- sets VT100 terminal on or off (1-on, 0-off)termup- forces screen refresh, if VT100 terminal is offrnd X- function to return random number 0..Xein X- function to return value of expansion pin Xeout X,Y- control expansion pin, X[0..3], Y[0..1] on/off (pin 0 is labelled "G2", 1="G3", 2="B0", 3="B1")edr X,Y- sets expansion pin function X[0..3], Y[0..1] output/inputuin X- function to return received byte from serial port, if X=0, function is non-blocking, if X=1, function is blockinguout X- outputs value X to serial port as single byteinput "string"- prints string and returns user entered valuepeek X- returns value from memory location Xpoke X,Y- write value Y into memory, on location Xcursor X- turns cursor on (X=1) or off (X=0)kin X- function to return byte from keyboard, if X=0, function is non-blocking, if X=1, function is blocking
BASIC CLI commands
run- runs programsave X- Save program buffer to flash. There are 16 slots: X[0..15]load X- Load program into buffer from flash. There are 16 slots: X[0..15]list- list whole programmore- list program by pagesmemclr- clears all code from the program bufferfree- prints amount of free program buffersload- load new program into buffer from serial portssave- output program buffer via serial porthelp- short help
Aliases
In order to save you some typing, we defined some aliases for functions
print-pntprintln-ptl
clrscr-cls,clrinput-inpsetxy-sxyreturn-retcursor-cur
Gotchas
There are a few gotchas that you may run into if really go wild with your BASIC program. Here's a few to keep in mind for those who care to read them:
- There is a line limit of about 70 characters (just shy of two lines on the badge's scree). If you type more characters than this, your command will be truncated.
- If you're using the GPIO pins and you press the power button while your program is running, you will need to reinitialize the IO pins after you turn the badge back on. You can work around this by making sure you re-initialize the direction and pin values frequently in your looping programs and not just at the beginning.
- Code in the program buffer can be viewed one page at a time by typing
-
BASIC Program Examples
10/16/2018 at 16:21 • 0 commentsPrint out all possible characters:
10 for i=32 to 255
20 chr i
30 next i
Bling the LEDs randomly (d is diode [0..2], s is state [0..1])
10 d = rnd 2
20 s = rnd 1
30 led d,s
40 print “Press BRK to return to BASIC prompt”
50 wait 100
60 goto 10
Play random Major triads:
10 let i = rnd 77
20 if i<53 then goto 10
30 tune i,i+4,i+7,400
40 goto 10
Scroll some text. The space before the text erases the previous character in that position:
10 let i=0
20 color 14,12
30 clrscr
40 setxy i,0
50 print " Scroller"
60 i=i+1
70 wait 150
80 if i<32 then goto 40
90 color 15,0
Bounce ball on screen. Shows:
- Moving to different areas on screen.
- Changing color.
- Using delays and subroutines.
- Turn off the blinking text cursor with cursor 0.
- Manual screen refresh (termt 0 shuts off automatic scanning, termup triggers manual refresh) for a smoother animation than the scroll text example.
5 termt 0
7 cursor 0
10 let x = 39
20 let d = 0
30 clrscr
40 color 11,0
50 setxy x,10
60 chr 32
70 if d = 1 then gosub 200
80 if d = 0 then gosub 300
90 chr 254
95 termup
100 if x = 0 then d = 1
110 if x = 39 then d = 0
120 wait 50
130 goto 50
200 x = x + 1
210 return
300 x = x - 1
310 setxy x,10
320 return
Function to read byte from serial port and print it out
10 println uin 0
20 wait 500
30 goto 10
This one starts printing zero every 500ms, if there is any incoming byte from serial port, it gets written out.
If you change uin parameter from 0 to 1, function gets blocking, ie. execution doesn't continue until serial byte is received. In that case, only when byte is received interpreter prints anything out.
The same example can be used to read data from keyboard, the function used is called kin.
-
Music Syntax and Guide
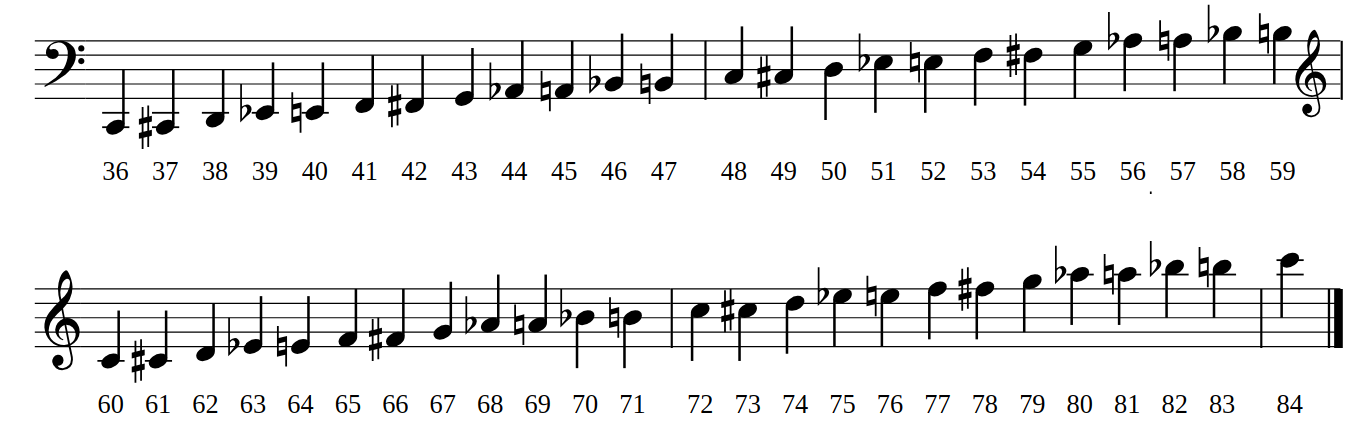
10/16/2018 at 16:21 • 0 commentsThis badge has a built-in speaker and you can compose music for 3 voices using a simple scripting language. Use the BASIC interpreter to access these features with the syntax:
tune voice1,voice2,voice3,durationDuration is the number of milliseconds this chord should be held. The voice values use Scientific Pitch Notation (https://hac.io/hGf7) where middle C is 60. Do a C major chord held for 1 second would look like this
tune 60,64,67,1000-- below is a cheat sheet.PRO TIP: Remember BASIC programs can be saved in any of 16 slots (0..15) using the save/load commands.
![]()
As an example, try typing this into your BASIC interpreter (you may want to type
memclrbefore you start, to clear any existing code):10 tune 0,0,72,131 20 tune 0,0,74,131 30 tune 0,0,77,131 40 tune 0,0,74,131 50 tune 70,74,81,262 60 tune 0,0,0,131 70 tune 70,74,81,393 80 tune 60,76,79,524 90 tune 0,0,0,131 100 tune 0,0,72,131 110 tune 0,0,74,131 120 tune 0,0,77,131 130 tune 0,0,74,131 140 tune 69,72,79,262 150 tune 0,0,0,131 160 tune 69,72,79,393 170 tune 62,69,77,393 180 tune 62,69,76,131 190 tune 62,69,74,655
-
Serial Communications with Badge
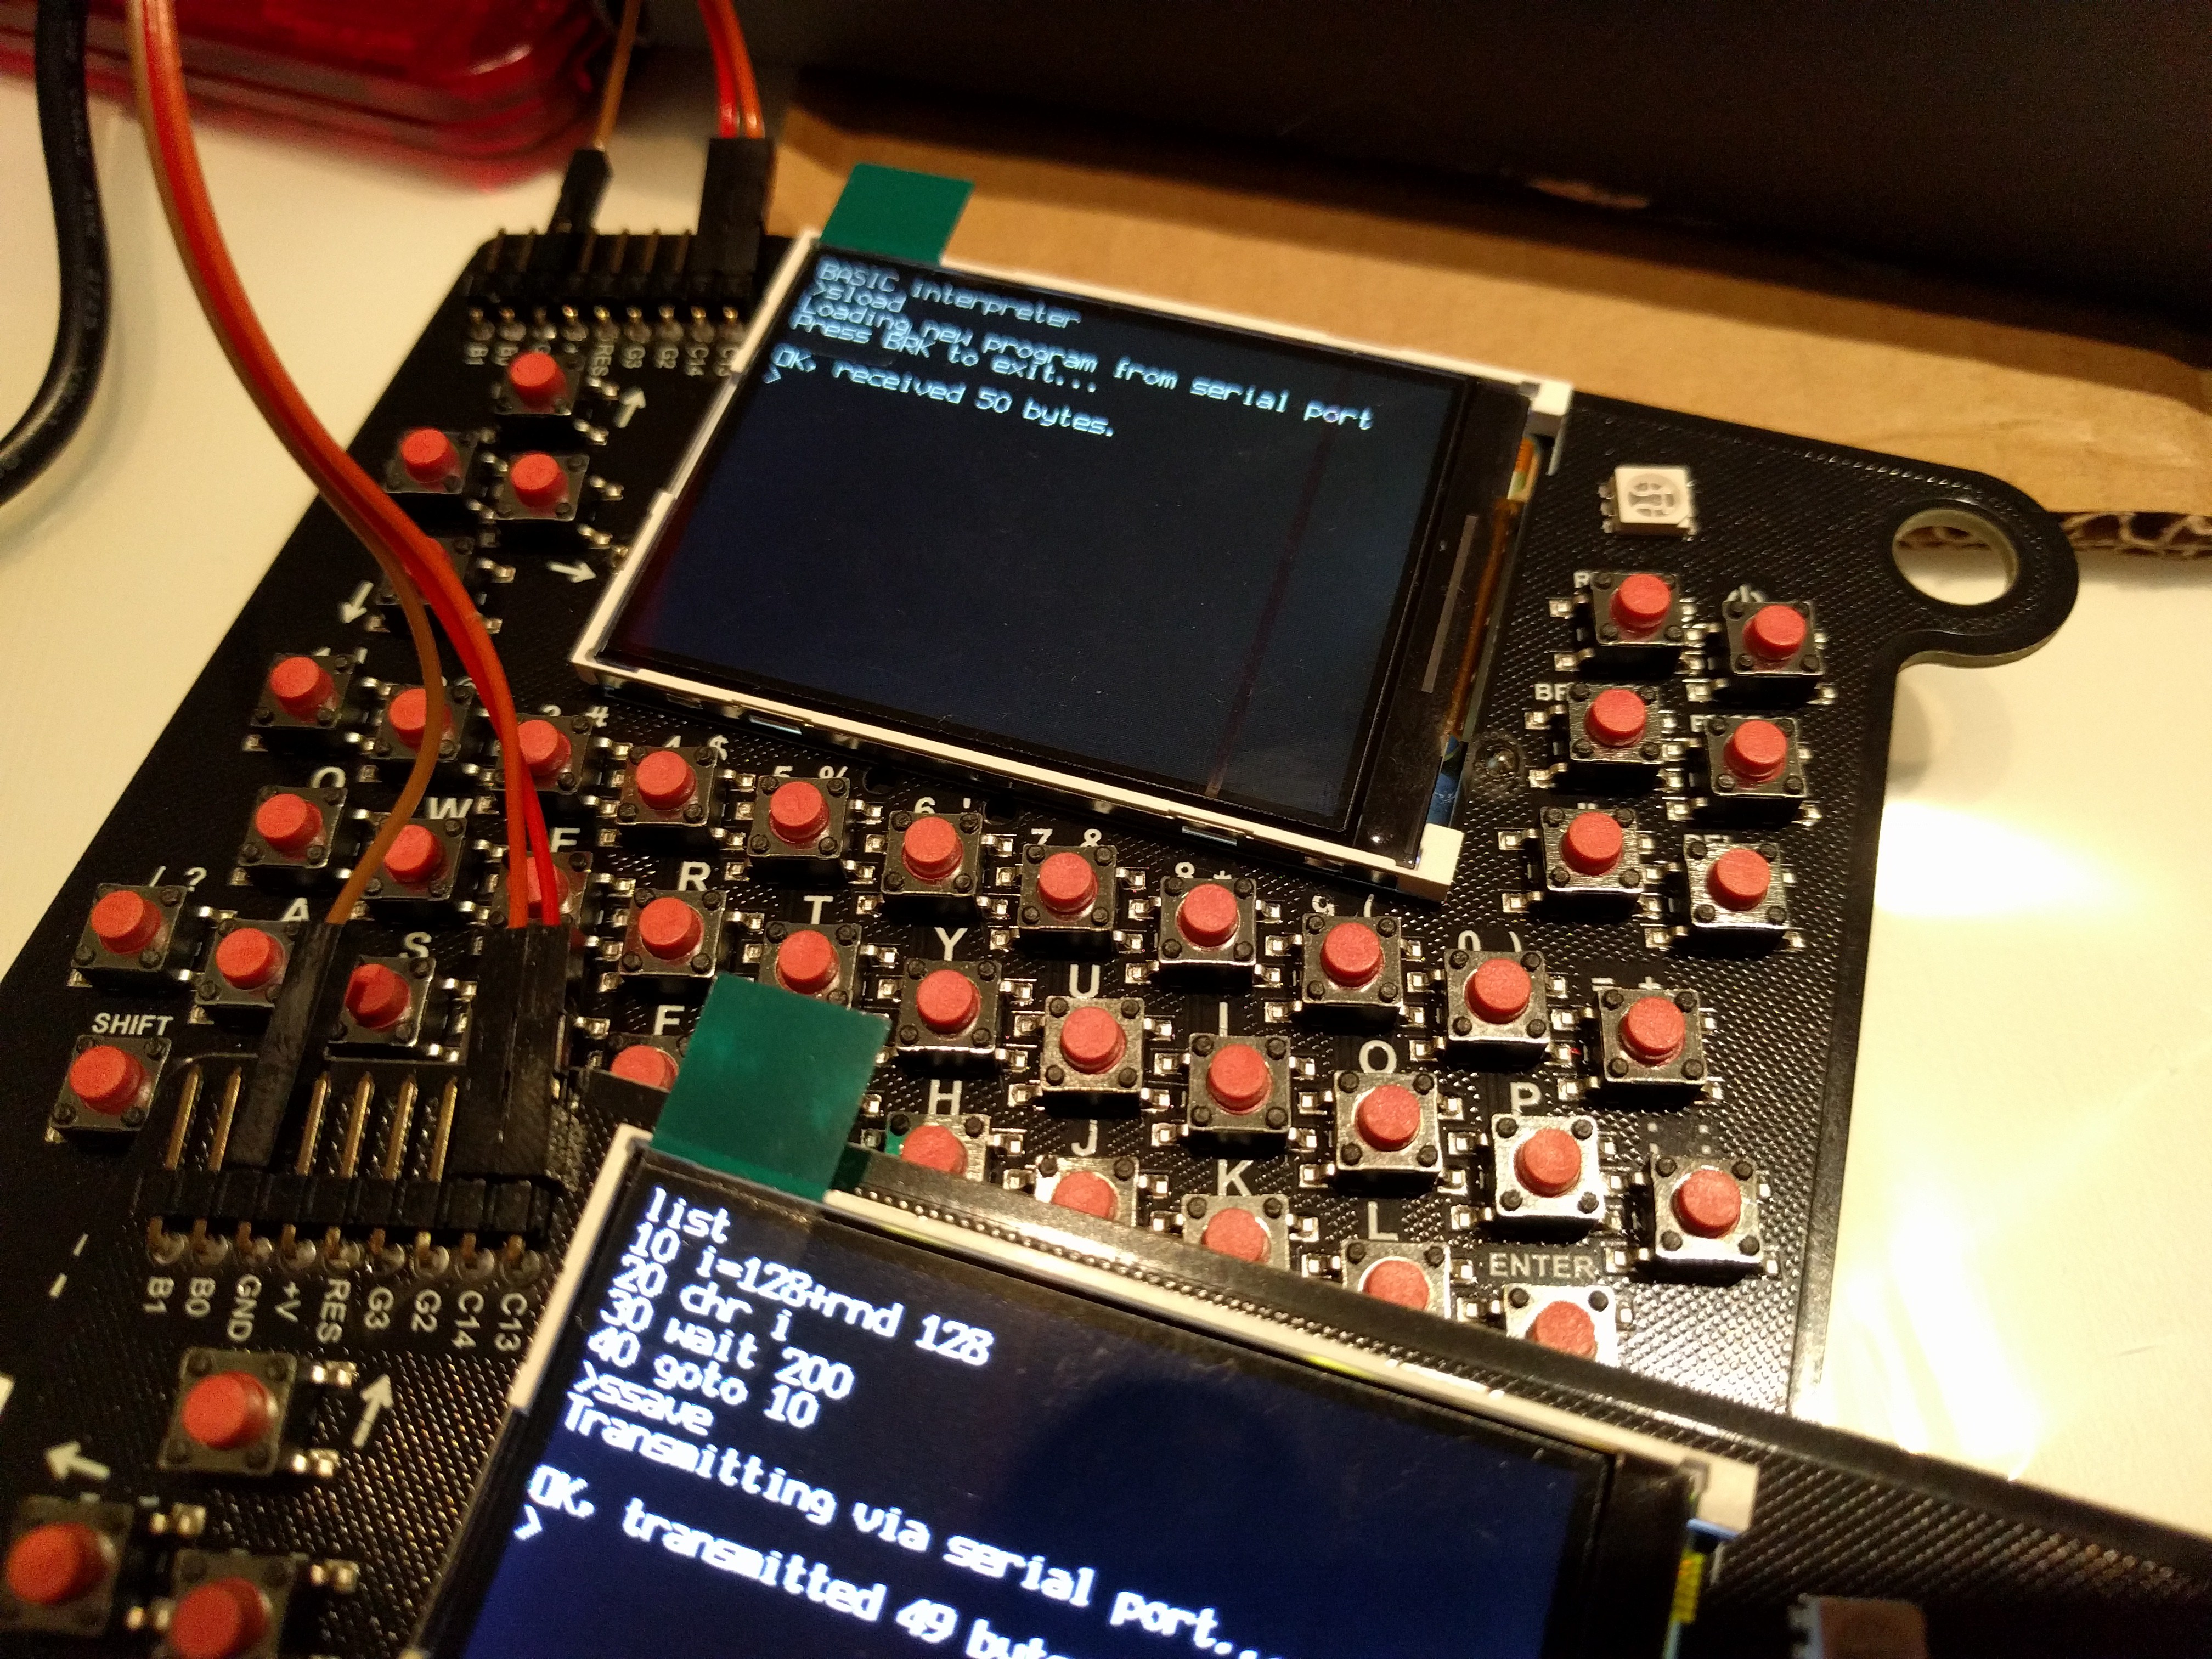
10/16/2018 at 16:21 • 2 commentsBadge to Badge
Remember those TI graphic calculators that had a cable to transfer programs? The badges can work in the same way.
![]()
- Connect the GND pins on the expansion header.
- Connect C14<-->C13 and C13<-->C14 on the two badges.
- On receiving badge type "sload" and it will wait for program to arrive
- On sending badge type "ssave". Program will be sent. Receiving badge will report 1 byte more than sending badge to indicate the zero terminator
- Type list on receiving badge to see new code in the program buffer.
IMPORTANT TIP: If the receiving badge doesn't react, reset that badge (shift-reset) and try again. Sometimes this is necessary after first connecting the cables.
Computer-to-Badge
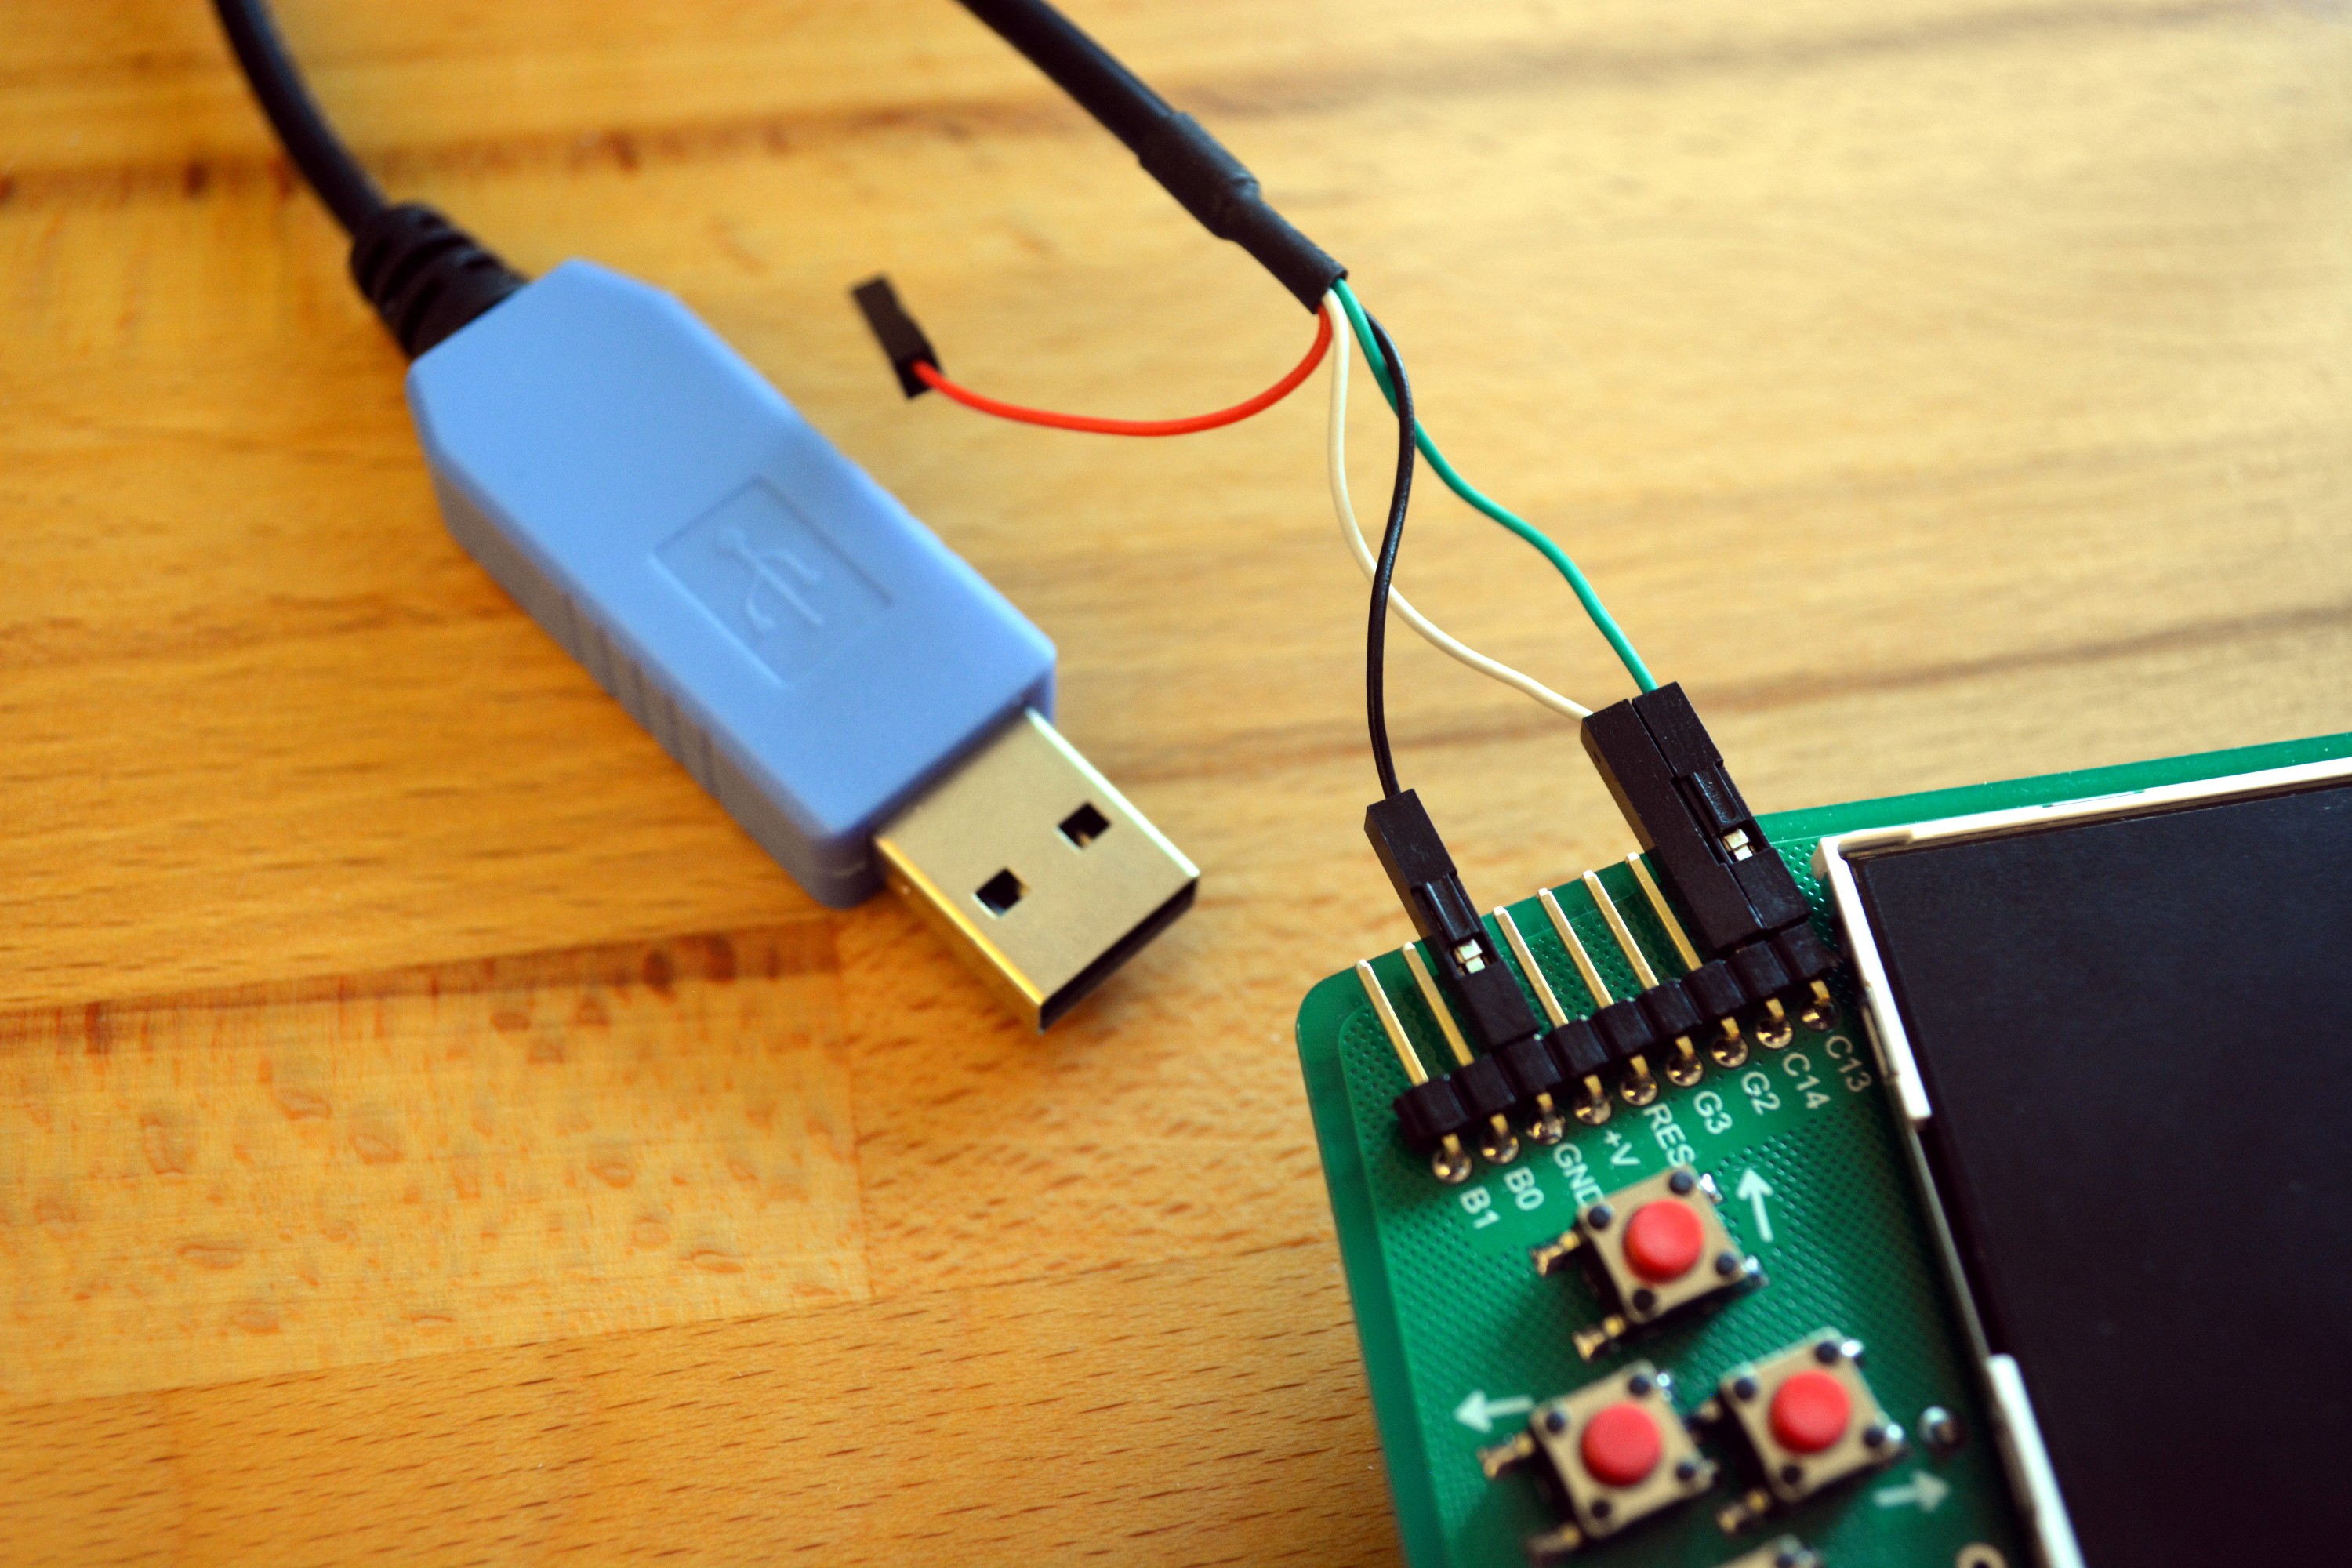
A serial-to-TTL cable will allow you to communicate between the badge and a computer. If you own one of this cables we highly recommend you bring it with you! We will have cables on hand but it will be necessary to share them so extras are great!
Wiring Diagram:
- Badge Pin Ground (GND) --> Ground on serial cable
- Badge Pin TX (C14) --> RX on serial cable (White in this example)
- Badge Pin RX (C13) --> TX on serial cable (Green in this example)
- Important: Leave voltage disconnected (Red in this example)
![]()
Serial Connection Info:
- Baud: 19200 8N1
- In basic, use command
ssaveto send program buffer as string - In BASIC, use command
sloadto recieve string into buffer - CP/M includes xmodem. Check your computer's serial program to ensure it supports this protocol. In the Z80 Emulator, switch to b: drive and run command similar to this:
xmdm r d:FILENAME.EXT
Linux: Simple Instructions for Transferring BASIC Programs
This quick walkthrough assumes that USB to TTL serial cable will enumerate as /dev/ttyUSB0. Look at dmesg output after plugging cable to ensure this is true.
Setup simple Linux serial connection:
Use dmesg and look for where the serial cable is mounted -- this example assumes /dev/ttyUSB0. It then sets permissions to that mounting point, sets the serial parameters to a "sane" value, and configures the port as needed. When in doubt, power cycle your badge and try again.
sudo chmod 777 /dev/ttyUSB0
stty -F /dev/ttyUSB0 sane
stty -F /dev/ttyUSB0 19200 cs8 -cstopb -parenb -opost -inlcr
stty -F /dev/ttyUSB0
Send a File to Badge
- On the badge, type
sloadinto BASIC - On computer type:
cat basic.txt > /dev/ttyUSB0 - On the badge, press BRK
Receive a File from Badge
- On computer type:
cat /dev/ttyUSB0 > newbasic.txt - On the badge, type ssave
- On computer type CTRL-C
MacOS X
Be sure your adapter is properly installed and set up (may require downloading and installing driver) before using either of the two options below: command line vs. GUI
Option 1: Command line configuration with 'stty'
(Works with some but not all adapters on MacOS X. Notably, this doesn't appear to work with PL2303-based adapters like the one sold by Adafruit.)
MacOS X also has the 'stty' command like Linux above. However, the MacOS implementation doesn't follow the same rules on persisting settings. According to information from this page on StackExchange, the trick is to "hold" the serial port so that it retains settings yet does not return a "Resource busy" error when something else tries to use the port.
The procedure is as follows:
- Find the name of your serial port device inside /dev/. It is probably /dev/cu.usbserial-[something something]. Use this name in place of the example 'cu.usbserial-ABCD1234 for the rest of this procedure.
$ ls /dev/cu.usb* /dev/cu.usbserial-ABCD1234- Before using any serial port commands, open a "file descriptor" on that device. This only needs to be done once per session.
$ exec 3<>/dev/cu.usbserial-ABCD1234- Run the 'stty' commands, now the settings will stick.
$ stty -f /dev/cu.usbserial-ABCD1234 19200 cs8 -cstopb -parenb -opost -inlcr- As above, transfer BASIC program to badge with cat [filename] > [usb device]
$ cat basic.txt > /dev/cu.usbserial-ABCD1234- Transfer from badge with cat [usb device] > [filename]
$ cat /dev/cu.usbserial-ABCD1234 > newbasic.txt- Repeat serial commands as many times as desired for this session.
- When done, clean up by closing the file desriptor.
$ exec 3<&-Option 2: CoolTerm
(Works with all known adapters, but requires installing software.)
- Download CoolTerm for MacOS X, install, and launch.
- Click 'Options' to configure CoolTerm.
- 'Port' = the USB to serial adapter.
- 'Baudrate' = 19200
- 'Data Bits' = 8
- 'Parity' = N
- 'Stop bits' = 1
- Click 'Connect' to establish connection.
- To upload a text file: Inside "Connection" menu, select "Send Textfile..."
- To download, "Connection"/"Capture to Textfile"
Windows: Serial transfer
Courtesy of [Electron Plumber]:
Configure serial port (COM3)
C:\Users\user>mode COM3 BAUD=19200 PARITY=n DATA=8Copy file to serial port
C:\Users\user>copy basic.txt COM3 1 file(s) copied. -
Guide for Programming in C
10/16/2018 at 16:21 • 6 commentsSetting Up the Toolchain
You will need a PIC programmer to write your own HEX files onto the badge. PICkit 3 and PICkit 4 have both been tested to work as programmers via the pin header on the badge.
The BASIC badge is based around a PIC32MX370F512H. Software is compiled using MPLABX, XC32 compiler, and legacy peripheral libraries from Microchip.
- Download three packages:
- Navigate to the Downloads" tab at the bottom of the Microchip Compilers page.
- Download
MPLAB® XC32/32++ Compiler v2.10for your operating system - Download
PIC32 Legacy Peripheral Librariesfor your operating system - Navigate to the "Downloads" tab part way down the screen at the Microchip MPLAB X IDE page.
- Install the packages:
- Install the XC32 compiler first
- Install the peripheral libraries next. IMPORTANT: You must specify the same directory as the XC32 compiler. This will likely not be the default option during install. For Linux installation this director was:
/opt/microchip/xc32/v2.10/ - Install MPLABX IDE
- Open the MPLABX project from this repository
- A PIC programmer like the PICKIT3 is required to program your badge
- On the PIC programmer, pins 1-5 correspond to RES, V+, GND, B0, and B1 on the badge
(If your programmer isn't recognized in Ubuntu 18.04 see troubleshooting below)
Testing Your Toolchain Installation
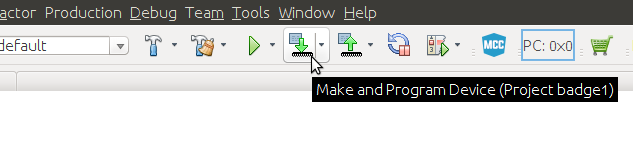
To test that the tools are properly installed before Supercon, clone the badge firmware repository on Github. Open the project, plug in your PICkit, and click "Make and Program Device"
![]()
If all goes well, everything will work up to the point PICkit tries to communicate with a badge that's not there yet, at which time you'll see an error message like this:
Target device was not found (could not detect target voltage VDD).
You must connect to a target device to use PICkit 3.
Congratulations! You are ready to hit the ground running. Once you pick up your badge and connect it to your PICkit, the firmware upload should succeed.
User Examples for C Programming
The stock firmware includes an example program that has both a menu entry, and many of the commands that will commonly be needed to write your own C code.
- Selecting user program will run
void user_program_init(void)first.- This is where you should do all of your program setup. This is a good function to call from your program when you want it to start over again.
- After the init function is called,
void user_program_loop(void)will be called- This is where the main functionality of your program should be stored.
- If this function returns, it will immediately be called again.
- millis() is a 32-bit upcounting millisecond timer. Non-blocking delays are a matter of setting a variable as millis()+1000 and then polling millis() until it is larger than this variable.
Advanced
- The screen defaults to scanning a 40x20 character array (screen will automatically update when array data changes). For direct control of the screen:
enable_display_scanning(0);//Turns off auto screen scanning, value of 1 turns back on- view disp.h for screen manipulation functions to use in manual mode
- When directly controlling the screen, you will want to perform a screen refresh after badge wakes up from sleep
- There is function pointer in hw.h that will call your screen refresh function on wake. Here is the example for setting which function will be executed (do this in the initialization function of your program):
start_after_wake = &you_refresh_function;
Troubleshooting
Upon updating to Ubuntu 18.04 it seems that Microchip's udev rules for PICkit programmers have been broken by the new systemd configuration. Here's how to fix:
(These instructions found at: https://www.microchip.com/forums/FindPost/1071004)
$ sudo systemctl edit systemd-udevd
An editor will open to create a so called override.conf file.
In the empty override file, copy and paste this two lines:[Service] IPAddressAllow=localhostEnter Ctrl-O to save, then Ctrl-X to exit.
$ sudo reboot
Compiler error on fundamental C types, like 'void':
error: variable has incomplete type 'void'
error: expected ';' after top level declarator
Recently Microchip upgraded their compilers to default to C99 standards, but older C code (like the legacy libraries used by the badge) do not meet that standard. You'll need to go into Project Properties and, under compiler global options, change C standard to C90.
fatal error: peripheral/adc10.h: No such file or directory
This error means the PIC32 Legacy Peripheral Libraries were not successfully installed. Please review installation instructions above, especially the part about specifying XC32 compiler directory.
- Download three packages:
-
Hardware Hacking
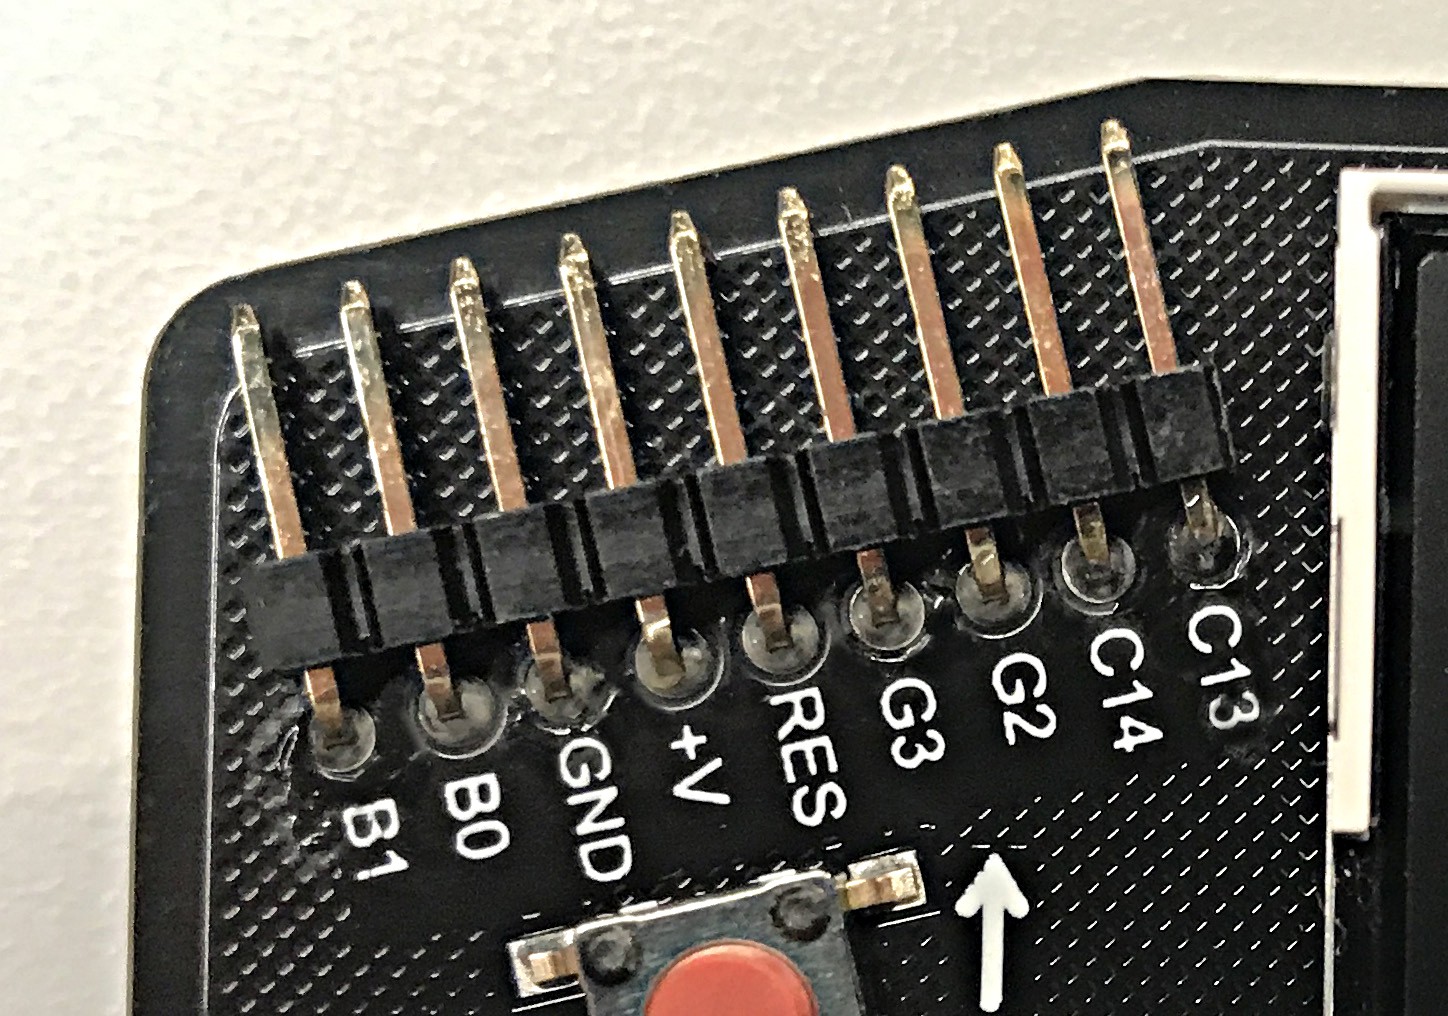
10/16/2018 at 16:20 • 7 commentsFront view of expansion Header:
![]()
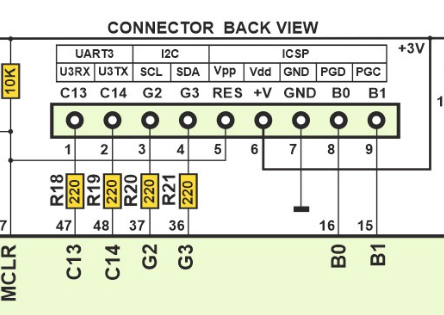
Here is a rear view diagram of the pin header taken from the badge schematic.
![]()
These pins can be controlled from BASIC using the edir, ein, and eout commands. The UART on pins C13 and C14 can be accessed from BASIC using uin and uout commands.
G2 and G3 are 5V tolerant but all other pins should be interfaced at 3V.
Important: there is no voltage regulation on the badge, and the PIC32 datasheet lists maximum Vdd of 3.6. Keep this in mind if upgrading power supply beyond a pair of AA batteries. (A fully charged lithium ion battery tops out at 4.2V.)
Expansion Board
![]()
New for the Hackaday Supercon is a hardware expansion board for prototyping your own circuits. Pictured here is the prototype. The final design will be black, and it will include three headers for #Shitty Add-Ons
To the right there will be a mounting hole so that the expansion board can be firmly affixed to your badge.
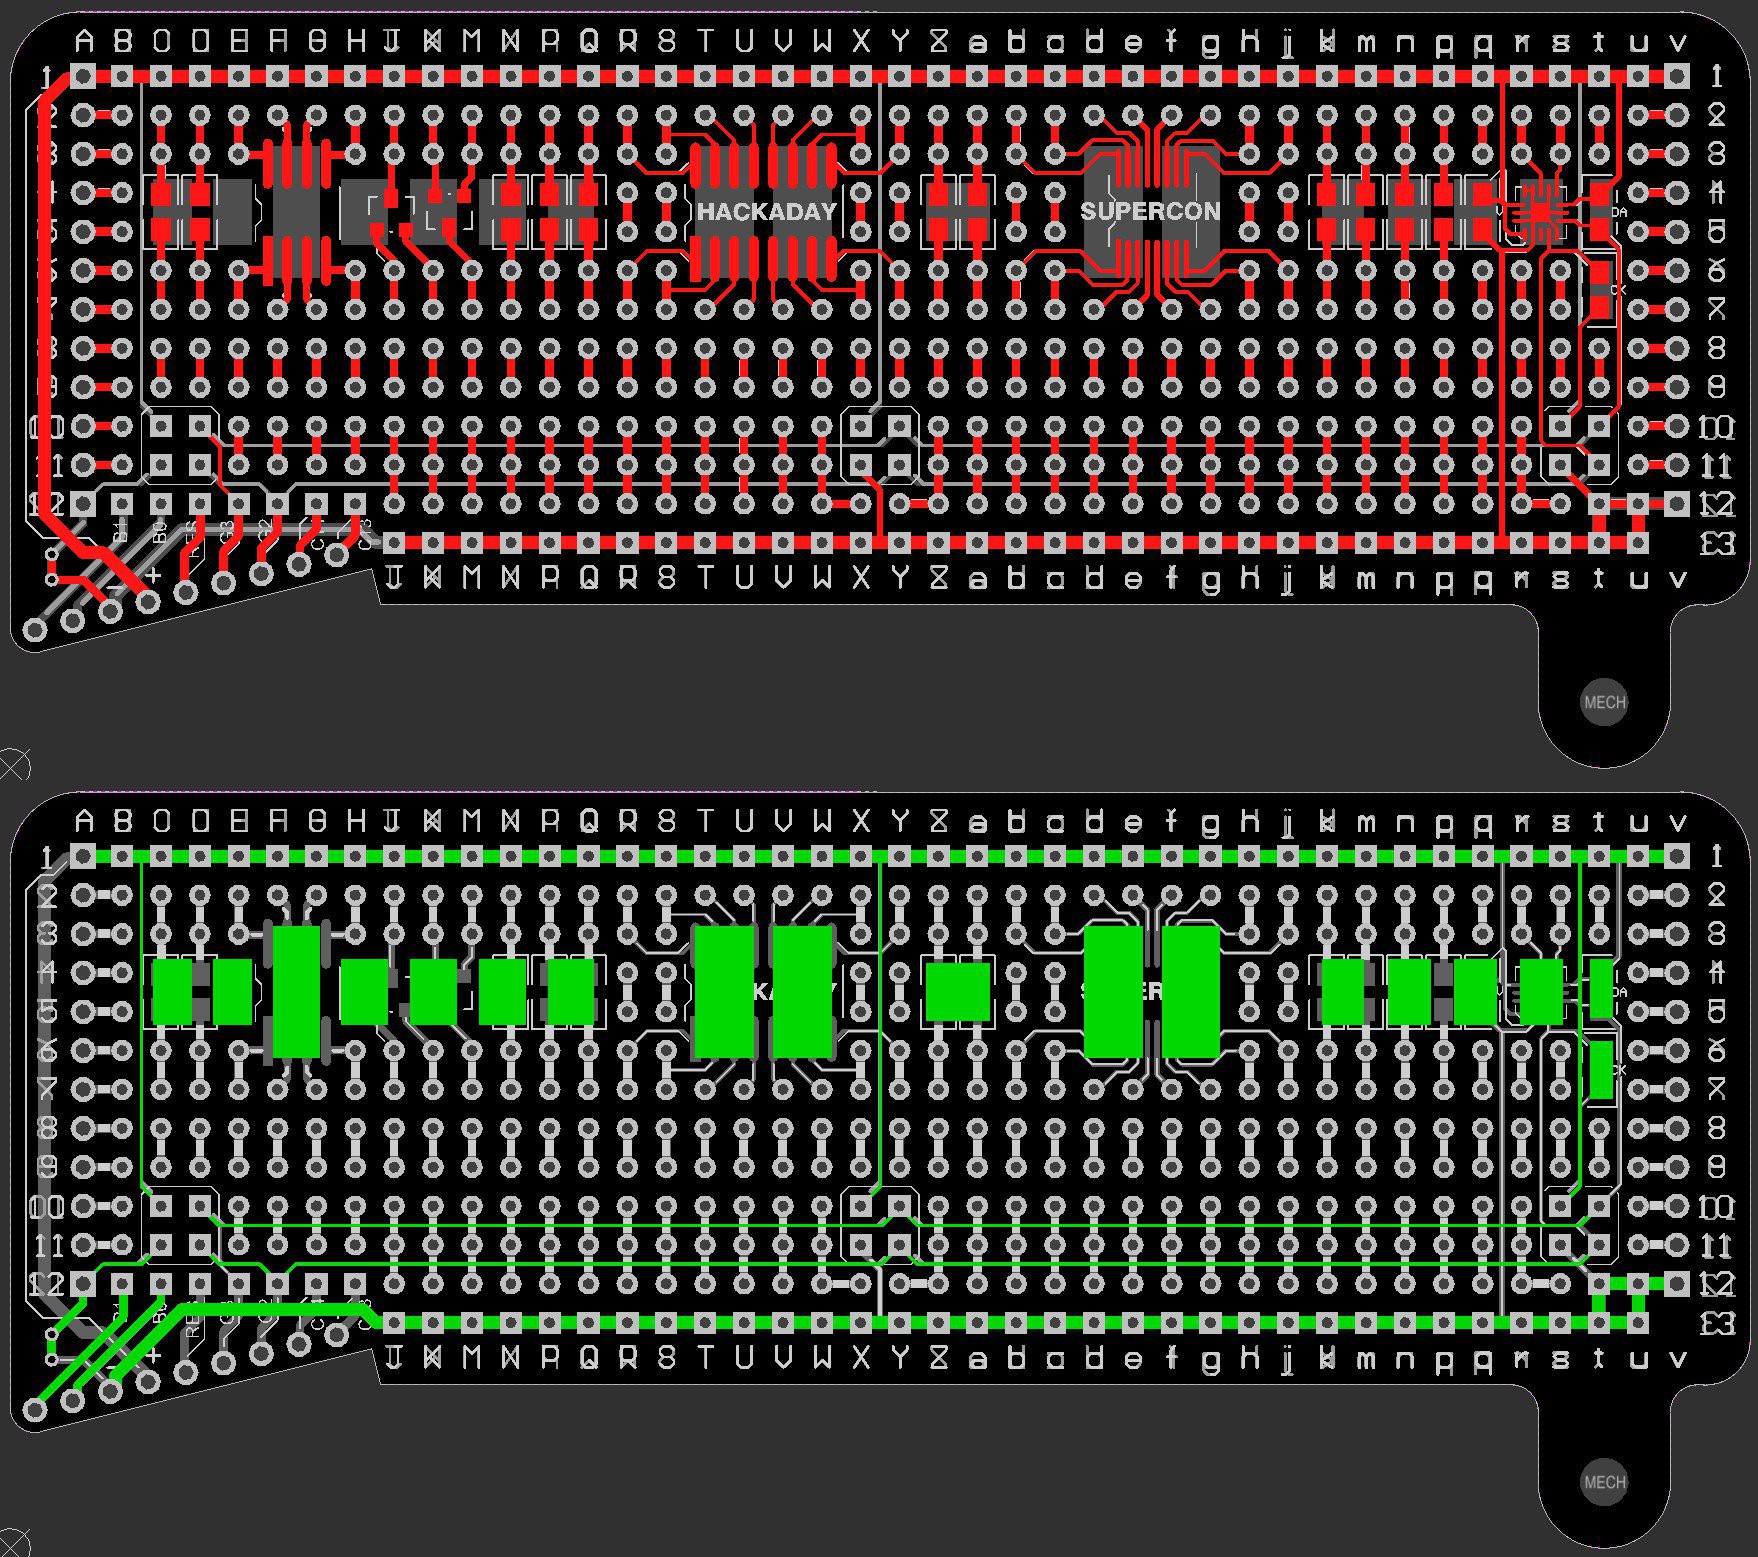
![]()
Here is the front view (red) and rear view (green) of the circuitry for the expansion board. Here is the list of package footprints available:
- 3 × Shitty Add-On headers
- 1 × SO-8
- 1 × SO-16
- 1 × TSSOP-16
- 2 × SOT-23 (for SMD transistors)
- 14 × 0805 (for SMD passive components)
- 1 × LGA-16 (for accelerometer only)
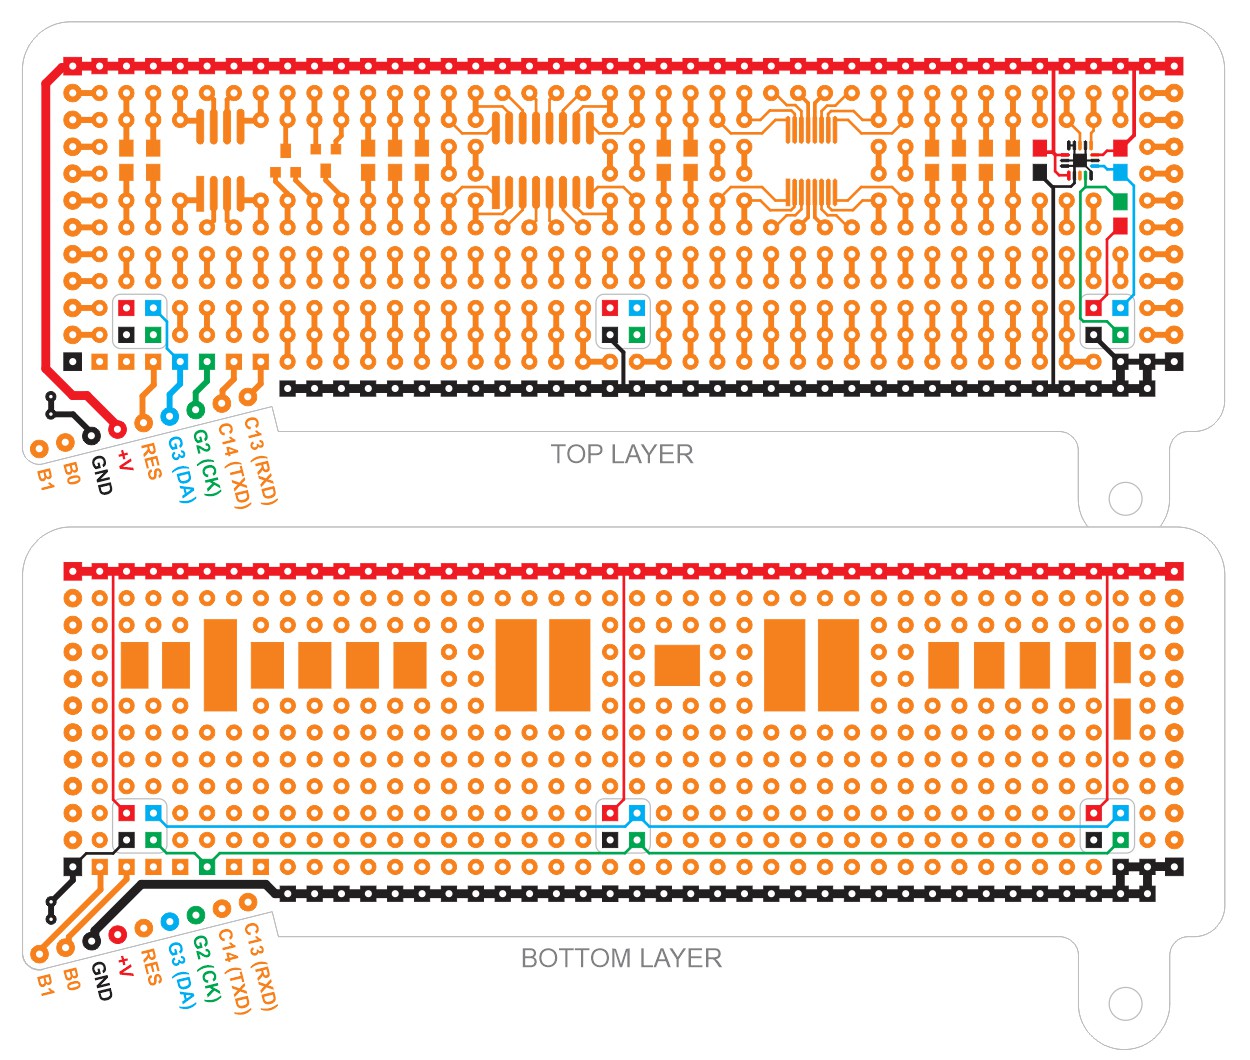
All round pads are general purpose pads, and square ones are connected and intended for special use. The following drawing contains color marking for those pads, so the black pads are Ground (0V) connection, red pads are for +3V supply, green ones are I2C Clock pads, and blue ones are I2C Data pads. They are arranged so that you can use up to three shitty-add-on connectors without any modification of the PCB.
![]()
Pull-Up Resistor Footprints for I2C
If you plan to use I2C (for your own circuit or for a shitty-add-on), pull-up resistors must be added. Please note that there are no pull-up resistors for the I2C bus on the main board, so you should add 4K7 (or similar) pull-up resistors on the noted 0805 footprints at the column "t", rows 4-5 and 6-7. Those 0805 footprints are marked as DA (data) and CK (clock).
Adding an Accelerometer
If you add an LIS3 accelerometer to your expansion board, it is highly recommended to add the ceramic capacitor at the column "q", rows 4-5. Its capacitance should be 4.7 to (preferably) 10 µF.
Pin 1 of the accelerometer is at the bottom left. Only LIS3DH or LIS3DE accelerometers can be used, as the pads on the LGA-16 footprint are connected to required sources. Please note that LIS3DH and LIS3DE have the same pinout diagram, but they are many internal differences, including register and slave addresses. For instance, LIS3DH has 16-bit output reading for each axis, and LIS3DE has 8-bit outputs.
Other Footprints on the Expansion Board
There are 18 large square pads at the bottom layer of the PCB. All those pads are general purpose and are convenient for attaching large components or thick conductors.
Leftmost and rightmost columns "A" and "v" can be used for SIL connectors. Holes on these pads are with 1mm diameter, so they can accept normal male pins of SIL headers.
-
CP/M on Badge, Quick Guide
10/16/2018 at 16:20 • 12 commentsAfter you start Z80 emulator with CP/M, the machine boots up on A drive greeting you by prompt
A>
There is not much to do with this drive, as it is 22kB RAM disk. It is empty after boot, as you can try with command
dir
that prints what is in current directory. You can switch to disk B, where is more to be found
b:
and system will respond with
B>
meaning you are there. You can now list content of this directory again and discover a few executable (.COM) files, like XMDM, MBASIC or FORTH. You can play around with those; notice that some of them expect different line (CR) end than what badge uses (LF). You can do CR line end by hitting SHIFT+ENTER. Exit MBASIC by typing system<CR>.
On disk C you have some more goodies, namely famous ZORK game and SARGON chess game.
Disk D is empty, with 512kB of capacity. You can copy files to/from disks utilizing PIP program, with syntax of
pip d:=c:zork1.com
that will copy file zork1.com to drive d. Notice you should run this one from disk B, where pip resides, or explicitly set path to pip program.
If you want to erase the file, just type
era d:zork1.com
If you happen to need to list ASCII file, invoke command
type file.txt
or dump binary file in hexa form by running
dump file.bin
Stat command is used to display statistics of a file or drive; you can run
b:stat
to display info of drives or
b:stat *.*
to display information about all files on particular drive. Notice the wildcards - you can use it when copying or erasing the files too.
If you want to transfer files from computer (or perhaps another badge), you may use XMODEM program. Run
b:xmdm r d:filename
to start saving received file on D drive, and start XMODEM transfer on other side. The transfer speed is 19200 baud. You may try to archive files into ARC format and un-arc it on CP/M side with dedicated software, if you want to transfer more files. On linux, you may want to use sx to transfer files, or moserial or cutecom for GUI access, with windows, teraterm is good option.
You may want to try assembler toolchain consisting of ED editor, ASM assembler, LOAD program to convert hex to .COM file and DDT debugger. There is quite a lot of Z80 CP/M software on the interwebs, you may want to look for "walnut creek CP/M CD". Be prepared that a lot of CP/M software was designed for modified machines, sidetracking BIOS, so it may not run on this particular machine.
Notice badge has option to switch from local standard input/output (keyboard/display) to serial port (on pins C13 and C14 on expansion port, 3,3V levels, don't forget ground) by pressing LSHIFT+RSHIFT+BRK; with the same combination taking you back to local access. You may access the command line using terminal emulator on your PC, gaining somehow more comfortable access.
You can find more details about the CP/M commands and programs here and here.
-
Tutorial for Programming in C
10/16/2018 at 16:19 • 3 commentsUse your badge as a flashlight with 'lumos'
This tutorial walks through the following:
- Find out how to do something on the badge, by looking at implementation details of a related existing BASIC command.
- Look at three ways to trigger the new code:
- Add it as a program to be launched at main menu command line.
- Add it as a new BASIC command.
- Add it to the default user program.
One of the first things we do with the badge is to light up its LED using BASIC commands. For this tutorial, we want to light up all three LEDs to use the badge as a flashlight. We can do this with the following simple BASIC program:
10 led 0,1
20 led 1,1
30 led 2,1
This works, but it's silly to take up a BASIC program slot just for this. So in order to add this feature to badge firmware, we start by looking at what happens under the hood when BASIC sees the "led" keyword.
- basic/tokenizer.h:
- Declare enum TOKENIZER_LED.
- basic/tokenizer.c:
- Static array keywords[] associates command string 'led' with TOKENIZER_LED.
- basic/ubasic.c:
- Inside function statement() a TOKENIZER_LED triggers a call to led_statement()
- led_statement() processes the tokens and calls into set_led()
- hw.c:
- set_led() sets the PIC32 pins corresponding to LEDs.
Copying from set_led(), we can write a short function to turn on all three at once:
void flashlight()
{
  LED_R = 1;
  LED_G = 1;
  LED_B = 1;
}
Side note: this is equivalent to calling an existing function set_led_word(0x07), but for the sake of the tutorial we'll proceed with adding a new function.
Now we'll survey the options for putting our new function to work, you can use any combination of the below as you see fit for your code:
Option 1: add to main menu:
To light up LEDs when user enters a command in the main menu, we edit badge_menu() in badge.c. After the user presses enter (NEWLINE), there's an if/else tree to process commands. We can add a new menu command to this list. We'll make our new command "lumos".
[...existing code...]
    else if (strcmp(menu_buff,"lumos")==0)
        {
        flashlight();
        }
[...existing code...]
Now we can type "lumos" at the main menu to turn on flashlight mode.
Option 2: add to BASIC commands
(UPDATE: The Superconference badge firmware now has a much faster BASIC tokenizer, an upgrade over the Belgrade badge. The downside is that it's more difficult to modify. The instruction below applies to the slower but easier to modify BASIC tokenizer.)
This retraces our steps digging into BASIC commands, this time adding our own code.
- basic/tokenizer.h:
- Declare enum TOKENIZER_LUMOS.
- basic/tokenizer.c:
- Add to keywords[] array to associate string "lumos" with TOKENIZER_LUMOS.
- basic/ubasic.c:
- Add to the switch statement inside statement(), so a TOKENIZER_LUMOS will call lumos_statement()
- Add new function lumos_statement() to process tokens and call flashlight().
Now "lumos" will work as a badge BASIC keyword
10 lumos
Option 3: add to user program:
The default user program waits for a user key press. Add a call to flashlight() just after a key is detected in user_program_loop() of user_program.c.
[...]
    if (get_stat!=0)
        {
        flashlight(); /* Turn on all three LEDs */
        /* Show which letter was pressed just as an example: */
[...]
With this change, the LEDs will light up on the first key press after the user program starts.
But the user program is your playground to do as you please, so feel free to experiment!
To see all of the above code snippets in context, look at this Github branch. (Disclaimer: as of Oct 25, this links to a fork of the older Belgrade badge repository. This link will be upgraded to the Supercon badge repository soon.)
-
C Programming HOWTO Reference
10/16/2018 at 16:19 • 0 commentsThis section is a concise reference guide for Superconference hackers short on time. It will continue growing through Supercon weekend to be a programming FAQ as needed.
HOWTO: Get an overview of badge code
- main.c: Most of this file is a large comment block describing overall project layout.
HOWTO: Free up memory to make room for big projects.
- badge_settings.h
- Data memory: USE_RAM_IMAGE_NEW and USE_RAMDISK
- Program memory: USE_ROMDISK and USE_ROMDISK2
- Frees up memory at the cost of degrading/disabling badge's Z80 emulator running CP/M.
HOWTO: Upload new badge firmware faster.
- Free up program memory, see above. Smaller program memory means less data to transfer to the badge on every firmware upload.
HOWTO: Manage memory at runtime.
- The default badge firmware uses only compile-time memory allocation. (There is no call to malloc()) This avoids memory leaks, heap fragmentation, etc.
- The following blocks of memory, allocated at compile time, may be available.
- ram[]: 64 kb available when not running Z80 emulator. See splash.c for an example of how to use it.
- Advanced challenge: code injection into Z80 emulator memory using ram[].
- flash_buff[]: Available when not interacting with flash storage
- bprog[]: Available when not running BASIC
- disp_buffer[] color_buffer[]: Available if not printing text on screen
- ram[]: 64 kb available when not running Z80 emulator. See splash.c for an example of how to use it.
HOWTO: Draw a bitmap to screen.
- tft_set_write_area(x,y,width,height); //Set the drawing area
- IMPORTANT: Drawing area is INCLUSIVE. This means to draw the entire screen width of 320 pixels, "x" would be zero, and "width" is 319. NOT 320.
- TFT_24_7789_Write_Command(0x2C); // Begin bitmap data transfer.
- TFT_24_7789_Write_Data3(red, green, blue); // RGB value for one pixel, repeat until drawing area is filled.
Example 1: disp.c: void tft_fill_area() fills an area with a single color.
Example 2: nyancat.c: nyancat() renders animation frame line-by-line.
HOWTO: Stop automatic redraw of text buffer on screen.
- enable_display_scanning(0);
HOWTO: Read/write nonvolatile (flash) memory.
- hwz.c: fl_read_4k(), fl_erase_4k(), fl_write_4k()
- badge_settings.h has a comment block laying out how flash memory is organized.
- Example usage in badge.c: basic_load_program() and basic_save_program()
HOWTO: Generate sounds which aren't musical notes.
- hw.c: sound_set_generator()
HOWTO: Read keyboard directly.
- hw.c: keyb_tasks()
- stdio_get() can get confused when multiple keys are pressed simultaneously so certain key combinations require direct reading. (Example: a game that needs to know a user pressed "Up" and "Right" simultaneously for a diagonal move.)
HOWTO: See under the hood of a BASIC command.
- basic/ubasic.c: static void statement(void)
- When the BASIC interpreter sees a recognized command (in the form of a token) statement() will call a corresponding C function to do the actual work.
HOWTO: Add a new BASIC command.
- tokenizer_generate/ubasic.re
- This is the input file for re2c to generate a new high speed BASIC tokenizer.
HOWTO: I2C
(Added in version 1.21)
- hw.c: iic_init(), iic_start(), etc
- user_program_temp.c is not part of the badge firmware build, but serves as sample program demonstrating interaction with Si7020 temperature sensor over I2C.
HOWTO: PWM
- Easy way: Take over one of the three audio voice timers (Timer2/3/4) and, instead of always inverting one of the audio generator pins, count duty cycle and output to one of the expansion port pins accordingly.
- hw.c: Timer2Handler(), etc.
- Proper way: Use the PIC32 Output Compare peripheral to do basically the same thing, but using high performance dedicated hardware.
HOWTO: Solve the badge puzzle challenge
- LOL No.
The following tasks have no direct support in default firmware. If someone steps up and write a piece of code to do it, please message Roger Cheng to add a link here.
HOWTO: SPI
- It will take bit-banging code to communicate SPI over expansion header.
2018 Hackaday Superconference Badge
Based on the Hackaday Conference in Belgrade, this badge will be a stand-alone, battery powered vintage computer packed with features