Anthony DiGirolamo
-
i2c Thumb Keyboard
02/24/2020 at 03:35 • 0 commentsA few folks have asked for KiCad files for the i2c version. I was hoping to be able to make these at home and put them up on Tindie but I don't have the time at this point.
You can find the files on my github page: https://github.com/AnthonyDiGirolamo/i2c-thumb-keyboard
Hopefully y'all will find this useful! If you make anything with it please let me know! I would love to see anything you come up with.
-
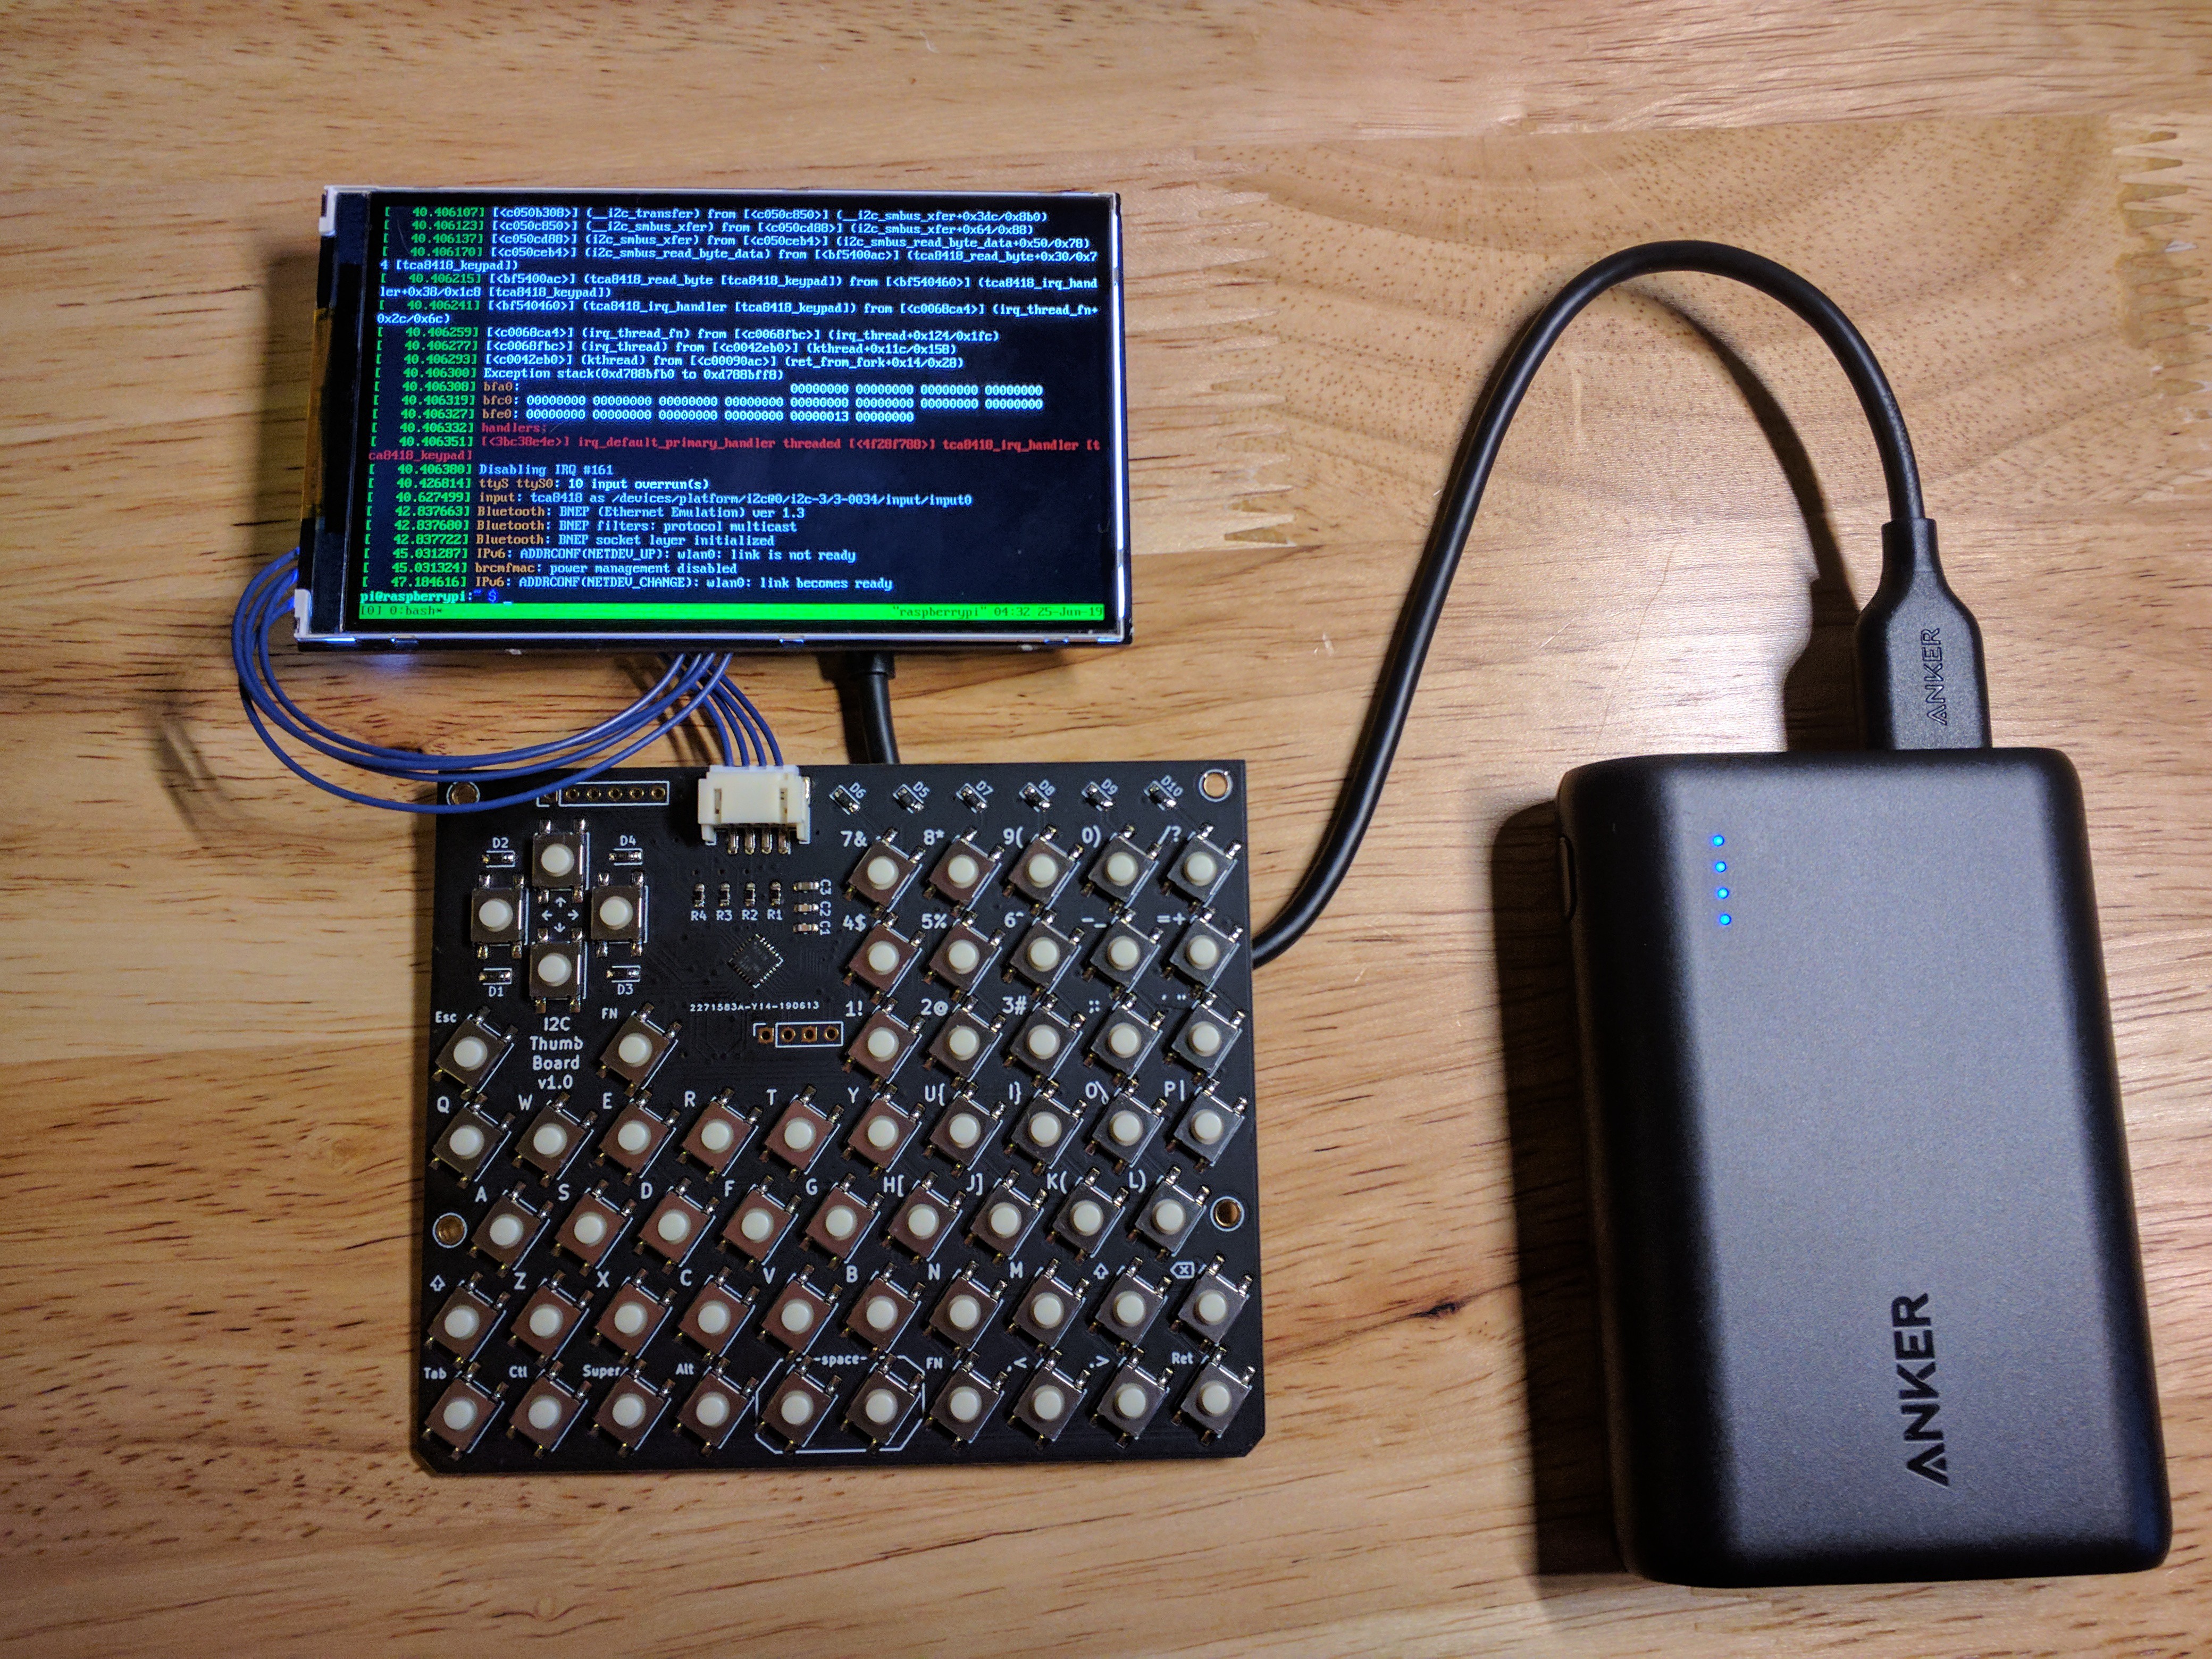
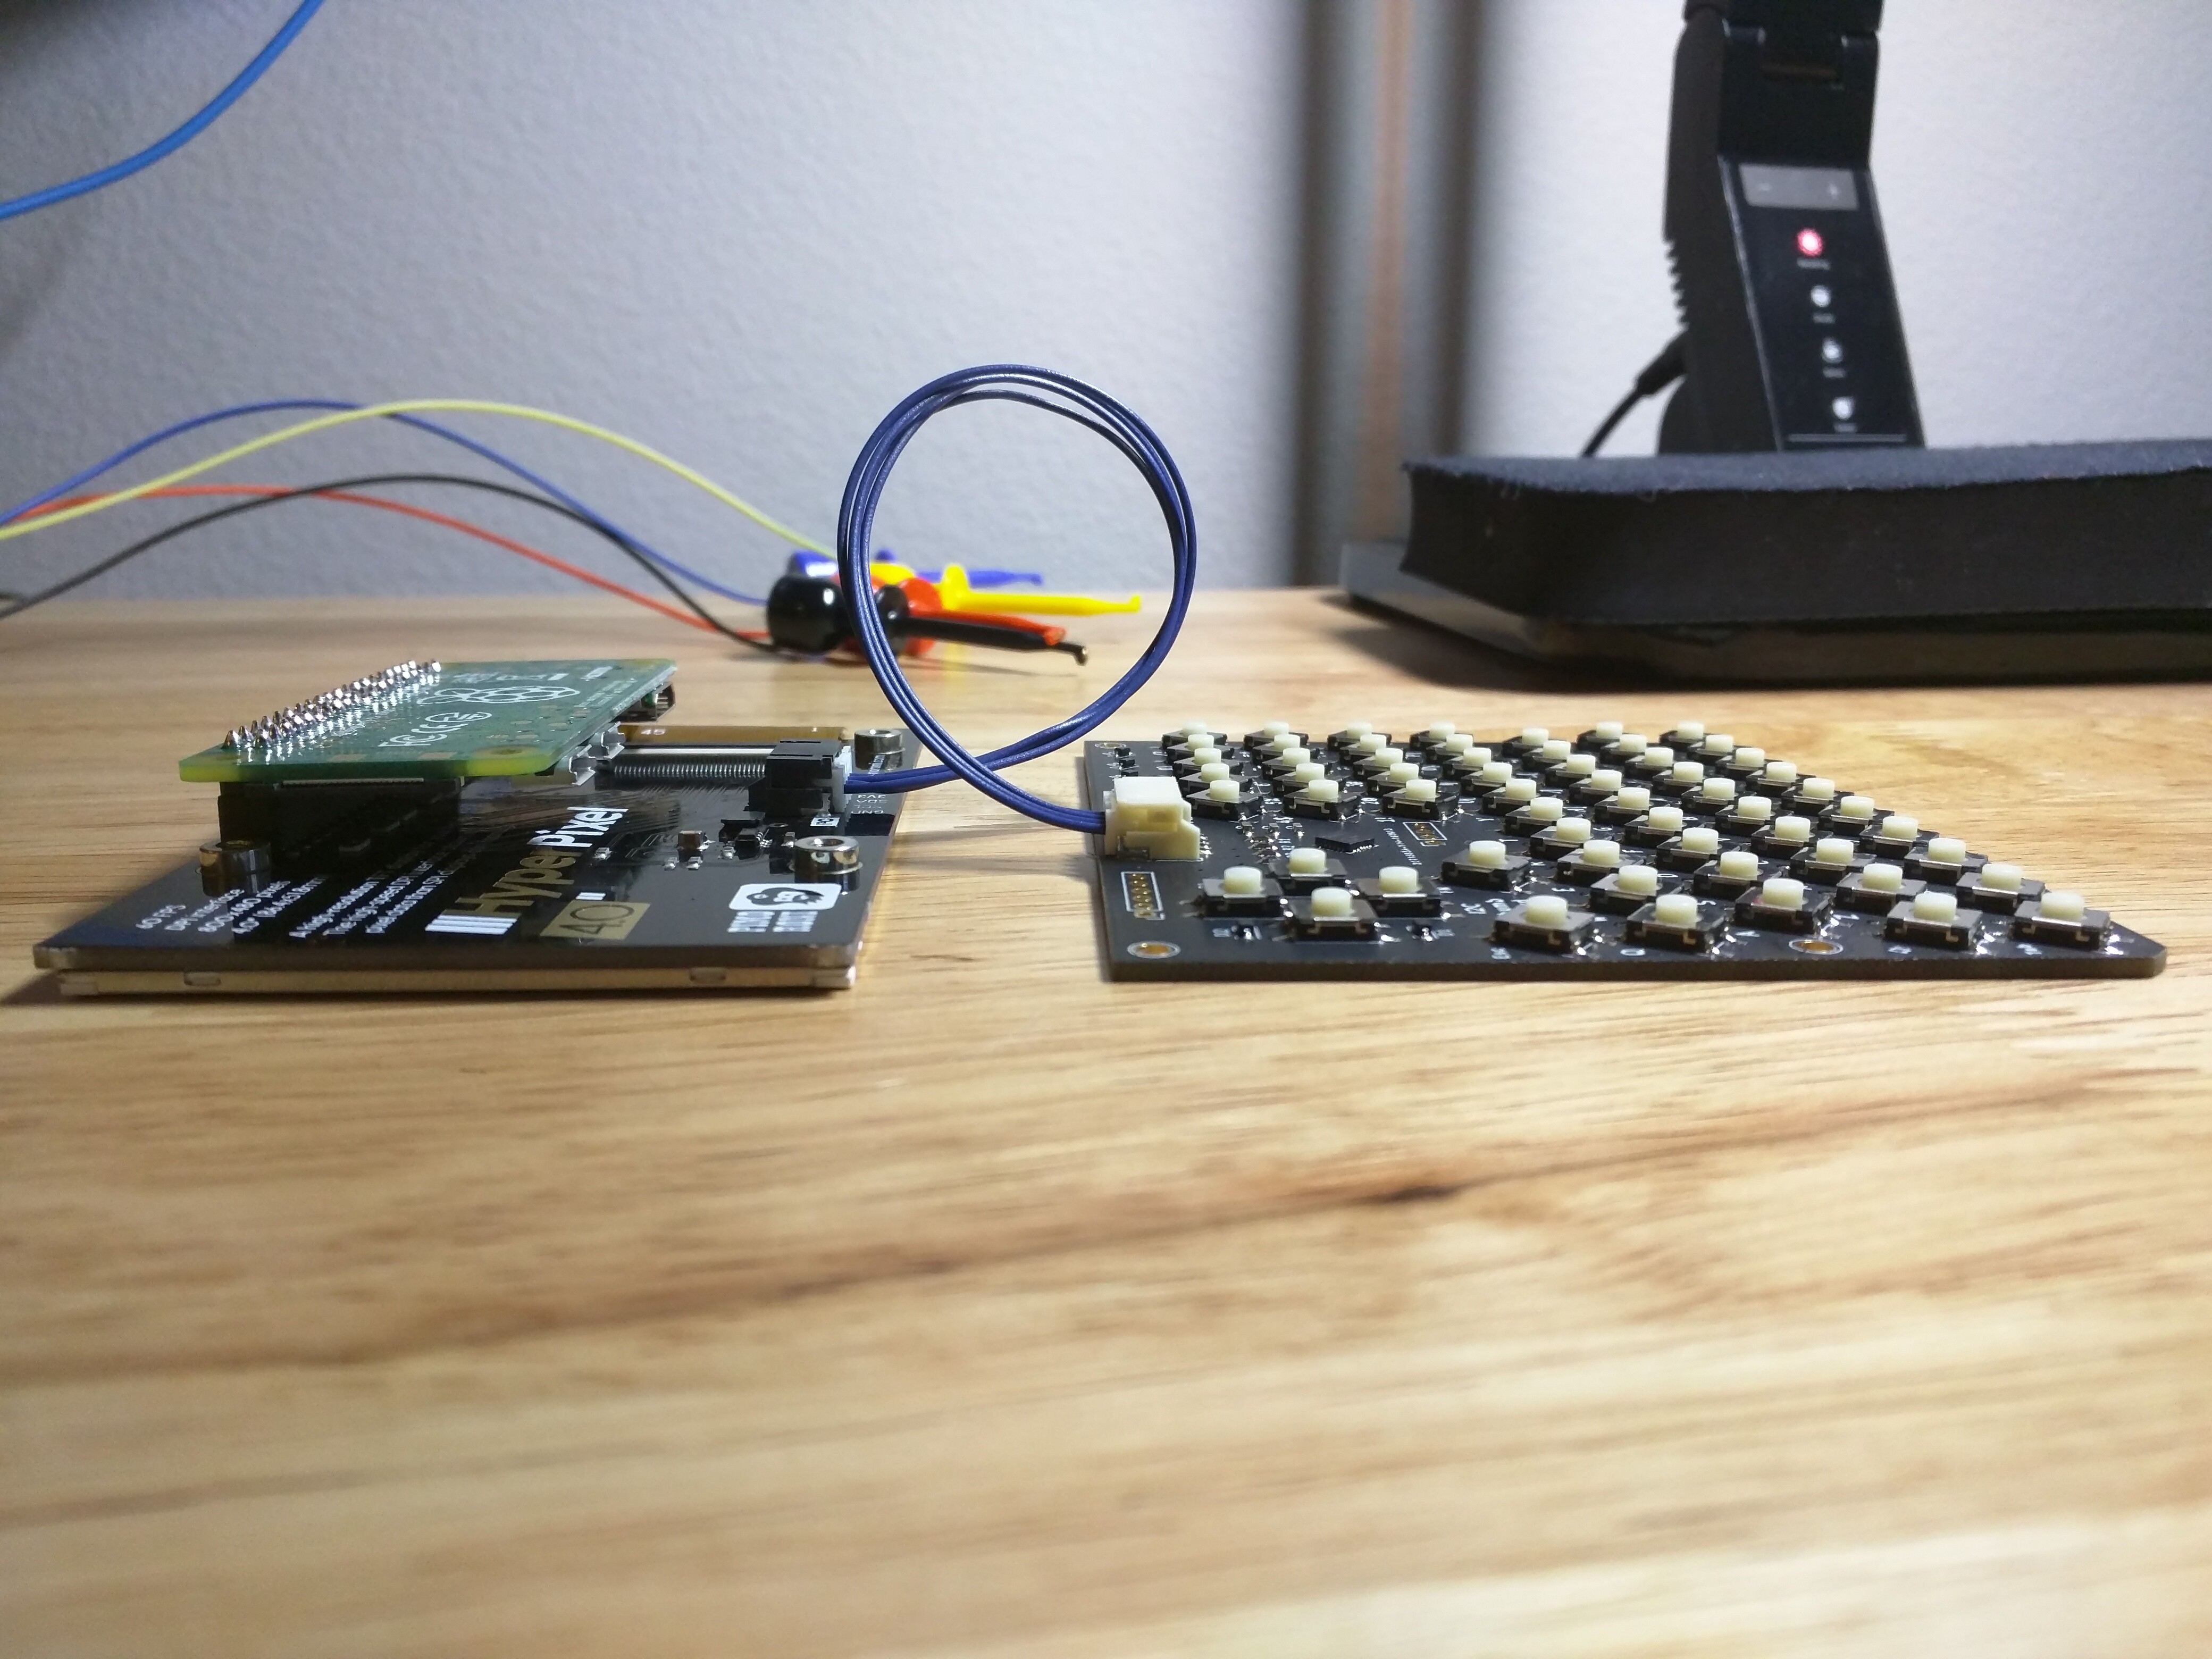
Raspberry Pi i2c Connection
06/25/2019 at 04:06 • 0 commentsConnecting to the rpi and Hyperpixel4 screen works! I modified the hyperpixel4.dtsfile in the hyperpixel4 github repo. Thanks to the Malti project for the sample tca8418 dts file.
![]()
![]()
Here's the modified dts file. It requires the tca8418_keypad kernel module to be compiled and installed. I'll get instructions up for that eventually. Right now no interrupt pin is connected and the tca8418 interrupt is set to gpio 11 (the i2c clock line). I'd pick a different pin but there's no other ones available on the hyperpixel4 pinout. I'm also not using the touch version of the hyperpixel4 which also uses the same i2c bus. That may cause conflicts so I'll have to try that next.
Edit 2019-06-29: The keyboard and touch screen both seem to work, just not at the same time. Keys will not register if you are touching the screen / moving the cursor continuously. Likewise if you are pressing/holding keys down then touching the screen will not work. One at a time works just fine though!
/dts-v1/; /plugin/; / { compatible = "brcm,bcm2708"; fragment@0 { target = <0xdeadbeef>; __overlay__ { pinctrl-names = "default"; pinctrl-0 = <0x1>; }; }; fragment@1 { target = <0xdeadbeef>; __overlay__ { dpi18_pins { brcm,pins = <0x0 0x1 0x2 0x3 0x4 0x5 0x6 0x7 0x8 0x9 0xc 0xd 0xe 0xf 0x10 0x11 0x14 0x15 0x16 0x17 0x18 0x19>; brcm,function = <0x6>; brcm,pull = <0x0>; phandle = <0x1>; }; }; }; fragment@2 { target-path = "/"; __overlay__ { i2c_gpio: i2c@0 { compatible = "i2c-gpio"; gpios = <&gpio 10 0 /* sda */ &gpio 11 0 /* scl */ >; i2c-gpio,delay-us = <4>; /* ~100 kHz */ #address-cells = <1>; #size-cells = <0>; }; }; }; fragment@3 { target = <&i2c_gpio>; __overlay__ { /* needed to avoid dtc warning */ #address-cells = <1>; #size-cells = <0>; ft6236: ft6236@5d { compatible = "goodix,gt911"; reg = <0x5d>; interrupt-parent = <&gpio>; interrupts = <27 2>; touchscreen-size-x = <480>; touchscreen-size-y = <800>; touchscreen-x-mm = <85>; touchscreen-y-mm = <51>; }; tca8418: tca8418@34 { compatible = "ti,tca8418"; reg = <0x34>; irq-gpio = <&gpio 11 0x2>; // IRQF_TRIGGER_FALLING interrupts = <11 2>; // high-to-low edge triggered interrupt-parent = <&gpio>; interrupt-controller; keypad,num-rows = <6>; keypad,num-columns = <10>; // row | column | key-code ex: 04,08,0010 q key linux,keymap = < 0x00000069 // 01 0,0 left 105 0x00010067 // 02 0,1 up 103 0x0002006c // 03 0,2 down 108 0x0003006a // 04 0,3 right 106 0x00040005 // 05 0,4 4 5 0x00050008 // 06 0,5 7 8 0x00060009 // 07 0,6 8 9 0x0007000a // 08 0,7 9 10 0x0008000b // 09 0,8 0 11 0x00090035 // 10 0,9 slash 53 0x01000002 // 11 1,0 1 2 0x01010006 // 12 1,1 5 6 0x01020003 // 13 1,2 2 3 0x01030007 // 14 1,3 6 7 0x01040004 // 15 1,4 3 4 0x0105000c // 16 1,5 minus 12 0x01060027 // 17 1,6 semicolon 39 0x0107000d // 18 1,7 equal 13 0x01080028 // 19 1,8 apostrophe 40 0x01090001 // 20 1,9 esc 1 0x02000010 // 21 2,0 KEY_Q 16 0x02010011 // 22 2,1 KEY_W 17 0x02020012 // 23 2,2 KEY_E 18 0x02030013 // 24 2,3 KEY_R 19 0x02040014 // 25 2,4 KEY_T 20 0x02050015 // 26 2,5 KEY_Y 21 0x02060016 // 27 2,6 KEY_U 22 0x02070017 // 28 2,7 KEY_I 23 0x02080018 // 29 2,8 KEY_O 24 0x02090019 // 30 2,9 KEY_P 25 0x0300001e // 31 3,0 KEY_A 30 0x0301001f // 32 3,1 KEY_S 31 0x03020020 // 33 3,2 KEY_D 32 0x03030021 // 34 3,3 KEY_F 33 0x03040022 // 35 3,4 KEY_G 34 0x03050023 // 36 3,5 KEY_H 35 0x03060024 // 37 3,6 KEY_J 36 0x03070025 // 38 3,7 KEY_K 37 0x03080026 // 39 3,8 KEY_L 38 0x03090029 // 40 3,9 grave 41 0x0400002a // 41 4,0 leftshift 42 0x0401002c // 42 4,1 KEY_Z 44 0x0402002d // 43 4,2 KEY_X 45 0x0403002e // 44 4,3 KEY_C 46 0x0404002f // 45 4,4 KEY_V 47 0x04050030 // 46 4,5 KEY_B 48 0x04060031 // 47 4,6 KEY_N 49 0x04070032 // 48 4,7 KEY_M 50 0x04080036 // 49 4,8 rightshift 54 0x0409000e // 50 4,9 backspace 14 0x0500000f // 51 5,0 tab 15 0x0501001d // 52 5,1 leftctrl 29 0x05020038 // 53 5,2 leftmeta 125 0x0503007d // 54 5,3 leftalt 56 0x0504001a // 55 5,4 leftbrace 26 0x05050039 // 56 5,5 space 57 0x0506001b // 57 5,6 rightbrace 27 0x05070033 // 58 5,7 comma 51 0x05080034 // 59 5,8 dot 52 0x0509001c // 60 5,9 enter 28 >; }; }; }; fragment@4 { target-path = "/"; __overlay__ { rpi_backlight: rpi_backlight { compatible = "gpio-backlight"; gpios = <&gpio 19 0>; default-on; }; }; }; fragment@5 { target = <&ft6236>; __overlay__ { touchscreen-inverted-x = <1>; touchscreen-inverted-y = <1>; }; }; __symbols__ { dpi18_pins = "/fragment@1/__overlay__/dpi18_pins"; }; __local_fixups__ { fragment@0 { __overlay__ { pinctrl-0 = <0x0>; }; }; }; __fixups__ { leds = "/fragment@0:target:0"; gpio = "/fragment@1:target:0"; }; __overrides__ { rotate = <0>,"-5"; }; }; -
Working on v2
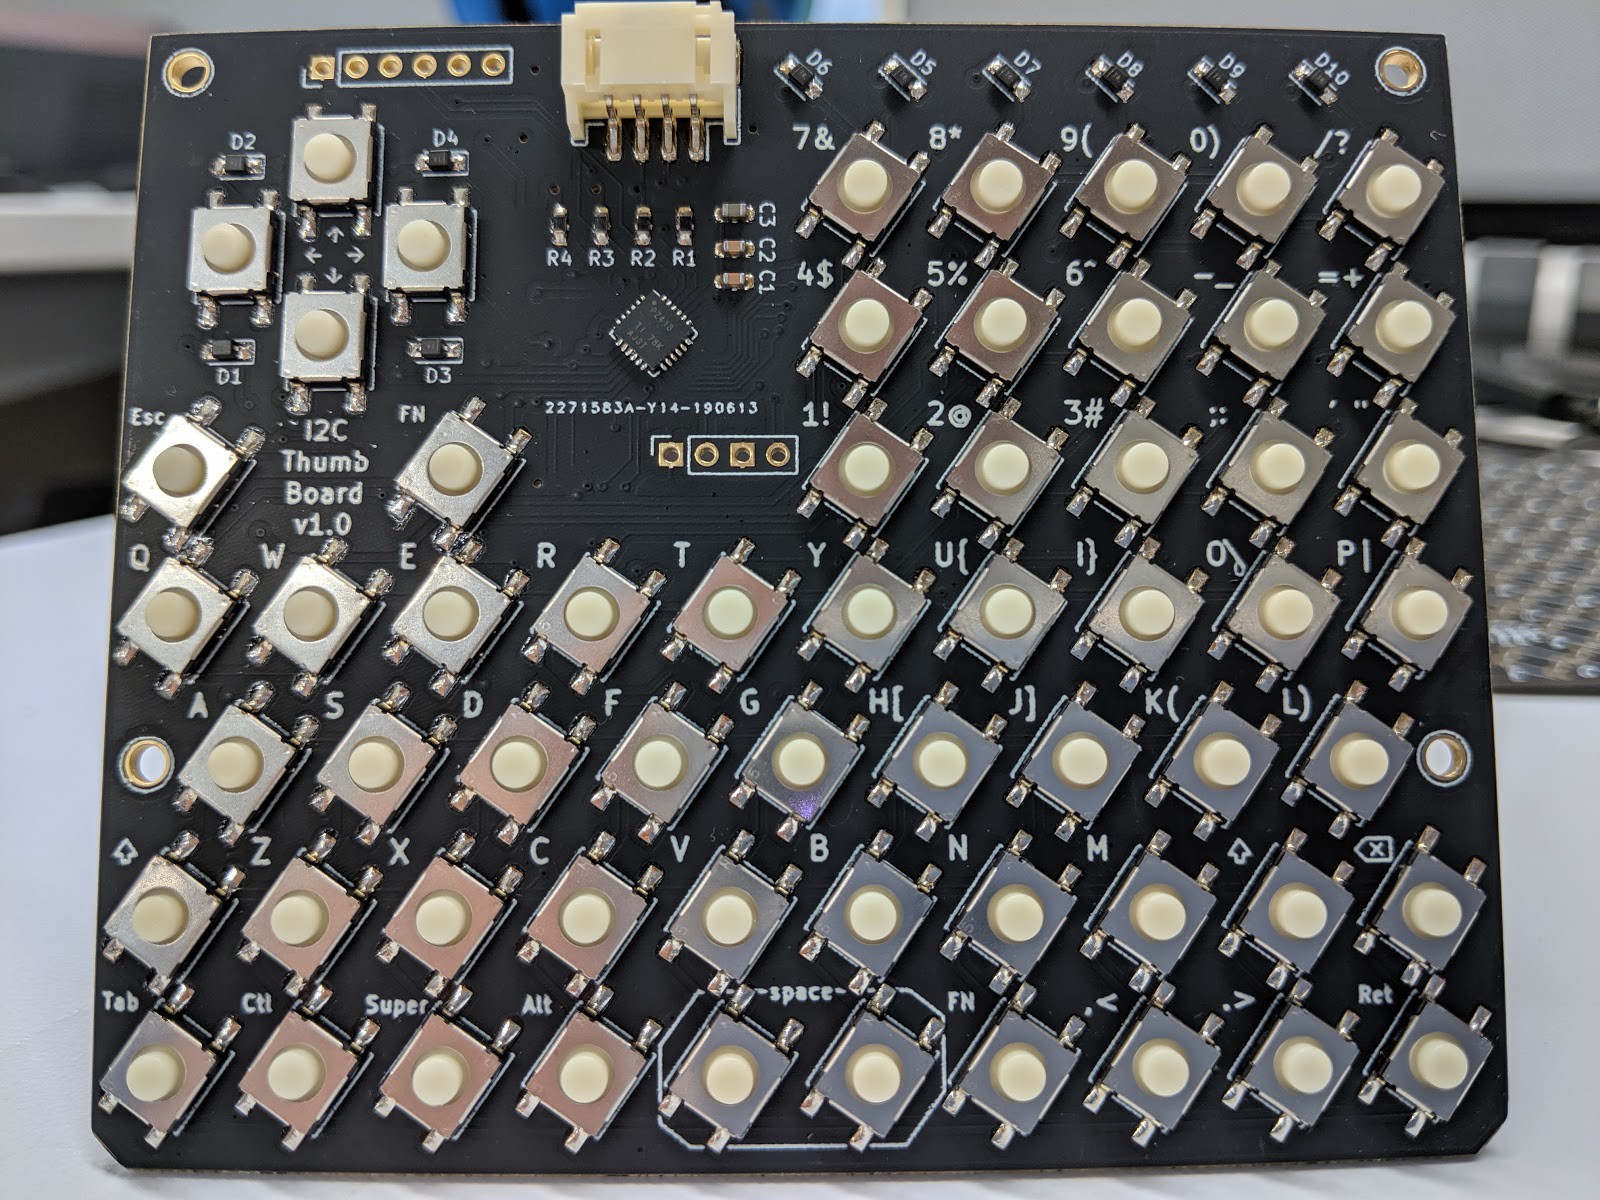
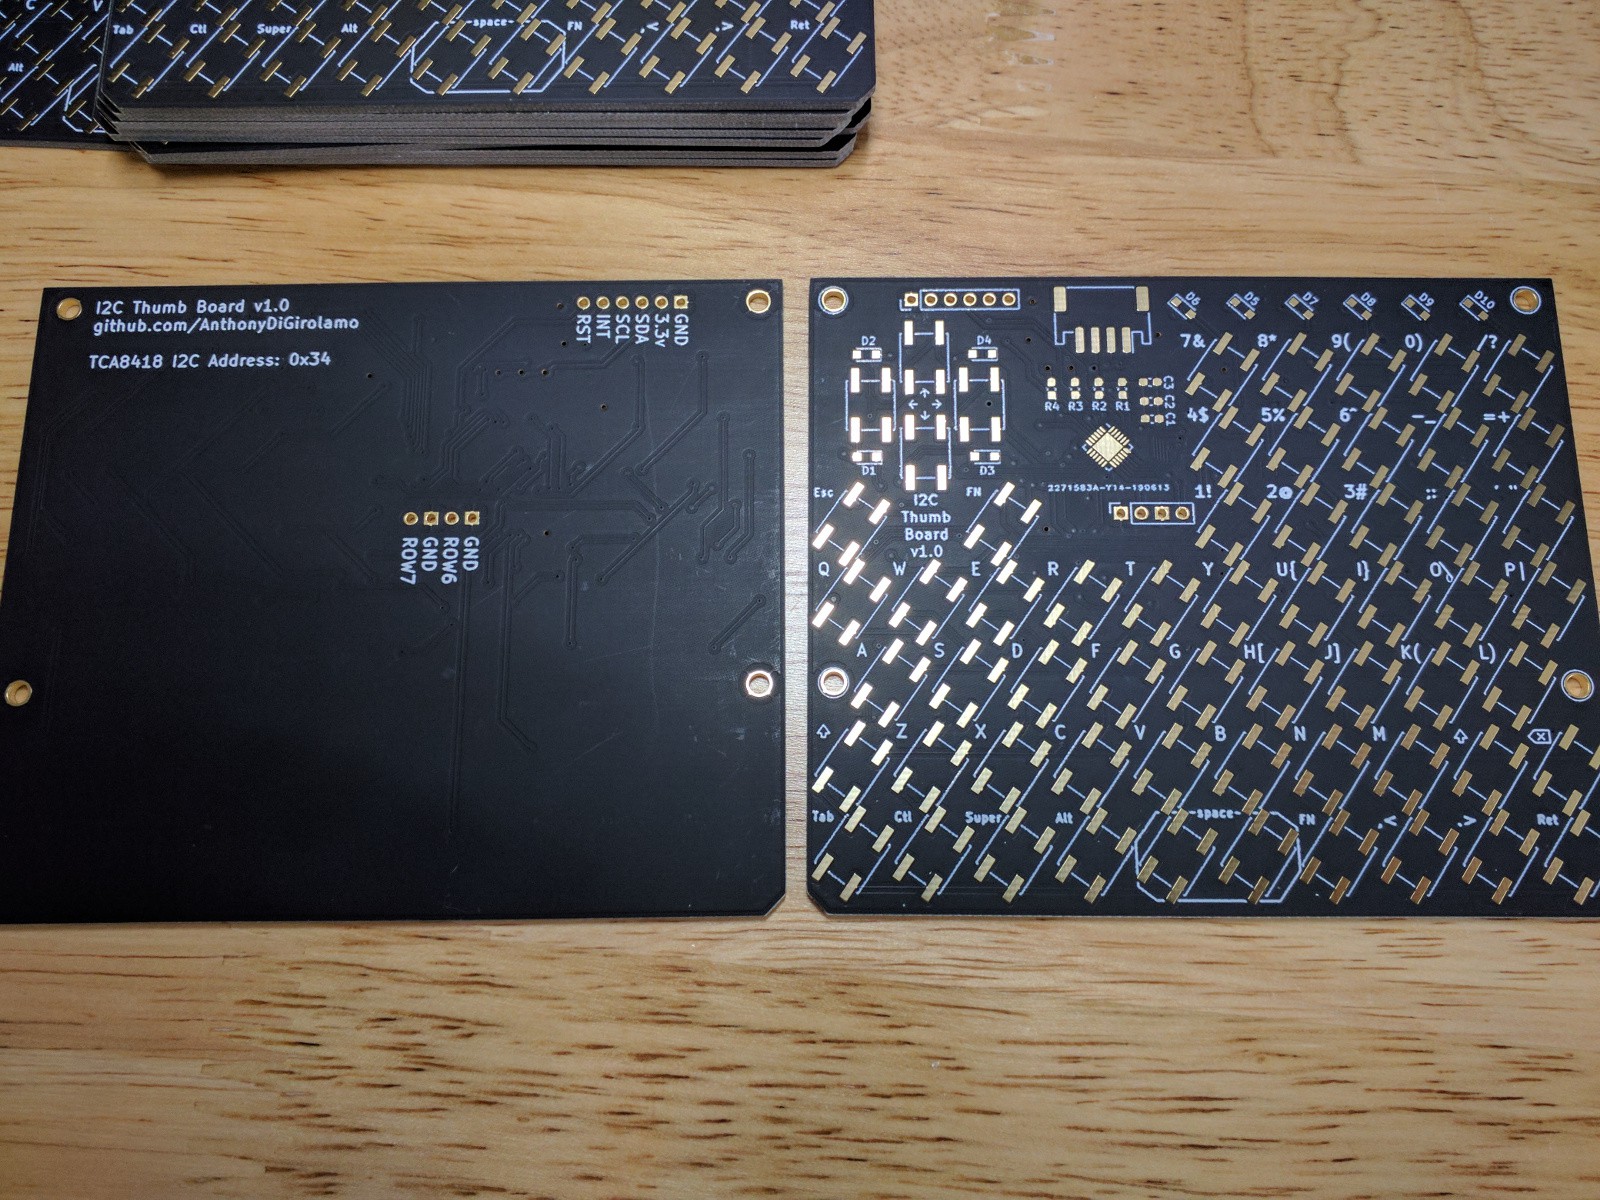
06/22/2019 at 01:37 • 5 commentsGood news everyone! I'm working on a version 2.0 board that operates over i2c using the TCA8418. This will be my first project using SMD parts and so far so good.
For switches I picked the EVQ-Q2B03W. They are more pricey than your typical tactile switch but are worth the cost in my opinion. The datasheet says they require 0.5 N of force to press, are 3.1 mm tall and are rated at 2,000,000 presses. They are VERY light touch, it really doesn't require much more force than just typing on your phone screen.
It breaks out all the usual bits and includes a JST-PH connector for i2c that is compatible with Adafruit's PyBadge and PyGamer.
Next steps will be:
- Seeing if this will work on raspberry pis without any other hardware. Note to self: checkout how the Malti project did this.
- Write an Arduino library (mostly done)
- Write a Micropython/Circuitpython library
- Look into getting them manufactured professionally. It took me about an hour to pick and place by hand and reflow.
![]()
![]()
-
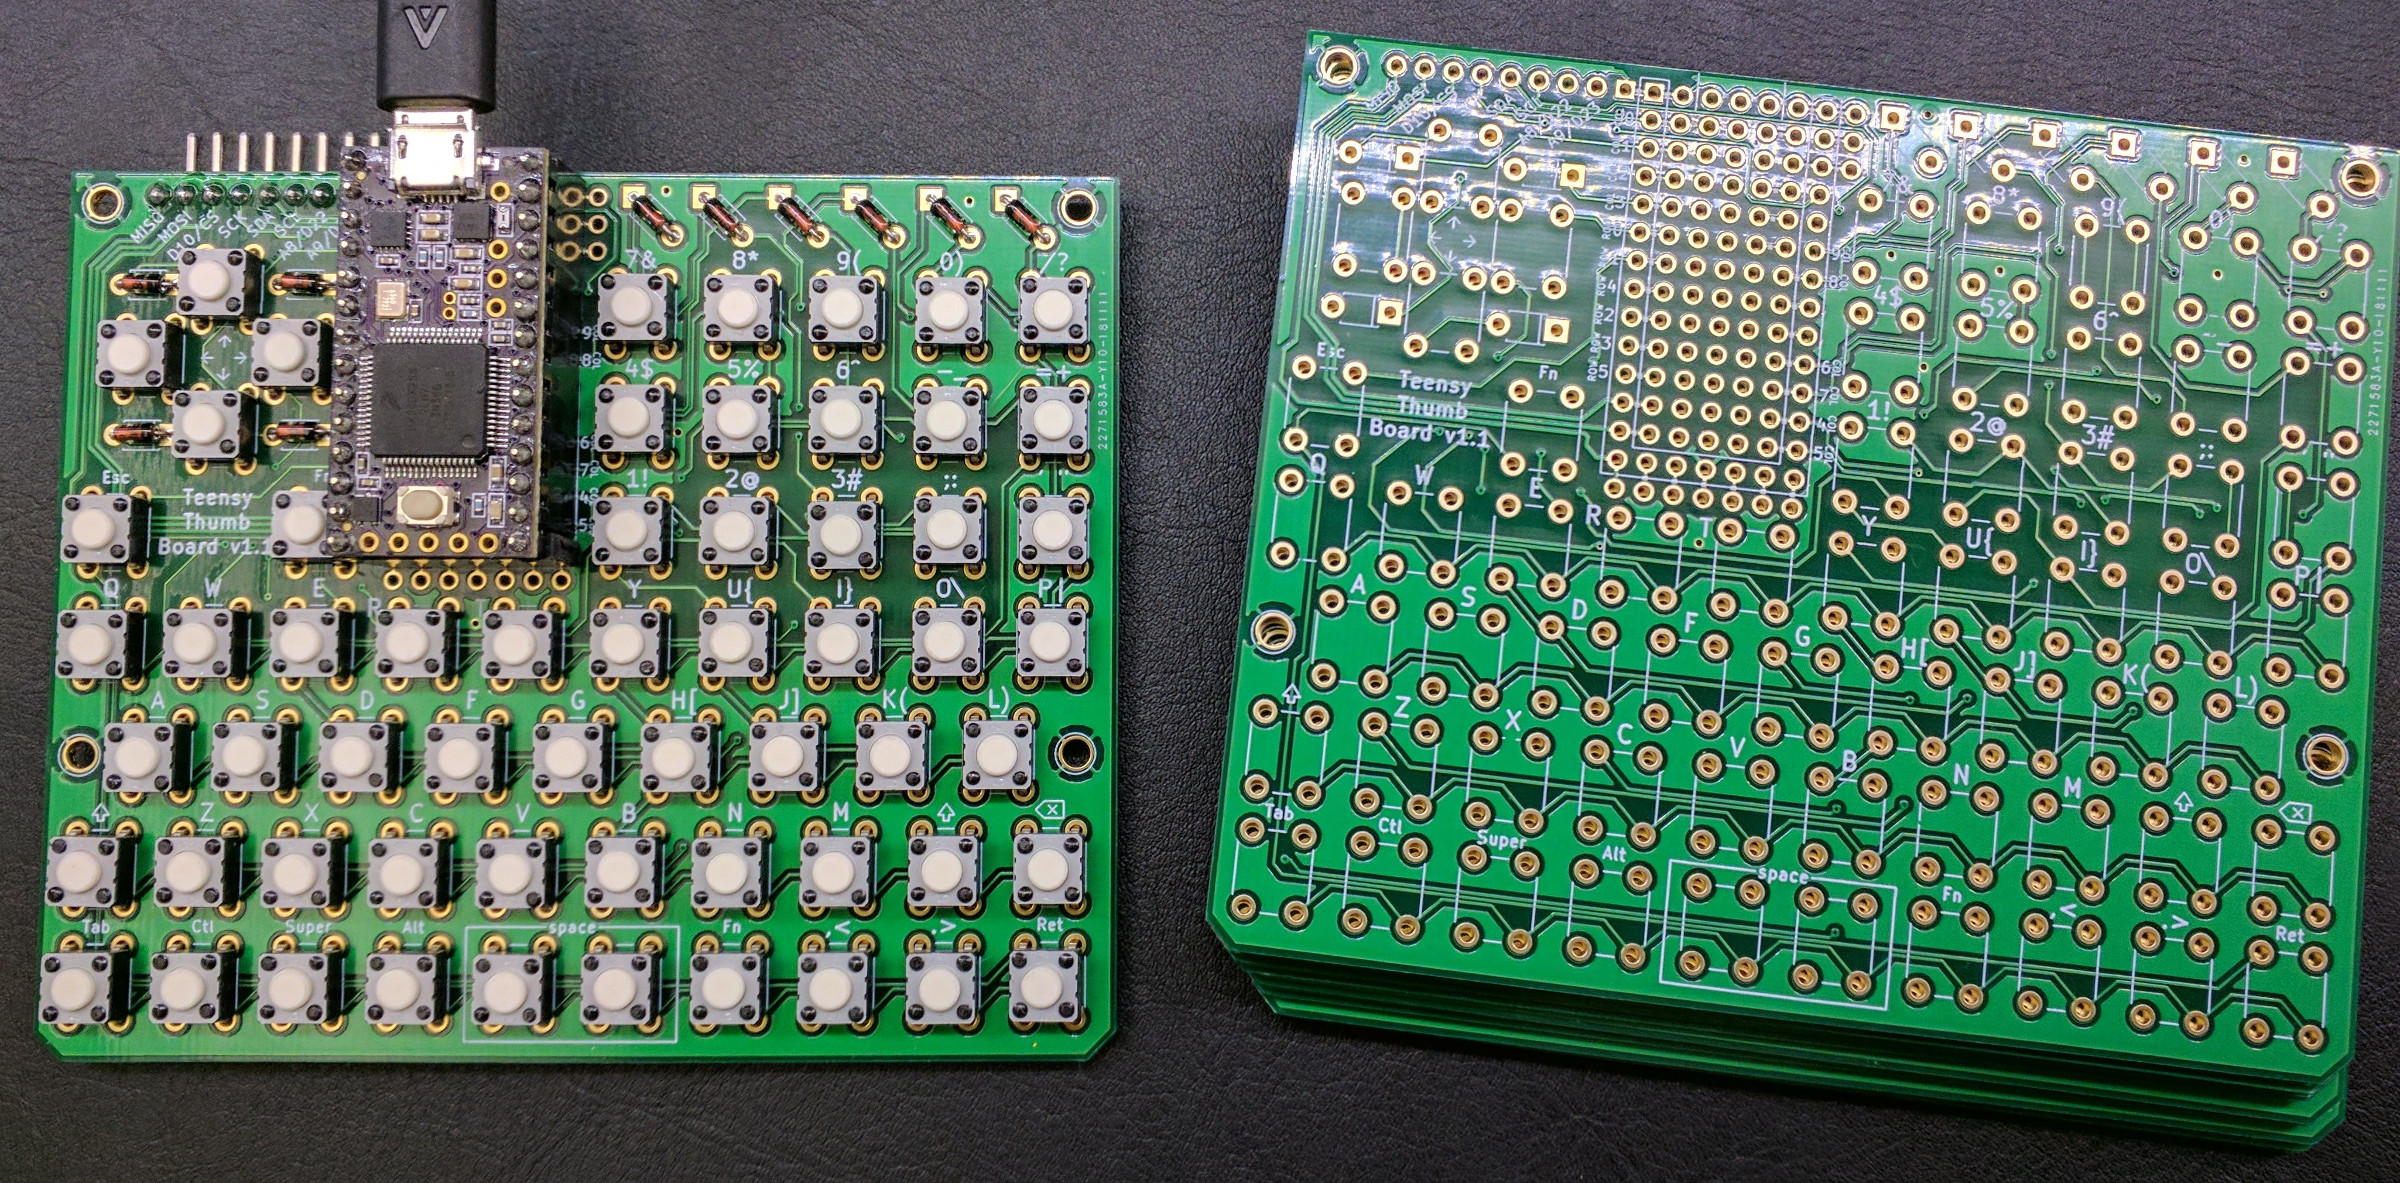
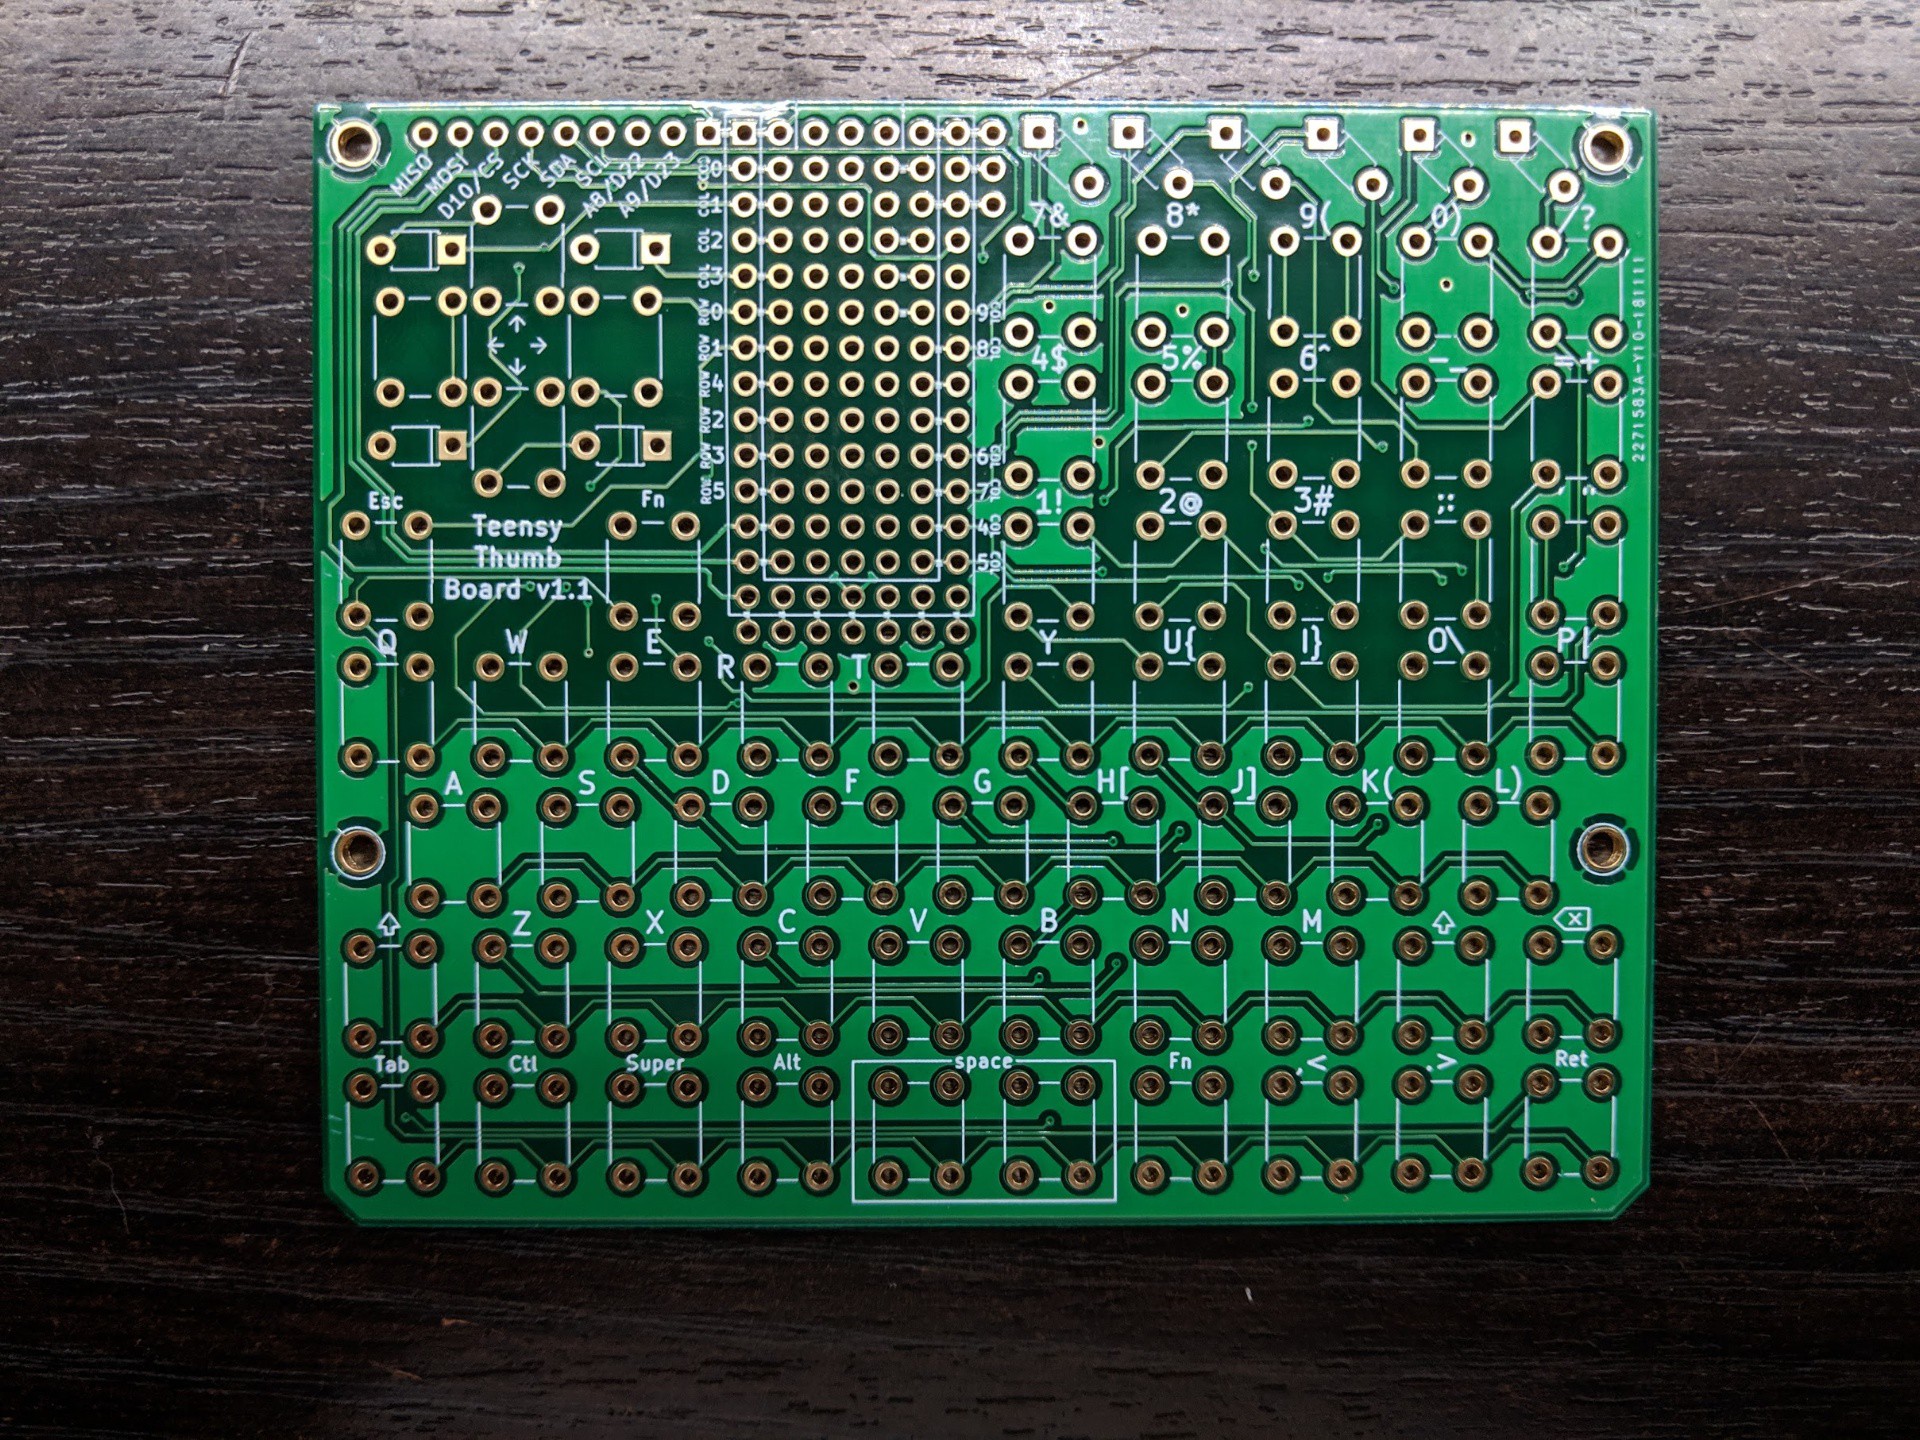
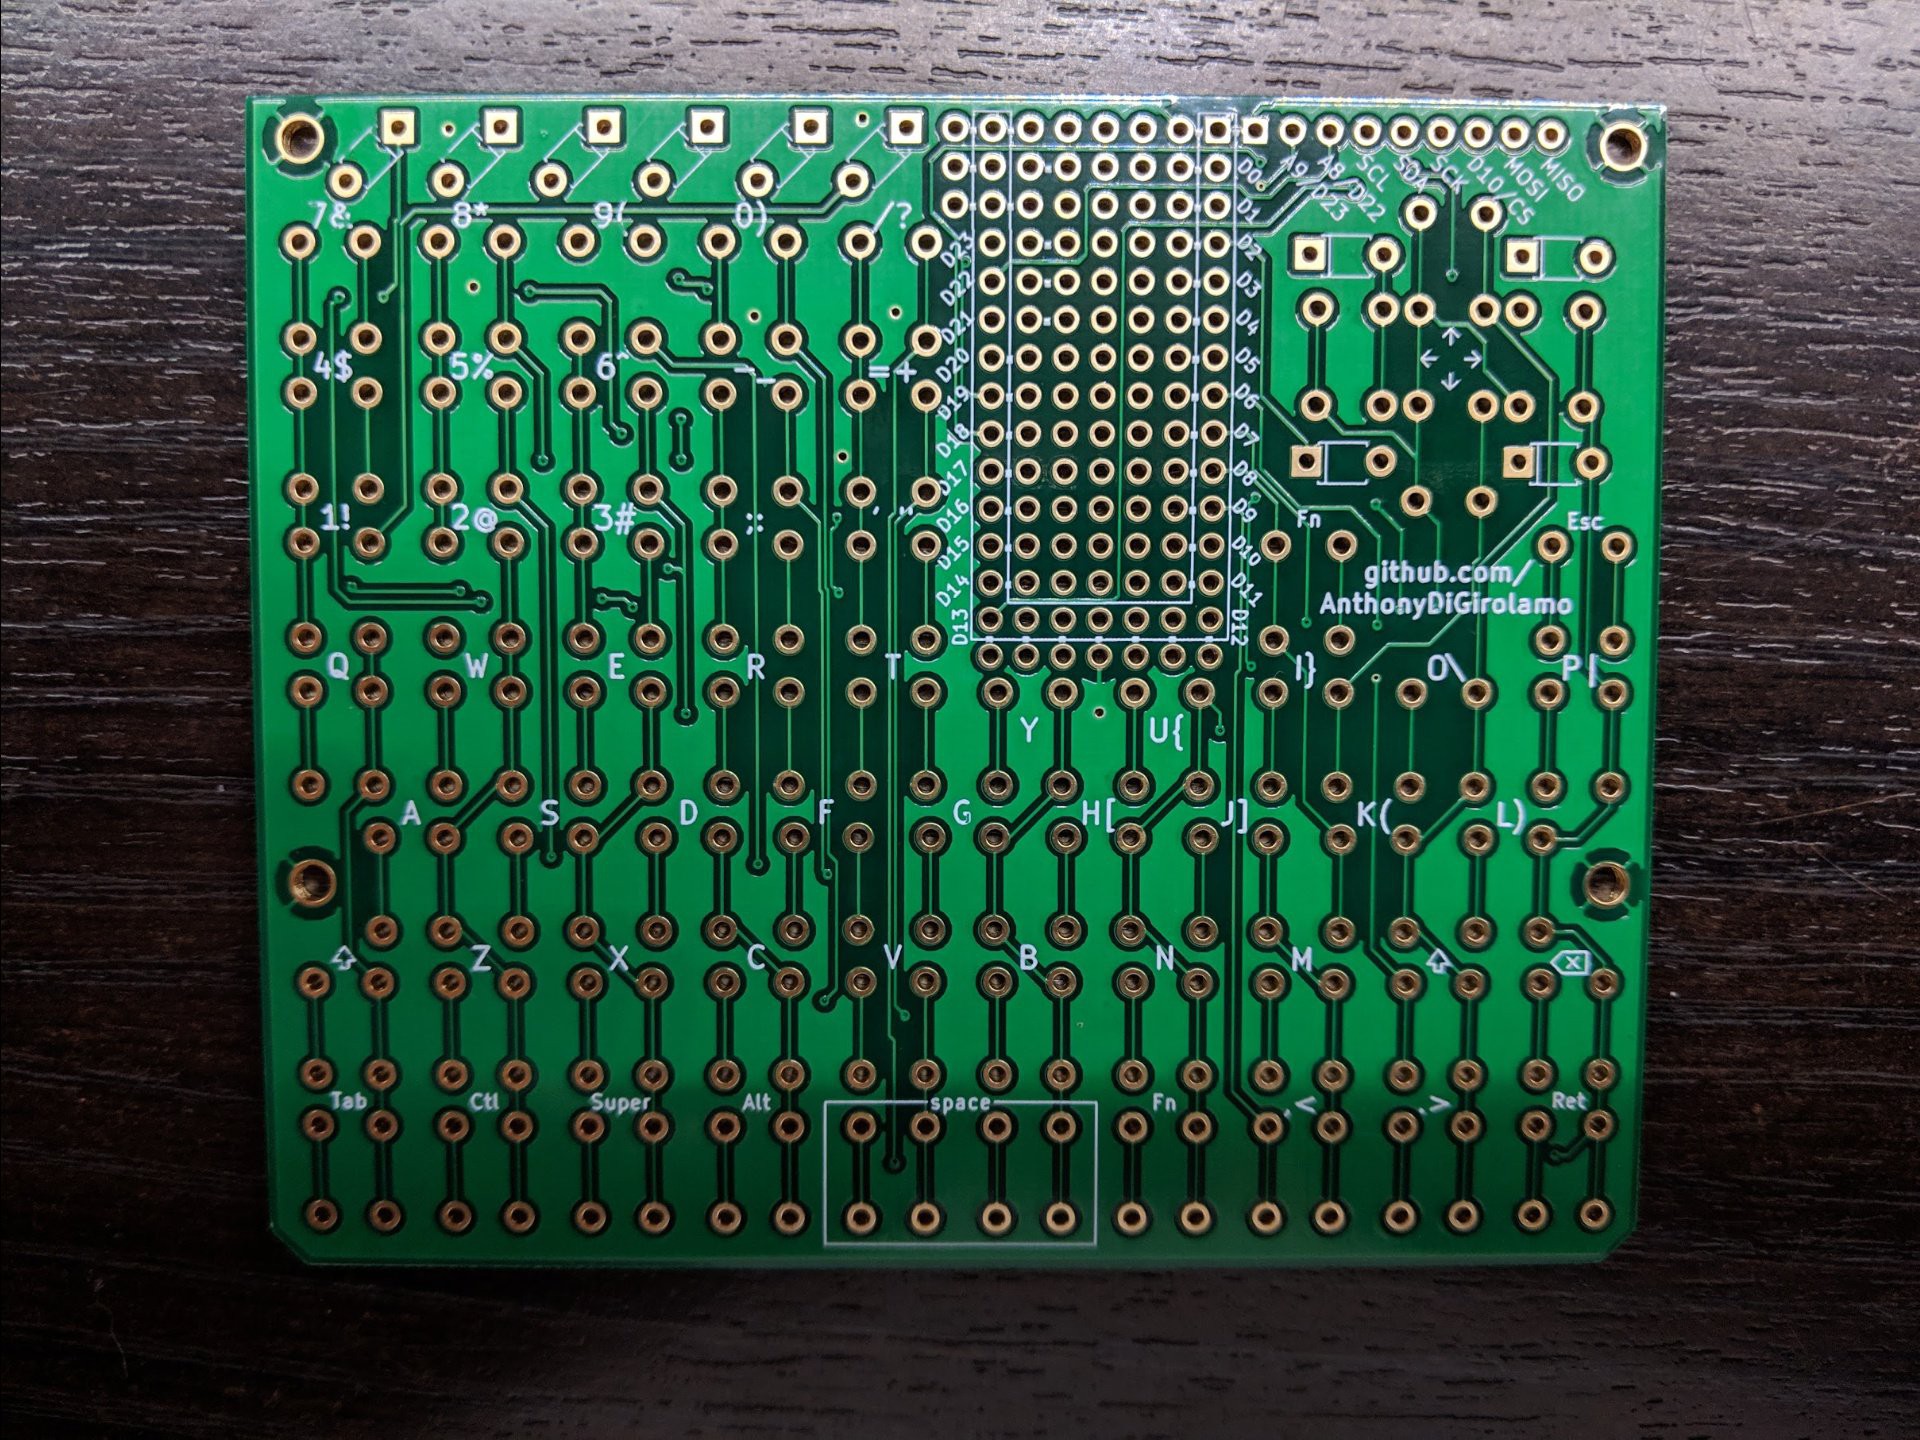
Version 1.1 Tested
11/30/2018 at 03:06 • 0 commentsQuick update: v1.1 is tested and works nicely! I'll update again if I can figure out how to get it on tindie.com.
![]()
-
Example Firmware Posted
11/20/2018 at 07:27 • 0 commentsI've gotten the code more or less in a shareable state. Still not perfect I'm sure, but good enough for now.
The layout for USB keyboarding is defined here:
If you don't need a USB keyboard and are rolling your own hardware project then you can focus on this layout:
There are three layers defined: base, shift, and Fn layers.
USB can be disabled by commenting out define USE_TEENSY_USB_KEYBOARD.
All the keyboardy goodness is handled by the keyboard_update(); function called from inside the standard arduino loop().
If you don't need the keys to behave like a keyboard you can gut most of that example and just use key_matrix.update(); The KeyboardMatrix class handles reading the button states.
An alternative firmware option for a pure USB keyboard would be to run the excellent https://github.com/qmk/qmk_firmware.
-
Version 1.1 PCB Arrived
11/20/2018 at 06:26 • 0 commentsLooks good so far. Some parts of the silkscreen didn't come out great. The lines between connected pads in the proto area are hard to make out. I'll have to update that in a later version. Electrically everything seems connected. I'll solder one up and test soon.
![]()
![]()
-
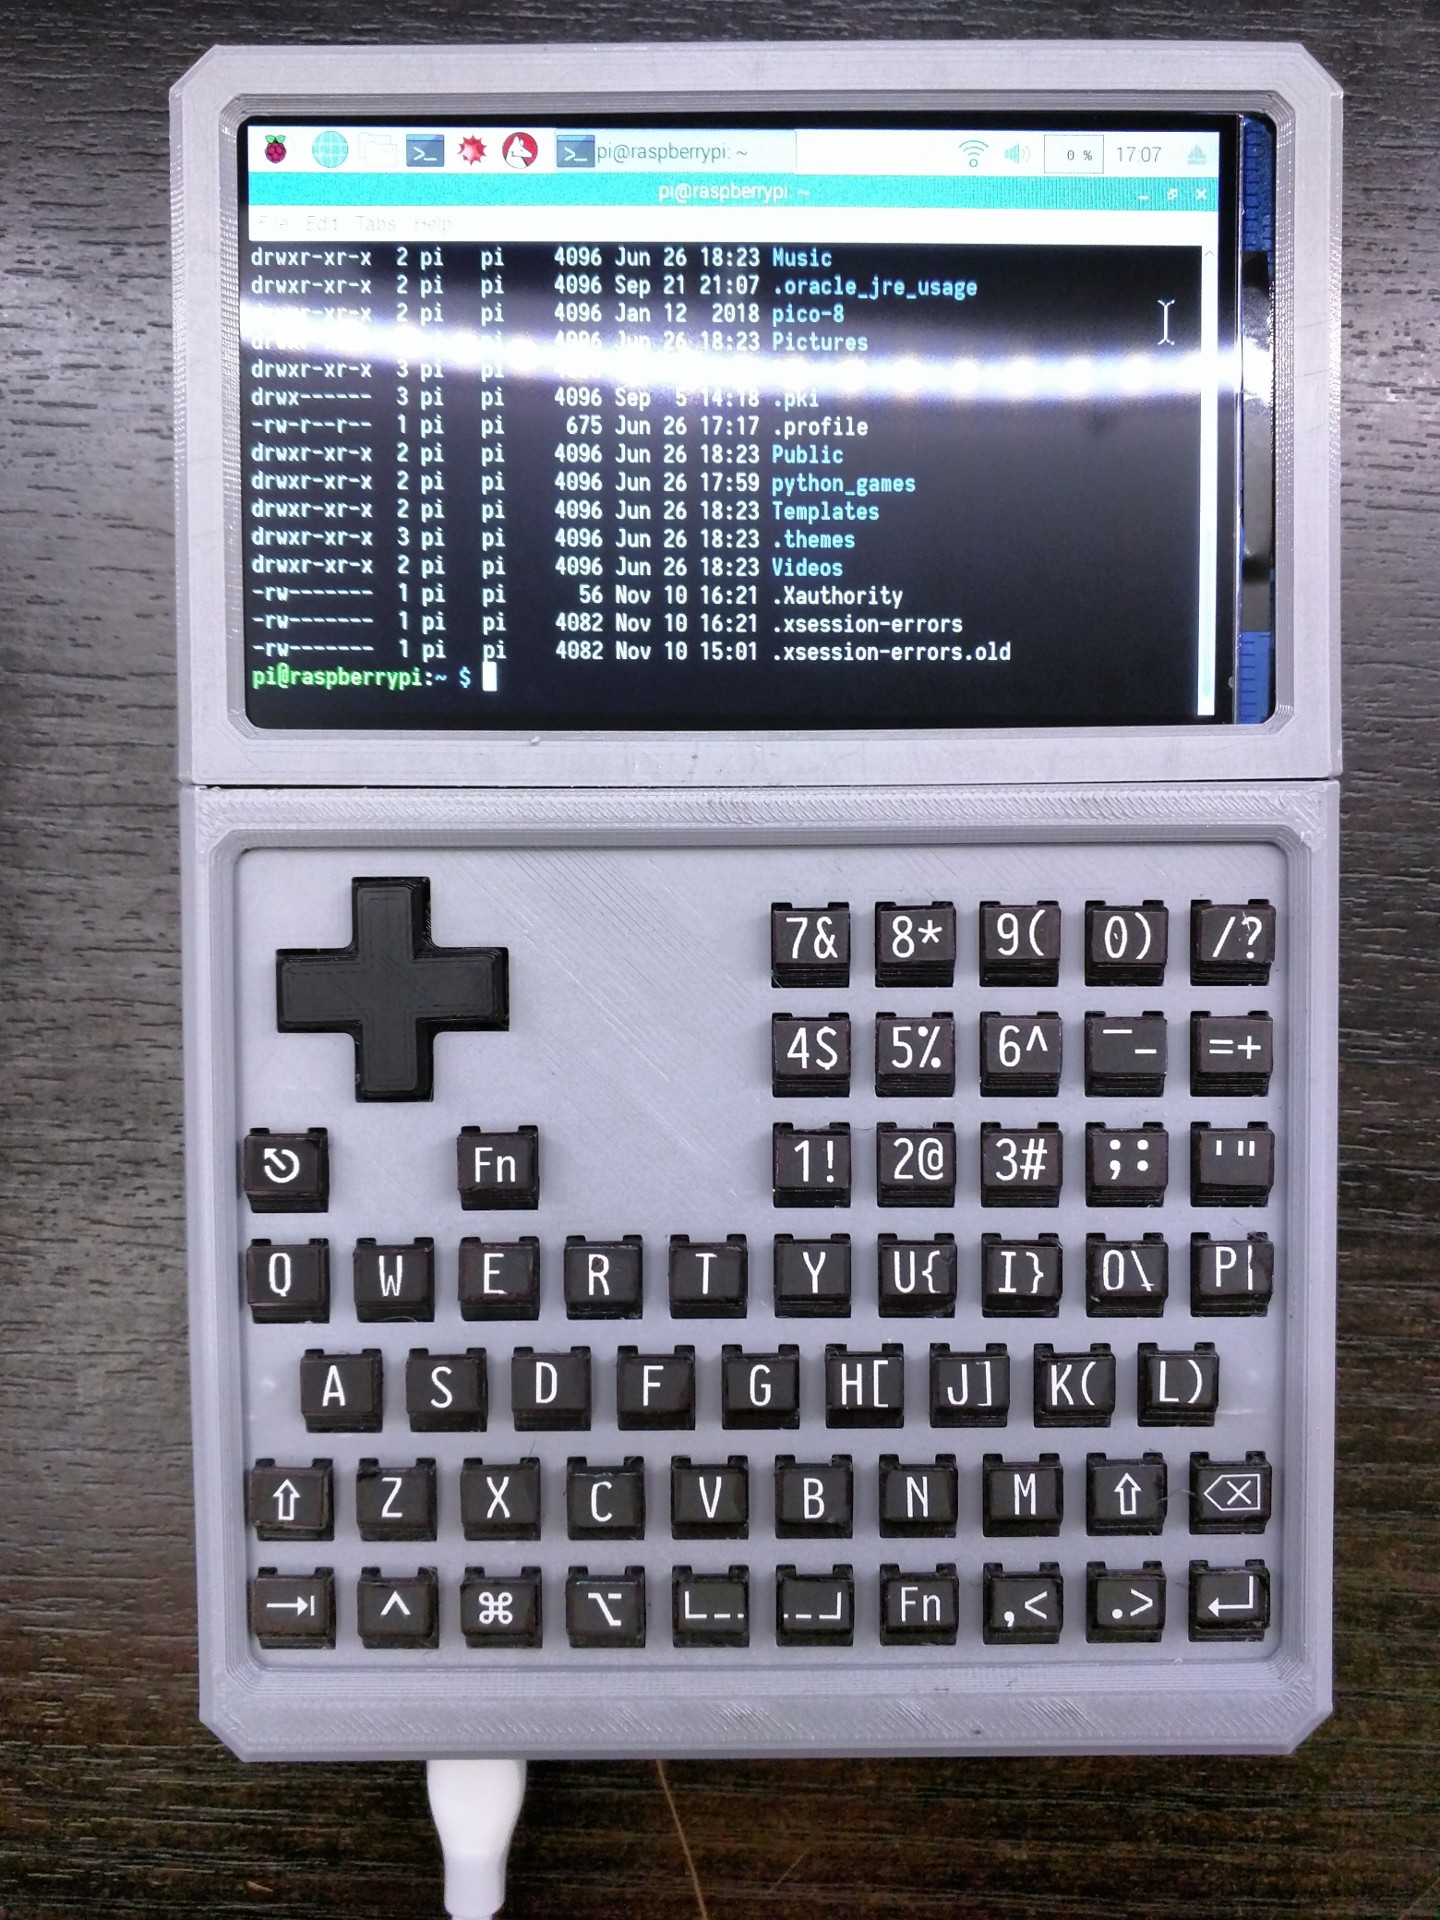
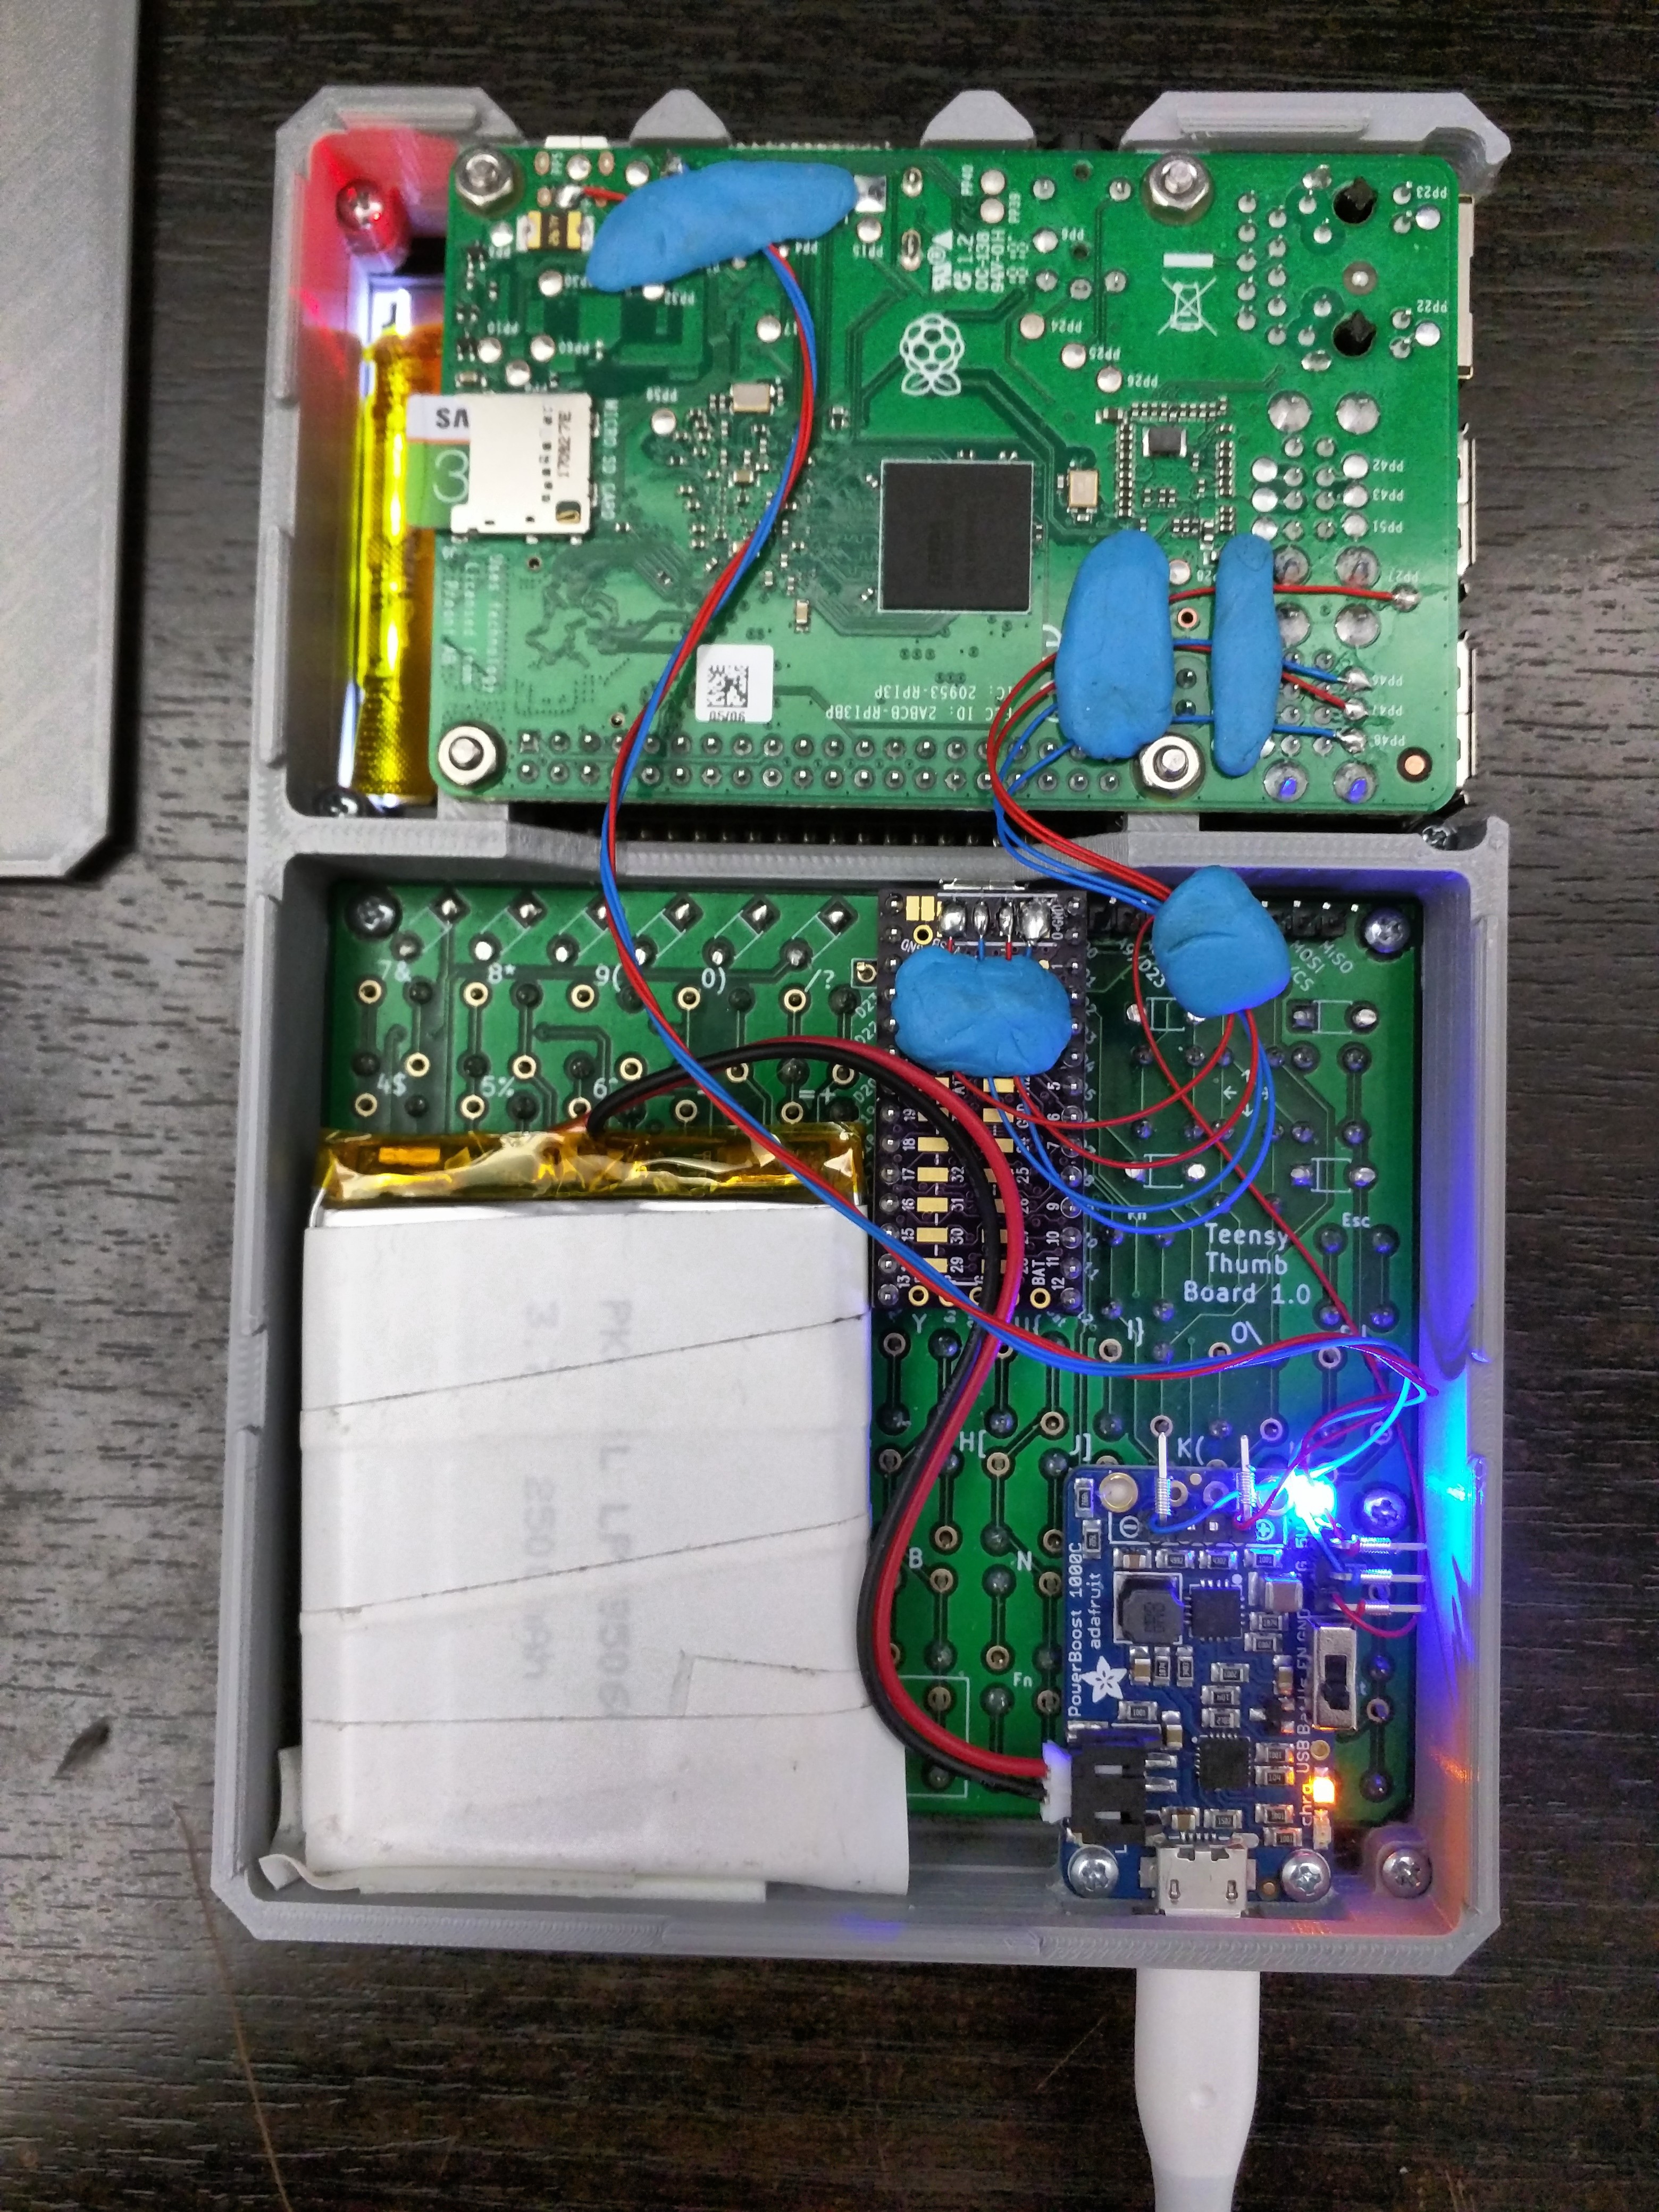
Proof of Concept: Raspberry Pi Handheld - Part 4 - Teensy to RPi Connections
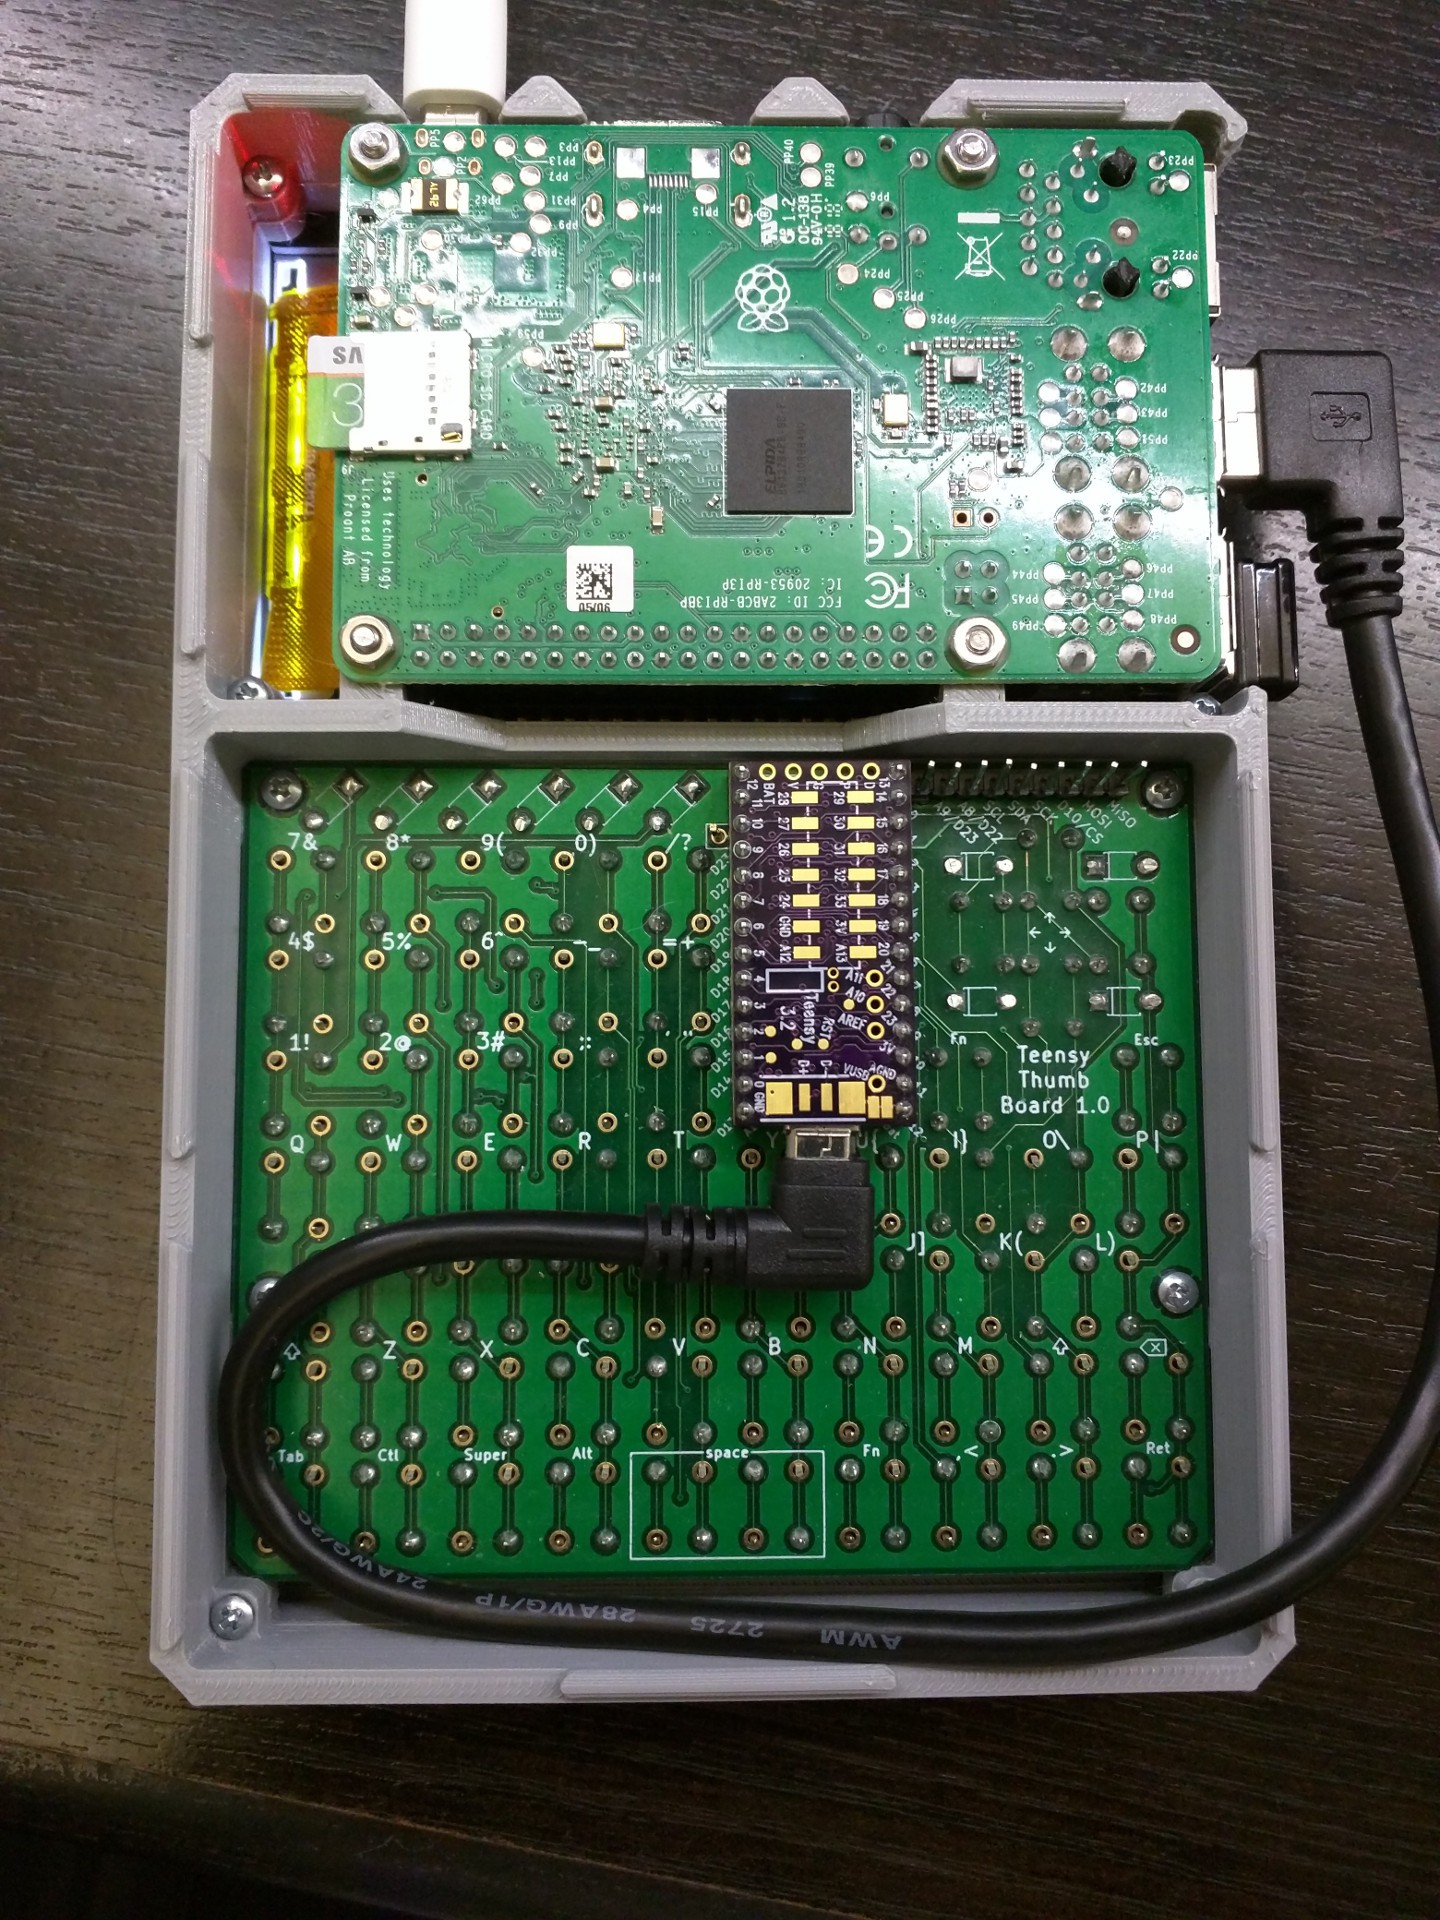
11/20/2018 at 02:43 • 0 commentsTurns out having an additional microcontroller in a raspberry pi project is pretty useful. I was able add backlight control and low battery monitoring to the keyboard with these connections. The Teensy is happy to output a PWM signal for backlight control. You can bind any key combination to change the PWM duty cycle and change the backlight brightness without any RPi intervention.
Low battery monitoring currently looks at the LBO pin that is pulled low if the battery dips below 3.2v. Alternative would be to have a voltage divider monitoring the BATT pin directly to get the full range of battery voltages similar to https://jeelabs.org/2013/05/16/measuring-the-battery-without-draining-it When the the LBO pin is low the Teensy can output serial message (over the default USB serial) that the RPi could monitor and then display a notification to the user.
Here are all the connections:Rpi3B+ PowerBoost PP2 5V PP3 GND
Rpi3B+   Teensy 3.2/LC USB Surface Pads
PP48     GND
PP47     D+
PP46     D-
PP27     VBUS
Low battery monitoring:
Teensy D22 to Powerboost LBO

Backlight control:
Teensy D23 to BCM19 (GPIO pin 35 hyperpixel4 backlight control)
Rpi Power Test points from: https://www.raspberrypi.org/documentation/hardware/raspberrypi/schematics/README.md
Teensy 3.2/LC Pinout: https://www.pjrc.com/teensy/pinout.html
Hyperpixel4 Pinout: https://pinout.xyz/pinout/hyperpixel4
Powerboost 1000c Pinout: https://learn.adafruit.com/adafruit-powerboost-1000c-load-share-usb-charge-boost/pinouts -
Proof of Concept: Raspberry Pi Handheld - Part 3 - Nearly Complete
11/11/2018 at 05:46 • 0 commentsEverything looks good! All that's missing is a hole for the sliding power switch on the back cover. I wired the low bat pin on the Adafriut PowerBoost to the Teensy. When the battery is running low the teensy can send a message over the serial USB to the RPi3 and pop up a notification to the user. Software and code are pending and will be added to github soon.
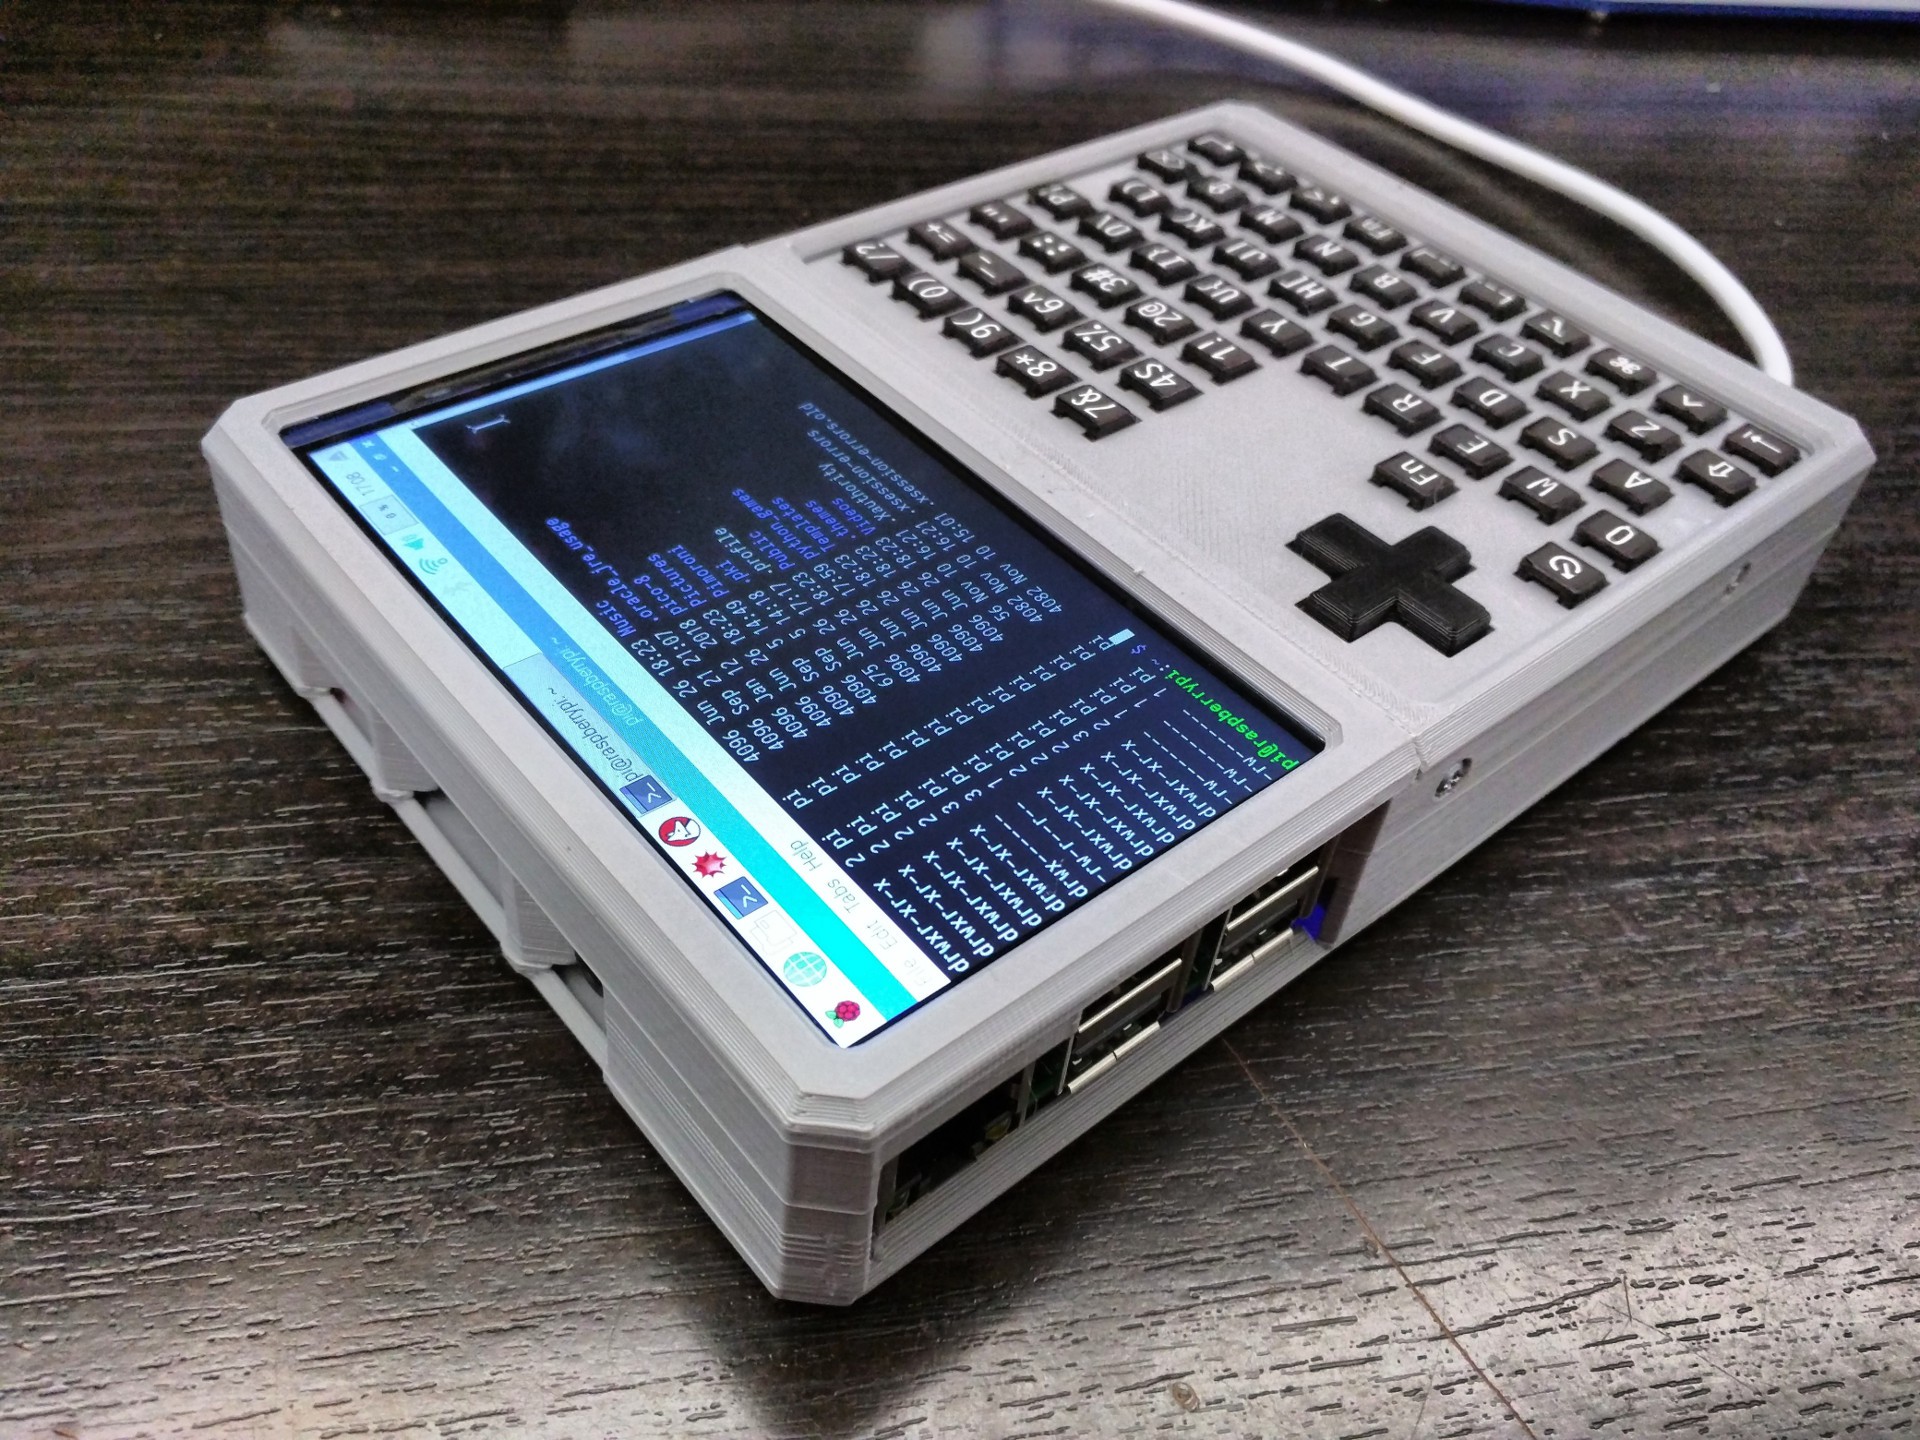
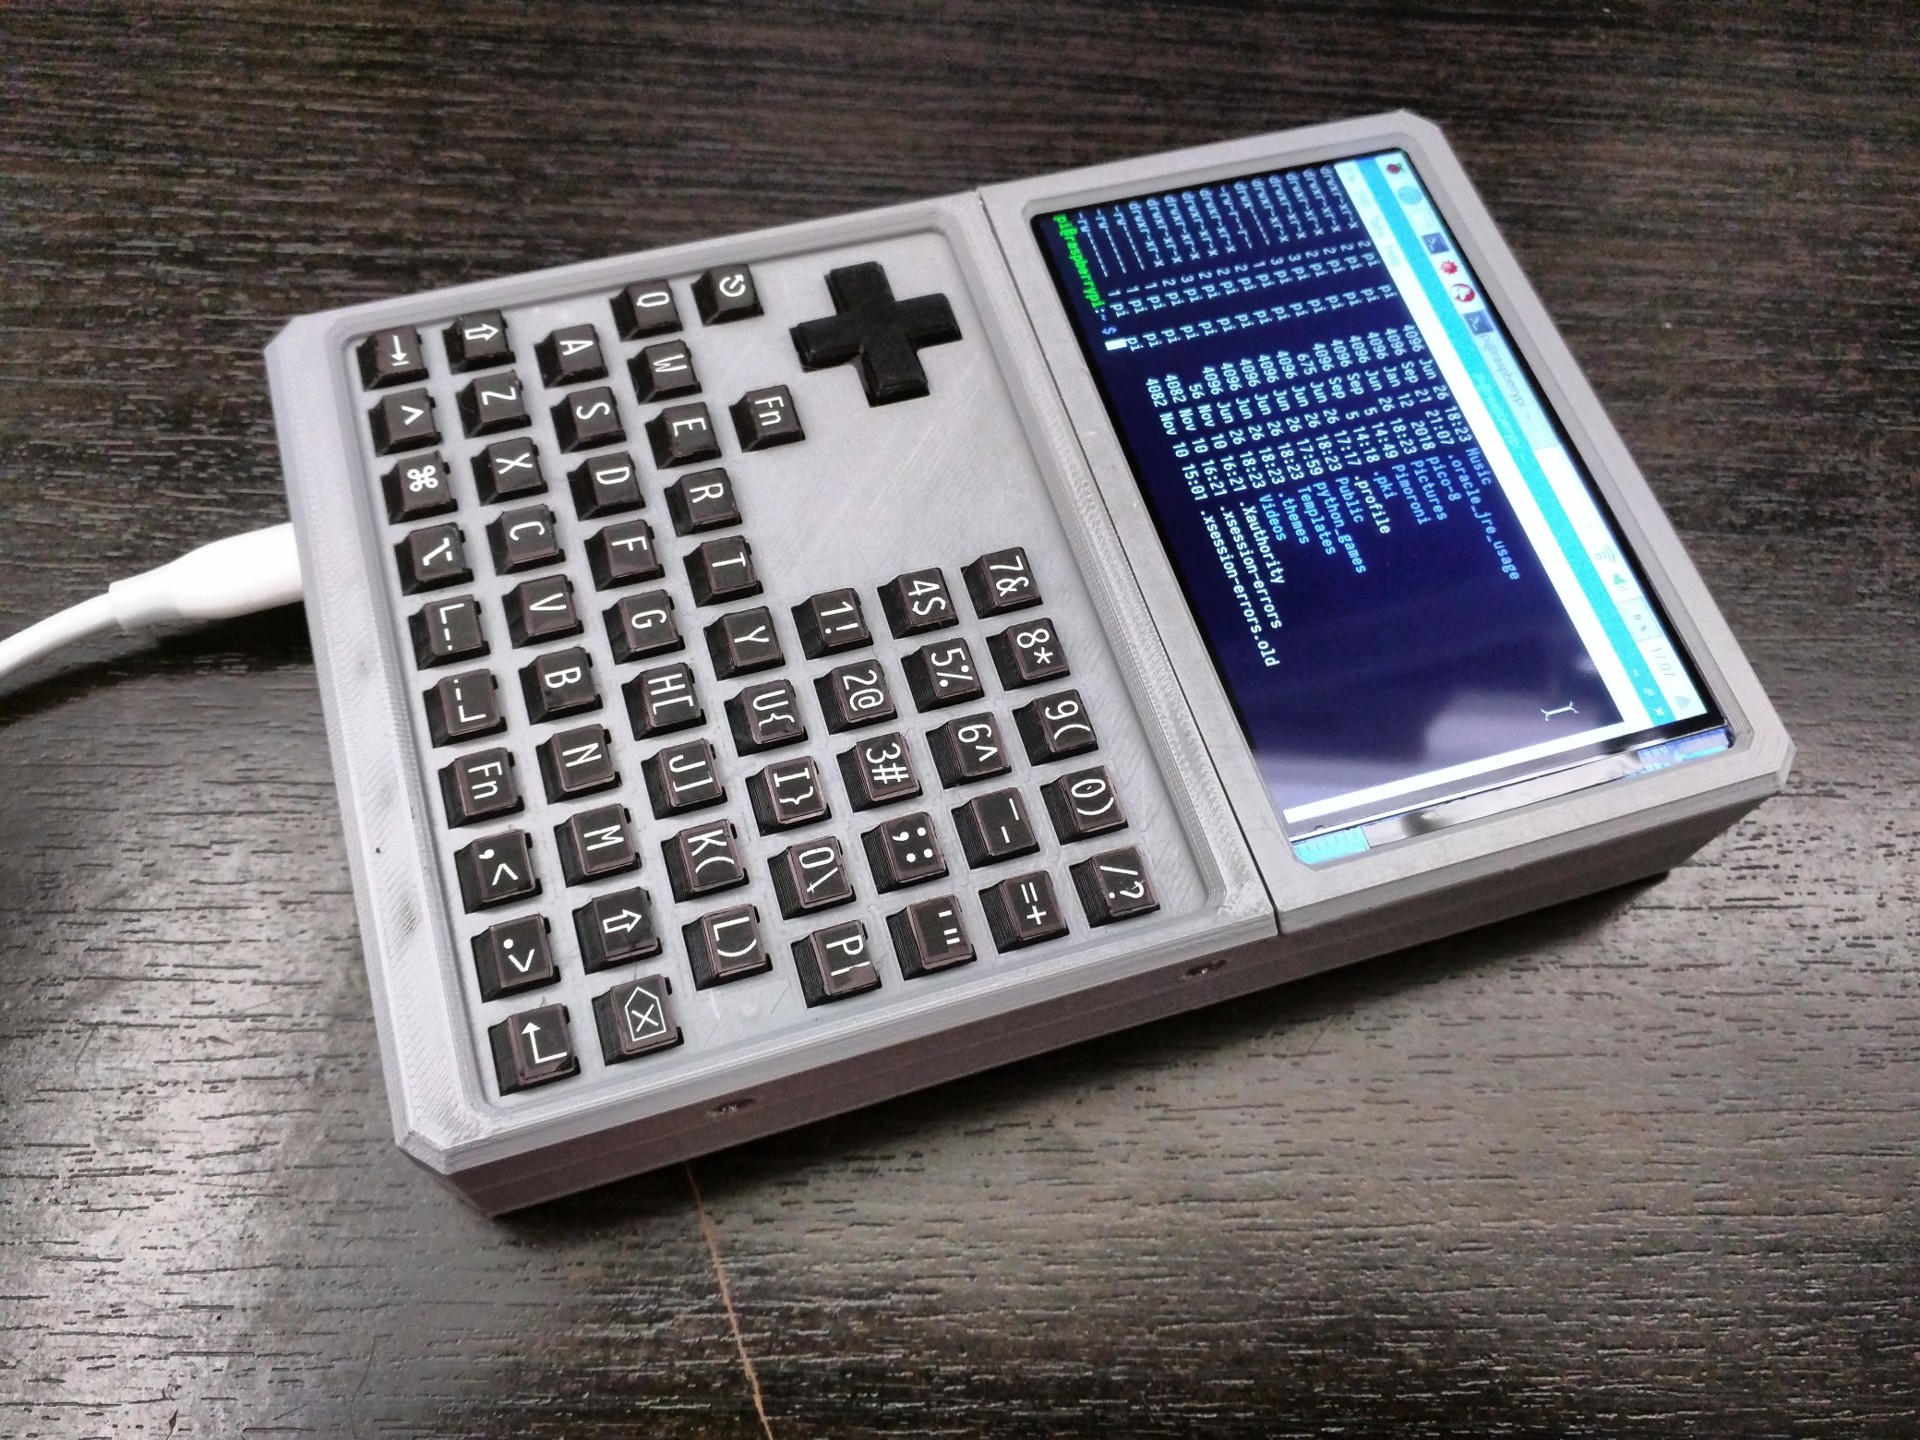
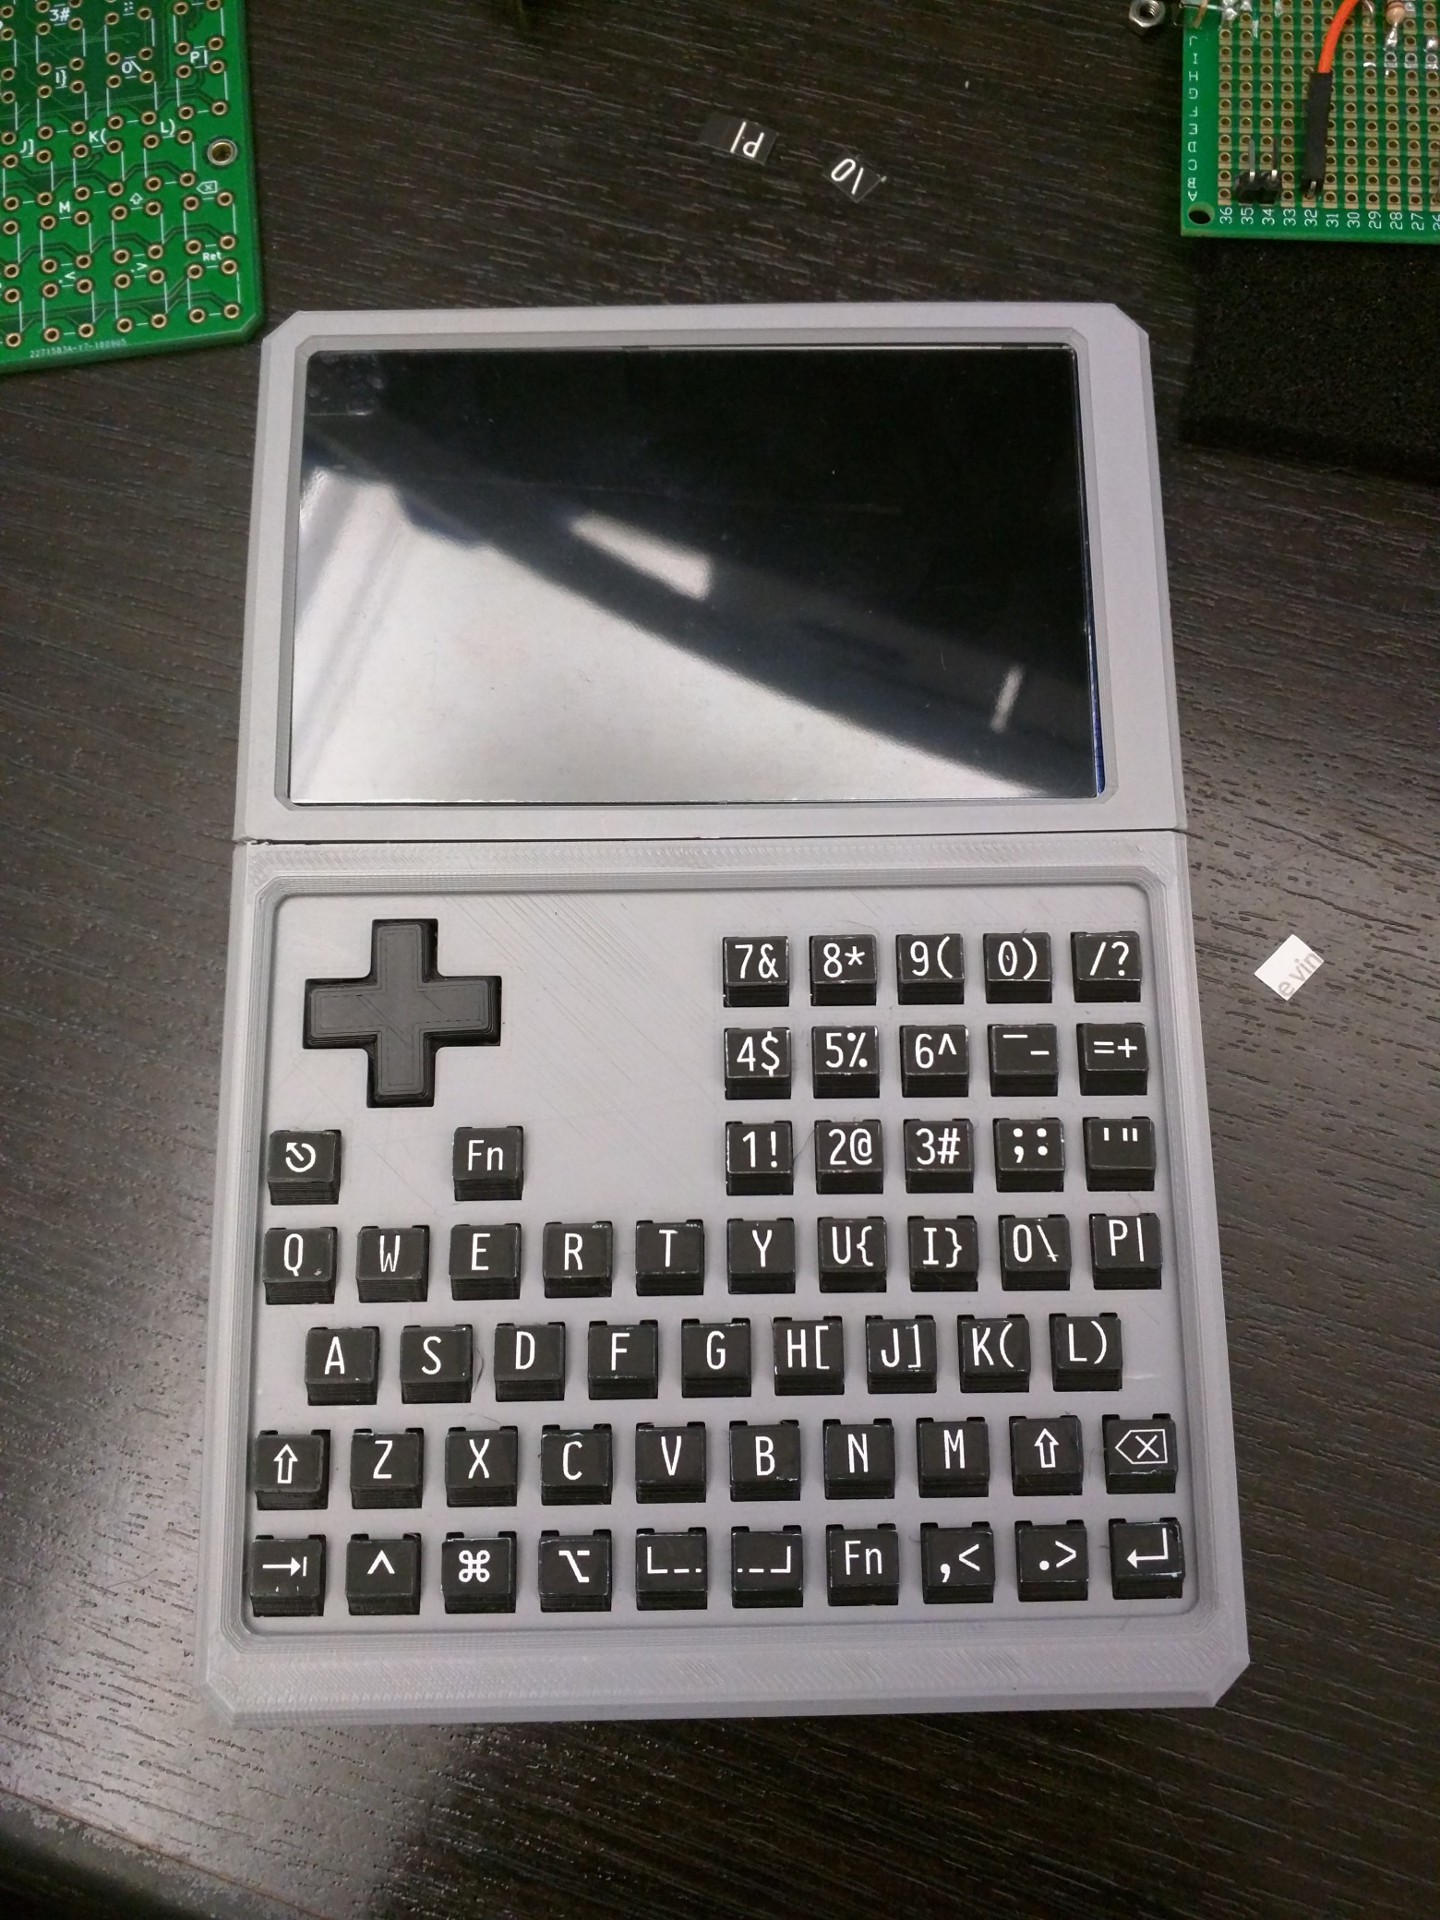
Keyboard behaves as a standard USB keyboard as expected using PJRC's excellent USB Keyboard and Mouse library: https://www.pjrc.com/teensy/td_keyboard.html There's some bonus functionality for using the D-pad to move the mouse cursor around. That turned out to be useful for the non-touch screen. By the way this really needs a touch screen, I've repeatedly tapped on the screen expecting something to happen despite knowing it doesn't work.
![]()
![]()
![]()
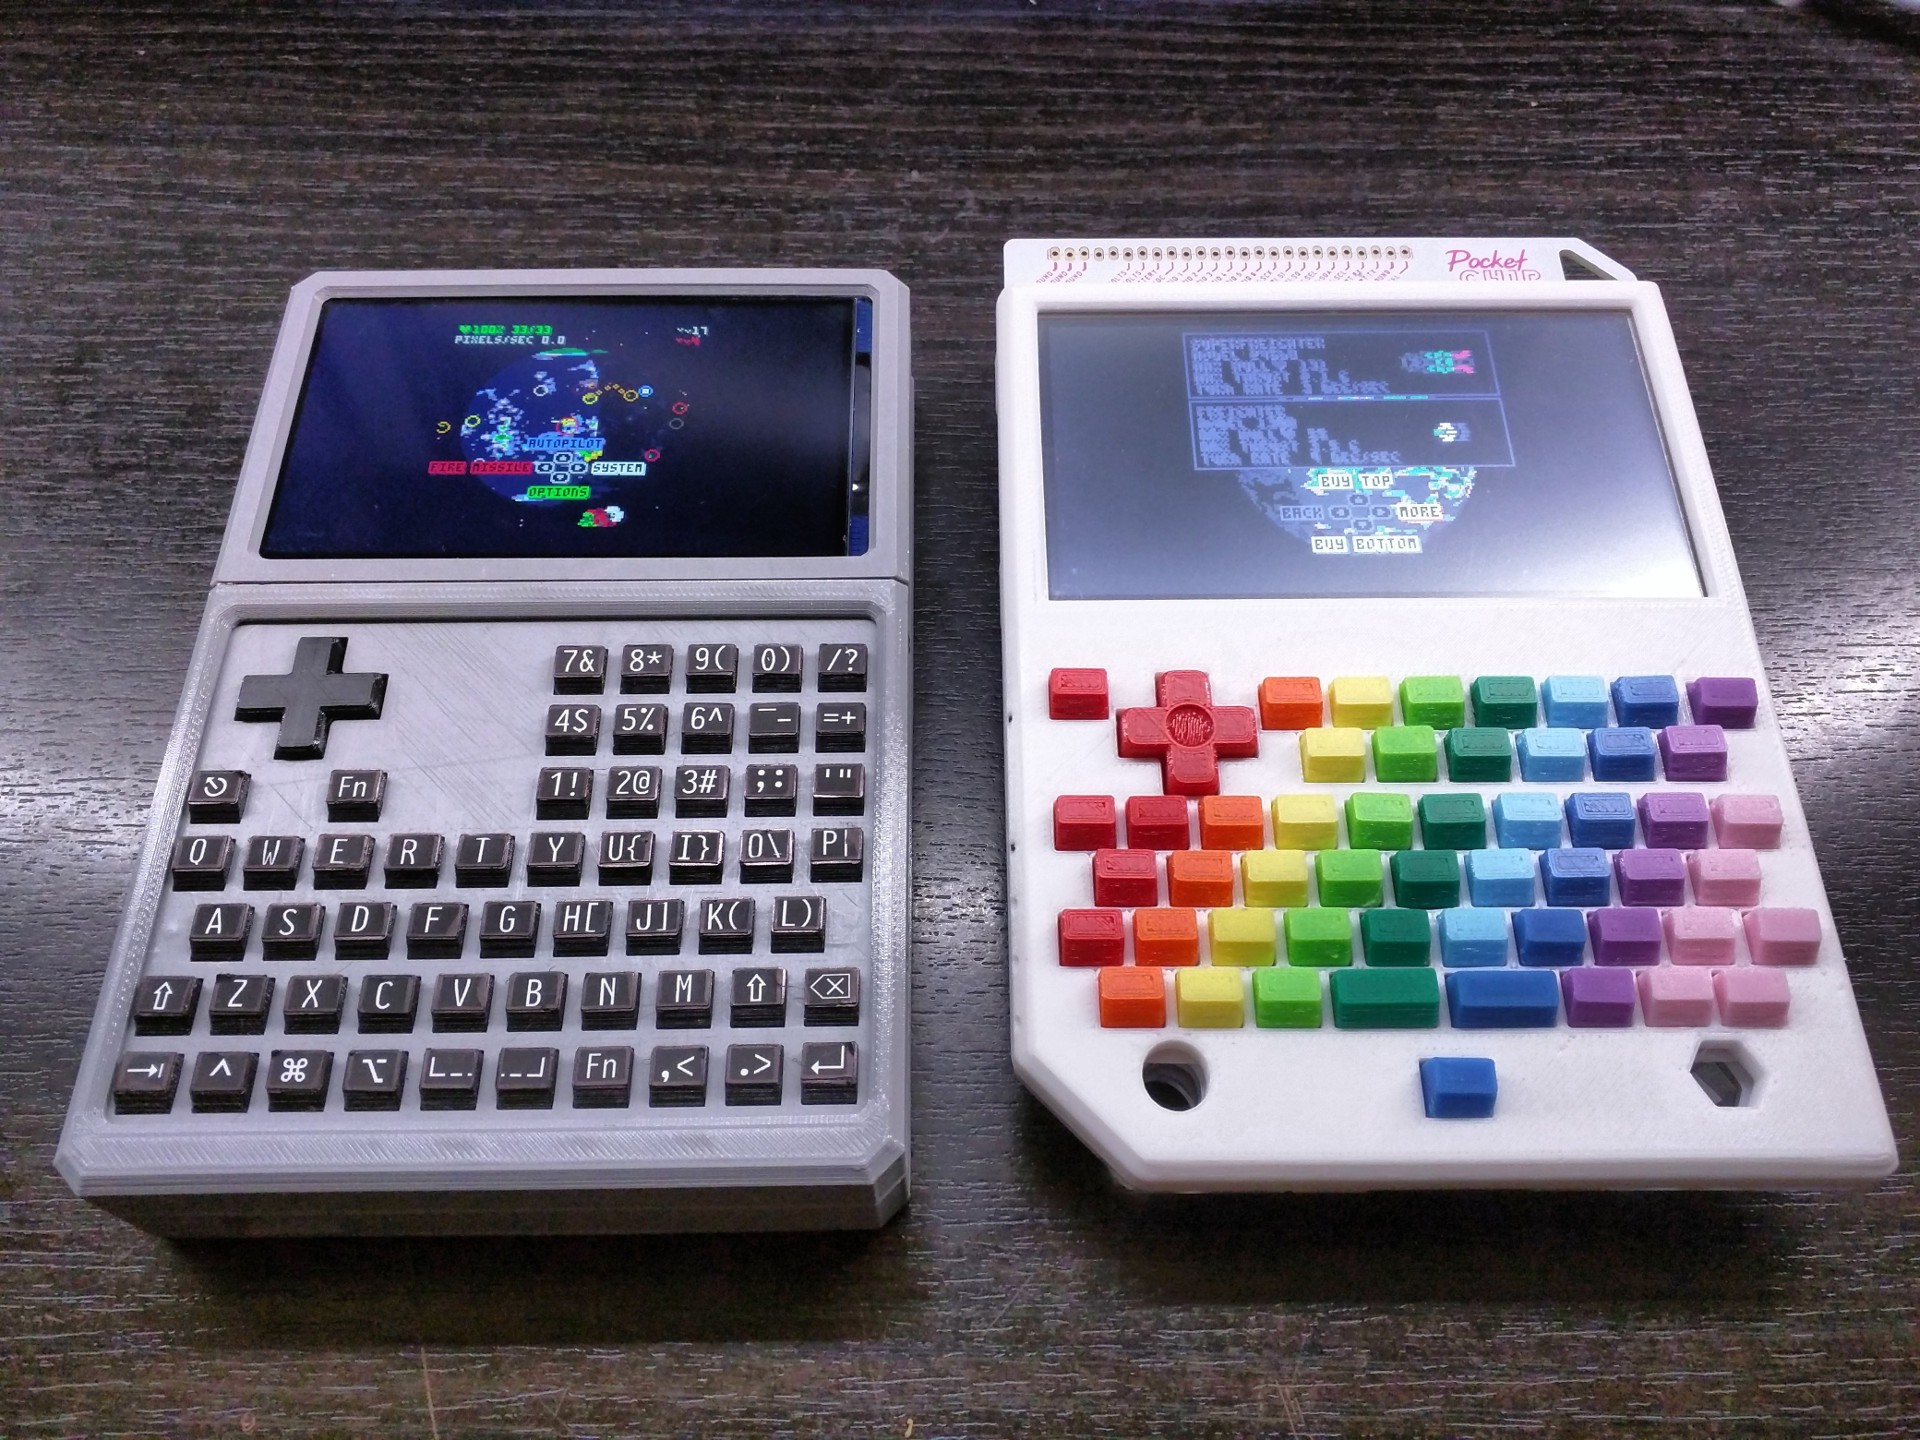
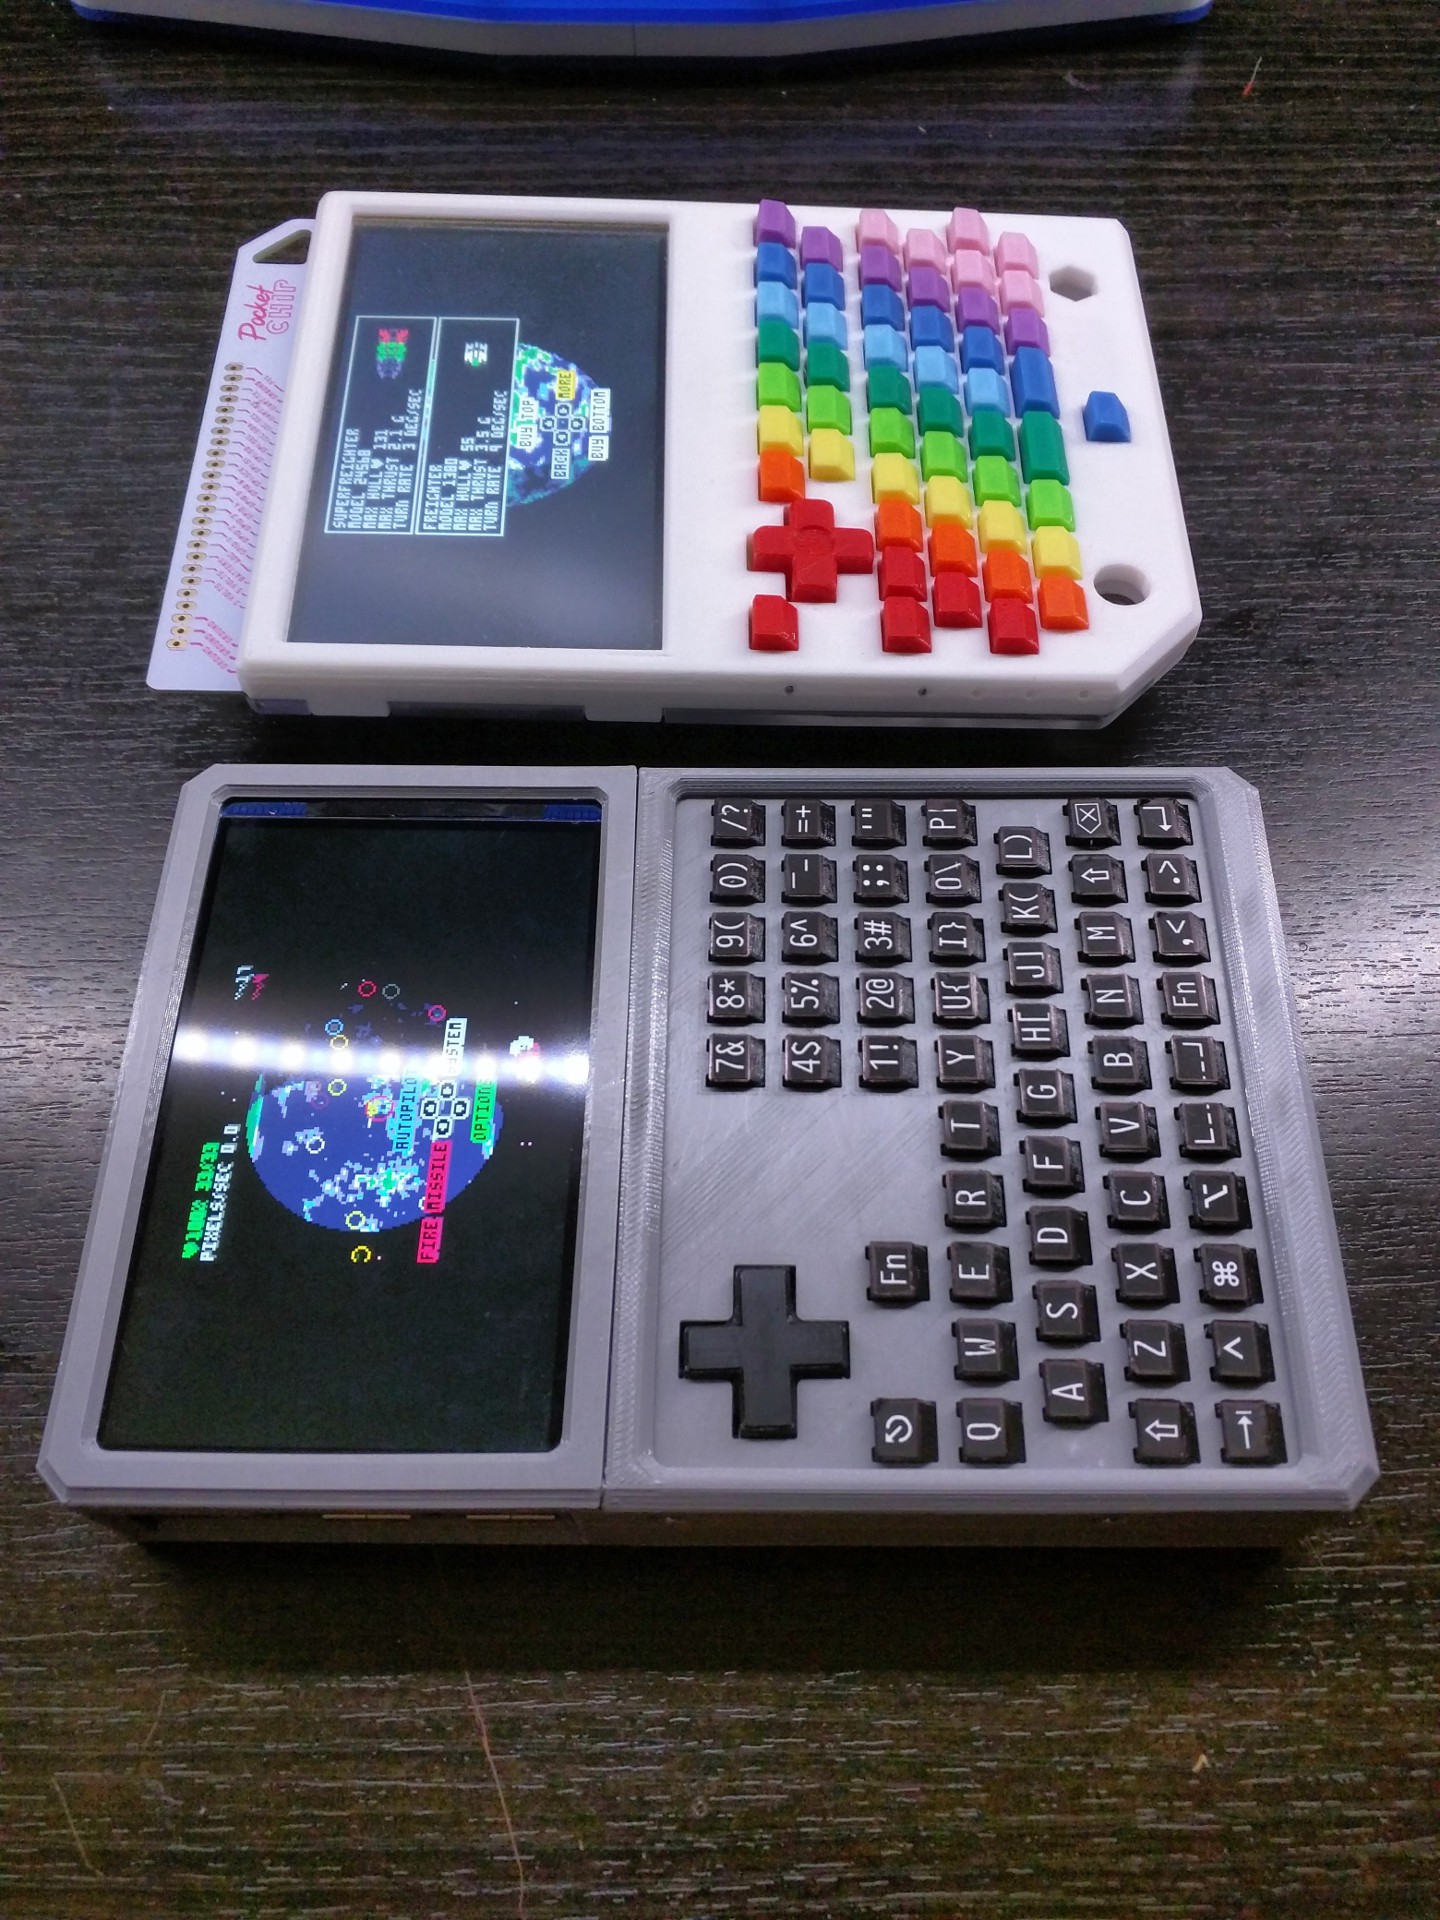
Time to get back to some pico-8, love2d and maybe tic-80 coding.
![]()
![]()
![]()
-
Proof of Concept: Raspberry Pi Handheld - Part 2 - Case Design
11/11/2018 at 05:34 • 0 commentsThis was a challenging case to make. The hardest part was supporting the HyperPixel display and the RPi3 using only the mounting holes. I didn't want any pressure put onto the display to prevent cracks.
When I ordered the parts only the non-touch version of the HyperPixel was in stock so thats what I've modeled the case on. I've got a touch screen version on order and will make separate display bezels for each once that arrives.
Here's the front of the case with the modular keyboard and LCD mounted.
![]()
And the back side
![]()
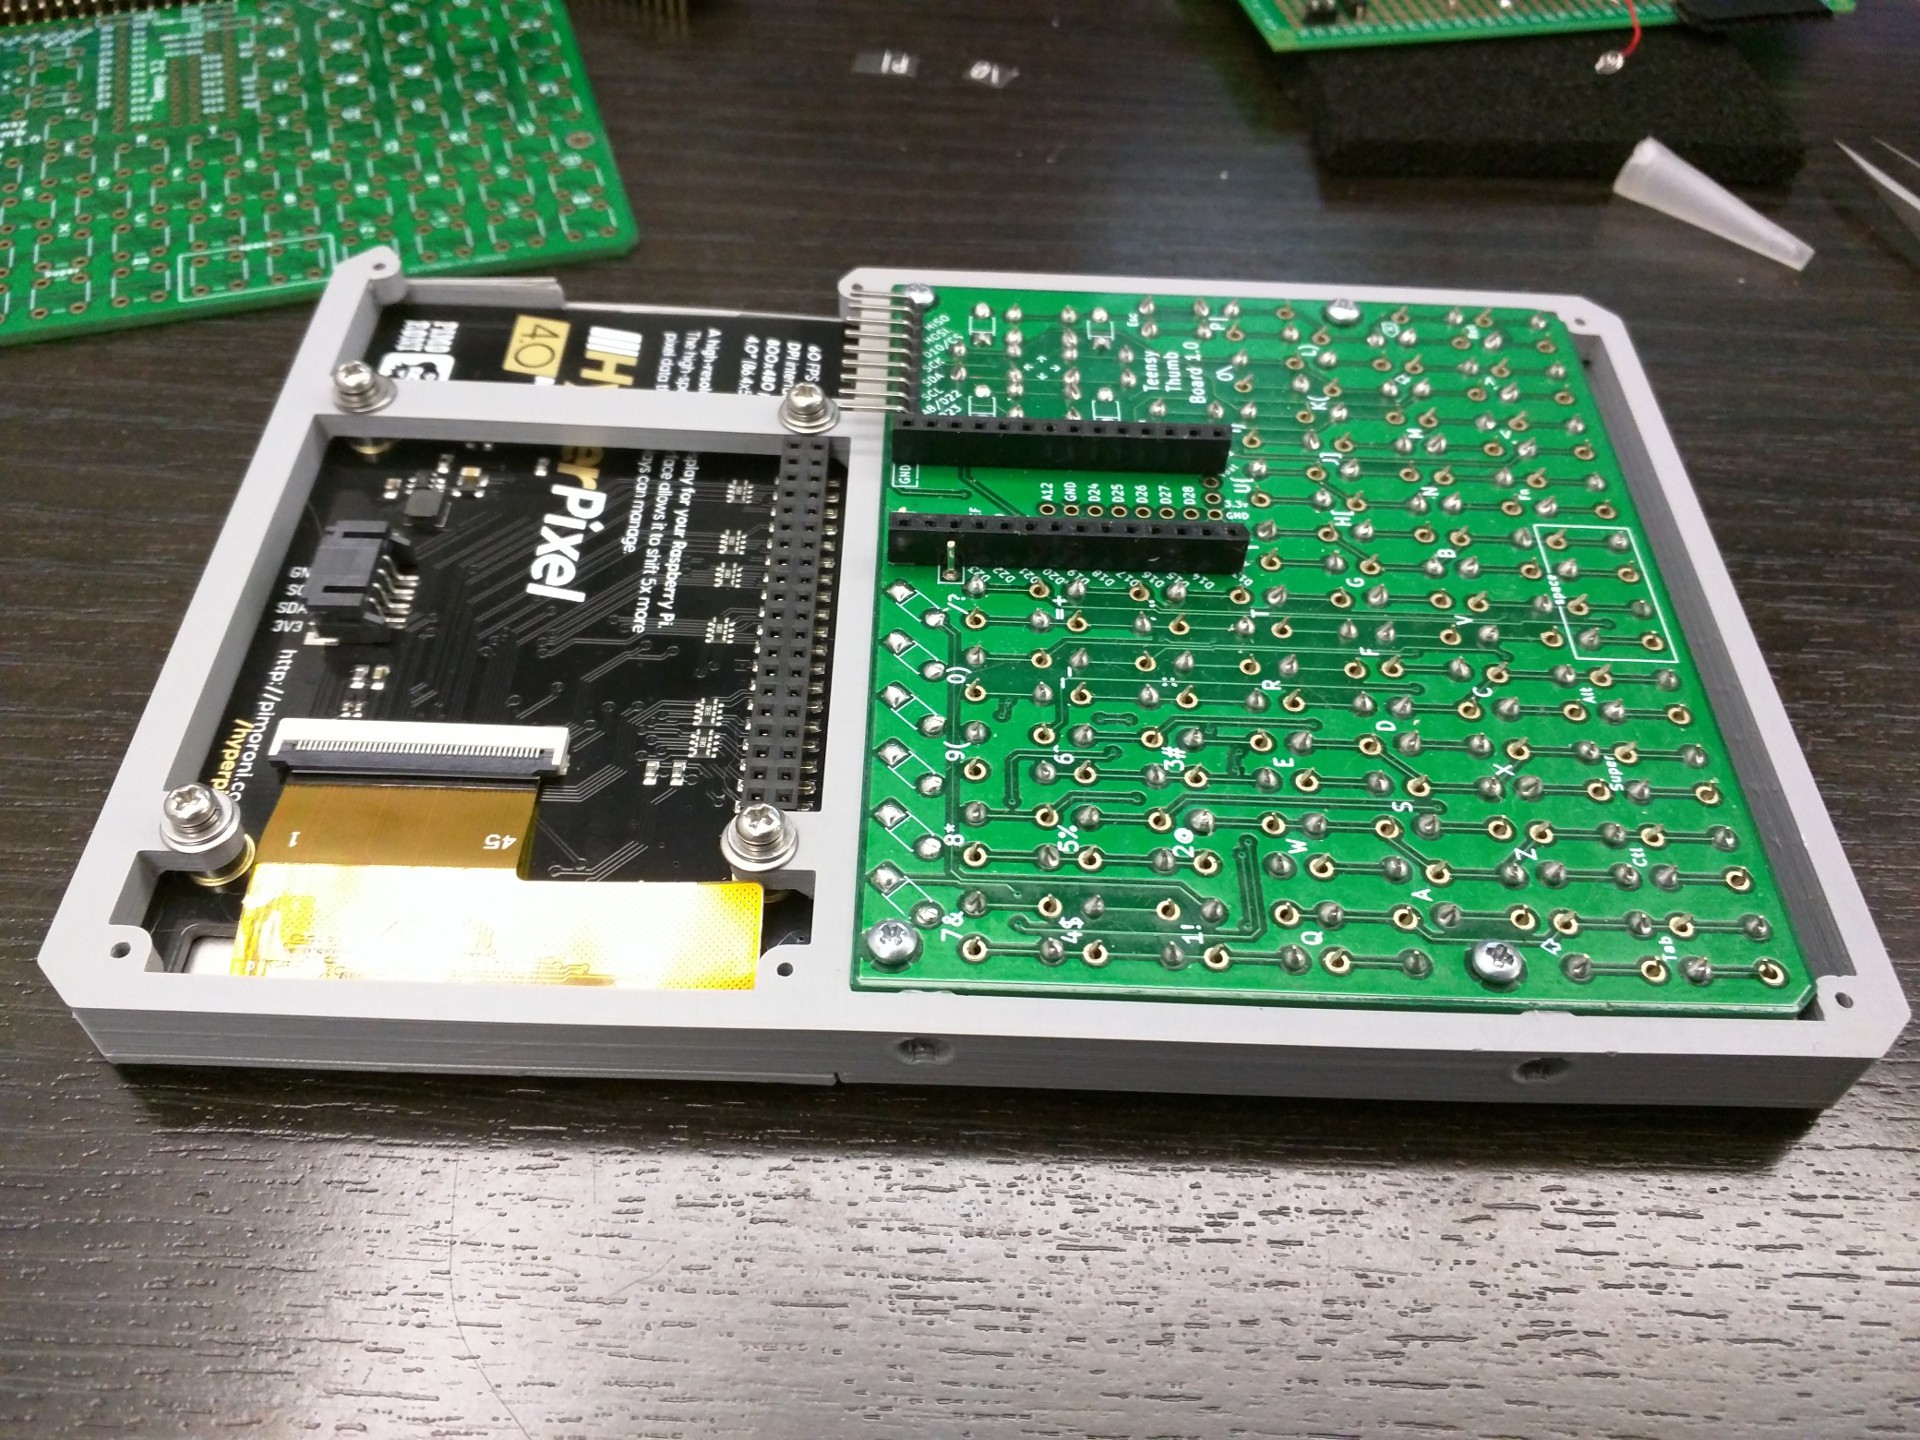
This is where the RPi3 needs to be mounted:
![]()
That requires another layer. Here's the result. Temporary USB cable connecting to the Teensy:
![]()
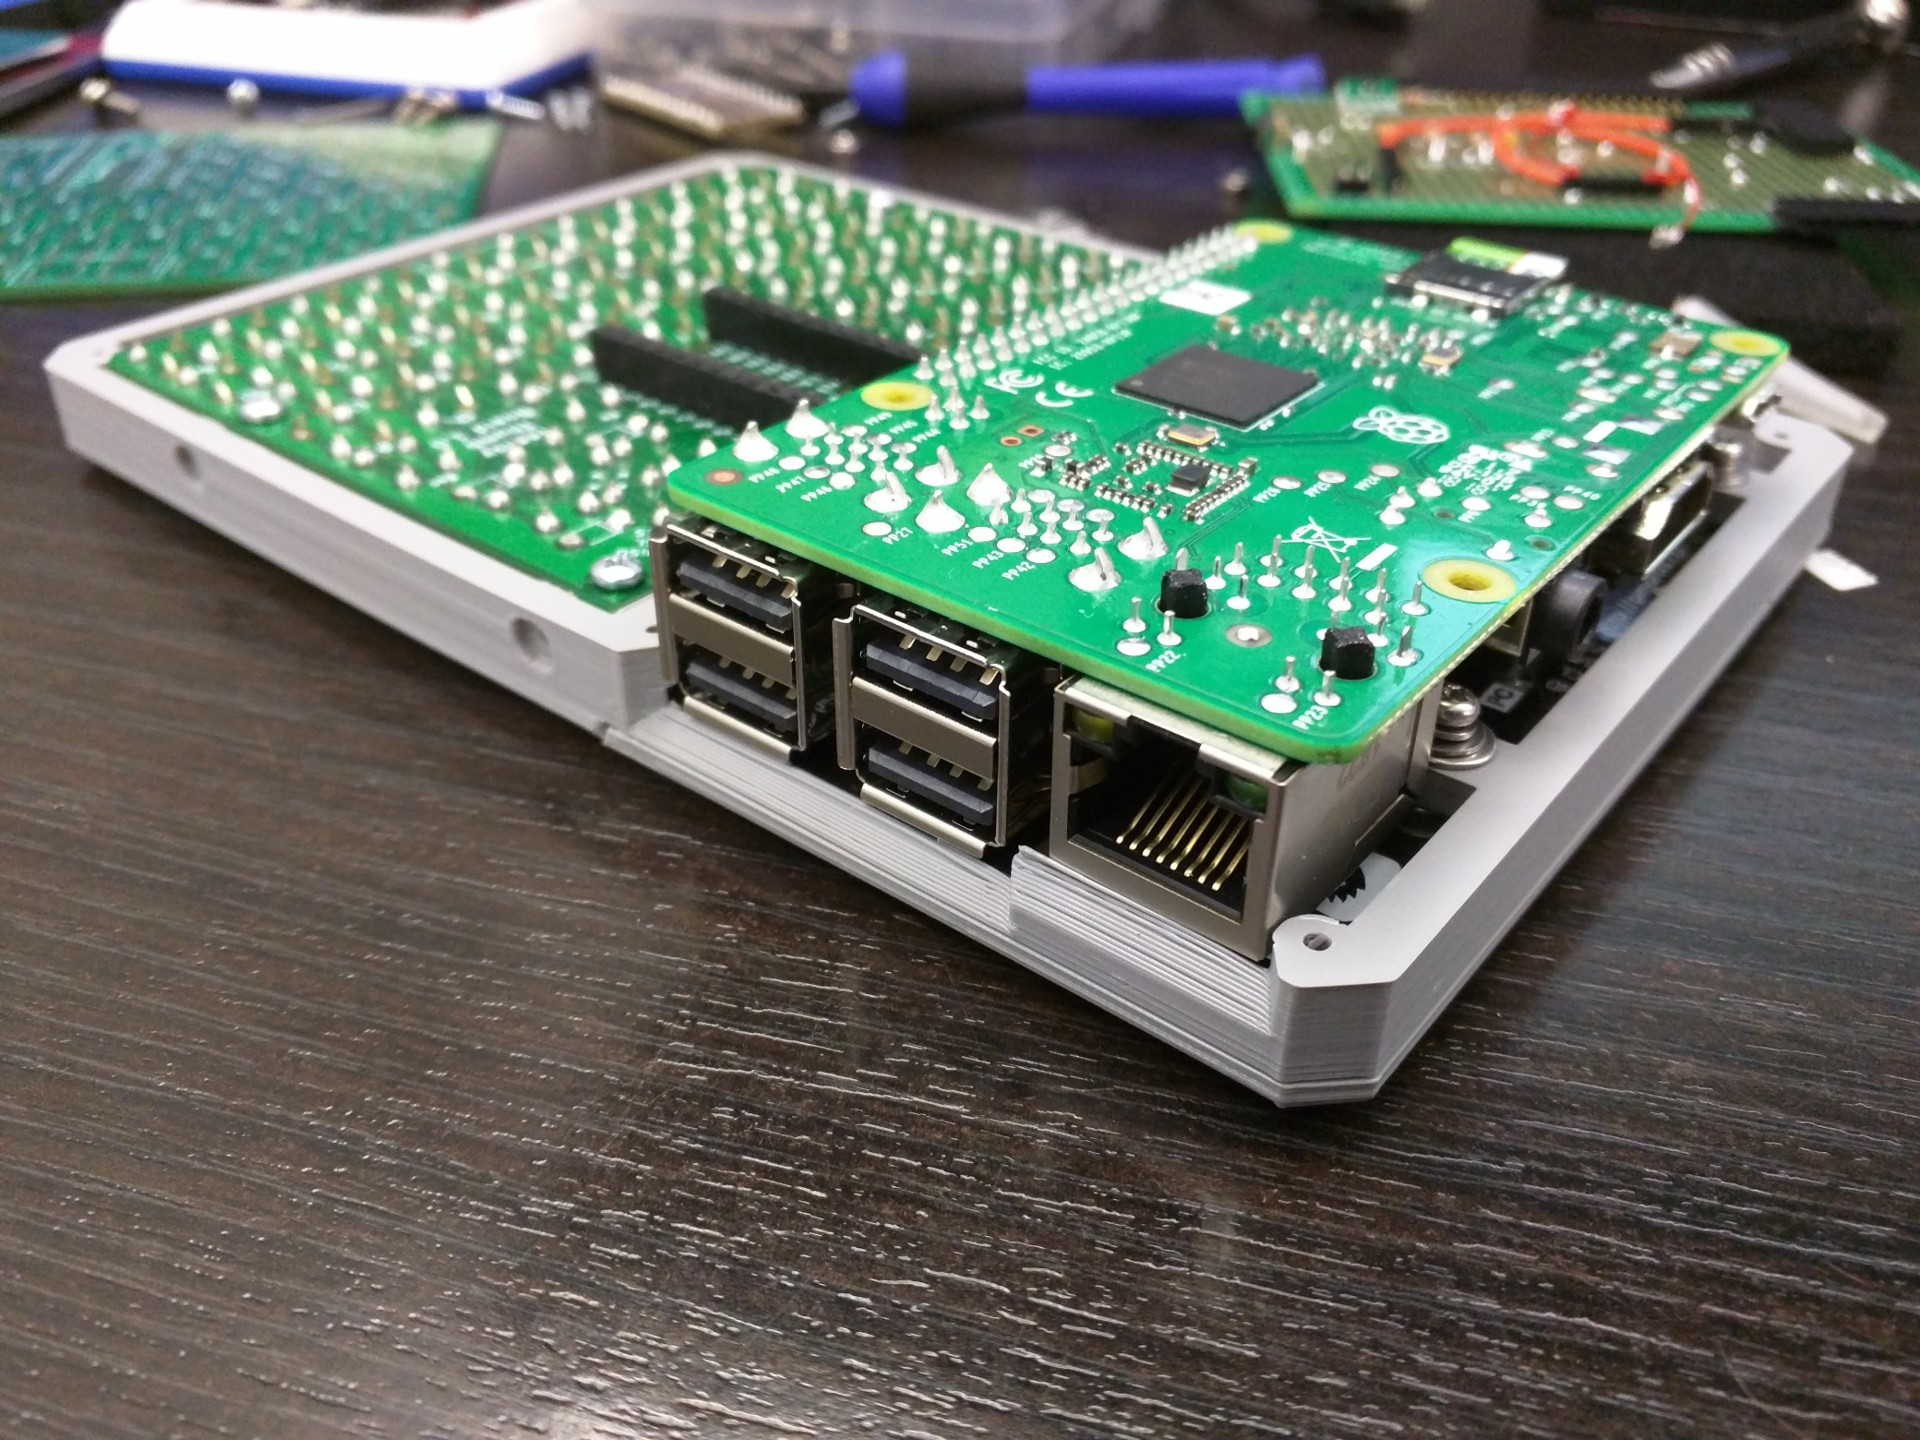
The two halves of the case are mounted using self tapping plastic screws. Nicer M2.5 screws and hex nuts are used on the display and RPi3. The LCD bezel and case are held with screw free snap tabs.
Next up I added power and wired the Teensy directly to the USB solder pads.
![]()
This post is getting long so I'll add the final photos to Part 3
-
Proof of Concept: Raspberry Pi Handheld - Part 1
11/11/2018 at 05:18 • 0 commentsYou might call this a PocketCHIP love letter.
Parts:
- Teensy Thumb Keyboard PCB
https://hackaday.io/project/162281-teensy-thumb-keyboard
https://github.com/AnthonyDiGirolamo/teensy-thumb-keyboard - Teensy 3.2 - $19.80
https://www.pjrc.com/store/teensy32.html
https://www.adafruit.com/product/2756 - HyperPixel 4.0 - $49.95
https://shop.pimoroni.com/products/hyperpixel-4?variant=12569485443155
https://www.adafruit.com/product/3578 - PowerBoost 1000 Charger - Rechargeable 5V Lipo USB Boost @ 1A - 1000C - $19.95
https://shop.pimoroni.com/products/powerboost-1000-charger-rechargeable-5v-lipo-usb-boost-1a-1000c
https://www.adafruit.com/product/2465 - Lithium Ion Polymer Battery - 3.7v 2500mAh - $14.95
https://www.adafruit.com/product/328 - Slide Switch - $0.95
https://shop.pimoroni.com/products/spdt-mini-power-switch
https://www.adafruit.com/product/805 - Raspberry Pi 3 - Model B+ - 1.4GHz Cortex-A53 with 1GB RAM -$35
https://www.adafruit.com/product/3775
https://shop.pimoroni.com/products/raspberry-pi-3-b-plus - SD Card - $6.99
https://www.amazon.com/Samsung-MicroSD-Adapter-MB-ME32GA-AM/dp/B06XWN9Q99 - Panasonic EVQ-PAC04M Tacticle Switche
https://www.mouser.com/ProductDetail/667-EVQ-PAC04M
https://www.digikey.com/products/en?keywords=EVQ-PAC04M
60x $0.0177ea - 1n4148 Zener Diodes
https://www.amazon.com/gp/product/B06XB1R2NK
- Teensy Thumb Keyboard PCB
Teensy Thumb Keyboard
Handheld tactile switch keyboard for Teensy 3.2 compatible boards.