Capt. Flatus O'Flaherty ☠
-
Testing the Device
12/27/2018 at 11:28 • 0 commentsAfter putting the system into headless mode and logging in via a laptop using SSH, I was able to test the system 'in the field'. Initially, there was a bug that caused the camera to turn off after 15 minutes and this was cured by installing 'screen' on the Raspberry Pi and typing 'screen' into the command line before initiating the python files. What screen does is it opens another terminal on the Pi, so it has it's own live terminal which does not get shut down when my laptop terminal shuts down. It's a really good solution and avoids having to mess about with other 'run on boot' solutions which can potentially wreck the whole system.
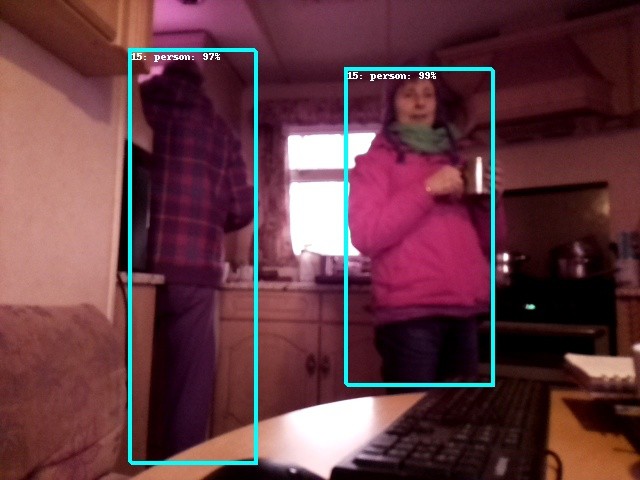
A separate video camera was set up in my office, 200 m away, synchronised with the main camera and focused on the receiver gadget (bottom right of video). On testing, the system did not respond to the dog in the camera frame, but did respond to me (a person) ….. Success!
-
Detecting Other Objects and Animals
12/23/2018 at 14:20 • 0 commentsThe 'security_cam.py' file is a generic 'live-object-detection' script and can be modified very easily to detect a total of 20 different objects.
If we look at line 119:
# "Class of interest" - Display detections only if they match this class ID
CLASS_PERSON         = 15
To detect dogs, just change this to:
# "Class of interest" - Display detections only if they match this class ID
CLASS_DOG         = 12
Also, line 200 needs to be changed as well:
        # Filter a specific class/category
        if( output_dict.get( 'detection_classes_' + str(i) ) == CLASS_PERSON ):
Although the person class worked really well and was quite impressive, the dog class was a little bit underwhelming and not nearly as good as some of the other models I've tested. Nonetheless, here's the full list of classes available with this model:
- Aeroplane
- Bycycle
- Bird
- Boat
- Bottle
- Bus
- Car
- Cat
- Chair
- Cow
- Diningtable
- Dog
- Horse
- Motorbike
- Person
- Pottedplant
- Sheep
- Sofa
- Train
- TVmonitor
-
Arduino MKRWAN 1300 Code
12/23/2018 at 12:50 • 0 commentsNothing too fancy about the code, except I wanted the tone of the beeper to change according to how close the detected person was to the camera. This would be useful for discerning the difference between someone posting a letter in the postbox and someone actually walking up the drive. The code uses string analysis functions to, firstly, confirm that the data is coherent by searching for the word 'Box' and then finding the two pairs of coordinates that represent the detection box. If the detected person is close to the camera, the area of the detection box is greater and the resulting alarm tone is of higher frequency:
#include <SPI.h> #include <LoRa.h> String myString =" "; String myStringReversed =" "; void setup() { pinMode(4, OUTPUT); pinMode(LED_BUILTIN, OUTPUT); tone(5,1000,1000); digitalWrite(LED_BUILTIN, HIGH); digitalWrite(4, HIGH); delay(1000); digitalWrite(LED_BUILTIN, LOW); digitalWrite(4, LOW); Serial.begin(9600); // while (!Serial); Serial.println("LoRa Receiver"); if (!LoRa.begin(8690E5)) { Serial.println("Starting LoRa failed!"); while (1); } } void loop() { //delay (1000); // try to parse packet int packetSize = LoRa.parsePacket(); if (packetSize) { // received a packet Serial.print("Received packet '"); digitalWrite(LED_BUILTIN, HIGH); digitalWrite(4, HIGH); delay(100); digitalWrite(LED_BUILTIN, LOW); digitalWrite(4, LOW); // read packet myString =" "; myStringReversed =" "; int i = 0; char c; while (LoRa.available()) { //c[i] = (char)LoRa.read(); //Serial.print((char)LoRa.read()); myString = (char)LoRa.read() + myString; i++; //Reverse the string: c = myString.charAt(0); myStringReversed = myStringReversed + c; } processString(); //Serial.print("My string: ");Serial.print(myString); // print RSSI of packet //Serial.print("' with RSSI "); //Serial.println(LoRa.packetRssi()); } } void processString() { Serial.print("My string reversed:");Serial.print(myStringReversed); // print RSSI of packet Serial.print("' with RSSI "); Serial.println(LoRa.packetRssi()); int len = myStringReversed.length(); int j=0; char a,b,c,d; String coord1 = " "; String coord2 = " "; String coord3 = " "; String coord4 = " "; int k =0; char x = ','; int z=1; int y=1; int r=1; int s=1; int v=0; while (j < len) { a = myStringReversed.charAt(j); b = myStringReversed.charAt(j+1); c = myStringReversed.charAt(j+2); if((a=='B')&&(b=='o')&&(c=='x')) // The word 'box' has been identified in the string - k is now greater than 0. { k = j+5; Serial.print("Character B was found at: ");Serial.println(j); } j++; } if (k>0) { v =0; // int V stops perpetual loops occurring. while((z==1)&&(v<200)) { if(myStringReversed.charAt(k)==x) // Build up string 'coord' until a comma is reached. { Serial.print("k");Serial.println(k); z=0; } else { coord1 = coord1 + myStringReversed.charAt(k); k++; v++; //Serial.print("coord1: ");Serial.println(coord1); } } v =0; k++; while((y==1)&&(v<200)) { if(myStringReversed.charAt(k)==')') // Build up string 'coord' until a comma is reached. { Serial.print("k");Serial.println(k); y=0; } else { coord2 = coord2 + myStringReversed.charAt(k); k++; v++; //Serial.print("coord2: ");Serial.println(coord2); } } v =0; k=k+3; // Takes account of two brackets and a comma. while((r==1)&&(v<200)) { if(myStringReversed.charAt(k)==x) // Build up string 'coord' until a comma is reached. { Serial.print("k");Serial.println(k); r=0; } else { coord3 = coord3 + myStringReversed.charAt(k); k++; v++; //Serial.print("coord3: ");Serial.println(coord3); } } v =0; k++; while((s==1)&&(v<200)) { if(myStringReversed.charAt(k)==')') // Build up string 'coord' until a comma is reached. { Serial.print("k");Serial.println(k); s=0; } else { coord4 = coord4 + myStringReversed.charAt(k); k++; v++; //Serial.print("coord4: ");Serial.println(coord4); } } } Serial.print("coord1: ");Serial.println(coord1); Serial.print("coord2: ");Serial.println(coord2); Serial.print("coord3: ");Serial.println(coord3); Serial.print("coord4: ");Serial.println(coord4); int coord10 = coord1.toInt(); int coord20 = coord2.toInt(); int coord30 = coord3.toInt(); int coord40 = coord4.toInt(); int area = (coord40 - coord20) * (coord30 - coord10); tone(5,(area/100)+200,100); Serial.print("Box area: ");Serial.println(area); } -
Detector and Transmitter Unit
12/23/2018 at 11:44 • 0 comments![]() As can be seen, this unit is very easy to assemble and just needed to be located in a waterproof case with a transparent front ( https://uk.rs-online.com/web/p/general-purpose-enclosures/0104212/ ) . The above components were wedged tightly into the box using thick cardboard and a bit of judicious Origami:
As can be seen, this unit is very easy to assemble and just needed to be located in a waterproof case with a transparent front ( https://uk.rs-online.com/web/p/general-purpose-enclosures/0104212/ ) . The above components were wedged tightly into the box using thick cardboard and a bit of judicious Origami:![]() The camera MUST be up the right way round for the neural network to work properly.
The camera MUST be up the right way round for the neural network to work properly. -
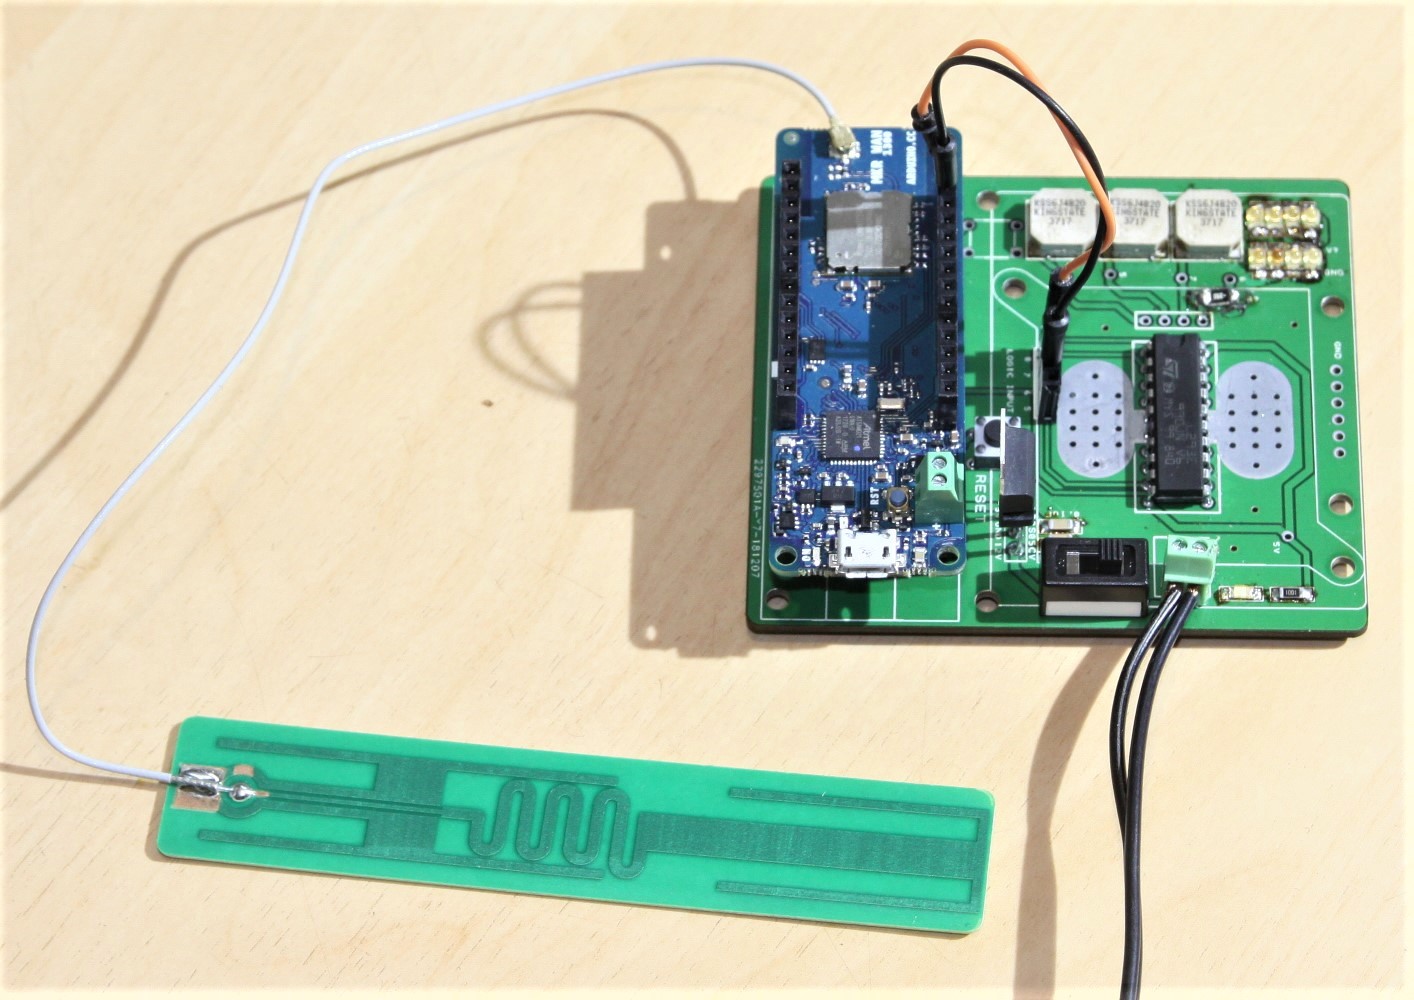
Reciever PCB Populated
12/23/2018 at 11:37 • 0 comments![]() Other than the Arduino MKRWAN 1300, the PCB features a L293E chip for stepping up the voltage and current required for the alarm system, which is itself a block of 8 LEDs and 3 buzzer beeper chips. Attempting to run these devices directly off the Arduino would instantly frazzle the device!
Other than the Arduino MKRWAN 1300, the PCB features a L293E chip for stepping up the voltage and current required for the alarm system, which is itself a block of 8 LEDs and 3 buzzer beeper chips. Attempting to run these devices directly off the Arduino would instantly frazzle the device!After assembly and testing, the whole thing worked perfectly and, after a bit of experimentation, the best resister for the red LEDs was 39 Ohms.
![]()
Although most of the components are surface mount, they are all very large and no stencil is required. After checking the polarity of the LEDs, the PCB was pasted up with solder, populated with the surface mount components and chucked in the toaster oven for cooking to 260 degrees C.
-
Example of Captured Image
12/15/2018 at 13:15 • 0 comments![]()
-
Save Camera Snapshots to a USB Drive
12/14/2018 at 18:35 • 0 commentsThe security cam Python file can be easily adapted to save the repeated snapshots of detected people by modifying line 235 to something like the following, where my USB drive is called 'KINSTON':
photo = ( "/media/pi/KINGSTON" + "/captures/photo_" + cur_time + ".jpg" )In reality, using this USB stick slowed down the program rather drastically! Images can be transferred / deleted easily from the Pi if another PC is used to SSH into the Pi once it's deployed.
-
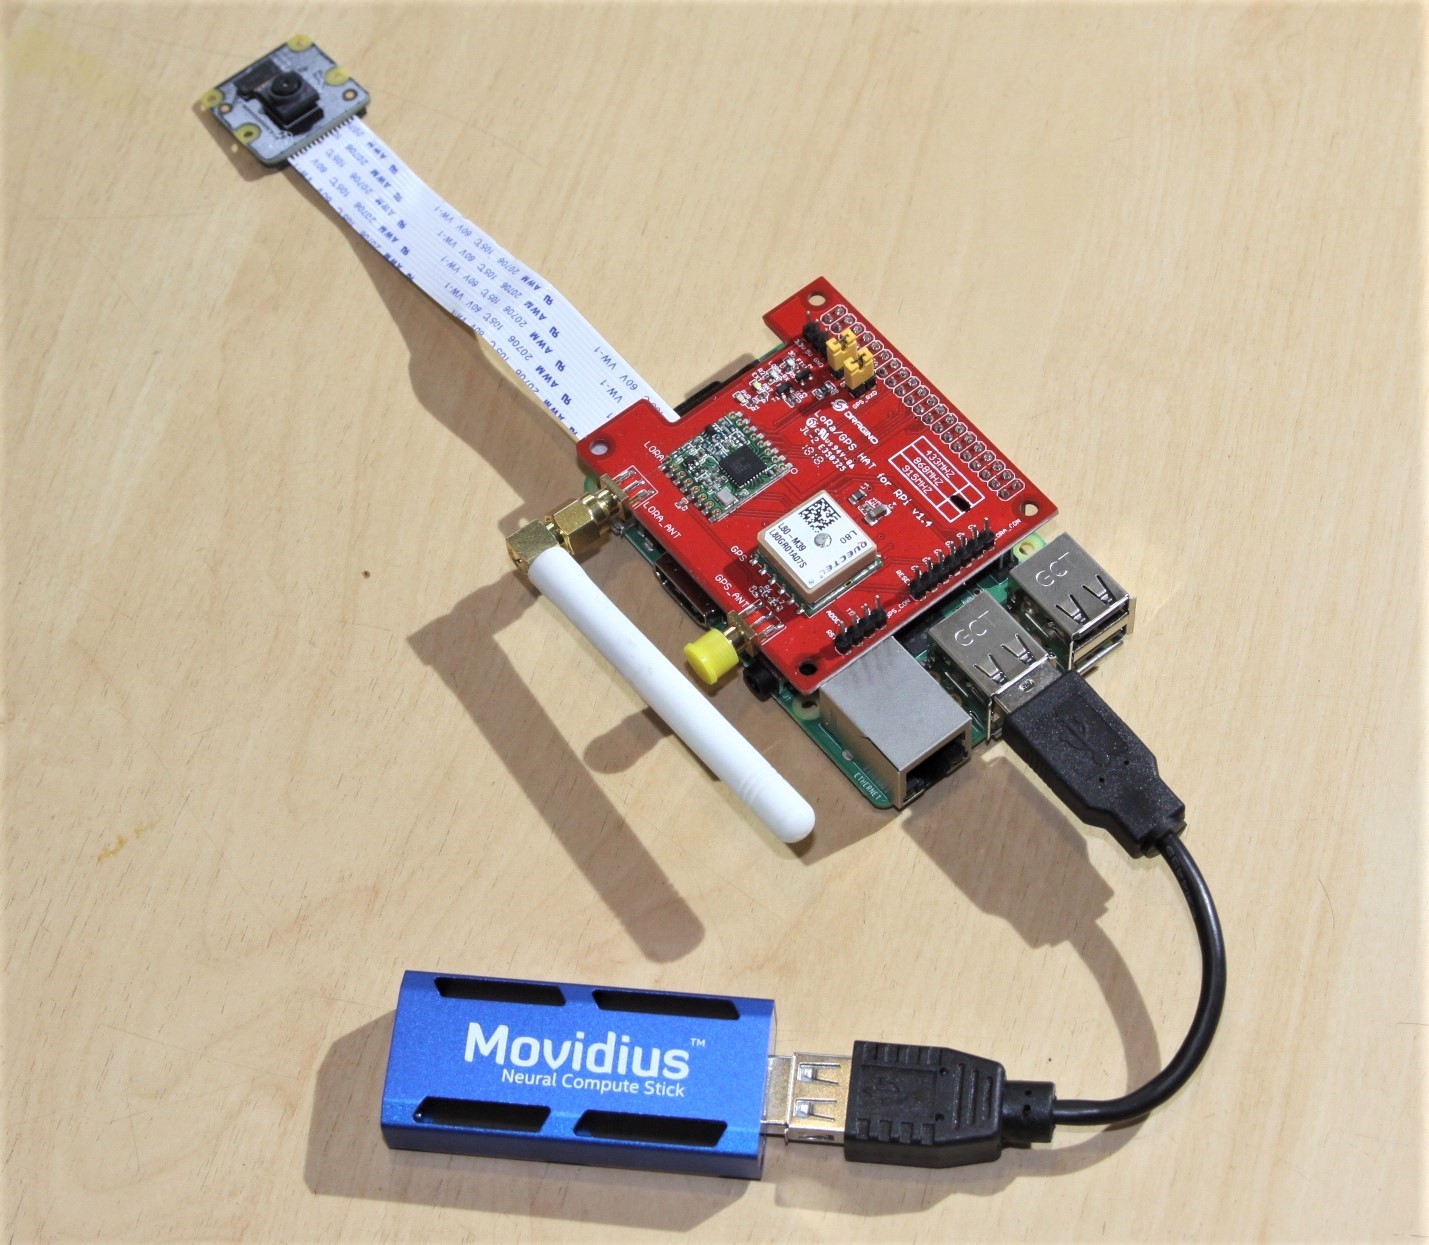
Upgrading Camera to Raspberry Pi NoIR V2
12/14/2018 at 17:56 • 0 commentsObviously, we're going to want to use this gadget in the dark with infra red lights, so we need a decent camera with IR capabilities ie no IR filter. Fortunately, these cameras are a lot cheaper an more compact than the Logitech USB and they're also very easy to install:
Firstly, check that camera is enabled in the RPi settings and then, after plugging it into the board, check it works with:
$ raspistill -o image.jpgNext install the following Python dependencies
$ sudo apt-get install python3-picamera
$ pip3 install "picamera[array]"
$ pip3 install imutils
Lastly, use the Pi cam version of the security_cam file, downloadable from here: https://cdn.hackaday.io/files/1626676959544928/security_camPiCam.py
Run the file using the following command:
$ cd && cd /home/pi/ncappzoo/apps/securityCam && python3 security_camPiCam.pyThe security camera is now ready to test out in the wild, although obviously not in the rain! It'll be interesting to see what the transmitter range will be with a decent antenna :)
Other than waterproofing, another issue is where to collect the captured photos produced when the device spots a person - maybe a USB stick, to prevent filling up the raspberry Pi SD card?
-
Combining Two Python Packages to get LoRa and Security Cam Working Together
12/14/2018 at 13:26 • 0 commentsIt's been a bit of a battle, with a steep Python learning curve, but finally I created a single Python file that enables a time stamp, detection class, confidence and bounding box coordinates to be sent to the Arduino base station. Obviously, there's still a number of dependancies in various directories - some close by and others deeply embedded in the Python system somewhere, but here's my 'top of the stack' code:
#!/usr/bin/python3 # **************************************************************************** # Copyright(c) 2017 Intel Corporation. # License: MIT See LICENSE file in root directory. # **************************************************************************** # Detect objects on a LIVE camera feed using and send data over LoRa network # Intel® Movidius™ Neural Compute Stick (NCS) import os import cv2 import sys import numpy import ntpath import argparse import mvnc.mvncapi as mvnc from time import localtime, strftime from utils import visualize_output from utils import deserialize_output from pySX127x_master import basic_test01 import datetime import array as arr import numpy as np from time import sleep from pySX127x_master.SX127x.LoRa import * from pySX127x_master.SX127x.LoRaArgumentParser import LoRaArgumentParser from pySX127x_master.SX127x.board_config import BOARD #from pySX127x_master import Tegwyns_LoRa_Beacon BOARD.setup() parser = LoRaArgumentParser("A simple LoRa beacon") parser.add_argument('--single', '-S', dest='single', default=False, action="store_true", help="Single transmission") parser.add_argument('--wait', '-w', dest='wait', default=1, action="store", type=float, help="Waiting time between transmissions (default is 0s)") myString = "" #from pySX127x_master.Tegwyns_LoRa_Beacon import * class LoRaBeacon(LoRa): def __init__(self, verbose=False): super(LoRaBeacon, self).__init__(verbose) self.set_mode(MODE.SLEEP) self.set_dio_mapping([1,0,0,0,0,0]) def on_rx_done(self): print("\nRxDone") print(self.get_irq_flags()) print(map(hex, self.read_payload(nocheck=True))) self.set_mode(MODE.SLEEP) self.reset_ptr_rx() self.set_mode(MODE.RXCONT) def on_cad_done(self): print("\non_CadDone") print(self.get_irq_flags()) def on_rx_timeout(self): print("\non_RxTimeout") print(self.get_irq_flags()) def on_valid_header(self): print("\non_ValidHeader") print(self.get_irq_flags()) def on_payload_crc_error(self): print("\non_PayloadCrcError") print(self.get_irq_flags()) def on_fhss_change_channel(self): print("\non_FhssChangeChannel") print(self.get_irq_flags()) def start(self): global args sys.stdout.write("\rstart\r") stamp = str(datetime.datetime.now()) text=bytearray('PING LoRa Test PI: ' + stamp + (' ') + myString,'utf-8') self.write_payload([0x00, 0x00, 0x00, 0x00] + list(text)) self.set_mode(MODE.TX) lora = LoRaBeacon(verbose=False) args = parser.parse_args(lora) lora.set_pa_config(pa_select=1) #lora.set_rx_crc(True) #lora.set_agc_auto_on(True) #lora.set_lna_gain(GAIN.NOT_USED) #lora.set_coding_rate(CODING_RATE.CR4_6) #lora.set_implicit_header_mode(False) #lora.set_pa_config(max_power=0x04, output_power=0x0F) #lora.set_pa_config(max_power=0x04, output_power=0b01000000) #lora.set_low_data_rate_optim(True) #lora.set_pa_ramp(PA_RAMP.RAMP_50_us) #print(lora) #assert(lora.get_lna()['lna_gain'] == GAIN.NOT_USED) assert(lora.get_agc_auto_on() == 1) print("Security cam config:") print(" Wait %f s" % args.wait) print(" Single tx = %s" % args.single) print("") lora.start() # "Class of interest" - Display detections only if they match this class ID CLASS_PERSON = 15 # Detection threshold: Minimum confidance to tag as valid detection CONFIDANCE_THRESHOLD = 0.60 # 60% confidant # Variable to store commandline arguments ARGS = None # OpenCV object for video capture camera = None # ---- Step 1: Open the enumerated device and get a handle to it ------------- def open_ncs_device(): # Look for enumerated NCS device(s); quit program if none found. devices = mvnc.EnumerateDevices() if len( devices ) == 0: print( "No devices found" ) quit() # Get a handle to the first enumerated device and open it device = mvnc.Device( devices[0] ) device.OpenDevice() return device # ---- Step 2: Load a graph file onto the NCS device ------------------------- def load_graph( device ): # Read the graph file into a buffer with open( ARGS.graph, mode='rb' ) as f: blob = f.read() # Load the graph buffer into the NCS graph = device.AllocateGraph( blob ) return graph # ---- Step 3: Pre-process the images ---------------------------------------- def pre_process_image( frame ): # Resize image [Image size is defined by choosen network, during training] img = cv2.resize( frame, tuple( ARGS.dim ) ) # Convert RGB to BGR [OpenCV reads image in BGR, some networks may need RGB] if( ARGS.colormode == "rgb" ): img = img[:, :, ::-1] # Mean subtraction & scaling [A common technique used to center the data] img = img.astype( numpy.float16 ) img = ( img - numpy.float16( ARGS.mean ) ) * ARGS.scale return img # ---- Step 4: Read & print inference results from the NCS ------------------- def infer_image( graph, img, frame ): #from pySX127x_master.Tegwyns_LoRa_Beacon import LoRaBeacon #from pySX127x_master import Tegwyns_LoRa_Beacon # Load the image as a half-precision floating point array graph.LoadTensor( img, 'user object' ) # Get the results from NCS output, userobj = graph.GetResult() # Get execution time inference_time = graph.GetGraphOption( mvnc.GraphOption.TIME_TAKEN ) # Deserialize the output into a python dictionary output_dict = deserialize_output.ssd( output, CONFIDANCE_THRESHOLD, frame.shape ) # Print the results (each image/frame may have multiple objects) for i in range( 0, output_dict['num_detections'] ): # Filter a specific class/category if( output_dict.get( 'detection_classes_' + str(i) ) == CLASS_PERSON ): cur_time = strftime( "%Y_%m_%d_%H_%M_%S", localtime() ) print( "Person detected on " + cur_time ) print(".... Press q to quit ..... ") # Extract top-left & bottom-right coordinates of detected objects (y1, x1) = output_dict.get('detection_boxes_' + str(i))[0] (y2, x2) = output_dict.get('detection_boxes_' + str(i))[1] #print (y1, x1) # Prep string to overlay on the image display_str = ( labels[output_dict.get('detection_classes_' + str(i))] + ": " + str( output_dict.get('detection_scores_' + str(i) ) ) + "%" ) print (display_str) print (y1, x1) print (y2, x2) # Overlay bounding boxes, detection class and scores frame = visualize_output.draw_bounding_box( y1, x1, y2, x2, frame, thickness=4, color=(255, 255, 0), display_str=display_str ) global myString myString = display_str + " , " + "(" + str(y1) + "," + str(x1) +")" + "," + "(" + str(y2) + "," + str(x2) +")" ########################################################################################### lora.start() ########################################################################################### # Capture snapshots photo = ( os.path.dirname(os.path.realpath(__file__)) + "/captures/photo_" + cur_time + ".jpg" ) cv2.imwrite( photo, frame ) # If a display is available, show the image on which inference was performed if 'DISPLAY' in os.environ: cv2.imshow( 'NCS live inference', frame ) # ---- Step 5: Unload the graph and close the device ------------------------- def close_ncs_device( device, graph ): graph.DeallocateGraph() device.CloseDevice() camera.release() cv2.destroyAllWindows() # ---- Main function (entry point for this script ) -------------------------- def main(): device = open_ncs_device() graph = load_graph( device ) # Main loop: Capture live stream & send frames to NCS while( True ): ret, frame = camera.read() img = pre_process_image( frame ) infer_image( graph, img, frame ) # Display the frame for 5ms, and close the window so that the next # frame can be displayed. Close the window if 'q' or 'Q' is pressed. if( cv2.waitKey( 5 ) & 0xFF == ord( 'q' ) ): break close_ncs_device( device, graph ) # ---- Define 'main' function as the entry point for this script ------------- if __name__ == '__main__': parser = argparse.ArgumentParser( description="DIY smart security camera PoC using \ Intel® Movidius™ Neural Compute Stick." ) parser.add_argument( '-g', '--graph', type=str, default='../../caffe/SSD_MobileNet/graph', help="Absolute path to the neural network graph file." ) parser.add_argument( '-v', '--video', type=int, default=0, help="Index of your computer's V4L2 video device. \ ex. 0 for /dev/video0" ) parser.add_argument( '-l', '--labels', type=str, default='../../caffe/SSD_MobileNet/labels.txt', help="Absolute path to labels file." ) parser.add_argument( '-M', '--mean', type=float, nargs='+', default=[127.5, 127.5, 127.5], help="',' delimited floating point values for image mean." ) parser.add_argument( '-S', '--scale', type=float, default=0.00789, help="Absolute path to labels file." ) parser.add_argument( '-D', '--dim', type=int, nargs='+', default=[300, 300], help="Image dimensions. ex. -D 224 224" ) parser.add_argument( '-c', '--colormode', type=str, default="bgr", help="RGB vs BGR color sequence. This is network dependent." ) ARGS = parser.parse_args() # Create a VideoCapture object camera = cv2.VideoCapture( ARGS.video ) # Set camera resolution camera.set( cv2.CAP_PROP_FRAME_WIDTH, 620 ) camera.set( cv2.CAP_PROP_FRAME_HEIGHT, 480 ) # Load the labels file labels =[ line.rstrip('\n') for line in open( ARGS.labels ) if line != 'classes\n'] main() # ==== End of file =========================================================== -
Getting 'Person Detector' Working using the Neural Compute Stick
12/12/2018 at 16:47 • 0 commentsA couple of key things to note before getting started:
- The correct Neural Compute stick for Raspberry Pi is the NCSM2450.DK1 and currently (2018) no other Intel sticks will work on the Pi.
- Be careful which version of the stick SDK or APi is downloaded - V2 and above is NOT for Raspbian stretch, only Ubuntu 16.04.
Instructions:
1. I installed the full version of the latetst version 1 of the SDK and the APi and it did not take too long to install:
$ sudo apt-get update
$ sudo apt-get install
$ git clone https://github.com/movidius/ncsdk.git
$ cd /home/pi/ncsdk && sudo make install
$ cd /home/pi/ncsdk && sudo make examples
2. Test that the stick is working ok:
$ git clone https://github.com/movidius/ncappzoo
$ cd /home/pi/ncappzoo/apps/hello_ncs_py
$ python3 hello_ncs.py
3. Download this file: https://cdn.hackaday.io/files/1626676959544928/graph and paste it into the /home/pi/ncappzoo/caffe/SSD_MobileNet folder. Do not change it's name or extention.
4. Make and run the demo using the following commands:
$ cd /home/pi/ncappzoo/apps/security-cam
$ make run
..... Obviously a camera is required. Mine is a USB logitech and it worked straight away.
LoRa + Neural Network Security System
Spot trespassers with a neural network and transmit basic results via LoRa
 As can be seen, this unit is very easy to assemble and just needed to be located in a waterproof case with a transparent front (
 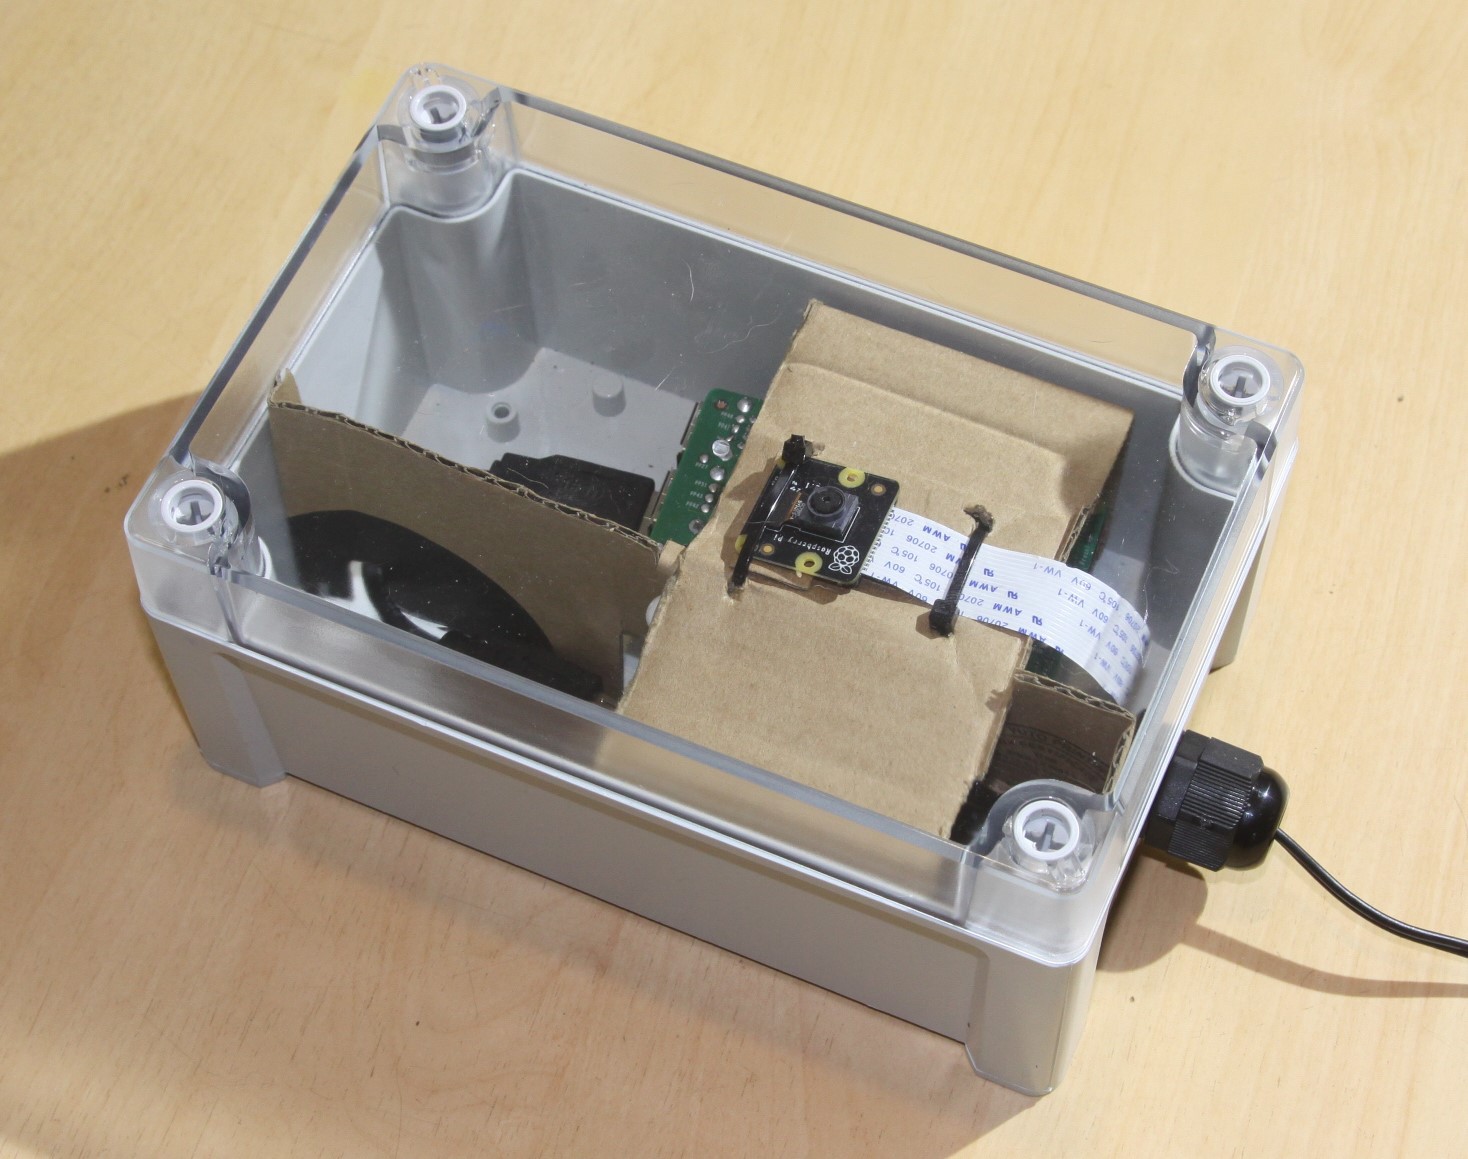 The camera MUST be up the right way round for the neural network to work properly.
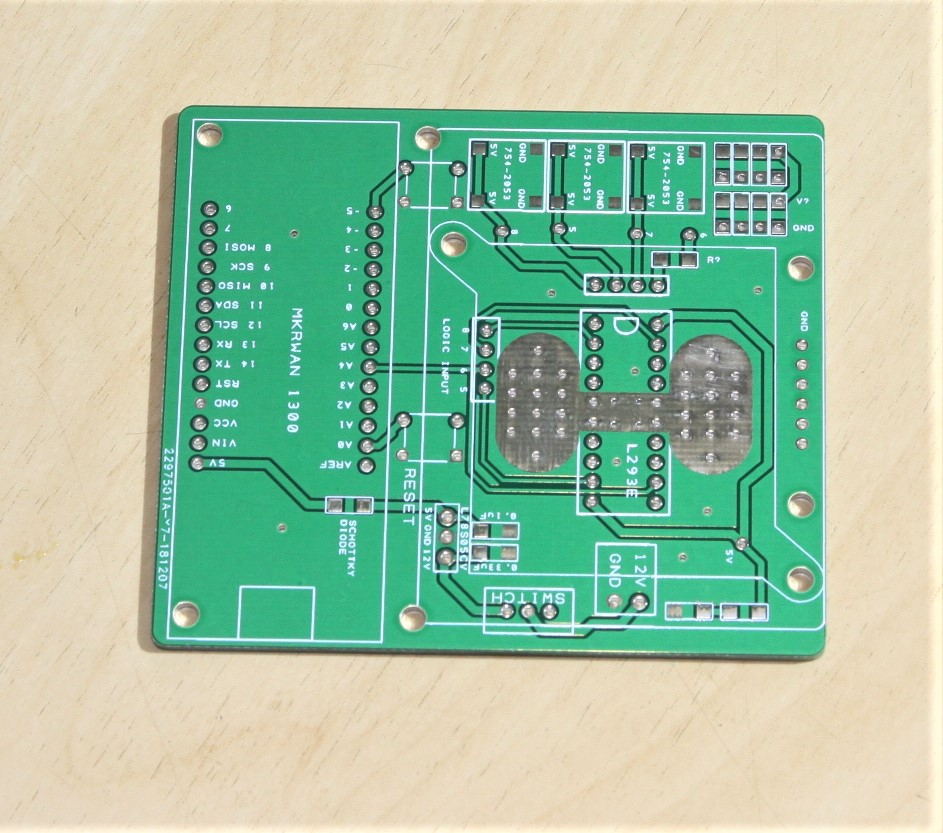 Other than the Arduino MKRWAN 1300, the PCB features a L293E chip for stepping up the voltage and current required for the alarm system, which is itself a block of 8 LEDs and 3 buzzer beeper chips. Attempting to run these devices directly off the Arduino would instantly frazzle the device!