Close
0%
0%

Raspberry PI wireless Telescope Control

Advanced SkyFi 3 replacement for Celestron

Similar projects worth following
First things first: Licensing. This project is licensed under Creative Commons: Attribution-NonCommercial-ShareAlike 4.0 International (CC BY-NC-SA 4.0). No commercial use is allowed.

I recently bought a Celestron NexStar 6SE. The first frustration: I always have to set date and time on the HC. So seems like the HW development of this thing stopped 1999. With SkySafari on my Mac connected to the Handcontroller over USB I was able to set time and location and do GoTos and still fully make use of the Handcontroller. Good so far. But my final goal was to use my iPad and at least set the time on the hand controller automatically.This project is inspired and would not have been possible without Danes #Raspberry Pi Driven Telescope Mount

I found two commercial options to go wireless:

Celestron SkyPortal Wi-Fi Module (about $99 in US, 150€ in Europe)

https://www.celestron.com/products/skyportal-wifi-module

And to get the time automatically synced you need:

Celestron SkySync GPS (about $110 in US, 250€ in Europe) which will set time and location on the hand controller. 

SkyFi 3  (about $200 in US, 330€ in Europe)

http://skysafariastronomy.com/skyfi-3-professional-astronomy-telescope-control.html

As I live in Europe I found 300€ a little too expensive just to get Wi-Fi. And SkyFi requires an additional battery. Again one thing more to take care of.

So I checked out the Celestron SkyPortal doing some research. It just plugs into the AUX port on the telescope and you can connect your iPad, Mac etc.

BUT: You have to use SkySafari for alignment. You still can use the cursor keys on the hand controller, but that’s it. 

This is not what I wanted. I wanted the same experience as connected via USB to the HC. Use the HC for alignment. Then use the hand controller or the iPad for Go-Tos, search etc.

Both options are not satisfying. SkyFi would allow me to do what I want, but has a battery and is expensive. It just creates a WiFi and bridges the serial port to wireless.

I have a few Raspberry PIs and motivated by this fantastic guide: Raspberry Pi Driven Telescope Mount  I started to build my own solution.

What I wanted to achieve:

  • original functionality similar to USB connection but wireless (finished)
  • no hardware modification on the original hand controller (finished)
  • automatic set date and time (via NTP) (finished)
  • no extra battery (the AUX port delivers 12V, so let’s use this) (finished)

Bonus features I want to play with:

  • Real-Time-Clock (RTC) for the PI, to get time even when not connected (using GPS instead)
  • Add a GPS for location and time sync.  (finished, but the script for location is not yet done)
  • Add an OLED display to show some basic information: Wifi connection, IP, time, location etc. (finished, nicer scripts required)
  • Create a Wi-Fi hotspot if I am not near my home network, so I can still connect wireless to my PI. In a first step I can then push time and location from the SkySafari mobile app. But to make this work perfect I need the RTC, best would be to have a working GPS as well. Or: push time and location from the SkySafari mobile app. (finished)
  • Make the PI run on a read only filesystem. This will prevent damage to the SD when just unplugging power instead of doing a clean shutdown. This will require allot of testing to figure out which components will work on a RO filesystem. (finished)

In my project I try to make as many things as possible optional. You can use a  separate power supply when at home or use a battery pack if you don't like to solder things / cables on your PI.  It is your choice to add a GPS module to get time and location, you still have the option to set time and location from SkySafari if you don't want to add the GPS.

Before spending about 300€ to upgrade my telescope mount to the late 20st century I prefer to build something myself and upgrade with 21st century technology. Taking the remaining money to take my wife to dinner. 

Comparison of the solutions

FeatureThis ProjectInstructionCelestron Sky-Portal + 
SkySync GPS
SkyFi 3
Works with other  vendorsYes*Step 1&2NoYes
Hardware modification on controllerNo...
Read more »

astro_PI_top_v3.stl

3D printed case. Top. Has a cut for the OLED display. Depending on your OLED the pins might not work. Printed with PLA, solid infill, supports needed.

Standard Tesselated Geometry - 285.82 kB - 12/30/2018 at 19:41

Download

astro_PI_bottom_v3.stl

3D printed case. Bottom. Pins should fit the PI. Take care of your SD card. Better remove the card before inserting or removing the PI. Printed with PLA, solid infill, supports needed.

Standard Tesselated Geometry - 840.02 kB - 12/30/2018 at 19:40

Download

  • 1 × Celestron NexStar 6SE The telescope of course, in my case with micro USB on the hand controller
  • 1 × Raspberry PI Zero W Raspbian Stretch Lite
  • 1 × Mini USB to Micro USB OTG Cable To connect the PI to the handcontroller, Host on the Mini USB side. LINDY 31717 - USB 2.0 Kabel Micro-B zu Mini-B OTG - 0,5m
  • 1 × GPS: MakerHawk GPS-Modul 51 Mikrocontroller Ublox
  • 1 × Voltage Regulator 12V to 5V Pololu D24V10F5, supporting 1000mA.

View all 7 components

  • Getting closer to the finish line

    ChrisG7101/11/2019 at 16:41 4 comments

    Finally I found some time to work on the python script to send the GPS location to the hand controller.  The files are already in the GitHub repository.

    Finally I have a replacement for the Celestron SkyQ Wi-Fi and SkySync GPS. Or for the SkyPortal Wi-Fi. 

    Now I need you guys for testing. Does it work? Where are the bugs? What needs to be fixed?

    I'm planning a few SD card images with different options. Also the case needs some improvements for a better snap. The OLED is pretty bright and might be annoying, so I need an idea either to turn it off after some time integrate a cover into the case.

  • Created a git repo with some of the files

    ChrisG7101/05/2019 at 18:44 0 comments

    You can find some of my python script files in my GitHub repo:

    Simply clone https://github.com/ChrisG71muc/astro.

    Just clone it to you PI and move the files you want to use to /home/pi

    git clone https://github.com/ChrisG71muc/astro.git

  • STL files and new SD card image

    ChrisG7112/30/2018 at 19:44 0 comments

    Just uploaded the STL files for the case (look at the project files here) and a new image with the hotspot to Dropbox.

    Take care of the changes to the other  image below!

    The new  SD-card image on DropBox: https://www.dropbox.com/s/tqi5yzdyyuuqd3b/astro_gps_hotspot.dmg.zip?dl=0

    You need a 16GB SD card. larger are OK as well of course.

    *** UPDATE: Even I am using an 8GB to create the image it seems to be too big to write it back to an 8GB card. So please use a 16GB card. It's anyway difficult meanwhile to get an 8GB card. ***

    It should boot on PI 2 B+ and PI 3 B+ and also on PI Zero W.  Username: pi Password: raspberry

    I finished all config steps I described in my project. But there are a few to-do's;

    • Wi-Fi is NOT configured, but the PI will create a hotspot: SSID: AstroPI PSK: 12345677890
    • Once connected to the SSID you can SSH to the PI at 10.0.0.5
    • System is RO! To make any config changes edit /boot/cmdline.txt and reboot. Don't forget to go back to RO once you are done.
    • HDMI is not turned off to allow you to boot a PI Zero with keyboard and screen so you can configure the Wi-Fi
    • you should add a GPS, everything is configured, just connect the hardware.
    • hand controller time is set from NTP or GPS. If you don't have the GPS set time and location manually or push from SkySafari. Please edit rc.local accordingly. 
    • location is set to a fixed location, have a look at /home/pi/hc-location.sh
    • Check the script to disable the green LED and run it manually /home/pi-led-off.sh  You might need to change one value for your hardware.

    This should give you a quick start in just 30min.

    Let me know if you found the little easter egg.

    I know, pictures or it did not happen:

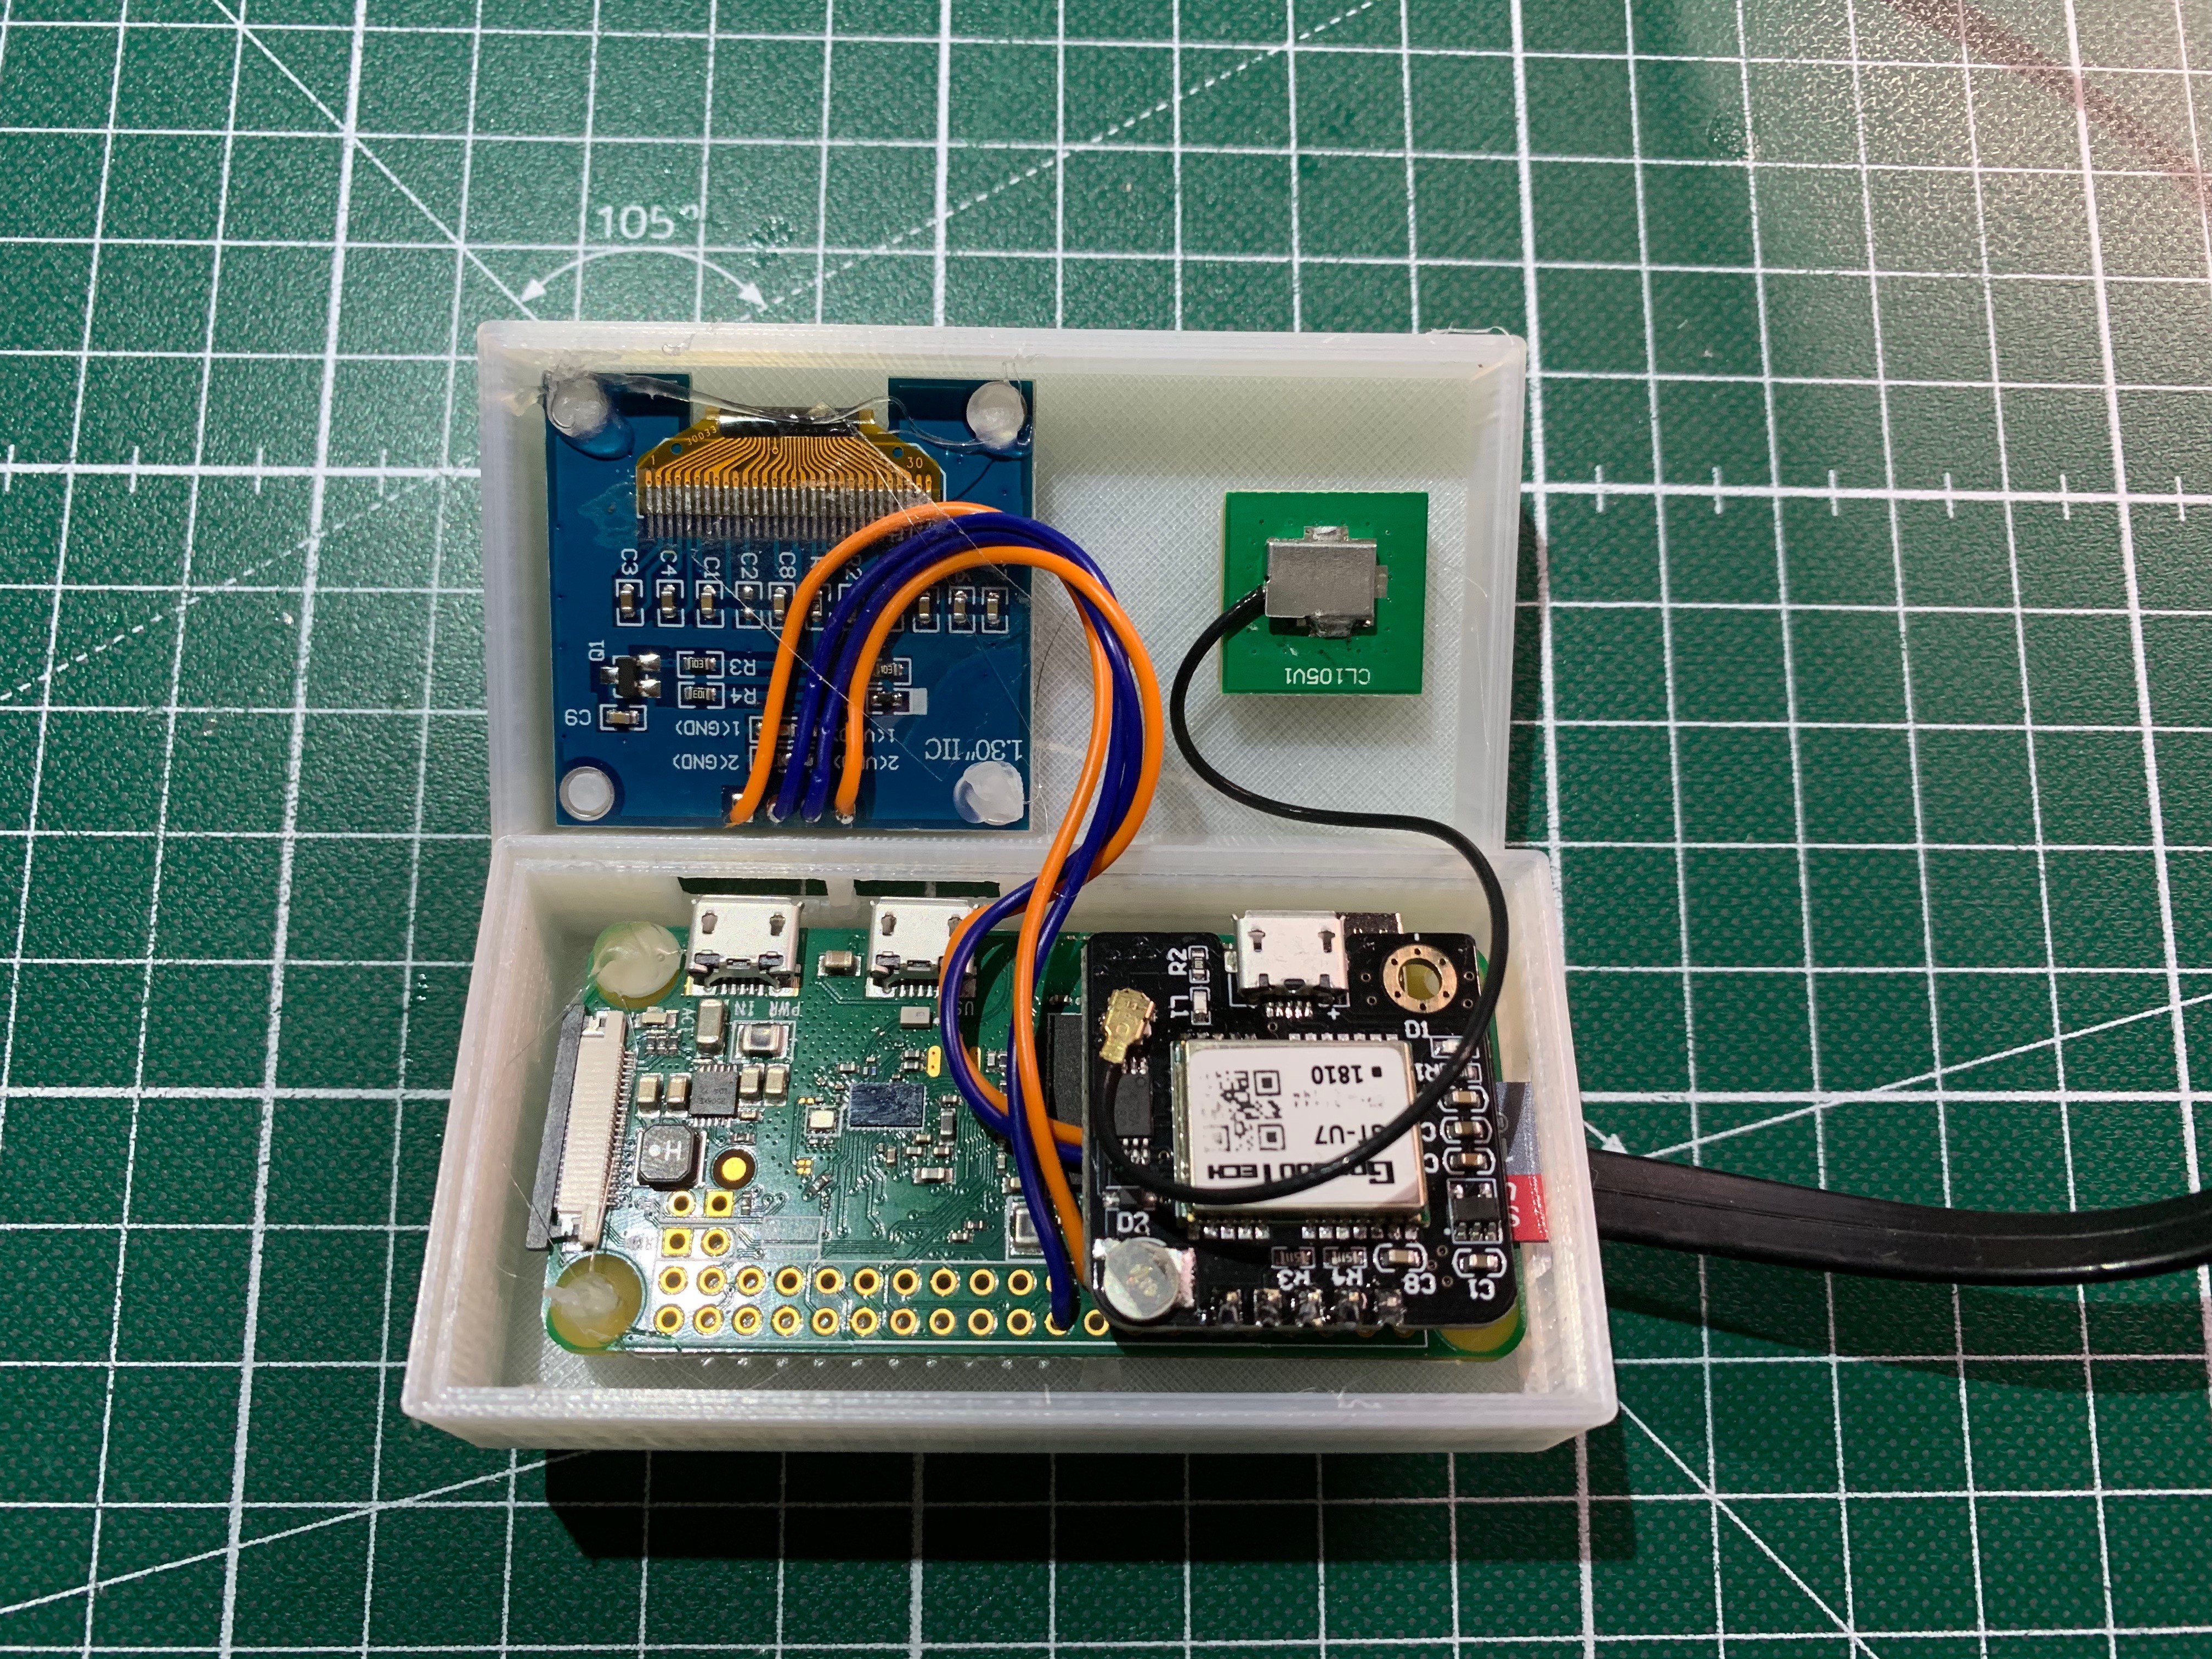
    I found a way to use header pins to solder the GPS directly to the PI. Make sure to add I2C wires for the display first. On top you can see the back of the display and the GPS antenna (you should put some isolating tape at the back). I used some hot glue to keep everything in place. The voltage regulator is under the PI, also hot glued. It is a pretty tight fit, I might need to add 1mm here or there in the next version. 

  • Wi-Fi Hotspot, OLED display and 3D printed case

    ChrisG7112/26/2018 at 22:15 2 comments

    I am a little bit behind with documentation, but in the meantime I finished the configuration for the Wi-Fi Hotspot, added an OLED display and created a 3D printed case.

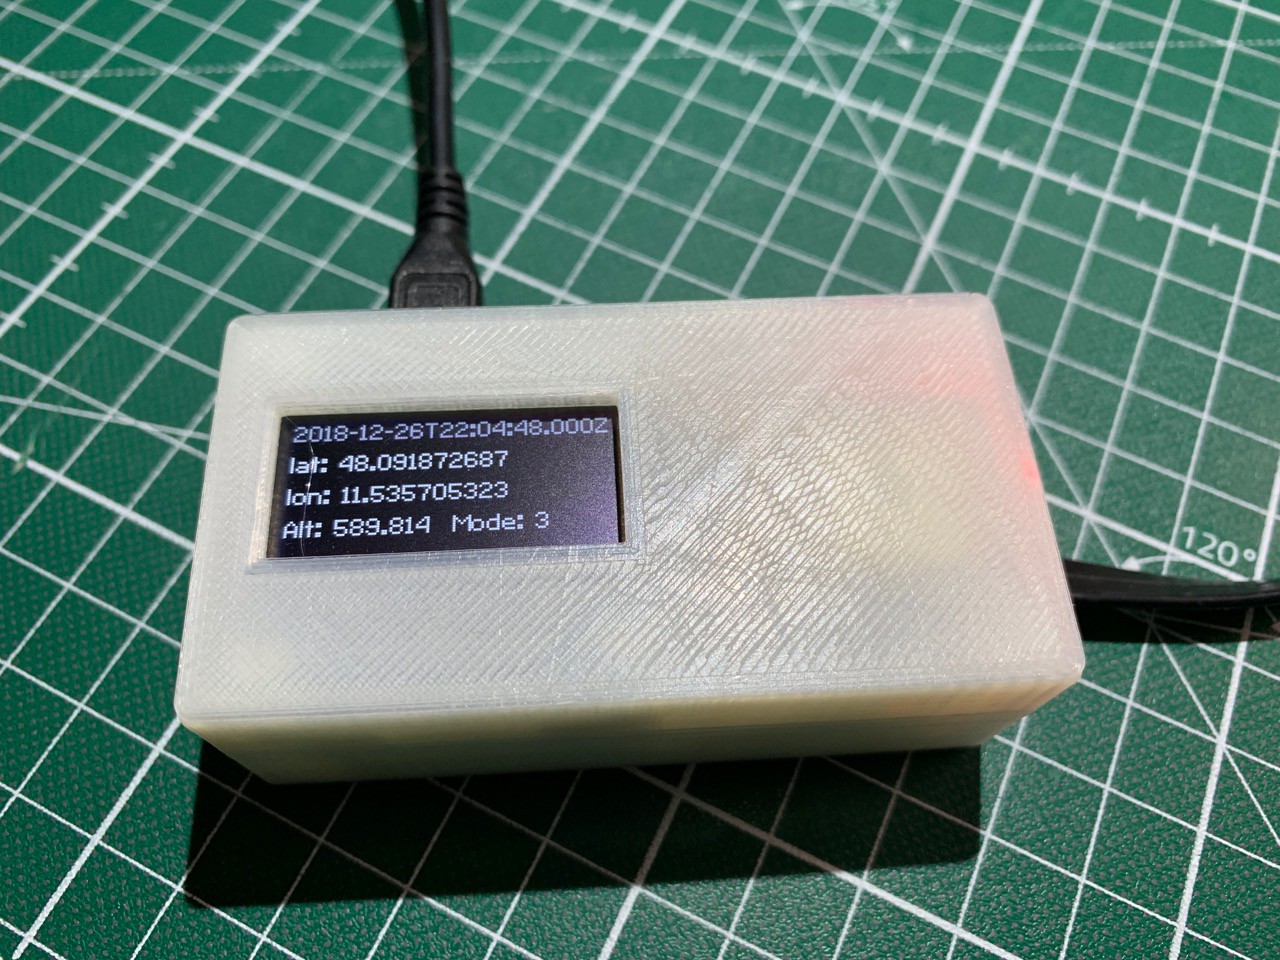
    Here I am running a script which shows the current GPS data on the OLED. 

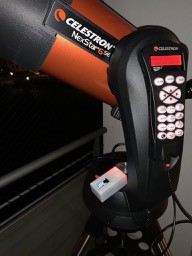
    Clear sky. First time I could really test my creation. You can see the USB cable with the red ring connected to the hand controller and the PI showing current time and GPS coordinates.

    (still need to finish the script to set location as well. I would like to combine this with the hotspot enabled.)

  • Power from AUX port

    ChrisG7112/16/2018 at 12:48 0 comments

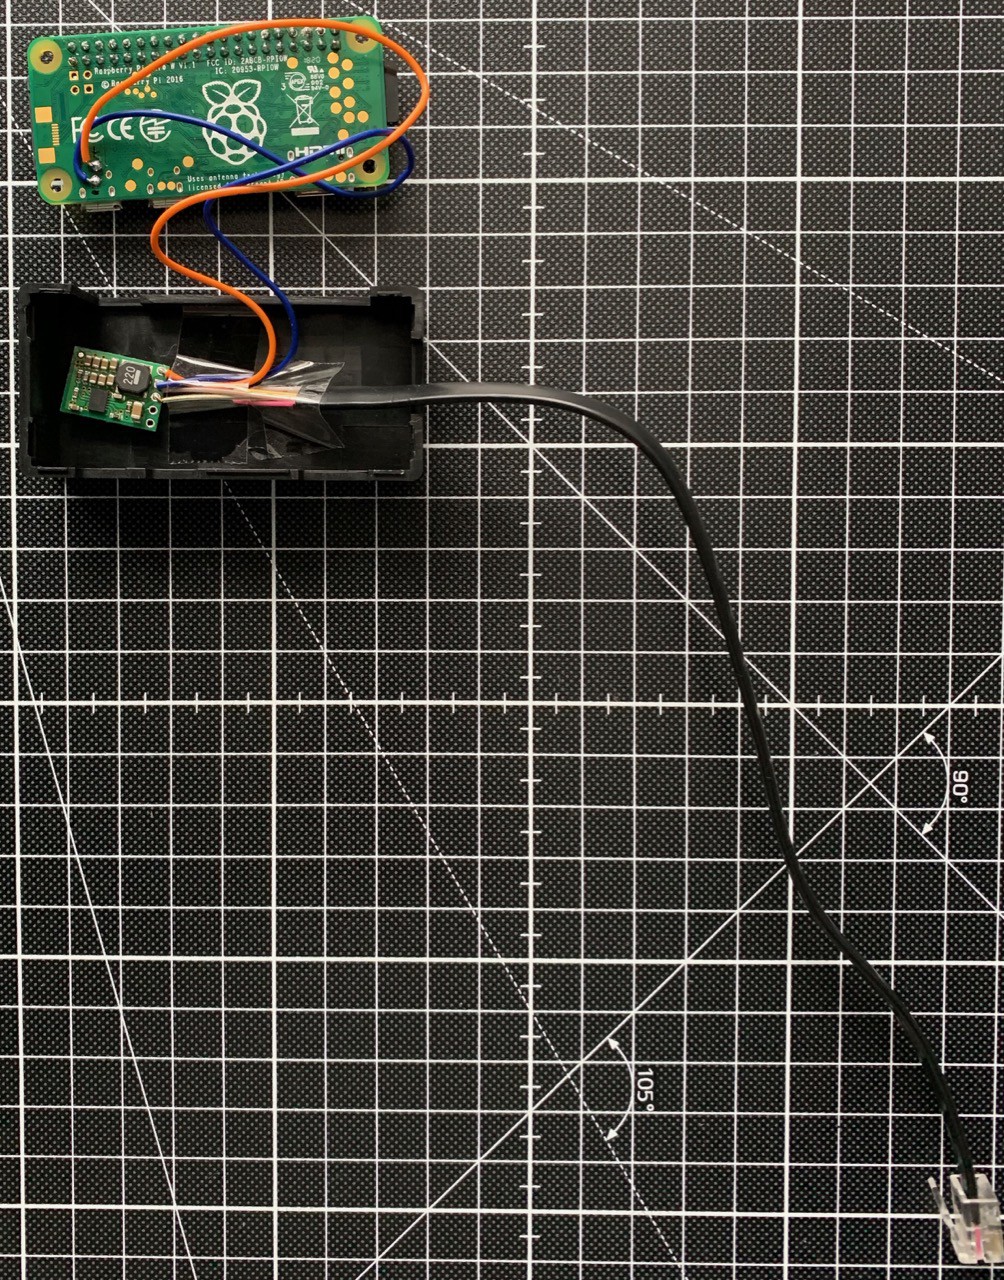
    Finally the step-down arrived. I am using a Pololu D24V10F5. To connect to the AUX port I ordered a RJ12 to RJ12 cable and cut it in half. Pin3 on the AUX port is +12V and PIN 5 is GND. Have a look at the instructions for more details.

  • Ready to go SD card image

    ChrisG7112/12/2018 at 07:25 0 comments

    *UPDATED* fixed a few config issues. Should work now as described.

    I posted an SD-card image on DropBox: https://www.dropbox.com/s/idmsyydqbjci9l3/pi_for_telescope.dmg.zip?dl=0

    You need an 16 GB (8GB might work) SD card, larger are OK as well of course.

    *** UPDATE: Even I am using an 8GB to create the image it seems to be too big to write it back to an 8GB card. So please use a 16GB card. It's anyway difficult meanwhile to get an 8GB card. ***

    It should boot on PI 2 B+ and PI 3 B+ and also on PI Zero W.  Username: pi Password: raspberry

    I finished all config steps I described in my project. But there are a few to-do's;

    • Wi-Fi is NOT configured. You have to configure yourself with sudo raspi-config. For Pi 2 B+ add a USB dongle of course.
    • HDMI is not turned off to allow you to boot a PI Zero with keyboard and screen so you can configure the Wi-Fi
    • System is prepared for RO, but booting RW. Just change /boot/cmdline.txt 
    • you can add a GPS, everything is configured, just connect the hardware.
    • hand controller time is set from NTP or GPS
    • location is set to a fixed location, have a look at /home/pi/hc-location.sh
    • Check the script to disable the green LED and run it manually /home/pi-led-off.sh  You might need to change one value for your hardware.

    This should give you a quick start in just 30min.

    Let me know if you found the little easter egg.

  • A litte bit of optimization

    ChrisG7112/09/2018 at 14:30 0 comments

    I am adding a few instructions for optimization.

    - turn off HDMI, to save a little power.

    - turn off LED after we send the time to the hand controller (and location)

    - change to a RO filesystem, so a hard power cut should not cause any havoc on the SD card and increase the lifetime.

    I have decided to setup two boxes. One PI zero W for observing from home:

    • Wi-Fi via the home network. (and of course you have to make sure you have coverage where you are using the telescope.
    • No GPS. I have not yet found a case for the PI where everything fit's in. So the location I am sending to the hand controller is fixed to my home location.
    • Time is synced to NTP public NTP servers. 
    • I will use power from the telescope mounts AUX port with a RJ12 connector. (not yet finished)

    Currently I have the time set on the HC after less than 60s.

    Another unit, most likely a PI 3 B+ or PI 3 A+, as the cases have a little bit more space to add the additional components. Or maybe a PI Zero in a case of a PI 3. 

    • Wi-Fi via home or if out of reach enable Hotspot.
    • With GPS to fetch time and location
    • Power from the telescope mounts AUX port.

    I dropped the idea of adding a RTC. NTP is pretty fast, and with the GPS I will have a super accurate time.

  • Time sync with GPS

    ChrisG7112/07/2018 at 15:03 0 comments

    Step 5 and 6 show how to add the GPS module to the PI and use it as a time source. This will be helpful if there is no internet connection.

  • Time sync with NTP and setting time on the Handcontroller

    ChrisG7112/07/2018 at 15:00 0 comments

    Step 3 and Step 4 show how to sync the time to a NTP server on the internet and set the time on the NexStar hand controller.

  • Setting up the PI and USB connection to the NexStar hand controller

    ChrisG7112/07/2018 at 07:38 0 comments

    In the beginning I wanted to make things easy. No soldering required. As I do most observations from home I am in the range of my home Wi-Fi. The PI connects wireless to the network and power is supplied by a power adapter. Connection to the NexStar hand controller is over USB. I am using the micro-USB adapter that came with my PI Zero W  and a USB to mini -USB cable.

    After finishing Instruction Step 2 you have a replacement for a SkyFi3 adapter and can control your telescope over wireless for less than $50.

View all 10 project logs

  • 1
    setup the Raspberry PI

    I prefer to use one of my old Pi2s for prototyping before moving the project to the PI Zero. This allows a headless setup straight away, as the PI2 comes with an ethernet connector.

    Prepare your SD card with Raspbian Stretch Lite and create a file with the name ssh on the boot partition. Put the card into the PI and boot it up. Connected to ethernet you should be able to find the IP on your DHCP server (home router) and be able to SSH into the PI. Remember the default User is pi and the password is raspberry

    Now use raspi-config to configure some basic settings:

    sudo raspi-config
    • set a new password
    • set a hostname
    • configure your Wi-Fi. I have a USB dongle for the PI2. The PI Zero W has Wi-Fi build in.
    • configure timezone, I suggest to use UTC. This will make things easier when setting the time on your NexStar hand controller.
    • configure memory split, reduce it to 16MB
    • expand the filesystem

    And of course you want to update your system to the latest versions:

    sudo apt-get update
    sudo apt-get upgrade

    NOTE:

    If you create a script and want to run it do not forget to make it executable: chmod 755 script.sh

    Also: Make sure your Wi-Fi is working and you have good coverage. Please do not blame me for you bad Wi-Fi. ;-)

  • 2
    Connect the telescope and connect to SkySafari

    Let’s start with something easy. To control the telescope I want to connect the PI to the mini-USB. For the PI zero you need a micro USB to mini USB OTG cable with Micro USB on the host side. Alternative you can use the micro USB to USB adapter that comes with many PI Zeros and a regular USB to Mini USB cable.

    To power the PI you can use an adapter or a battery pack (one of those you use to charge your phone on the go).

    The newer NexStar hand controller comes with a mini USB port and has a PL2303 Serial2USB adapter build in. All we need to do is plug in the USB to the PI. Raspbian should automatically detect and the serial port should show up as /dev/ttyUSB0.

    DO NOT HOT PLUG THE USB Cable. My Pi Zero crashes every time I connect the USB to the PI. Please make the connections in the following order:

    • Connect the hand controller with the PI Zero.
    • Power on the telescope
    • Power on the PI Zero.

    If you power on the PI first it will try to power the hand controller and suffer from under voltage. 

    Issue seems to happen because of two different GNDs, one from external power supply and one from telescope mount. Since I take 12V from AUX it does not happen any more.

    I also recommend to do a save shutdown of the PI and do not just unplug power. There are two options to make this a little safer at  a later point:

    • run the PI on a RO filesystem, see instructions below.
    • add a button to initiate the shutdown

    To connect the telescopes hand controller you need a Mini USB cable. The hand controller has a built in PL2303 serial to USB adapter. Once you connect it to the PI it will be reachable via /dev/ttyUSB0. 

    Install ser2net:

    sudo apt-get install ser2net

    and configure it:

    sudo nano /etc/ser2net.conf

    Insert  one line at the end:

    4030:raw:10:/dev/ttyUSB0:9600 8DATABITS NONE 1STOPBIT

    4030 is the TCP/IP port number to connect to the port over the network.

    Star the service:

    sudo service ser2net start

     A good time for a reboot. 

    sudo poweroff

     Make the connections as described and boot the PI. This should take just a minute.

    Configure SkySafari

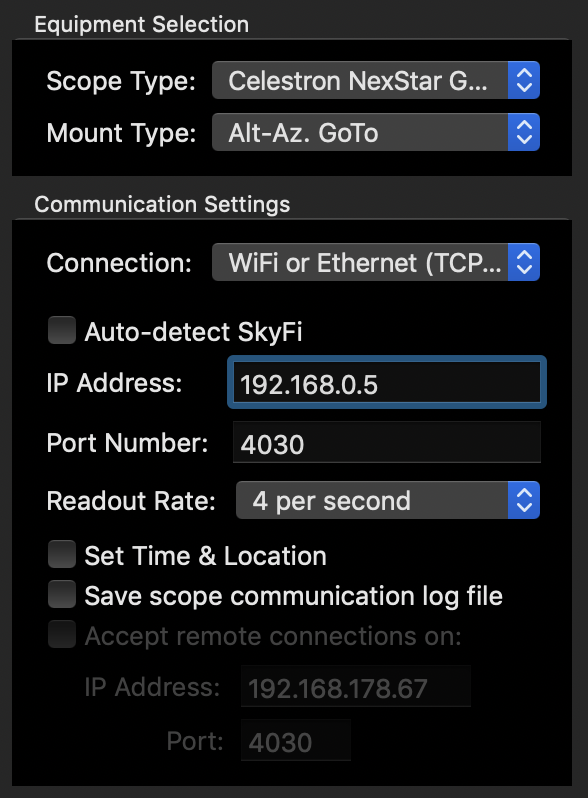
    In settings, telescope setup, select Scope Type =

    Click Connect.

    Align your telescope now with the hand controller. SkySafari should automatically follow after alignment. Now you can use SkySafari and the Handcontroller for GoTos etc.

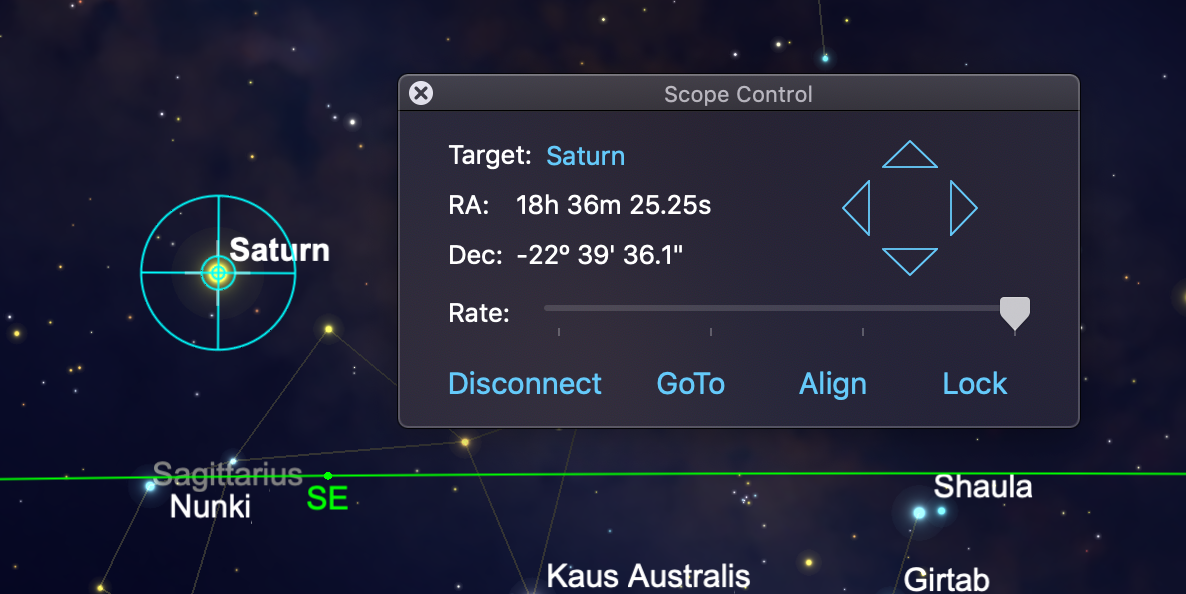
    I used the hand controller to do a solar system align on Saturn:

    , Mount Type = Alt-Az GoTo. Connection WiFi or Ethernet (TCP/IP) Enter the Pi's IP address, and port number 4030.

    For now you can enable „Set Time & Location“, but once your PI sets the time you should disable this.

    Click Connect.

    Align your telescope now with the hand controller. SkySafari should automatically follow after alignment. Now you can use SkySafari and the Handcontroller for GoTos etc.

    I used the hand controller to do a solar system align on Saturn:

    I expect this to work with any telescope supported by SkyFi3 and SkySafari.

  • 3
    Get the time from NTP

    By default the PI automatically syncs the time if it has connection to the internet. But I want to go one step further. So let's install an NTP server. Later we can also use the time from GPS with the NTP server.

    To make things a little easier, let's work as root. Which I usually not do, but it makes the guide much more readable without all the sudo in front of each command. Remember: Think before you type.

    sudo -i

    First we need to stop the default timesyncd-systemd service:

    systemctl stop systemd-timesyncd
    systemctl disable systemd-timesyncd
    

    Now we need to install the NTP server:

    apt-get install ntp

    NTP will start right away with a default configuration and start to sync with NTP servers. You can check this with

    ntpq -pn

    Output will look like this:

         remote           refid      st t when poll reach   delay   offset  jitter
    ==============================================================================
     0.debian.pool.n .POOL.          16 p    -   64    0    0.000    0.000   0.004
     1.debian.pool.n .POOL.          16 p    -   64    0    0.000    0.000   0.004
     2.debian.pool.n .POOL.          16 p    -   64    0    0.000    0.000   0.004
     3.debian.pool.n .POOL.          16 p    -   64    0    0.000    0.000   0.004
    +145.239.3.131   131.188.3.223    2 u   44   64  177   20.699   -0.212   4.160
    #37.120.184.82   212.59.0.1       3 u   36   64  177   16.670   -4.241  15.315
    +217.144.138.234 26.91.187.18     2 u   46   64  177   23.756    0.019   4.103
    #131.234.137.64  .DCF.            1 u   50   64  177   28.657  -47.197  14.524
    +78.46.107.140   192.53.103.103   2 u   40   64  177   20.362    1.735   2.716
    *136.243.70.198  141.24.7.240     2 u   42   64  177   18.602    0.020   3.506
    +62.113.233.18   193.171.23.163   2 u   46   64  177   19.822    1.555   3.035
    

    Of course your output will look different. In my case this server was selected as the best time source:

    *136.243.70.198  141.24.7.240     2 u   42   64  177   18.602    0.020   3.506

     This is indicated by the * at the beginning of the line.

    You can also use ntptime to check if you received valid time:

    ntptime

    Output should look like this:

    ntp_gettime() returns code 0 (OK)
      time dfb4be58.d4b1ab08  Fri, Dec  7 2018  9:39:36.830, (.830836483),
      maximum error 54240 us, estimated error 6808 us, TAI offset 0
    ntp_adjtime() returns code 0 (OK)
      modes 0x0 (),
      offset -149.432 us, frequency -10.075 ppm, interval 1 s,
      maximum error 54240 us, estimated error 6808 us,
      status 0x2001 (PLL,NANO),
      time constant 6, precision 0.001 us, tolerance 500 ppm,

    You can tweak the config file to your needs with:

    nano /etc/ntp.conf

    you can easily find detailed instructions in the internet. Just google for raspbian ntp config

    As the PI does not have a RTC the time will be way off after reboot. Let's force an immediate NTP sync. This can be done by editing rc.local

    nano /etc/rc.local

    Add the following lines before exit:

    logger "Beginning force syncing NTP..."
    service ntp stop
    ntpd -gq
    service ntp start
    logger "Finished force syncing NTP..."

     Now you PI should have accurate time just after booting. In my case this takes a little less than 60s.

View all 12 instructions

Enjoy this project?

Share

Discussions

Mark Smith wrote 12/31/2020 at 17:17 point

Awesome, nextstar 8se and raspberry pi3 working. Would be great if I can find a way to get ax Xbox controller working with the focuser.

One issue I found was the is was mounted as r/w I tried the overlay setting and this made no difference. It's was default to yes.

  Are you sure? yes | no

Dan wrote 11/14/2020 at 15:59 point

I really like this project. Why can I not log in using the WiFi details given? I will try with a screen and keyboard to see what is happening.

  Are you sure? yes | no

Dan wrote 11/14/2020 at 17:15 point

Fails to boot through to login screen. Stops on searching for GPS.

  Are you sure? yes | no

ChrisG71 wrote 11/16/2020 at 21:13 point

I did not take care of the images for a long time. But you can always start with a fresh Linux on your PI and follow the instructions to set up everything.

  Are you sure? yes | no

Matt Omond wrote 10/04/2020 at 23:05 point

I love this project and keep coming back to it because I have the old controller not USB but rs232. Is there anyway to do this over serial.  I would love to hear your thoughts.. Thanks Matt..

  Are you sure? yes | no

ChrisG71 wrote 10/05/2020 at 11:14 point

Not sure about the hand controller. I'm afraid it needs 12V on the serial. Look at Dane's project, he bypassed the connector and directly connected to the chip. Or you could try to find a USB to serial for the Celestron. Maybe this would work: https://www.amazon.de/-/en/Converter-Celestron-Nexstar-Telescope-handheld/dp/B085T5W5DW unfortunately it does not come with a micro USB.

  Are you sure? yes | no

loykastj wrote 04/24/2020 at 19:52 point

Chris, this is incredible! Probably one of the best 21st century additions to my telescope that I have found for visual observing. I have a Nexstar Evolution 9.25 pier mounted in my observatory, but I have a Nexstar 5SE for travel and this will greatly benefit that portable telescope. 

Question, would it be possible to apply your GPS arrangement to the Raspberry Pi Zero W that Dane Gardner installed inside of the Nexstar rev. G hand controller? 

That way I could have the Pi Zero W with GPS permanently inside the controller with no additional boxes to carry when traveling with the Nexstar 5SE. 

  Are you sure? yes | no

Florian Hahn wrote 05/19/2020 at 07:12 point

I would say probably it is possible. The only challenge will be to find the right spot for the GPS antenna. In my case that is one of the thickest parts and also I am not sure if the signal will be any good without the antenna facing upwards. I would recommend to go for the external solution.

  Are you sure? yes | no

Alan Somers wrote 05/06/2019 at 01:33 point

I have everything working for the most part, but there's one annoying issue I hope is resolvable: Setting position and time on the hand controller works fine...until I connect SkySafari to the Pi over Wifi. At that point forward, the time and position upload scripts stop working, hanging on the ttyUSB0 device write, even if the TCP/IP connection from SkySafari is closed or the ser2net service is stopped. The only fix I've identified thus far is rebooting the Pi. Any suggestions, other than making sure I don't connect SkySafari until I'm ready to start Gotos?

  Are you sure? yes | no

ChrisG71 wrote 05/06/2019 at 06:26 point

Hi Alan, so far I did not run into this issue because I always wait until I see the date corrected on the hand controller and then I finish alignment with the hand controller.  After the mount is aligned I connect to SkySafari. 

Once you connect SkySafari the ser2net will keep the port busy. I don't think it's possible to fix this for your workflow.

  Are you sure? yes | no

Alan Somers wrote 05/07/2019 at 03:34 point

How do you initiate the upload of date/time/location to the HC? I was experimenting with udev rules to do it a minute after plugging the USB cable into the HC (to give everything a chance to initialize).

  Are you sure? yes | no

Alan Somers wrote 05/07/2019 at 14:56 point

I submitted an issue on the ser2net GitHub and the main developer responded. He said that s2n does close the device if you disconnect the TCP port and that the issue must be with the device driver. I don't know that I believe him, since I can run the time and location scripts multiple times before connecting via SkySafari and the HC accepts the command every time. That involves multiple opens and closes of the device. If I get some spare time, I'll dig into the ser2net code and see if I can find any issues.

  Are you sure? yes | no

Alan Somers wrote 05/09/2019 at 15:09 point

I finally figured out a solution: rather than fight with ser2net, I decided to work with it. I enabled the control port in the ser2net configuration and used the /dev/tcp "file" built into bash to tell set2net to kill any existing connections before sending the date/time or location string through port 4030.

  Are you sure? yes | no

Alan Somers wrote 04/24/2019 at 22:23 point

Which OTG cable did you use? Looking online at the reviews, there seems to be an inconsistency with regard to certain OTG cables working for some people but not for others.

  Are you sure? yes | no

ChrisG71 wrote 04/27/2019 at 10:27 point

I used this cable:

LINDY 31717 - USB 2.0 Kabel Micro-B zu Mini-B OTG - 0,5m

  Are you sure? yes | no

Florian Hahn wrote 05/19/2020 at 07:16 point

An alternative which also works great:

DeLock USB 2.0 Hi-Speed Kabel micro-B Stecker - Mini-B Stecker schwarz 1,0m

  Are you sure? yes | no

Similar Projects

Does this project spark your interest?

Become a member to follow this project and never miss any updates