 ChrisG71
-
1setup the Raspberry PI
I prefer to use one of my old Pi2s for prototyping before moving the project to the PI Zero. This allows a headless setup straight away, as the PI2 comes with an ethernet connector.
Prepare your SD card with Raspbian Stretch Lite and create a file with the name ssh on the boot partition. Put the card into the PI and boot it up. Connected to ethernet you should be able to find the IP on your DHCP server (home router) and be able to SSH into the PI. Remember the default User is pi and the password is raspberry
Now use raspi-config to configure some basic settings:
sudo raspi-config
- set a new password
- set a hostname
- configure your Wi-Fi. I have a USB dongle for the PI2. The PI Zero W has Wi-Fi build in.
- configure timezone, I suggest to use UTC. This will make things easier when setting the time on your NexStar hand controller.
- configure memory split, reduce it to 16MB
- expand the filesystem
And of course you want to update your system to the latest versions:
sudo apt-get update
sudo apt-get upgrade
NOTE:
If you create a script and want to run it do not forget to make it executable: chmod 755 script.sh
Also: Make sure your Wi-Fi is working and you have good coverage. Please do not blame me for you bad Wi-Fi. ;-)
-
2Connect the telescope and connect to SkySafari
Let’s start with something easy. To control the telescope I want to connect the PI to the mini-USB. For the PI zero you need a micro USB to mini USB OTG cable with Micro USB on the host side. Alternative you can use the micro USB to USB adapter that comes with many PI Zeros and a regular USB to Mini USB cable.
To power the PI you can use an adapter or a battery pack (one of those you use to charge your phone on the go).
The newer NexStar hand controller comes with a mini USB port and has a PL2303 Serial2USB adapter build in. All we need to do is plug in the USB to the PI. Raspbian should automatically detect and the serial port should show up as /dev/ttyUSB0.
DO NOT HOT PLUG THE USB Cable. My Pi Zero crashes every time I connect the USB to the PI. Please make the connections in the following order:
- Connect the hand controller with the PI Zero.
- Power on the telescope
- Power on the PI Zero.
If you power on the PI first it will try to power the hand controller and suffer from under voltage.
Issue seems to happen because of two different GNDs, one from external power supply and one from telescope mount. Since I take 12V from AUX it does not happen any more.
I also recommend to do a save shutdown of the PI and do not just unplug power. There are two options to make this a little safer at a later point:
- run the PI on a RO filesystem, see instructions below.
- add a button to initiate the shutdown
To connect the telescopes hand controller you need a Mini USB cable. The hand controller has a built in PL2303 serial to USB adapter. Once you connect it to the PI it will be reachable via /dev/ttyUSB0.
Install ser2net:
sudo apt-get install ser2net
and configure it:
sudo nano /etc/ser2net.conf
Insert one line at the end:
4030:raw:10:/dev/ttyUSB0:9600 8DATABITS NONE 1STOPBIT
4030 is the TCP/IP port number to connect to the port over the network.
Star the service:
sudo service ser2net start
A good time for a reboot.
sudo poweroff
Make the connections as described and boot the PI. This should take just a minute.
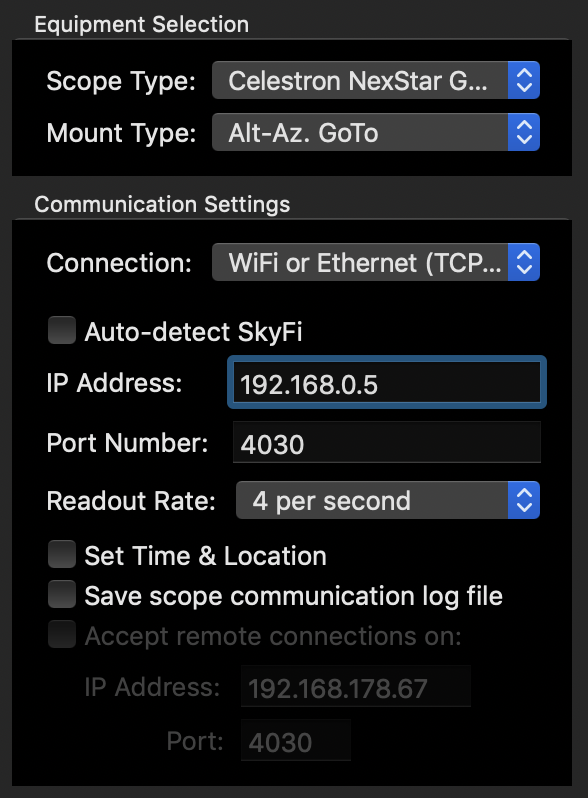
Configure SkySafari
In settings, telescope setup, select Scope Type =
Click Connect.
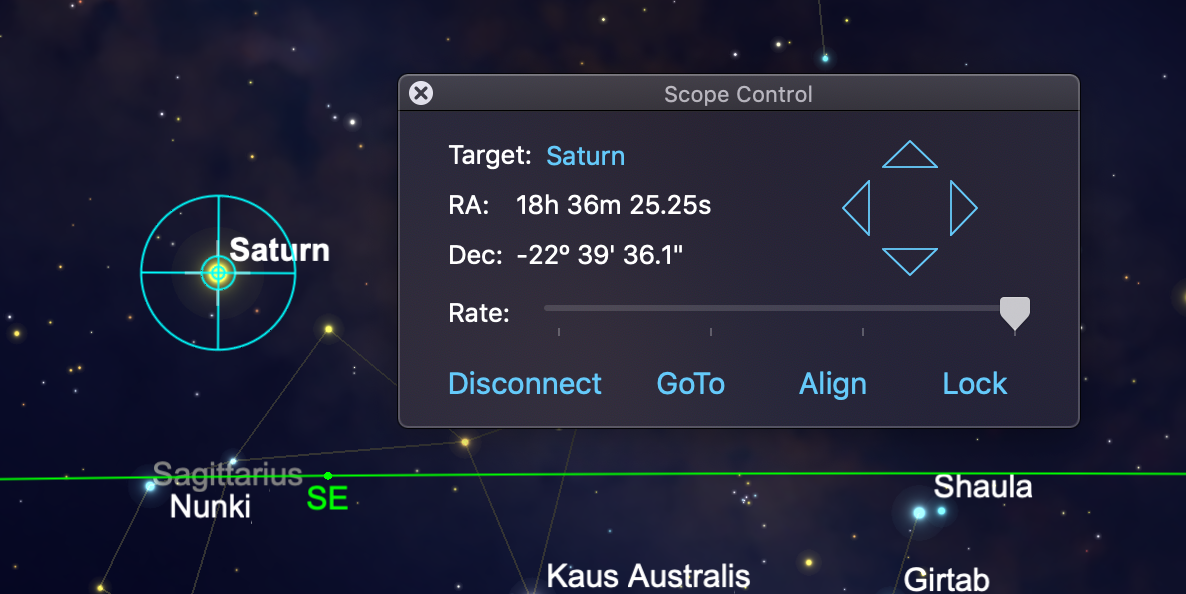
Align your telescope now with the hand controller. SkySafari should automatically follow after alignment. Now you can use SkySafari and the Handcontroller for GoTos etc.
I used the hand controller to do a solar system align on Saturn:
, Mount Type = Alt-Az GoTo. Connection WiFi or Ethernet (TCP/IP) Enter the Pi's IP address, and port number 4030.
![]()
For now you can enable „Set Time & Location“, but once your PI sets the time you should disable this.
Click Connect.
Align your telescope now with the hand controller. SkySafari should automatically follow after alignment. Now you can use SkySafari and the Handcontroller for GoTos etc.
I used the hand controller to do a solar system align on Saturn:
![]()
I expect this to work with any telescope supported by SkyFi3 and SkySafari.
-
3Get the time from NTP
By default the PI automatically syncs the time if it has connection to the internet. But I want to go one step further. So let's install an NTP server. Later we can also use the time from GPS with the NTP server.
To make things a little easier, let's work as root. Which I usually not do, but it makes the guide much more readable without all the sudo in front of each command. Remember: Think before you type.
sudo -i
First we need to stop the default timesyncd-systemd service:
systemctl stop systemd-timesyncd
systemctl disable systemd-timesyncd
Now we need to install the NTP server:
apt-get install ntp
NTP will start right away with a default configuration and start to sync with NTP servers. You can check this with
ntpq -pn
Output will look like this:
     remote           refid      st t when poll reach   delay   offset  jitter
==============================================================================
 0.debian.pool.n .POOL.          16 p    -   64    0    0.000    0.000   0.004
 1.debian.pool.n .POOL.          16 p    -   64    0    0.000    0.000   0.004
 2.debian.pool.n .POOL.          16 p    -   64    0    0.000    0.000   0.004
 3.debian.pool.n .POOL.          16 p    -   64    0    0.000    0.000   0.004
+145.239.3.131   131.188.3.223    2 u   44   64  177   20.699   -0.212   4.160
#37.120.184.82   212.59.0.1       3 u   36   64  177   16.670   -4.241  15.315
+217.144.138.234 26.91.187.18     2 u   46   64  177   23.756    0.019   4.103
#131.234.137.64  .DCF.            1 u   50   64  177   28.657  -47.197  14.524
+78.46.107.140   192.53.103.103   2 u   40   64  177   20.362    1.735   2.716
*136.243.70.198  141.24.7.240     2 u   42   64  177   18.602    0.020   3.506
+62.113.233.18   193.171.23.163   2 u   46   64  177   19.822    1.555   3.035
Of course your output will look different. In my case this server was selected as the best time source:
*136.243.70.198 141.24.7.240 2 u 42 64 177 18.602 0.020 3.506
This is indicated by the * at the beginning of the line.
You can also use ntptime to check if you received valid time:
ntptime
Output should look like this:
ntp_gettime() returns code 0 (OK)
  time dfb4be58.d4b1ab08  Fri, Dec  7 2018  9:39:36.830, (.830836483),
  maximum error 54240 us, estimated error 6808 us, TAI offset 0
ntp_adjtime() returns code 0 (OK)
  modes 0x0 (),
  offset -149.432 us, frequency -10.075 ppm, interval 1 s,
  maximum error 54240 us, estimated error 6808 us,
  status 0x2001 (PLL,NANO),
  time constant 6, precision 0.001 us, tolerance 500 ppm,
You can tweak the config file to your needs with:
nano /etc/ntp.conf
you can easily find detailed instructions in the internet. Just google for raspbian ntp config.
As the PI does not have a RTC the time will be way off after reboot. Let's force an immediate NTP sync. This can be done by editing rc.local
nano /etc/rc.local
Add the following lines before exit:
logger "Beginning force syncing NTP..."
service ntp stop
ntpd -gq
service ntp start
logger "Finished force syncing NTP..."
Now you PI should have accurate time just after booting. In my case this takes a little less than 60s.
-
4Set the time of the handcontroller
nano /etc/systemd/system/gpsd.serviceDane did such a great job I'd like to send you to his project: Raspberry Pi Driven Telescope Mount to set the time of the hand controller.
You have to modify the serial port in the scripts, as my project is connecting to the hand controller via USB:
readonly serial=/dev/ttyUSB0
In my case it takes less than 60s until I have a valid time on the hand controller and can start with the alignment.
-
5Add the GPS module
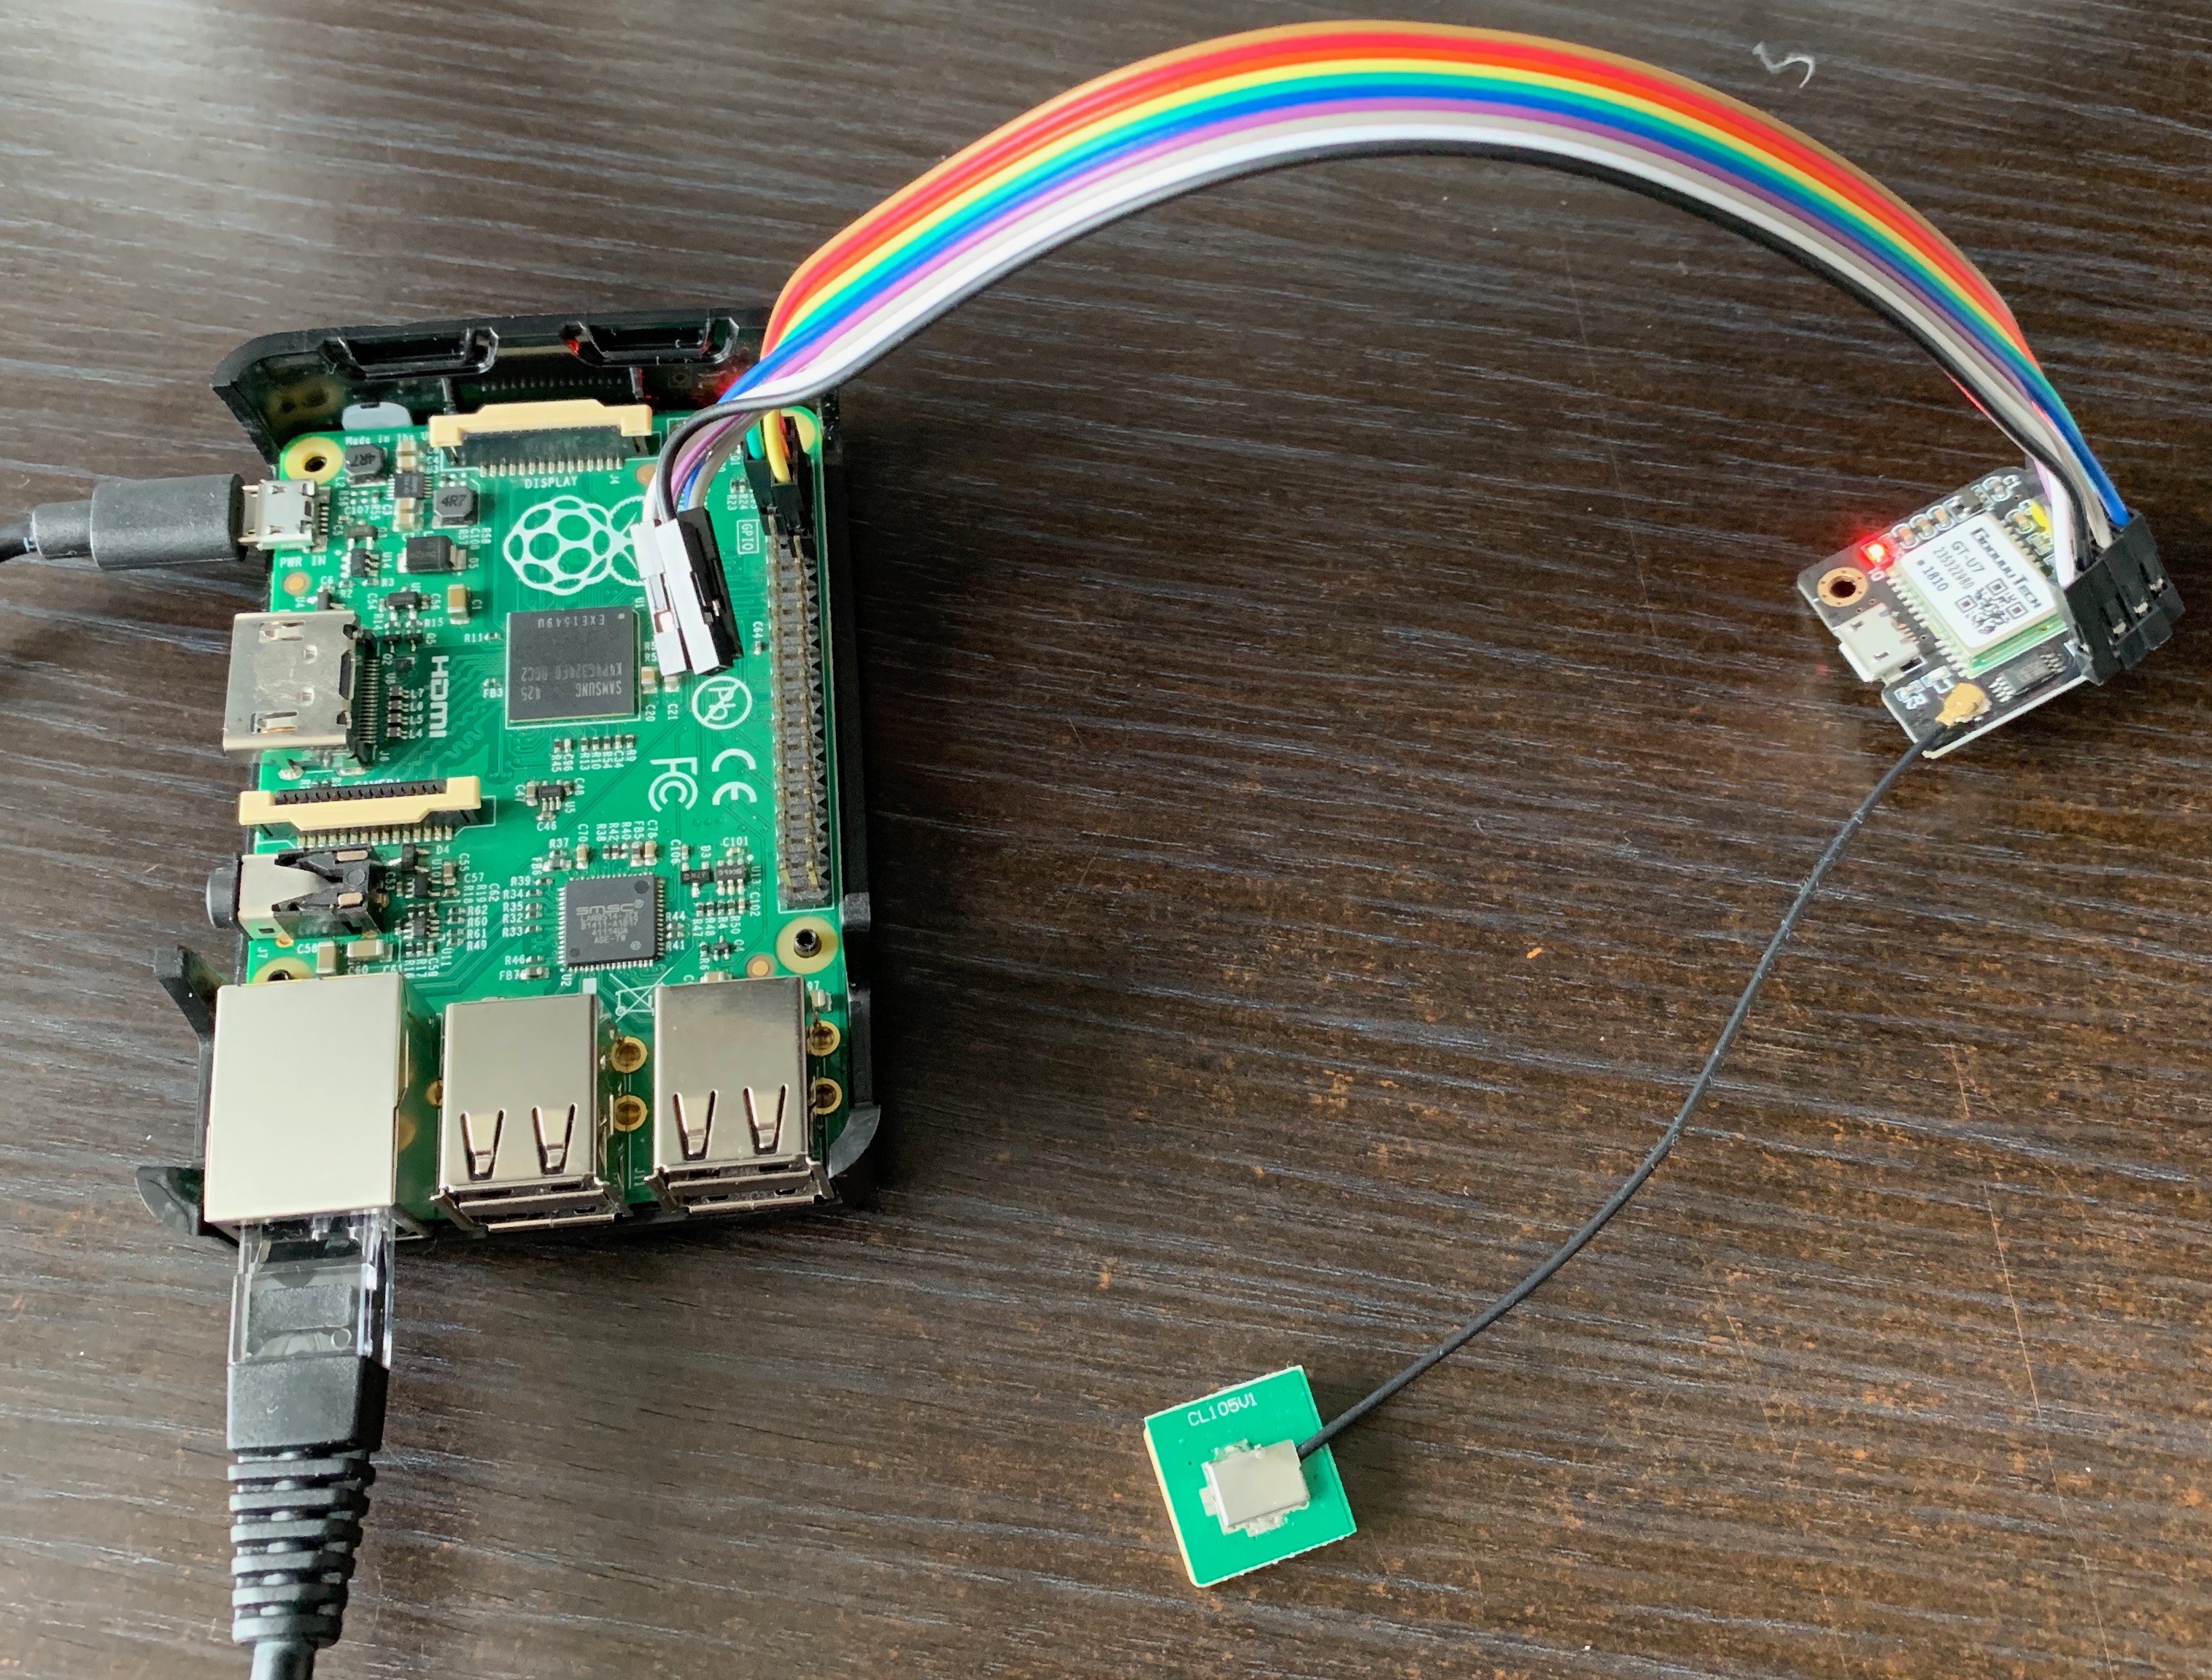
Now it starts to get a little bit more difficult. My GPS module arrived and this will require some light soldering.
This is how to connect the module to the PI:
GPS Module Raspberry PI PIN on Raspberry VCC 3.3V PIN 1 or PIN17 GND GND PIN 6 or any other GND RXD TXD / GPIO 14 PIN 8 TXD RXD / GPIO 15 PIN 10 PPS GPIO 18 PIN 12 This is how it currently looks on my PI2. Not very nice for now, later I will solder the GPS to the PI Zero W. But first need to figure out how much space I will have in the case. And I want to have power coming from the telescope first. But as the GPS module arrived before the step-down module I started with the GPS.
![]()
We first need to free the serial port on the GPIO:
use raspi-config to disable the console on the serial but leave the serial enabled.
raspi-config
Steps:
- go to 5: interface options
- go to P6: serial
- Would you like a login shell to be accessible over serial? select NO
- Would you like the serial port hardware to be enabled? select YES
On newer PI hardware you want to use the hardware UART for the GPS instead of Bluetooth, you have to edit /boot/config.txt
Changes on /boot/config.txt of course require a reboot.
# Use the /dev/ttyAMA0 UART for user applications (GPS), not Bluetooth
dtoverlay=pi3-disable-bt
Install gpsd:
apt-get install gpsd gpsd-clients python-gps pps-tools
The service start right away, so we need to stop it:
systemctl stop gpsd.socket
systemctl disable gpsd.socket
Now set the speed to 9600 and start the GPDS manually for testing:
stty -F /dev/ttyAMA0 9600
gpsd /dev/ttyAMA0 -F /var/run/gpsd.sock -n
With cgps you can watch your GPS:
cgps -s
Output should look like this:
┌───────────────────────────────────────────┐┌─────────────────────────────────┐
│    Time:       2018-12-07T11:24:12.000Z   ││PRN:   Elev:  Azim:  SNR:  Used: │
│    Latitude:    49.091774 N               ││   2    27    312    18      Y   │
│    Longitude:   12.535313 E               ││   3    31    111    33      Y   │
│    Altitude:   567.5 m                    ││   6    56    267    20      N   │
│    Speed:      0.0 kph                    ││   7    31    177    31      Y   │
│    Heading:    0.0 deg (true)             ││   9    82    271    15      Y   │
│    Climb:      0.9 m/min                  ││  16    09    080    30      Y   │
│    Status:     3D FIX (11 secs)           ││  19    10    243    17      N   │
│    Longitude Err:   +/- 59 m              ││  22    12    116    32      Y   │
│    Latitude Err:    +/- 77 m              ││  23    65    061    29      Y   │
│    Altitude Err:    +/- 33 m              ││  26    11    053    23      N   │
│    Course Err:      n/a                   ││                                 │
│    Speed Err:       +/- 1 kph             ││                                 │
│    Time offset:     0.130                 ││                                 │
│    Grid Square:     JN58sc                ││                                 │
└───────────────────────────────────────────┘└─────────────────────────────────┘
Type Q to exit.
Once everything is working edit /etc/default/gpsd.
nano /etc/default/gpsd
Mine looks like this:
# Default settings for the gpsd init script and the hotplug wrapper.

# Start the gpsd daemon automatically at boot time
START_DAEMON="true"

# Use USB hotplugging to add new USB devices automatically to the daemon
USBAUTO="false"

# Devices gpsd should collect to at boot time.
# They need to be read/writeable, either by user gpsd or the group dialout.
DEVICES="/dev/ttyAMA0"

# Other options you want to pass to gpsd
GPSD_OPTIONS="-n"

GPSD_SOCKET="/var/run/gpsd.sock"
Re-enable the service we disabled:
killall gpsd
systemctl enable gpsd.socket
systemctl start gpsd.socket
Test your settings again with cgps.
** UPDATE **
The GPSD does not start automatically at boot by default. I found a forum post with the solution described below:
Please note that systemd will only start gpsd on request by clients connecting to the unix or tcp socket. In case you need gpsd to run always, you'll need to configure systemd to start it. One way would be to create /etc/systemd/system/gpsd.service with the following content:
nano /etc/systemd/system/gpsd.service
copy and paste this code:
[Unit]
Description=GPS (Global Positioning System) Daemon
Requires=gpsd.socket
# Needed with chrony SOCK refclock
# After=chronyd.service

[Service]
EnvironmentFile=-/etc/default/gpsd
EnvironmentFile=-/etc/sysconfig/gpsd
ExecStart=/usr/sbin/gpsd -N $GPSD_OPTIONS $DEVICES

[Install]
WantedBy=multi-user.target
Also=gpsd.socket
Reload systemd:
systemctl daemon-reload
systemctl reenable gpsd.service
At the next boot GPSD should start automatically with the correct settings.
-
6Get time from GPS
GPS will give us a pretty accurate time pretty fast. But I want to take it to the next level and use the PPS signal as well. Let's see how we can use this later. The PPS signal requires a good GPS fix, so it will take some time. Not sure what happens if we update the time on the hand controller after alignment.
To enable the PI to receive the PPS you have to edit /boot/4
nano /boot/config.txt
and add the following at the end:
# Add gps-pps
dtoverlay=pps-gpio,gpiopin=18
Add the module
nano /etc/modules
add this line:
# GPS-PPS
pps-gpio
reboot the PI and check if the module is loaded:
lsmod | grep pps
Output should look like this:
pps_gpio                3089  0
pps_core                8606  3 pps_gpio,pps_ldisc
Test the pps:
ppstest /dev/pps0
Output should look like this:
trying PPS source "/dev/pps0"
found PPS source "/dev/pps0"
ok, found 1 source(s), now start fetching data...
source 0 - assert 1545385683.769082073, sequence: 1084 - clear  0.000000000, sequence: 0
source 0 - assert 1545385684.769091074, sequence: 1085 - clear  0.000000000, sequence: 0
source 0 - assert 1545385685.769101074, sequence: 1086 - clear  0.000000000, sequence: 0
source 0 - assert 1545385686.769103075, sequence: 1087 - clear  0.000000000, sequence: 0
source 0 - assert 1545385687.769111075, sequence: 1088 - clear  0.000000000, sequence: 0
source 0 - assert 1545385688.769126076, sequence: 1089 - clear  0.000000000, sequence: 0
Stop with CTRL-C
Connect ntpd to the GPS:
nano /etc/ntp.conf
add the following:
# Read the rough GPS time from device 127.127.28.0
# Read the accurate PPS time from device 127.127.22.0

server 127.127.28.0 minpoll 4 maxpoll 4 iburst prefer
fudge 127.127.28.0 flag1 1 refid GPS

server 127.127.22.0 minpoll 4 maxpoll 4
fudge 127.127.22.0 flag1 1 refid PPS

# we should have another preferred server
server time.goole.com iburst
Restart the NTP server:
service ntp restart
And check the status
root@raspberrypi:~# ntpq -pn
     remote           refid      st t when poll reach   delay   offset  jitter
==============================================================================
*127.127.28.0    .GPS.            0 l    6   16    1    0.000  -10.252   0.002
 127.127.22.0    .PPS.            0 l    -   16    0    0.000    0.000   0.000
 216.239.35.12   .GOOG.           1 u   36   64    1   33.843   -0.381   0.002
In the output above the time is very quickly synced to GPS. This might change after some time depending on the GPS signal quality.
Now the NTP has synced to one of the servers on the internet and is using the PPS signal from the GPS for higher precision. The GPS became invalid, most likely because the offset between the two other servers. The offset is in msec, so nothing to worry about.
root@raspberrypi:~# ntpq -pn
     remote           refid      st t when poll reach   delay   offset  jitter
==============================================================================
*127.127.28.0    .GPS.            0 l    6   16    7    0.000   -4.247   1.553
 127.127.22.0    .PPS.            0 l    -   16    0    0.000    0.000   0.000
 216.239.35.12   .GOOG.           1 u   48   64    1   48.167   -1.320   0.002
Here you can find some good explanation of the ntpq output.
After letting it settle for a while, my GPS was always excluded, because the offset was above 100ms. I found this nice explanation about GPSD time service. I decided to change the /etc/ntp.conf and added time1 0.120 to config of my GPS:
server 127.127.28.0 minpoll 4 maxpoll 4 iburst
fudge 127.127.28.0 refid GPS time1 0.120
Now the GPS is part of the candidate list and no longer excluded, PPS is used as well. After some time the Google server also becomes a candidate.
root@raspberrypi:~# ntpq -pn
     remote           refid      st t when poll reach   delay   offset  jitter
==============================================================================
*127.127.28.0    .GPS.            0 l    3   16  377    0.000   -0.670   2.257
o127.127.22.0    .PPS.            0 l    2   16  377    0.000    7.234   0.657
+216.239.35.12   .GOOG.           1 u   11   64   17   32.024    9.154   5.616
This is definitely a little over-engineered for the use case of setting the time on the NexStar hand controller. But when I started using the GPS to fetch the time I wanted to go for the full solution.
-
7Optimization Part 1
adafruitI decided to move the forced time sync to /etc/rc.local and use the script /home/pi/hc-settime.sh just to push the time to the hand controller.
In rc.local I also disable the HDMI port and the LED after the time is pushed to the hand controller.
Let's add one line to /etc/rc.local:
# turn off HDMI, to save a little power.
/usr/bin/tvservice -o
add a script to turn off the LED:
nano led-off.sh
with the following code:
#!/bin/sh -e
echo none | sudo tee /sys/class/leds/led0/trigger
# this is for PI zero only:
echo 1 | sudo tee /sys/class/leds/led0/brightness
and run this at the end of hc-time.sh.
LED will turn off, once the time is set. It will not turn off if you are not connected to the hand controller. If you initiate a power off it will turn on after some time and then turn off again once shutdown is completed.
-
8Optimization Part 2 - read-only mode. THIS IS THE LAST STEP.
WARNING:
This should always be the very last step. Do only apply this to your PI if you already have a backup of the SD and verified it can be restored and is working.
Read-Only mode will protect your system against power loss (e.g. switching off the telescope and losing power). Once your PI is running on a RO filesystem it should no longer be necessary to do a safe shutdown of the operating system.
I found very elegant solution, which is using the overlayFS with good instructions here.
This solution will give you the option to change a parameter in /boot/cmdline.txt to make the system RW again to apply updates and changes. Much nicer. So I prefer the last method.
Working as root.
Turn of swap and disable man indexing:
dphys-swapfile swapoff
systemctl disable dphys-swapfile
apt-get purge dphys-swapfile
chmod -x /etc/cron.daily/man-db
chmod -x /etc/cron.weekly/man-db
Edit /etc/fstab
nano /etc/fstab
Add a line:
tmpfs /var/log tmpfs size=70M 0 0
Download and run the script:
wget https://raw.githubusercontent.com/janztec/empc-arpi-linux-readonly/master/install-experimental.sh -O install-experimental.sh
sudo bash install-experimental.sh
If you need to mount as rw at the next boot, simply edit /boot/cmdline.txt
sudo nano /boot/cmdline.txt
and change overlay=yes to overlay=no
overlay=yes dwc_otg.lpm_enable=0 console=tty1 root=PARTUUID=47154473-02 rootfstype=ext4 elevator=deadline fsck.repair=yes rootwait
overlay=no dwc_otg.lpm_enable=0 console=tty1 root=PARTUUID=47154473-02 rootfstype=ext4 elevator=deadline fsck.repair=yes rootwait
Now you can easily apply some changes, make updates etc. Don't forget to change to RO again.
-
9Power for the PI Zero W from Celestron AUX Port
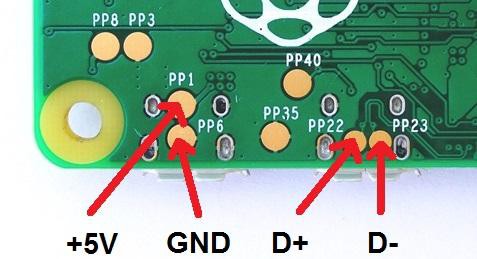
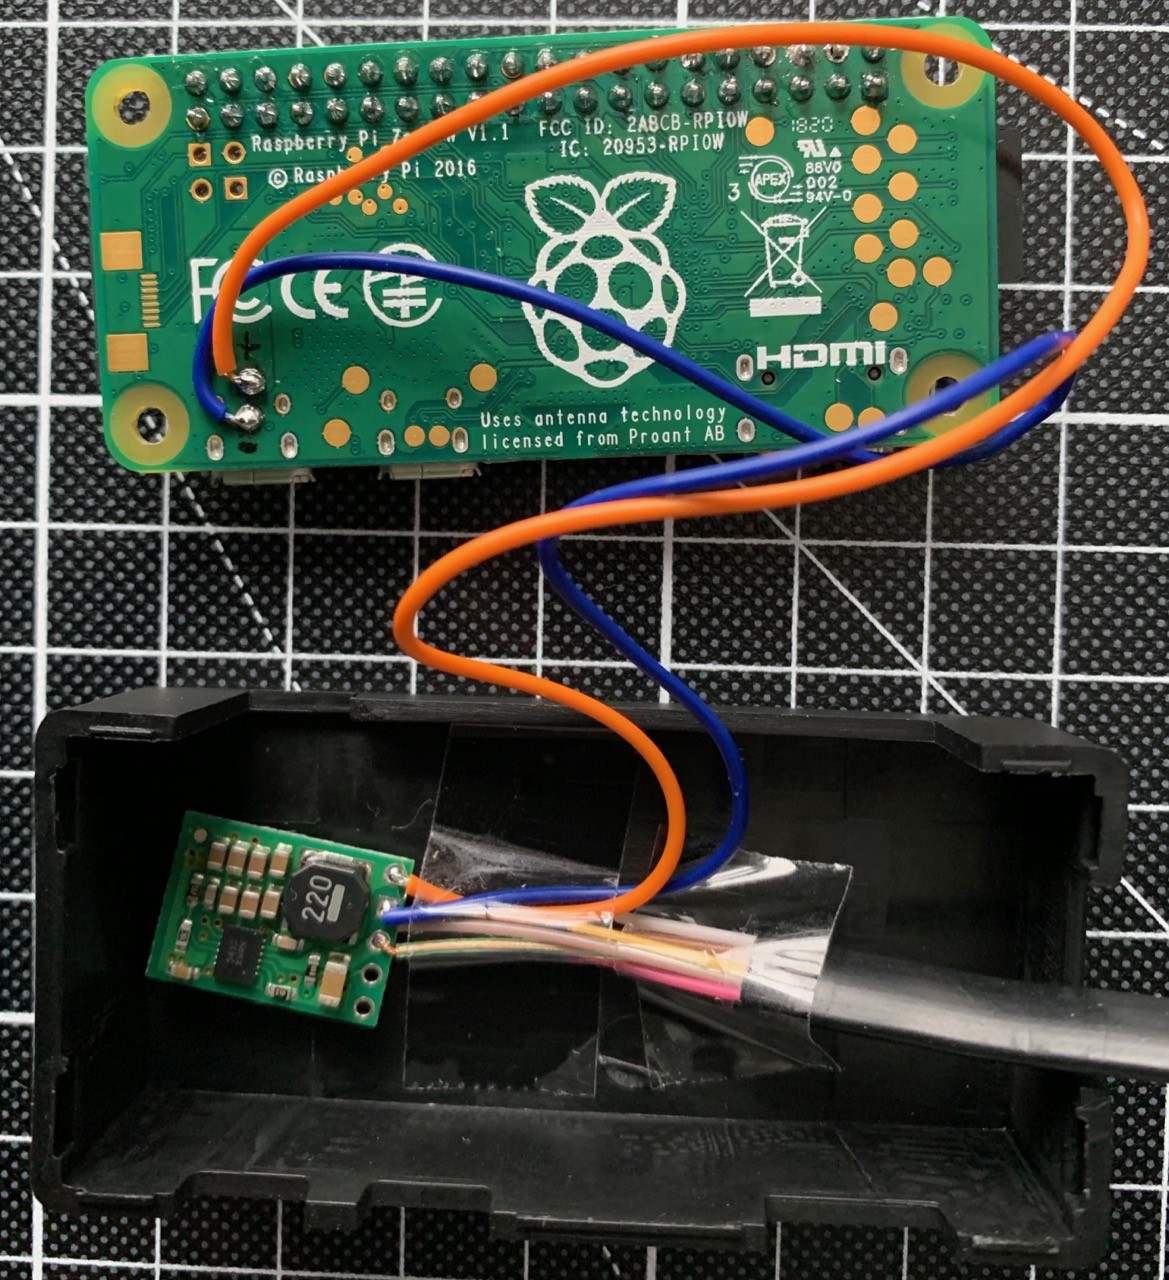
This step requires some easy soldering. You just have to solder a few cables to the voltage regulator and to two test pins on the PI.
I used a Pololu D24V10F5. But there are many others voltage regulators available. The D24V10F5 can deliver up to 1000mA at 5V and works with an input voltage of up to 36V, the minimum voltage is just a little bit over 5V. Please be careful, most of them do not have a protection against wrong polarity, so have a look at the data sheet, if you are using a different model.
![]()
This model has 5 pins:
PG Power Good not connected SHDN VIN input 12 V from AUX port pin 3 GND Ground GND on AUX port pin 5 and PI Zero test pad PP 1 blue cable VOUT 5V output 5V PI zero test pad PP 6 orange cable DO NOT connect you power supply to the GPIO pins, as those are not protected by the poly fuse. Use the test pads PP1 and PP6 which are directly connected to the micro USB 5V input connector.
![]()
DO NOT connect your PI zero too two power supplies at the same time. You might want to stick a tape over the micro USB port once you are finished.
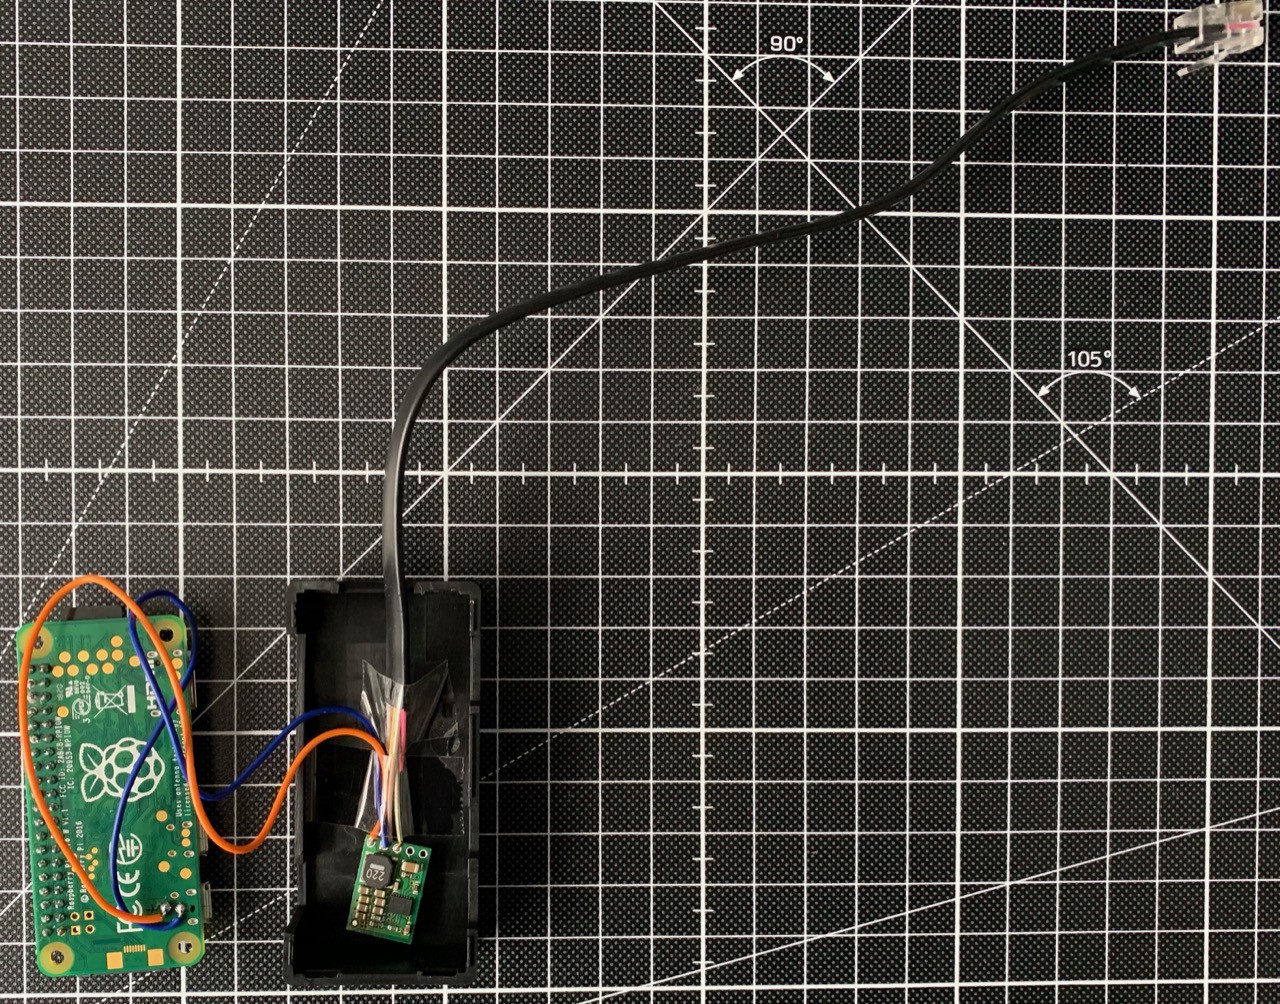
Here are a few more pictures:
![]()
![]()
I am not happy with the current case, but it will do it for some time. Maybe I can make a 3D printed case, but there are still a few things I would like to add the ePaper display, and also the GPS module does not fit into the current case.
-
10Auto WiFi Hotspot Switch - Direct Connection
I found a great guide here from roboberry. I don't want to copy & paste his great work here. It took me about 15min to get this up and running. Now the PI creates its own SSID once it loses connection to my home Wi-Fi. SD card image is linked in the logs section.
If you are using the Hotspot I recommend to add the GPS module or a RTC module. Else you will not have accurate time. Of course you can set hand controller time and location manually or push from SkySafari.
In short: working as root:
apt-get purge dns-root-data

apt-get install hostapd
apt-get install dnsmasq

systemctl disable hostapd
systemctl disable dnsmasq
Edit /etc/hostapd/hostapd.conf.
nano /etc/hostapd/hostapd.conf
Change the country_code to match your location (e.g. US). SSID will be AstroPI. Of course you can also change SSID and passphrase.
#2.4GHz setup wifi 80211 b,g,n
interface=wlan0
driver=nl80211
ssid=AstroPI
hw_mode=g
channel=1
wmm_enabled=0
macaddr_acl=0
auth_algs=1
ignore_broadcast_ssid=0
wpa=2
wpa_passphrase=1234567890
wpa_key_mgmt=WPA-PSK
wpa_pairwise=CCMP TKIP
rsn_pairwise=CCMP

#80211n - Change DE to your WiFi country code
country_code=DE
ieee80211n=1
ieee80211d=1
next:
nano /etc/default/hostapd
change conf line to:
DAEMON_CONF="/etc/hostapd/hostapd.conf"
Check opts line, must be:
#DAEMON_OPTS=""
configure dns_masq:
nano /etc/dnsmasq.conf
add at the end of the file add the following. You might want to make sure the PI is using the same network as your home network, so change the dhcp-range accordingly, e.g.: dhcp-range=192..168.0.100,192.168.0.120,12
#AutoHotspot Config
#stop DNSmasq from using resolv.conf
no-resolv
#Interface to use
interface=wlan0
bind-interfaces
# start and end IP to use for your devices. lease time 12h
dhcp-range=10.0.0.50,10.0.0.150,12
Configure DHCP client:
nano /etc/dhcpcd.conf
add at the end:
nohook wpa_supplicant
create the autohotspot service:
nano /etc/systemd/system/autohotspot.service
content:
[Unit]
Description=Automatically generates an internet Hotspot when a valid ssid is not in range
After=multi-user.target
[Service]
Type=oneshot
RemainAfterExit=yes
ExecStart=/usr/bin/autohotspot
[Install]
WantedBy=multi-user.target
enable the service:
systemctl enable autohotspot.service
check the Wi-Fi configuration and make sure it matches your home network:
nano /etc/wpa_supplicant/wpa_supplicant.conf
The script will search for the SSIDs in the above config file.
Create the autohotspot script:
nano /usr/bin/autohotspot
copy&paste:
Your PI will be at 10.0.0.5 if running the hotspot, you might want to change IP config here as well. Look for 10.0.0.5, it's only a single line.
#!/bin/bash
#version 0.95-4-N/HS

#You may share this script on the condition a reference to RaspberryConnect.com
#must be included in copies or derivatives of this script.

#A script to switch between a wifi network and a non internet routed Hotspot
#Works at startup or with a seperate timer or manually without a reboot
#Other setup required find out more at
#http://www.raspberryconnect.com

wifidev="wlan0" #device name to use. Default is wlan0.
#use the command: iw dev ,to see wifi interface name

IFSdef=$IFS
cnt=0
#These four lines capture the wifi networks the RPi is setup to use
wpassid=$(awk '/ssid="/{ print $0 }' /etc/wpa_supplicant/wpa_supplicant.conf | awk -F'ssid=' '{ print $2 }' ORS=',' | sed 's/\"/''/g' | sed 's/,$//')
IFS=","
ssids=($wpassid)
IFS=$IFSdef #reset back to defaults


#Note:If you only want to check for certain SSIDs
#Remove the # in in front of ssids=('mySSID1'.... below and put a # infront of all four lines above
# separated by a space, eg ('mySSID1' 'mySSID2')
#ssids=('mySSID1' 'mySSID2' 'mySSID3')

#Enter the Routers Mac Addresses for hidden SSIDs, seperated by spaces ie
#( '11:22:33:44:55:66' 'aa:bb:cc:dd:ee:ff' )
mac=()

ssidsmac=("${ssids[@]}" "${mac[@]}") #combines ssid and MAC for checking

createAdHocNetwork()
{
    echo "Creating Hotspot"
    ip link set dev "$wifidev" down
    ip a add 10.0.0.5/24 brd + dev "$wifidev"
    ip link set dev "$wifidev" up
    dhcpcd -k "$wifidev" >/dev/null 2>&1
    systemctl start dnsmasq
    systemctl start hostapd
}

KillHotspot()
{
    echo "Shutting Down Hotspot"
    ip link set dev "$wifidev" down
    systemctl stop hostapd
    systemctl stop dnsmasq
    ip addr flush dev "$wifidev"
    ip link set dev "$wifidev" up
    dhcpcd  -n "$wifidev" >/dev/null 2>&1
}

ChkWifiUp()
{
    echo "Checking WiFi connection ok"
        sleep 20 #give time for connection to be completed to router
    if ! wpa_cli -i "$wifidev" status | grep 'ip_address' >/dev/null 2>&1
        then #Failed to connect to wifi (check your wifi settings, password etc)
           echo 'Wifi failed to connect, falling back to Hotspot.'
               wpa_cli terminate "$wifidev" >/dev/null 2>&1
           createAdHocNetwork
    fi
}


FindSSID()
{
#Check to see what SSID's and MAC addresses are in range
ssidChk=('NoSSid')
i=0; j=0
until [ $i -eq 1 ] #wait for wifi if busy, usb wifi is slower.
do
        ssidreply=$((iw dev "$wifidev" scan ap-force | egrep "^BSS|SSID:") 2>&1) >/dev/null 2>&1
        echo "SSid's in range: " $ssidreply
        echo "Device Available Check try " $j
        if (($j >= 10)); then #if busy 10 times goto hotspot
                 echo "Device busy or unavailable 10 times, going to Hotspot"
                 ssidreply=""
                 i=1
    elif echo "$ssidreply" | grep "No such device (-19)" >/dev/null 2>&1; then
                echo "No Device Reported, try " $j
        NoDevice
        elif echo "$ssidreply" | grep "Network is down (-100)" >/dev/null 2>&1 ; then
                echo "Network Not available, trying again" $j
                j=$((j + 1))
                sleep 2
    elif echo "$ssidreplay" | grep "Read-only file system (-30)" >/dev/null 2>&1 ; then
        echo "Temporary Read only file system, trying again"
        j=$((j + 1))
        sleep 2
    elif ! echo "$ssidreply" | grep "resource busy (-16)"  >/dev/null 2>&1 ; then
               echo "Device Available, checking SSid Results"
        i=1
    else #see if device not busy in 2 seconds
                echo "Device unavailable checking again, try " $j
        j=$((j + 1))
        sleep 2
    fi
done

for ssid in "${ssidsmac[@]}"
do
     if (echo "$ssidreply" | grep "$ssid") >/dev/null 2>&1
     then
          #Valid SSid found, passing to script
              echo "Valid SSID Detected, assesing Wifi status"
              ssidChk=$ssid
              return 0
      else
          #No Network found, NoSSid issued"
              echo "No SSid found, assessing WiFi status"
              ssidChk='NoSSid'
     fi
done
}

NoDevice()
{
    #if no wifi device,ie usb wifi removed, activate wifi so when it is
    #reconnected wifi to a router will be available
    echo "No wifi device connected"
    wpa_supplicant -B -i "$wifidev" -c /etc/wpa_supplicant/wpa_supplicant.conf >/dev/null 2>&1
    exit 1
}

FindSSID

#Create Hotspot or connect to valid wifi networks
if [ "$ssidChk" != "NoSSid" ]
then
       if systemctl status hostapd | grep "(running)" >/dev/null 2>&1
       then #hotspot running and ssid in range
              KillHotspot
              echo "Hotspot Deactivated, Bringing Wifi Up"
              wpa_supplicant -B -i "$wifidev" -c /etc/wpa_supplicant/wpa_supplicant.conf >/dev/null 2>&1
              ChkWifiUp
       elif { wpa_cli -i "$wifidev" status | grep 'ip_address'; } >/dev/null 2>&1
       then #Already connected
              echo "Wifi already connected to a network"
       else #ssid exists and no hotspot running connect to wifi network
              echo "Connecting to the WiFi Network"
              wpa_supplicant -B -i "$wifidev" -c /etc/wpa_supplicant/wpa_supplicant.conf >/dev/null 2>&1
              ChkWifiUp
       fi
else #ssid or MAC address not in range
       if systemctl status hostapd | grep "(running)" >/dev/null 2>&1
       then
              echo "Hostspot already active"
       elif { wpa_cli status | grep "$wifidev"; } >/dev/null 2>&1
       then
              echo "Cleaning wifi files and Activating Hotspot"
              wpa_cli terminate >/dev/null 2>&1
              ip addr flush "$wifidev"
              ip link set dev "$wifidev" down
              rm -r /var/run/wpa_supplicant >/dev/null 2>&1
              createAdHocNetwork
       else #"No SSID, activating Hotspot"
              createAdHocNetwork
       fi
fi
Make it executable:
chmod +x /usr/bin/autohotspot
The script will check automatically at boot time if in range of your home network. If not it will create the hotspot.
If you want the script to check periodically add a line to the crontab.
BUT: if you have bad Wi-Fi coverage at your observing site from you home network this might cause some problems. As I said in the beginning: Don't blame me for you bad Wi-Fi coverage. ;-)
Edit the crontab:
crontab -e
Add a line:
*/5 * * * * sudo /usr/bin/autohotspot >/dev/null 2>&1
OK. This was not very short.
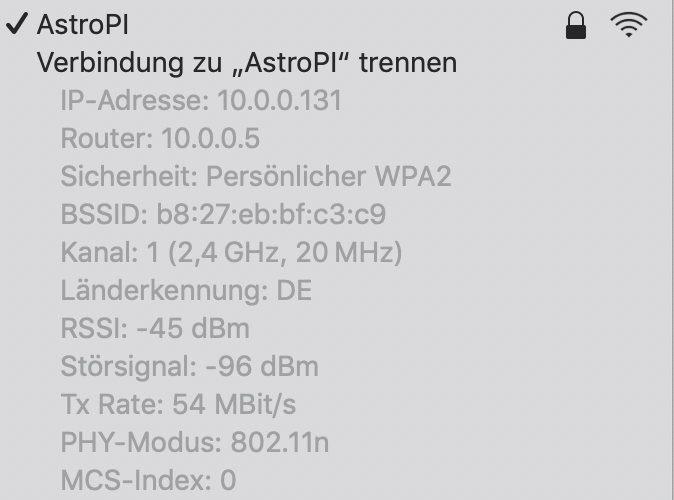
This is my Mac connecting to the hotspot:
![]()
Raspberry PI wireless Telescope Control
Advanced SkyFi 3 replacement for Celestron

Discussions
Become a Hackaday.io Member
Create an account to leave a comment. Already have an account? Log In.
I had some issues with the get-gps.py. I believe since this guide was written python changed to python3. I had to edit the first line to #!/usr/bin/env python3 to fix a no gps3 module found.
My python skills are very basic but I also got syntax errors on the last line of the file. I believe there are 2 missing parentheses print("{0} {1}".format(celestron(coordinates[0]), celestron(coordinates[1])))
Are you sure? yes | no
Another issue: When I added the commands to the rc.local file to force a NTP time update, the boot hung up with address resolution errors. If I run the same commands after I'm able to log in over SSH, they work fine. Is it possible that /etc/rc.local is running before the autohotspot service?
Are you sure? yes | no
I found one issue with my install after following your instructions: the hostapd service was masked for some reason so that it couldn't start. For lack of console connections, I rebuilt my system 3 or 4 times before I finally broke down and bought a Mini HDMI-to-HDMI cable and a cheap USB keyboard to troubleshoot it.
Anyway, the fix was to issue the command "sudo systemctl unmask hostapd". Once I did that, the autohotspot script was working as it should, both in client and hotspot mode.
Are you sure? yes | no