Zapp
Zapp-
B.E.N.D.E.R. Walkthrough
09/30/2019 at 05:12 • 0 commentsTLDR
Spoiler Alert! This is a walk through for the Badge Enabled Non Directive Enigma Routine (B.E.N.D.E.R) v2.0. Major storyline and context is left out because it's assumed you have a badge, have given up, and just want to learn WTF was going on (and we encourage you to try this stuff as well). Let this be your guide and we assume you read the previous log on how to play B.E.N.D.E.R.
North Village
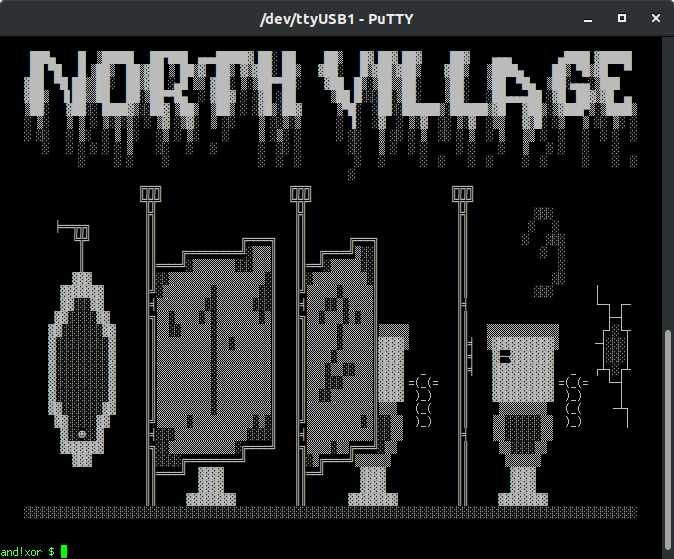
This challenge requires that the player exploit a buffer overflow to execute a command which requires root privileges to run. You are in a bathroom.

Main Puzzle
Looking at SHITTER_STALL_3 hints at the need to "flush" the toiler as it is about to "overflow" and that your gag sounds "ekoz" throughout the bathroom. EKOZ is a lulz version of ECHO and susceptible to a buffer overflow. By echoing a very long string > 24 characters, it overflows and executes the SYSTEM call command with root privileges.
and!xor $ EKOZ 123456789012345678901234 FLUSH

  With great power comes great responsibility.

  Your super 1337 badge computer executes a flush.
  Almost everything goes down the hole, except a few remaining letters: CYBERPATHOGENS
  Something must be clogged as everything begins to flow back and fill up the bowl.
Now that you know the letters in the toilet spelled out "CYBERPATHOGENS" one would think that this is the hidden password in the area that you need to yell into the GLORYHOLE
and!xor $ HACK GLORYHOLE WITH CYBERPATHOGENS
  After yelling the password you hear a faint reply...
  CONDOM...COMBO...IM...A...TEAPOT...
Now you are given a hint that the combination to the CONDOM_VENDING_MACHINE is related to "I'm a teapot," -> HTTP Status 418
and!xor $ LOOK AT CONDOM_VENDING_MACHINE
  Always play it safe, even in the apocalpyse! The dispense knob wont turn, it requires a quarter.
  However gum is jammed in the coin slot (we hope its gum).
  There's also a 3 wheel COMBO_SPINNER for maintenance.

and!xor $ HACK COMBO_SPINNER WITH 418
  The combination works, the door to the vending panel swings open, and some new l00t drops on the floor.
  North Village Hack: 15% Completion Earned
The reward loot: USB_CONDOM
Easter Egg
There is a hidden phone number in SHITTER_STALL_2 which is revealed by looking at the tagging.
and!xor $ LOOK AT SHITTER_STALL_2
  A nuclear winter toilet stall. Nothing here but a bunch of bathroom stall TAGGING.

and!xor $ LOOK AT TAGGING
4 GUD TIEM CALL 805-203-6888 YELL NAYM IN GLORYHOLECalling the phone number and listening to the voicemail plays a SSTV encoded photo. Decoding that photo is DICKBUTT.
Yelling this in to the GLORYHOLE per its instructions unlocks the easter egg points.
South Village
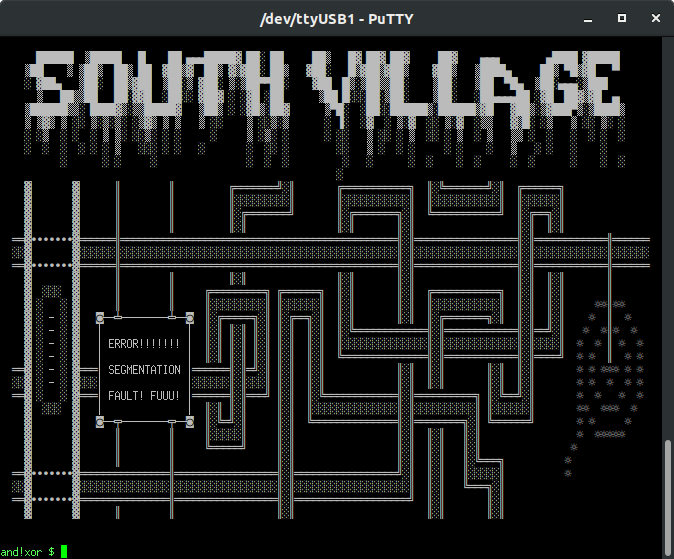
This challenge requires that the player decode a punch tape, debug the instructions, and submit a patch. You found the internet...a series of tubes...
Main Puzzle
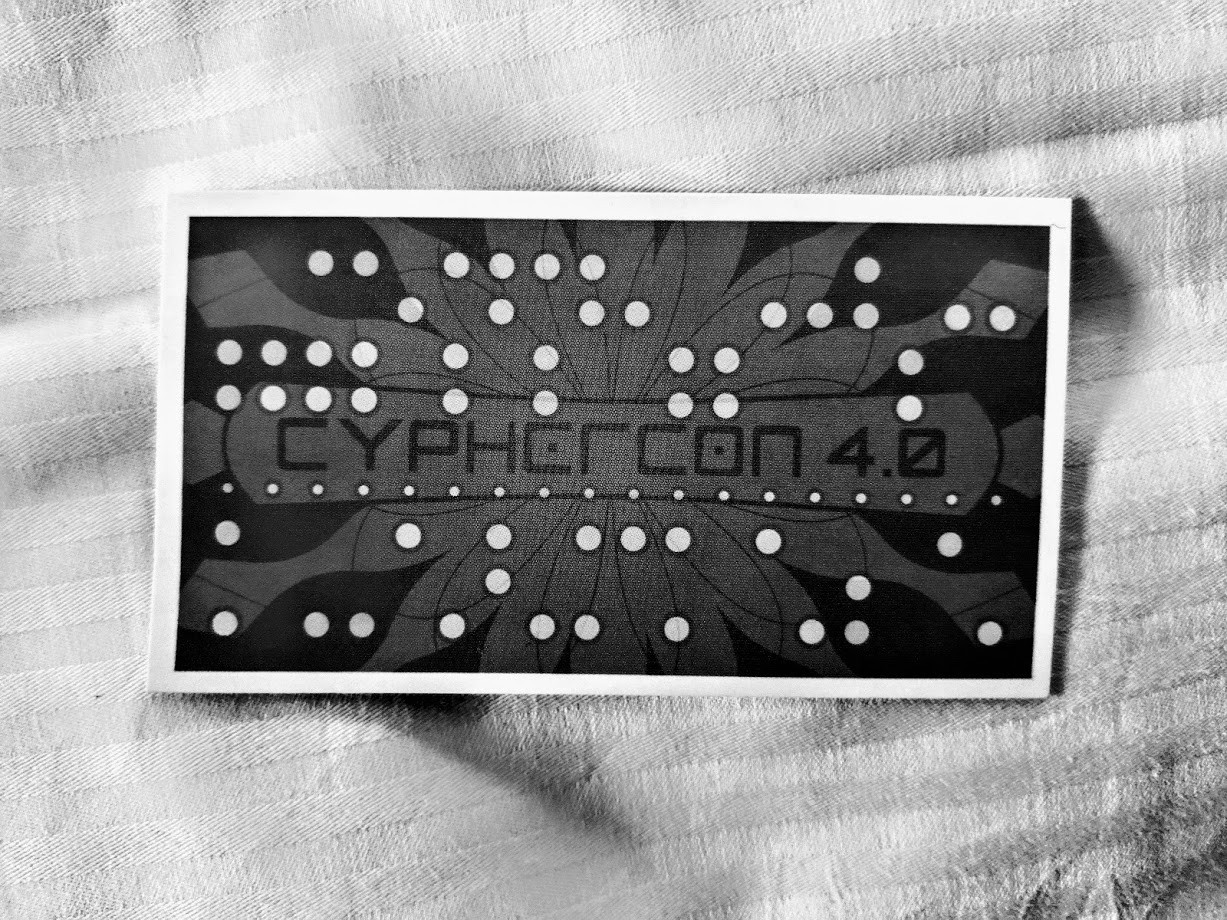
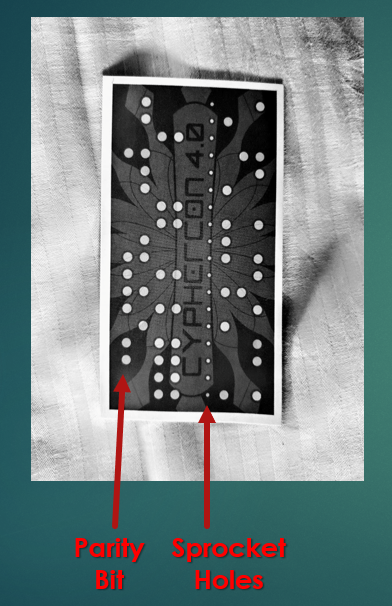
Looking at the aptly titled binder "RTFM" provides instructions on how to look at the MASTER_TAPE and how to patch. Initially the player must look at the MASTER_TAPE and decode it to determine why the TACO_NET is offline. Tip of the hat to the TyMkrs for inspiring this puzzle from CypherCon 4.0.
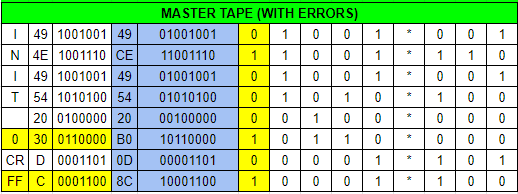
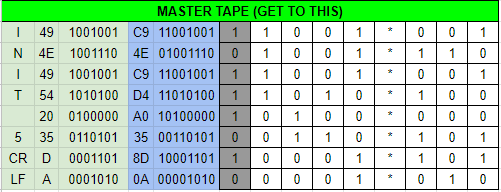
and!xor $ LOOK AT MASTER_TAPE
  Here's what your copy of the current master tape looks like...

  -^-^-^-^-^-^-
  | .O..O*..O |
  | OO..O*OO. |
  | .O..O*..O |
  | .O.O.*O.. |
  | ..O..*... |
  | O.OO.*... |
  | ....O*O.O |
  | O...O*O.. |
  -^-^-^-^-^-^-
Initially it should confuse the player given punched holes "O" are 1's on tape and dots "." are zero's. Translating this to a table, removing the parity bit, and finally to hexadecimal reveals its ASCII value.
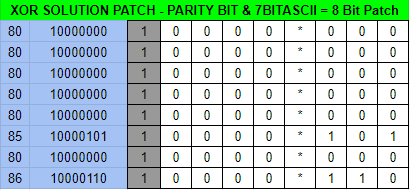
"INIT 0 CRFF" The errors are highlighted in yellow. No wonder it won't start. This needs to be changed to "INIT 5 CRLF" in addition to fixing the parity error given ASCII requires an EVEN parity; right now it is ODD which is EIA formatted. The following patch would fix this.
Ensure you have the TAPE_PUNCH first, which is obtained from the EAST_VILLAGE as a freebie item.
and!xor $ HACK PUNCH_TAPE WITH 8080808080858086
  You carefully punch your patch on a blank tape strip and submit it in to the PNEUMATIC_TUBE_SYSTEM.
  SHOOOMF! (Thats the sound pneumatic vacuum tubes make)

  -^-^-^-^-^-^-
  | O....*... |
  | O....*... |
  | O....*... |
  | O....*... |
  | O....*... |
  | O....*O.O |
  | O....*... |
  | O....*OO. |
  -^-^-^-^-^-^-

  Patiently you wait and a copy of the patched master tape is returned to you...

  -^-^-^-^-^-^-
  | OO..O*..O |
  | .O..O*OO. |
  | OO..O*..O |
  | OO.O.*O.. |
  | O.O..*... |
  | ..OO.*O.O |
  | O...O*O.O |
  | ....O*.O. |
  -^-^-^-^-^-^-

  The patch works! This machine which is the TACONET comes back to life!.
  Also a taxidermied squirrel appears wedged in the tube now...who sent that through?
  New l00t awaits you as well, for all your ancient hackery.
  South Village Hack: 15% Completion Earned
Easter Egg
The instructions say to hack the PUNCH_TAPE with the patched code. By simply hacking it with a TAPE_PUNCH and just poking holes for fun, the following happens.
and!xor $ HACK PUNCH_TAPE WITH TAPE_PUNCHEaster Egg Hack: 4% Completion Earned Look at you not following directions. Just blindly punching tape for the shit of it. Marching to the beat of your own drum...That's worth some points.East Village
This challenge requires that the player to create a hardware implant to save Joe Fitz's life. You are in a cryogenic lab.
Main Puzzle
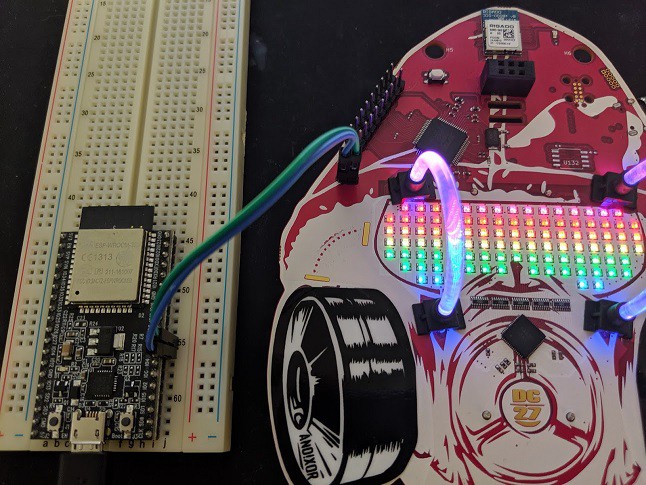
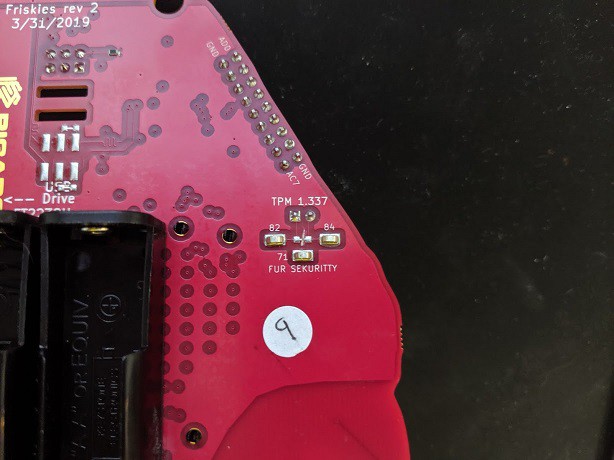
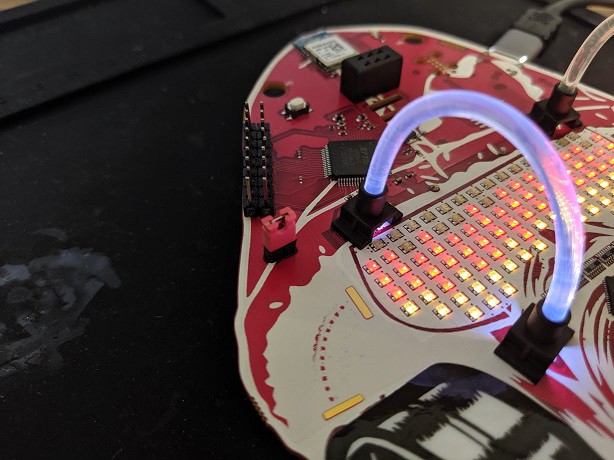
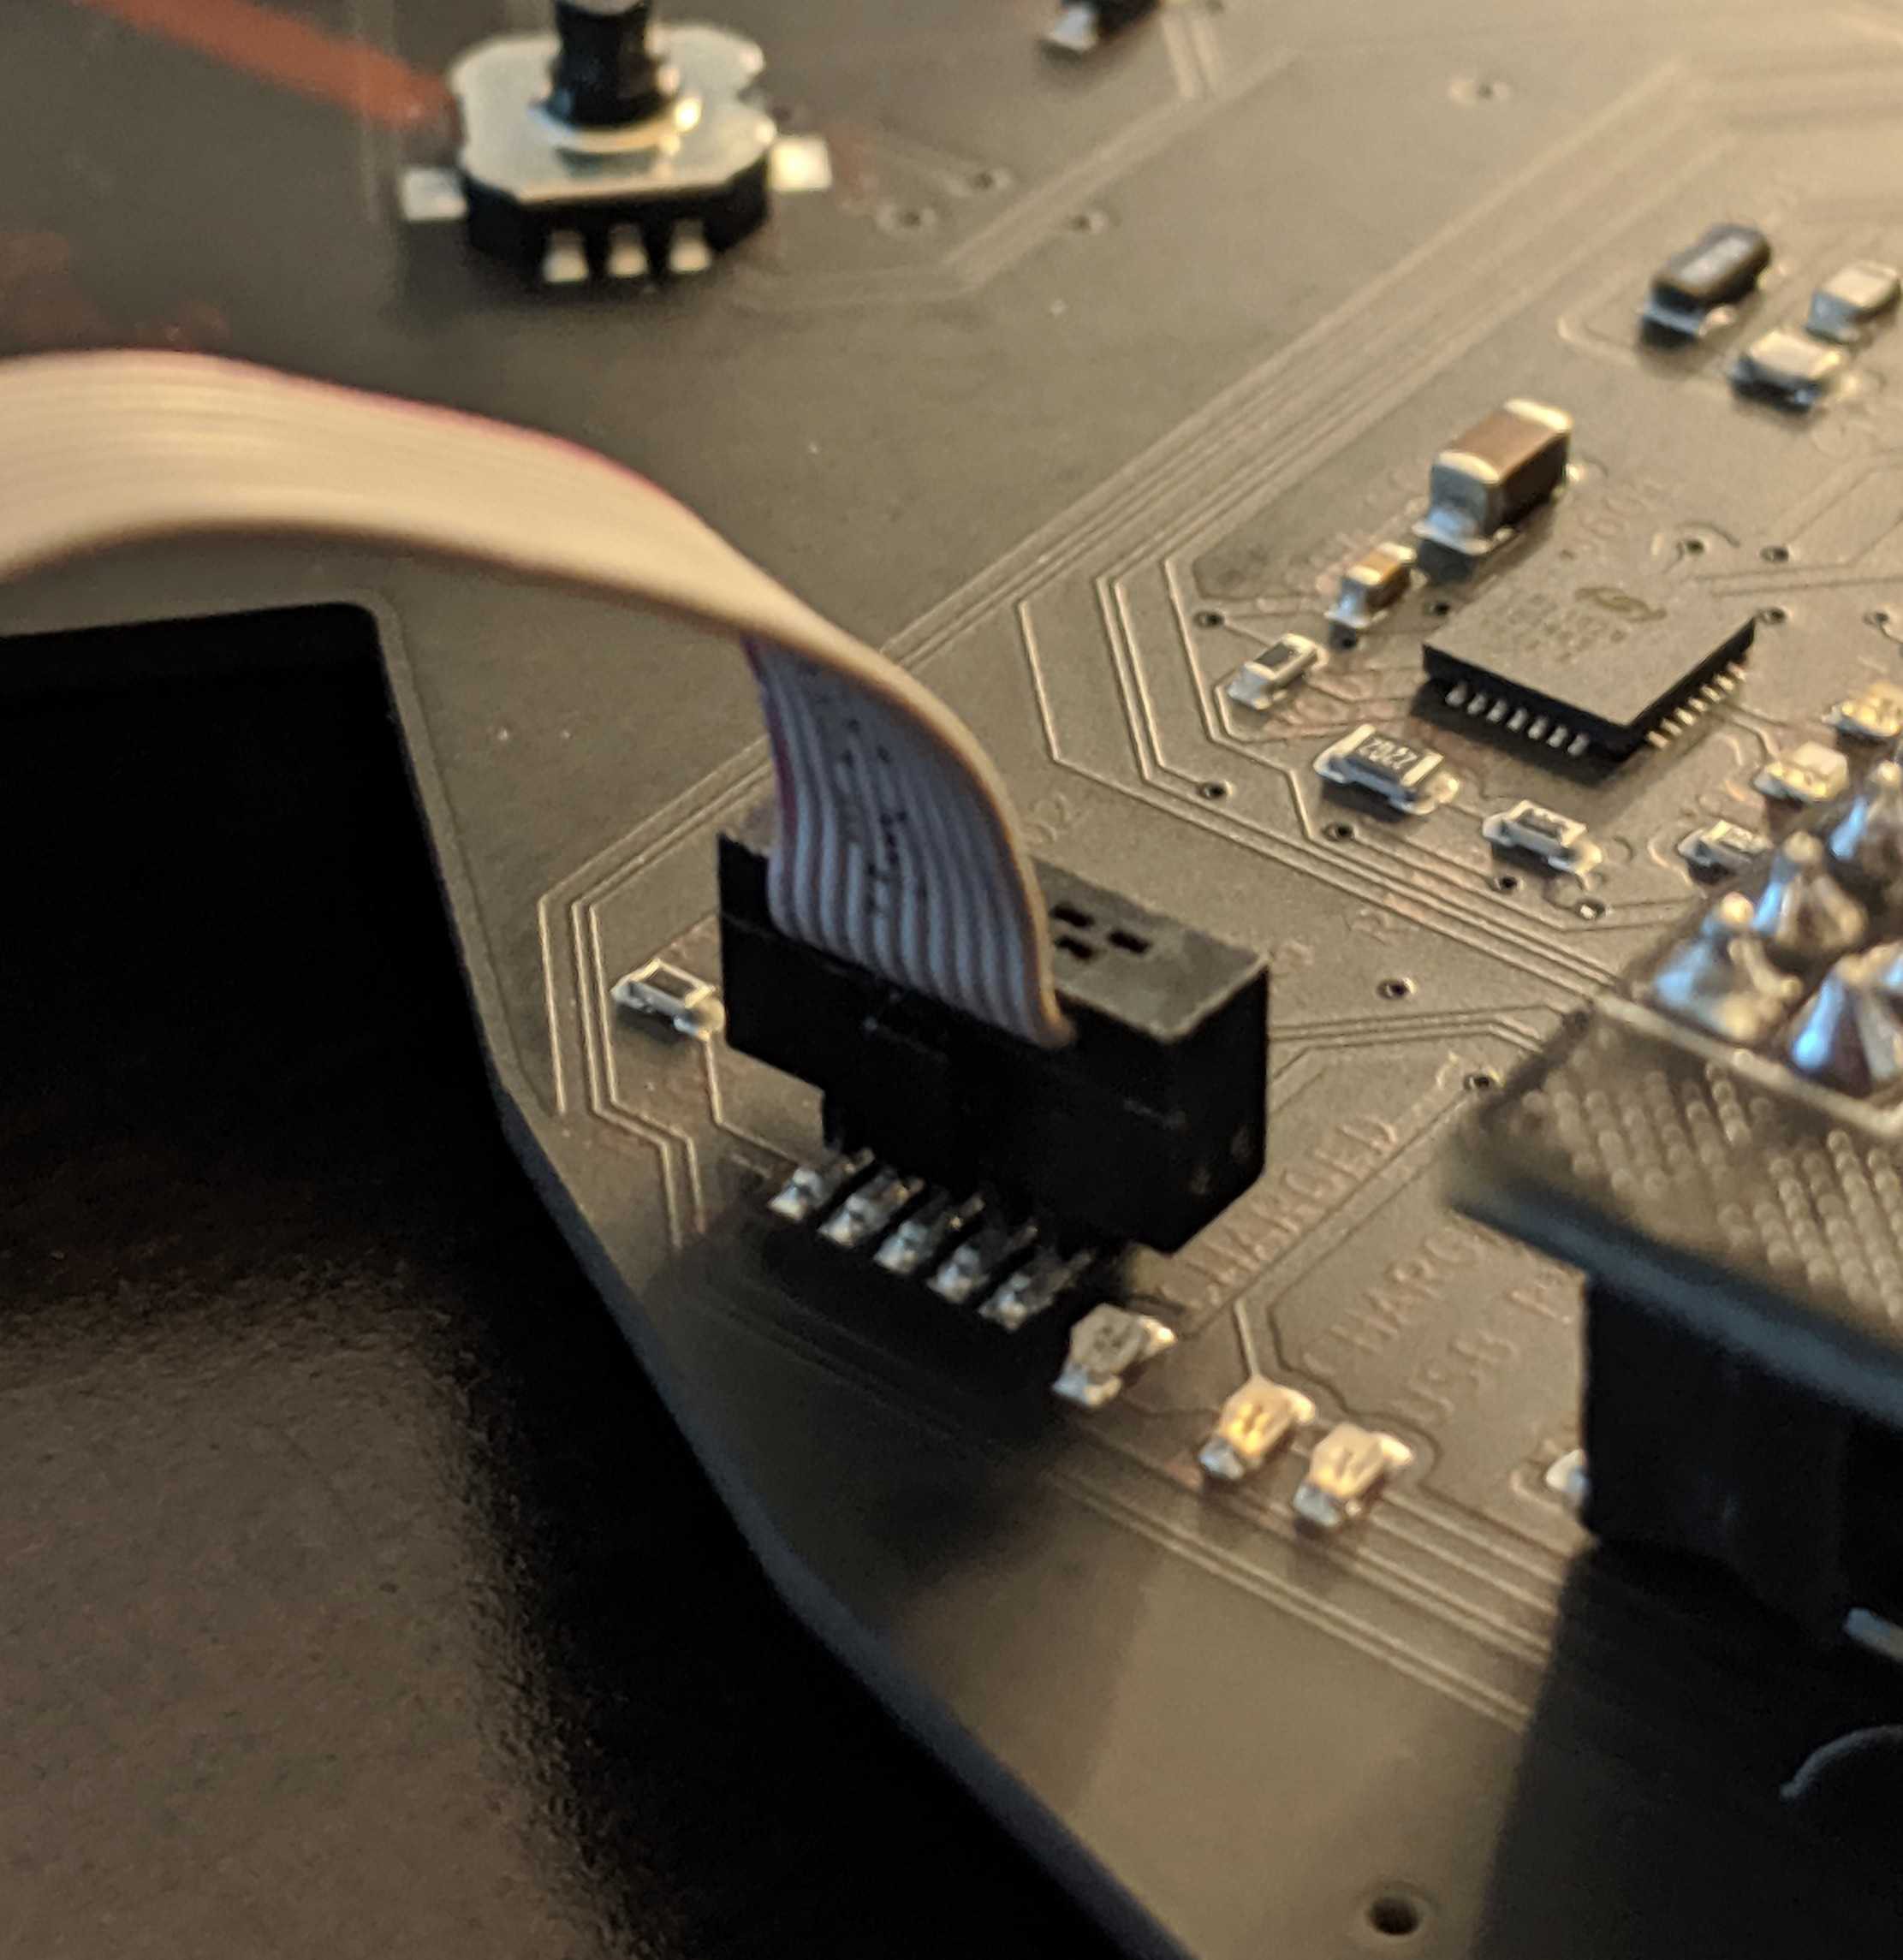
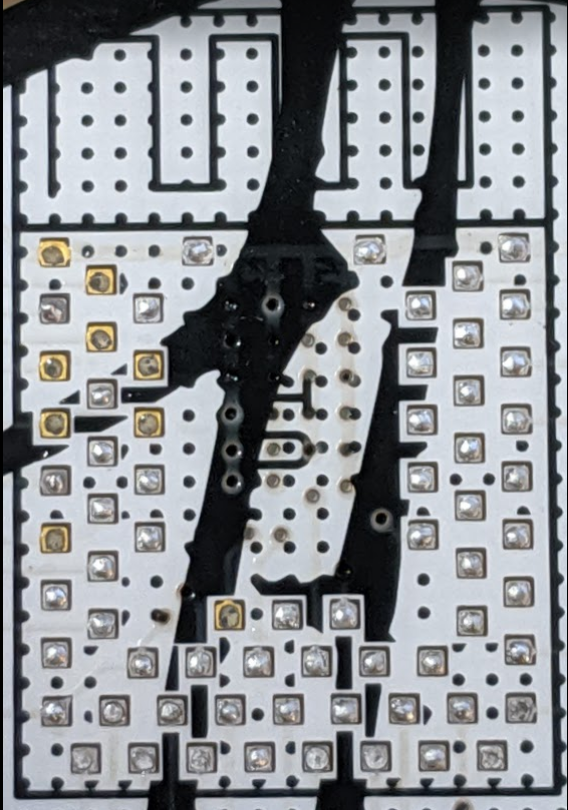
The CIRCUIT_BOARD has exposed TPM debug pinouts...and if the player has actually looked at the back of their badge... They will notice there is a TPM 1.337 for SEKURITTY; the TTY being a hint that perhaps this is all done on serial. 82 is ASCII "R" - 84 is ASCII "T" - 71 is ASCII "G" - For Tx, Rx, and GND respectively. Looking closely you can see there is a loop back net tie. This trace has to be cut with an exacto knife. Once the puzzle is complete one can solder a bridge back or put a couple male header pins with a jumper. Once the cut has been made and probes attached to the Tx, Rx, and GND lines we can proceed. In the photos below, I chose to cut the traces and solder on male header pins.
By hooking up a logic analyzer, another 3.3v debugger microcontroller (Teensy, ESP32), or FT2232, you can see the serial traffic on boot when the player hacks the reset button with their finger.
In a passive state the message across the serial line appears as follows:
TPM=1_AX3$7_From here the player should infer that TPM=1 means encryption is enabled, " _ " is a message delimiter, and "AX3$7_" is some encrypted junk on the end. From here they should make an implant to read this serial string, change TPM=1 to TPM=0 and see what happens. The following is an Arduino sketch doing such that (note I used an ESP32 and Teensy to verify since they run on 3.3V logic, a normal Arduino Uno runs 5V logic and would require a level shifter... fuck that). Essentially this is your run of the mill Arduino serial "echo" code. Only parse the Rx input and if it is of a certain value (bounded by preexisting delimiters or conditions) change it before sending it out the Tx line.
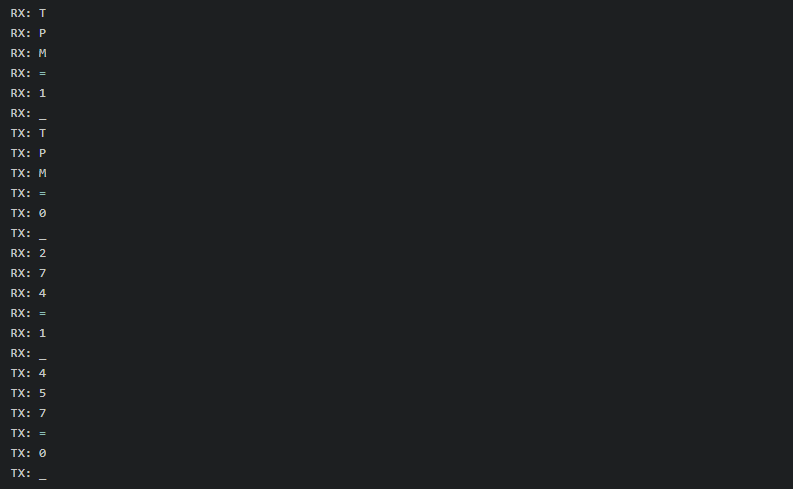
//Board = ESP32 Dev Module
#define HWSERIAL Serial1
#define RXPIN 16 //ESP32 RX Pin on Serial1
#define TXPIN 17 //ESP32 TX Pin on Serial1

int count = 0;      //For Counting how many bytes have been recieved
bool echo = false;  //For toggling pass through vs MITM implant mode
int buffer[6];      //I know all message blocks are 6 characters long

void setup() {
    Serial.begin(9600);
    HWSERIAL.begin(9600, SERIAL_8N1, RXPIN, TXPIN);
}

void loop() {
  int incomingByte; //For storing what is recieved over UART
  if(echo){ //Act as a passthrough
    if (HWSERIAL.available() > 0) {
      incomingByte = HWSERIAL.read();
      Serial.print("RX/TX: ");    //So I can watch what's going on
      Serial.println((char)incomingByte); //So I can watch what's going on
      HWSERIAL.print((char)incomingByte); //Pass through what I saw
    }
  }
  else{ //Act as a MITM implant
    if (HWSERIAL.available() > 0) {
      incomingByte = HWSERIAL.read(); //Store what was received
      Serial.print("RX: ");
      Serial.println((char)incomingByte);
      buffer[count]=incomingByte;
      count++;
      if(count == 6){ //Modify the message block
        //Turn off the TPM Module so nothing is encrypted
        if((buffer[0]==84)&&(buffer[1]==80)&&(buffer[2]==77)&&(buffer[3]==61)&&(buffer[4]==49)&&(buffer[5]==95)){
          //TPM=1_ : 84 80 77 61 49 95 / TPM=0_ : 84 80 77 61 48 95 / Enable or Disable Encryption
          buffer[4]=48; //Encryption from enabled (1) to disabled (0)
        }

        //Send the modified message block
        for(int i=0; i<6; i++){
          Serial.print("TX: ");     //So I can watch what's going on
          Serial.println((char)buffer[i]); //So I can watch what's going on
          HWSERIAL.print((char)buffer[i]); //Send the modified data
        }

        count = 0; //reset the counter
      }
    }
  }
}
Once doing this we can now see the serial message, with TPM off, and the serial traffic in full flavor.
TPM=0_274=1_So now we see the encrypted messaged means 274=1, but WTF does that mean? By typing "look at HOOMAHN_FITZY" it is explained that he drew a figure 8 on the glass. That is a hint at the ANSI art blinky lights on the cryogenic chambers are identified in Octal.
The octal under the taco translates to 274. Fitzy translates to 457. At this point the player has many implant options. Set 274=0 and thaw the taco. Set 457=0 and save Joe's life. How about 457=1? I'll save these alternate endings for the devoted player to hack and find out, for now lets free Mr. Fitz.
//Board = ESP32 Dev Module
#define HWSERIAL Serial1
#define RXPIN 16 //ESP32 RX Pin on Serial1
#define TXPIN 17 //ESP32 TX Pin on Serial1

int count = 0;      //For Counting how many bytes have been received
bool echo = false;  //For toggling pass through vs MITM implant mode
int buffer[6];      //I know all message blocks are 6 characters long

void setup() {
    Serial.begin(9600);
    HWSERIAL.begin(9600, SERIAL_8N1, RXPIN, TXPIN);
}

void loop() {
  int incomingByte; //For storing what is recieved over UART
  if(echo){ //Act as a passthrough
    if (HWSERIAL.available() > 0) {
      incomingByte = HWSERIAL.read();
      Serial.print("RX/TX: ");    //So I can watch what's going on
      Serial.println((char)incomingByte); //So I can watch what's going on
      HWSERIAL.print((char)incomingByte); //Pass through what I saw
    }
  }
  else{ //Act as a MITM implant
    if (HWSERIAL.available() > 0) {
      incomingByte = HWSERIAL.read(); //Store what was recieved
      Serial.print("RX: ");
      Serial.println((char)incomingByte);
      buffer[count]=incomingByte;
      count++;
      if(count == 6){ //Modify the message block
        //Turn off the TPM Module so nothing is encrypted
        if((buffer[0]==84)&&(buffer[1]==80)&&(buffer[2]==77)&&(buffer[3]==61)&&(buffer[4]==49)&&(buffer[5]==95)){
          //TPM=1_ : 84 80 77 61 49 95 / TPM=0_ : 84 80 77 61 48 95 / Enable or Disable Encryption
          buffer[4]=48; //Encryption from enabled (1) to disabled (0)
        }
        if((buffer[0]==50)&&(buffer[1]==55)&&(buffer[2]==52)&&(buffer[3]==61)&&(buffer[4]==49)&&(buffer[5]==95)){
          //274=1_ : 50 55 52 61 49 95 / Freeze the Taco (current state, nothing happens its already frozen)
          //Modify nothing - The computer resets nothing happens

          /*
          //274=0_ : 50 55 52 61 48 95 / Free the Taco
          buffer[4]=48;
          */

          /*
          //457=1_ : 52 53 55 61 49 95 / Freeze the Fitz
          buffer[0]=52;
          buffer[1]=53;
          buffer[2]=55;
          //No need to change buffer[3] since it is "=" (61)
          buffer[4]=49;
          buffer[5]=95;
          */

          //457=0_ : 52 53 55 61 48 95 / Free the Fitz (Lets do this)
          buffer[0]=52;
          buffer[1]=53;
          buffer[2]=55;
          //No need to change buffer[3] since it is "=" (61)
          buffer[4]=48;
          buffer[5]=95;
        }

        //Send the modified message block
        for(int i=0; i<6; i++){
          Serial.print("TX: ");     //So I can watch what's going on
          Serial.println((char)buffer[i]); //So I can watch what's going on
          HWSERIAL.print((char)buffer[i]); //Send the modified data
        }

        count = 0; //reset the counter
      }
    }
  }
}
Running this now results in the following on the serial line. Note that RX signifies what was received by the implant and TX is what our implant sent.
And the grand finale...
and!xor $ HACK RESET_BUTTON WITH FINGER
  The computer resets. Something happens...
  The HOOMAHN_FITZY pod opens and Joe is released.
  High fives for celebration but he doesn't want to stick around. Would you?
  Before he leaves he tapes up a photo of himself in the pod window to trick his captors...
  Why does he keep life size photos of his face? Dunno but it works out.
  Joe tosses a care package for your troubles on the ground and then bolts.
  East Village Hack: 15% Completion Earned
Finally, we can close the circuit with a jumper (to be clean about it) or solder the net tie bridge on the back of the badge which was cut. I chose the jumper. FWIW I technically did not need an extra micro-controller. I could have used the FT2232 and written a program in C or Python to do the same thing. I was lazy and re-used implant code I already had written on Arduino. Want to help me out? Post the code using the FTDI with PyFTDI library or in C, I'll buy you a beer.
Alternatively, if you had a DOOM SAO, the same can be achieved by using the code within the custom application section. Also given the hints that the DOOM SAO can be used for Serial and I2C bus passive and active hacking... go with it! Note, when writing this I realized the spelling error in the DOOM SAO code "...appliaction()" I could do a pull request to fix it. Or I could leave it to the community to fix it. Given its Arduino code, it's expected to leave shit in the wild.
The Doom SAO Github Link: https://github.com/LonghornEngineer/DOOM_SAO
void mode_5_custom_appliaction()
{
  // TODO - This section is for others to add their own code for custom functionality
  if(menu_display_5)
  {
    SerialUSB.println("**Hardware Implant Mode**");
    SerialUSB.println("Connect the source's serial TX to the SAO RX Pin PB23");
    SerialUSB.println("Connect the target's serial RX to the SAO TX Pin PB22");
    SerialUSB.println("Press Q to quit back to the main menu.\n");
    menu_display_5 = false; //this prevents infinite printing of the menu in loop
  }

  //Enable Serial
  if(!sao_serial_baud_selection){
    SAOSERIAL.begin(9600);
    sao_serial_baud_selection = true;
  }

  int implant_incoming_byte; //For storing what is recieved over PB23

  if (SAOSERIAL.available() > 0) {
    implant_incoming_byte = SAOSERIAL.read(); //Store what was recieved
    SerialUSB.print("RX: ");
    SerialUSB.println((char)implant_incoming_byte);
    buffer[count]=implant_incoming_byte;
    count++;

    if(count == 6){ //Modify the message block
      //Turn off the TPM Module so nothing is encrypted
      if((buffer[0]==84)&&(buffer[1]==80)&&(buffer[2]==77)&&(buffer[3]==61)&&(buffer[4]==49)&&(buffer[5]==95)){
        //TPM=1_ : 84 80 77 61 49 95 / TPM=0_ : 84 80 77 61 48 95 / Enable or Disable Encryption
        buffer[4]=48; //Encryption from enabled (1) to disabled (0)
      }
      if((buffer[0]==50)&&(buffer[1]==55)&&(buffer[2]==52)&&(buffer[3]==61)&&(buffer[4]==49)&&(buffer[5]==95)){
        /*
        //274=1_ : 50 55 52 61 49 95 / Freeze the Taco (nothing happens)

        //274=0_ : 50 55 52 61 48 95 / Free the Taco (game over)
        buffer[4]=48;

        //457=1_ : 52 53 55 61 49 95 / Freeze the Fitz (game over)
        buffer[0]=52;
        buffer[1]=53;
        buffer[2]=55;
        buffer[3]=61;
        buffer[4]=49;
        buffer[5]=95;
        */

        //457=0_ : 52 53 55 61 48 95 / Free the Fitz (you win)
        buffer[0]=52;
        buffer[1]=53;
        buffer[2]=55;
        buffer[3]=61;
        buffer[4]=48;
        buffer[5]=95;
      }
      //Send the modified message block
      for(int i=0; i<6; i++){
        SerialUSB.print("TX: ");     //So I can watch what's going on
        SerialUSB.println((char)buffer[i]); //So I can watch what's going on
        SAOSERIAL.print((char)buffer[i]); //Send the modified data
      }
      count = 0; //reset the counter
    }
  }
}
Easter Egg
There is a small debugging breakout on the CIRCUIT_BOARD about the size of a grain of rice.
The player needs to hack it with the GRAIN_OF_RICE they obtained in the West Village brewery.and!xor $ HACK CIRCUIT_BOARD WITH GRAIN_OF_RICEEaster Egg Hack: 4% Completion Earned Slipping the tiny grain of rice on to the circuit board easily looks like a hardware implant. Functionally...it does nothing...Might as well publish a story about it.West Village
This challenge requires that the player reverse engineer a binary, break the hash, and hack a license file together to activate the brewery software. You are in a craft beer brewery.
Main Puzzle
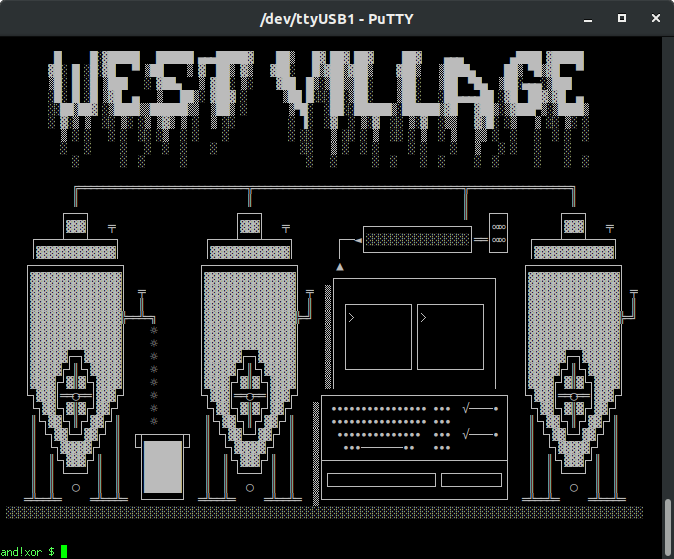
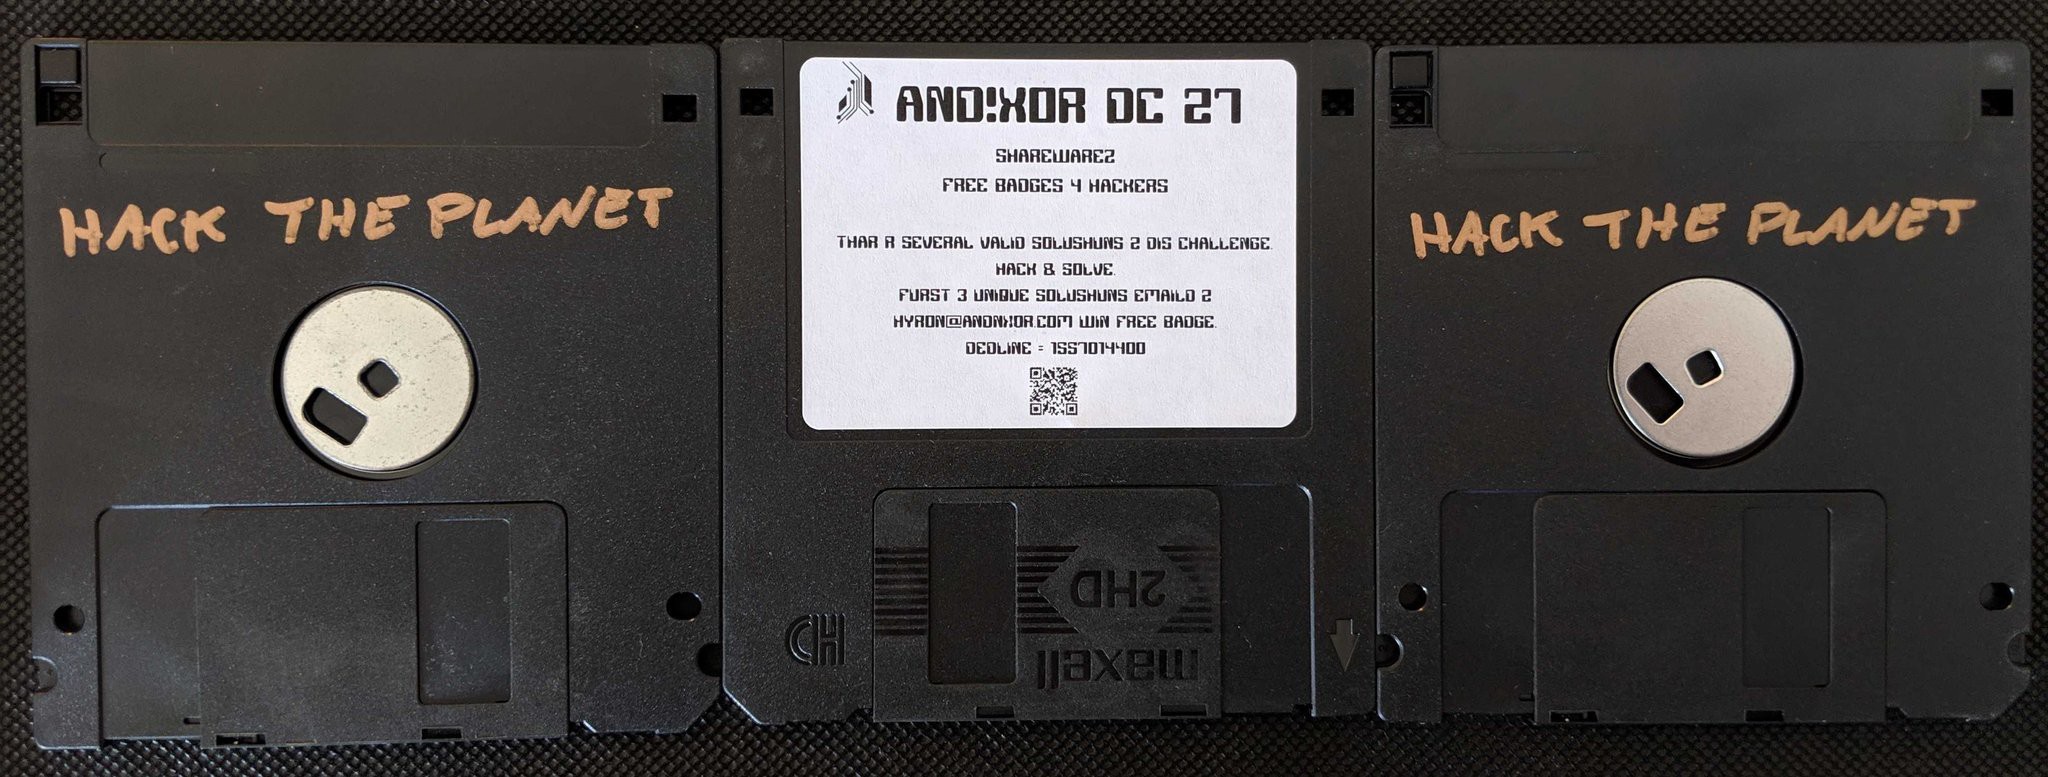
Initially the computer is offline, looking for a FLOPPY_DISK to boot from (obtained from North Village); doing this will provide easter egg points. Once bringing the computer online, the following is learned by looking at the MONITOR_1:
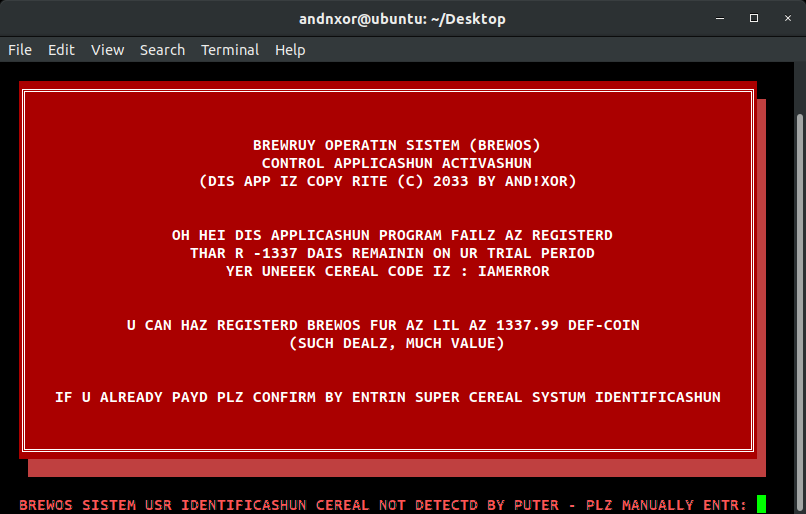
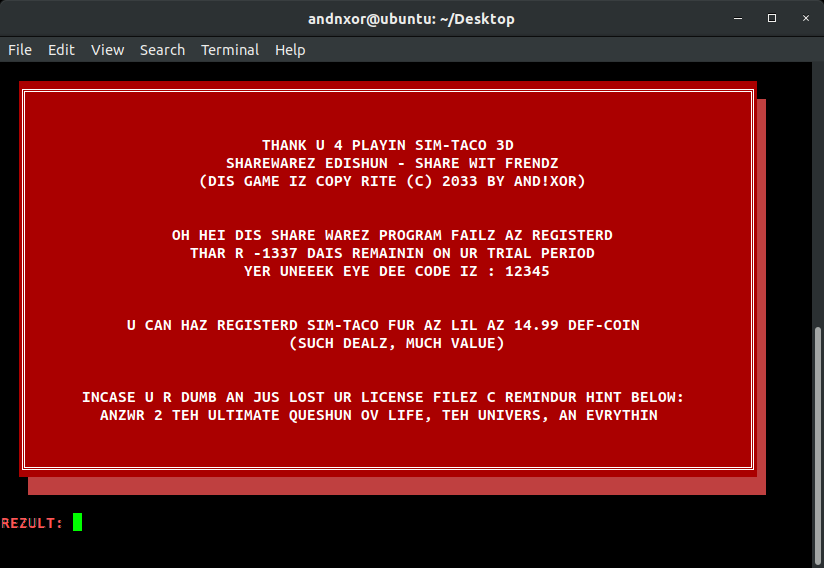
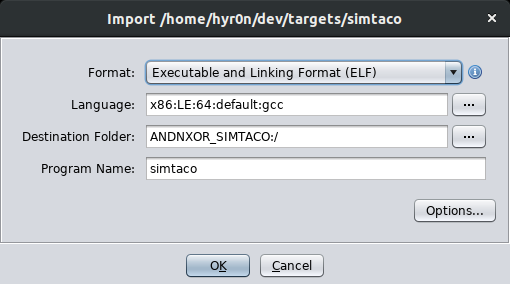
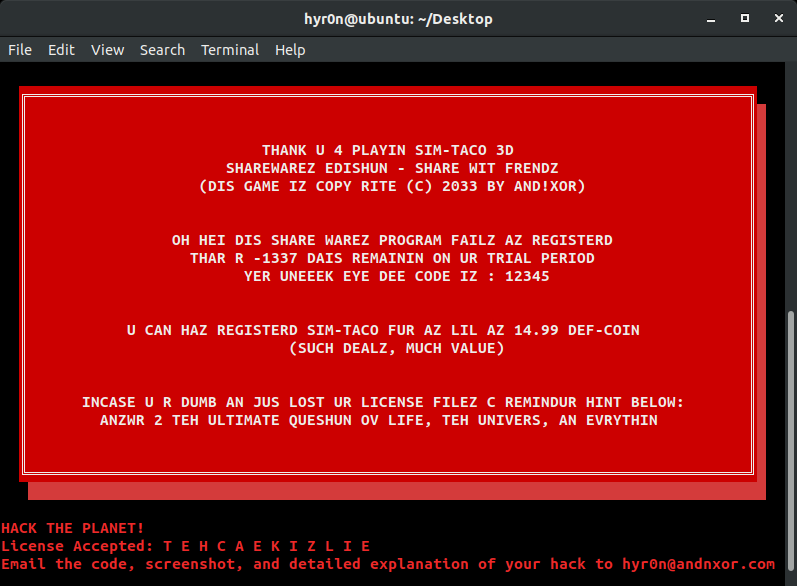
and!xor $ LOOK AT MONITOR_1
  Looking at the first monitor, all you see is the message ACTIVATION FAILED.
  You quickly pound out a pwd and check the logs to find: hbs@linux~$ /var/log/brewOS
  It was sent off site somewhere, but it has a link: http://bit.ly/2HWwd7z
  With that file, you could surely figure out the license key and hack the KEYBOARD with it...right?
  All this brewery is making you b00ze hangry. You just want to NOM on delicious craft brew...
Going to http://bit.ly/2HWwd7z downloads a binary "brewOS - Once executing the program the following is displayed:
If the player read the Hackaday Manual on the system commands, they would hopefully notice the key hints of: CEREAL, SYSTUM... By looking up their unique badge serial number via the CLI they can then input that in to brewOS. The following is only applicable to Hyr0n's development badge and makes this puzzle unique per each badge as the activation code only works with a salted hash of the serial number.
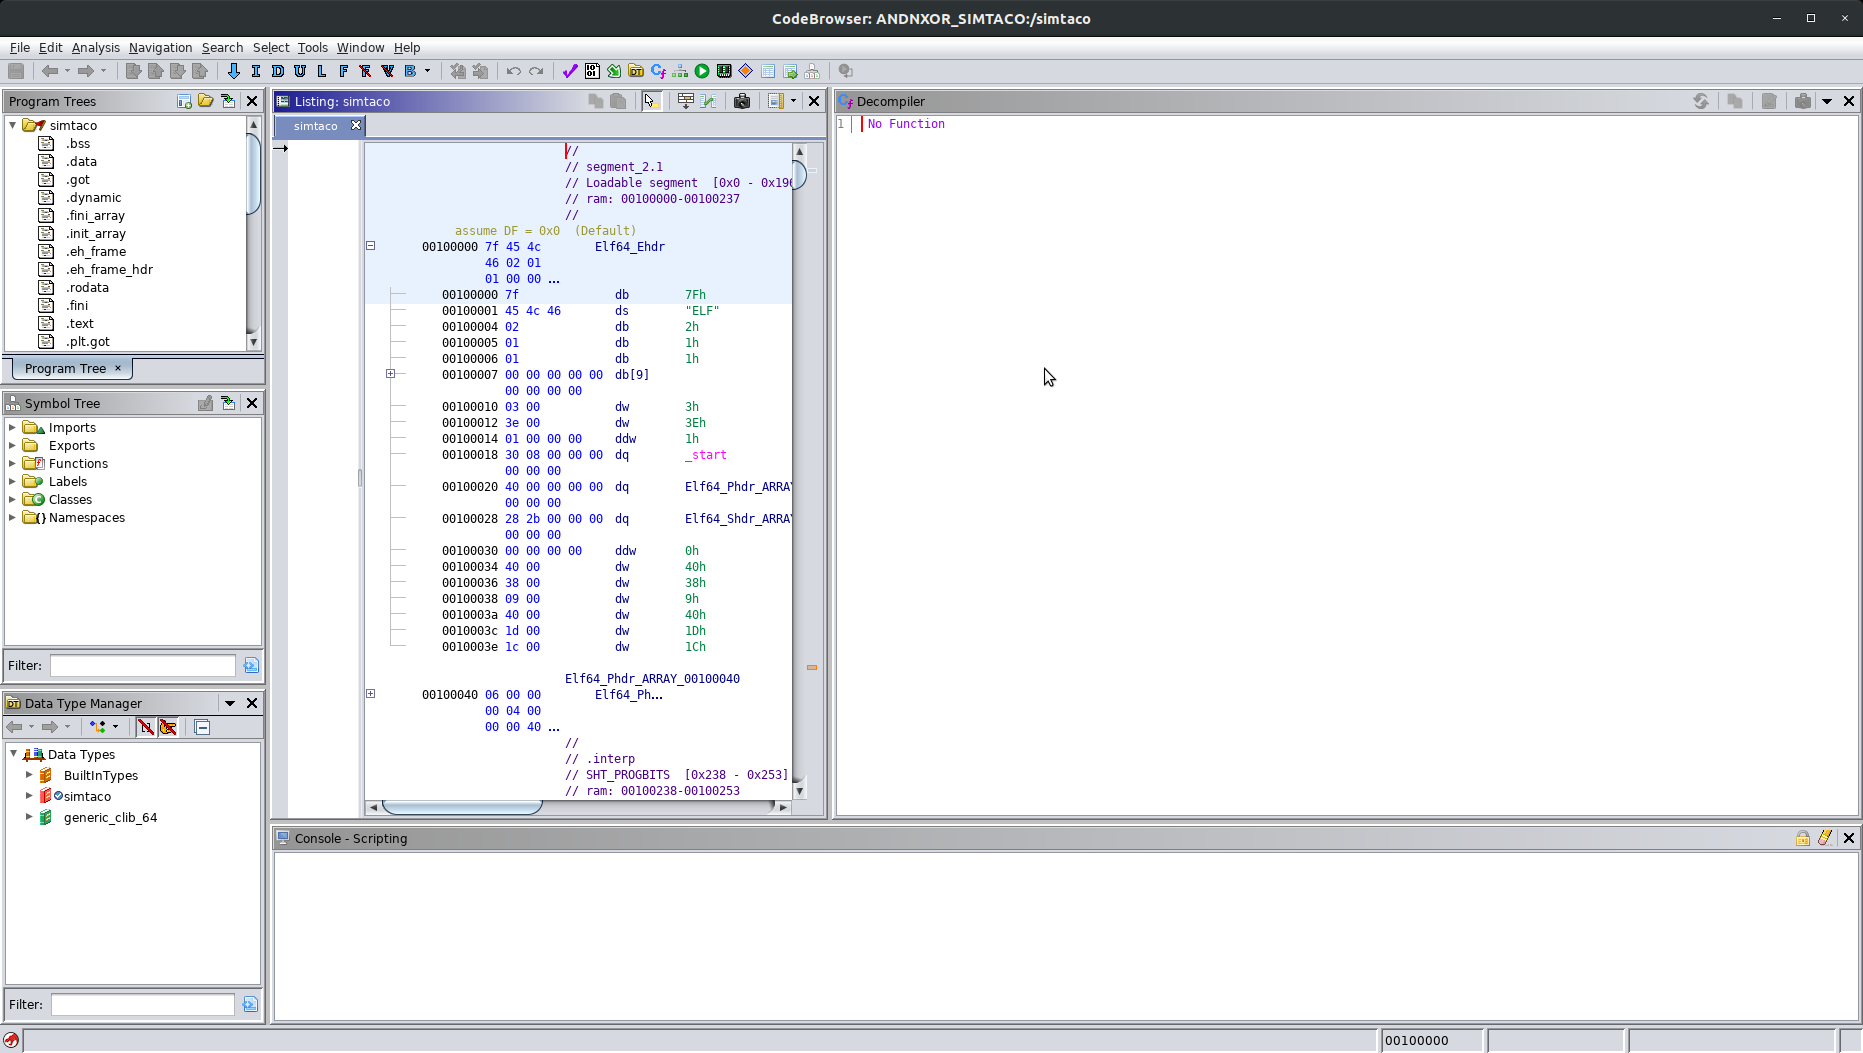
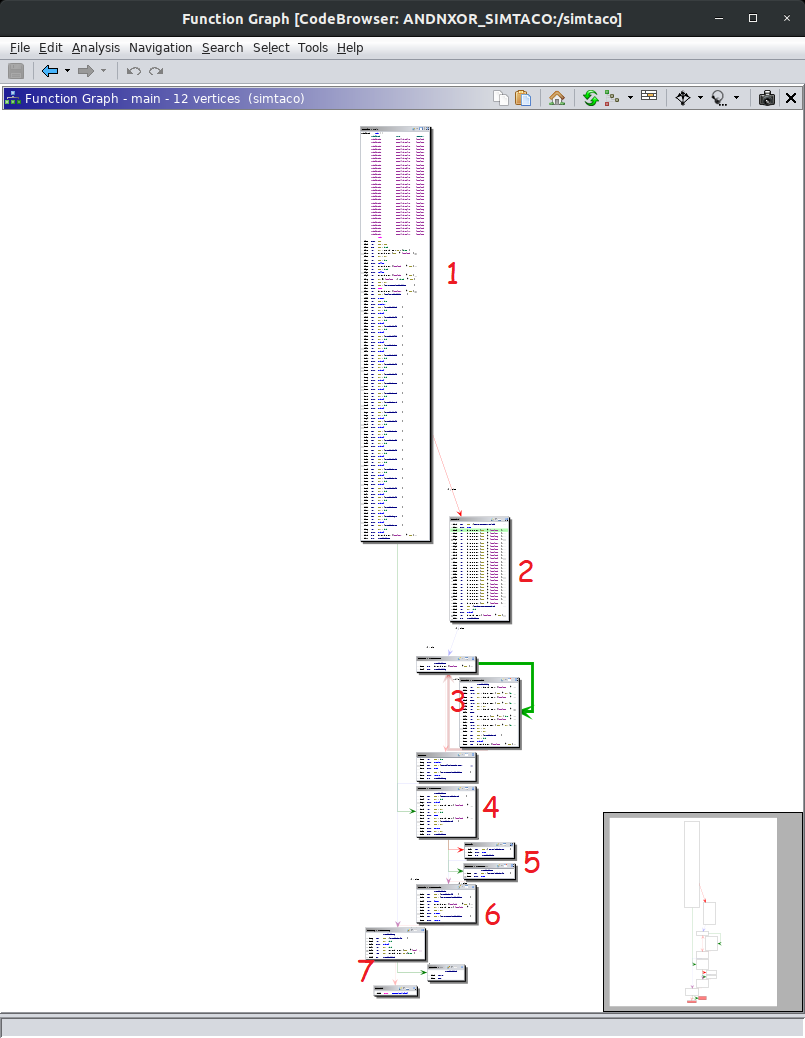
and!xor $ SYSTUM CEREAL
0x29090bbdc1cf4488
Removing the "0x" we know that in this case, the unique system serial number is "29090bbdc1cf4488" Now it's time to get our hands dirty and fire up your RE tool of choice, we will use Ghidra. We wrote a very detailed post on using Ghidra with our CypherCon free badge challenge, use that for reference in setting up and running with your environment. Once the file has been loaded, lets focus on the decompiled (not disassembled) since it is pretty straight forward. Looking through the code and annotating the control flow graph, we see the following...
Essentially the program does the following
- Display splash screen & declare variables
- Get the user id as input from the user
- Generate a string using Hyr0n's handy dandy string dump obfuscation
- Concatenate the input with another string on the end
- Run an MD5 hash on the new string
- Open a hidden license file ".license_cache"
- If the contents of the license file match the salted user id, it tells you that its activated
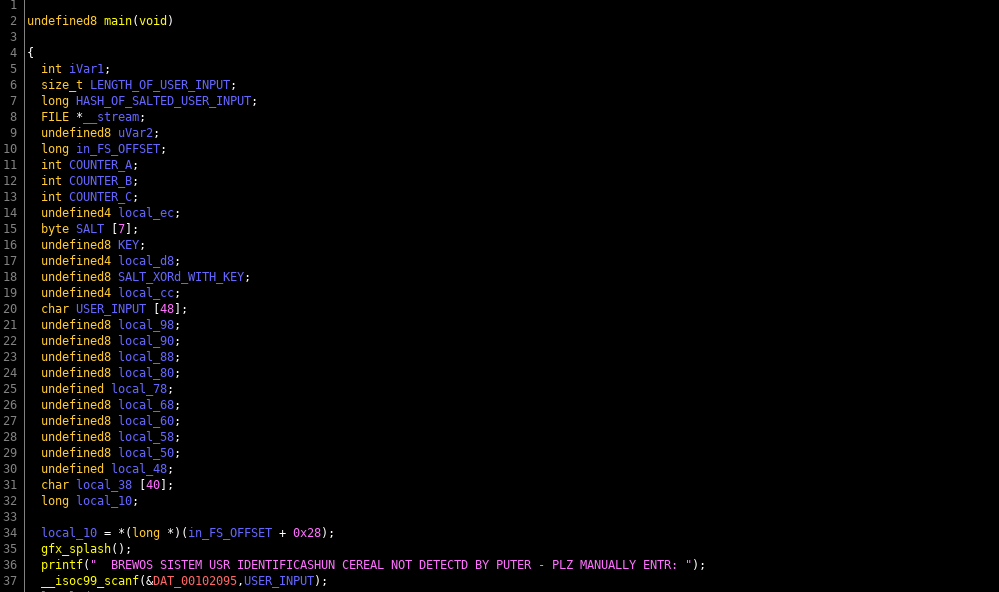
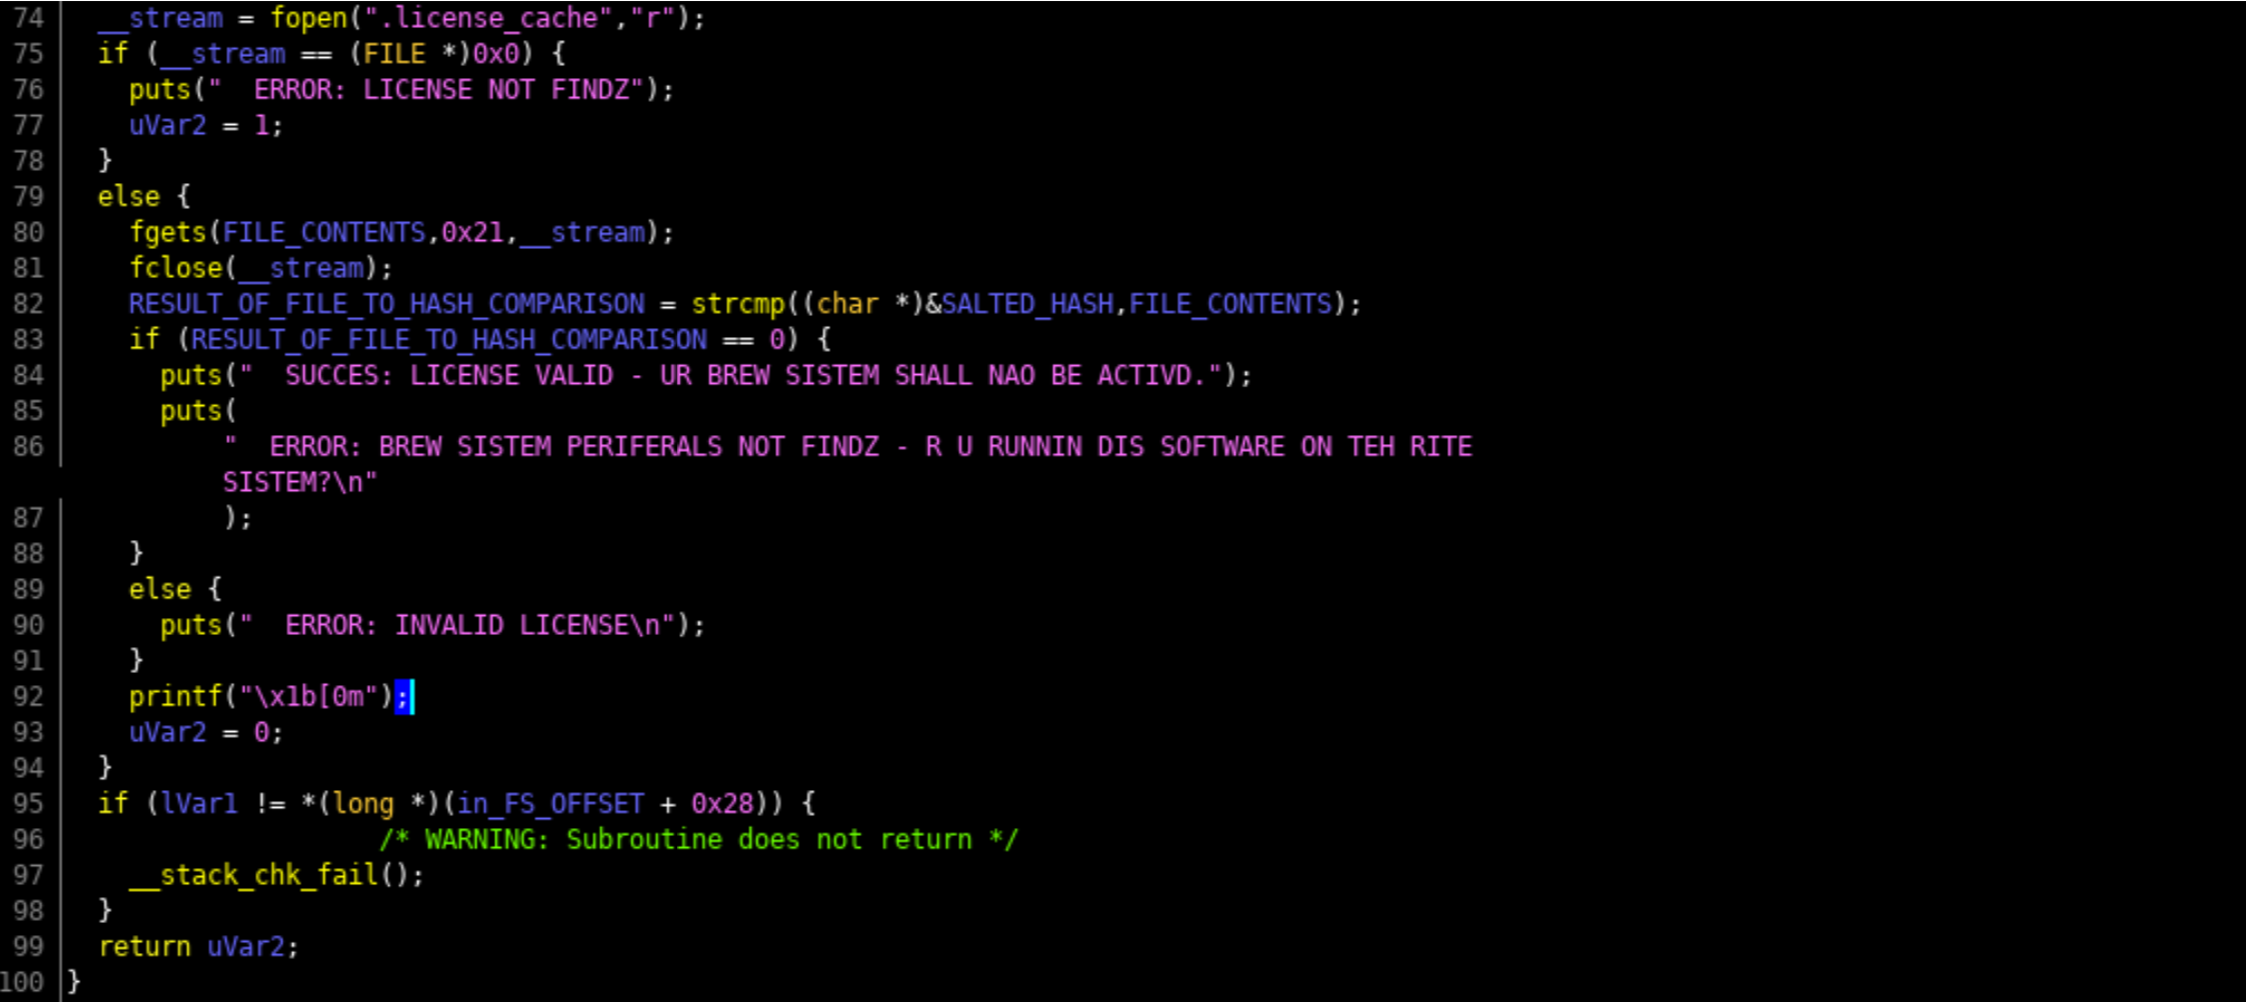
For reference here is a copy pasta of the decompiled code to follow along with...I heart Ghidra.
undefined8 main(void)

{
  int iVar1;
  size_t sVar2;
  long lVar3;
  FILE *__stream;
  undefined8 uVar4;
  long in_FS_OFFSET;
  int local_11c;
  int local_118;
  int local_114;
  undefined4 local_ec;
  byte local_e7 [7];
  undefined8 local_e0;
  undefined4 local_d8;
  undefined8 local_d4;
  undefined4 local_cc;
  char local_c8 [48];
  undefined8 local_98;
  undefined8 local_90;
  undefined8 local_88;
  undefined8 local_80;
  undefined local_78;
  undefined8 local_68;
  undefined8 local_60;
  undefined8 local_58;
  undefined8 local_50;
  undefined local_48;
  char local_38 [40];
  long local_10;

  local_10 = *(long *)(in_FS_OFFSET + 0x28);
  gfx_splash();
  printf("  BREWOS SISTEM USR IDENTIFICASHUN CEREAL NOT DETECTD BY PUTER - PLZ MANUALLY ENTR: ");
  __isoc99_scanf(&DAT_00102095,local_c8);
  local_d8 = 0;
  local_e0 = 0x4b4338514b53;
  local_cc = 0;
  local_d4 = 0x190668010e03;
  local_11c = 0;
  while (local_11c < 6) {
    local_e7[(long)local_11c] =
         *(byte *)((long)&local_e0 + (long)local_11c) ^ *(byte *)((long)&local_d4 + (long)local_11c)
    ;
    local_11c = local_11c + 1;
  }
  strcat(local_c8,(char *)local_e7);
  local_98 = 0;
  local_90 = 0;
  local_88 = 0;
  local_80 = 0;
  local_78 = 0;
  local_68 = 0;
  local_60 = 0;
  local_58 = 0;
  local_50 = 0;
  local_48 = 0;
  sVar2 = strlen(local_c8);
  lVar3 = md5(local_c8,sVar2 & 0xffffffff,sVar2 & 0xffffffff);
  local_118 = 0;
  while (local_118 < 4) {
    local_ec = *(undefined4 *)(lVar3 + (long)local_118 * 4);
    local_114 = 0;
    while (local_114 < 4) {
      sprintf((char *)&local_68,"%02x",(ulong)*(byte *)((long)&local_ec + (long)local_114));
      strcat((char *)&local_98,(char *)&local_68);
      local_114 = local_114 + 1;
    }
    local_118 = local_118 + 1;
  }
  __stream = fopen(".license_cache","r");
  if (__stream == (FILE *)0x0) {
    puts("  ERROR: LICENSE NOT FINDZ");
    uVar4 = 1;
  }
  else {
    fgets(local_38,0x21,__stream);
    fclose(__stream);
    iVar1 = strcmp((char *)&local_98,local_38);
    if (iVar1 == 0) {
      puts("  SUCCES: LICENSE VALID - UR BREW SISTEM SHALL NAO BE ACTIVD.");
      puts(
          "  ERROR: BREW SISTEM PERIFERALS NOT FINDZ - R U RUNNIN DIS SOFTWARE ON TEH RITESISTEM?\n"
          );
    }
    else {
      puts("  ERROR: INVALID LICENSE\n");
    }
    printf("\x1b[0m");
    uVar4 = 0;
  }
  if (local_10 != *(long *)(in_FS_OFFSET + 0x28)) {
                    /* WARNING: Subroutine does not return */
    __stack_chk_fail();
  }
  return uVar4;
}
So let's dig into how you actually look at decompiled code and figure this out (jump to function MAIN). You may see variable names change because as you figure out roughly what variables are used for, you should ALWAYS CHANGE THEIR NAME TO MAKE SENSE OF IT ALL. ALWAYS. DO THIS. Or don's.
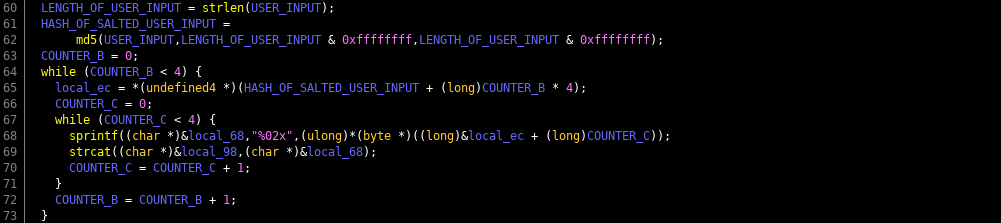
1. Display splash screen & declare variables
2. Get the user id as input from the user
This is pretty straight forward, if you've every programmed, there's not much to explain here. And if you've never programmed in C or C++... RE of binaries is going to be drinking from a fire hose. Learn the basics of software synthesis, before you jump into software analysis.
3. Generate a string using Hyr0n's handy dandy string dump obfuscation
4. Concatenate the input with another string on the end
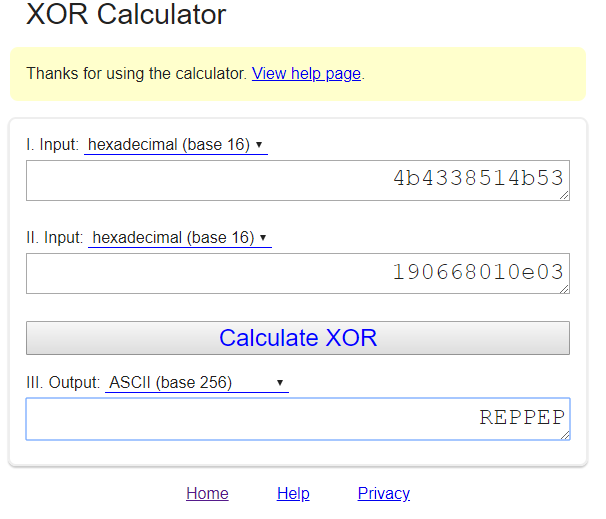
Again if you read the earlier post you know I'm against cheap tricks like running string dumps on a binary. Its super useful, just not for our puzzles really. The basics are like this, instead of having a hidden key as a string, create an array of numbers of your key in ASCII. Then XOR it out of band and make a second "encrypted" message, repeat and change it to ASCII integer values. Then when you need your private key in code all you have to do is XOR ^ the cell of both arrays with one another, and it will decode the message. This is not real encryption, its a cheap obfuscation technique to thwart string dumps. In general you should never put a private key in code. But this is a puzzle, so its okay. So why are we taking this an concatenating it on the end of the user input...it's salt. Always salt your hashes. Only what's super interesting here is compiler optimization. You would have thought that my two arrays would also be arrays in the code. We'll the compiler was like "fuck that" and converted them in to two QWORDS (64 bit unsigned integers) and their values are shown in hex. Be careful, because when you go from integer arrays (which are easy for people to read) into QWORDS (which are easy for computers to read), endianness comes in to play. Specifically little endianness. Seeing as this is denoted with hex, use a quick online HEX XOR tool and see what happens.
Since it was converted to little endian, displaying the XOR result in ASCII looks backwards, the message I intended we use as hash salt is "PEPPER" (I'm a god damn riot).
5. Run an MD5 hash on the new string
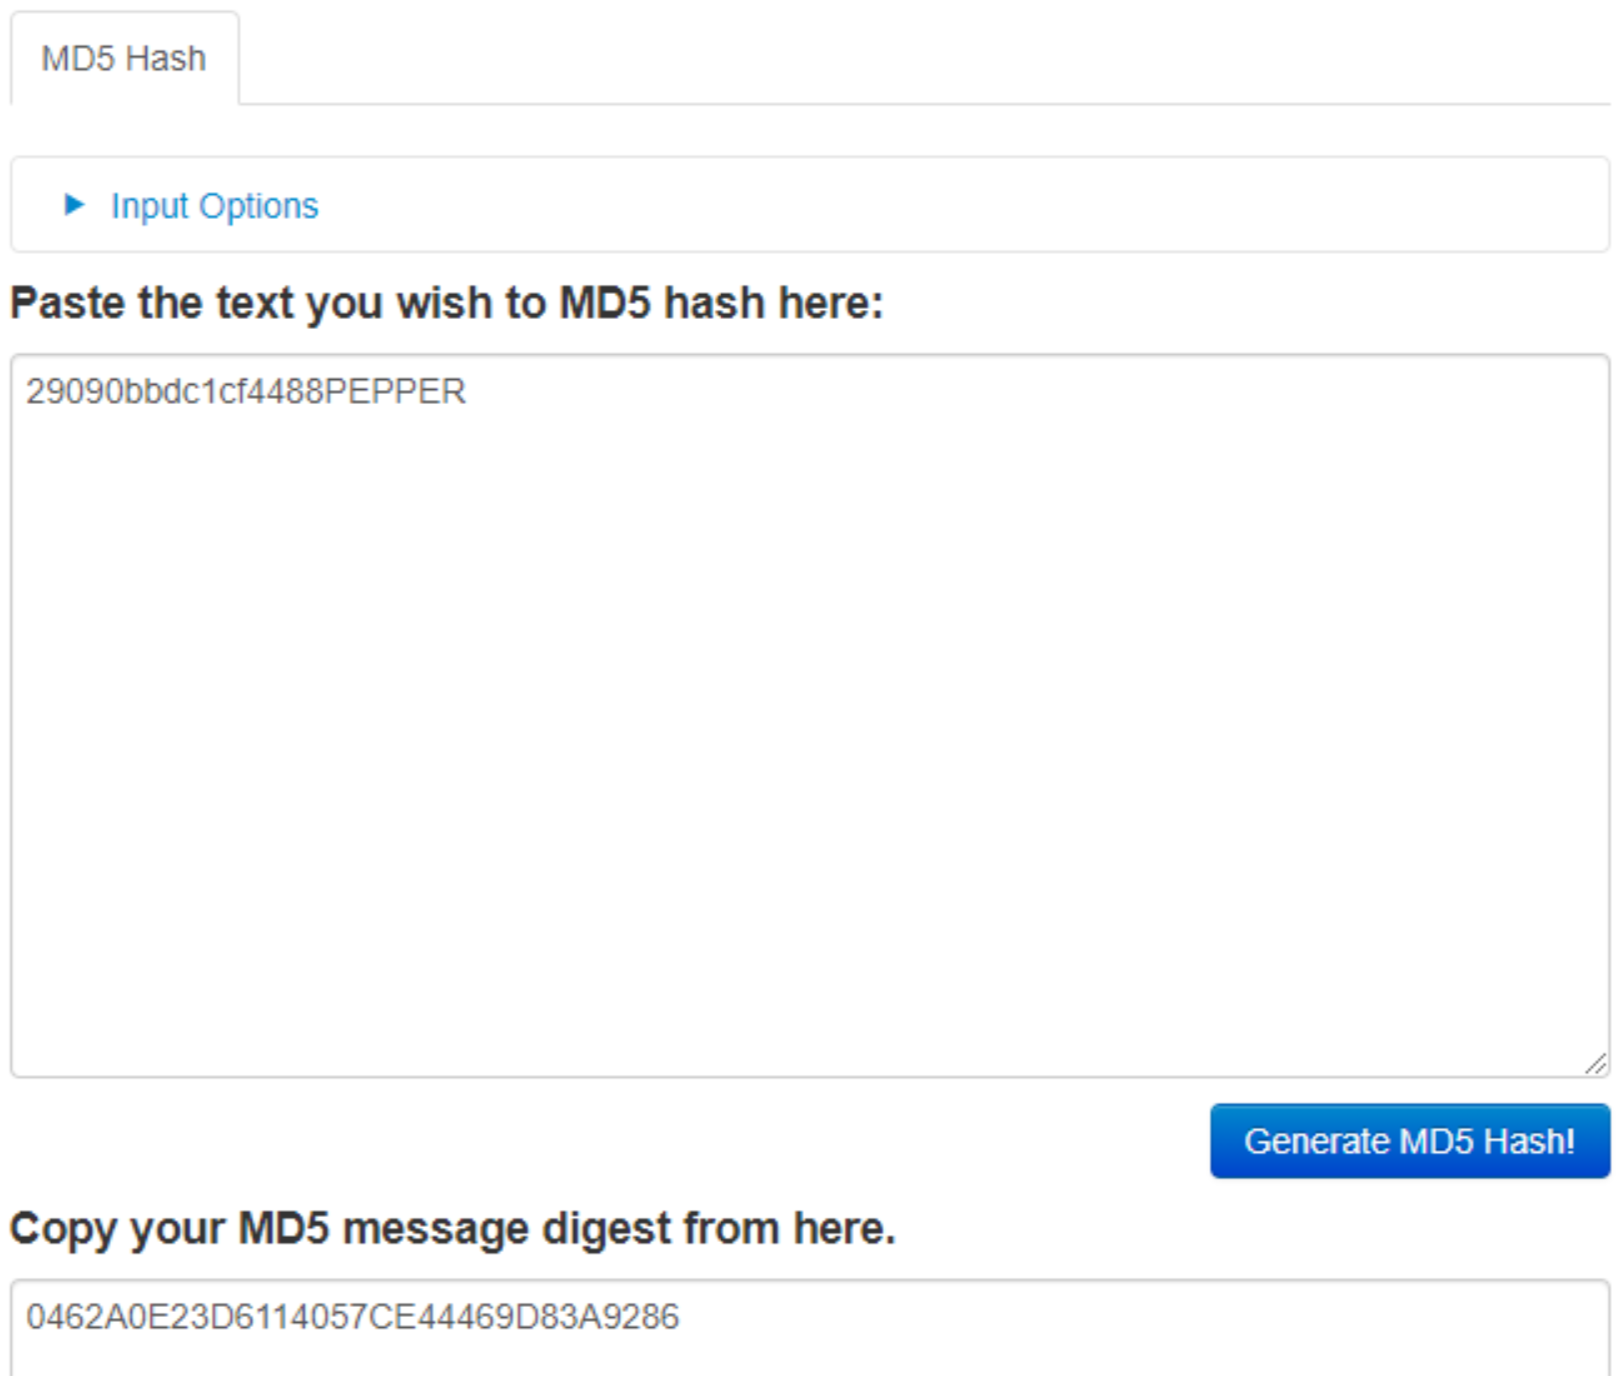
I left debug symbols on so you could see the name of the function was md5. This should really clue you in on, to understand how it's working do some quick homework. But essentially I concatenated the salt "PEPPER" on to the end of the user input of their system serial number. This gets hashed that way a person can't simply just run an MD5 cracker on the hash. However by RE-ing the code, now that you know its an MD5 hash with PEPPER concatenated on the end...are we getting warm? Use an online MD5 hash generator and just add PEPPER on the end of the serial id you obtained.
6. Open a hidden license file ".license_cache"
7. If the contents of the license file match the salted user id, it tells you that its activated
So now you have figure out all of the information. Create a license file and put the contents of your salted serial id in it and run brewOS to confirm that it is correct. However we are running this software on our own computer, not on the brewery computer. Now that you know you have the right activation code, go back in to the badge CLI and hack the keyboard with it. Side note, AWESUM uses the same salted (PEPPER) MD5 logic as the brewOS; by running AWESUM 29090bbdc1cf4488, resulting in a hash of 0462a0e23d6114057ce44469d83a9286. Now why wouldn't you just hammer away trying in the badge instead of safely on your computer? Because you get 3 attempts then I format the badge. DFIU!
and!xor $ hack KEYBOARD with 0462a0e23d6114057ce44469d83a9286
  License Accepted!
  The brewery comes to life and the DRAWER slides open with a little reward as well.
  West Village Hack: 15% Completion Earned
Easter Egg
This easter egg is freebie points as you can not complete the main puzzle without hacking the floppy drive with the floppy disk first.
and!xor $ hack FLOPPY_DRIVE with FLOPPY_DISK
  Easter Egg Hack: 4% Completion Earned
  The console begins to boot from the FLOPPY_DISK and MONITOR_1 comes to life.
Home Village
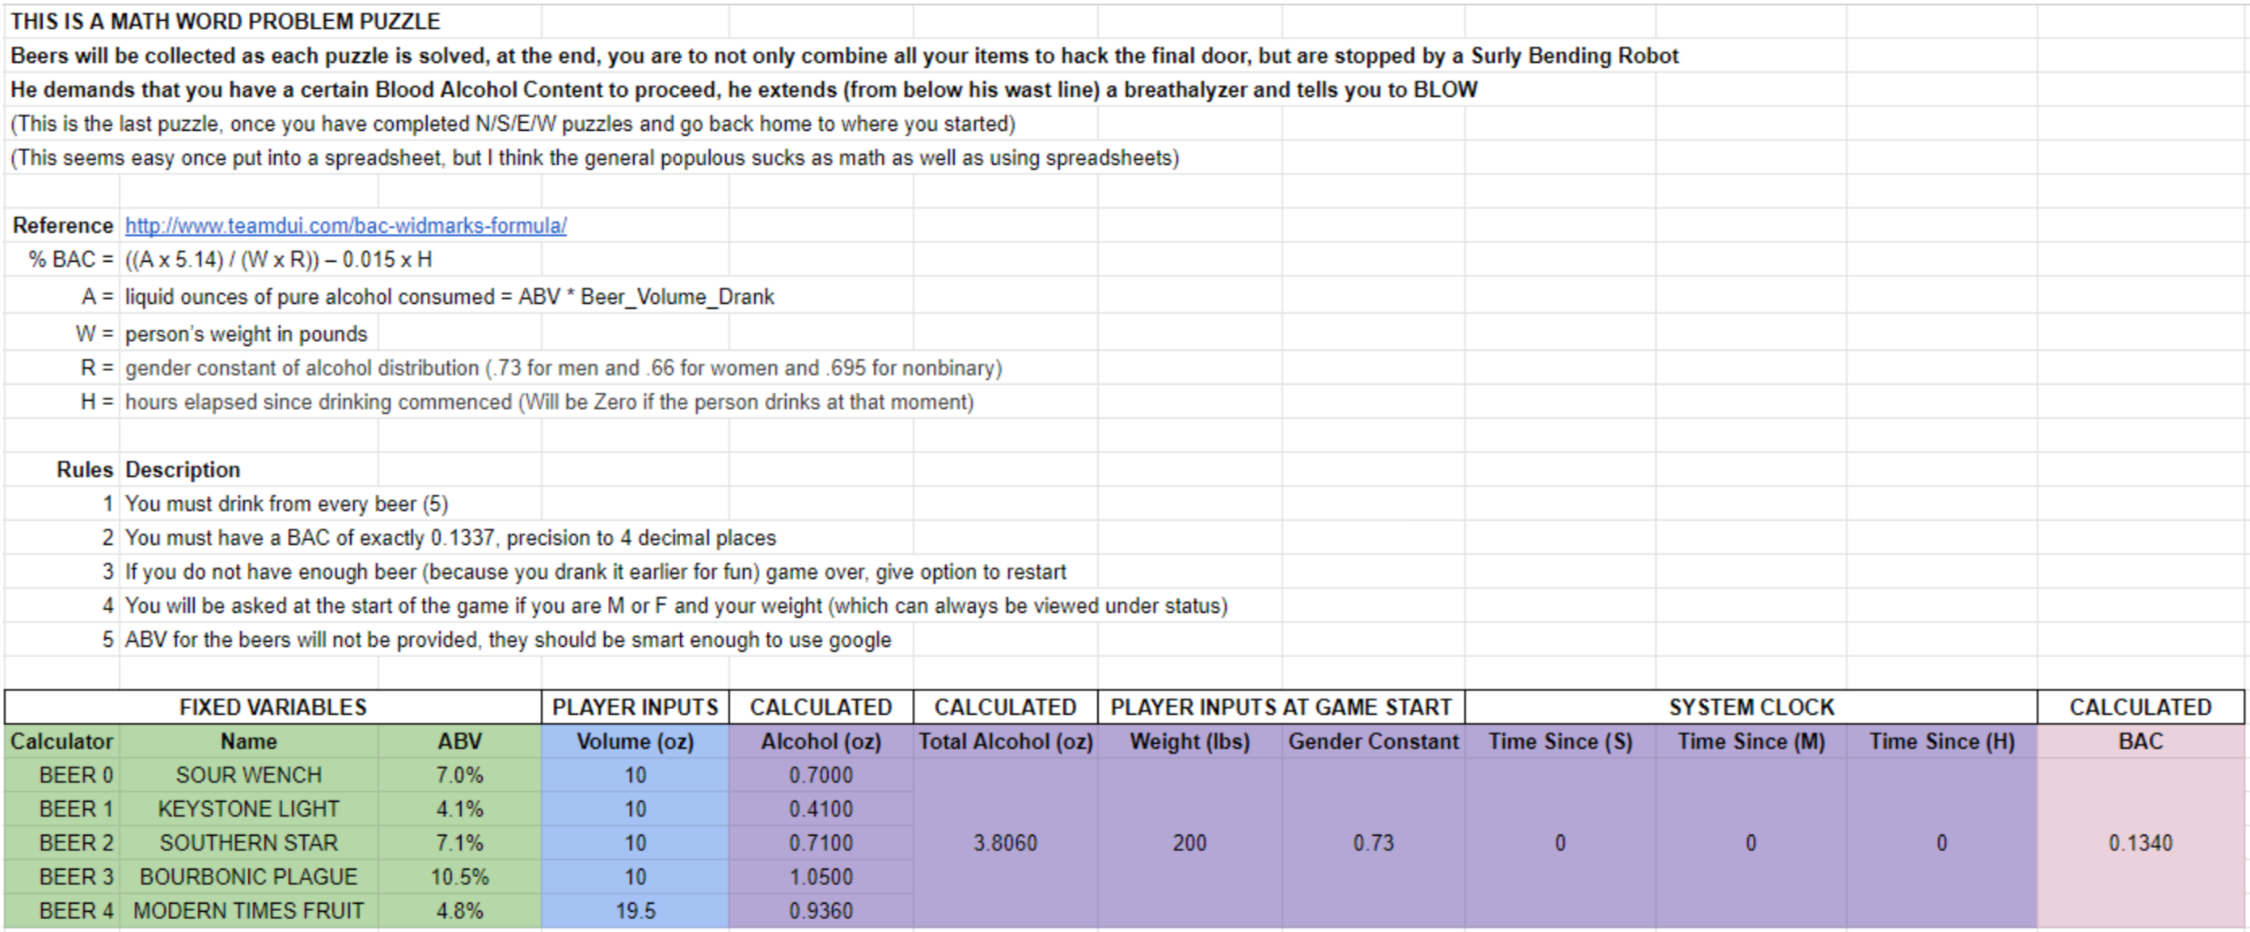
This challenge requires that the player have completed all other challenges, collected all items and beers, and drinks to produce a BAC of 0.1337
Main Puzzle
Yes this is a rehash of the DC26 final puzzle, but we love it so much. Collect the beers, drink from all of them, and based on your weight and gender determination... get your BAC to 0.1337. Looking at SOMETHING_FAMILIAR shows a drinking bending robot who father time has not treated well. Your items will help restore him to his former glory. Then you can drink and blow...his breathalyzer. The ABV of each beer is not known, you must use the information superhighway to figure this out.
and!xor $ look at SOMETHING_FAMILIAR
  Intuition takes over, you quickly douse him with STAR_SAN and the alkaline dissolves.
  Next you open his locked belly casing with a LOCK_PICK, leveraging the PAPER_CLIP as a tension bar.
  You pull out his internal 10ft USB cable and bring it to the DJ_COMPUTER for power...
  But you're not that dumb. NO! Why trust DJ Dead's computer?
  Always use protection, which is why that USB_CONDOM does just the trick for safe power.
  The robot comes back to life, extends his BREATHALYZER, and projects instructions on the wall:
  TO PROCEED YOU MUST ABIDE BY THE FOLLOWING RULES:
  * HAVE A BLOOD ALCOHOL LEVEL OF EXACTLY 0.1337, ACCURATE TO 4 DECIMAL PLACES
  * DRINK FROM ALL FIVE CRAFT BEERS COLLECTED
  * % BAC = ((A x 5.14) \ (W x R)) – 0.015 x H
  * A = TOTAL LIQUID OUNCES OF ALCOHOL CONSUMED = ABV * VOLUME OF ALCOHOL DRANK
  * W = PERSONS WEIGHT IN POUNDS
  * R = GENDER CONSTANT OF ALCOHOL DISTRIBUTION (0.73 FOR MALE, 0.66 FOR FEMALE, 0.695 FOR NON-BINARY)
  * H = HOURS ELAPSED SINCE YOUR FIRST DRINK (HOPE YOU DIDNT START THE PARTY EARLY)
  * CLI = hack BREATHALYZER with BREATH
It is best to do this math with a spreadsheet...
and!xor $ drink BALLAST_POINT_SOUR_WENCH 10
  You down some delicious craft b33r
  Your BAC is now 0.0246
and!xor $ drink KEYSTONE_LIGHT 10
  You down some delicious craft b33r
  Your BAC is now 0.0390
and!xor $ drink SOUTHERN_STAR_CONSPIRACY_THEORY 10
  You down some delicious craft b33r
  Your BAC is now 0.0639
and!xor $ drink CASCADE_BOURBONIC_PLAGUE_2016 10
  You down some delicious craft b33r
  Your BAC is now 0.1008
and!xor $ drink MODERN_TIMES_FRUITLANDS 19.5
  You down some delicious craft b33r
  Your BAC is now 0.1329
and!xor $ drink MODERN_TIMES_FRUITLANDS 1
  You down some delicious craft b33r
  Your BAC is now 0.1345
and!xor $ hack BREATHALYZER with BREATH
  Your BAC is 0.1343
  If its too low, keep drinking...
  If its too high, wait it out...
  Regardless, you suck at this game!
and!xor $ hack BREATHALYZER with BREATH
  Your BAC is 0.1341
  If its too low, keep drinking...
  If its too high, wait it out...
  Regardless, you suck at this game!
As you can see, even I drank a little too much. Just gotta wait it out since the badge uses a real time clock to degrade your blood alcohol content in real time, as it actually would be metabolized in the meat space. But eventually I blew just right.
and!xor $ hack BREATHALYZER with BREATH
  YOUR BREATH...YOUR STANKY ASS BREATH...HAS A BAC IS 1.337 AND THE FINAL CHALLENGE IS SOLVED.
  A BRIGHT LIGHT BEAMS FROM THE NIGHT SKY, SOMETHING DARTING ACROSS VERY QUICKLY.
  THE RADIO TOWER IS NOW BATHED IN BLINDING LIGHT AND YOU CANT SEE.
  TO BE CONTINUED...
  YOU HAVE COMPLETED THE AND!XOR DC27 BADGE CHALLENGE. TYPE BENDER STATUS AND SCREENSHOT IT.
  CONTACT US ON TWITTER @ANDNXOR && EMAIL HYR0N@ANDNXOR.COM ASAP BEFORE THE CON IS OVER.
  YOUR STATE WILL SAVE ON A TASK THAT RUNS EVERY DAY, YOU MAY SAFELY DISCONNECT THE BADGE IN 24 HOURS...
  Home Village Hack: 15% Completion Earned
No, the badge actually saves your state instantly, not in 24 hours. I'm just a dick. Oh yeah if you type "bender status" you'll notice that completing everything results in a completion of 95%. I'm a dick. ¯_(ツ)_/¯
Easter Egg
There is an inception type easter egg, where one has to keep digging to find out the last of the last eggs. Start with the STICKY_NOTE...
and!xor $ look
  You enter the doorway and it opens to a dusty radio broadcast room.
  Lets call this HOME for now...
  A relic of the past, but nostalgia holds a place in your heart.
  There's a DJ_COMPUTER on a desk, powered up, with a prompt.
  A pile of mixtapes, discs, and a STICKY_NOTE on a piece of media are in the corner.
  You peer out the window and to your surprise the world has gone to shit. Like nuclear winter fallout shit.
  They did it. They finally did it. DEF CON was cancelled and look what happened.
  From this radio tower lookout you can see two intersecting roads going in to the city.
  They are perpendicular creating four possible directions: NORTH, SOUTH, EAST, and WEST.
  Looking back away from the window and back in the room you notice something SOMETHING_FAMILIAR...
  An item catches your eye for the taking: BOTTLE_OPENER
  You smell some booze for the drinking: BALLAST_POINT_SOUR_WENCH
and!xor $ look at STICKY_NOTE
  A reminder from a DJ Dead to throw together a MIXTAPE.
and!xor $ look at MIXTAPE
  It's hard to read, the LABEL is very faded.
and!xor $ look at LABEL
  Almost half peeled off but you can see some ENGRAVING from what was written.
and!xor $ look at ENGRAVING
  Tilted in the light the engraving shows http://bit.ly/2HB1Ggg
  Easter Egg Hack: 4% Completion Earned
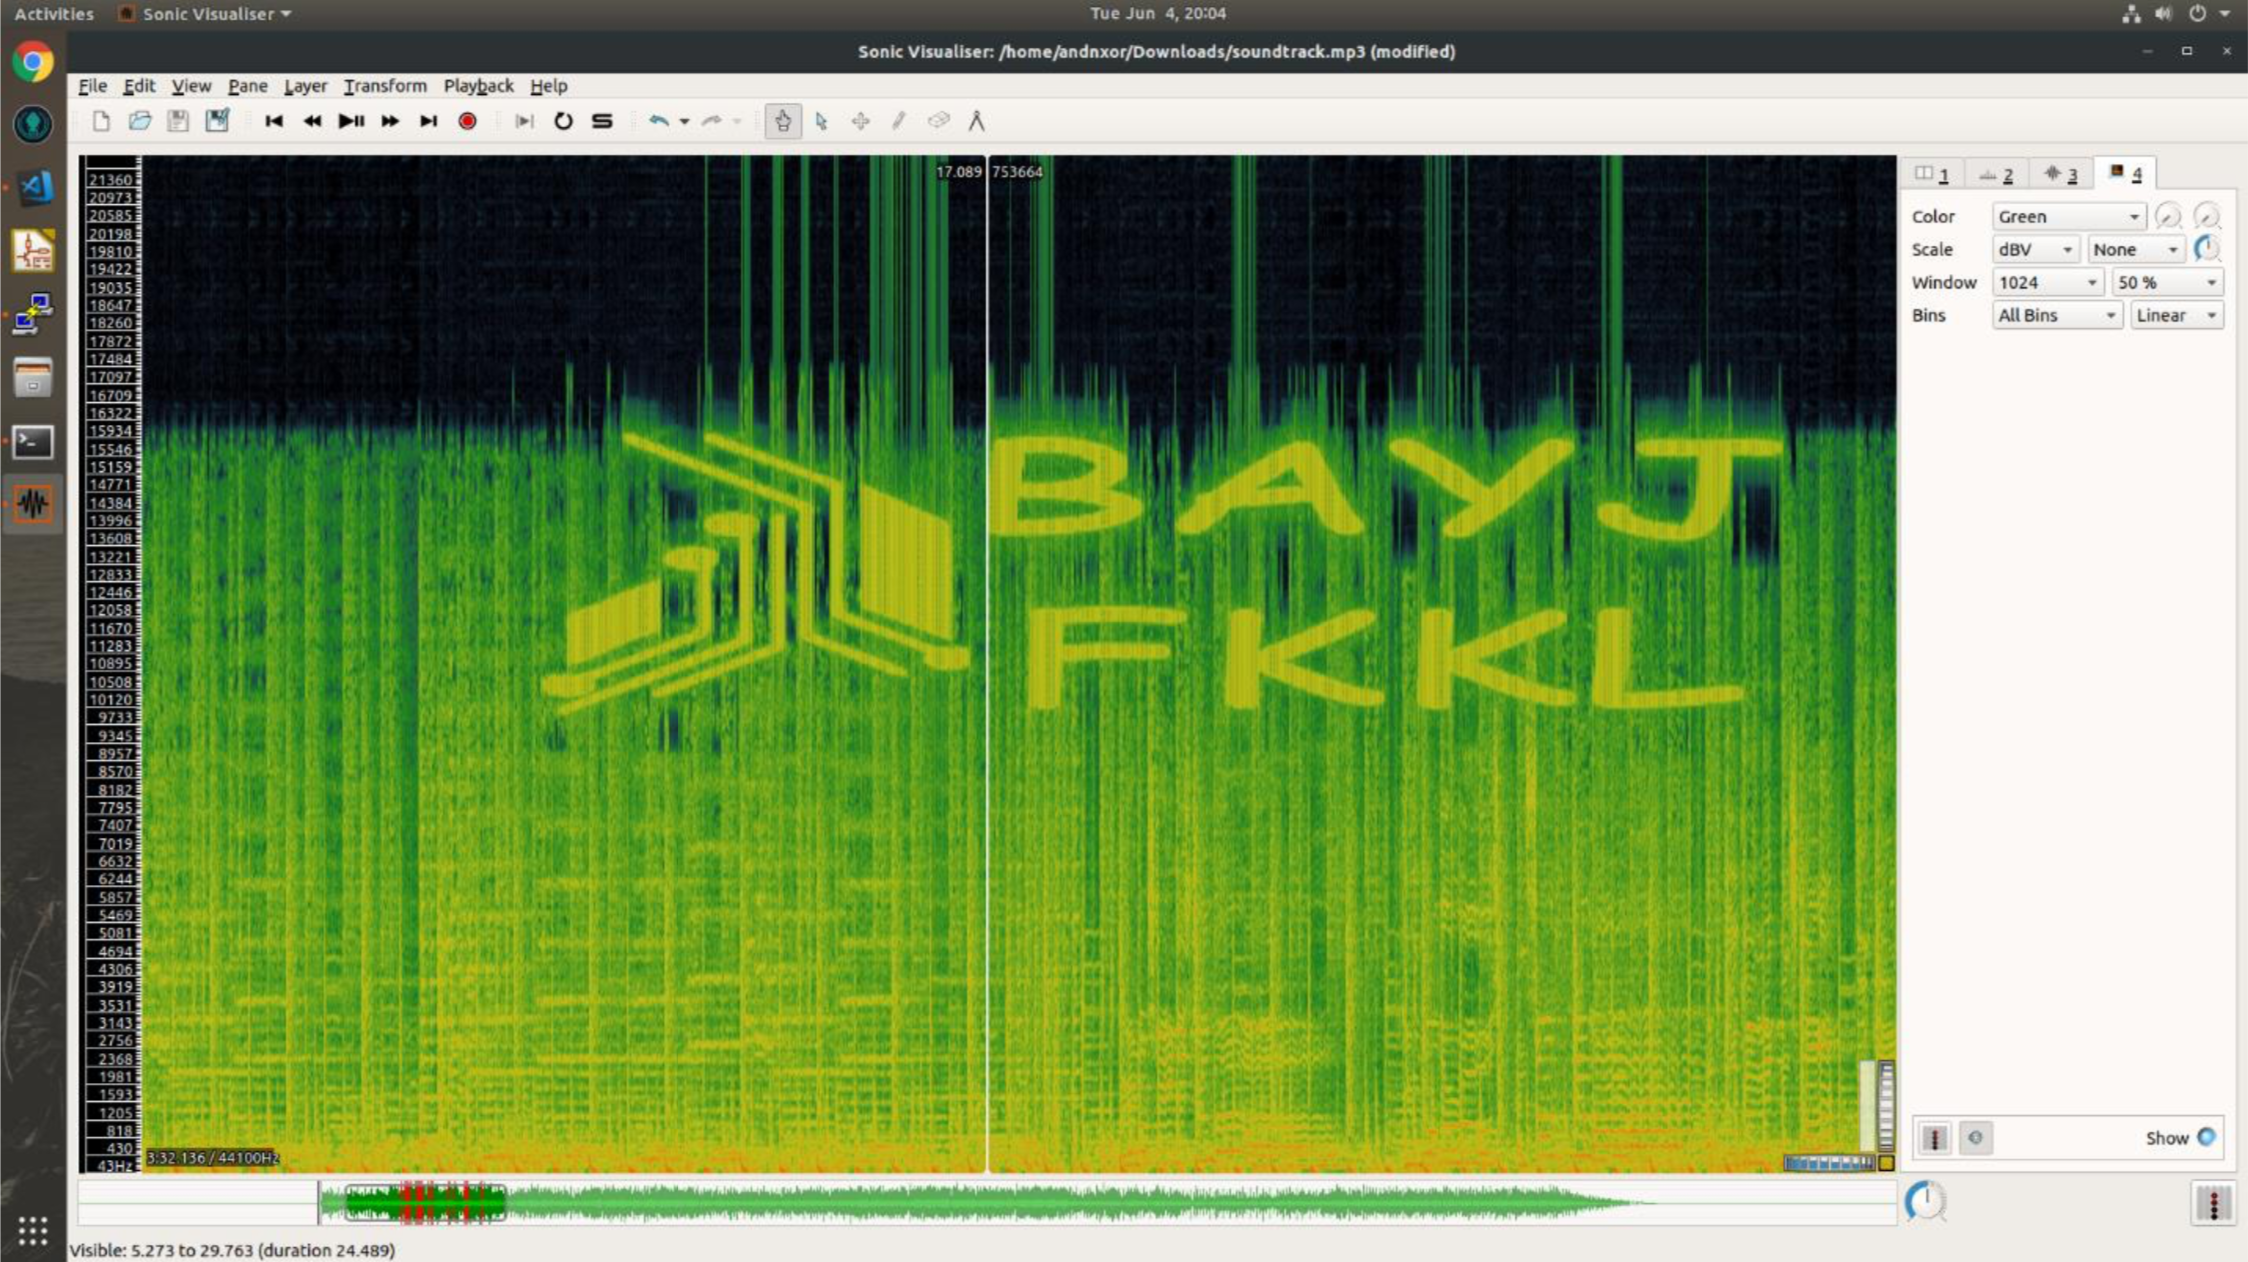
One may give up at this point but there is obviously an URL to follow...yeah we Rick Rolled you. But did we JUST Rick Roll you or is there more to it? At about 10 seconds there's some strange noises. Sounds like some Audio Steganography. If you looked at the DJ_COMPUTER it asks that you enter an UNLOCK_CODE. All unlock codes released on Twitter and elsewhere are entered at HOME via "hack DJ_COMPUTER with XXXXXX" So lets unravel this mystery... Analyzing wave forms is best done with an initial look with a spectrogram view.
andnxor@ubuntu:~$ sudo apt-get install sonic-visualiser
Open the new mp3 file, however the image will not be visible in the default view. Press Alt+G to add the Spectrogram layer. Drag left/right to pan.
Now that you have the unlock code...
and!xor $ hack DJ_COMPUTER with BAYJFKKL
THATS IT! SEE YOU AT DC28! KTHXBYE!
-
SWD all the things!
08/01/2019 at 22:14 • 0 commentsWhat's better than a blinky badge? A blinky badge that can hack!
This post is an extension of hyr0n's post on all the wonderful things you can do with the FT2232H. It is also quite advanced as it will require you compile code and do some soldering. But the journey is worth it.
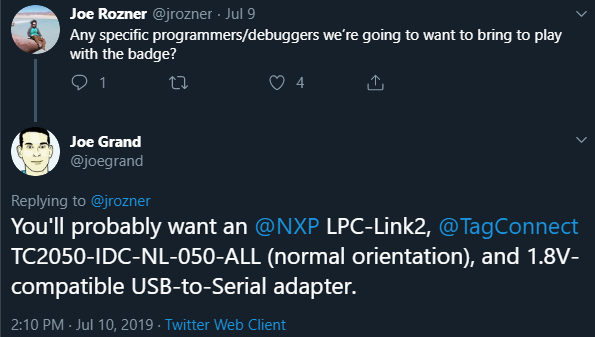
This writeup is timely, just as I was able to make the SWD interface work successfully, Joe Grand tweeted this:TOP SECRET! This year's #DEFCON 27 Badge uses an @NXP KL27 ARM Cortex-M0+ (among other things). For most efficient hacking, use an LPC-Link2, @TagConnect TC2050-IDC-NL-050-ALL (normal orientation), and 1.8V-compatible level translator or USB-to-Serial adapter. pic.twitter.com/Ene68B8JjI
— Joe Grand (@joegrand) August 1, 2019In theory the technique below will work on the official DC27 badge although it is written to work with NRF52 targets.
Note this log was adapted from: https://www.allaboutcircuits.com/technical-articles/getting-started-with-openocd-using-ft2232h-adapter-for-swd-debugging/Pre-requesites
- An FT2232 device, preferably one of our badges.
- A suitable linux build environment (git, make, etc)
- arm-none-eabi-gdb (and related) tools
- Appropriate connector for target device
- SWD 10-pin 1.27mm pitch (Da Bomb badge)
- Tagconnect 2050 (AND!XOR / DEF CON 27)
- Wires, flux, solder, and a steady hand
- Adapter from target connector to badge / FT2232 + jumper wires
Hardware
Our badge has a dual channel FT2232. Channel A is broken out adjacent to the device.
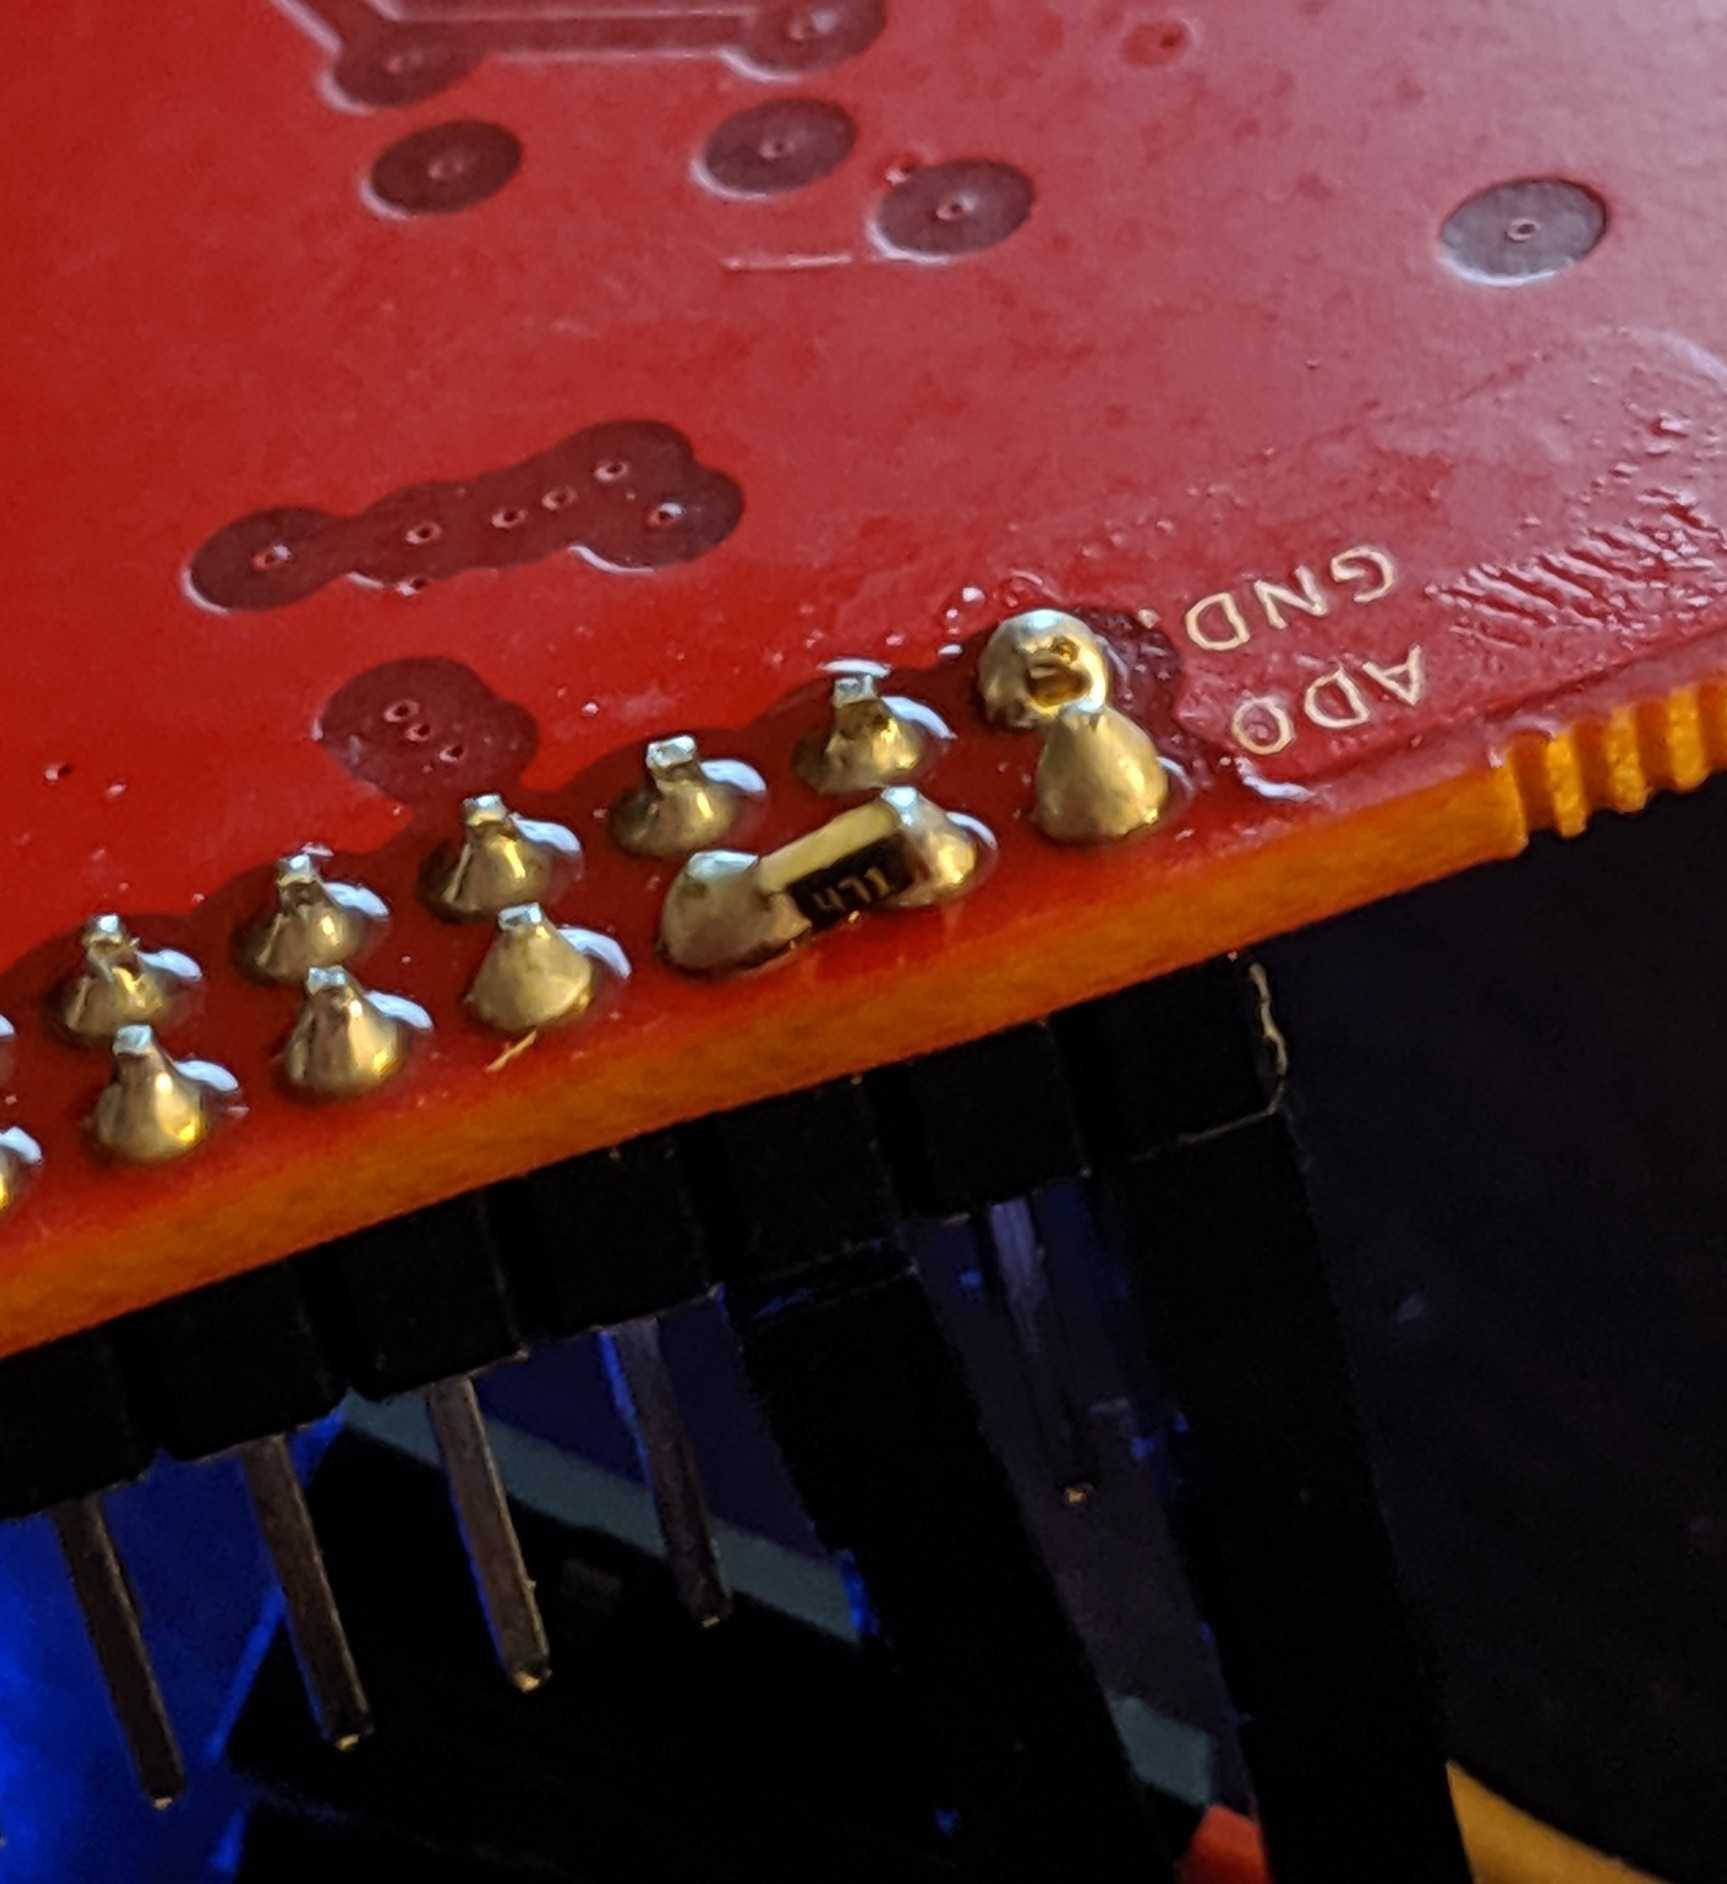
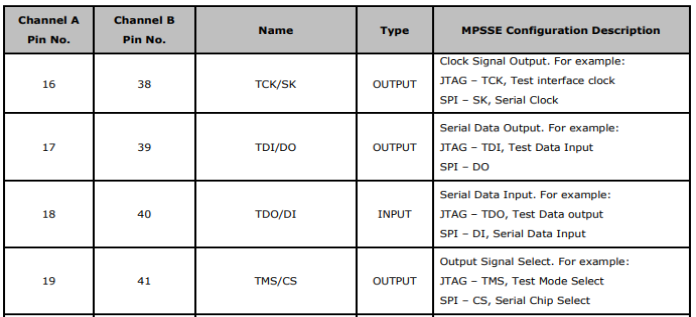
Referring to the FT2232HL datasheet, the key channel A pins for MPSSE are TCK/SK, TDI/DO, TDO/DI (ADBUS0, ADBUS1, and ADBUS2 respectively). The trick is wiring TDI to TDO with a resistor and to SWDIO on the SWD interface since the SWD interface is just SWDIO and SWCLK. SWO, nRESET, and Vcc can be ignored.The best way, in our opinion, is to slap a 470 ohm 0805 resistor between ADBUS1 and ADBUS2. Not so bad yet.
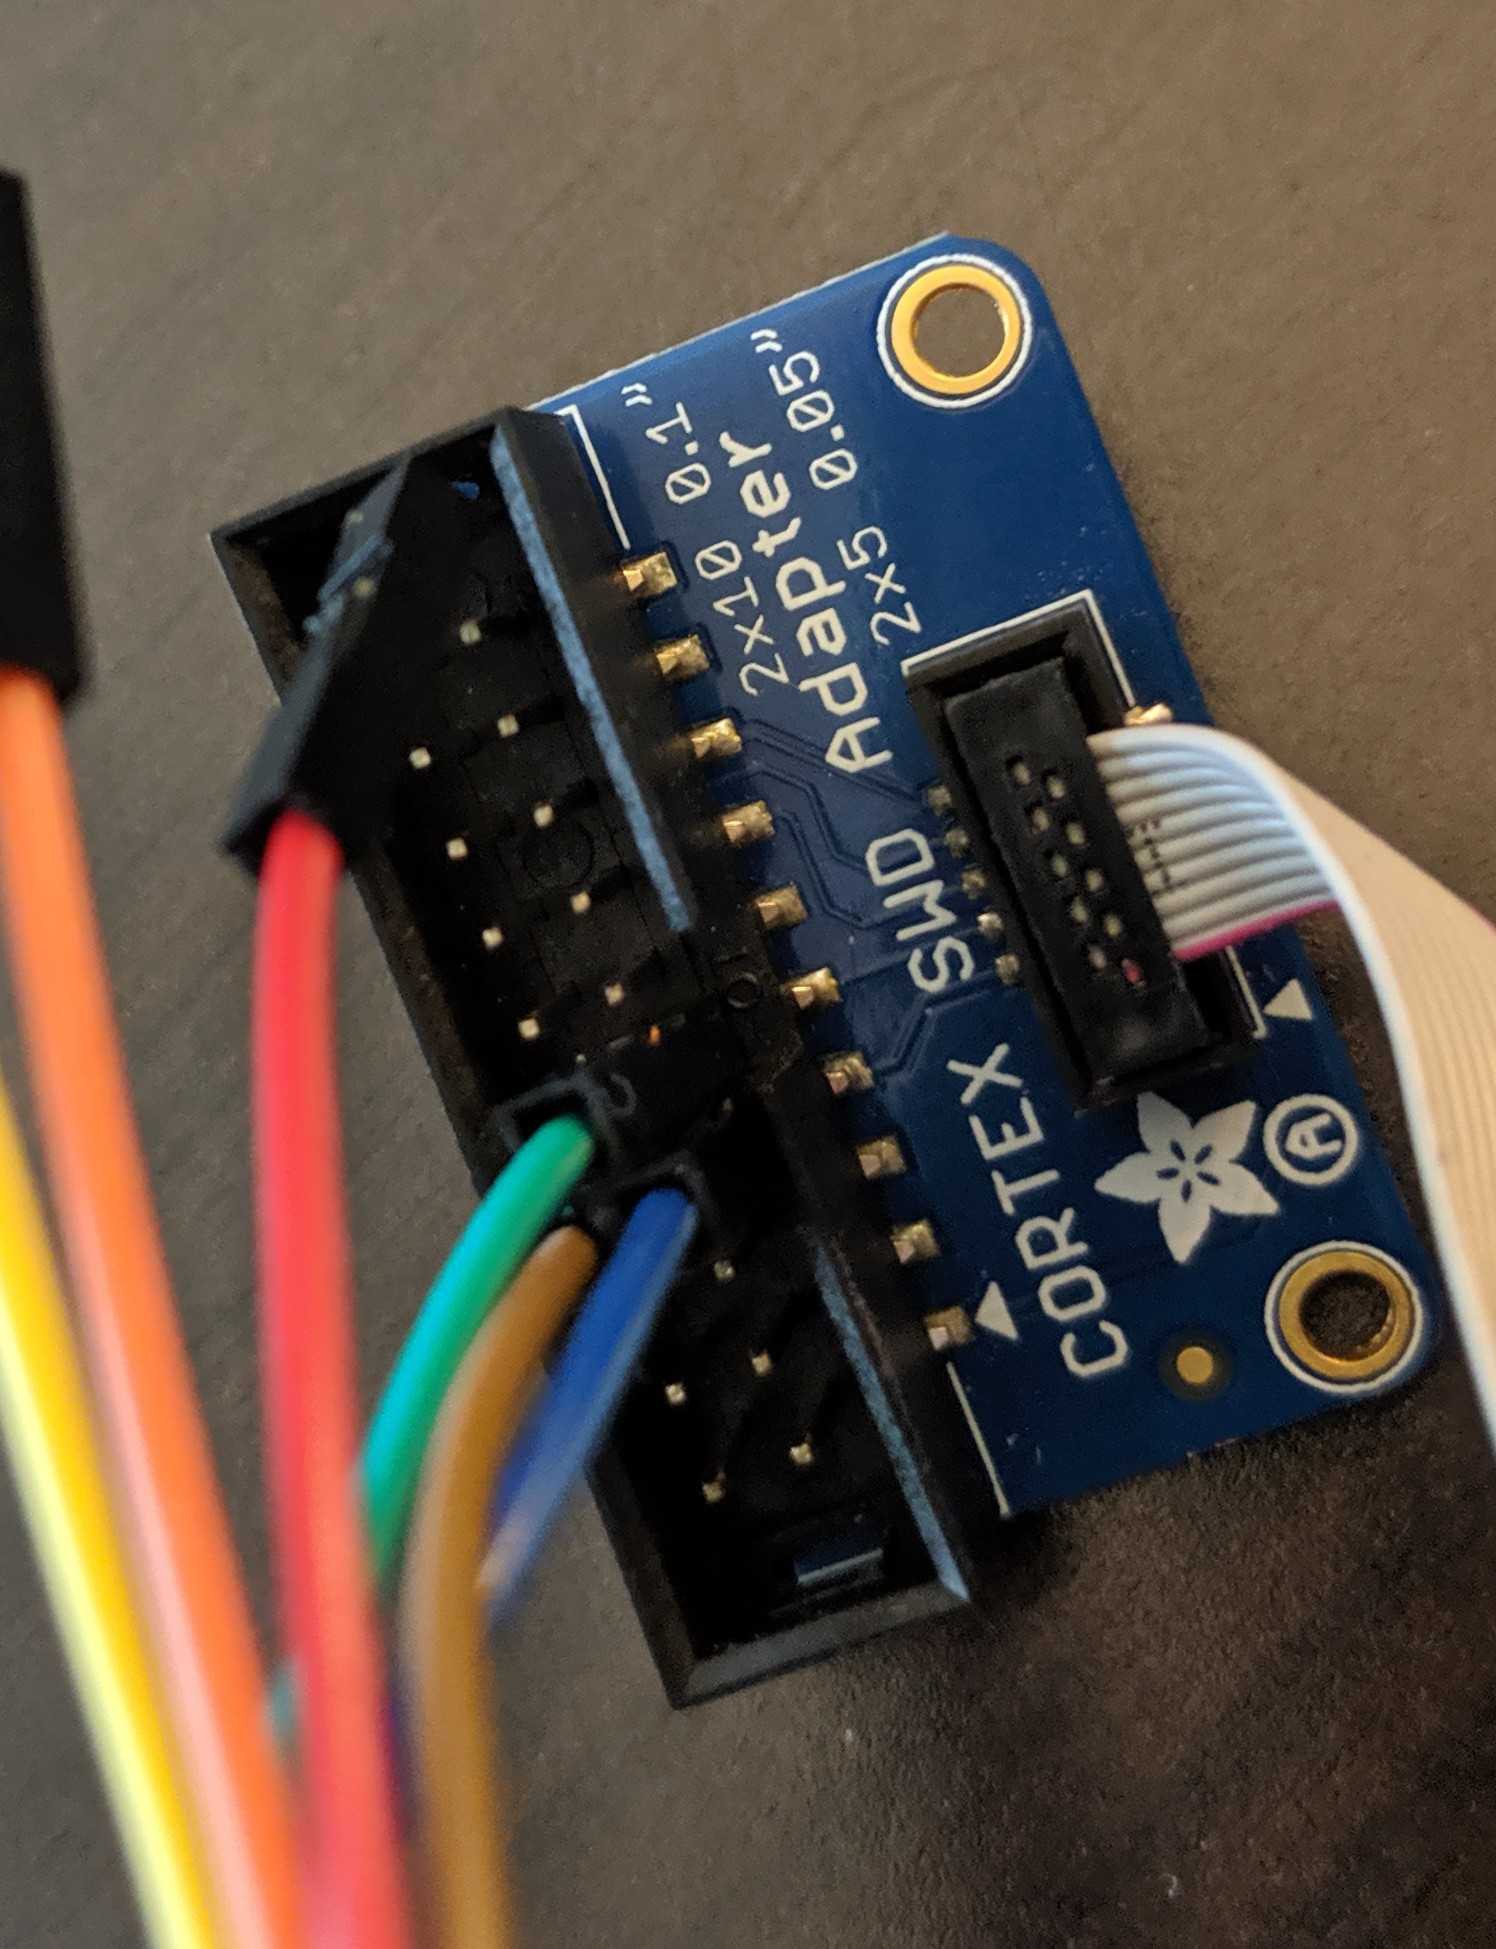
Next step is to connect to the target. Refer to the FTDI to Target diagram. TDI(ADBUS1) and TDO(ADBUS2) pins are connected via a resistor then to SWDIO. Using your adapter or amazing electrical skills connect to the target device. We'll leave this one to you but for reference this is how we connected from the badge to Da Bomb badge using an Adafruit JTAG 20 pin to SWD 10 pin adapter YMMV.
BADGE: TDO(ADBUS2) <==> Adapter: TMS <==> Da Bomb: SWDIO
BADGE: TCK(ADBUS0)<==> Adapter: TCK <==> Da Bomb: SWCLK
BADGE: GND <==> Adapter: GND <==> Da Bomb: GNDSoftwareI won't be going into the ARM tools in detail those are for other tutorials. But if you really must know I posted some resources here: GDB SWD Tutorial
The key to making this all work is OpenOCD. Unfortunately binaries distributed with Ubuntu and other Linux distributions are lacking. Therefore we must compile our own. Just like the good ol' days on your parents' computer with your Slackware distribution.
The Zylin distribution of OpenOCD seems to be well maintained but does not post binaries.
First step, clone the repo:$ git clone http://openocd.zylin.com/openocdNext, bootstrap the environment. This will find unmet dependencies that need to be installed. I'll leave that to you.
$ cd openocd
$ ./bootstrap
+ aclocal
+ libtoolize --automake --copy
+ autoconf
+ autoheader
+ automake --gnu --add-missing --copy
Makefile.am:46: warning: wildcard $(srcdir: non-POSIX variable name
Makefile.am:46: (probably a GNU make extension)
Setting up submodules
Generating build system...
Bootstrap complete. Quick build instructions:
./configure ....
Now the important part, configuring the build.
$ ./configure \
    --enable-aice \
    --enable-amtjtagaccel \
    --enable-armjtagew \
    --enable-cmsis-dap \
    --enable-dummy \
    --enable-ftdi \
    --enable-gw16012 \
    --enable-jlink \
    --enable-jtag_vpi \
    --enable-opendous \
    --enable-openjtag_ftdi \
    --enable-osbdm \
    --enable-legacy-ft2232_libftdi \
    --enable-parport \
    --disable-parport-ppdev \
    --enable-parport-giveio \
    --enable-presto_libftdi \
    --enable-remote-bitbang \
    --enable-rlink \
    --enable-stlink \
    --enable-ti-icdi \
    --enable-ulink \
    --enable-usb-blaster-2 \
    --enable-usb_blaster_libftdi \
    --enable-usbprog \
    --enable-vsllink
This will enable common interfaces and targets. By default OpenOCD does not compile with support for NRF52 or FTDI. Note you may have dependencies issues to resolve before continuing.
Finally build OpenOCD. Install is optional.
$ make
$ sudo make install
By default binaries are placed in openocd/src while interface and target scripts are in openocd/tcl. If you opted to install OpenOCD the binary ends up in /usr/local/bin/openocd and the interface and target scripts will go into /usr/local/share/openocd/scripts.
Getting to GDB
Now the fun bit...
Create a file called ocd. Copy the following into the file.
interface ftdi
transport select swd
ftdi_vid_pid 0x0403 0x6010
ftdi_channel 0
ftdi_layout_init 0x0018 0x05fb
ftdi_layout_signal SWD_EN -data 0
ftdi_layout_signal nSRST -data 0x0010
NOTE: This command targets and NRF52 which is used by various badge groups including AND!XOR, DaBomb, DC801, and DCZIA. OpenOCD supports a wide range of targets, select a different target script for other targets.
The DC27 badge is using the NXP KL27. Using OpenOCD with it should be as simple as changing the target to target/klx.cfg. YMMV.
From the current directory, run the following.
$ openocd -f ocd -f target/nrf52.cfg
Open On-Chip Debugger 0.10.0+dev-00922-g7a93c9e0 (2019-07-31-19:20)
Licensed under GNU GPL v2
For bug reports, read
    http://openocd.org/doc/doxygen/bugs.html
Info : FTDI SWD mode enabled
Info : Listening on port 6666 for tcl connections
Info : Listening on port 4444 for telnet connections
Info : clock speed 1000 kHz
Info : SWD DPIDR 0x2ba01477
Info : nrf52.cpu: hardware has 6 breakpoints, 4 watchpoints
Info : Listening on port 3333 for gdb connections
If successful you will have a GDB instance listening on port 3333. Now connect to it:
$ arm-none-eabi-gdb -ex "target extended-remote localhost:3333"
GNU gdb (GNU Tools for Arm Embedded Processors 7-2018-q3-update) 8.1.0.20180315-git
Copyright (C) 2018 Free Software Foundation, Inc.
License GPLv3+: GNU GPL version 3 or later <http://gnu.org/licenses/gpl.html>
This is free software: you are free to change and redistribute it.
There is NO WARRANTY, to the extent permitted by law.  Type "show copying"
and "show warranty" for details.
This GDB was configured as "--host=x86_64-pc-linux-gnu --target=arm-none-eabi".
Type "show configuration" for configuration details.
For bug reporting instructions, please see:
<http://www.gnu.org/software/gdb/bugs/>.
Find the GDB manual and other documentation resources online at:
<http://www.gnu.org/software/gdb/documentation/>.
For help, type "help".
Type "apropos word" to search for commands related to "word".
Remote debugging using localhost:3333
warning: No executable has been specified and target does not support
determining executable automatically.  Try using the "file" command.
0x0002868e in ?? ()
(gdb)
Enjoy and hack all the things!
-
Not-so-retro-spective Production Log
08/01/2019 at 01:38 • 0 commentsThis is our third year utilizing Macrofab as our PCBA. Each year we've improved our own production process to identify failures as close to the badge production as possible. A major part of this is providing Macrofab with the tools they need to quickly flash and test badges.
This year we sent them a virtual machine (with OpenOCD), STLink V2 clones, and Tag Connect 2050s. The VM was pre-configured with the test firmware and tools to get the job done. A standard feature in our DC26 and DC27 badge is a Power on Self Test (POST). This year our POST tests the capacitive touch controller, internal file system, and LED driver. Any failures during POST results in a flashing green LED. After flashing each badge Macrofab simply needed to observe the green LED and LED matrix to know if the badge is functional.Initial Failures
This year we manufactured 600 badges. Of those, 28 failed tested at Macrofab that they were not able to correct. Below is the breakdown of what they found:
- 10 unable to flash
- 4 LED matrix flashing too fast
- 10 LEDs do not light up
- 4 Some other POST failure
Less than 5% failure, not bad, but not great either.
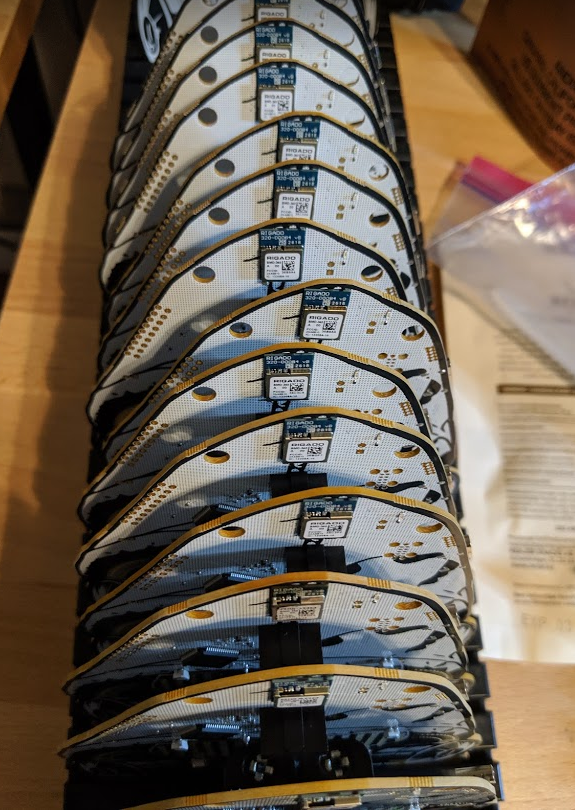
Triage
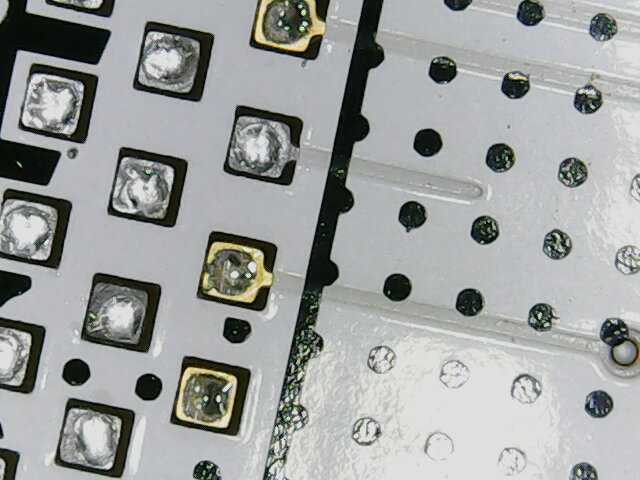
Zapp spent the better part of a day testing each failed badge. Initial thoughts were that the LED driver, a massive QFN60 IC, had shorts between pins. Our DC26 badge had issues with this due to our paste layer. It's relatively easy to correct. The first badge triaged backed up this assumption. After a little touch up with a soldering iron, Zapp had a working badge. Note the extra solder blob between the pins.
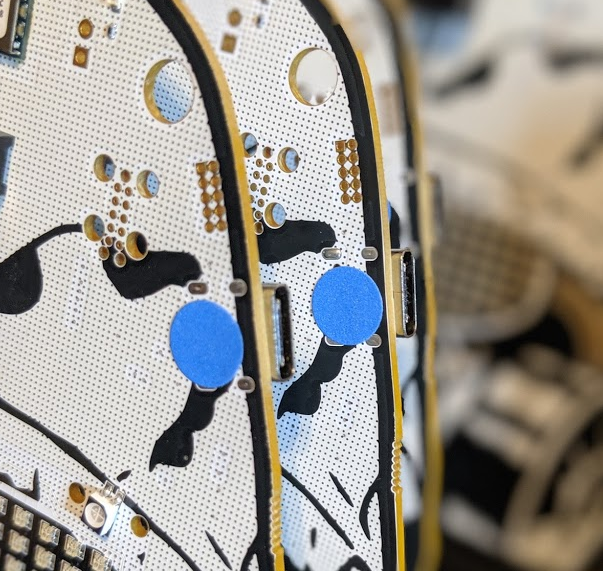
This assumption was quickly proven wrong, however, the second badge had a POST failure. Logs indicated a IQS333 failure (capacitive touch controller). The IQS333 is also a QFN part, but not as large. No amount of touch up on the IC helped resolve the issue. In fact it would occasionally correct itself then fail again.
Zapp continued through the badges marking badges with failed LED drivers and/or failed captouch controllers. The LED matrix flashing too fast issue was quickly resolved with a flash of production firmware, however, all 4 badges were found to have capacitive touch failures.
During the triage Zapp found a new failure mode which turned out to be a gap in the Macrofab test coverage, oops! Serial to the FT2232 was not tested. On 6 of the 28 badges serial was not functional.
By the end of triage, failures were further grouped as:
- No Serial (6 of 28)
- No LEDs (13 of 28)
- Capacitive Touch Failure (6 of 28)
- Cannot flash (10 of 28)
Many badges had multiple failures, womp womp
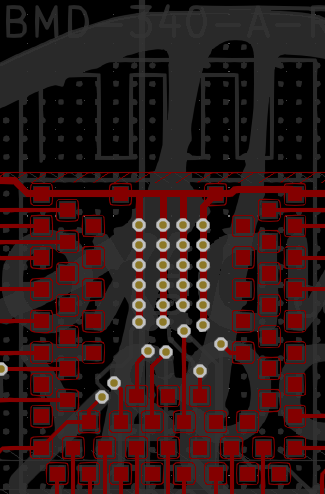
BMD-340
With triage complete, Zapp started on the badges that could not be flashed. The BMD-340 module is connected directly to the SWD and Tag Connect headers, see schematic below for Tag Connect breakout. In fact the traces are very short on the PCB as well. This likely means the module did not reflow properly.
The BMD-340 is a very complex footprint. 65 pins all under the module with 0.5mm pads.
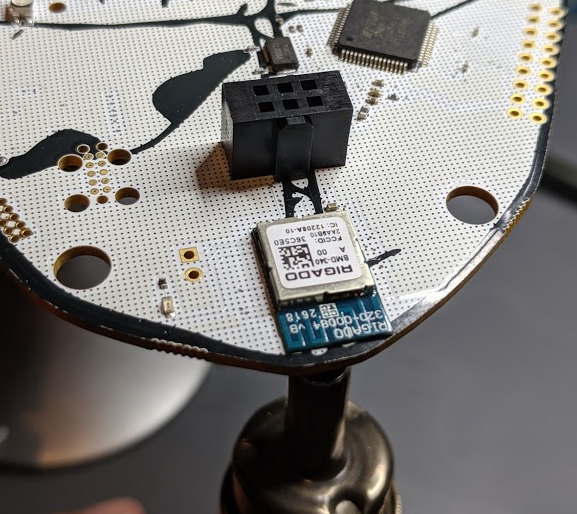
We decided to sacrifice one badge to investigate, using hot air from the bottom of the PCB, Zapp removed the module.
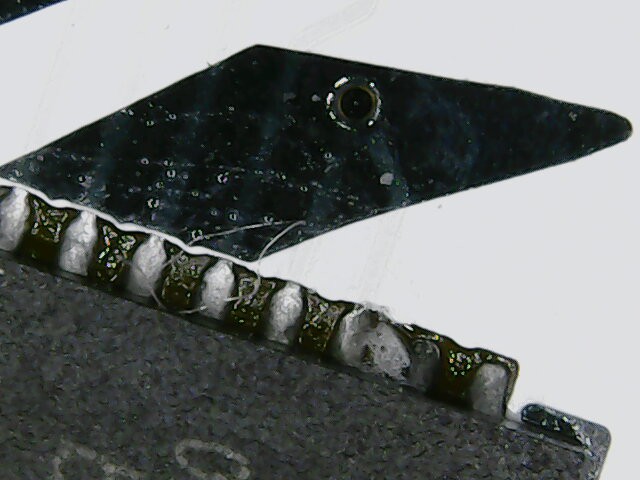
What Zapp found was insufficient solder on the SWCLK pin.
What Zapp also found was his hot air was set *way* too high. Getting this right is harder than it sounds. Macrofab uses a lead-free process which requires a much higher temperature to melt solder. However, the only way to heat the board is from underneath the PCB. Zapp eventually dialed this in but a couple boards have some burn marks, sorry!
With the root cause identified, the hard part was to come, resoldering the modules. To do so, Zapp applied some rosin flux (the good stuff) then using a soldering iron and some 63/37 solder applied tinned each pad on the PCB. It is important to ensure each pad has the same amount of solder to avoid issues. Zapp repeated the same process to the underside of the module, leaving some flux to help with the heat transfer when reflowing.The final step is the reverse of the first, position the module (it can be off by a mm) on the PCB, apply hot air to the underside for about 30 seconds. The 63/37 solder has a lower melting point. Once the solder melts the module snaps into place.
After cooling, Zapp was able to flash the badge and all is well after some cleaning. Zapp then repeated this process on the other 9 badges that failed flashing also recovering those.Moar BMD-340
Next was to debug the capacitive touch and LED driver issues. After touching up the QFN pins and still nothing working, Zapp found that the SDB pin was not being pulled high by the BMD-340 which would enable the LED driver. Given the previous issues with insufficient solder, Zapp removed the BMD-340. Same issue as the SWCLK pin, this time on the pin used to pull SDB high. Sigh...
Same process as before and all of those were recovered. Additionally, the capacitive touch controller was also fixed due to its RDY pin not being connected from the same issue.
After 2 days of triage and BMD-340 reflow, Zapp had 3 badges left with failures that were still not functional.Serial Issues
The last 3 badges would not come up on USB. In our badge design the FT2232 handles the USB regardless of the BMD-340 status. In the case of these 3, Linux dmesg complained about a bad USB cable. Zapp checked the 12mhz crystal and touched up the FT2232 IC, still no dice. After looking at the badge under the AmScope he discovered a a very tiny short between pins 3 and 2 on the ESD protection IC (U2) effectively shorting the USB D+ line to GND.
A quick touch up with the soldering iron on all 3 badges and they were good to go!Summary
While 5% failure rate may not seem that high, it has an impact on the overall unit cost. By providing Macrofab with the ability to flash and test the badges on the line we avoided a good number of failures. However, the gap in our test coverage meant failures related to serial may have slipped through. Fortunately our team still has to do its own quality control and final firmware flashing that will catch those issues before they make it into the hands of hackers.
We provided feedback back to Macrofab, at this time we're not aware of any design issues with our PCB. The BMD-340 solder issues may just be a function of the very small pins underneath the module. In the future we will avoid such modules so visual inspection (even with a scope) can catch the issues and simple hand soldering can correct them.
Bottomline, all 28 were fixed however 2 had burn damage to the PCB itself while Zapp was finding the ideal temperature for his hot air. We'll tag these as such and hope to find a good home.
-
FTDI 2232H Breakout For Hardware Hacking
07/23/2019 at 01:22 • 1 commentIntroduction
One of the functions we were most excited about including in this year's badge was an FTDI 2232H with breakout such that it could be used as a hardware hacking tool. Hack the other badges, IoT devices, embedded systems of your choice... Hack The Planet. Think of this like a Bus Pirate, however instead of a clunky embedded CLI you will be using software on your computer to interface with it.
Many folks hear FTDI and just think of a serial UART to USB adapter. That's the 232R. However the FT X232H series can be used for a LOT more. For reference the "X" in the prior "X232H" that I mentioned refers to the number of channels on the chip. A standard "232H" has a single channel, a "2232H" has two channels, and a "4232H" (you guessed it) has four channels. By a channel, what this really means is that IC has an independent functional module performing the capabilities described in the data sheet. Our 2232H is like a two in one!
Since we have a two channels on the "2232H," the first channel "A" we dedicated to the hardware hacking breakout (and to be compatible with applications which may only look for the default channel), where as the second channel "B" we integrated as our badge SoC's serial UART interface for the embedded terminal (BOTNET, BENDER). So when you plug in the badge to a computer, you will get two devices.
On a Linux System...
- Channel A (Hardware Hacking) - /dev/ttyUSB0
- Channel B (Serial Terminal) - /dev/ttyUSB1
On a Windows System...
- Channel A (Hardware Hacking) - COM (N)
- Channel B (Serial Terminal) - COM (N+1)
Note that Windows keeps track of permanently assigns virtual COM ports to every serial device it ever interfaces with. So (for example) if the badge is the 45th device ever plugged in, Channel A = COM45 and Channel B = COM46 ¯\_(ツ)_/¯
Also, bragging rights... based on our extensive market research (using Google while drinking) this badge is the FIRST USB-C based FTDI X232H Debugger / Hardware Hacking tool out there! No more three tries to plug in your USB cable and it has bling to light your path. Yep, let that sink in.
AND!XOR = King of Shit Mountain
But if change scares you, or living in the past with comfortable hardware interfaces toots your fancy, here's a USB C to Mini Adapter
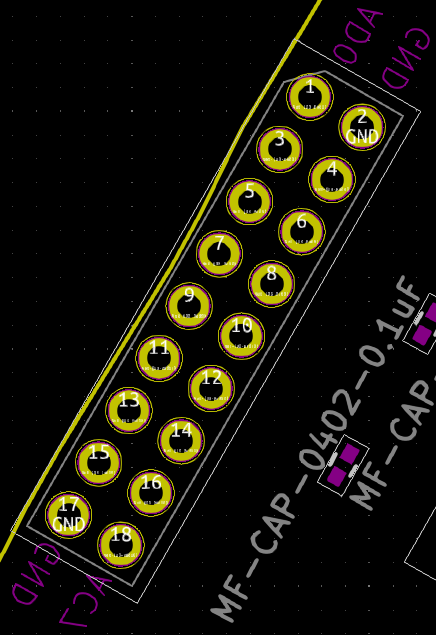
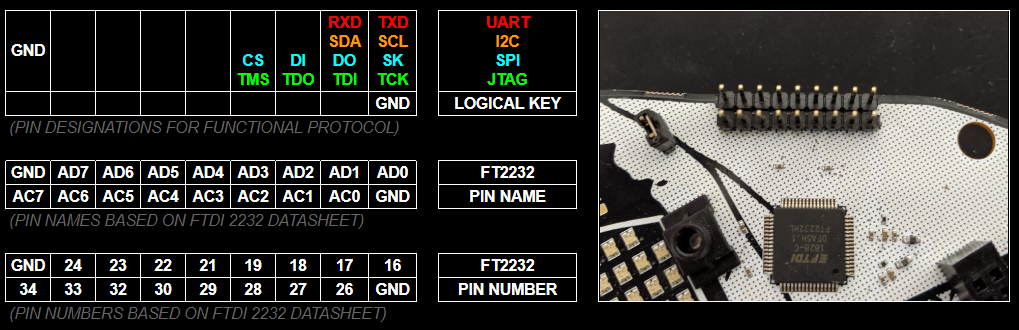
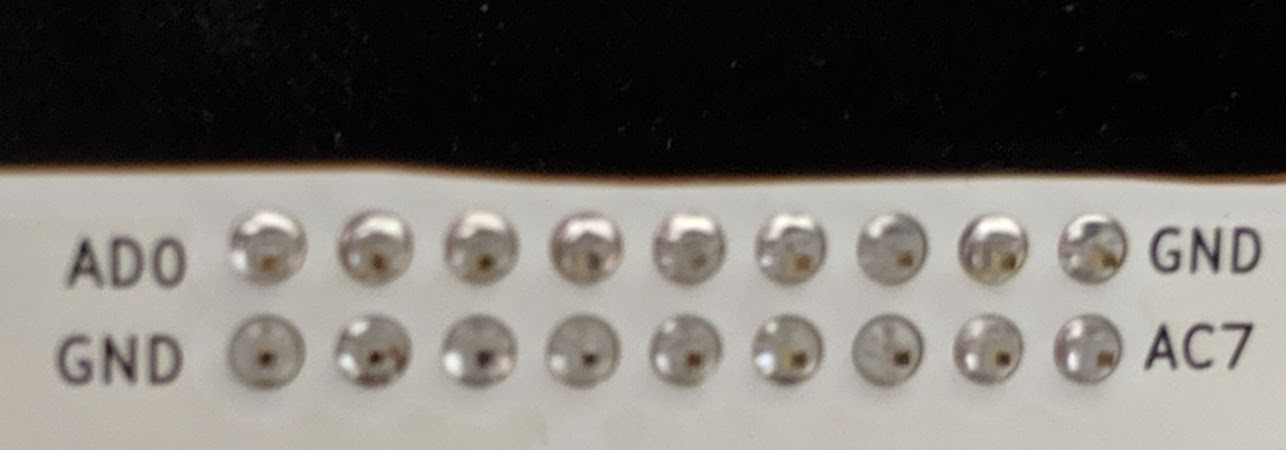
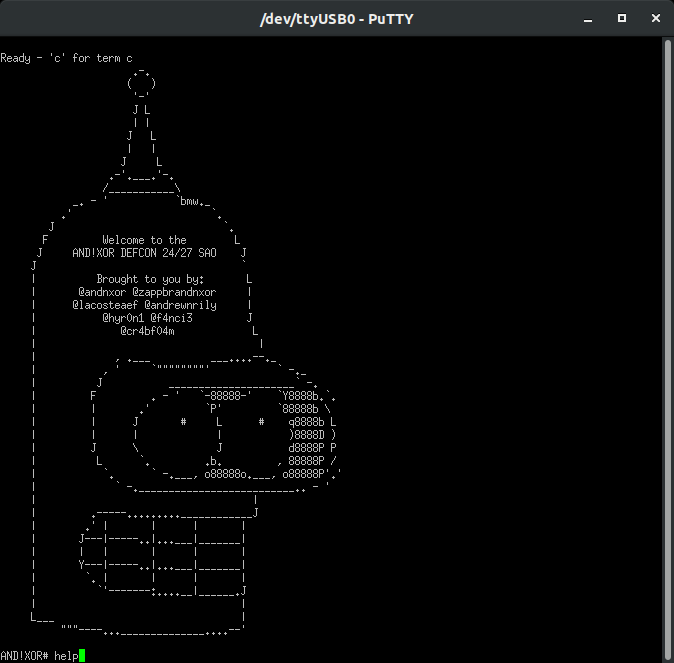
Reading The Legend
The legend at the top of this log is meant to be there as your quick reference. Visually line up those 9x2 cells of information with the 9x2 breakout pins on the badge. This is how you know what to wire up. Right off the bat, you probably think, "Uh... I only need the pins on the top far right like 90% of the time." The answer to that is usually going to be "Yes...but..." there is a lot you can do with this beyond the quick and dirty which would require the other pins (such as bit banging). Also before we go any further, here is a silk screened reference on the BACK of the badge (which makes it opposite) so if you are ever confused you can map up the pins with the legend above.
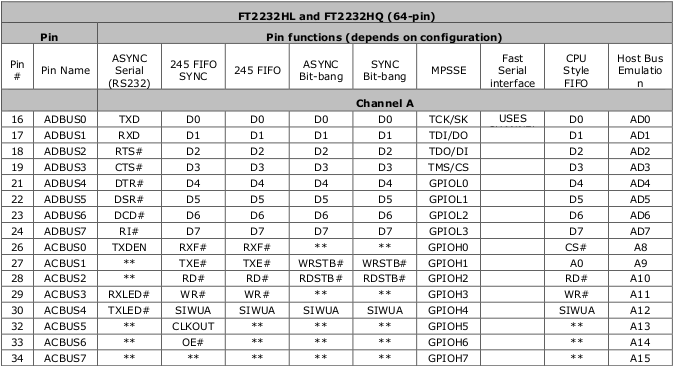
So to really understand the tool you have in your hands, you need to RTFM. There's so much in there and reading the data sheet will give you the boiler plate knowledge necessary to use it. But if you're gonna be lazy... TLDR (these tables are how those pin numbers and names map up to functionality)
As you can see, each pin function has a lot more optional capability that we listed in the quick reference legend; e.g. ASYNC Serial RS232 supports the full specification with RTS, CTS, DTR, DSR, DCD, and even has options to break out pins for options Tx and Rx blinky LEDs. Very cool, but not 100% necessary. Use the data sheet (or be lazy and look at these tables).
(Ignore the Channel B Column, we used Channel B for our Badge's Serial Interface)
The data sheet contains subsections to show which pins for MPSSE allow JTAG and SPI as well.
Learn By
DoingHackingSo we could just talk about data sheets all day OR we could just show you some hands on examples to get you comfortable and started. Let's do the latter. Also, in case you are wondering why we chose the pin out we did (shifting the bottom row over by 1 and staggering GND), this was for re-use of a standard Saleae probe bundle as well as general disagreement between Zapp and Hyr0n about which end GND should be on (closest to vs furthest away from your commonly used functional pins). Compromise prevails!
Warning: Before we get started know this, you have a chance of permanently destroying whatever it is you are trying to hack. Hacking hardware involves learning and the best kind of learning comes from making mistakes (and magic smoke). But you are reading this on Hackaday, so we assume you're on a quest for knowledge and up to the challenge of destroying 10 things to learn how one worked. Proceed at your own risk.
Asynchronous Serial Example
Requires
- Target Device with Serial Interface
- Three Wires (TX, RX, GND)
- Serial Terminal
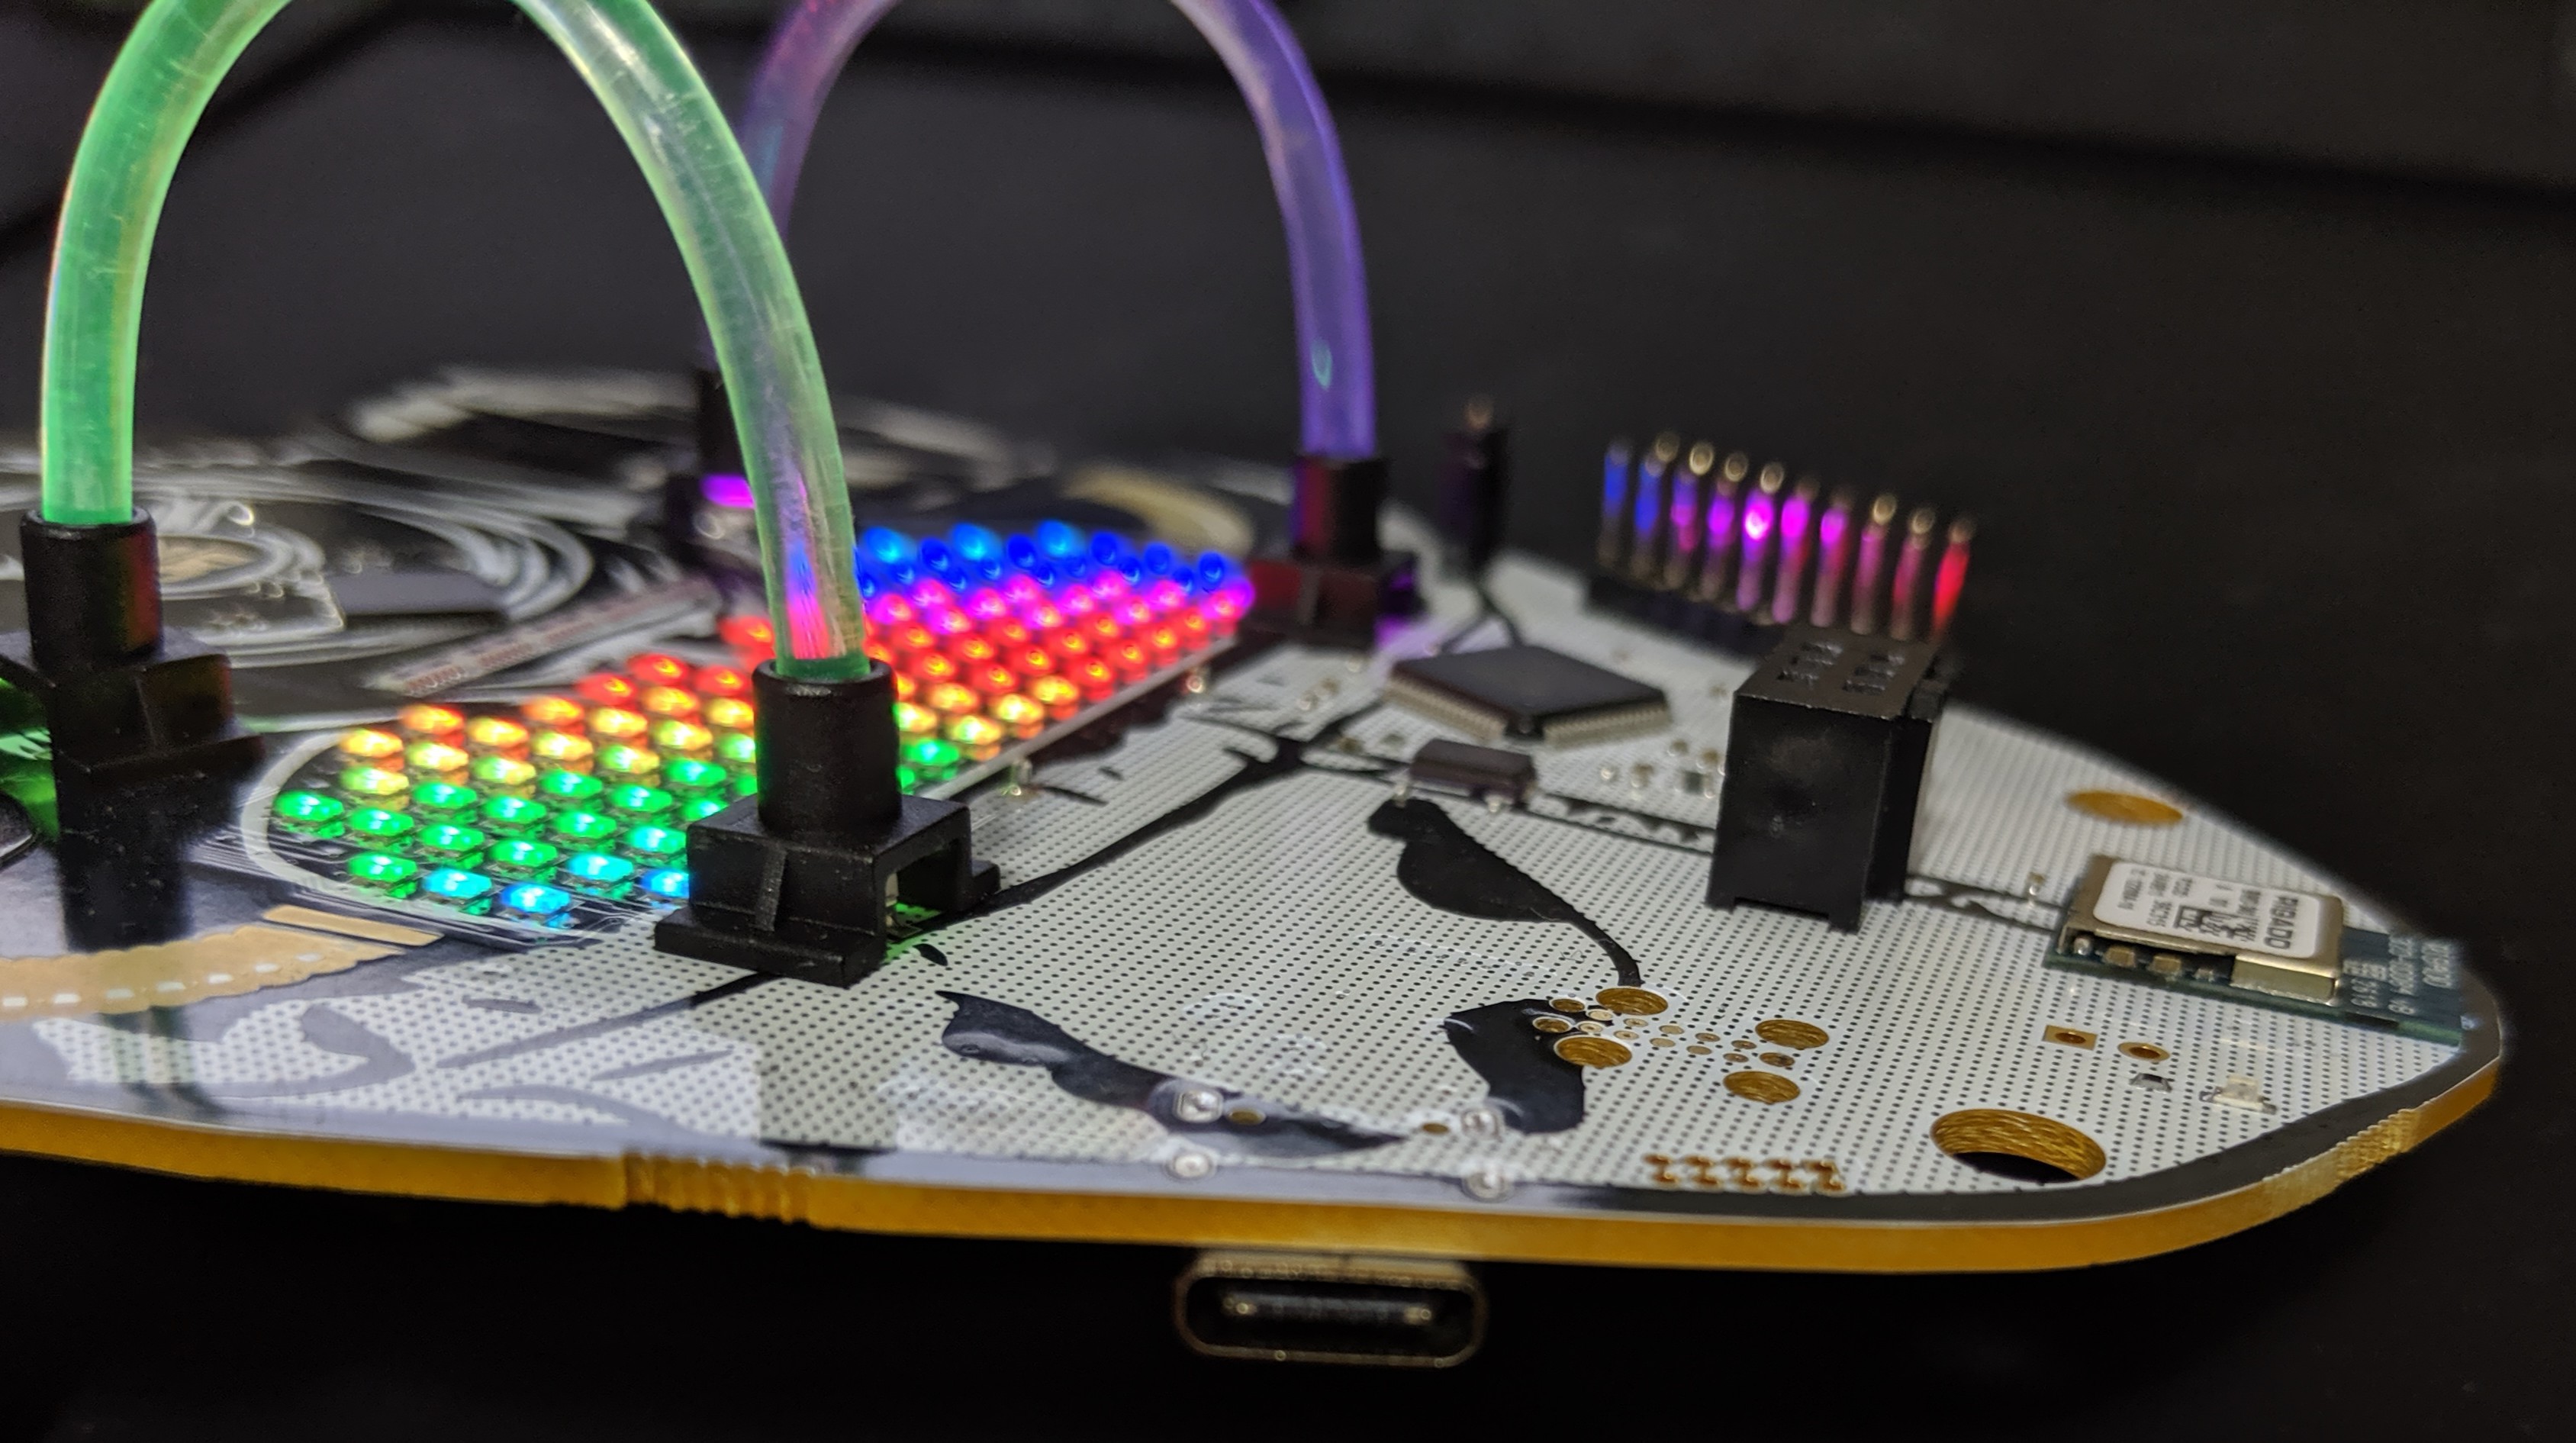
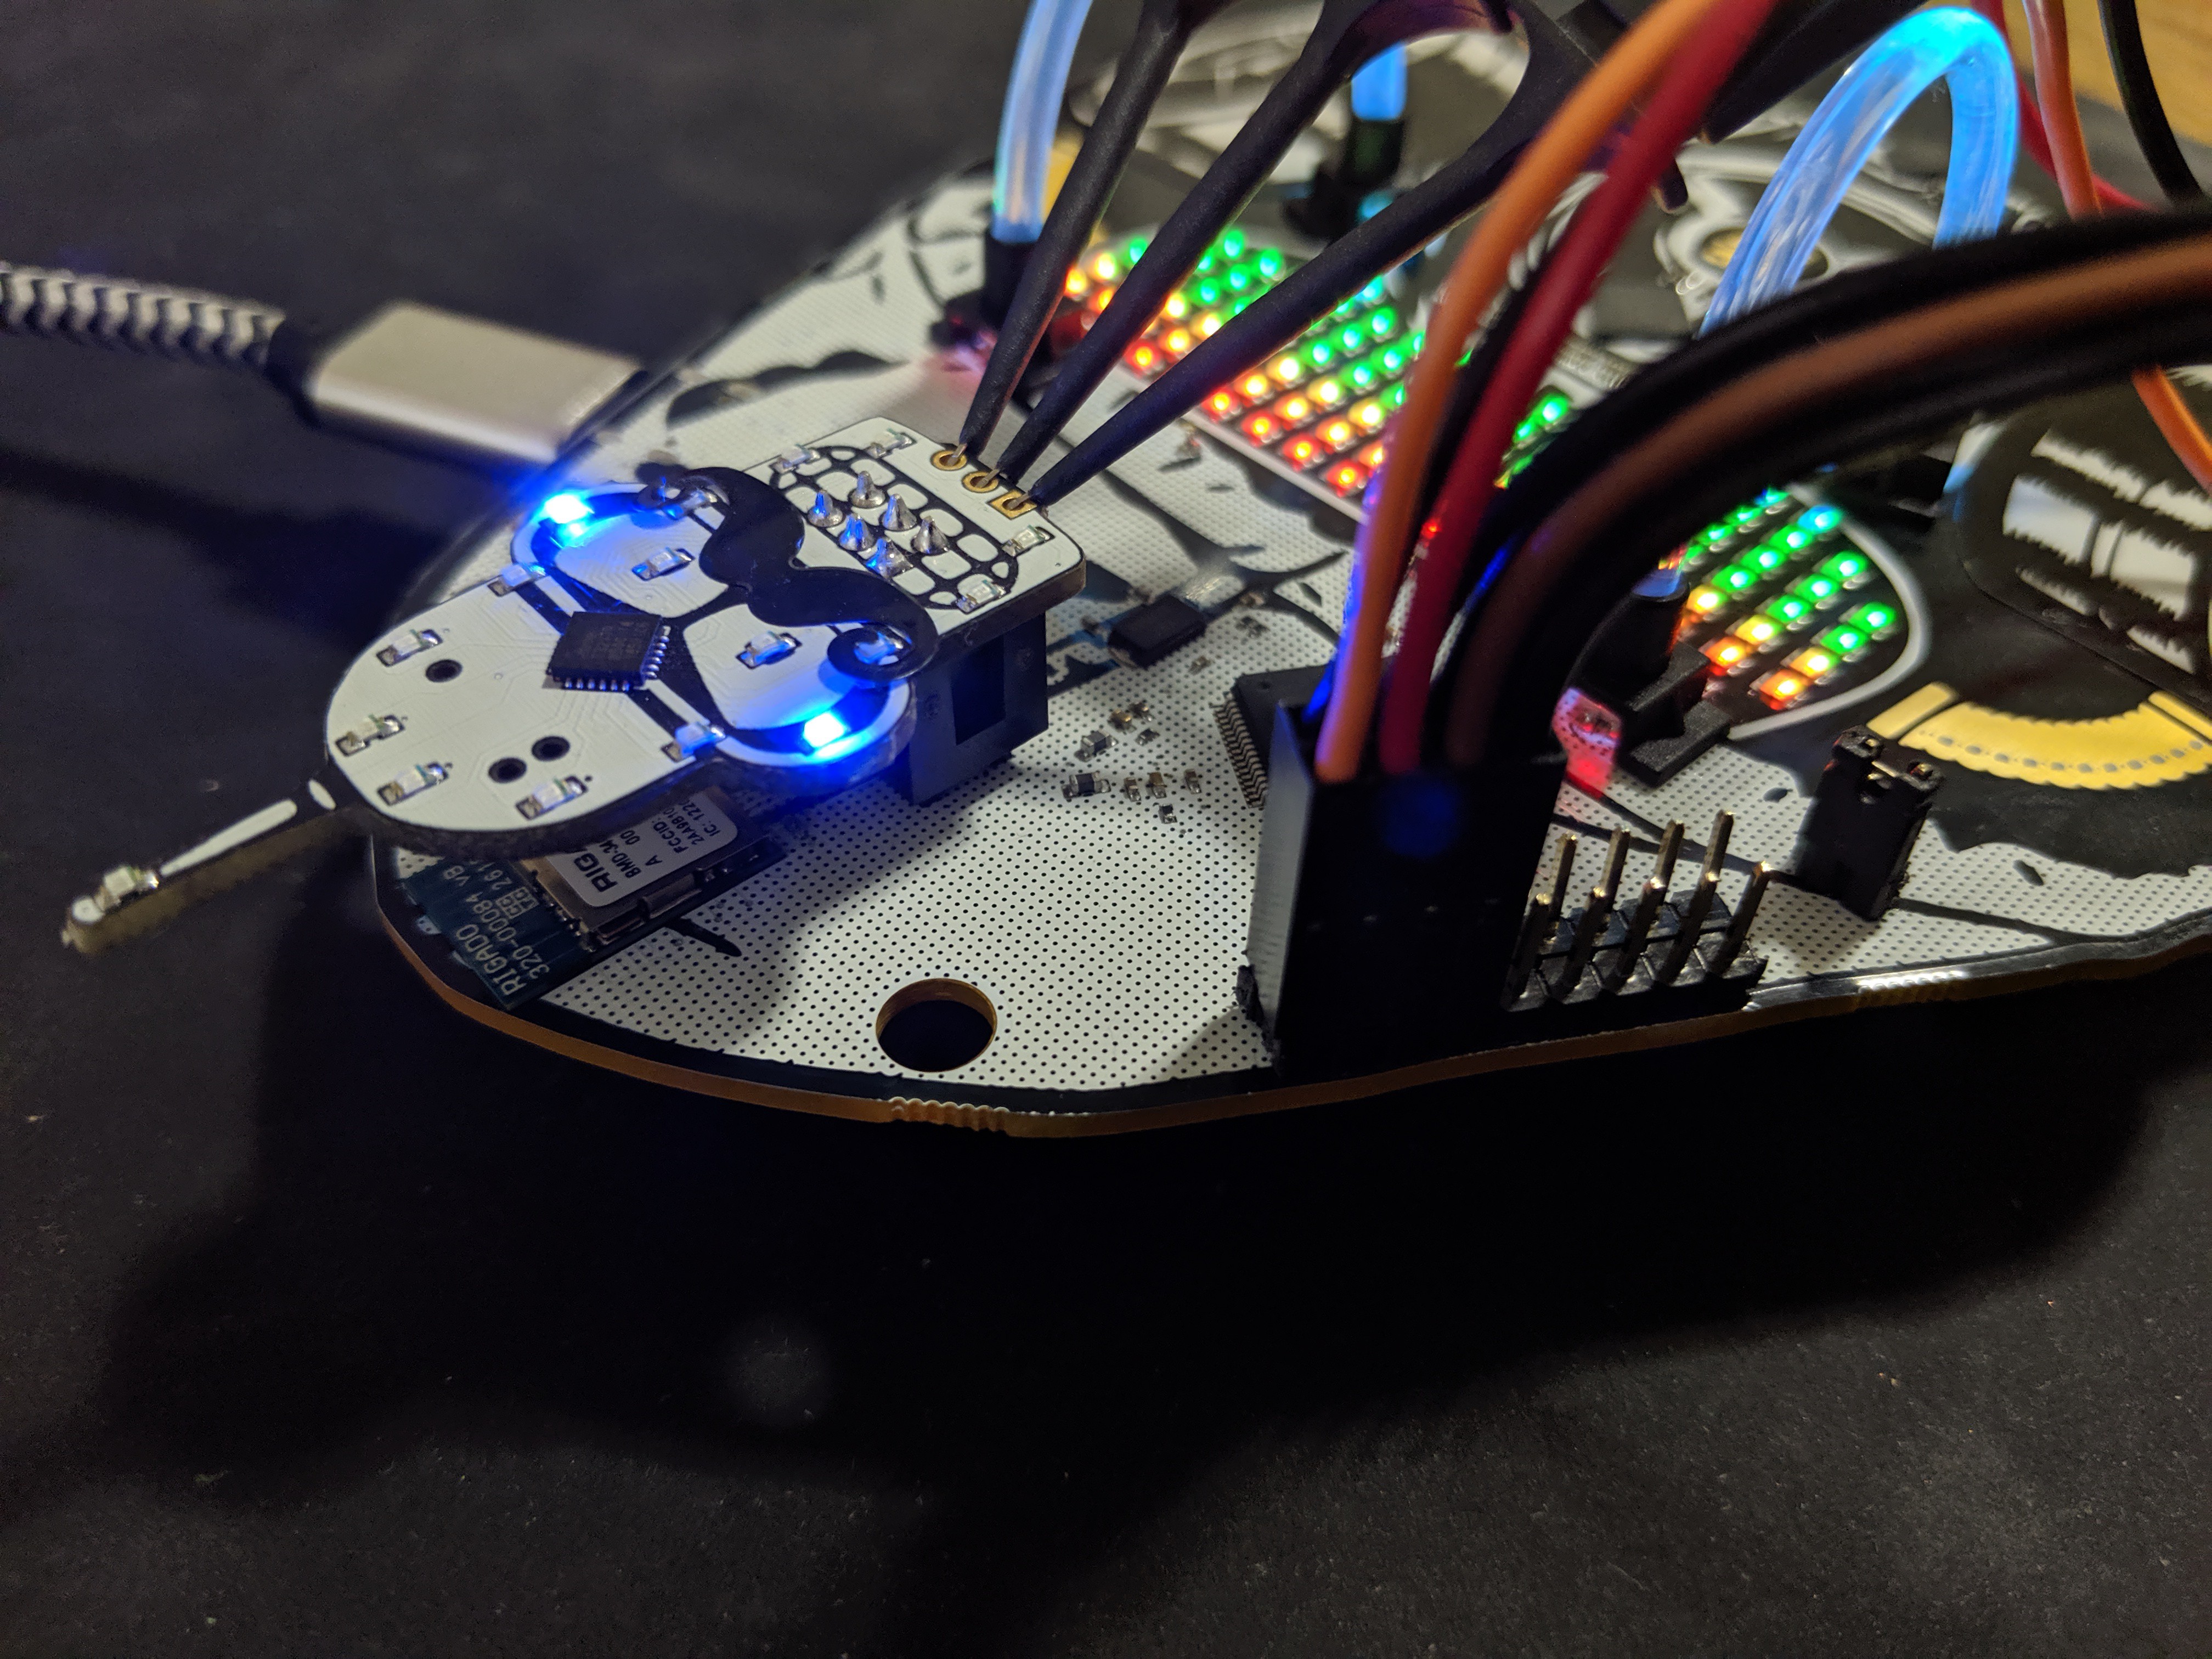
Here we have connected the following...
- FT2232 TX ~ PIN16 (ORANGE) to the Bender SAO RX
- FT2232 RX ~ PIN17 (RED) to the Bender SAO TX
- FT2232 GND (BLACK) to the Bender SAO GND (note this isn't necessary because they already have common ground but is good practice)
Another angle for clarity...
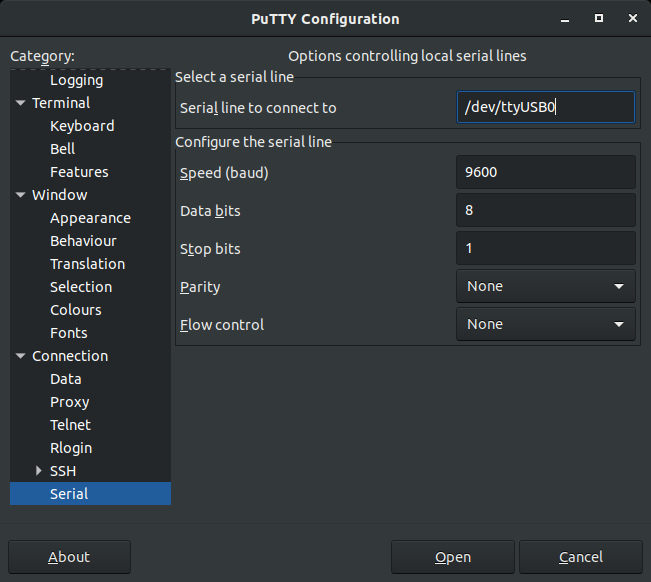
Now since we created the Classic DC24 Bender SAO to have an embedded UART pinout (like the original badge where the USB interface was), we already know the Serial settings (9600/8/N/1). If not, use a JTAGulator to figure it out. So now lets setup our terminal...
Connect and we see...
Well there you go! But you may be thinking...C'mon...do I really need a Serial UART adapter conveniently on my badge at DEF CON?
Shamelessly flood Twitter hacking the DEF CON badge with our badge :)
But take SPECIAL NOTE to what Kingpin called out: 1.8V Serial Adapter
The FTDI 2232 runs at 3V so you will need to put a logic level converter in line to convert the 3V -> 1.8V
Dumping SPI Flash Example
Requires
- Target Device with SPI Flash Module & Data It's Data Sheet
- Five Wires (CLK, SDI, SDO, CS, GND)
- Three Wires for Power (Optional if not in device hacking)
- Flashrom (sudo apt-get install flashrom)
Before we get started, watch this quick video from Deral Heiland (who also is an awesomo hardware hacking madman that enjoys reballing BGA with tweezers in his free time)
https://www.youtube.com/watch?v=ZCeisJ4zWp8
This calls out the Shikra (which Hyr0n owns and has used for a while). But guess what makes the $50 Shikra special, or the $15 Adafruit FT232H breakout, or the rando Ebay $4 FT232H breakout special, or our FREE badge for hackers special... they all use the same FTDI X232H :) (derp)
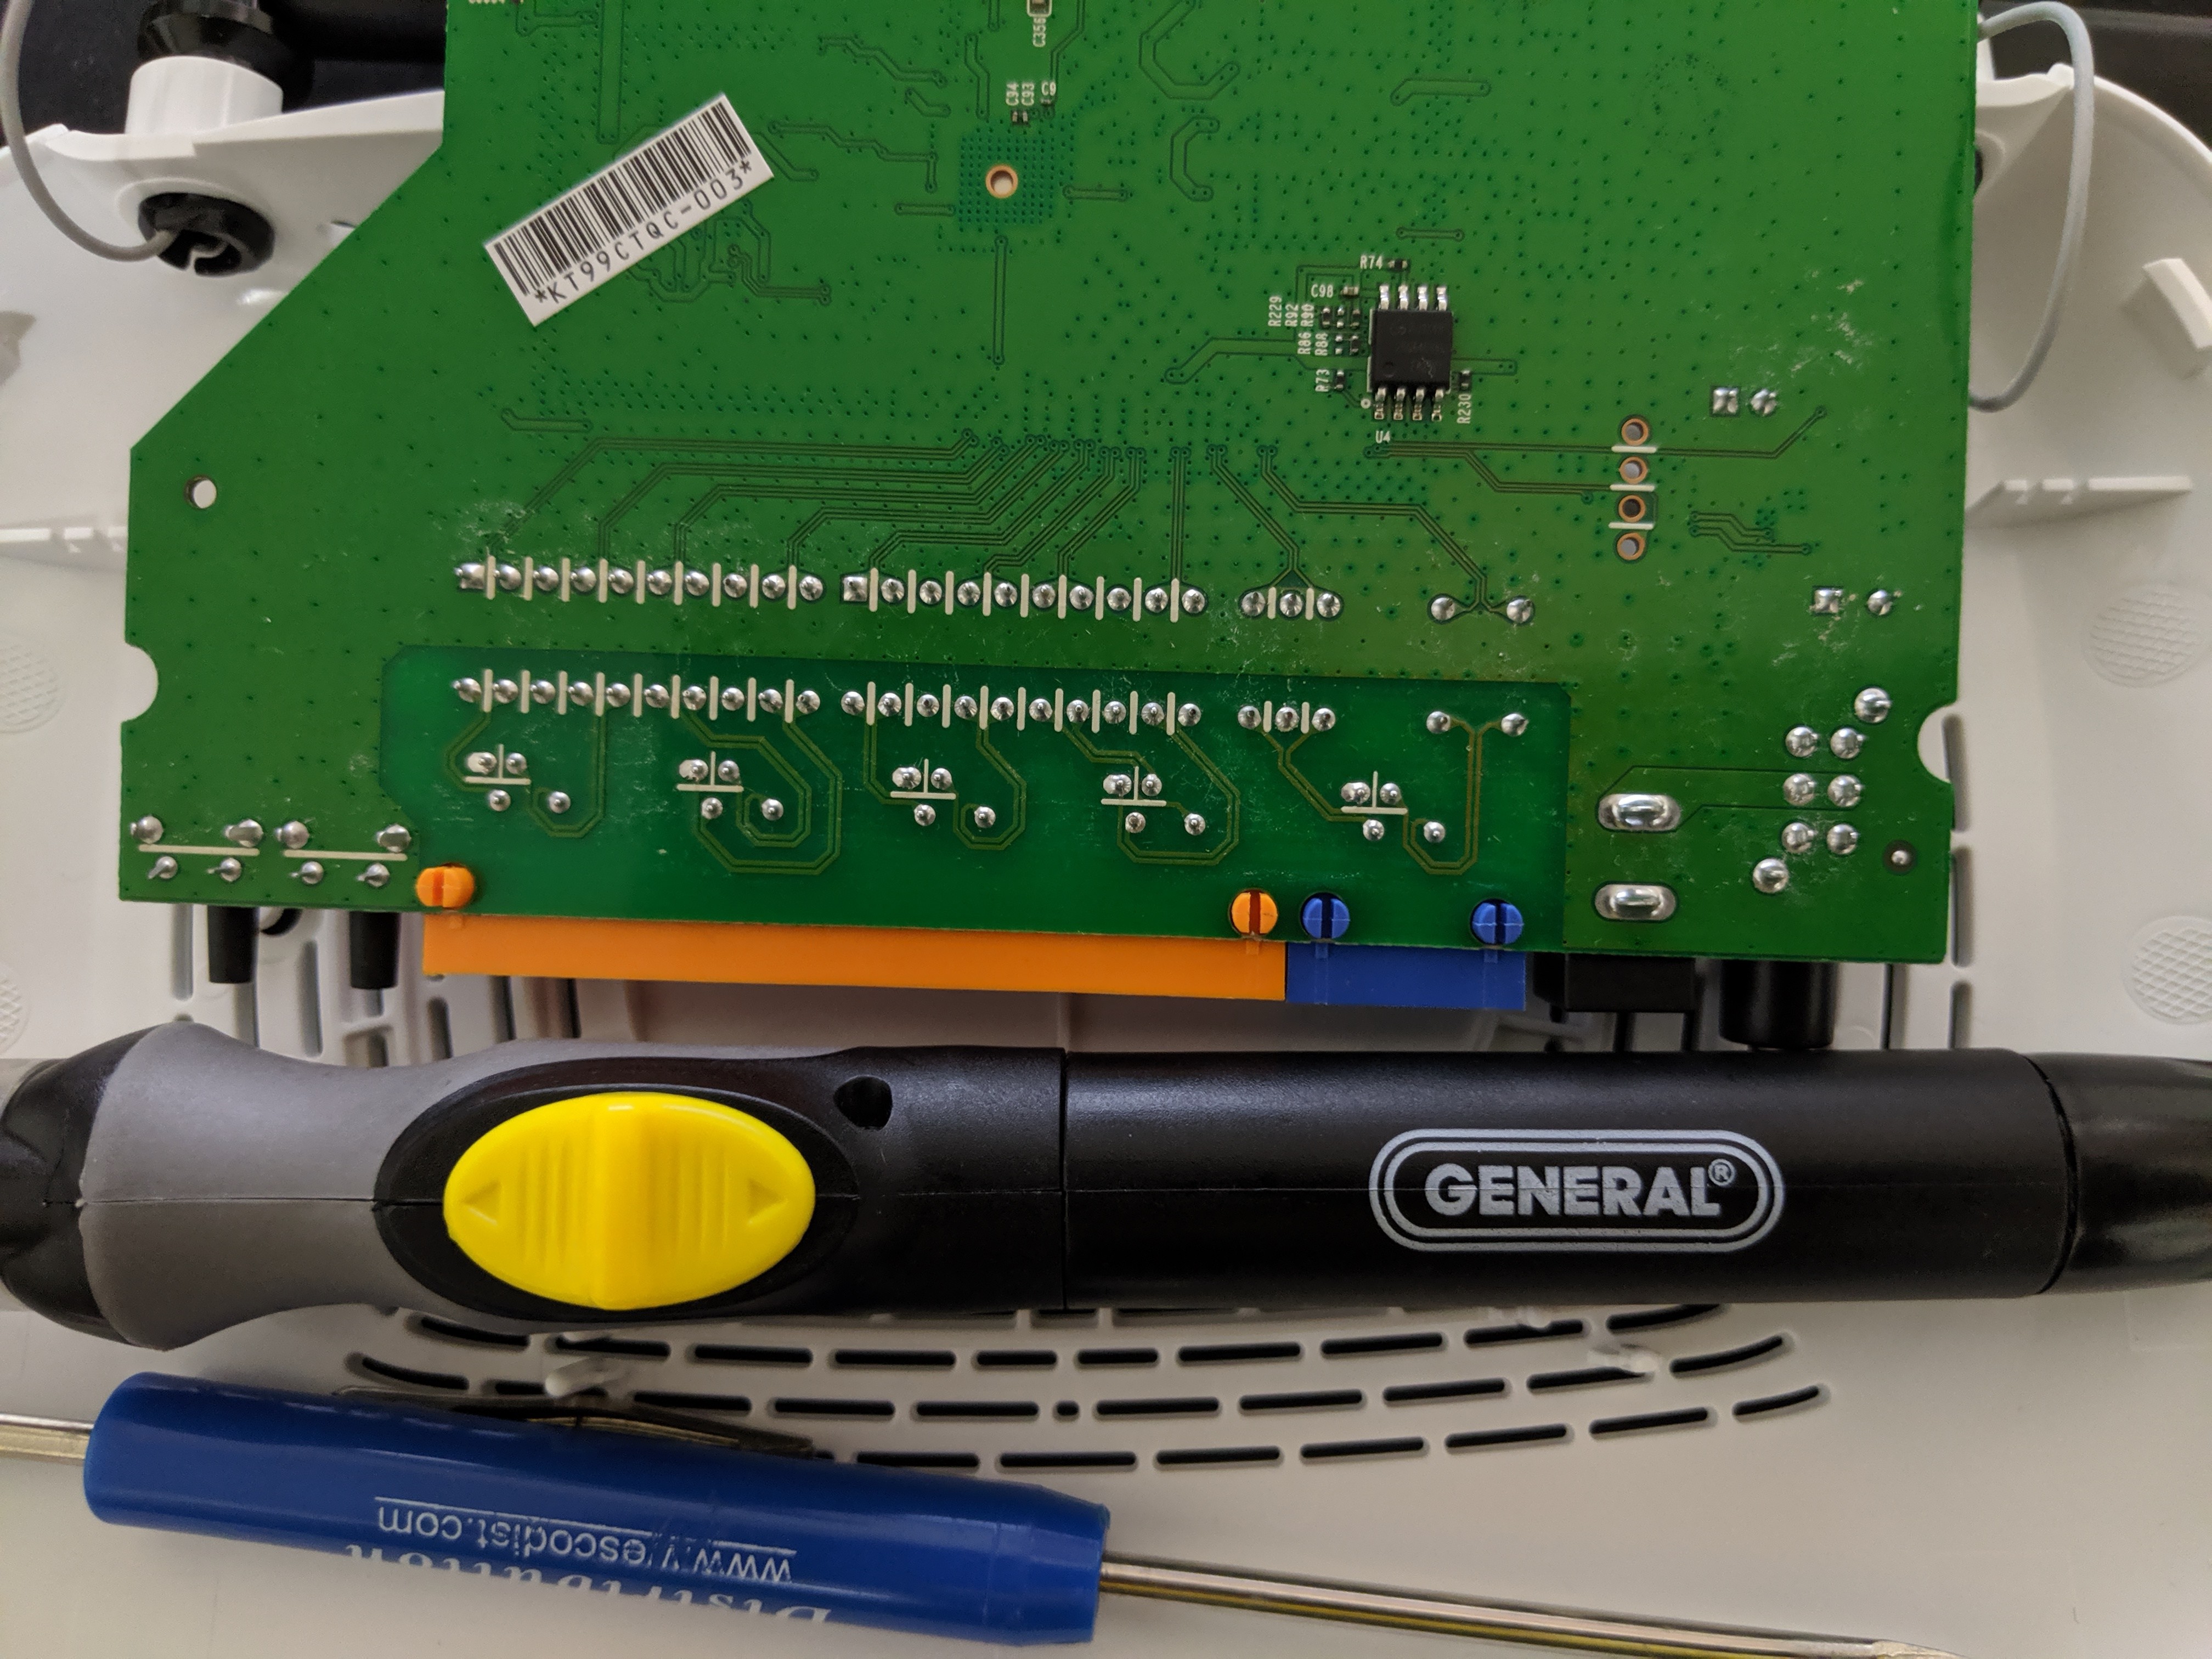
For a target we used a TP-Link (TL-WR841N). For the love of god do NOT use this as your home router...
By the power of screwdriver we got it open and look!
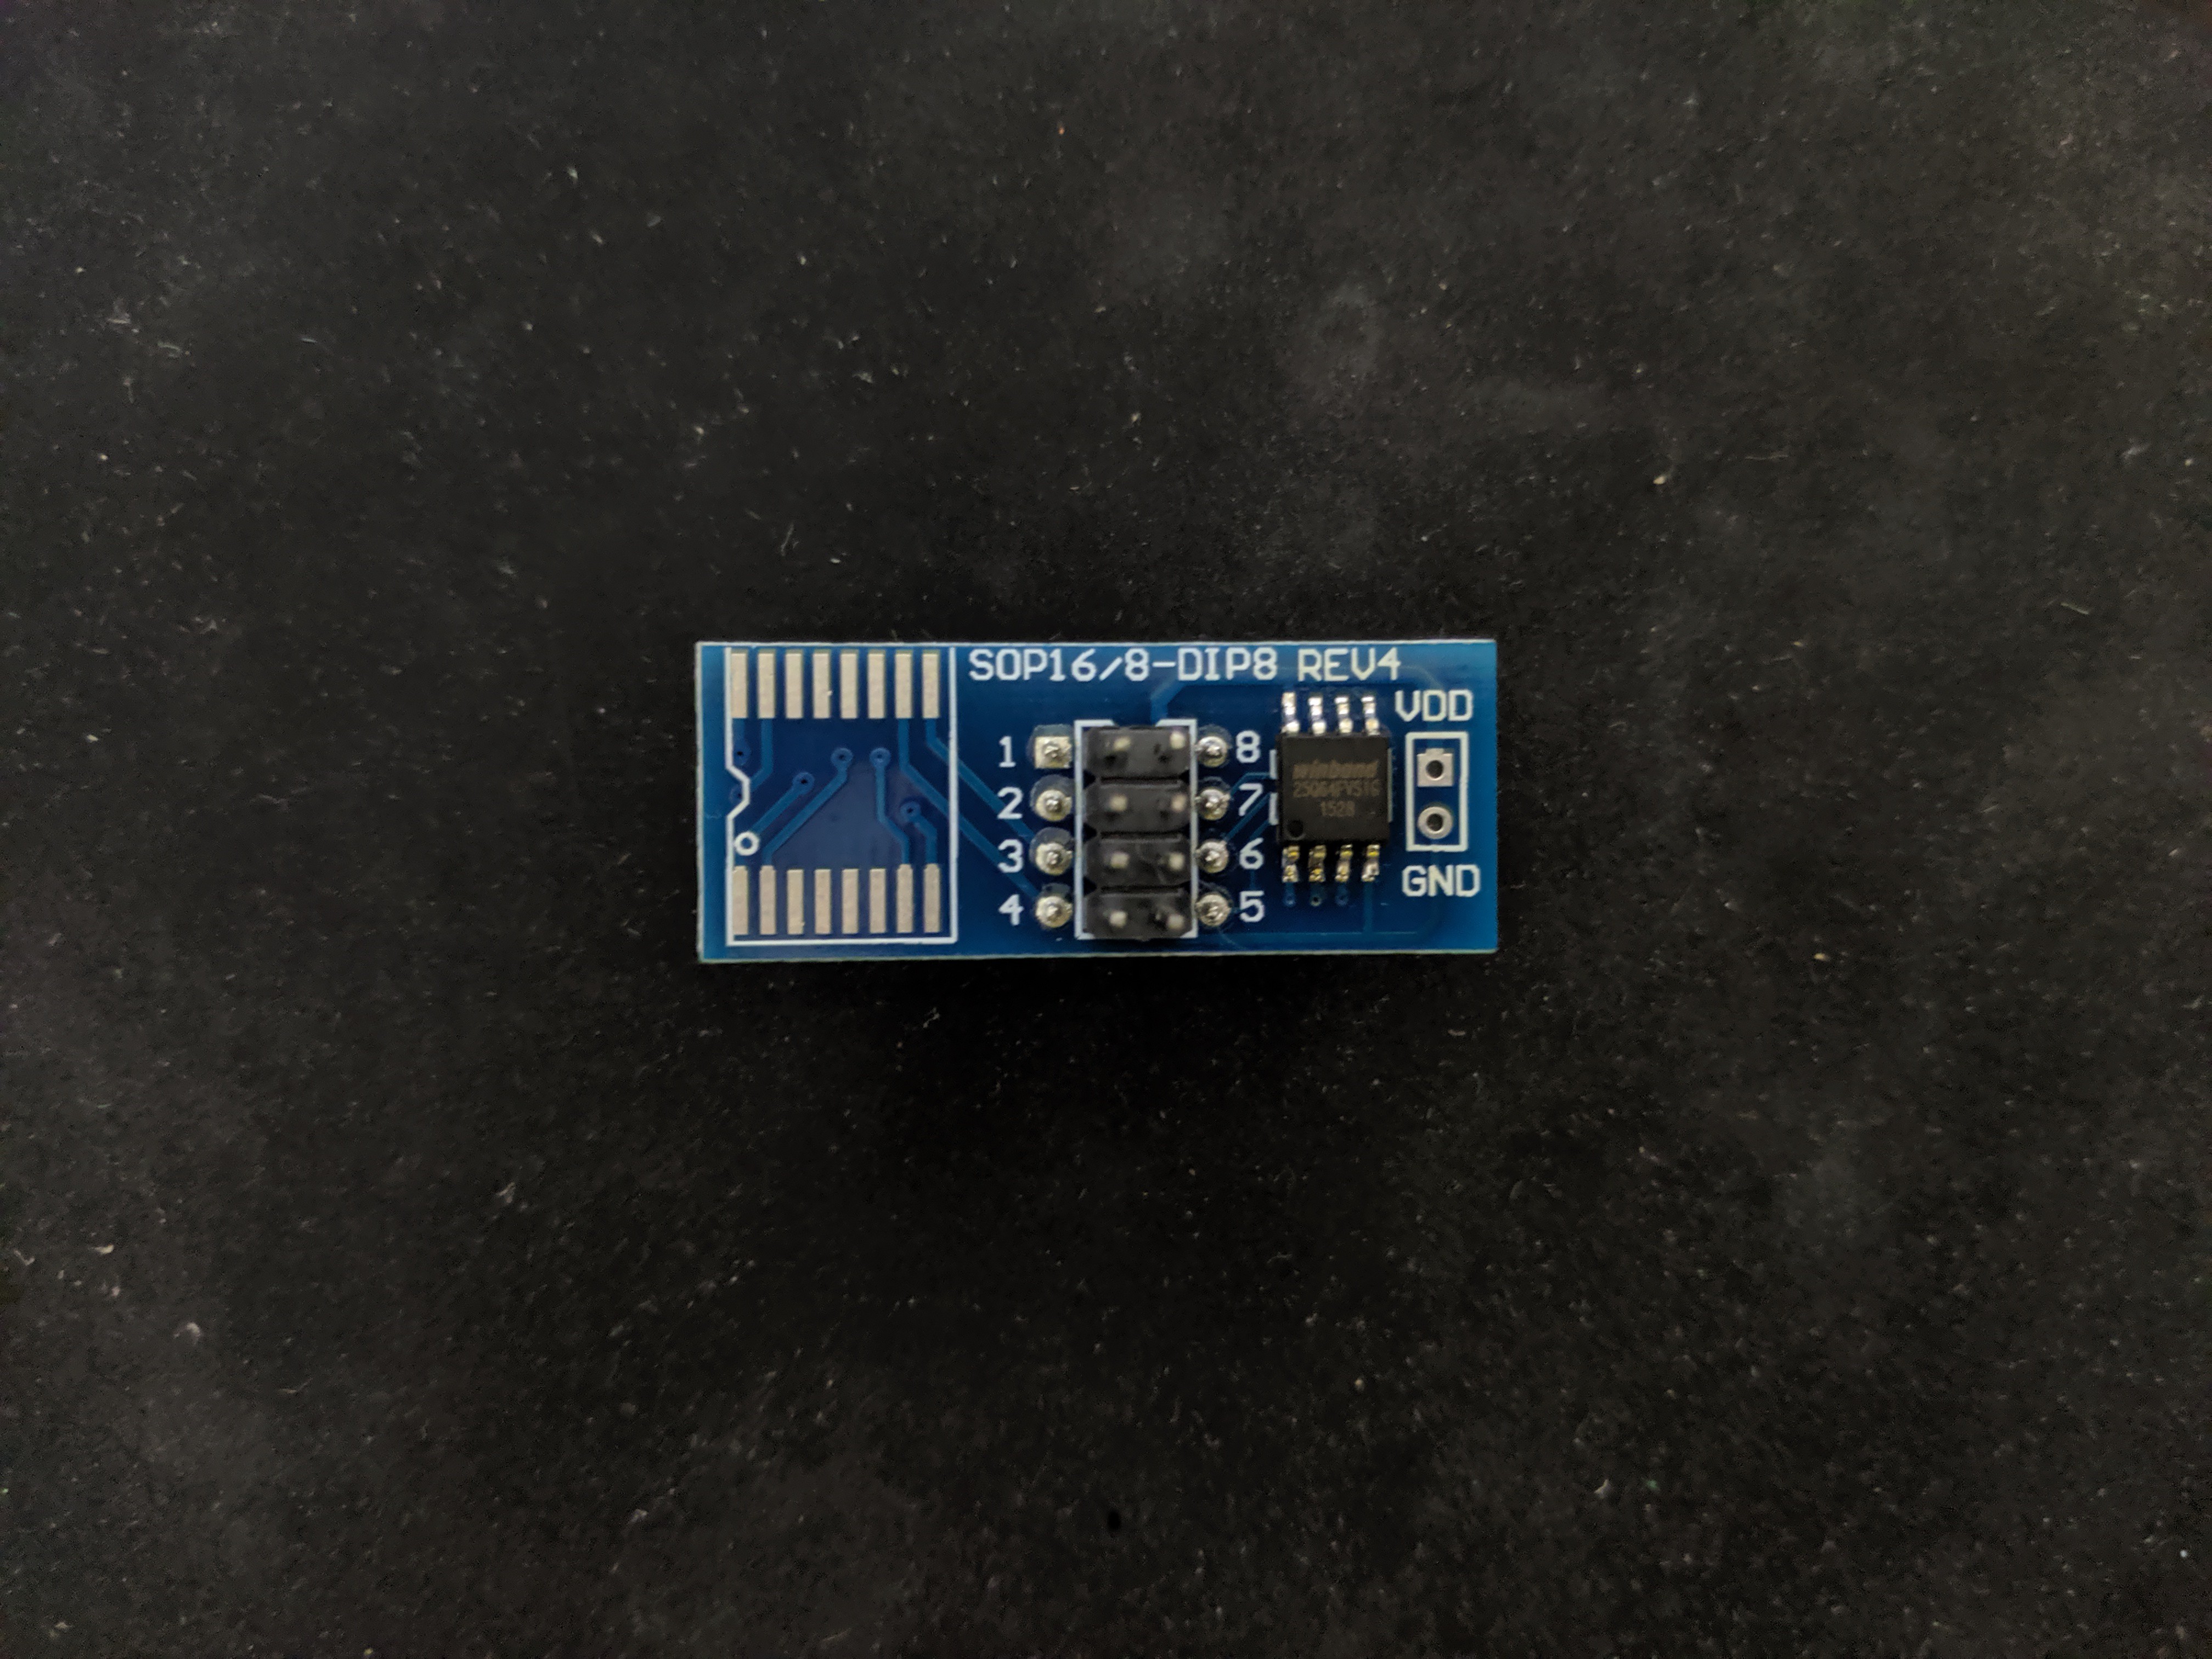
Actually SPI flash is fairly common on most home networking and IoT devices. In the reveal trailer we used an SOIC 8 pin clip (which are nice) however you have to remember to take the target device's MCU and hold NRST to GND to put it in a comatose state (otherwise it will grab control of the SPI flash and you won't be able to dump its contents). To make this example cleaner, I de-soldered the chip and put it on a target board. The trade off with this method is that (as Darel showed in his short tutorial) you have to provide external power to the flash modules VCC, HLD, and WPX pins. But it's cleaner and usually faster than figuring out how to sleep the target systems MCU (and not damage it). Also, SOIC-8 clips are useful for about < 10 times, then the contacts get wiggly and stop working well.
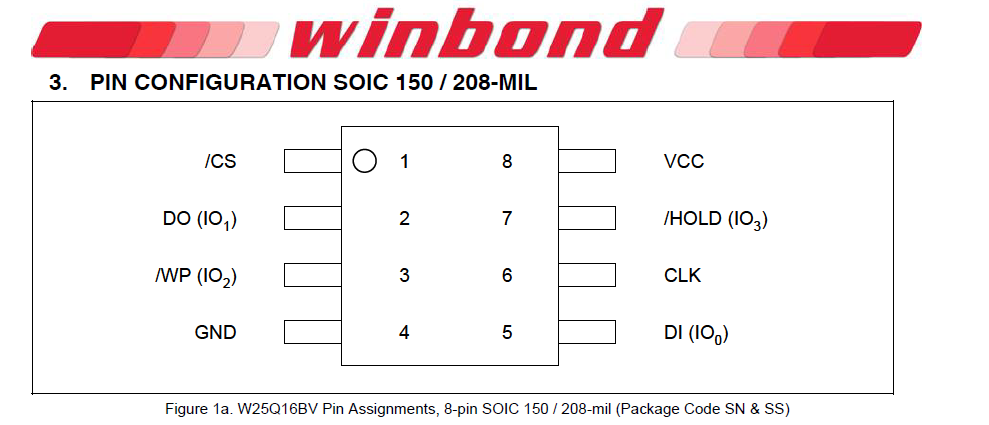
Let's Google the chips code and find its data sheet: W25Q64
- Winbond W25Q64 SPI Flash
- Data Sheet
This is actually very common and a lot of times one will find knock of clones in their devices. Use a logic analyzer to determine the pin out, but 9/10 times it's the same pin out that Winbond uses. Be careful though, if you apply power or the wrong I/O you can erase the entire flash. Use a logic analyzer if you aren't confident. So for reference, here's the data sheet pin out:
Let's wire this up...
- FT2232 CLK ~ PIN16 to the Flash CLK
- FT2232 SDO ~ PIN17 to the Flash MOSI/DI
- FT2232 SDI ~ PIN18 to the Flash MISO/DO
- FT2232 CS ~ PIN19 to the Flash CS
- FT2232 GND to the Flash GND
- External Power 3V to the Flash VCC
- External Power 3V to the Flash HLD
- External Power 3V to the Flash WP
Let's dump the binary using flashrom...
- flashrom -p ft2232_spi:type=2232H,port=A -r router_firmware_dump.bin
- Notice the settings are specific for the ft2232 because we have multiple channels (port=A)
- This will take a couple of minutes but it's faster than a bus pirate at 20-30 minutes!
andnxor@ubuntu:~/dev/flash_dumps$ flashrom -p ft2232_spi:type=2232H,port=A -r router_firmware_dump.bin
flashrom v0.9.9-r1954 on Linux 4.15.0-46-generic (x86_64)
flashrom is free software, get the source code at https://flashrom.org

Calibrating delay loop... OK.
Found Winbond flash chip "W25Q64.V" (8192 kB, SPI) on ft2232_spi.
Reading flash... done.
Now you have a dump of "whatever" was on the flash. This is where you can use your favorite hex editor (but it probably will NOT help you much) or use binwalk to unpack and analyze it. You will usually end up with an embedded Linux file system with all sorts of fun useful things to explore in the /etc/ directory in terms of configuration files, shadow files with crappy encryption, default accounts and passwords...the world is your oyster. Hack, explore, learn, and break apart every IoT device you own before the machines rise up.
Logic Analyzer
Requires
- Target device with a bus you want to monitor (Serial, I2C, SPI, etc)
- Pulseview / Sigrok (sudo apt-get install sigrok)
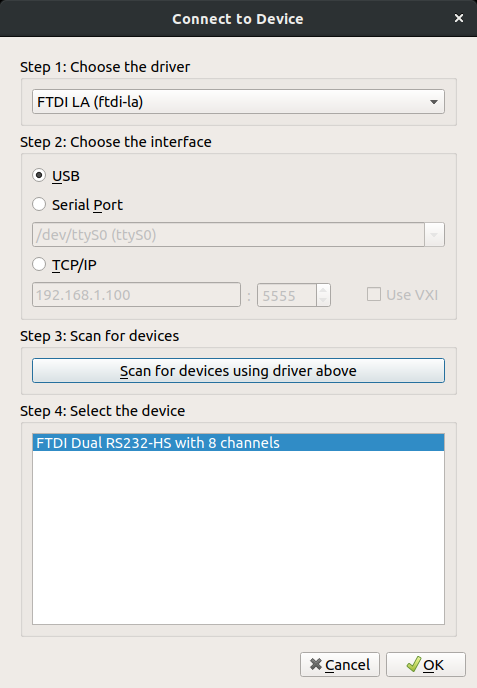
- Read the Sigrok Documentation on FT2232 Devices
Remember above when I said something about needing a Logic Analyzer? Yeah, it can do that too. Install Sigrok then start it from your application drawer (it will have the name Pulseview). Go to the capture device settings. Use the following...
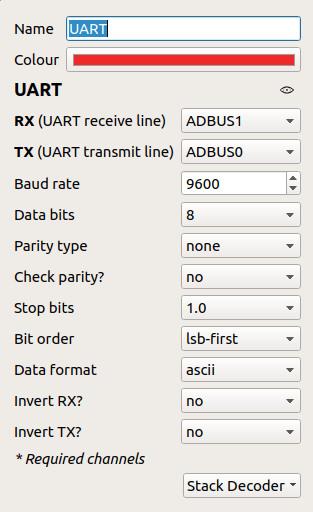
For this demo, we'll use the Classic Bender SAO again. We've connected the FTDI TX (which Pulseview / Sigrok appropriately named ADBUS0) to the Bender RX, FTDI RX (which Pulseview / Sigrok appropriately named ADBUS1) to the Bender TX. We know this is serial UART so let's go ahead and add the UART decoder and set it up...
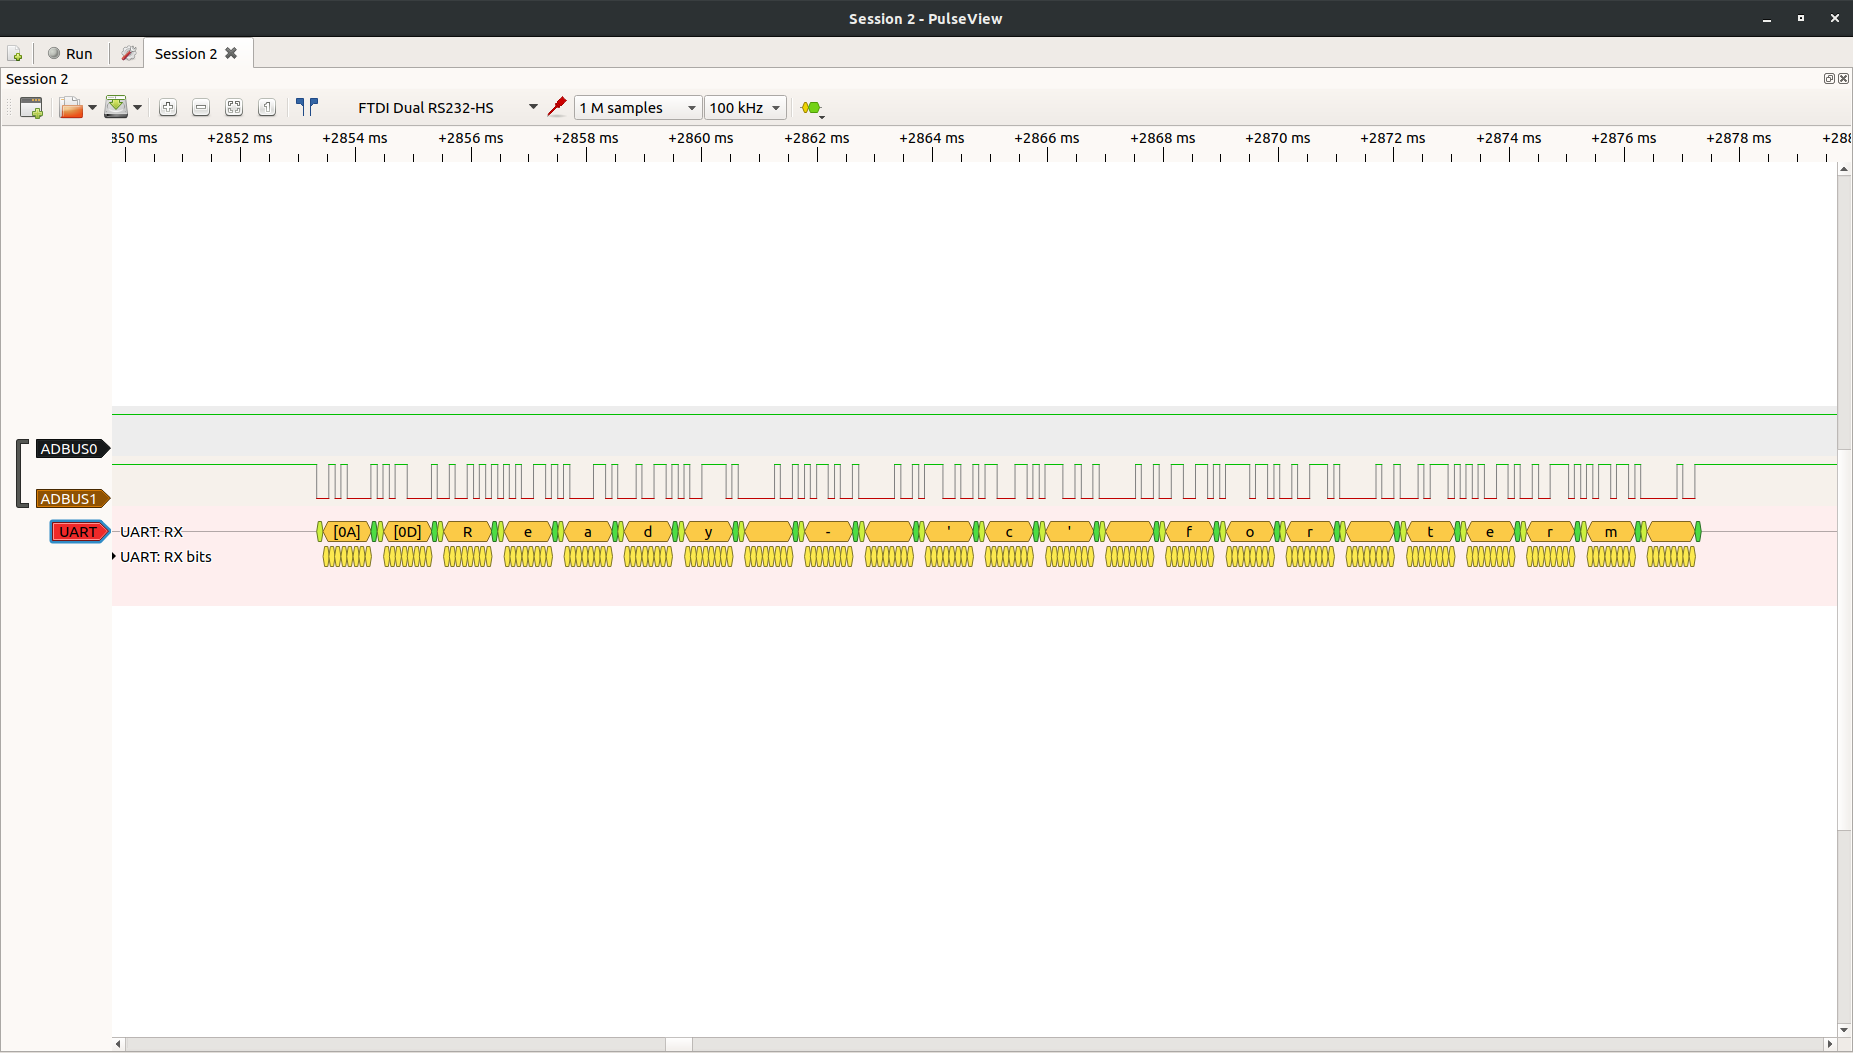
Let's set the sample rate to 100kHz and run..
There we go! As you can see in the drop down many decoders are built in to this open source logic analyzer software package. Have fun and learn what's really going across your embedded interfaces.
JTAG Debugging Example
Requires
- Target Device with JTAG Interface
- GDB and OpenOCD
We were getting ready to write another PoC and ran across a perfect example leveraging the FT2232 for OpenOCD debugging on JTAG / SWD (okay, really Hyr0n is up late and getting very tired).
There's really no reason to write up our own when perfectly relevant information exists on the internet. OpenOCD isn't for the faint of heart and has a steep learning curve. But boy howdy is it powerful. You can debug the embedded device in real time, NOP logic, circumvent password checks ;) All of this is possible as long as when the target device was provisioned, that debug wasn't disabled. Zapp is working on a very detailed post describing this, so stay tuned...
Other Fun
At this point you are probably wondering what else can you do with it? Well the reason so many tools exist is that FTDI published well written application design notes and programming guides. There's even Python modules and guides for using them if you aren't comfortable programming in C. Make your own tools or at the very least leverage the hundreds of packages out there that already work with the FT2232.
While you wait for the next post, watch this talk given by Joe Fitz at Securi-Tay 2019 showing many awesome things you can do with this chip.
-
BENDER 2.0
07/22/2019 at 03:53 • 0 commentsThe Badge Enabled Non Directive Enigma Routine (B.E.N.D.E.R) is back for more embedded text based adventure hacking challenges. This is our puzzle framework we introduced during our DC26 project. Essentially it takes the style of an older text based adventure game (e.g. Colossal Cave, Zork, etc.) with ANSI style graphics. You have a limited set of command line interface actions which you perform on items. However this is not purely isolated to the terminal shell. B.E.N.D.E.R. is a framework to help us present our security challenges with hacker friendly graphics and encapsulate the game story line in a fun way. You start the game in the Home Village and must travel either North, South, East, or West Villages to solve a number of challenges leveraging actual hacking skills and contextually "in game" items. Our badges are for hacker cons and will always try to explore and teach some aspect of security.
For example, on the DC26 badge, in the North Village the hacker would "hack PIN_PAD with 1234" (or any four digit pin) causing the lights on the badge to blink. Solving the challenge required a logic analyzer or o-scope to see the timing on the I2C bus change, leveraging side channel power analysis to crack the pin which was randomized for every badge. As the delay got longer, you were closer to the actual pin.
Another example from the DC26 badge, in the West Village where once using an in game smartphone app used to fly a WiFi enabled drone...nothing would happen... unless you were using an actual device to capture the WiFi packets coming from the badge and analyzing them in WireShark to learn the sekrets.
Serial Connection
B.E.N.D.E.R. is entirely accessed through a serial terminal.
- Speed: 115200
- Data Bits: 8
- Stop Bits: 1
- Parity: None
- Flow Control: None
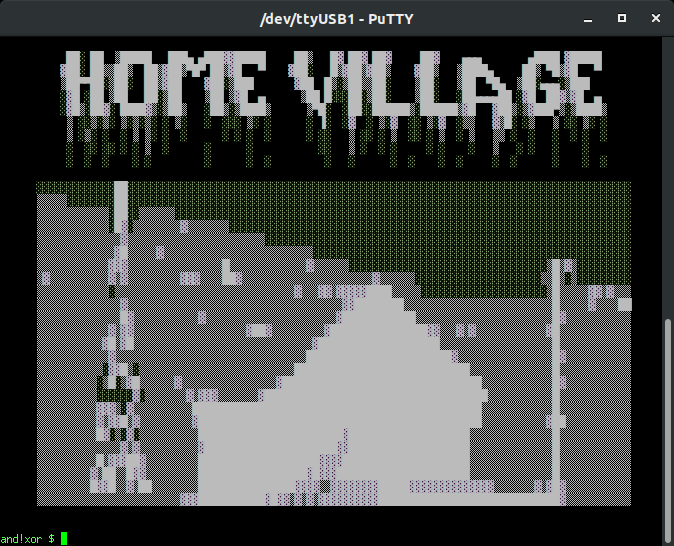
- Window Columns (110) - This is important for the GFX to appear properly on your screen!
- Window Rows (40) - This is important for the GFX to appear properly on your screen!
An important thing to note, our badge mounts as TWO serial devices because we leverage the FTDI 2232H component. The first digit (2) in the component number signifies that there are actually two FT232H cores on the chip. We user the first one as the FT2232 breakout for hardware hacking and the second one for the embedded terminal. If you use Linux (and you always should), that means plugging in the badge will result in two USB mount points:
- /dev/ttyUSB0 : The Hardware Hacking Breakout
- /dev/ttyUSB1 : The Embedded Serial Terminal (BOTNET & B.E.N.D.E.R.)
On Windows, this means you will get a virtual com port of N and N+1, choose the N+1. Windows keeps track of all serial devices every plugged in and saves them. So if the badge is the 45th device you have ever plugged in, the following would happen...
- COM45 : The Hardwre Hacking Breakout
- COM46: The Embedded Serial Terminal (BOTNET & B.E.N.D.E.R.)
Now back to Linux. We have some better recommendations after clunking around last year. We still recommend a terminal with allows escape sequences and ANSI (otherwise you get no colors or GFX). Minicom can be a bit tricky to setup, but the following work great:
- PuTTY
- sudo apt-get install putty
- usage: launch from your application tray
- Ensure to set the Window Column (110) and Row (40) settings for proper GFX display
- Screen
- sudo apt-get install screen
- command line application
- usage: screen /dev/ttyUSB1 115200
- Ensure to resize your console window such that the Window Column (110) and Row (40) settings can have proper GFX display
- CTRL+A : Enters the screen command menu
- CTRL+A then "\" to disconnect and quit
Commands
So how does one start? At the command line type "BENDER" for a list of sub commands.
- BENDER (sub commands listed below)
- STATUS: Status of your progress
- WEIGHT: Set your weight (100-400lbs)
- GENDER: Set your gender (M, F, X)
- RECAP: Recap since DC26 = Run This First!
- RESET: Reset the challenge (all data will be deleted)
- COMMANDS: Commands specific to B.E.N.D.E.R.
Commands specific to B.E.N.D.E.R. are listed as: WALK, N, S, E, W, LOOK, HACK, DRINK, STEAL
Navigation
- WALK (sub commands listed below)
- HOME: Walk to the Home Village
- NORTH: Walk to the North
- SOUTH: Walk to the South
- EAST: Walk to the East
- WEST: Walk to the West
Essentially WALK is how you navigate. The sub commands to a location are relative to your current location. Since "HOME" is central to all locations, typing "WALK HOME" will always take the player back to their starting location. However since it also takes in to account directional relativity, being in the south village and typing "WALK NORTH" will take you along the trail to the HOME VILLAGE. Repeating the command to "WALK NORTH" will then continue on the the trail to the NORTH VILLAGE. There are also quick key short cuts to ensure this was just like Colossal Cave.
- Quick Navigation (the follow direction commands can be entered as short cuts)
- N: Shortcut for typing "WALK NORTH"
- S: Shortcut for typing "WALK SOUTH"
- E: Shortcut for typing "WALK EAST"
- W: Shortcut for typing "WALK WEST"
Interaction
Items which you can interact with are in ALL CAPS and displayed in an area's general information or in your inventory
- LOOK
- Typing without any sub command displays general information about the area
- AT: Displays specific information about a target item.
- DRINK (all the booze)
- Allows you to drink beverages in your inventory with a specified volume
- Example: "DRINK BALLAST_POINT_SOUR_WENCH 22.0"
- HACK (all the things)
- Allows you to hack items with items in your inventory
- Example: "HACK BIG_RED_BUTTON with FINGER"
- STEAL
- Allows you to take items you find
- Example: "STEAL BOTTLE OPENER"
- BENDER STATUS
- Displays your current status as well as items in your inventory
Preview...
We aren't going to show much more than this, after all we want you to get a badge and try this out. However the following is a copy paste preview straight from the terminal. Enjoy!
██░ ██ ▒█████ ███▄ ▄███▓▓█████ ██▒ █▓ ██▓ ██▓ ██▓ ▄▄▄ ▄████ ▓█████ ▓██░ ██▒▒██▒ ██▒▓██▒▀█▀ ██▒▓█ ▀ ▓██░ █▒▓██▒▓██▒ ▓██▒ ▒████▄ ██▒ ▀█▒▓█ ▀ ▒██▀▀██░▒██░ ██▒▓██ ▓██░▒███ ▓██ █▒░▒██▒▒██░ ▒██░ ▒██ ▀█▄ ▒██░▄▄▄░▒███ ░▓█ ░██ ▒██ ██░▒██ ▒██ ▒▓█ ▄ ▒██ █░░░██░▒██░ ▒██░ ░██▄▄▄▄██ ░▓█ ██▓▒▓█ ▄ ░▓█▒░██▓░ ████▓▒░▒██▒ ░██▒░▒████▒ ▒▀█░ ░██░░██████▒░██████▒▓█ ▓██▒░▒▓███▀▒░▒████▒ ▒ ░░▒░▒░ ▒░▒░▒░ ░ ▒░ ░ ░░░ ▒░ ░ ░ ▐░ ░▓ ░ ▒░▓ ░░ ▒░▓ ░▒▒ ▓▒█░ ░▒ ▒ ░░ ▒░ ░ ▒ ░▒░ ░ ░ ▒ ▒░ ░ ░ ░ ░ ░ ░ ░ ░░ ▒ ░░ ░ ▒ ░░ ░ ▒ ░ ▒ ▒▒ ░ ░ ░ ░ ░ ░ ░ ░░ ░░ ░ ░ ▒ ░ ░ ░ ░░ ▒ ░ ░ ░ ░ ░ ░ ▒ ░ ░ ░ ░ ░ ░ ░ ░ ░ ░ ░ ░ ░ ░ ░ ░ ░ ░ ░ ░ ░ ░ ░ ░░░░░░░░░░░░░██░░░░░░░░░░░░░░░░░░░░░░░░░░░░░░░░░░░░░░░░░░░░░░░░░░░░░░░░░░░░░░░░░░░░░░░░░░░░░░░░░░░░ ▒▒▒▒▒░░░░░░░░██░░░░░░░░░░░░░░░░░░░░░░░░░░░░░░░░░░░░░░░░░░░░░░░░░░░░░░░░░░░░░░░░░░░░░░░░░░░░░░░░░░░░ ▒▒▒▒▒▒▒▒▒▒▒▒░██░░▒▒▒▒▒▒░░░░░░░░░░░░░░░░░░░░░░░░░░░░░░░░░░░░░░░░░░░░░░░░░░░░░░░░░░░░░░░░░░░░░░░░░░░░ ▒▒▒▒▒▒▒▒▒▒▒▒░█▓░▒▒▒▒▒▒▒▒▓▒▒▒▒▒▒▒░░░░░░░░░░░░░░░░░░░░░░░░░░░░░░░░░░░░░░░░░░░░░░░░░░░░░░░░░░░░░░░░░░░ ▒▒▒▒▒▒▒▒▒▒▒▒▒▒▓▒▒▒▒▒▒▒▒▒▒▒▒▒▒▒▒▒▒▒▒▒▒▒░░░░░░░░░░░░░░░░░░░░░░░░░░░░░░░░░░░░░░░░░░░░░░░░░░░░░░░░░░░░░ ▒▒▒▒▒▒▒▒▒▒▒▒▒▓█▒▒▒▒▒▓▒▒▒▒▒▒▒▒▒▒▒▒▒▒▒▒▒▒▒▒▒▒▒▒▒░░░░░░░░░░░░░░░░░░░░░░░░░░░░░░░░░░░░░░░░░░░░░░░░░░░░░ ▒▒▒▒▒▒▒▒▒▒▒▒▓▓▓▒▒▒▒▒▒▒▒▒▒▒▒▒▒▒▒█▒▒▒▒▒▒▒▒▒▒▒▒▒▓▒▒▒▒▒▒░░░░░░░░░░░░░░░░░░░░░░░░░░░░░░░░░▒█▒▓▒░░░░░░░░░ ▒▓▒▒▒▒▒▒▒▒▒▒▓▒▓▒▒▒▒▒▒▒▒▒▓▓▓▒▒▒▒██▓▒▒▒▒▒▒▒▒▒▒▒▒▒▒▒▒▒▒▒▒▒▒▓▒▒▒▒▒▒░░░░░░░░░░░░░░░░░░░░░▒▒█▒░▒░░░░░░░░░ ▒▒▒▒▒▒▒▒▒▒▒▒░▒▒▒▒▒▒▒▒▒▒▒▒▒▒▒▒▒▒▒▒▒▒▒▒▒▒▒▒▒▒▓▒▒▒▓▓▒▓▓▓▓▓████▒▒▒▒▒░░░░░░░░░░░░░░░░░░░░░▒█▒▒▒▒▒▓▓▒▓▒▒▒ ▒▒▒▒▒▒▒▒▒▒▒▒▒▒▓▒▒▒▒▒▒▒▒▒▒▒▒▒▒▒▒▒▒▒▒▒▒▒▒▒▒▒▒▒▒▒▒▒▒▒▒▓▓████████▒▒▒▒▒▒▒▒▒▒▒▒▒▒▒▒▒▒▒▒▒▒▒▒▒█▒▒▒▒▒▓▒▒▒▒██ ▒▒▒▒▒▒▒▒▒▒▒▒▒▒█▓▒▒▒▒▒▒▒▒▒▒▒▓▒▒▒▒▒▒▒▒▒▒▒▒▒▒▒▒▒▒▒▒▒▒▓████████████▒▒▒▒▒▒▒▒▒▒▒▒▒▒▒▒▒▒▒▒▒▒▒█▓▒▒▒▒▒▒▒▒▒▒▒ ▒▒▒▒▒▒▒▒▒▒▒▒▓▒▓▓▒▒▒▒▒▒▒▒▒▒▒▒▒▒▒▒▒▒▒▓██▓▒▒▒▒▒▒▒▒▒▓████████████████▓▓▒▒▒▓▒▓▒▒▒▒▒▒▒▒▒▒▒▒▓█▒▒▒▒▒▒▒▒▒▒▒▒ ▒▒▒▒▒▒▒▒▒▒▒▓█▒▓█▒▒▒▒▒▒▒▒▒▒▒▒▒▒▒▒▒▒▒▒▒▒▒▒▒▒▒▒▒▒▓████████████████████▒▒▒▒▒▒▒▒▒▒▒▒▒▒▒▒▒▒▒█▒▒▒▒▒▒▒▒▒▒▒▒ ▒▒▒▒▒▒▒▒▒▒▒▒▓▒▒▒▒▒▒▒▒▒▒▒▒▒▒▒▒▒▒▒▒▒▒▒▒▒▒▒▒▒▒▒▒████████████████████████▓▒▒▒▒▒▒▒▒▒▒▒▒▒▒▒▒█▓▒▒▒▒▒▒▒▒▒▒▒ ▒▒▒▒▒▒▒▒▒▒▒░▓▓█▒░▒▒▒▒▒▒▒▒▒▒▒▒▒▒▒▒▒▒▒▒▒▒▒▒▒▒█████████████████████████████▒▒▒▒▒▒▒▒▒▒▒▒▒▒█▒▒▒▒▒▒▒▒▒▒▒▒ ▒▒▒▒▒▒▒▒▒▒░▒█░▒▓█▒▒▒▒▒▒▓▒▒▒▒▒▒▒▒▒▒▒▒▒▒▒▒▓█████████████████████████████████▒▒▒▒▒▒▒▒▒▒▒▒█▓▒▒▒▒▒▒▒▒▒▒▒ ▒▒▒▒▒▒▒▒▒▒░░░░░░▓░▒▒▒▒▒▒▒▓▒▓▓▓▒▒▒▒▒▒▒▓█████████████████████████████████████▒▒▒▒▒▒▒▒▒▒▒█▒▒▒▒▒▒▒▒▒▒▒▒ ▒▒▒▒▒▒▒▒▒▒▓▓▓▒░▓▒▒▒▒▒▒▒▒▒▒████████████████████████████████████████████████▒▒▒▒▒▒▒▒▒▒▒▒█▒▒▒▒▒▒▒▒▒▒▒▒ ▒▒▒▒▒▒▒▒▒▒▓▒▓▓█▒▓▒▒▒▒▒▒▒▒▒▓███████████████████████████████████████████████▒▒▒▒▒▒▒▒▒▒▒▓██▒▒▒▒▒▒▒▒▒▒▒ ▒▒▒▒▒▒▒▒▒▒█▓░▒░▓░▒▒▒▒▒▒▒▒▒▒████████████████████████▓████████████████████▒▒▒▒▒▒▒▒▒▒▒▒▒▒█▒▒▒▒▒▒▒▒▒▒▒▒ ▒▒▒▒▒▒▒▒▒▒▒▒▒▒▓▒▓▒▒▒▒▒▒▒▒▒▒▓██████████████████████▓▓████████████████████▒▒▒▒▒▒▒▒▒▒▒▒▒▒█▒▒▒▒▒▒▒▒▒▒▒▒ ▒▒▒▒▒▒▒▒▒▒█▒▓▓▓██▓▒▒▒▒▒▒▒▒▒████████████████████▓▓▓▓█████████████████████▒▒▒▒▒▒▒▒▒▒▒▒▒▒█▒▒▒▒▒▒▒▒▒▒▒▒ ▒▒▒▒▒▒▒▒▒▓▒██▒▒█▓▓▒▒▒▒▒▒▒▒▒██████████████████▓█▓▓▓██████████████████████▒▒▒▒▒▒▒▒▒▒▒▒▒▒█▒▒▒▒▒▒▒▒▒▒▒▒ ▒▒▒▒▒▒▒▒▒█▓▓█▒▒▓▒██▒▒▒▒▒▒▒▒████████████████▓▓▓▓▒▒▓▓▓▓▓▓▓▓█████▓▓▓▓▓▓▓▓▓▓▓▓▓▓▒▒▒▒▒▒▒▓▒▓█▓▒▒▒▒▒▒▒▒▒▒▒ ▒▒▒▒▒▒▒▒▒▒▒▒▒▒▒▒▒▒▒▒▒▒▒▒▓▓▓███████████▓█▓▓▒▓▒▓▒▓▓▓▓▓▓▓▓▓▓██████████████████████████████▓▒▒▒▒▒▒▒▒▒▒▒ and!xor $ BENDER BENDER - Badge Enabled Non Directive Enigma Routine (B.E.N.D.E.R) 2.0 Subcommands: STATUS :Status of your progress WEIGHT :Set your weight (100-400lbs) GENDER :Set your gender (M,F,X) RECAP :Recap since DC26 - Run This First! RESET :Reset the challenge (B.E.N.D.E.R. specific save data) COMMANDS :Commands specific to B.E.N.D.E.R. and!xor $ BENDER STATUS Name: HYRON_W Gender: Not Set Weight: Not Set Blood Alcohol Content: 0.0000 B.E.N.D.E.R. Completion: 0% Location: Home Village L00T: LIST OF YER HOARDINGS --------------------------- FINGER and!xor $ BENDER WEIGHT Enter a valid weight between 100-400 lbs. e.g. $ bender weight 200 and!xor $ BENDER WEIGHT 180 Weight change successful! and!xor $ BENDER GENDER X Sex change successful: NonBinary-Bot! and!xor $ BENDER RECAP ░▒░░░░░▒▒░░░░░░░░░░░░░▒░░░░░░░░░▓▓▓▓▓▓▓▓▓▓▓▓▓▓▓▓▓▓▓▓▓▓▓▓▓▓▓▓▒▒▒▒▓▓▓▓▓▓▓▓▓▓▓▓▓▓▓▓▓▓▓▓▓▓▓███████████▓ ░░░░▓▓▓▓▓░░░░▒░░░░░░░░░░░░░▒░░░▓▓▓▓▓▓▓▓▓▓▓▓▓▓▓▓▓▓▓▓▒▒▒▒▒▒▒▓▒▒▒▒▒▒▓▓▓▒▒▒▓▓▓▓▓▓▓▓▓▓▓▓▓█▓███████▓▓▓▓██ ░░░░▓▓▓▓▒░░░░░░░░░░░░░░░░░░▒▒░▓▓▓▓▓▓▓▓▓▓▓▓▓▓▓▓▒▒▒▒▒▓▓▓▒▒▒▒▒▒▒▒▓▓▓▓▓▓▓▓█▓▒▒▓░▒▒▒▓▓▓▓███████▓▓▓██▓█▓▓ ░░░░░░░░░░░░░░░░░░░░░░░░░░░░░▓▓▓▓▓▓▓▓▓▓▓▓▓▓▓▓▒▒▒▒▒▒▒▒▒▓▓▓▓▓▓▓▓▓▓▓▓▓▒▓▒░░▓▓▒▒▒▒▒▒▓▓██████████▓▓█████ ░░░░░░░░░░░░░░░░░░░░░░░░░░░░▒▓▓▓▓▓▓▓▓▓▓▓▓▓▓▓▓▓▓▓▓▓▒▒▓▓▓▓▓▓▓▓▓▓▓▓▒▒▒▒▒▓▒▒░▒▓▓▒▒▒▒▒▒▓███████▓███▓████ ░░░░░░░░░░░░░░░░░░░░░░░░░░░░▓▓▓▓▓▓▓▓▓▓▓▓▓▓▓▓▓▓▓▓▓▓░░░░▓▓▓▓▓▓▓▓▒▒▒▒▒▒▒▒▒▒▒▒▓█▓▓▒▒▒▒▒▒▒████████▓█▓▓▓▓ ░░░░░░░░░░░░░░░░░░░░░░░░░░░▓▓▓▓▓▓▓▓▓▓▓▓▓▓▓▓▓▓▓▓▓▓░░░░░░░░░░▓▓▓▒▒▒▒▒▒▒▒▒▒░▓▓▓▓█▓▒▒▒▒▓▓▒███████▓▓██▓█ ░░░░░░░░░░░░░░░░░░░░░░░░░░▒▓▓▓▓▓▓▓▓▓▓▓████▓▓▓▓▓░░░░░░░░░░░░░░░░▒▓▓▓▒▒▒▒▒▓▓▓▓▒▒▒▓▓▓▓▓▓▒█▓▓▓▓▓▓▓▓▓█▓▓ ░░░░░░░░░░░░░░░░░░░░░░░░░▒▓▓▓▓▓▓▓████████▓▓█▓▓▓▓▓░░░░░░░░░░░░░░░░░░░░░░░░▒▓▓▓▓▓▓▓▓▓▓██▓▓█████▓▓▓▓▓▓ ░░░░░░░░░░░░░░░░░░░░░░░░░▓▓███▓███████████▓▓▓▓▓▓▒░░░░░░░░░░░░░░░░░░░░░░░░▓▓▓▓▓▓▓▒▓██▓██████████▓▓█▓ ░░░░░░░░░░░░░░░░░░░░░░░░▓██▓▓▓▓▓▓▓▓▓▓████████▓░░░░░░░░░░░░░░░░░░░░░░░░░░░░░▓▓▓▓██▓███████▓███▓█▓▓▓▓ ░░░░░░░░░░░░░░░░░░░░░░░▓▓██████▓▓██████████░░░░░░░░░░░░░░░░░░░░░░░░░░░░░░░░▓▓▓▓▓███████▓██████▓▓███ ░░░░░░░░░░░░░░░░░░░░░░▓▓██████████▒▒░▒▒▒▒▒▒▒░░░░░░░░░░░░░░░░░░░░░░░░░░░░▓▓▓█████████████▓████████▓▓ ░░░░░░░░░░░░░░░░░░░░░░▓█████████▒▒▒▒▒░▒▒░░░▒▒▒▒░░░░░░░░░░░░░░░░░░░░░░░▓▓██████▓██████████████▓▓████ ░░░░░░░░▒░▒░░░░░░░░░░██████████▓▒▒░▒░░░░▒▒▓▓▓▓▓▒▒▒░░░░░░░░░░░░░░░░░▒▓▓█████████████████████████▓███ ░░░░░░░░░░░░░░░░░░░░████████████▒░▒░░░░▒▒▒▒▒▒▓▓▒▒▒▓▓▓░░░░░░░░░░░░░▓██████████████▓▓▓██▓▓█████████▓█ ░░░░░░░░░░░░░░░░░░░██████████████▒░░░░░░░░░░░░░░░▓▓▒▒▒▒░░░░░░░░░░▓▓▓█▓███████████████████▓▓████████ ░░░░░░░░░░░░░░░░░░▒█████████████▒▒▒▒▒▒▒▒▒░▒░▒░░░░▒░░░░▒▒▒░░░░░░▓██▓▓█████████████████████████████▓█ ░░░░░░░░░░░░░░░░░▒▓███████████▒▒▒▒▒▒▒▒▒▒▒▒▒▒▒▒░░░░░░░░░░░▒░░░░█▓███████████████████████████████████ ░░░░░░░░░░░░░░░░░███████████▒░░▒░░▒▒▒▒▒▒▒▒▒▒▒▒▒▒▒░▒▒▒▒▒░░░░░▓██████████████████████████████████████ ░░░░░▒▒▒▒▒▒▒░░░░██████████▓▒▒▒▒▒░▒▒▒▒▒▒▒▒▒▒▒▒░▒▒▒▒▒░▒▒░░░▒▒█▓▓█████████████████████████████████████ ░░░░░░░░░░▒▒░░░██████████▒▒▒▒▒▒▒▒▒▒▒▒▒▒▒▒░░░▒▒▒▒▒▒▒▒▒▒▒▒▒▒▒█▓██████████████████████████████████████ ░░░░░░░░░░░░░░█████████▒░▒▒▒▒▒▒▒▒▒▒▒▒▒▒▒░░░▒▒▒▒▒▒▒▒▒▒▒▒░▒▒▒████████████████████████████████████████ ░░░░░░░░░░░░██████████▒▒▒▒▒▒▒▒▒▒▒▒▒▒▒▒▒░░░▒▒▒▒▒▒▒▒▒▒▒▒▒▒▒▒▒████████████████████████████████████████ ░░░░░░░░░░▒█████████▒░▒▒▒▒▒▒▒▒▒▒▒▒▒▒▒▒▒░░▒▒▒▒▒▒▒▒▒▒▒▒▒▒▒▒▒█▓███████████████████████████████████████ ░░░░░░░░░░▓████████▒░░▒▒▒▒▒▒▒▒▒▒▒▒▒▒▒░░▓▒░▒▒▒▒▒▒▒▒▒▒▒▒▒▒▒▒█████████████████████████████████████████ ░░░░░░░░░██▓▓█████▒▒▒▒▒▒▒▒▒▒▒▒▒▒▒▒░░░░░█▒▒▒▒▒▒▒▒▒▒▒▒▒▒▒▒▒▒█████████████████████████████████████████ ░░░░░░░░▓▓███████▒▒▒▒▒▒▒▒▒▒▒▒▒▒▒▒▒▒▒░▒█▒▒▒▒▒▒▒▒▒▒▒▒▒▒▒▒▒▒██████████████████████████████████████████ ░░░░░░░▒▓██████▓▓▓▓▓▒▒▒▒▒▒▒░░░░▒▒▒▒░▒█▒▒▒▒▒▒▒▒▒▒▒▒▒▒▒▒▒▒█████████████████▓▒▒░██████████████████████ ░░░░░░░▒▓█████▒▓▓▓▓▓▓▓▓▓░░▒▒▒▒▒▒▒▒▓██▒▒▒▓▓▓▓▒▒▒▒▒▒▒▒▒▒▒█████████████████░▒▓░░█████████████▓▒▒██████ ░░░░░░░░▒██▓▒▒▓▓▓▓▓▓▓▓▓▓▒░░▒▒▒▒▒▒████░▒▓▓▓▓▓▓▓▓▒▓▒░▒▒▒████████████████▒▓▒▒▒████████████▓▓▒▒▒▒▒▒████ ░░░░░░░░░░▒▒▓▓▓▓▓▓▓▓▓▒▓██████▓▒▒▓█████▓▓▓▓▓▓▓▓▓▒▒▒▒▒▒▒████████████████▒░░░██████████▓▓▒▒▒▒▒▒▒▒▒▒▒▒█ ░░░░░░░░▒▓▓▓▓▓▓▓▓▓▓▓▒▓█████████▓█▓████▓▓▓▓▓▓▓▓▒▒█████████████████████░░░▒▓████████▓▓▒▒▒▒▒▒▒▒▒▒▒▒▒▒▒ ░░░░░░▒▓▓▓▓▓▓▓▓▓▓▓▒▒░░░░░░░░▓▓▓░░░███▓▓▓▓▓▓▓▓▓▒▓███████████████████░░░▒▒▒▒█████▓▓▓▒▒▒▒▒▒▒▒▒▒▒▒▒▒▒▒▒ What? Did you get black out drunk and forget about what happened? Shit alright... Last year you woke up in the middle of the desert, no idea how you got there (big surprise). Some weird ass server rack was there, robot locked up inside, no power. You hacked some puzzles, got drunk, ended up in a Radio Shack, got drunk... Went into a Saloon, got drunk, ended up dancing in a with some creepy WiFi cactus dude. Messed with a TacoCorp Taco Truck, got drunk, got power up and running to the server rack. Robot came out and yelled at you, you ate a bunch of Tacos, got super drunk, and blew the robot. Fell into a hole in the ground, made your way through an underground bunker, then opened a door... Soundes like a good time. Oh and TacoCorp is probably not happy with you. So what happened after that door opened? You slipped on a taco wrapper and tripped over a pizza box left by some lazy asshole pizza delivery man. Spinning around backwards, then falling into some windowed freezer thing...fuck it was cold. The world got dark...you slept...and then awoke. You must have been in some cryogenic sleep for a long time. Exiting your sleepy freezer bed you stretch and yawn many years of nasty taco morning breath. You're not in the same place as before either. Someone moved that cold coffin while you were knocked out. There are stairs going up, you ascend them to a solid metal door and uncrank a door locking mechanism... (You should look around at this point) and!xor $ LOOK You enter the doorway and it opens to a dusty radio broadcast room. Lets call this HOME for now... A relic of the past, but nostalgia holds a place in your heart. There's a DJ_COMPUTER on a desk, powered up, with a prompt. A pile of mixtapes, discs, and a STICKY_NOTE on a piece of media are in the corner. You peer out the window and to your surprise the world has gone to shit. Like nuclear winter fallout shit. They did it. They finally did it. DEF CON was cancelled and look what happened. From this radio tower lookout you can see two intersecting roads going in to the city. They are perpendicular creating four possible directions: NORTH, SOUTH, EAST, and WEST. Looking back away from the window and back in the room you notice something SOMETHING_FAMILIAR... An item catches your eye for the taking: BOTTLE_OPENER You smell some booze for the drinking: BALLAST_POINT_SOUR_WENCH and!xor $ STEAL BOTTLE_OPENER You stole a BOTTLE_OPENER and!xor $ STEAL BALLAST_POINT_SOUR_WENCH You stole a BALLAST_POINT_SOUR_WENCH and!xor $ DRINK BALLAST_POINT_SOUR_WENCH 18.0 You down some delicious craft b33r Your BAC is now 0.0518 and!xor $ -
DC27 DOOM SAO - Hurt Me Plenty
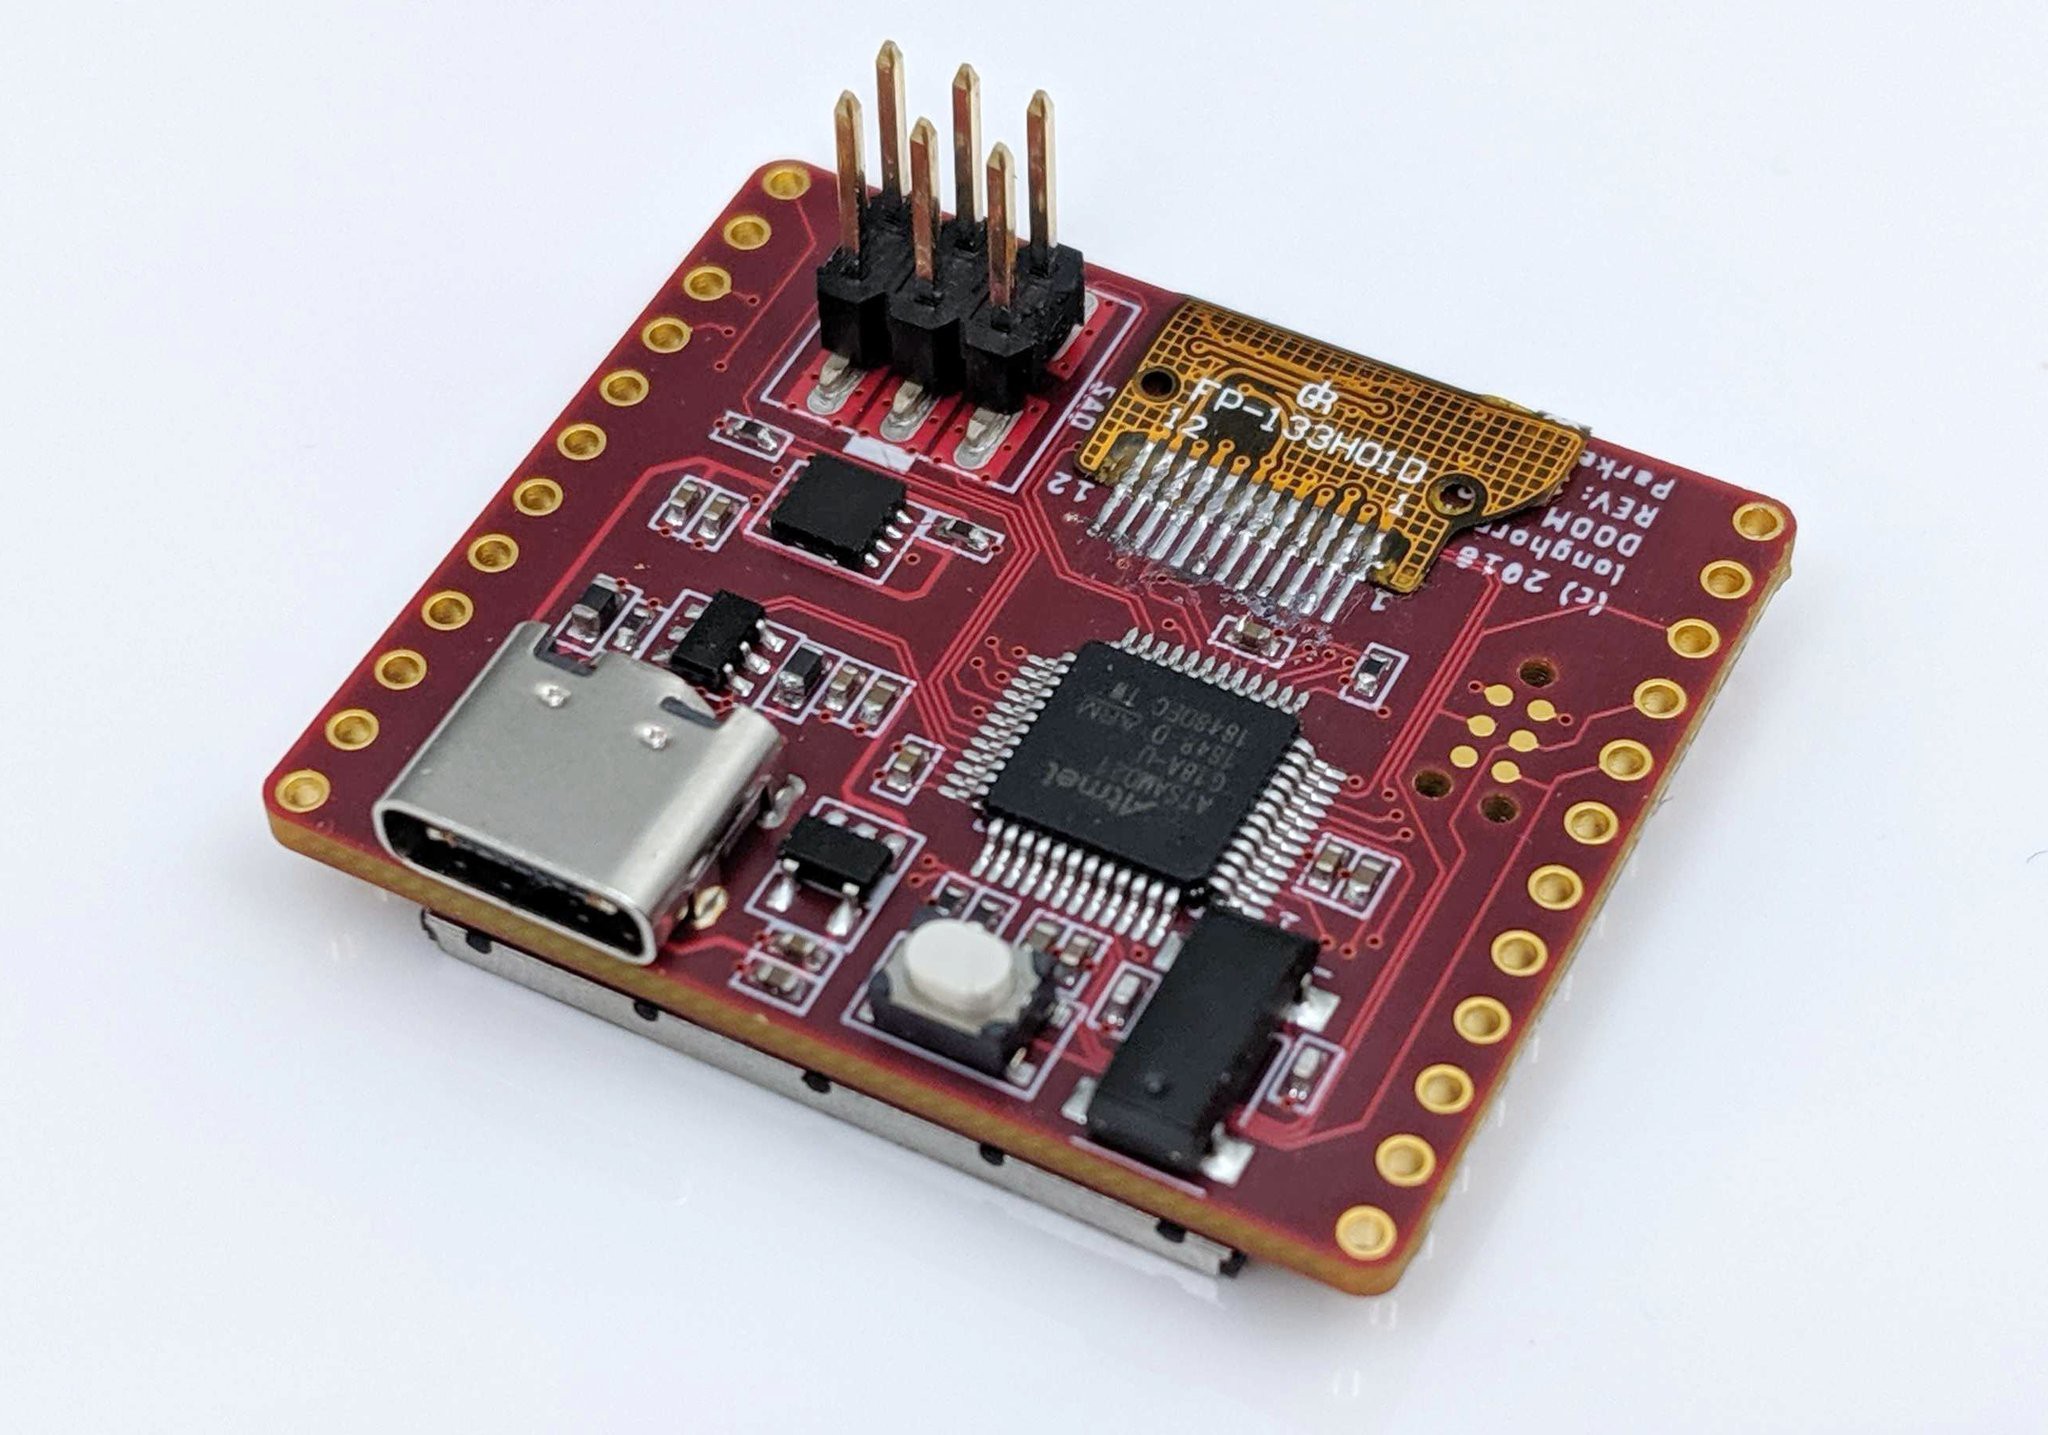
07/18/2019 at 05:48 • 0 commentsWe’ve been lucky this year to have Cr4bf04m on our team, aka LonghornEngineer, aka Parker Dillmann. He shared our goal of the DC27 project to make the badges free during hacker summer camp. Aside from philanthropist backers and generous sponsors (Urbane Security, MacroFab, Mouser, and Rigado), a way we helped raise funds this year was though designing three
ShittySuperior Add Ons (SAO). Why aren’t they shitty? Because in the same way we want our badges to be more than some blinky lights and FR4… Our SAOs are actual embedded devices with MCU’s, firmware, challenges, easter eggs, and present some useful function which hackers can explore and learn from. Cr4bf04m wanted to engineer an add on which was a hardware hacking tool...that also displayed the face of our beloved space marine while fighting demons on the I2C bus. It’s open source, leverages the SAO v1.69bis standard, and is Arduino compatible so it’s easy to add your own functionality. The design has been discussed on the Macrofab Engineering Podcast (MEP) recently and after a long couple of weeks finalizing the firmware, here’s what the team has to show for this hardware hacking tool.- Github
- MEP Links
- AND!XOR Store (we still have some left, but we will shut down soon for DEF CON)
Hardware
- Arduino Compatible MCU ATSAMD21G18A
- All unused I/O from the MCU is accessible
- Physical Interface for the V1.69bis standard
- High DPI ST7789 1.3" 240x240 LCD Screen
- USB Type-C configured for USB 2.0 (REVERSIBLE)
Functionality
- Full implementation of the logical V1.69bis standard for integration with DC27 Badges
- Auto mode for DOOM Guy for badges that are not DOOM SAO compatible
- Serial Terminal accessible through the USB Type-C connector
- User defined section for adding your own code
- DOOM Guy Interface
- DOOM Guy Bus Sniffer
- I2C Bus Sniffer
- Serial UART Sniffer
- EEPROM Persistence
- Custom Application Mode
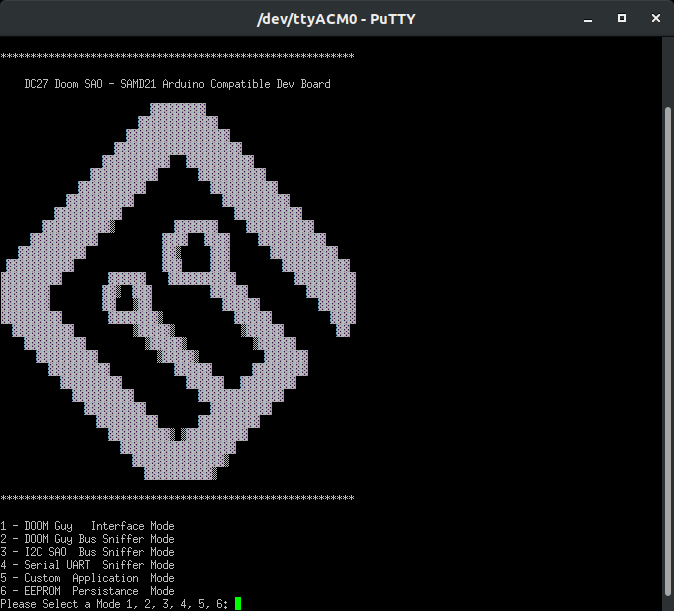
The video at the top showed us going through the menu to exercise the functionality, below is an explanation of what those features entail.
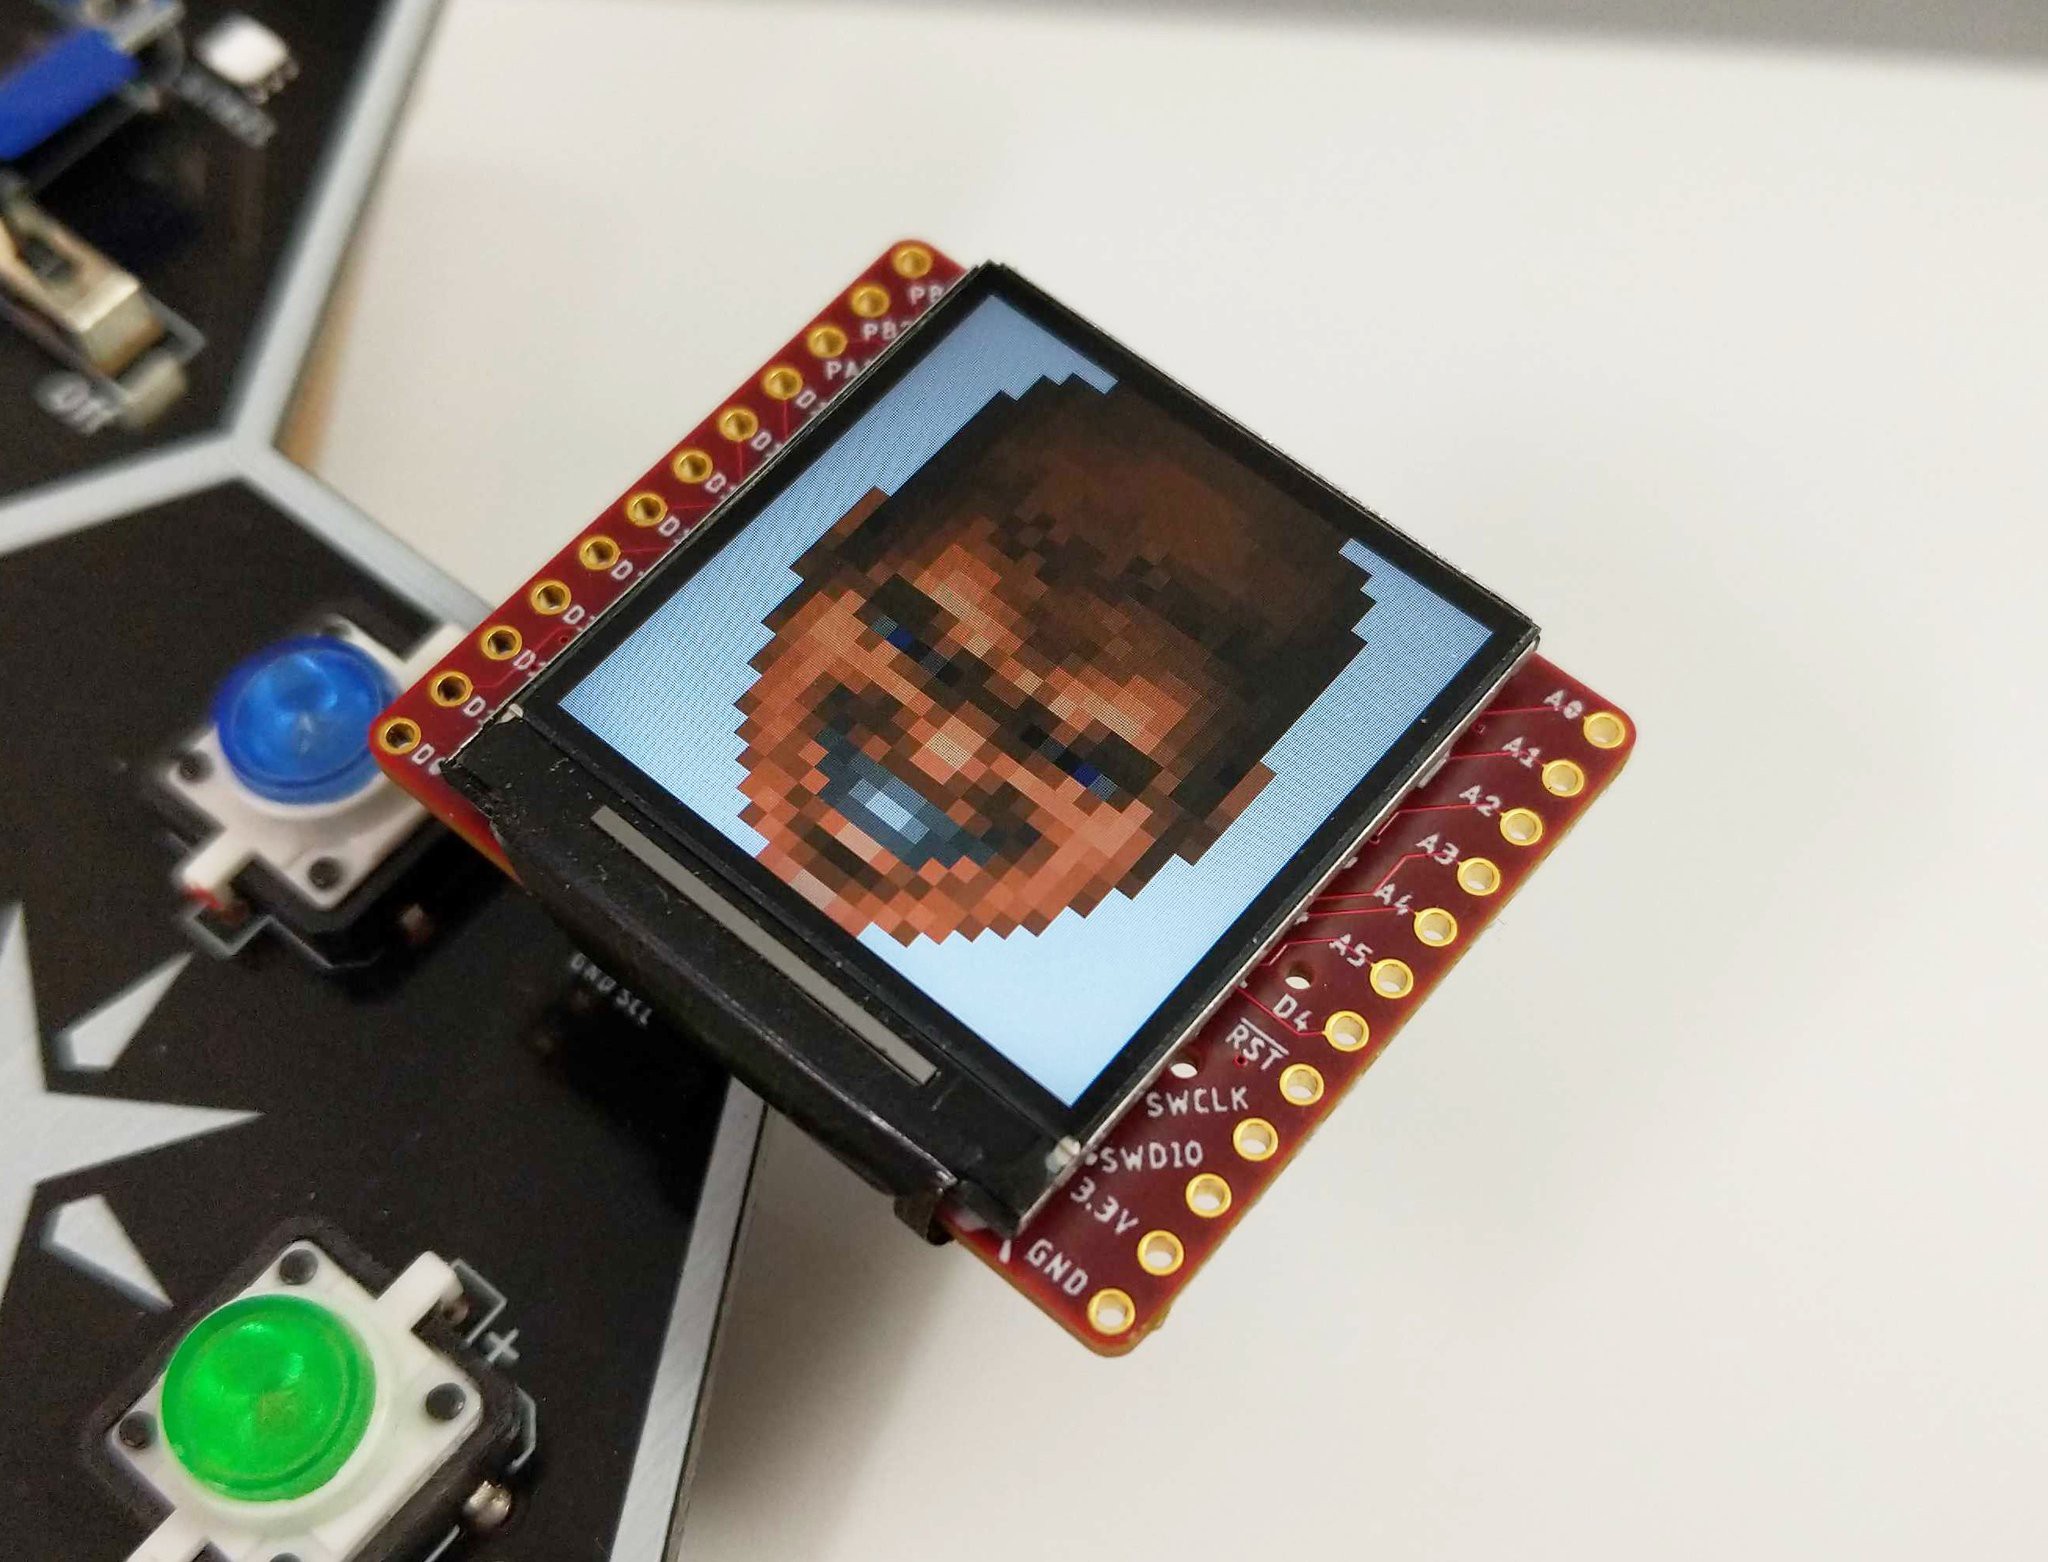
DOOM Guy Interface
To claim one leverages SAO v1.69bis, means more than just providing 3V and GND... one needs to interact with the badge over I2C and GPIO. Through I2C integration, the DOOM SAO makes use of the AND!XOR SAO Reference Design and implements a menu accessible over serial UART.
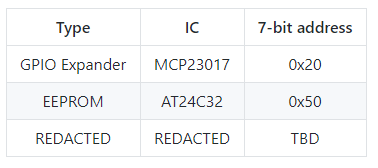
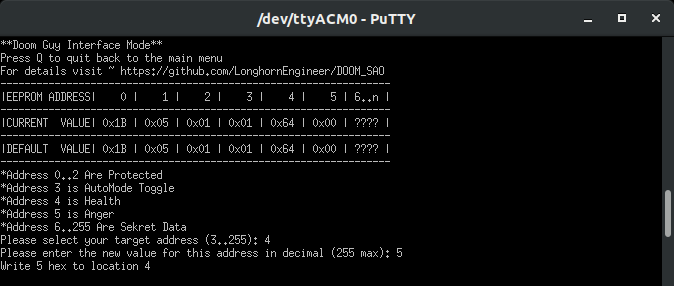
Before we get in to the interface, a few technical details need to be understood. For I2C, virtual EEPROM was implemented as below based on the AT24C32 using a 7-bit address of 0x50.
The addressable space of the EEPROM then follows as:
- DC Year: Use 0x1B for DC27
- Maker ID: Unique identifier for SAO maker, AND!XOR uses 0x49 (Middle 8bits of our registered Bluetooth ID): Cr4bf04m uses 0x05.
- SAO Type ID: Unique identifier assigned by the maker for the SAO: 0x01 for DOOM SAO
- Data: Arbitrary data parseable by anything recognizing DC, Maker, and SAO values
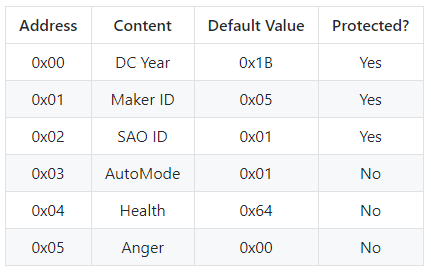
The leads to the DOOM SAO EEPROM at 0x50 having the following:
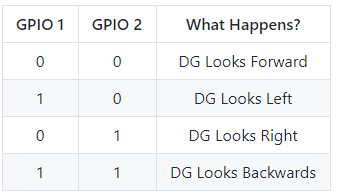
With v1.69bis a GPIO interface was added to the standard for the badge to have additional control of the SAO. We have to use that too!
All of this combined means its fully bonafide v1.69bis compatible with badges (that choose to interact with SAOs). Such as, when it gets plugged in to a badge, special things may happen… But this also means a lot should be provided to the hacker via an easy interface. Plug in that SAO using the latest in
circa 2000 19 Year Old USB Micro Technology21st Century USB-C technology, open your favorite serial terminal application, and use the following:- Baud: 9600
- Data Bits: 8
- Stop Bits: 1
- Parity: None
- Flow Control: None
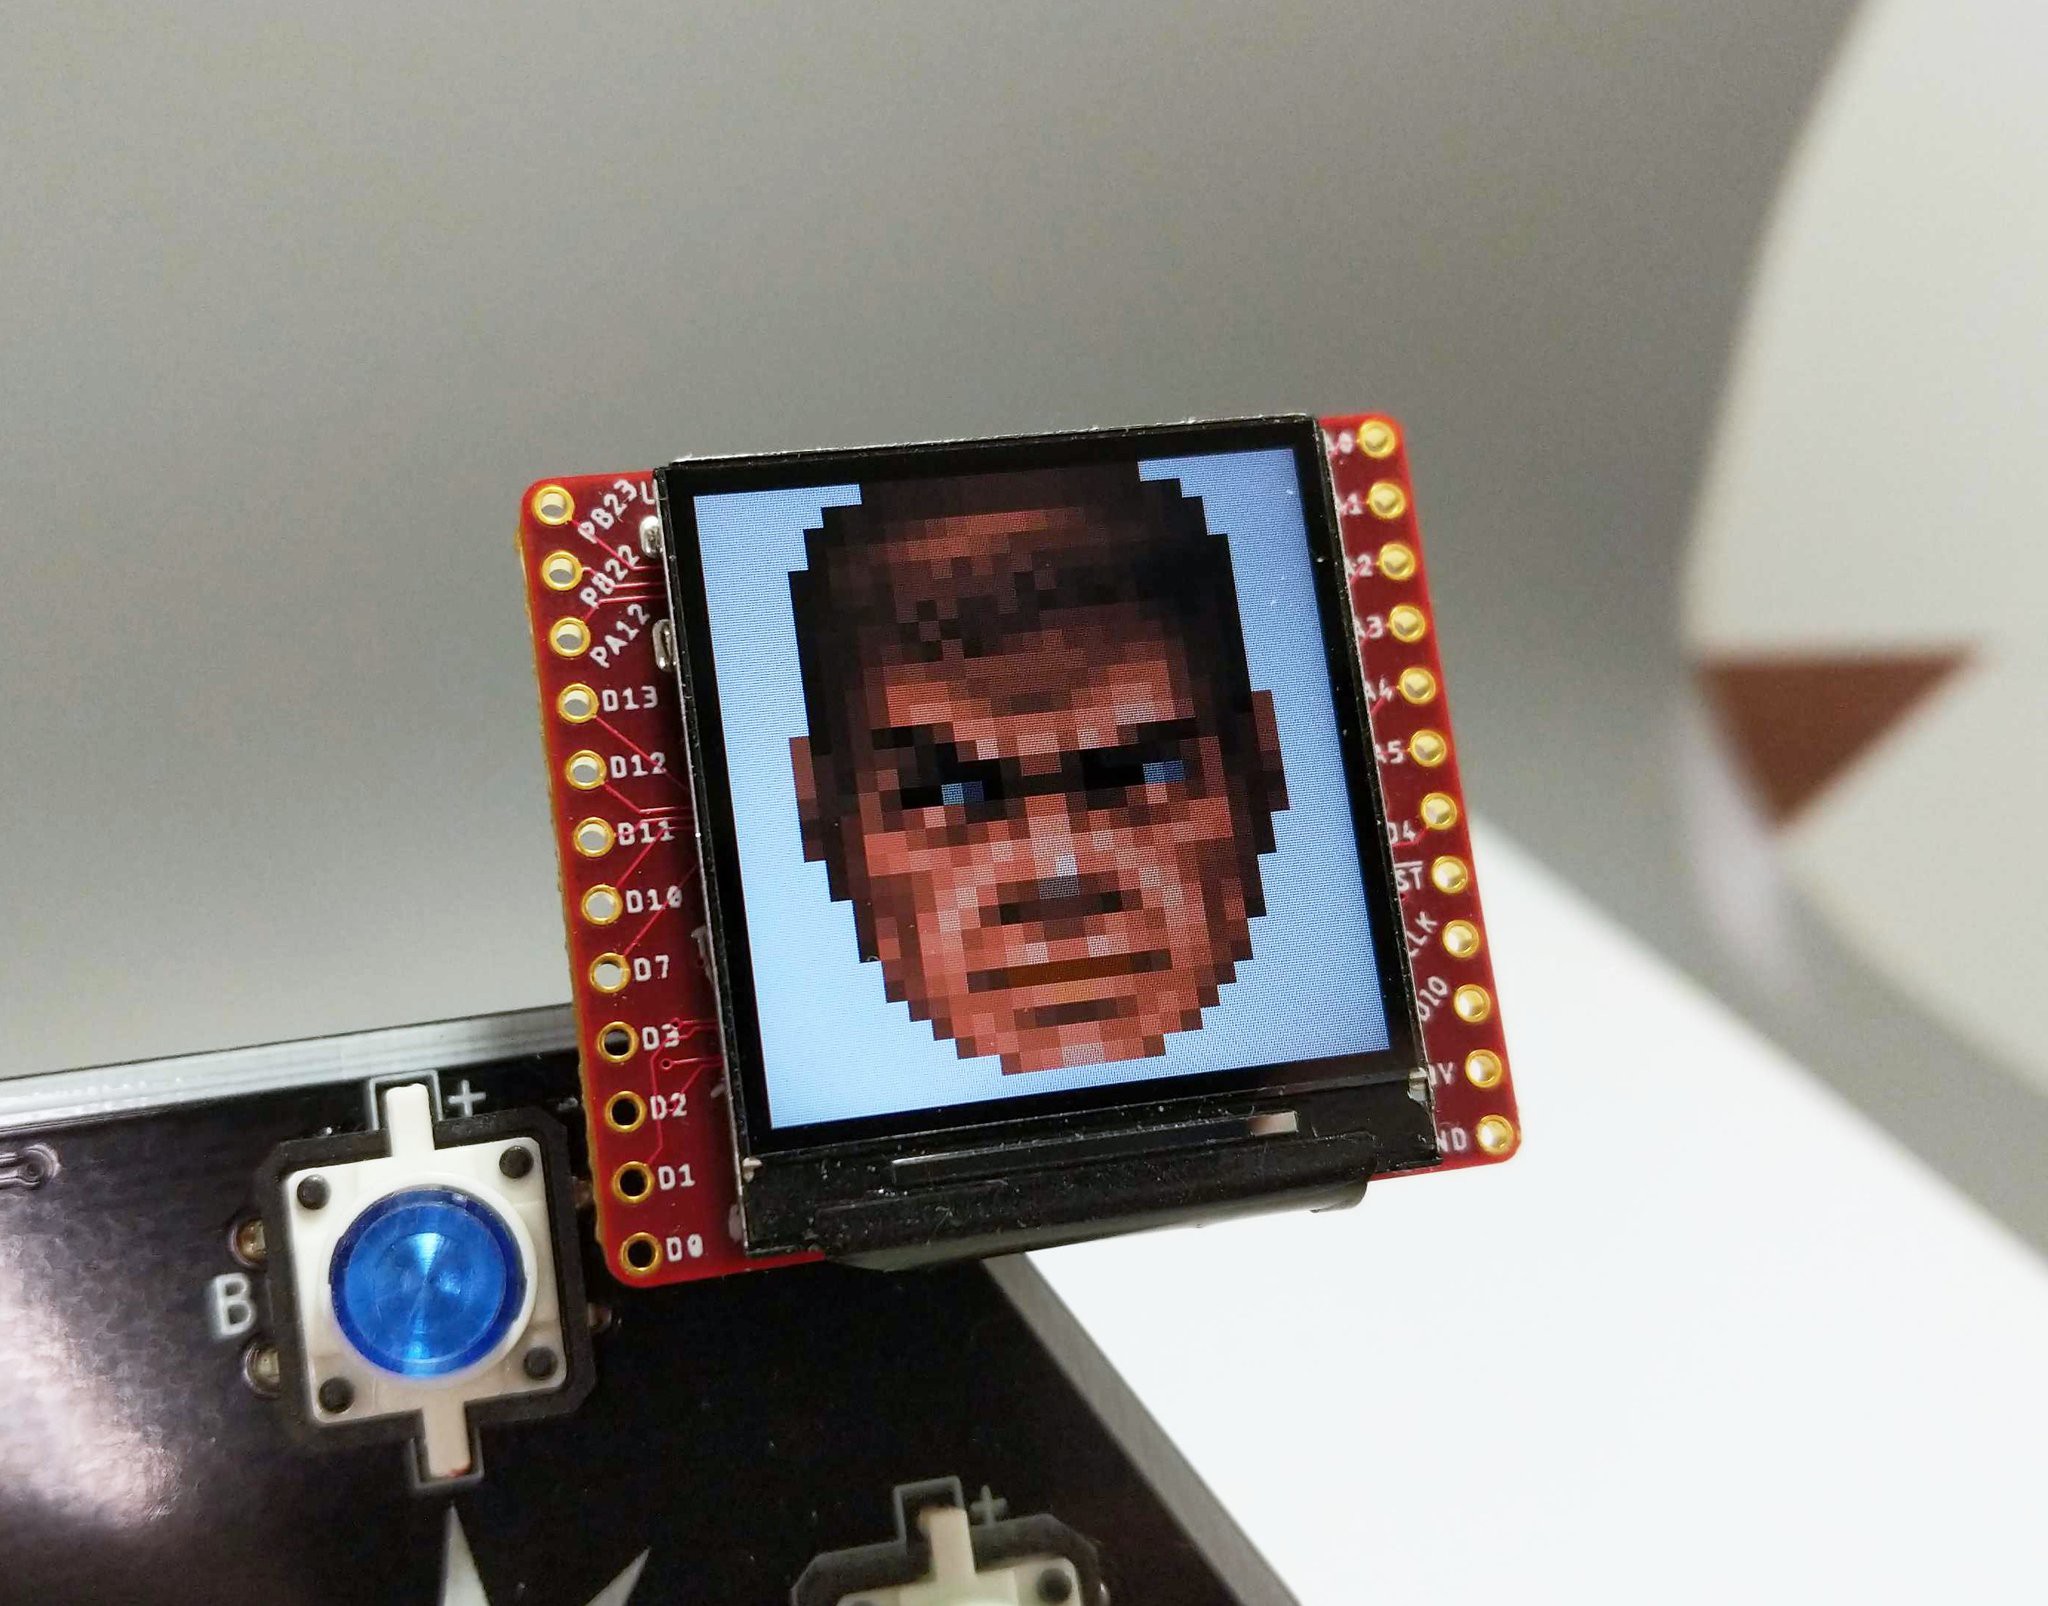
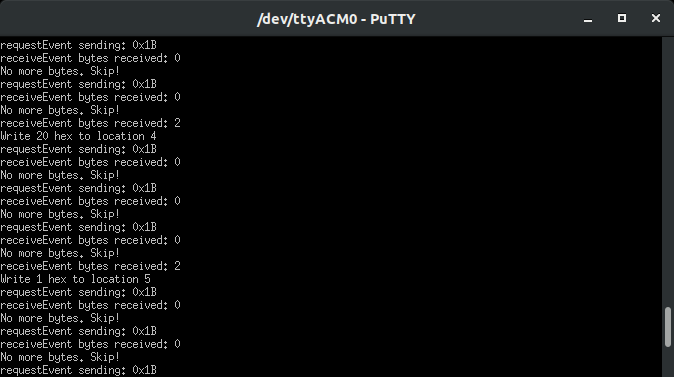
So in this example (and as you saw in the video above), we modified the Health Address (4) and set the value to 5 (really almost dead). The end result is the DOOM Guy face gets super near death bloody. Enable anger at address (5) set to true (1), he’ll show those gritting angry teeth. The point of this is to let you modify the animation however you want and interact directly with the EEPROM. Given this is addressable over I2C, the host badge can control it as well ;)
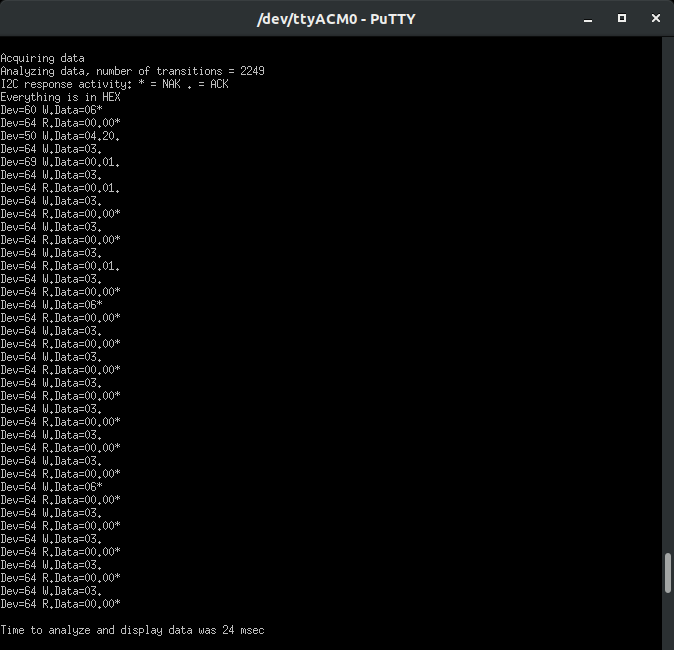
DOOM Guy Bus Sniffer
Maybe some interesting things are happening to your SAO and you are curious what on earth the badge and SAO are doing? The DOOM Guy Bus Monitor specifically filters out and decodes the I2C data being sent to the SAO interface in a hoomahn readable format. Consider this your poor man’s logic analyzer, with SAO decoding. There...your Saleae doesn’t have SAO decoding, which is shocking considering the SAO is the fastest adopted embedded standard (not verified, but Benchoff said it on the internet so it must be true). Who knows what you’ll find...other badge maker’s ID’s, magic bytes, unlock codes...
I2C Bus Sniffer
Expanding on the concept of the poor man’s logic analyzer, what about exposing the entire I2C bus? Cr4bf04m ported an I2C sniffer project to the SAO. Many badges have two or more SAO interfaces, some SAO’s are even expanders. Plugging in a DOOM SAO into a badge with this configuration, would not only let you see the data between the badge and DOOM, but the badge and other SAOs, as well as the entire traffic capture. You get the entire I2C bus. Below you can see I2C bus data as well as modifying the health of the DOOM SAO (Dev=0x50), Writing Data (W.Data=) at Address (04) the value of 20: Dev=50 W.Data=04.20. Ignore Dev=64, that’s another device on the badge we tried to leave silent to minimize the I2C noise in this capture.
Serial UART Sniffer
More poor man’s analyzer! This time, for serial UART. However what makes this interesting is the approach of doing it in line via a man-in-the-middle. Hyr0n has to thank Joe Fitz for his Hardware Hacker training that gave him the idea. This allows you to passively MITM another embedded system's serial UART line. Connect the source's serial TX to the SAO RX Pin PB23. Connect the target's serial RX to the SAO TX Pin PB22. Choose the appropriate baud rate and byte translation (ASCII or DEC). In this example we will MITM the Classic DC24 Bender SAO. The original DC24 Bender Badge had a USB connector at the bottom to access the serial terminal. Our Bender SAO...has three small through hole interfaces..wonder what that is for?
This is the cleanest rats nest we could make. For reference: the BENDER (TX) -> DOOM PB23 (RX) ~ YELLOW; DOOM PB22 (TX) -> FTDI (RX) ~ YELLOW; BENDER RX -> FTDI (TX) ~ ORANGE. Essentially the TX line is getting MITM from the DOOM SAO. Here’s what happens…
As you can see, everything that goes between the source and it’s target can be passively sniffed in real time without affecting its functionality. Many embedded devices, while not efficient or common as it use to be, leverage serial UART to transfer data internal to the device (not just user interface terminals).
EEPROM Persistence
Whenever the SAO loses power it resets to its default state. However, what if you want it so DOOM Guy is always angry and bloodied? Persistence. Hyr0n ported over a project which leverages the SAMD21 internal non-volatile memory for storage. This is convenient, but it is DANGEROUS. Non-volatile storage is meant for flashing the program, not frequently writing data. It tends to wear out. Since you won't be changing your settings 10,000+ times you should be okay. But we stress that it is OFF by default, turn it on, make the changes you want, then turn it off. You don’t know how other badge makers are leveraging the SAO EEPROM and may be making thousands of writes a minute/hour/etc. Given that, you are presented with the warning below…
Custom Application Mode
Most importantly, this SAO was designed to be built upon. It is an Arduino compatible dev board, the GPIO of the SAO have been broken out for your hacking, and the firmware is even stubbed out waiting for you to add some code of your own. Need some ideas? Everything we provided as functionality is passive. What if you were more offensive? Go back to the SAO Design Reference EEPROM...there’s a finite amount of maker ID’s and values one could enumerate over in a for loop… How about the serial sniffer, it’s practically begging to be a hardware implant the size of 800 grains of rice. The GPIO on the side, could probably have some really badass twisty through hole LED blinky contraption...or a TV B Gone… We’re curious to see what folks come up with and want to share back on GitHub!
void mode_5_custom_appliaction() {
 //This section is for others to add their own code for custom functionality
 if(menu_display_5) {
    SerialUSB.println("**Custom Application**");
    SerialUSB.println("No custom code added yet. How sad.");
    SerialUSB.println("To get started visit ~ https://github.com/LonghornEngineer/DOOM_SAO");
    SerialUSB.print("Press Q to quit back to the main menu: ");
    menu_display_5 = false; //this prevents infinite printing of the menu in loop
  }
  // Press (Q or q) to quit back to main menu
  incomingByte = SerialUSB.read();
  if((incomingByte == 'q') || (incomingByte == 'Q')){
    SerialUSB.print((char)incomingByte); //echo user selection to the USB terminal
    SerialUSB.println(" \n");
    sao_mode = 0;
    menu_display_0 = true;
    menu_display_5 = true;
  }
  //TODO - YOUR CODE GOES HERE!
}
In Closing...
We hope you have fun with this SAO. We hope you hack some badges or other embedded devices with it too. There are still some left at our shop as well if you are interested in a pre-built one and want to support the cause. We're going to take any remaining stock to Hacker Warehouse in the vendor area at DEF CON. It’s also completely open source on GitHub so you can build your own. As for the one's people have ordered, we are flashing them this weekend and will be shipping very soon. See you at hacker summer camp in a couple weeks! (Badge coming very very soon too…)
-
Reverse Engineering with Ghidra - SimTaco Floppy Challenge
06/07/2019 at 02:21 • 0 commentsSo we gave it some time to rest, but it's time to walk through what our CypherCon hacking challenge was and the ways the folks who won were able to accomplish it. If we don't share, we don't learn. If you're thinking, WTF does this have to do with your electronic badge project we want to see that... we'll we're keeping that a sekret for a bit longer. So until the reveal, we put out hacking challenges for people to earn free badges.
Why hacking for badges? Because we want to encourage people to learn new things, reward hackers with blingy electronics that contain even more embedded security puzzles to learn new things. Philanthropic hacker karma with knowledge gained. They're free, you just have to earn them :) Also a big shout out to our Philanthropists and Sponsors who are helping us make this happen: Urbane Security, Macrofab, Mouser, and Rigado.
We made 40 of these Floppy disks loaded with a special binary and left them around the Wisconsin Conference center during CypherCon. Also this was inspired by the Floppy Disk badge @aprilwright made for DC26. Initially the first part of this challenge was, how the hell do you read the floppy? Conveniently, between the hundreds of hackers at the conference and it butting up against the Midwest Gaming Classic, there was a large collection of vintage computers around. Some folks tried putting the disks in, but were reminded...those computers weren't networked so how the hell would you get the file off anyway? Truth be told, if you don't have a stack of these laying around like Hyr0n does, then you go on Amazon and search for a "USB Floppy Drive." That simple. Now even though there are a dozen different brands, be forewarned they are all the same manufacturer and all are garbage. 1000000% Garbage where you have to pop in the disk just at the right time. Regardless they do work. So once a person got that disk being read by a computer, they found a file to copy off: "simtaco"
First things first, chmod +x that binary to make it executable, cross your fingers it's not not not malware...and run it.
So if you're thinking "42" - yeah that's the good cult reference, but no... this is a hacking challenge. You don't earn free badges that easily. For this we're gonna have to get up in that binaries guts. Last year I showed you my free open source software of choice for RE which was RadaRE2. We'll the NSA has spoiled us with their warez, because I've gone Ghidra and I'm never going back (sorry HexRays I dont have 1 BTC worth of license fees to shell out ANNUALLY for Ida). In case you aren't familiar with the name, the NSA open sourced their internal binary reverse engineering tool, Ghidra, back in February when Rob Joyce gave his talk at RSA. We were also curious in 2 months time how many people would flock to it. Actually every person who solved the challenge told us they were using Ghidra as well, which made all the sense to title this project log the way we did. Now there are ton's of write ups and tutorials on YouTube showing how to use Ghidra in depth. This post is NOT that. The intent of this is to show you just enough to peak your curiosity and show you that reverse engineering isn't black magic wizardry (like RF is).
For your reference here's a copy of the binary to play along: http://bit.ly/2EQMHgH
Install Ghidra
This is going to assume you run the same Linux system we do, Ubuntu 18.04.2
- Download Ghidra: https://ghidra-sre.org/
- Install Java OpenJDK 11
- sudo apt install openjdk-11-jdk
- Unzip your Ghidra download anywhere then run "./ghidraRun"
- If Ghidra says it can't find your JDK, then you don't have the right version of OpenJDK 11 installed. For a while "11" had JRE 10 bundled with it due to GA, but it was resolved a few weeks ago. So if you aren't up to date, you will have to manually install the OpenJDK 11 by doing the following...
- $ sudo add-apt-repository ppa:openjdk-r/ppa
$ sudo apt upgrade - Again you shouldn't have to do this. Make sure your repo and system is up to date before trying the install of openjdk-11-jdk it should be the correct version.
Setup A New Project
While this is pretty straight forward once you get the hang of it, many leave out the little details to explain the framework and how this works. Which can be a little frustrating and daunting for a first time user. Keep this in mine, Ghidra was setup to create reverse engineering projects with version control, to be shared (or not) among teams of people. So when setting up a new project, think of it in that way, you are creating a project and then you add a binary (or binaries) to it which you want to reverse engineer.
- ./ghidraRun
- FIle -> New Project -> Non-Shared Project
- Pick a directory to host your project and give the project a name "ANDNXOR_SIMTACO" -> Finish
- Note its a common mistake to just point it to a pre-existing folder and assume it will import your binary. It wont. You have to manually add the files to your project.
- File -> Import File -> Browse your computer and pick the "simtaco" binary
- You'll get some binary import summary results. Read them, it's interesting metadata about the program.
- Most important and never talked about part: To open your binary with Ghidra (which has now been imported) you need to click "simtaco" and drag it on to the Ghidra dragon icon, then let go.
A new window will open and it will tell you "simtaco has not been analyzed. Would you like to analyze it now?" HELL YEAH. Accept the default options and just click "Analyze" on the next window.
To help with all these screenshots and text, we will do our best to record videos along the way. Here's a recording of everything I just explained.
So right off the bat, if you've never done this before, you're probably thinking "okay...wtf"
Think of the left pane of windows as shortcuts to your program variables, symbols, and data types. The middle window is "disassembled code" as in that binary in assembly. The far right is pseudo-C style version of the binary which is "decompiled code." For ground truth of it all, assembly is always the way to go. However many of us don't think in memory registers and jumps. So this program is simple enough that we'll be fine with the decompiler. Those windows will always show you the disassembled and decompiled versions of the area of code you are looking at. So lets go to the most important function: Main. On the symbol tree, expand FUNCTIONS, scroll down, and choose "main." Things should start to look a but more familiar in the decompiled window pane. However since it is decompiled, it has no idea what the variable names were. That's part of the fun, once you start figuring out what stuff does, right click and rename variables as you go along. To make this easier and avoid less detailed screenshots, I will copy/pasta the full decompiled code from Ghidra into a code block below.
undefined8 main(void)

{
  int iVar1;
  char *__s;
  char *__command;
  long in_FS_OFFSET;
  int local_e8;
  stat local_c8;
  byte abStack52 [12];
  byte local_28 [4];
  undefined local_24;
  undefined local_23;
  undefined local_22;
  undefined local_21;
  undefined local_20;
  undefined local_1f;
  undefined local_1e;
  undefined local_1d;
  byte local_1c [4];
  undefined local_18;
  undefined local_17;
  undefined local_16;
  undefined local_15;
  undefined local_14;
  undefined local_13;
  undefined local_12;
  undefined local_11;
  long local_10;

  local_10 = *(long *)(in_FS_OFFSET + 0x28);
  __s = (char *)malloc(10);
  __command = (char *)malloc(0x80);
  iVar1 = stat(".tmp_cache",&local_c8);
  system("clear");
  putchar(10);
  printf(
        " \x1b[1;37m\x1b[41m╔════════════════════════════════════════════════════════════════════════════════╗\n\x1b[0m"
        );
  printf(&DAT_00100ef0);
  printf(&DAT_00100ef0);
  printf(
        "  \x1b[1;37m\x1b[41m║\xa0\xa0\xa0\xa0\xa0\xa0\xa0\xa0\xa0\xa0\xa0\xa0\xa0            THANK U 4 PLAYIN SIM-TACO 3D\xa0                   \xa0\xa0\xa0\xa0\xa0\xa0║░\n\x1b[0m"
        );
  printf(&DAT_00101038);
  printf(
        "  \x1b[1;37m\x1b[41m║\xa0\xa0\xa0\xa0\xa0\xa0\xa0            (DIS GAME IZ COPY RITE (C)2033 BYAND!XOR)\xa0\xa0\xa0\xa0\xa0\xa0\xa0\xa0\xa0\xa0\xa0\xa0\xa0\xa0\xa0\xa0\xa0\xa0║░\n\x1b[0m"
        );
  printf(&DAT_00100ef0);
  printf(&DAT_00100ef0);
  printf(&DAT_00101158);
  printf(&DAT_001011e0);
  printf(&DAT_00101270);
  printf(&DAT_00100ef0);
  printf(&DAT_00100ef0);
  printf(
        "  \x1b[1;37m\x1b[41m║\xa0\xa0\xa0\xa0\xa0\xa0\xa0\xa0\xa0\xa0 U CAN HAZ\xa0REGISTERDSIM-TACO FUR AZ LIL AZ 14.99 DEF-COIN\xa0\xa0\xa0  \xa0\xa0\xa0\xa0\xa0\xa0\xa0║░\n\x1b[0m"
        );
  printf(&DAT_00101390);
  printf(&DAT_00100ef0);
  printf(&DAT_00100ef0);
  printf(
        "  \x1b[1;37m\x1b[41m║\xa0\xa0\xa0\xa0\xa0\xa0INCASE U R DUMB AN JUS LOST UR LICENSE FILEZC REMINDUR HINT BELOW:\xa0\xa0\xa0\xa0\xa0\xa0\xa0║░\n\x1b[0m"
        );
  printf(
        "  \x1b[1;37m\x1b[41m║\xa0\xa0\xa0\xa0\xa0\xa0  ANZWR 2 TEH ULTIMATE QUESHUN OV LIFE, TEHUNIVERS, AN EVRYTHIN\xa0\xa0\xa0\xa0\xa0\xa0\xa0\xa0\xa0\xa0║░\n\x1b[0m"
        );
  printf(&DAT_00100ef0);
  printf(&DAT_00100ef0);
  printf(
        " \x1b[1;37m\x1b[41m╚════════════════════════════════════════════════════════════════════════════════╝░\n\x1b[0m"
        );
  printf(&DAT_00101648);
  printf("\n\x1b[1;91m");
  if (iVar1 == 0) {
    puts("HACK THE PLANET!");
    local_28[0] = 0x53;
    local_28[1] = 0x4b;
    local_28[2] = 0x51;
    local_28[3] = 0x38;
    local_24 = 0x43;
    local_23 = 0x4b;
    local_22 = 0x55;
    local_21 = 0x58;
    local_20 = 0x4e;
    local_1f = 0x34;
    local_1e = 0x4b;
    local_1d = 0x44;
    local_1c[0] = 7;
    local_1c[1] = 0xe;
    local_1c[2] = 0x19;
    local_1c[3] = 0x7b;
    local_18 = 2;
    local_17 = 0xe;
    local_16 = 0x1e;
    local_15 = 0x11;
    local_14 = 0x14;
    local_13 = 0x78;
    local_12 = 2;
    local_11 = 1;
    printf("License Accepted: ");
    local_e8 = 0;
    while (local_e8 < 0xc) {
      abStack52[(long)local_e8] = local_28[(long)local_e8] ^ local_1c[(long)local_e8];
      printf("%c ",(ulong)(uint)(int)(char)abStack52[(long)local_e8]);
      local_e8 = local_e8 + 1;
    }
    putchar(10);
    puts("Email the code, screenshot, and detailed explanation of your hack to hyr0n@andnxor.com\n")
    ;
    remove(".tmp_cache");
  }
  else {
    printf("REZULT: ");
    gets(__s);
    iVar1 = strcmp(__s,"42");
    if (iVar1 == 0) {
      puts("YEZ!\n");
    }
    else {
      puts("NOEP!\n");
    }
    fopen(".tmp_cache","wx");
    system(__command);
    remove(".tmp_cache");
  }
  printf("\x1b[0m");
  if (local_10 != *(long *)(in_FS_OFFSET + 0x28)) {
                    /* WARNING: Subroutine does not return */
    __stack_chk_fail();
  }
  return 0;
}
First Pass Analysis
The goal of this challenge was to find the sekret word, however we crafted it such that there were multiple ways of doing it. While the solutions were unique, everyone participating had to first understand what the program was doing. Hyr0n will now walk you through his approach, its not better or worse than others, just his methodology when doing this kind of thing.
- Click Window -> Function Graph
This is the control flow graph of the program. It takes the code and groups it in to logical blocks, where the change in control (i.e. loops, if statements, etc) could fork the path from start to finish of execution. Starting with this, printing it out or putting it on a second monitor, and writing down what is going on will help you take a good top down approach to reverse engineering. Remember, engineering is synthesis, reverse engineering is analysis. Make logical assumptions, investigate, validate or invalidate them, and use whatever data is there to help peel this onion. Going through the code and grouping it by the graph blocks...
- Declare variables, Print some graphics, Check if a file exists (tmp_cache)
- (IF) that file exists print Hack The Planet and some sekret code
- To print the sekret code, xor two arrays of integers together, then cast as characters. Then delete the tmp_cache file.
- (ELSE) Get input from the keyboard,
- (IF) That input is the value "42" say YEZ, (ELSE) Say NOEP
- Open the file tmp_cache, run a system call to whatever the value "command" is, delete .tmp_cache
- Clean up and close out the program
Once we know how the program works at a high level, this is where we try and use it in unintended ways. Are there ways to trick the logic as is without modification of the binary? Are there ways to cleverly modify the binary? Yes to both. Now on to the submitted solutions, the winners credited in parens.
Solution 1 - Just Touch ".tmp_cache" (@Crypto_Lizard)
The first way to get the sekret code was to simply create a hidden file named ".tmp_cache."
How would you figure this out? Look at line 35 in the code.
iVar1 = stat(".tmp_cache",&local_c8);While the thing in quotes is an initial tip off, look up what the stat function actually does.
It tries to read information about the file in the first function argument and stores the results in the second argument, returning a successful 0 if it was able to obtain information (i.e. the file exists) and -1 if not. Further on in the code, you see that the variable which stored that result "iVar1" (what Ghidra named it) has a fork in logic where you proceed to show the code or fail out.
if (iVar1 == 0) {
    puts("HACK THE PLANET!");
    //...IM ABBREVIATING THE CODE PASTE TO AVOID REDUNDANCY
    remove(".tmp_cache");
  }
  else {
    printf("REZULT: ");
    //...IM ABBREVIATING THE CODE PASTE TO AVOID REDUNDANCY
    remove(".tmp_cache");
  }
By seeing that in the code, it would tip you off to just create a blank file with that name before running it, the program would see .tmp_cache, and proceed to show the sekret code. Almost everyone submitted this solution first, but the win went to @Crypto_Lizard for jumping right on it.
Solution 2 - Modify JNZ to JZ (@syn_ack_zack)
The second solution is actually one of my favorite go to tricks, as well as one of the first Code -> Assembly conversions one learns when they get into RE. All statements boil down to binary logic and IF statements then boil down to the decision being TRUE or FALSE. But that is inefficient for a compiler to track both those values, so simply compare a result and see if it is ZERO or NOT ZERO. Whichever it is, you then jump to a different section of code. This second hack focuses on the same as the first, but instead of making the condition valid by adding a file, we're going to change the logic so the non-existence of ".tmp_cache" makes the statement true and the sekret code is displayed. See below for a comparison of the assembly vs. the decompiled code.
Before we jump into hacking it, there is something which unfortunately must be done. At the time this writing there is a bug in Ghidra...with patching. Of all things to have a bug with, that's a bad one and we hope the code maintainers are working to resolve it as we speak. If you try to modify the code and export a patch it will result in a segmentation fault. But there's a work around, that has some down side to it because it impacts the clarity of the decompiled code and assembly, only do this once you know there's something you want to patch. Close out of the CodeBrowser, go back to the main project screen when Ghidra launches, and delete the SimTaco file you imported.
Now, re-import the file and make a mental note of whats in the Language field.
x86 Architecture, Little Endian, 64 Bit, Default GCC
Now change the Format drop down from ELF to RAW Binary... and look, language is blank now. Click the three dots and search for x86 Architecture, Little Endian, 64 Bit, Default GCC. Hit okay and now the file is loaded in to your project (again). Drag it back on to the CodeBrowser (green Ghidra icon) and let's patch that file. Instantly you will notice all of your symbols are gone and can't simply find the MAIN function. Just scroll through them all until the code you recognize in the decompile window pops up.
For comparison you can see what this workaround method makes the assembly and decompiled code look like. Its not horrible, but not great either. Hopefully the NSA makes it their priority to fix soon (there's already a bug filed on Github).
Now simply right click on the "JNZ" (jump if not zero) in Ghidra, go through a little pop up, then change it's value to "JZ" (jump if zero) and hit enter. CTRL+S to save. Then type the letter O and you will get a pop up for Exporting simtaco: ensure the format is BINARY and change the output name to something like "simtaco_patch." Go open your terminal and CHMOD+X that file so it's executable and run it. BAM! You just hacked the planet and didn't even need that hidden license file to get the sekret code. Well done @syn_ack_zack.
Solution 3 - XOR Obfuscation (@mythdude155)
The third solution was to find the sekret code in the binary itself. Now that's usually a level 0 crackme challenge and we're not fond of simply dumping strings on a binary because it's too damn easy. So Hyr0n has a simple, but effective mitigation to dumping strings through XOR obfuscation. He uses the ASCII codes of the letters then XORs the message with a key. Then we put the private key and the encoded message as arrays of integers (knowing they will be cast and printed as characters), then run them through an XOR loop. XOR a message with a key, it's encoded. XOR that output with the key again, it's back to its original value. It's easy to undo if you know what to look for, but it thwarts simple string dumps. Let's look at the code again...
 if (iVar1 == 0) {
    puts("HACK THE PLANET!");
    local_28[0] = 0x53;
    local_28[1] = 0x4b;
    local_28[2] = 0x51;
    local_28[3] = 0x38;
    local_24 = 0x43;
    local_23 = 0x4b;
    local_22 = 0x55;
    local_21 = 0x58;
    local_20 = 0x4e;
    local_1f = 0x34;
    local_1e = 0x4b;
    local_1d = 0x44;
    local_1c[0] = 7;
    local_1c[1] = 0xe;
    local_1c[2] = 0x19;
    local_1c[3] = 0x7b;
    local_18 = 2;
    local_17 = 0xe;
    local_16 = 0x1e;
    local_15 = 0x11;
    local_14 = 0x14;
    local_13 = 0x78;
    local_12 = 2;
    local_11 = 1;
    printf("License Accepted: ");
    local_e8 = 0;
    while (local_e8 < 0xc) {
      abStack52[(long)local_e8] = local_28[(long)local_e8] ^ local_1c[(long)local_e8];
      printf("%c ",(ulong)(uint)(int)(char)abStack52[(long)local_e8]);
      local_e8 = local_e8 + 1;
    }
}
Again a lot of this can be intimidating at first even if you have a background in writing software, because compiler's do some really weird shit and no one ever bothers to check how the sausage is made. Above you see some arrays and a LOT of variables, leading up to a while loop that XOR's "^" them together. Make note at first that "local_e8" is a counter, treat it like your typical "i" or "j" used in for/while loops. So that loop starts at 0 and while it is less than "0xc", count++. In Ghidra if you select and hover the cursor over 0xc it will automagically show you it's value in other bases: it's 12 decimal....cuz that was "c" hex. Lets all remember how to count in hex... :) But even if you forget it will convert it for you.
So, we are going to start with the array's local_e8 and local_1c and iterate over them 12 times. But if you look at them declared above, they only have 4 array cells. You were taught that's a programming no no. Well it's okay for compilers. Those were originally arrays of size 12, but there's overhead associated with making it that big for something simple. So the compiler figured out, let's just make them 4 cells big and put variables on the stack right after them so you "purposely" over run the buffer. It's okay, they're adjoining on the stack. But that means a good methodology to recognizes patterns and work this backwards is...
- Determine how the data is used in the loop
- Determine how many iterations are in the loop
- Start with a variable and add up everything on the stack until you hit the max iterations
So applying that, this is what we get:
- Two sets of data are XOR'd together
- There are 12 iterations
- VARIABLE 1
- local_28[0] = 0x53;
- local_28[1] = 0x4b;
- local_28[2] = 0x51;
- local_28[3] = 0x38;
- local_24 = 0x43;
- local_23 = 0x4b;
- local_22 = 0x55;
- local_21 = 0x58;
- local_20 = 0x4e;
- local_1f = 0x34;
- local_1e = 0x4b;
- local_1d = 0x44;
- VARIABLE 2
- local_1c[0] = 7;
- local_1c[1] = 0xe;
- local_1c[2] = 0x19;
- local_1c[3] = 0x7b;
- local_18 = 2;
- local_17 = 0xe;
- local_16 = 0x1e;
- local_15 = 0x11;
- local_14 = 0x14;
- local_13 = 0x78;
- local_12 = 2;
- local_11 = 1;
So let's go on the internet and use a simple XOR calculator to see what happens when they run through that loop? (Reminder single character values need a 0 prepended to them and set the output to ASCII so you can read it)
In this case, looking through the decompiled binary was enough to let you see a private key and xor encoded message. Once you have those values, just manually do the calculation yourself to see what it was. If you followed the code, after this XOR operation the value was printed out as the sekret. Tip of the hat @mythdude155.
Solution 4 - Buffer Overflow (@d1g1t4l_t3mpl4r)
The last solution...no one got within the initial contest limits. We got the first three solutions and we were sad because this crackme was designed around a buffer overflow with the other possibilities added in after the fact to so there were multiple paths to success. Also we liked the idea of being able to fire off e-mails back at people, crushing their spirits with "Sorry, that solution has already been submitted. Keep hacking."
(note this is what Hyr0n actually looks like if he shaves his beard off)
So we let everyone know, fine, we'll accept just ONE more. Keep hacking. What you had to notice in the code was a call to the system() function, a very very dangerous practice (just like strcpy and memcpy). The system function takes whatever you enter as text and executes a command on the system. W.T.F. We'll some coders are lazy and make front ends GUIs this way which makes it useful or you could get the other processes to run as well which your own program may rely upon. So take a look through the code. Initially it's just used to clear the screen at the very beginning.
system("clear");Not really a big deal. It's typing clear at the screen. But it's used a second time towards the end.
system(__command);Remember the last solution where the arrays were a bit weird from optimization, but it was okay because the variables were instantiated and placed on the stack next to one another? We'll take a look at the beginning of the code.
undefined8 main(void)

{
  int iVar1;
  char *__s;
  char *__command;
....
  __s = (char *)malloc(10);
  __command = (char *)malloc(0x80);
}
So the stack first contains an integer, then a character array, then another character array...Those are actually just the pointers which are placed on the stack. Given we use malloc, the actual memory space for those character arrays are right next to one another on the heap. So if we have input for __s which exceeds its buffer, it is going to overflow in to __command. Then system() will execute whatever is contained in there (i.e. don't overflow it with rm -rf /). I just used malloc back to back to allocate memory directly (ya know to ensure they're both right there on the heap hanging out with one another). That means __s overflows into __command when the input is greater than what __s can hold.
It is used below when comparing the user input to 42 for the secret of the universe. All of this is nice but how does it help us get the sekret code?
The .tmp_cache file is created temporarily then deleted before the program closes.
    fopen(".tmp_cache","wx");
    system(__command);
    remove(".tmp_cache");
So if we can prevent that remove call from occurring, .tmp_cache is never deleted, and you break into the branch where the sekret code is displayed. What command could we run to do that...
Overflow simtaco by recursively executing simtaco.
Figuring all of this out, is why @d1g1t4l_t3mpl4r is a gentleman and a scholar.
In Closing...
Whether you found one of the floppy discs, succeed in this binary cracking challenge, witnessed from twitter, or even just stumbled upon this post, we hope it you enjoyed it and possibly learned something new. Above all, you should go and download Ghidra and start tearing apart binaries. Best way to start, is just write a simple program, then analyze it to see what your code looks like as assembly or pseudo C decompiled. It get's easier after a while. This was also a very benign application of all the capabilities Ghidra has, we really just had you decompile the binary to look at the code and generate a patch. The intent was to have a crackme challenge someone could solve in an evening and possibly spur some interest into a new field of security they maybe haven ventured in before. Challenges like this is what we like to pack in the badge, among other things like blinky lights and REDACTED. If you're into these kind of things, we will be giving away our badges at hacker summer camp this year due to the generosity of our Philanthropists and Sponsors.
Below is the original C code from the binary for comparison. Enjoy!
#include <stdio.h> #include <stdlib.h> #include <sys/stat.h>l #include <string.h> int main() { //Initialize #define RED "\x1b[1;91m" #define BG_RED "\x1b[41m" #define WHITE "\x1b[1;37m" #define RESET "\x1b[0m" char output[12]; char *imput; char *systemcommand; imput=(char *)malloc(10); systemcommand=(char *)malloc(128); struct stat status; int exists = stat(".tmp_cache", &status); //GFX system("clear"); printf("\n"); printf(" " WHITE BG_RED "╔════════════════════════════════════════════════════════════════════════════════╗\n" RESET); printf(" " WHITE BG_RED "║ ║░\n" RESET); printf(" " WHITE BG_RED "║ ║░\n" RESET); printf(" " WHITE BG_RED "║ THANK U 4 PLAYIN SIM-TACO 3D ║░\n" RESET); printf(" " WHITE BG_RED "║ SHAREWAREZ EDISHUN - SHARE WIT FRENDZ ║░\n" RESET); printf(" " WHITE BG_RED "║ (DIS GAME IZ COPY RITE (C) 2033 BY AND!XOR) ║░\n" RESET); printf(" " WHITE BG_RED "║ ║░\n" RESET); printf(" " WHITE BG_RED "║ ║░\n" RESET); printf(" " WHITE BG_RED "║ OH HEI DIS SHARE WAREZ PROGRAM FAILZ AZ REGISTERD ║░\n" RESET); printf(" " WHITE BG_RED "║ THAR R -1337 DAIS REMAININ ON UR TRIAL PERIOD ║░\n" RESET); printf(" " WHITE BG_RED "║ YER UNEEEK EYE DEE CODE IZ : 12345 ║░\n" RESET); printf(" " WHITE BG_RED "║ ║░\n" RESET); printf(" " WHITE BG_RED "║ ║░\n" RESET); printf(" " WHITE BG_RED "║ U CAN HAZ REGISTERD SIM-TACO FUR AZ LIL AZ 14.99 DEF-COIN ║░\n" RESET); printf(" " WHITE BG_RED "║ (SUCH DEALZ, MUCH VALUE) ║░\n" RESET); printf(" " WHITE BG_RED "║ ║░\n" RESET); printf(" " WHITE BG_RED "║ ║░\n" RESET); printf(" " WHITE BG_RED "║ INCASE U R DUMB AN JUS LOST UR LICENSE FILEZ C REMINDUR HINT BELOW: ║░\n" RESET); printf(" " WHITE BG_RED "║ ANZWR 2 TEH ULTIMATE QUESHUN OV LIFE, TEH UNIVERS, AN EVRYTHIN ║░\n" RESET); printf(" " WHITE BG_RED "║ ║░\n" RESET); printf(" " WHITE BG_RED "║ ║░\n" RESET); printf(" " WHITE BG_RED "╚════════════════════════════════════════════════════════════════════════════════╝░\n" RESET); printf(" " WHITE BG_RED "░░░░░░░░░░░░░░░░░░░░░░░░░░░░░░░░░░░░░░░░░░░░░░░░░░░░░░░░░░░░░░░░░░░░░░░░░░░░░░░░░░\n" RESET); printf("\n" RED); //Look for flag if(exists==0){ //The flag exists, ekoz was recursively called or they just made the flag file printf("HACK THE PLANET!\n"); //Lets fuck with people who dump strings and at least XOR the output //Hope they know what an XOR operation looks like in machine language :) //ASCII Value of key "SKQ8CKUXN4KD" char enc_key[12]={83,75,81,56,67,75,85,88,78,52,75,68}; //ASCII Value of key XOR'd with "TEHCAEKIZLIE" char msg[12]={7, 14, 25, 123, 2, 14, 30, 17, 20, 120, 2, 1}; printf("License Accepted: "); for (int i=0; i<12; i++){ output[i] = enc_key[i] ^ msg[i]; printf("%c ",output[i]); } printf("\n"); printf("Email the code, screenshot, and detailed explanation of your hack to hyr0n@andnxor.com\n\n"); //Remove the flag we/they created remove(".tmp_cache"); } else{ printf("REZULT: "); //Red Herring gets(imput); if(strcmp(imput, "42")==0) printf("YEZ!\n\n"); else { printf("NOEP!\n\n"); } //Create the flag FILE *fp = fopen(".tmp_cache","wx"); //Mischief system(systemcommand); //Remove the flag we/they created remove(".tmp_cache"); } printf(RESET); return 0; } -
CypherCon - Hotel Hackery, Good Friends, and Good Times
04/14/2019 at 02:56 • 0 commentsHAI 2600
So you may be wondering why the first log of our DEF CON badge project is titled after another conference: CypherCon. Something we briefly talk about but don't emphasize enough is that the members of AND!XOR are geographically distributed; i.e. we don't live near one another. So a few times a year we try to meet up at security conferences. From a "working on the badge" perspective this is what allows us to do things IRL, hang out together in the hotel rooms at night, debug the badge, design puzzles and hack the night away. See actual photo below...
But more importantly, socialization within other conferences, going to talks, and their villages is the main reason we go. Zapp has been there before and this was Hyr0n's first visit to Wisonsin. Overall a wonderful experience. Got to see old friends (Addie, Whisker ,Wire, Goetzman, Will, Krux, CarFucar, Mike Szczys, ViGreyTech), make new ones, even meet people we've talked to on Twitter for the past couple of years and have always missed one another in person (Rick Ridgley comes to mind, also we just need to say @d1g1t4l_t3mpl4r is a gentleman and a phreaking badass). It stresses me out to write this right now in fear that I forget to list someone's name from the weekend for love and shoutouts. If I did forget, don't hate me. I'm on 3 hours of sleep writing on an airplane with a screaming child behind me (I'm lucky to even get coherent sentences typed at this point). Just a reminder that you should always expand your scope beyond a single conference, attend as many as you can across the globe, since each one has a different vibe and you get to meet many awesome people. What can we say about CypherCon? It feel's like family. Everyone is so nice and welcoming, we love visiting the mid-west and need to get out there more often. We'll be back next year for certain.
CypherCon TyMkrs Badge Challenge
The ToyMakers created an amazing badge this year, it read paper tapes. As in, 50 years ago technology paper tapes and you had to either hand punch or submit jobs to create punched paper tape. You can see Hackaday Mike showing it here. Its not our place to go in to the depths of how their challenge worked, the scoring, etc... (that's someone else's write up to be done), but we can explain our part in it. Like many of the other villages, we were given code cards by Whisker to hand out in "whatever manner we see fit." Note, this also unofficially makes AND!XOR the first nomadic village right? See Zapp & Hyr0n brainstorm below...
Actually what we came up with isn't at all that original (many groups have used SSTV in the past) but it added layers of fun for some folks to learn something new while trying to get punch codes. We took a photo of the card and used Robot36 Slow Scan TV encoding. After all, if we are using 50+ year old computer program technology, what better way to transmit photos than with 50+ year old RF encoding technology? This creates a 36 second audio file which sounds amazing and was used as a voicemail. The phone number was released. Boy did we get some great voicemails from the conference attendees :) Anyway, once someone heard our recording they used an SSTV Decoder on their computer to translate the noise into a photo (assuming they knew what it was, if not then there was a lot of talk with the HAM folks or scouring the SigIDWiki.
Yeah its really bad quality. In fact any background noise affects the decoding. It made us smile to walk into the restroom and to see a few hackers huddled in the corner calling the voicemail since it was the quietest place they could find? Here's the original photo for comparison.
As you can see it probably took quite a few phone calls from devoted individuals to get enough samples to clearly piece together the image. Just to guide you through the process in a quick manner here's how one would solve our card. If you want more details of punch cards, look at wikipedia.
So its an image of punched tape. You have two options.
1) Manually feed new tape through your badge and hand punch it (BOOOORRRING)
2) Decode it, write it on a job card, and turn in to the TyMkrs to print a perfect tape for you (EDUCATION)
Duh, go with option 2. Knowledge is power. (And if we say something wrong in explaining this do not hesitate to correct us in the comments below).
Rotating it this way is going to help make a lot more sense. So lets start with parity and self clocking sprocket holes. The parity helps determine whether this is ASCII or EIA formatted. Do not count the sprocket holes and count left to right.
- EVEN PARITY = ASCII
- ODD PARITY = EIA
- ALL ROWS MUST BE EITHER EVEN OR ODD
So you can see there is an even number of bits per row, on every row of the tape, this means ASCII. The parity bit is only added such that there is an even number of bits in the row for ASCII, conversely if this was EIA you would only add a parity bit to make sure the total was odd. For example, as shown above the first row only has 2 bits and is already even, so the value in your parity column is zero. But the fourth row had 3 bits, so 1 parity bit was added to make it even. That's all that it is used for, you essentially ignore it once you know if this is ASCII or EIA. Fun fact, back in the day when you would process punched tape, if you had a single parity error the entire program would stop and fail. Boooo! Anyway the job submission required you to put it in hexadecimal and we know this is ASCII due to even parity, so....
Convert each row to binary, find the hex value of that binary, then convert that hex to decimal and get its ASCII value (Simple right?)
- 1000001 = 41 hex = A
- 1000100 = 44 hex = D
- 0110000 = 30 hex = 0
- 1000011 = 43 hex = C
- 1000001 = 41 hex = A
- 1000100 = 44 hex = D
- 0110000 = 30 hex = 0
- 0110101 = 35 hex = 5
- 1000100 = 44 hex = D
- 1000101 = 45 hex = E
- 0110001 = 31 hex = 1
- 1000110 = 46 hex = F
- 0110001 = 31 hex = 1
- 1000100 = 44 hex = D
- 0110001 = 31 hex = 1
- 0110001 = 31 hex = 1
- 0110000 = 30 hex = 0
- 0110101 = 35 hex = 5
The Code is (go bottom to top given how the tape is read in) : 5011D1F1ED50DAC0DA
One would then write this on a job card, turn it in, get a tape made, run it through their badge to get points, then share the tape with others because sharing is caring. We feel very humbled the TyMkrs included us in this and gave us the freedom to hand out the cards as we see fit. We heart you!
AND!XOR DC27 Free Badge Challenge
Oh did you see this? The other reason we like going to cons is so we can put our own challenges out there to let hackers earn free stuff.
IF((Do you hackers want to earn one of our badges) && (you were at CypherCon this weekend) && (you found a floppy disk)) == TRUE) ... Then you may be wondering, who could have access to a Floppy Drive over the weekend? You still have time... the deadline isn't until 1557014400 (PLENTY OF TIME TO GET THIS DONE). Well one person already won, congrats to Phyxius! So there are only two more free badges left to be earned. There are multiple ways to win this challenge so if you picked up one of the 40 floppies we hid around the conference I suggest you at least grab an original or USB Floppy drive and get hacking.
AND!XOR DC27 Badge Progress
So what did we get done on the badge with all this going on at CypherCon? Improving our provisioning scripts to ensure the initial setup and flashing of the badges using a <REDACTED> is turn key easy for the folks over at Macrofab. Don't forget, an important part of Design For Manufacturing (DFM) is taking in to account whatever needs to be done to initially provision the badges, needs to be done over...and over...and over... and you are paying by the minute so whatever you are thinking it better scale well. Minimize error and cost, make it easy and everyone wins.
Also we were able to knock out some awesome dynamic <REDACTED> bling from the classic <REDACTED> leveraging some fancy algorithm reverse engineering. We hope you like it as much as we do. Additionally two of the puzzles were refactored and white boarded (many tiny hotel room paper pads, which Hyr0n flushed so good luck dumpster diving). All in all it was a very productive trip making progress on the badge. April is crunch time for us, since we lock the baseline down in May to be feature complete; i.e. only bug fixes until DEF CON. It's all coming together and we're very excited about it. TTFN!