 Matt Bradshaw
-
1Source components
Please note, these instructions are for version 4 of the DrumKid code/circuit. Version 5 will be available fairly soon.
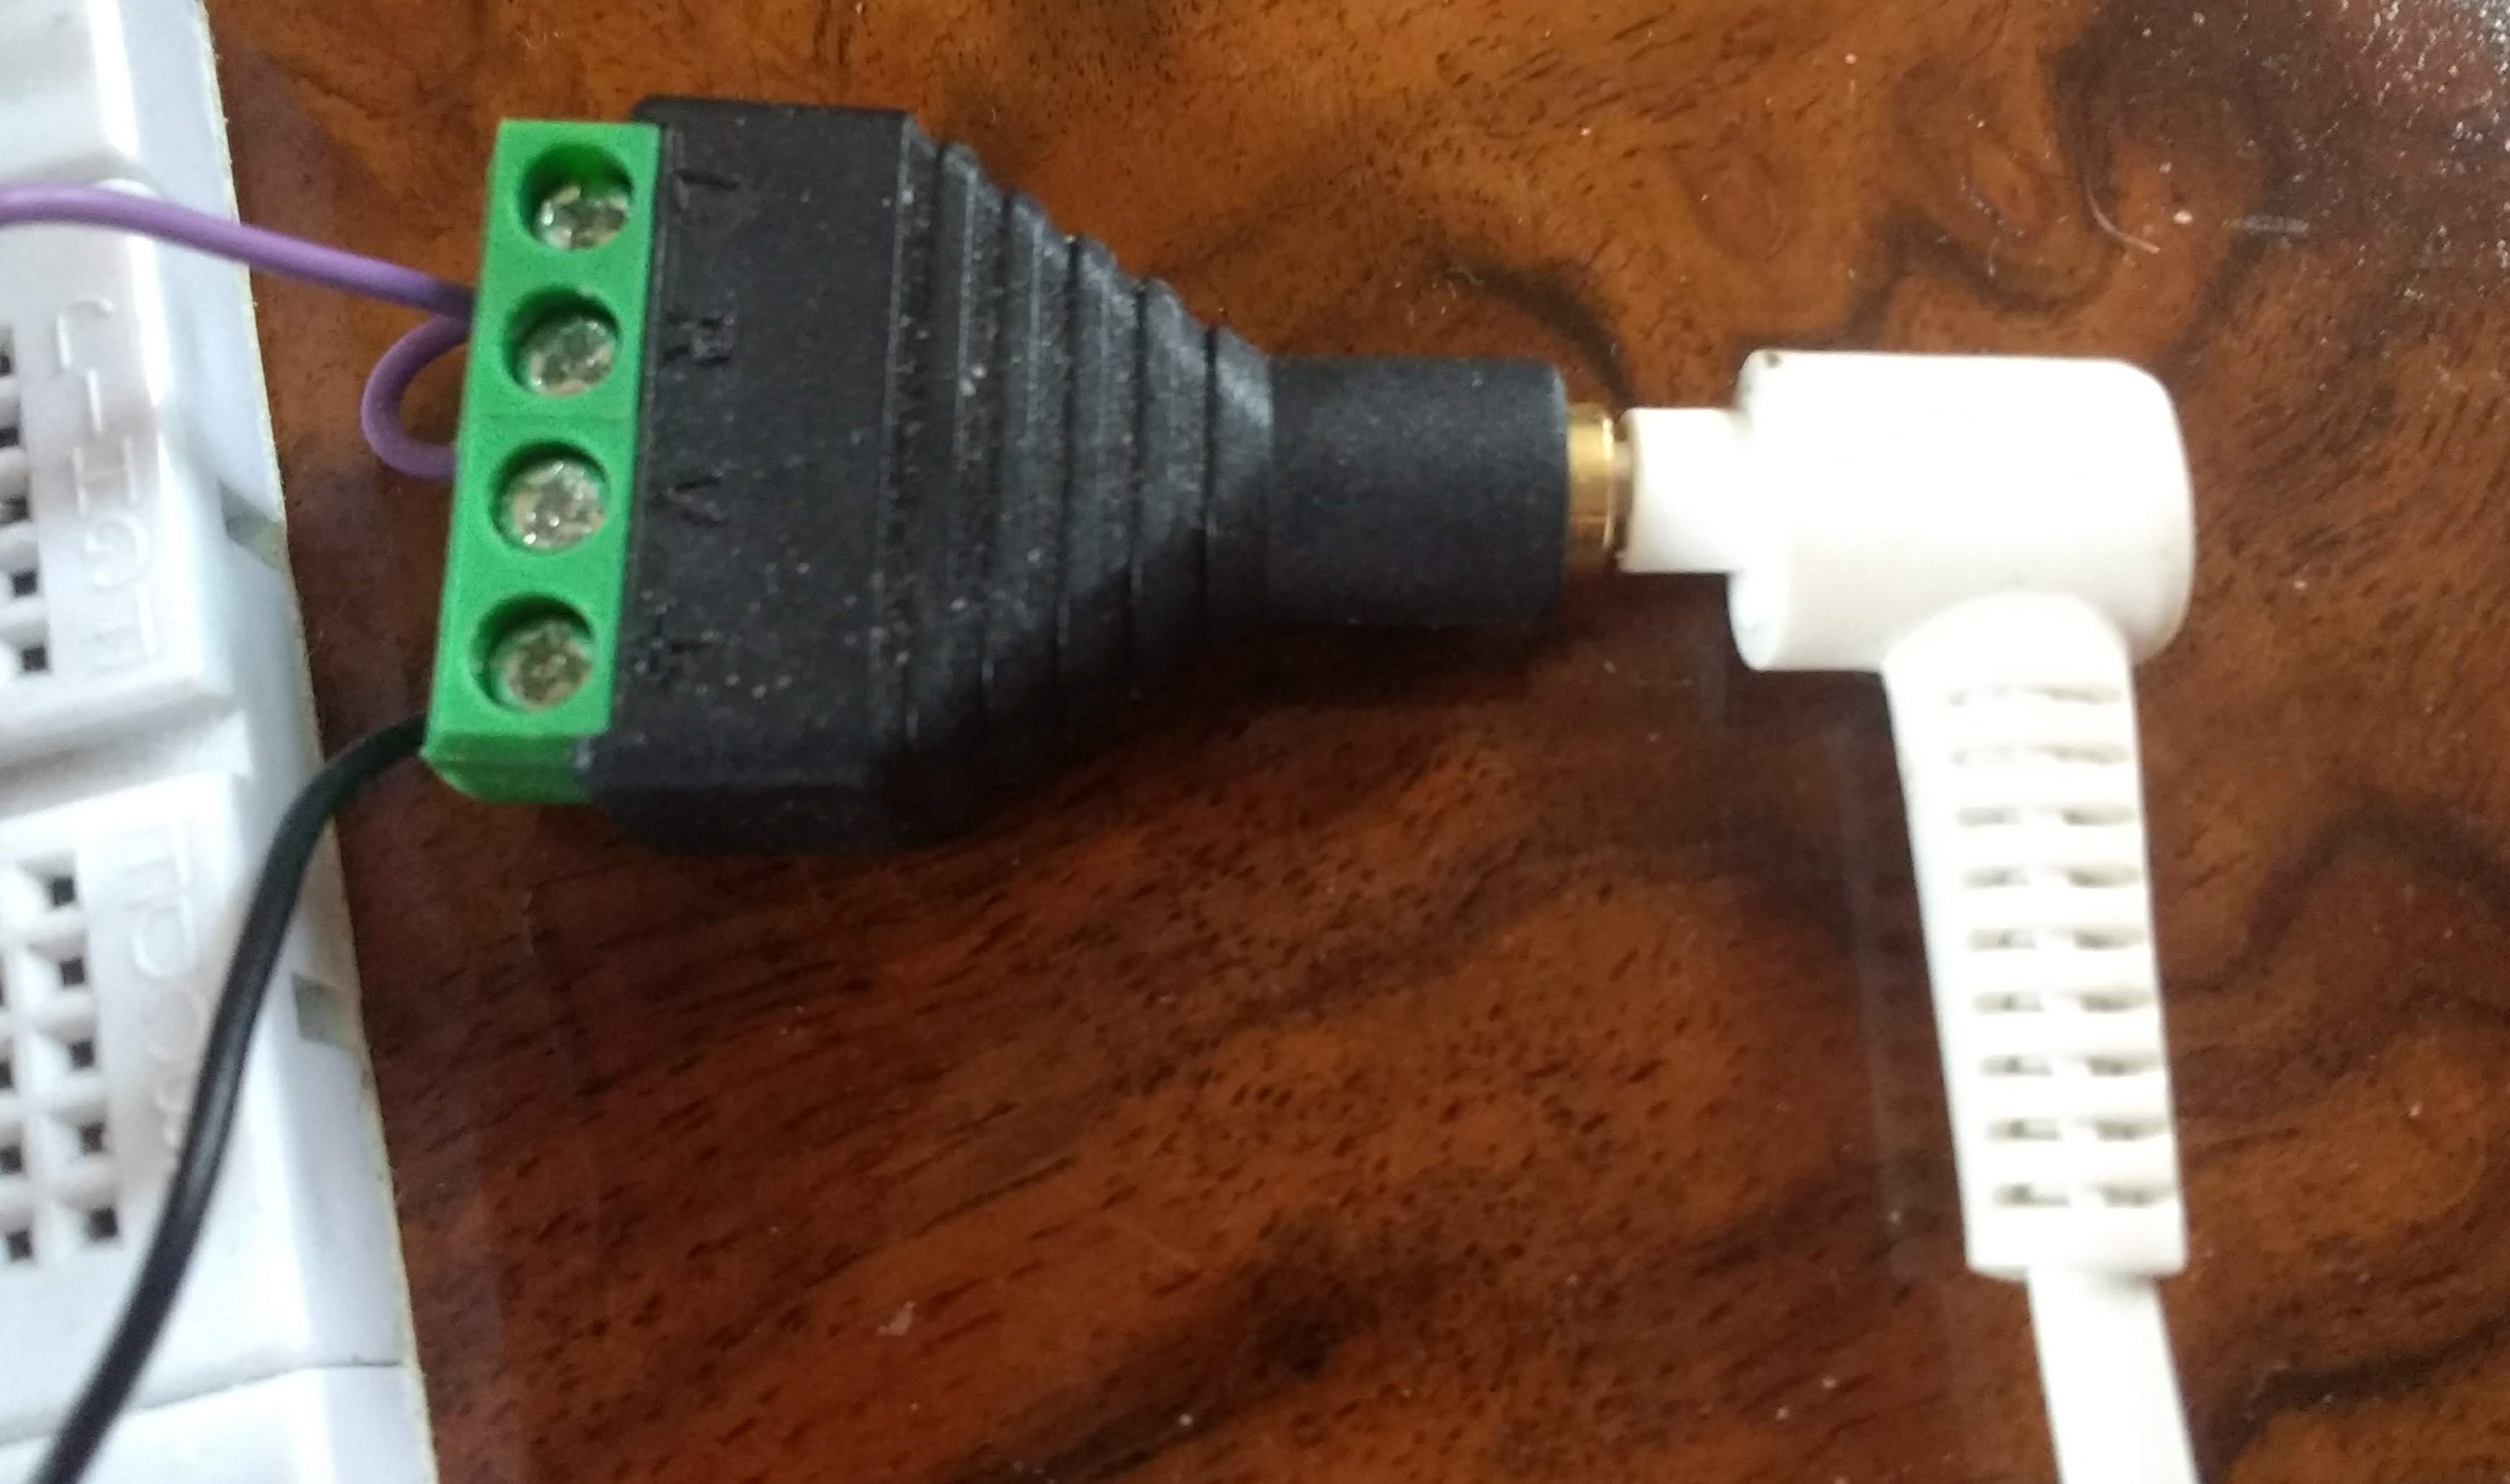
The simplest way to get a version of DrumKid working (apart from buying one when it's released!) is to build the breadboard circuit using an Arduino. The components are mainly pretty standard: you'll need a breadboard, jumper wires, an Arduino Uno, tactile buttons, LEDs, 10k potentiometers (linear), an LM386 amplifier chip, and a selection of capacitors and resistors. You'll also need some sort of breadboard-compatible headphone socket - I used a 3.5mm socket with screw terminals which is designed for prototyping like this.
![]()
3.5mm stereo socket (wired as mono) with screw terminals to connect to the breadboard I've squeezed everything onto a single breadboard with small buttons and tightly spaced potentiometers, but you might want to consider sprawling over two breadboards, which would allow you to use bigger buttons, making for a more ergonomic playing experience. Using a second breadboard might also give you space to use a breadboard-friendly Arduino variant, keeping the whole project a bit neater, although I haven't tested this.
-
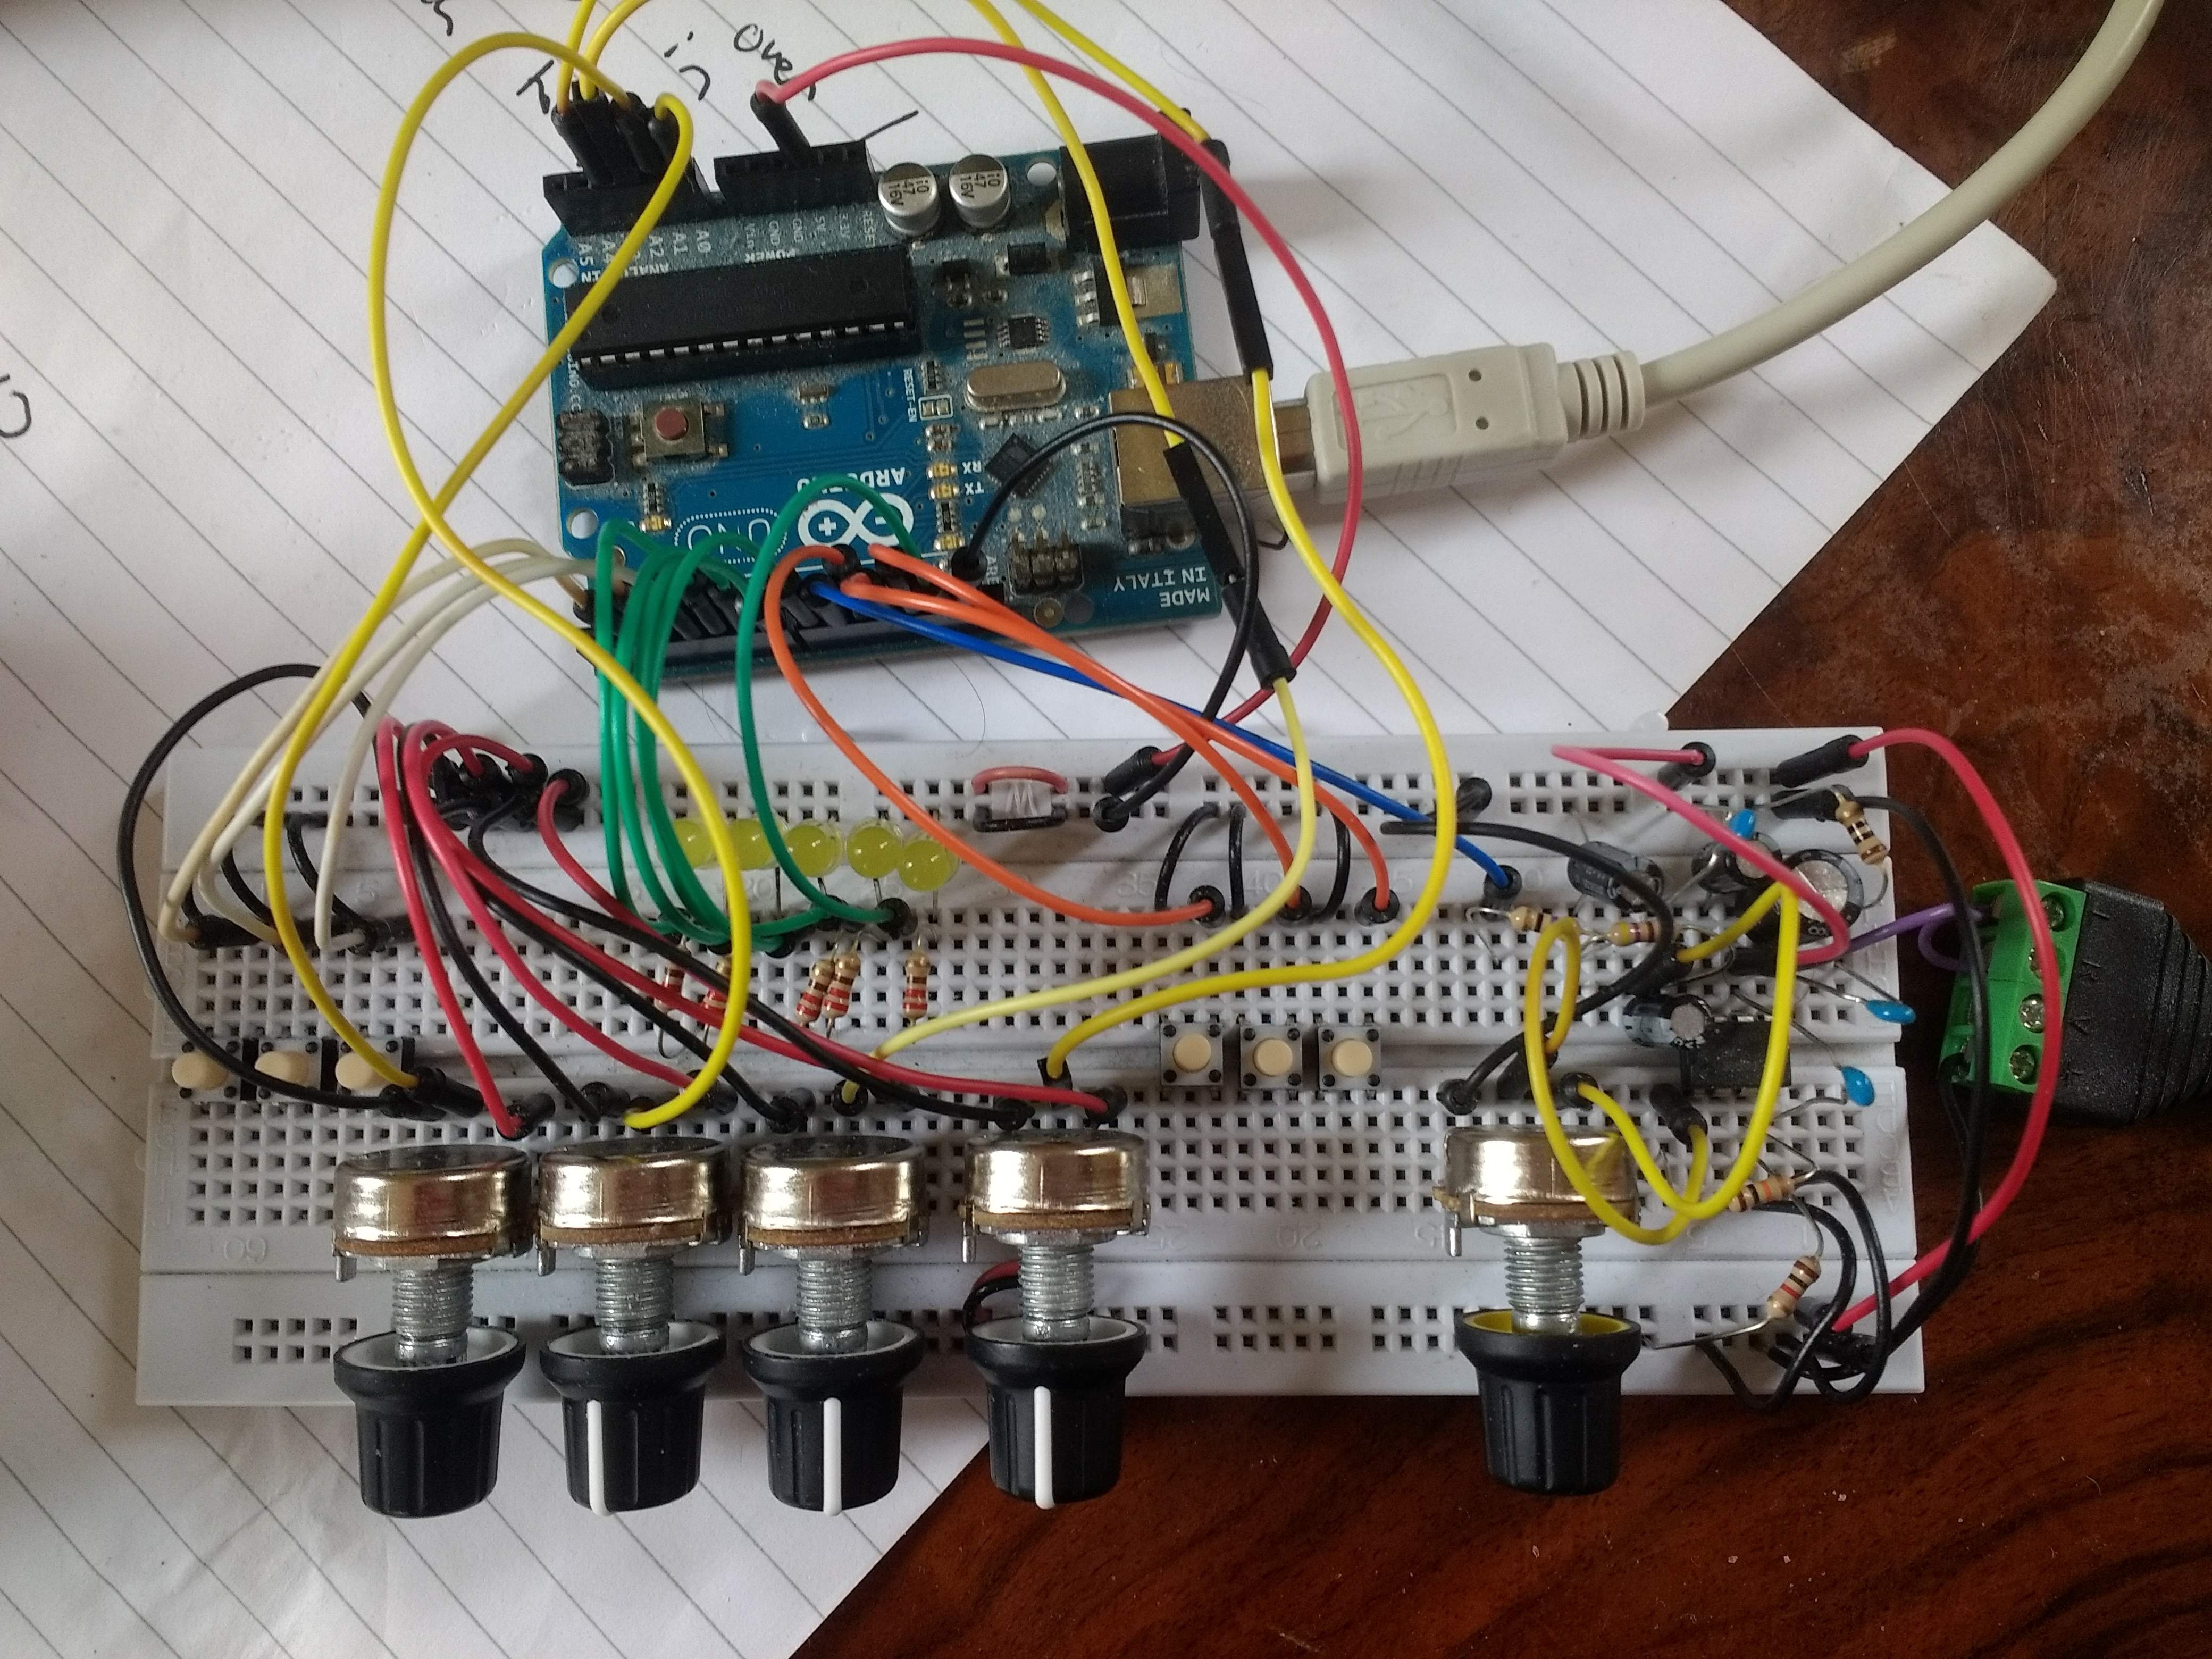
2Build breadboard circuit
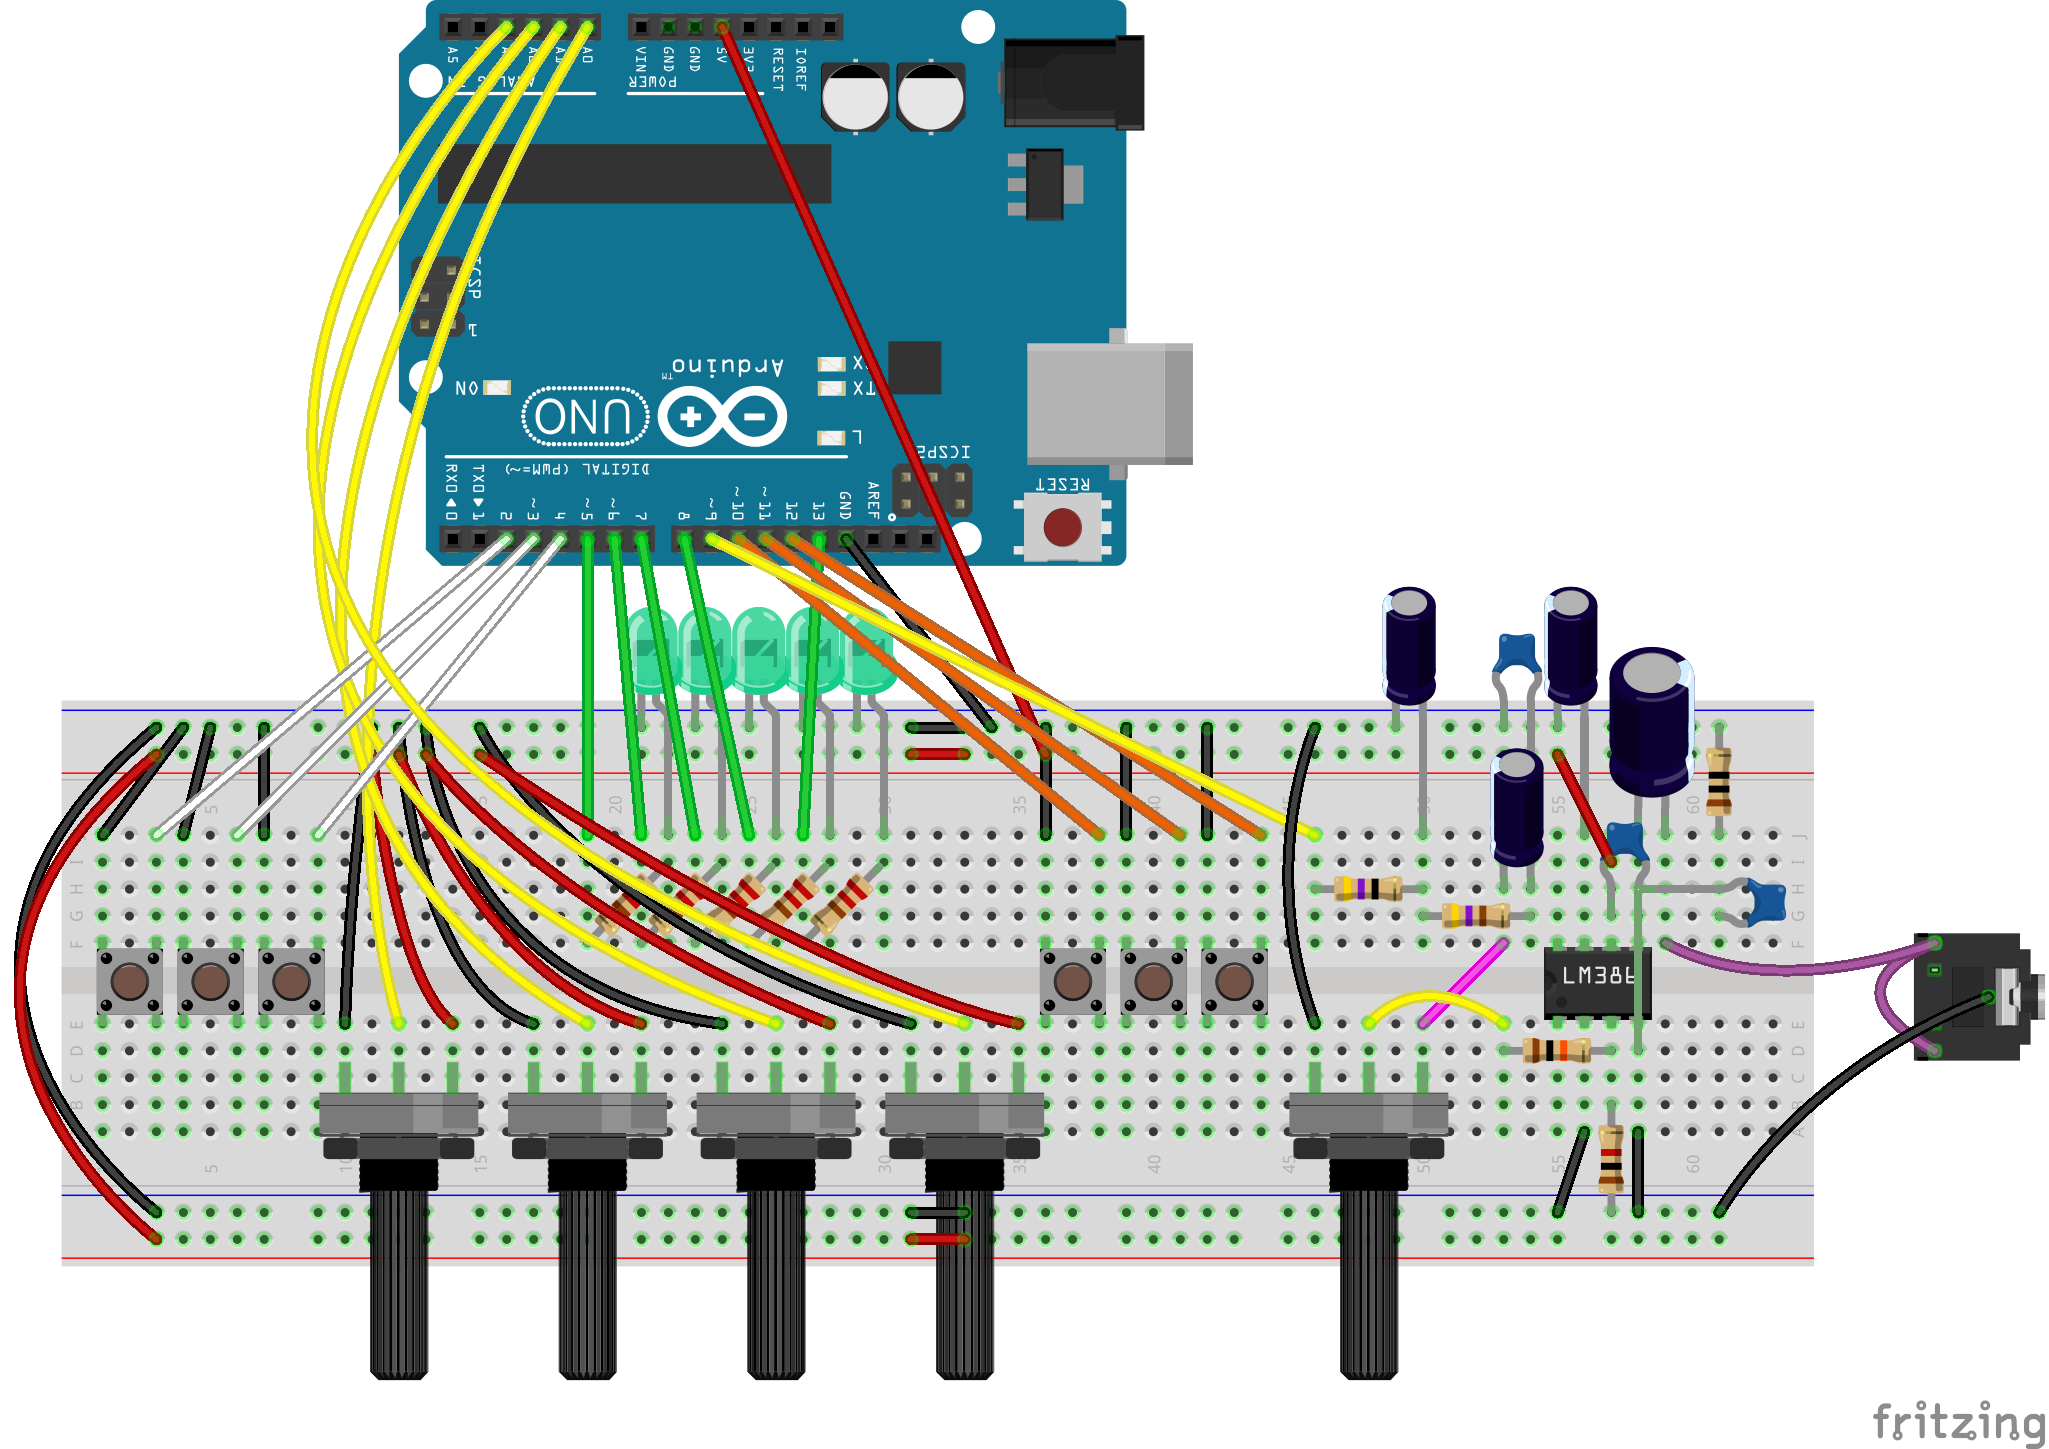
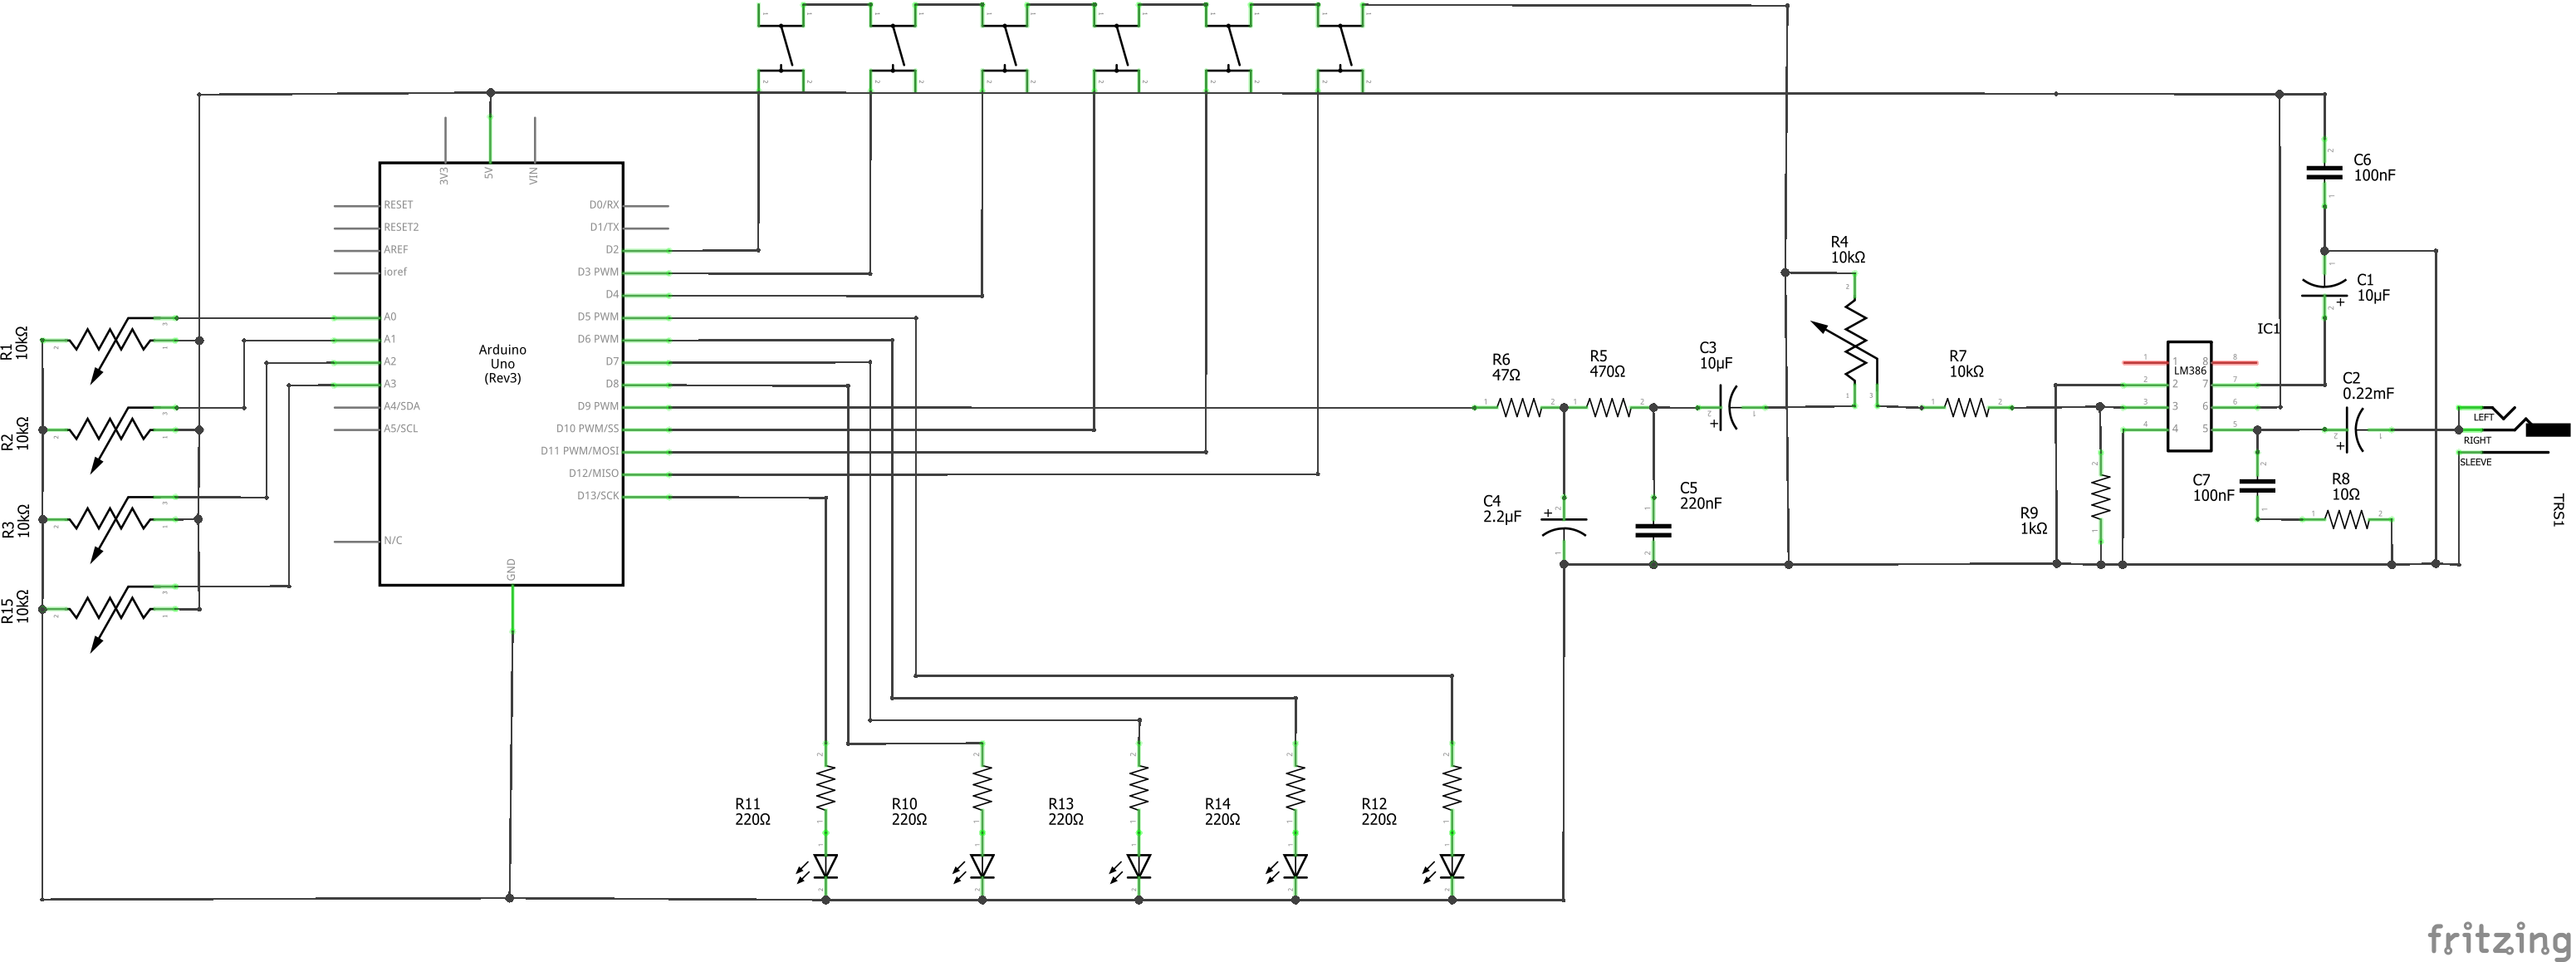
Build the breadboard circuit shown below. Refer to the schematic for capacitor values. There are six push buttons which use the Arduino's internal pull-up resistors, five LEDs with current-limiting resistors, and four potentiometers connected to the Arduino's analog inputs. All these parts of the circuit are fairly standard, and found in lots of basic Arduino examples.
The more complex part of the circuit is found on the right of the breadboard - this takes the audio output from pin 9 of the Arduino and filters it, before amplifying it. The raw audio output is a PWM output which has quite a lot of unwanted noise (the carrier signal), so I've added a 2nd-order RC filter to clean it up. In doing so, I've removed quite a lot of the higher frequencies, which I'm happy with because of the lo-fi sound I'm aiming for, but if you want to keep more of the high frequencies (at the expense of a noisier signal), you can try different resistor and capacitor values. The LM386 part of the circuit then amplifies the signal. There are many ways to wire an LM386, so feel free to use a different circuit for this if you'd prefer.
If you just want to play around with DrumKid and aren't too worried about audio quality, you can just connect your headphone socket straight to pin 9 and ground, and omit the the LM386 circuit, filter circuit, and volume control.
![]()
![]()
![]()
-
3Upload Arduino code
Download the DrumKid repository from https://github.com/mattybrad/drumkid and use the Arduino IDE (software) to open the Arduino sketch found at drumkid/v4/arduino/drumkid/drumkid.ino
The code relies on several external libraries, so you will either need to install them using the Arduino library manager or from a zip file. Any libraries not available through the library manager will be noted in the code.
Make sure that the DEBUGGING constant is set to "false", and BREADBOARD is set to "true", then upload the sketch to the Arduino. If all goes well, you should see all five LEDs flash rapidly, after which you can play your breadboard drum machine.
-
4Play your drum machine
Plug a pair of headphones into the headphone socket. Hit the far-right button to start the beat, then try out the different functions by turning the knobs. You can access different banks of functions by pressing any of the other five buttons.
I've written a manual for playing DrumKid which you can view here: https://github.com/mattybrad/drumkid/blob/master/v4/manual.md
-
5Next steps
If you enjoy playing with the breadboard version of DrumKid, you might want to upgrade to a "proper", permanent version. The simplest way to do this will be to buy one from www.mattbradshawdesign.com when I start selling DrumKid units to the public, hopefully around November 2019.
However, the GitHub repository also includes all the necessary files and information to make a non-breadboard version of DrumKid yourself. The "proper" version of DrumKid doesn't rely on an Arduino Uno, and instead uses an ATmega328 chip, along with a crystal oscillator and a couple of extra resistors and capacitors. You will also need a method of powering your instrument - my version uses three AA batteries.
The KiCAD schematic in the repo should be adequate for you to make your own stripboard layout of DrumKid. If you go down this route, you will need to use your own ingenuity to make a case (if you decide you need one).
You could even go the whole hog and use the Gerber files included in the repo to order your own PCBs. My DrumKid design uses a single PCB as the top surface of the instrument, with a laser-cut piece of plastic/wood as the bottom surface, and another laser-cut section to cover the electronics on the top. If you have access to a laser-cutter, you can make these sections using the DXF files found in the drumkid/case folder of the repo.
The various sections of DrumKid are held in place with a combination of standoffs, machine screws, and cap nuts, so you will need a selection of these - refer to the BOM for details.
DrumKid: aleatoric drum machine
A lo-fi digital drum machine which uses randomness to create unpredictable beats. Runs on Arduino, with audio provided by the Mozzi library.
Discussions
Become a Hackaday.io Member
Create an account to leave a comment. Already have an account? Log In.
Very well documented too. Much appreciated for sharing with the community!
Are you sure? yes | no
Very cool project I have breadboarded one and it's lots of fun. Do you think it will be possible to add a clock output or input? It would be amazing to have it playing with other instruments.
Thanks for your work
Juan Pablo
Are you sure? yes | no
Hi! Sorry I only just saw your question, but the answer is, hopefully, yes! I'm currently working on adding MIDI in/out, including MIDI clock. The code I'm using for this would also make a more simple clock in/out possible. I'm restructuring the code a bit to make this possible, so check the project in a week or two and hopefully the clock feature will exist.
Are you sure? yes | no
Thank you so much Matt! This looks awesome! I can't wait to build one :D
Are you sure? yes | no
Let me know if you do, would love to see/hear it!
Are you sure? yes | no