Close
0%
0%

Universal undervoltage lockout up to 34V input

Feature-packed over-discharge protection. Set the cell-count, minimum cell voltage and dip-time below threshold. Fully hackable!

janJan
Similar projects worth following
This board will solve one problem in my (any maybe your!) workshop and projects:
Using whatever battery you want for your projects without it being deeply discharged and damaged! The system automatically disconnects your load when the battery drops below the set voltage per cell for the set period of time.

ONE board for all your needs from 6V to 34V (e.g. 2 ... 8 cells). The real beauty is in the users freedom of choice. It is especially suited for LiPo or LiIon protection.

You:
- want to discharge your cells to 2.8V or better just to 3.2V to be safe? Go for it.
- expect heavy load-spikes near the cutoff-voltage which would set off any usual load-disconnect early? Set the dip-time to e.g. 5s, so your batteries can recover from the heavy load without the system turning off!

A shutdown can only be reset manually by the user.

DISCLAIMER:

After getting some attention because of this hackaday.com write-up I need to tell you the following:

This is a work in progress and NOT YET a safe and "turn-key" board which you could or should implement in your design blindly.

At the moment there's two versions.

  1. the working 1"x1" version which lacks the manual setting of the three parameters (they are set in software). The files of this one are here...
  2. the original version, which didn't work well because the regulator blew all the time

The original version is what I want to finish next, because it it the universal board which allows changing parameters "on the fly". It will have a fuse as well to keep the board from catching fire due to catastrophic events like short circuits...

Short summary

Use this board for all your battery powered projects, especially those using lithium ion or lithium polymer cells. It cuts the load from the battery if the user-set parameters are met and prevents the cells from deep-discharge, which can and will destroy the battery in the long run.

Key features 

  • Works from 2 to 8 cells.
    • Battery-voltages vary depending on charge:
      • 5.4 … 18.9V @ 2.7V/cell (max. allowed repeated discharge)
      • 7.2 … 25.2V @ 3.6V/cell (nominal voltage)
      • 8.4 … 33.6V @ 4.2V/cell (fully charged)
  • cuts off load when the battery voltage
    • sags below a user set threshold
    • for a user-set duration
  • no automatic reset, user manually re-enables the device
  • super low Rds_on N-Channel MOSFET for output switching
  • supply current (ON, working): 2mA
  • quiescent current (OFF): < 15µA

Basic mode of operation

With three Potentiometers you set the cell-count, the cut-off voltage per cell and the time the voltage needs to be below the threshold to cut the load from the battery.

The battery is connected with an standard XT60 connector, which is common for Li-Ion and Li-Po batteries. The load is connected on the opposite side of the board with screw terminals. It is initially off.

The board is activated by a short press of a button and the load is switched on if the battery voltage is high enough.

Amass_XT60PW-M_footprints.zip

Amass XT60PW-M normal and combination footprints

x-zip-compressed - 729.79 kB - 11/09/2019 at 12:24

Download

8SLiPoUVLO_Rev7.zip

Updated version. All files for the square inch version with software-defined variables (no pots or external resistors). Rev.6 was using a 30V power MOSFET which is obviously not a good choice for 34V max. input.

x-zip-compressed - 433.09 kB - 10/31/2019 at 19:10

Download

  • 15 – testing smart high side switch

    Jan11/11/2019 at 17:19 2 comments

    Just a quickie:

    I expect the test-boards for the BTS441RG smart high-side power switch to arrive end of this week.

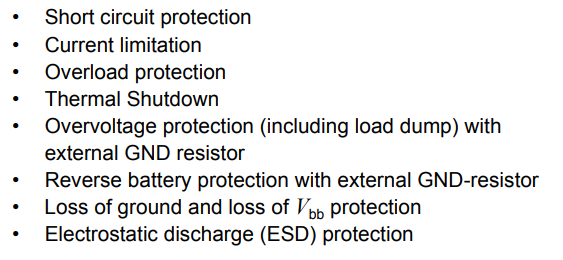
    This thing has some awesome protection features:

    The only "downside" is the relatively high Rdson of 20mΩ. But I'll do some thorough tests with this puppy. Stay tuned!

  • 14 – what will be next?!

    Jan11/08/2019 at 16:38 0 comments

    What's next?

    I decided to part the project into two separate ones:

    1. the square inch one
    2. the fully featured version with trim pots

    Also I decided to rename both projects to the correct technical term, so it is easier found by people who search for this kind of circuit.

    The square inch one: LVD² (low voltage disconnect 1x1 inch version)

    This is the version which was featured in this hackaday.com write-up. Many readers had great ideas on what to improve with this little board. Honestly, they were all right, it's just that the article simply was about an unfinished board. Anyway, here's what will happen to the square inch version:

    • switch from Attiny861 to the smaller but more capable 1-series Attiny816 (or 416)
    • implementation of a fuse which will probably be around 15A
    • reverse-voltage protection for the board
    • cut-out voltage can be set by changing an resistor
    • time-out can be set by changing an resistor

    Other than that I'll try to make a one-sided board from it to make assembly easier. In addition to that the software will be much different and really small, it will even fit into the Attiny416 which is even cheaper.

    The fully featured one: FFLVD

    This is the version I had in mind when I began this journey. It will be the more sophisticated but also bigger and more expensive version:

    • switch from Attiny861 to the smaller but more capable 1-series Attiny816
    • implementation of an over-current protection which can be set to values between 10 and 30A
    • reverse-voltage protection for the board
    • cut-out voltage can be set by a trim pot
    • time-out can be set by a trim pot

  • 14 – adventures in current measuring land

    Jan11/01/2019 at 16:50 3 comments

    So I would like to measure the current flowing in the next iteration of the board. There's many possible solutions to this. I do not need to measure over the full range of 0 to 10 or 15A in mA resolution. My aim is to cut the load off when a certain current is reached.

    So let's assume this current I want to cut the load at is 10 ampere. I needed to select a shunt for that. To not waste too much energy (because it is directly in line with the load) it needs to be as low resistance as possible.

    Selecting a shunt resistor

    So I chose a 0.005Ohm shunt. At 10A there will be (U = R*I) 0.05 ohm * 10A = 0.05V across it, which is 50mV. It will turn (P = R*I²) 0.005 ohm * 10²A = 0.5W into heat. The shunt needs to cope with that, so I chose a 1%, 2W version which comes in a 2512 case.

    But how the heck are we going to reliably measure 50mV and turn it into a value that allows the Attiny to work with?

    Selecting a proper Analog to Digital converter

    There are two ways I'll describe here.

    1 – using a separate ADC chip

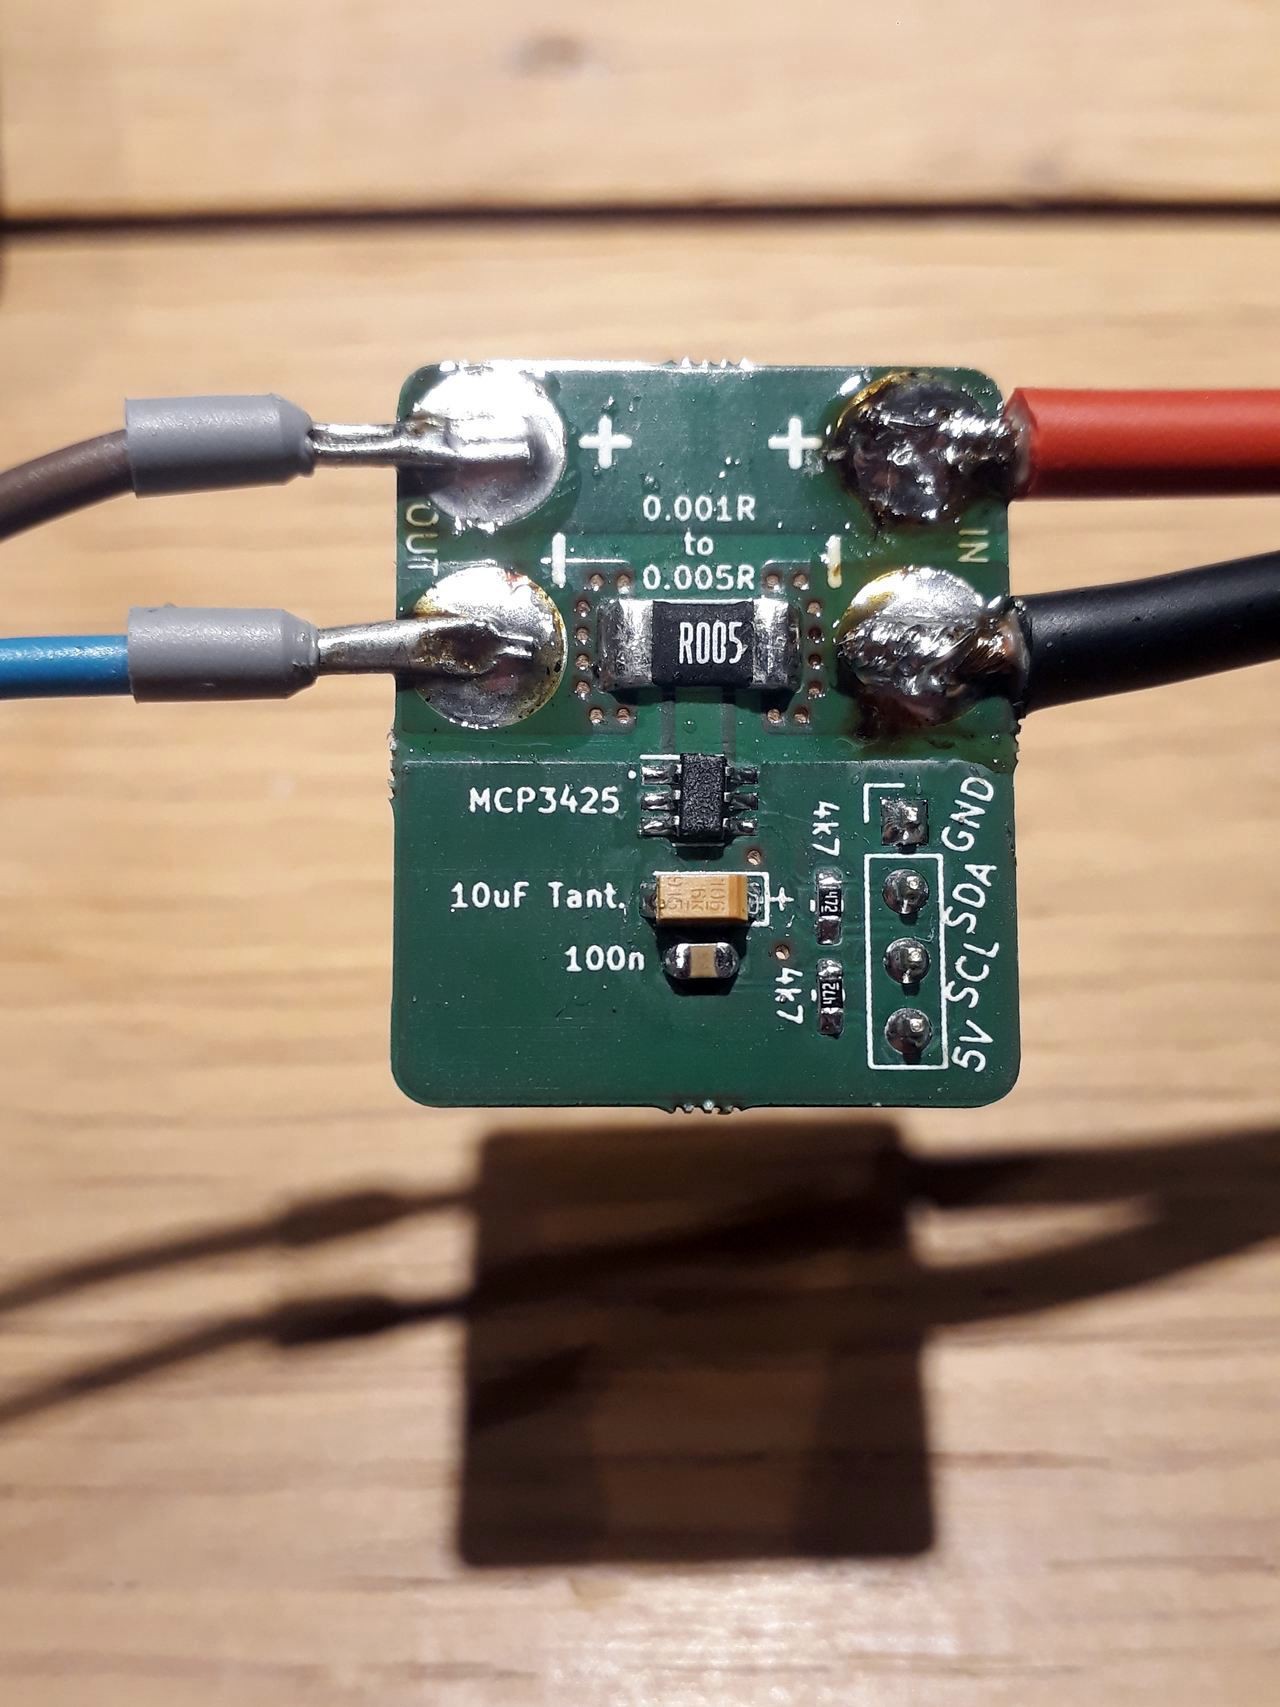
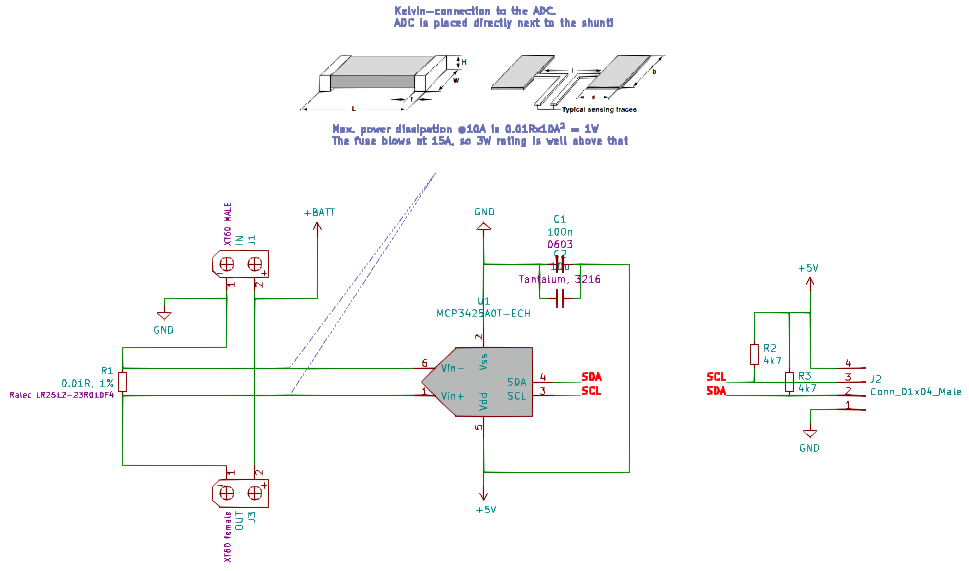
    Here's a small break-out board for the Microchip MCP3425 16Bit ADC chip. Here's the schematic:

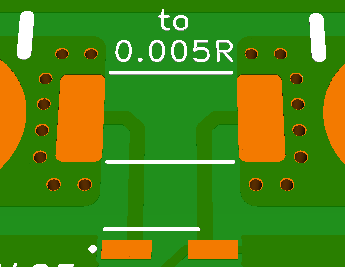
    As the ADC doesn't accept a voltage >> than VCC we need to sense the resistor voltage drop connected to ground. Sensing is done with the widely adopted "Kelvin sense connection":

    This eliminates a few problems regarding sensing directly from the main current path. Analog has evaluated an really special footprint design especially for this purpose here. Be sure to check that out as well!

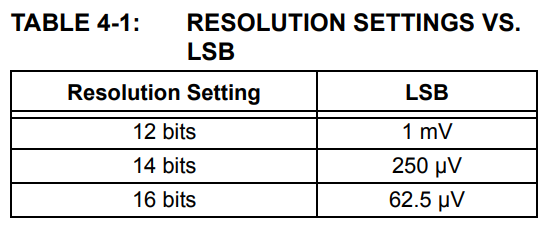
    The drop will be super low, so ground shift will be no problem here. These are the resolutions you can get from the ADC:

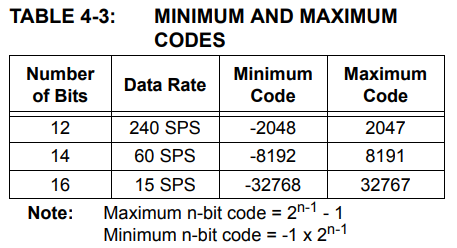
    More bits = longer measuring time:

    So, for a quick "just overcurrent protection" we can choose 12 bit resolution. This means a current of 10A gives us a code of 50, which is exactly 50mV in this case because of the 1mV resolution / LSB.

    Overcurrent-shutdown will take at least 4.2ms (240Hz sample rate). This could be too long to protect the MOSFET from destruction, I'll have to look into that. A fuse for the absolute max current needs to be implemented anyway.

    2 – using only the Attiny816

    Stay tuned...

  • 13 – square-inch version works ✔

    Jan09/18/2019 at 07:07 0 comments

    Update 2019-10-03

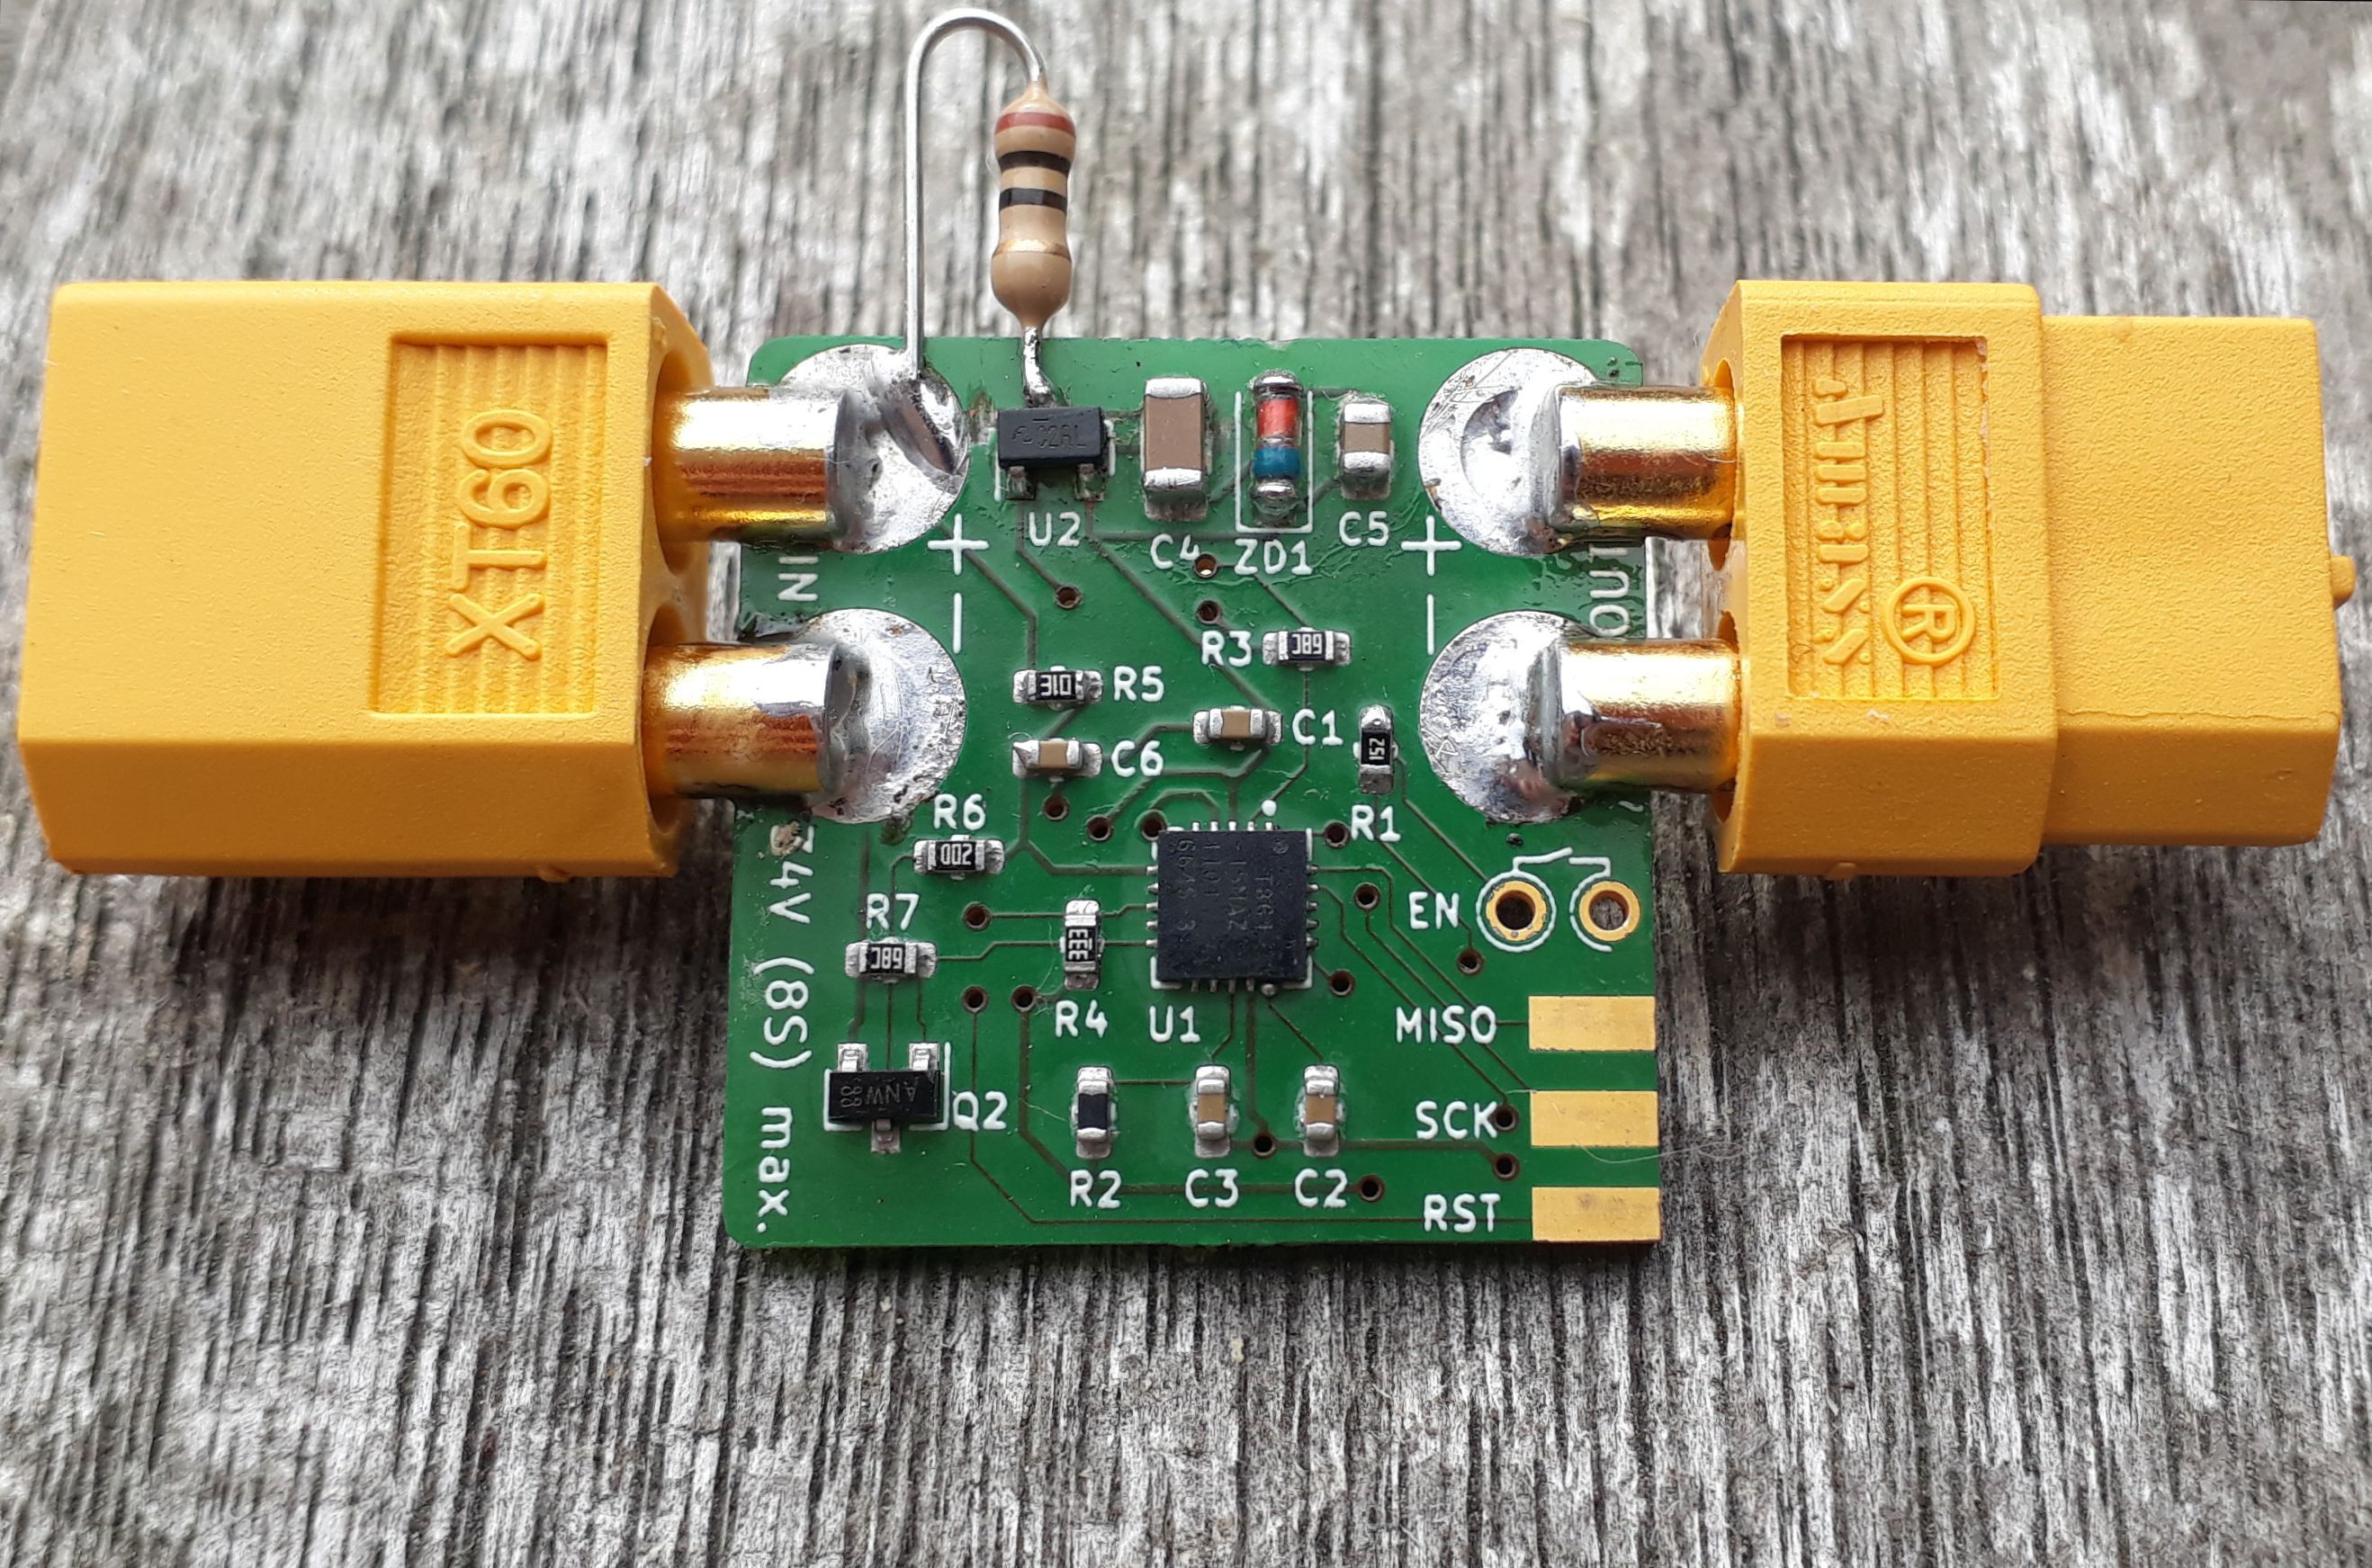
    finally working version - see the 10 ohm resistor :)

    Phew, that was a journey. This project really started killing me slowly... It worked at first but the damn thing tried to die randomly. As I put a 5V6 zener directly into the 5V rail (the reg. has a short circuit current of 20mA only so the zener does not need an resistor) at least the Attiny861 follow the regulator each time it blew...

    I tried everything and always thought: Ah, this works now. UNTIL it blew again. Mostly on (re)connecting the LiPo battery. So it had something to do with the inrush current.

    When I talked with @Simon Merrett about the issue, he suggested to limit the inrush current to the regulator with a resistor. First I though this is a bad idea because additional resistance in the path means more (quiescent) current.

    But I gave it a go. In the above picture you see a 10 ohm botch-resistor. It effectively kills the inrush-current to something which doesn't destroy the regulator.

    NOW IT FINALLY WORKS like... ALL THE TIME. Nice!

    Read more »

  • 12 – square-inch version ordered ✔

    Jan08/15/2019 at 10:33 0 comments

    Update – 20190826

    You always seem to find errors when it's too late for changes :)

    • used interrupt pin in the "wrong way":
      • switching it to +Vbat (via 50k, so the high voltage doesn't kill the pin)
      • forgot pull-down resistor

    The right way would've been: using the internal pull-up and switching to GND...

    • C4 should've been directly tied to the regulators input. It is connected correctly to +VBAT and GND, but not as close as possible to the regulator. As the whole board is only 25x25mm it shouldn't be a problem though...

    Update – 20190816

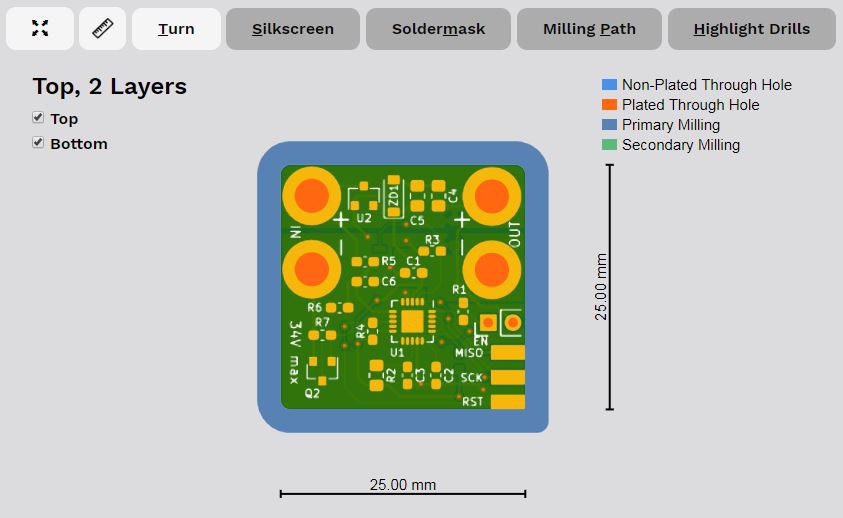
    Today I finished my square inch design and ordered it at Aisler:

    online shop rendering

    This time I added a stainless stencil for top and bottom because I hate adding solder paste with a toothpick or syringe :)

    Read more »

  • 11 – use case ONE: mobile boom box

    Jan08/06/2019 at 16:34 0 comments

    Update – 20190809

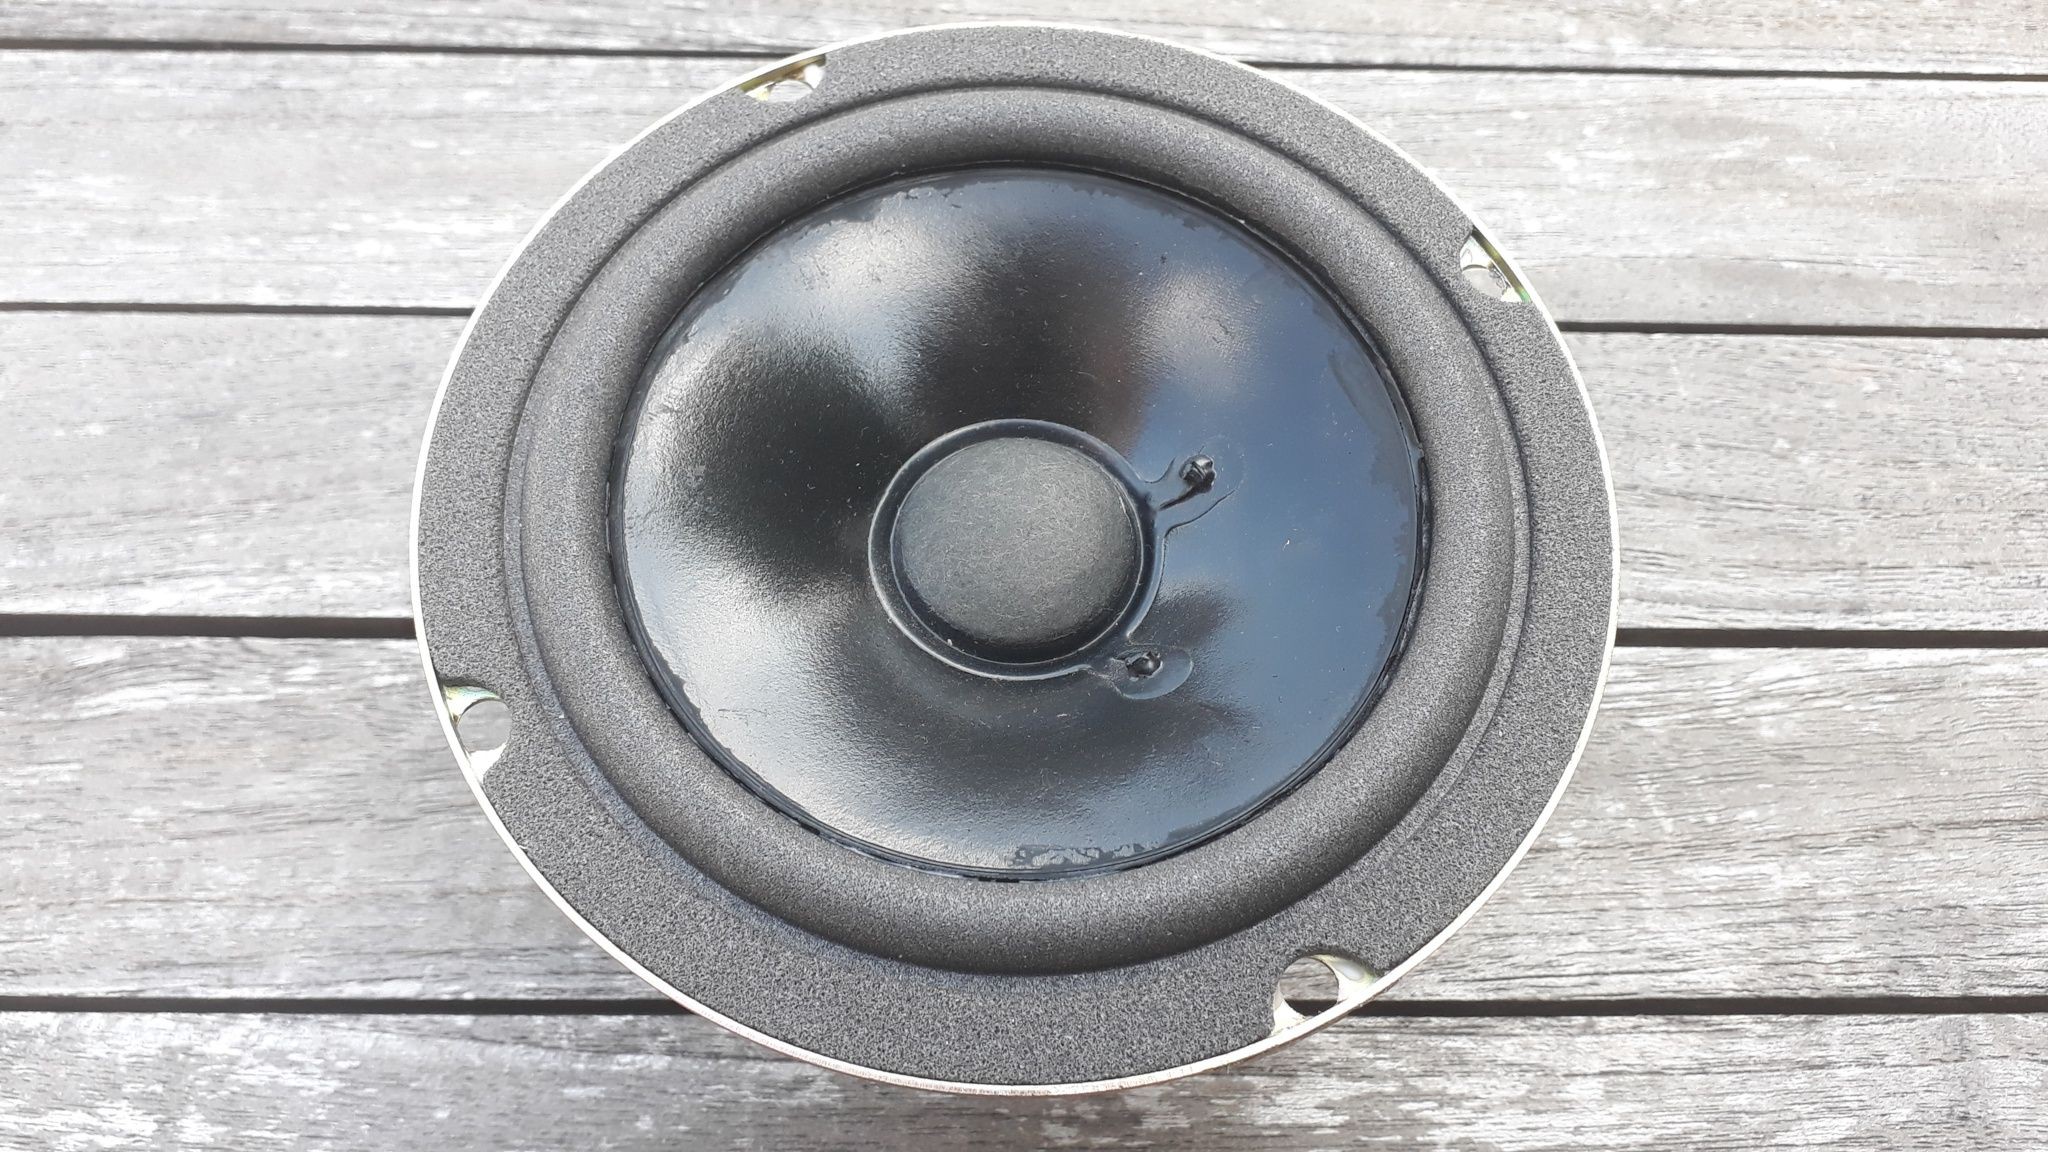
    Repaired speaker

    Speaker repair is done. Was quite the easy process, even glue was included. Next thing will be to mount the amp and battery etc. Would love to add both into the case but there's not enough spcae for both...

    Read more »

  • 10 – next iteration

    Jan07/22/2019 at 07:41 0 comments

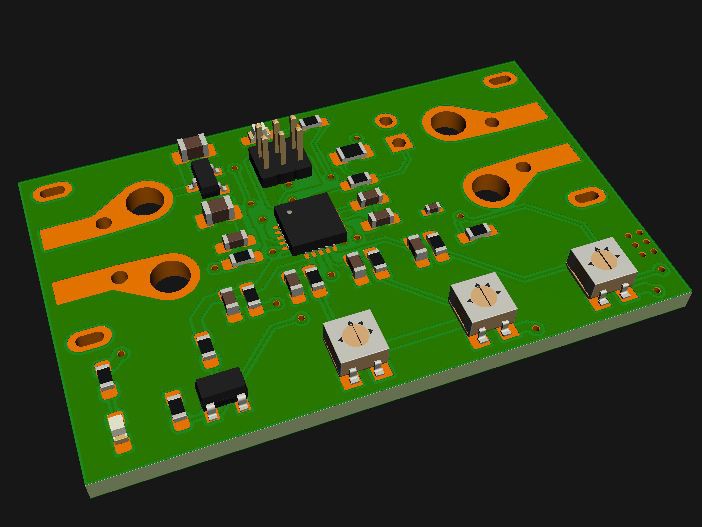
    Update:

    New board will look something like this. The above screenshot is fully routed and DRC'd. Should work :) Size is 25 x 40mm (1" x 1.6"). MOSFET and two diodes are on the bottom copper side. I'd love to get rid of the trimmer pots but then I'd loose all comfort which was a main goal of this project: using one board for all project-needs without the need for an PC to change settings...

    Read more »

  • 09 – first DC/DC tests

    Jan07/04/2019 at 19:31 0 comments

    Update – 2019-07-15

    The ripple-measurement screenshots I originally posted below were done with the ground-wire-alligator-clip-method and not the correct direct-connection method. See this Application note by Analog [p.5] for more details how to do it correctly. Analog doesn't call it "Incorrect Ground Loop Method" for no reason...

    Measuring this way (and setting the probe to 1x = no amplification) the ripple reduces to the more reasonable 30mVpp I mentioned in my updated log below.

    Update – 2019-07-10

    Using the DC/DC buck converter with nearly 30mVpp ripple the ADC readings by my Attiny861A test board are always within 0.05V of "jitter" between readings (each reading is an average of 10 single readings).

    So, the circuit seems to work just fine. Problematic thing is the "no load"-current of nearly 0.55mA which is too much drain on my projects batteries for my taste.

    We'll see where it goes from here...

    Read more »

  • 08 – thoughts about linear regulators

    Jan06/28/2019 at 07:15 4 comments

    There are some laws that just can't be bent. Ohms law is one of those. It dictates the law of conservation of power, which means: P_in = P_out.

    So, you can't just expect the small linear regulator in a SOT23-5 case to convert 40V to 5V and 100mA without getting hot.

    The power dissipated by the regulator will be:

    The biggest "drivers" here are the input voltage and the current at the output. I need at least 10mA to guarantee safe operation while switching the MOSFET. The ground current usually is in the range of 100µA.
    With a full 8S (yes, I want to extend to this cell-count) battery at 33.6V this means around 0.3W of power which the regulator needs to get rid off.
    SOT-23 cases feature very bad thermal design with around 170°C heat-up per W dissipated power. That's the "Junction to ambient thermal resistance" value in the datasheet. The value is so high because the plastic case has no metallic pad which could transfer the heat into the PCB much more efficiently.

    So, 0.3W x 170°C = 51°C heat on top of the ambient temperature. This would be okay on paper but it creates a hot-spot on the PCB which spreads to other parts which have a drift with temperature...
    The paper linked above has good design techniques for this style of case. I'll definitely try that anyway as the DC/DC chips I want to try are in that case too. Richtek has some good info on this as well.

  • 07 – new linear regulator tests

    Jan06/26/2019 at 19:30 5 comments

    Update 2019-07-15

    I tested two of the regulators. Both work quite well and didn't release the magic smoke yet. Even after the the repeated inrush-current tests (repeatedly connecting the fully charged 6S lipo battery) with the load connected.

    The MD7350H does indeed use the full 3% output voltage tolerance stated in the datasheet and is my least favorite part.

    The much smaller ME6203 works perfectly up to 38V and limits itself when short-circuited. It puts out perfect 5.00V under up to 20mA load and has a smaller footprint than the MD7350H. Using bigger PCB traces on all three pins will wick away enough heat to ensure proper cooling at 5V/10mA out (max).

    At 2.7µA current consumption with no load (µC in power down state) it's well within what I need for low battery discharge when the circuit cuts the connection. I think my next set of PCBs will use this regulator!

    The SY6345's are still in their anti-static bag and will be tested next.

    Read more »

View all 16 project logs

Enjoy this project?

Share

Discussions

Kevin Graehl wrote 01/01/2022 at 01:50 point

ANy interest in helping me with a 125 v version?
DC
415.341.2281

  Are you sure? yes | no

Jesse Schoch wrote 11/05/2019 at 22:34 point

Would this work for a dewalt 20v battery or would it be easier to just use a relay to cut off the battery?

  Are you sure? yes | no

Jan wrote 11/06/2019 at 05:00 point

Hi @Jesse Schoch!

It is perfectly suited for the job as long as you know how much current will flow (as there is no protection yet) 

A relay works too, but draws much more current when activated, especially those who can switch bigger currents... 

  Are you sure? yes | no

Xasin wrote 10/31/2019 at 20:56 point

I feel your problem regarding the latest write-up

My Lasertag project had a few people buying the PCBs even though I had written that there was a fault in the PCB ground plane, shorting out a button. It was fixable, but ... Yeah, it's a good idea to have a nice visible writing.

Awesome that you got that blog post though!

  Are you sure? yes | no

Jan wrote 11/06/2019 at 05:25 point

Thank you for your nice words @Xasin!

Good thing is I dug much deeper into the world of current carrying capability, via current capability, fuses and shunt current measurement because of all the feedback I got! 

  Are you sure? yes | no

tabbey01 wrote 10/31/2019 at 08:45 point

Nice board - looks like there's plenty of spare pins on the ATtiny to add a charge control circuit as well if you can find room for another power connector and mosfet -  that would be icing on  cake! 

Tony

  Are you sure? yes | no

Jan wrote 10/31/2019 at 09:43 point

Hi @tabbey01.
Thanks for your suggestions! The next revision will use an Attiny816 which has a few features I really like: Automatic accumulation of analog readings, many different calibrated analog references, no crystal needed, ...

I might add additional features, but need to get the very basic version working first. Many commenters mentioned the non-existing short circuit protection. I need to address that first :)

  Are you sure? yes | no

Simon Merrett wrote 10/26/2019 at 19:58 point

Did you just upgrade this to 34V rating? If so, congratulations! 

  Are you sure? yes | no

Jan wrote 10/27/2019 at 10:23 point

Hi @Simon Merrett to be honest, it's been like that before but I added it so it makes more sense to others who might want to use the circuit. Not everyone is using only LiIon or LiPo multicell batteries :)

The circuit itself should work up to 40V, it needs other values for the voltage measure resistor divider though.

  Are you sure? yes | no

Bharbour wrote 10/03/2019 at 21:20 point

Hi Jan,

Am I missing something? I don't see a files section.

Bob

  Are you sure? yes | no

Jan wrote 10/04/2019 at 06:53 point

Hi @Bharbour you're right. There's been so many sudden deaths of all the various revisions that I haven't uploaded files yet.
I sure will when everything is working fine, which it will eventually (I hope) :)

  Are you sure? yes | no

Bharbour wrote 10/27/2019 at 13:55 point

Hi Jan, Thanks for putting the schematics up. You might consider adding a zener or TVS on the input side to protect against inductive kickback when the board switches on or off. I spent 5 years working with hot swap power control chips and demo boards, and the parasitic inductance of a modest amount of wire can give you a surprising voltage transient. This board has a lot in common with those hot swap power controller demo boards.

  Are you sure? yes | no

Jan wrote 10/27/2019 at 10:59 point

@Bharbour I added the Rev6 files now. Works like a charm now thanks to the added 10R series resistor to the regulator.

  Are you sure? yes | no

Simon Merrett wrote 04/28/2019 at 10:38 point

Hey @Jan I know this is a preliminary version but is there a schematic you are happy to share? 

What regulators are you using? 

Also, what MOSFET do you envisage using and at what price? Maybe we can find something with equivalent RdsOn and logic level driving? 

What about a "Pro" version which adds JST balance connectors and has the ability to monitor each cell individually? 

Ref the pots, what about fixed resistors and pin header bridge jumpers? Just move the bridge jumper across the correct pair of pins for your configuration. Not as compact as pots but doesn't require a screw driver / flat tip to switch. Dip switch would be the same but I don't think it's cheaper than the pots. 

To shrink the board, can you put the FET and connectors on the bottom? 

For the microcontroller, how about the new ATtiny range (404, 814 etc)? Given the low speed requirements for the processing, they have some fantastically low current options when running on their internal 32kHz oscillator. 

  Are you sure? yes | no

Jan wrote 04/30/2019 at 16:55 point

Hi @Simon Merrett

Let me address everything individually:

1) schematics are in the files section

2) the regulator is a TPS70950 which works up to max. 30V input

3) you're right with the MOSFET. I changed it to an ultra low Rds_on one (1.1mΩ @ 4.5V gate) so I can ditch the driver

4) a pro version is not planned yet. I have to take sume things as granted, which in this case includes propperly balanced/charged battery packs

5) I used pots because the user can set the setting quickly and individually without the need to fling a soldering iron or something.

6) all alternatives to tiny pots seem to use more board space :(

7) board shrinking will be done in the next iteration!

8) the micro will be changed to some easy to program Attiny.

I appreciate your very eye-opening and competent help so far!

  Are you sure? yes | no

Similar Projects

Does this project spark your interest?

Become a member to follow this project and never miss any updates