-
Plethora of peripherals - using interrupts, timers and events in Arduino IDE
07/23/2019 at 01:16 • 1 commentSome people who have been following #Yapolamp recently may have noticed these two projects are blurring into each other a little. Particularly this log on getting efficient pulse timing using the ATtiny402.
This log is a bit of a handful but could serve as a helpful resource for someone who is coming to the ATtiny 0 series for the first time and has only used the Arduino IDE before.
For context, it's worth knowing that this code is an interim program for the next version of #Yapolamp. It is a low powered torch, based on the efficient LED-driving principles of the #TritiLED project. It has two main modes, which are created in this code.
The first mode is an "always on" mode. It needs to pulse the LEDs at about 30Hz so that they look like they are dimly on and you could find the torch in the dark if you needed to. 30Hz is good enough so that it doesn't look like it's flashing unless you look really carefully. We need the circuit to use as little power as possible to make the supercapacitors powering it last as long as possible and to ensure it will be glowing and showing its location whenever it may be needed.
The second mode is "fully on", which is as you would imagine, getting a decent amount of brightness out of the LEDs without wasting any of the charge in the supercapacitors.
I'm using the ATtiny402, a chip with lots to offer for this application. The main features we're going to look at this time are its Timer Counter B0 (TCB0), its real time clock (RTC), its interrupts, events and low power STANDBY mode.
In contrast to e.g. the ATtiny85 and older ATtinies, the new 0 and 1 series have different peripherals and you often have to use a different peripheral than you would have in the ATtiny85 to achieve the same effect. For example, to wake from sleep after a period of time with the ATtiny85, most of us would have used a WDT or watchdog timer. In the new ATtinies, that's not what a WDT is for and so it doesn't get involved in waking from sleep, only resetting if your code fails to run properly. To wake from low power modes, there are several ways we can use (great - we have choice) and they are based on the RTC.
Timer B
TCB0 is similar to the timer counters you will perhaps be familiar with from the older AVRs. I haven't explored it in depth but one feature that makes it stand out for LED driving is its "single shot" mode where, based on a trigger (which I'll come back to) you can set a timer going for one single run, without repeating when it reaches the end. We can also connect this to a hardware pin and none of this depends on the cpu to execute the pulse. However, it does need a clock running so if you were to try using this in a low power mode like standby, make sure both TCB0 and the 20MHz internal oscillator are set up for standby operation (bear in mind OSC20M has something like 125uA current cost to run in standby, so you must think carefully if you want to use TCB0 in low power modes).
Autocancelling peripherals
Unlike the older ATtinies, it seems that the new 0 series is very good at automatically turning off peripherals, such as ADC etc, when you enter low power modes such as STANDBY. I may end up regretting that statement but I have noticed good power performance is achieved without a plethora of commands to deactivate e.g. ADC before sleeping.
Interrupts
Interrupts are fairly straightforward. You must take care to clear the flags from within the Interrupt Service Routine (ISR) for predictable results (I observed continuous firing without the specific interrupt conditions because I tried clearing the flag elsewhere, and I have seen other people have similar issues on the AVRfreaks forum).
RTC
The RTC interrupts are worth exploring because here we have a choice. We can run the RTC overflow (OVF) interrupt to give us one ISR after a certain period and we can run the Periodic Interrupt Timer (PIT) to get a separate ISR based on the RTC's clock but at a different time than the RTC_OVF interrupt. Nice! Don't forget to make your variables volatile if they are going into an Interrupt Service Routine.
A big mistake I made on timers and RTC was due to my experience of using old AVR timers. I wanted to vary the duration of a timer before an interrupt would fire. In older AVRs I would have done this by varying the value of the compare register. CMP or compare in the 0 series is a valid register but it only helps you interrupt at a certain point within the timer's period. If you want to effectively shorten or lengthen that period duration, you want to edit the period register, or PER (as in RTC.PER).
Events
The events system on the new 0 and 1 series chips is great. You can use it as glue to take the input or output of one peripheral and send it to another peripheral, without getting the CPU involved. This works really nicely for fast response times. An example from #Yapolamp is that I wanted the next LED pulse to start as soon as the inductor driving the LEDs had stopped discharging through them. I was able to sense the inductor voltage using an input pin and use a falling edge on that pin to trigger the next single shot pulse from TCB0, using events only - not even an interrupt! It can also do it asynchronously, making response times fast and reducing cpu burden. Events have so much potential and deserve many logs to themselves. I definitely encourage you to look into them and see what you can achieve with minimal use of the CPU.
Low Power
Before we get into the specific low power modes, just remember that even I can achieve 18uA without entering a sleep mode by swapping the 20MHz clock for the internal 32kHz oscillator. There are plenty of applications where this would be good enough. The other amazing thing is that you can change clock sources on the fly in software, so if you find a demanding task has arrived at your microcontroller, it can raise its clock and crunch through the task before setting itself back to 32kHz.
Nevertheless, we also have low power modes. I won't touch on POWER_DOWN here because I haven't tried it. The reason for this is that although power performance is good, it doesn't let me run any peripherals in the background and is relatively slow to wake up - not good for me with all these LEDs to blink so often. I opted for STANDBY. It has excellent general performance (0.71uA plus your peripherals according to the datasheet). You do need to configure some peripherals, such as RTC and TCB0, to keep working in STANDBY mode. Keep an eye out in the datasheet.
Do bear in mind that there are several parts of the microcontroller's memory that have protected access to stop us accidentally changing something critical without making sure we really mean it! There are some different ways to do "protected writes" of settings to these areas, hunt around in a "Getting Started with RTC" or something similar from Microchip for examples. Clock settings are an example of a protected areas of memory.
Bitwise operators
When you are setting up registers, do be careful to use |= or = appropriately. If you look in the datasheet and see that you might overwrite other register settings inadvertently, then you need to use |= to avoid wiping those when you set one or a few bits. Something that I didn't know is that there are very helpful shorthand names for the register locations and settings. These often look like "TBC0.CTRLA" or "RTC_OVF_bm". You can see how they are mapped to the registers in the datasheet but sadly the datasheet doesn't tell you what to type to address a particular register. So you will find examples very helpful for this. I also searched for and found the files "ATtiny402.adtf" and "iot402.h", which will both be available on your computer if you have Atmel Studio and the ATtiny device pack installed. If you have the megaAVR Arduino board pack installed in the Arduino IDE, you also probably have a version of "iot402.h" somewhere in your Arduino15 folder (it's hidden in user appdata in windows). Mine is in
C:\Users\[username]\AppData\Local\arduino15\packages\arduino\tools\avr-gcc\7.3.0-atmel3.6.1-arduino5\avr\include\avrThese files open in a text editor like Notepad++ and should help if you want to address a register without having an example in front of you.
Those suffixes are important too:
_bm means it's a bitmask;
_gc means it's a group configuration (often two 8 bit registers / 16 bits);
_bp means it's a bit position, within a register of say 8 bits;
|= can work with these but remember also that "= 1 << xyz_bp" can also help.
If you have several bits to write at the same time, you can OR them together, like:
PORTA.DIRSET = PIN1_bm | PIN2_bm | PIN3_bm; to set three pins as outputs.
The codeHere's some prelim code that compiles nicely in the Arduino IDE but uses more direct register addressing and manipulation than Arduino functions. Hopefully you can see what it's doing but if not, here's the gist:
We set a single shot timer to generate the LED driver pulses. If running in fully on mode, the microcontroller is awake and pulses are rapidly generated by pin PA7 sensing the inductor voltage and driving the pulse with an event channel. Periodically, in much slower time, we have the RTC firing an interrupt. This is used to wake the system up when in "always on" mode and schedule another pulse via the reconfigured event generator on channel 0, to produce a very low power light (~20uA including LEDs).
Finally (in general terms) a PIT interrupt fires even less regularly than the RTC OVF that in "fully on" mode will recalculate the pulse duration for the LED driving TCB0 single shot pulse, based on a nifty reading of the supply voltage using no extra pins. I also use this PIT as a debounce - it has the right kind of period to allow this role without needing to employ a separate section of code or a pin interrupt. Given that we're not chasing fast events on the button, this is more than adequate.
Caveat. I'm sure this code is full of mistakes but I hope you may find some of the lines useful as examples for your own experimentation with these nifty microcontrollers.
/* This version manages to have two modes, "always on" (0) and "full on" (1).
 *   Sleep works in always on mode but not full on mode.
 *   Has auto pulse duration calculation for full on mode
 *   Uses events, pin-change interrupt, RTC OVF interrupt and TCB0 to generate modes
*/
#include <avr/sleep.h>
#include <avr/interrupt.h>

volatile uint8_t mode = 0;          // current options: "always on" (initial) and "fully on"
volatile uint8_t wasPushed = 0;     // button debouncing variable
volatile uint8_t isPushed = 0;      // button debouncing variable

ISR(RTC_CNT_vect)
{
  RTC.INTFLAGS = RTC_OVF_bm;        // Wake up from STANDBY. Just clear the flag (required) - the RTC overflow Event will handle the pulse
}

ISR(RTC_PIT_vect)
{
  RTC.PITINTFLAGS = RTC_PI_bm;      // Clear interrupt flag by writing '1' (required)
  modeToggle();                     // Handle modes changes in this function
  if (mode) adjustPulse();          // If in fully on mode, change pulse durations based on supply voltage
}

ISR(TCB0_INT_vect) {                // This interrupt fires when the timer reaches the CCMP value
  TCB0.CTRLA = 0 << TCB_ENABLE_bp;  // disable TCB0 until after an RTC overflow
  TCB0.INTFLAGS = TCB_CAPT_bm;      // clear the flag
}

void setup() {
  RTC_init();                         // Initialise the RTC timer
  EventSys_init();                    // Initialise the Event System
  ADC_init();                         // Initialise the ADC
  Pins_init();                        // Initialise the hardware pins
  TCB0_init();                        // Initialise Timer Counter B0
  set_sleep_mode(SLEEP_MODE_STANDBY); // set power saving mode as STANDBY, not POWER DOWN
  sleep_enable();                     // enable sleep mode
  sei();                              // turn on interrupts
  delay(20);                          // wait for clocks to stabilise (important) before...
  TCB0.CTRLB |= 1 << TCB_CCMPEN_bp;   // ... turning on the TCB0 waveform out (WO) via the pin PA6
}

void loop() {
  if (mode == 0) {                                  // in this case we are in low power always on mode
    PORTA.DIRCLR |= PIN1_bm;                        // become input and...
    PORTA.PIN1CTRL |= PORT_PULLUPEN_bm;             // ...pullup to save power
    EVSYS.ASYNCCH0 = EVSYS_ASYNCCH0_RTC_OVF_gc;     // feed the LED pulse with the RTC, about 32Hz so persistence of vision makes it look always on
    TCB0.INTCTRL |= 1 << TCB_CAPT_bp;               // stop the TCB0 interrupt
    sleep_cpu();                                    // go to sleep until the RTC wakes us
    TCB0.CTRLA |= 1 << TCB_ENABLE_bp;               // on waking, re-enable the TCB0 pulses
  }
  else {                                            // in this case, we are on full brightness
    PORTA.DIRSET |= PIN1_bm;                        // become OUTPUT
    PORTA.OUTCLR |= PIN1_bm;                        // provide a connection to GND for the pulse feedback divider
    EVSYS.ASYNCCH0 = EVSYS_ASYNCCH0_PORTA_PIN7_gc;  //enable event sys to take PA7 logic edge as an input
    TCB0.INTCTRL = 0 << TCB_CAPT_bp;                // disnable the TCB0 overflow interrupt to disable the single shot pulses
    TCB0.CTRLA |= 1 << TCB_ENABLE_bp;               // re-enable the TCB0 pulses
  }
}

void TCB0_init (void)
{
  TCB0.CCMP = 0x0017;                           /* Compare or Capture: 0x0017 works to start with. Is varied with voltage */
  //TCB0.CNT = 0x0100;                          /* no need to use but if we didn't want the single shot to fire straight away, we'd set this equal to TCB0.CCMP
  TCB0.CTRLB = 1 << TCB_ASYNC_bp                /* Asynchronous Enable: enabled. Gives a tighter pulse feedback loop */
               //| 1 << TCB_CCMPEN_bp           /* Pin Output Enable: enabled later on in setup. On the Waveform Out (WO) Pin*/
               //| 0 << TCB_CCMPINIT_bp         /* Pin Initial State: disabled. Only useful if you want to start in a particular state */
               | TCB_CNTMODE_SINGLE_gc;         /* Single Shot. This is key for generating controlled pulses */
  // TCB0.DBGCTRL = 0 << TCB_DBGRUN_bp;         /* Debug Run: disabled. Not required for this application */
  TCB0.EVCTRL = 1 << TCB_CAPTEI_bp              /* Event Input Enable: enabled. Rely on both pin input and RTC events to trigger it */
                | 0 << TCB_EDGE_bp              /* Event Edge: disabled. We only want one input edge to trigger a pulse */
                | 0 << TCB_FILTER_bp;           /* Input Capture Noise Cancellation Filter: disabled */
  TCB0.INTCTRL = 1 << TCB_CAPT_bp;              /* Capture or Timeout: enabled. This enables the CCMP match interrupt, which is needed in this application */
  TCB0.CTRLA = TCB_CLKSEL_CLKDIV1_gc            /* CLK_PER (No Prescaling) */
               | 1 << TCB_ENABLE_bp             /* Enable: enabled. Turn the timer on! */
               | 1 << TCB_RUNSTDBY_bp;          /* Run Standby: enabled. Need this so pulses work in STANDBY power saving mode */
  //     | 0 << TCB_SYNCUPD_bp; /* Synchronize Update: disabled */
}

void EventSys_init(void)
{
  EVSYS.ASYNCUSER0 = EVSYS_ASYNCUSER0_ASYNCCH0_gc; // set up TCB0 event input to take event channel 0
  EVSYS.ASYNCCH0 = EVSYS_ASYNCCH0_RTC_OVF_gc;      // start in power saving mode by triggering pulses with the RTC overflow event
}

void RTC_init(void)
{
  while (RTC.STATUS > 0) {
    ;                                   // Wait for all registers to be synchronized
  }
  RTC.CLKSEL = RTC_CLKSEL_INT32K_gc;    // 32.768kHz Internal Crystal Oscillator (OSC32K)
  while (RTC.STATUS > 0) {
    ;                                   // Wait for all registers to be synchronized
  }
  RTC.CTRLA = RTC_PRESCALER_DIV1_gc | RTC_RTCEN_bm | RTC_RUNSTDBY_bm; // set no prescaler, enable RTC and set to run in standby
  while (RTC.STATUS > 0) {
    ;                                   // Wait for all registers to be synchronized
  }
  RTC.INTCTRL = RTC_OVF_bm;             // set up the overflow interrupt
  while (RTC.STATUS > 0) {
    ;                                   // Wait for all registers to be synchronized
  }
  RTC.PER = 0x01FF;                     // set up the overflow period in number of clock cycles
  RTC.PITINTCTRL = RTC_PI_bm;           // PIT Interrupt: enabled
  RTC.PITCTRLA = RTC_PERIOD_CYC4096_gc  /* RTC Clock Cycles 4096, resulting in 32.768kHz/4096 = 8Hz */
                 | RTC_PITEN_bm;                       /* Enable PIT counter: enabled */
}

void ADC_init() {
  VREF.CTRLA = VREF_ADC0REFSEL_1V1_gc;  /* Set the Vref to 1.1V*/
  /* The following section is directly taken from Microchip App Note AN2447 page 13*/
  ADC0.MUXPOS = ADC_MUXPOS_INTREF_gc;    /* ADC internal reference, the Vbg*/
  ADC0.CTRLC = ADC_PRESC_DIV4_gc        /* CLK_PER divided by 4 */
               | ADC_REFSEL_VDDREF_gc   /* Vdd (Vcc) be ADC reference */
               | 0 << ADC_SAMPCAP_bp;    /* Sample Capacitance Selection: disabled */
  ADC0.CTRLA = 1 << ADC_ENABLE_bp       /* ADC Enable: enabled */
               | ADC_RESSEL_10BIT_gc;    /* 10-bit mode */
  ADC0.COMMAND |= 1;                    // start running ADC
}

void Pins_init() {
  PORTA.DIRSET |= PIN1_bm; // output. for voltage divider GND. PIN0 is UPDI
  PORTA.DIRCLR |= PIN2_bm; // input. not used
  PORTA.DIRCLR |= PIN3_bm; // input. for button
  PORTA.DIRSET |= PIN6_bm; // output. for driver pulse
  PORTA.DIRCLR |= PIN7_bm; // input. for pulse feedback

  PORTA.OUTCLR |= PIN1_bm;                            // provide a connection to GND for the pulse feedback divider
  PORTA.PIN2CTRL = PORT_PULLUPEN_bm;                  // pullup for power saving
  PORTA.PIN3CTRL = PORT_PULLUPEN_bm | PORT_INVEN_bm;  // pullup and invert for button logic
  PORTA.PIN7CTRL = PORT_PULLUPEN_bm | PORT_INVEN_bm;  // pullup and invert for pulse feedback logic

}

void modeToggle() {
  isPushed = (PORTA.IN & PIN3_bm);  // read the input pin
  if (isPushed && !wasPushed) {     // if the pin is pushed but wasn't last time
    mode++;                         // increment the mode
    if (mode > 1) mode = 0;         // set the mode to zero if it goes too high
  }
  wasPushed = isPushed;             // update the comparator for next time
}

void adjustPulse() {
  if (ADC0.INTFLAGS) {                                                    // If there is a reading to see
    cli();                                                                // turn interrupts off temporarily
    float reading = ( 0x400 * 1.1 ) / ADC0.RES ;                          // calculate the Vcc value
    int i = (int)(146.3 - 35.541 * reading + 2.3676 * reading * reading); // calculate the pulse duration in TBC0 ticks
    unsigned int pulseOn = i;                                             // convert to unsigned integer
    TCB0.CCMP = pulseOn;                                                  // update the TCB0 compare match register
    TCB0.CNT = pulseOn - 1; /* test code */                               // update the TCB0 counter register so a pulse isn't fired out of sync (may not be required)
    sei();                                                                // turn interrupts back on
  }
  if (mode == 1) {                                                        // only set the ADC to run if in fully on mode
    ADC0.COMMAND = 1 << ADC_STCONV_bp;                                    // set ADC running for the next reading
  }
}
Back to #Yapolamp now. Good luck with your ATtinies!
-
Reading the VCC with No GPIO! (LED debugger/UI)
05/19/2019 at 22:20 • 8 commentsIntro
There's a nifty trick you can do with some Atmel Microchip parts that allows you to read the VCC voltage without any pins other than the normal power connection; VCC - or VDD as it's referred to in the datasheets) and GND. I first heard about this on @MickMake 's demo, where he follows along with the Microchip application note AN2447.
This app note is generous enough to give sample code for the ATtiny817, which is close enough to bend for use in our ATtiny402 and many of the other 0 and 1 series parts. Note that there's a section in the app note which tells you what features your chip needs to have and therefore which chips can do this supply voltage reading trick with no extra pins or parts. BTW, the ATtiny402 isn't in that list on the current Rev A version of the app note, so checking the ATtiny402 datasheet gave me the confidence that it had the right features to pull this off:
- Has an Analogue to Digital Converter - ADC
- Allows the internally generated voltage reference (1.1V in this case) to act as an ADC input
- Allows the VCC (or VDD) supply to be used as the ADC's reference voltage
How it works. ADCs basically measure what fraction of an reference voltage (perhaps with a multiplier to scale it to the operating voltage of the chip) an input voltage is. These chips allow you to route the supply voltage to their ADC's reference and their internal bandgap voltage references to the ADC input to be measured. Then it's "multiplies and divides" to get a value from the ADC measurement results that represents the supply voltage.
So the ATtiny402 is ready to read the supply voltage. But how are we going to read the ATtiny402? I have dug around a little and I don't think the D (for debugging) in UPDI is going to be available with something as low cost as jtag2updi on an Arduino Nano for a very long time, if ever. If you have the smarts to do this though, please consider this log a challenge to your abilities and show us how to do it!
Given that we already have our ATtiny402 connected to an LED, we will use that as our user interface. We'll get it to blink the voltage to us - short blinks for whole Volts first, followed by long blinks for 1/10th Volts afterwards. Then a nice pause so we know we can stop counting!
Method
Firstly, you need to have got yourself to the point that you can open a project in Atmel Studio and have a way of uploading the compiled code to your ATtiny402. This could either be from the command line with avrdude or by adding your jtag2updi programmer to Atmel Studio and uploading from there. This is where we got up to in the last log.
A refresher on the connections:
Then we will compile and upload the following code:
/*
 * ATtiny402VoltageMeasure.c
 * This code reads the voltage on the ATtiny Vcc supply pin (Pin 1)
 * and blinks the result. No external voltage references,
 * voltage dividers or other pins are required.
 * Created: 16/05/2019 01:30:05
 * Author : Simon
 */

#ifndef F_CPU
#define F_CPU 3300000UL // 20 MHz clock speed / 6 prescaler
#endif

#include <util/delay.h>
#include <avr/io.h>

/* A custom (not library) function to delay for a variable number of milliseconds*/
void delay_ms(int count){
    while(count--){                // check if greater than 0 and decrement the counter for next iteration
    _delay_ms(1);                  // wait 1 millisecond
    }
}

/* A function to blink the LED, using the custom delay function*/
void blink(int flashes, int duration){
    while(flashes--){              // check if greater than 0 and decrement the flash counter for next iteration
    PORTA.OUTSET = PIN6_bm;        // LED off
    delay_ms(duration);            // wait for a set number of milliseconds using non-library function
    PORTA.OUTCLR = PIN6_bm;        // LED on
    _delay_ms(200);                // wait for 200 milliseconds
    }
}

int main(void)
{
/* This first step is to ensure we have correct clock settings
 * as we may have changed the clock source, frequency or prescaler
 * in a previously uploaded program */
    /* Set the Main clock to internal 20MHz oscillator*/
    _PROTECTED_WRITE(CLKCTRL.MCLKCTRLA, CLKCTRL_CLKSEL_OSC20M_gc);

    /* Set the Main clock division factor to 6X and keep the Main clock prescaler enabled. */
    _PROTECTED_WRITE(CLKCTRL.MCLKCTRLB, CLKCTRL_PDIV_6X_gc | CLKCTRL_PEN_bm);

/* We will now set a pin as an output through the LED
 * to give a visual readout of the supply voltage */
    /* Configure Port A, Pin 6 as an output (remember to connect LED to PB6 and use a resistor in series to GND)*/
    PORTA.DIRSET = PIN6_bm;
/* The App Note AN2447 uses Atmel Start to configure Vref but we'll do it explicitly in our code*/
    VREF.CTRLA = VREF_ADC0REFSEL_1V1_gc;  /* Set the Vref to 1.1V*/

/* The following section is directly taken from Microchip App Note AN2447 page 13*/
    ADC0.MUXPOS = ADC_MUXPOS_INTREF_gc    /* ADC internal reference, the Vbg*/;

    ADC0.CTRLC = ADC_PRESC_DIV4_gc        /* CLK_PER divided by 4 */
    | ADC_REFSEL_VDDREF_gc                /* Vdd (Vcc) be ADC reference */
    | 0 << ADC_SAMPCAP_bp                 /* Sample Capacitance Selection: disabled */;

    float Vcc_value = 0                   /* measured Vcc value */;
    ADC0.CTRLA = 1 << ADC_ENABLE_bp       /* ADC Enable: enabled */
    | 1 << ADC_FREERUN_bp                 /* ADC Free run mode: enabled */
    | ADC_RESSEL_10BIT_gc                 /* 10-bit mode */;
    ADC0.COMMAND |= 1;                    // start running ADC

    while(1) {
        if (ADC0.INTFLAGS)                // if an ADC result is ready
        {
            Vcc_value = ( 0x400 * 1.1 ) / ADC0.RES /* calculate the Vcc value */;

        /* This next section is NOT part of the app note example
         * but is inserted to provide the blinking LED as the user interface. */
        int digits = (int)Vcc_value;      // turn the voltage reading into an integer
        int decimals = (int)(Vcc_value * 10) - digits * 10;    // calculate the voltage decimal value
        blink(digits,200);                // blink the whole number of Volts fast (because there will be max 5 fast flashes)
        _delay_ms(1000);                  // wait a second to mark the transition to decimals
        blink(decimals,800);              // blink the tenths of a Volt slowly (because with upto 9 decimal values, slow is easier to count)
            _delay_ms(5000);              // wait 5 seconds so that groups of flashes representing a reading appear distinct
        }
    }
}
I won't break down every section but I will draw out a few observations for those coming from Arduino (or at least these things tripped me up in making this code):
- For loops don't work the same as in an Arduino sketch. As you will see in the code, a while loop does a good job of replacing it. There are other ways of looping, which you can Google for.
- Declare your other functions before they are called by the code. In Arduino, it allows you to pack them below the loop() but here you need them before they are called. In this case, you need to declare delay_ms() before it is called by blink(), which in turn needs to be declared before it is called by main();
- _delay_ms() doesn't work if you pass it a variable. That's why I had to create the similar-sounding delay_ms() function. It uses a counter to achieve very nearly the same effect as delaying for a variable number of milliseconds.
- Atmel Start is a feature of Atmel Studio which "is an innovative online tool for intuitive, graphical configuration of embedded software projects.", meaning that it sets parameters up for you. The datasheet example uses Atmel Start but we don't, so we needed to add the line about setting the Vref as 1.1V in our code.
ResultsI measured my ATtiny402's supply voltage with a multimeter. From the 5V rail it was getting 4.96V. I got 4 short flashes and 9 long flashes. Success! I had similar results with the 3.3V supply pin from the Arduino Nano as the ATtiny402's supply. It was about 3.2V and I got 3 short and 2 long flashes. We know that the 1.1V reference in the ATtinys isn't highly accurate, so a calibration may be needed in your case. If so, just change the 1.1 multiplier in this line to something which works for you:
Vcc_value = ( 0x400 * 1.1 ) / ADC0.RES
Next...
If anyone else has any ideas about what else to do that's cool with these chips that really highlights the chip's features with minimal additional components, let me know. However, there's every chance you'll have better odds of making the demo work, so could quickly find yourself as a project contributor!
I don't have time at the moment, but a quadrature encoder or other cool thing using the custom configurable logic would be a good log for someone to do...
-
Open a Project in Atmel Studio, Compile and Upload Code
05/16/2019 at 00:04 • 1 commentIn this log, we'll write a basic programme in Atmel Studio for the ATtiny402 which demonstrates one of its major advantages over the ATtinys and even ATMEGAs which went before: the ability to avoid the need to set fuses with a programmer.
If this doesn't strike you as wonderful, what it means is that we don't need to wait for avrdude or Arduino IDE to work out how to talk UPDI (although I'm sure it will get done soon with the new Arduino programming interface freedoms that have recently been announced) to set things like:
- Brownout detection
- Watchdog settings
- CLOCK speeds!
Yes, that's right, we no longer need to set the clock configuration before we upload code! We can even dynamically change both the clock speed AND source from within the programme! This opens up huge opportunities, such as running from the 32kHz internal oscillator down to 18uA - no need to sleep if you want the device to always be on and ready to respond to human timescale events.
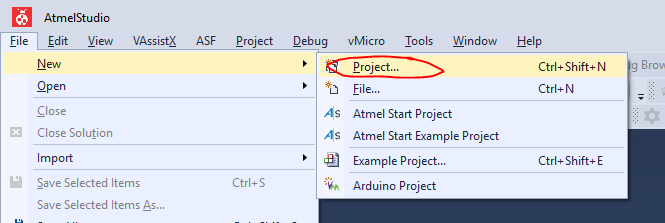
In Atmel Studio, open a new project:
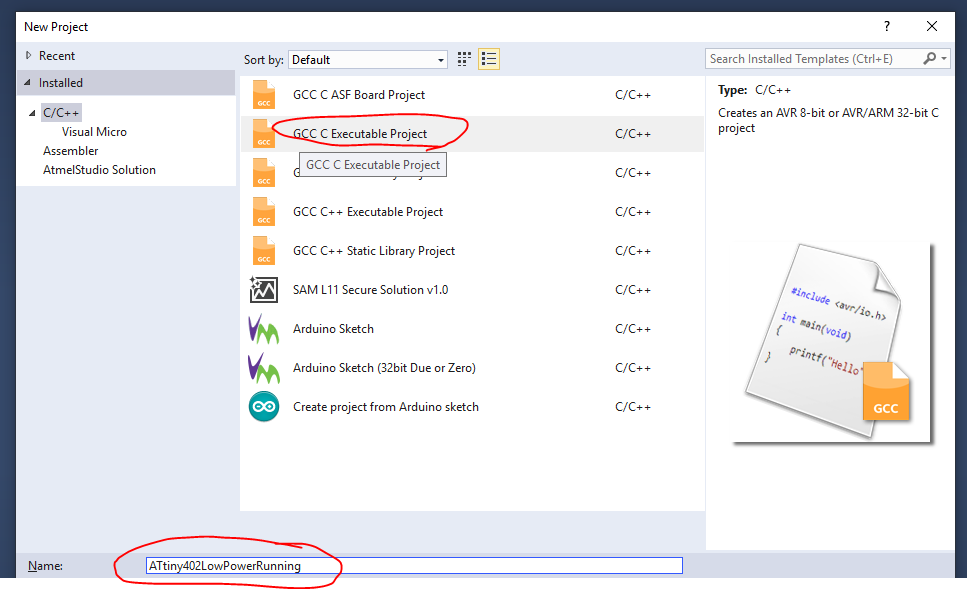
We need to give it a name (I left everything else as defaults) and then click on the option for a GCC C Executable Project and then click OK:
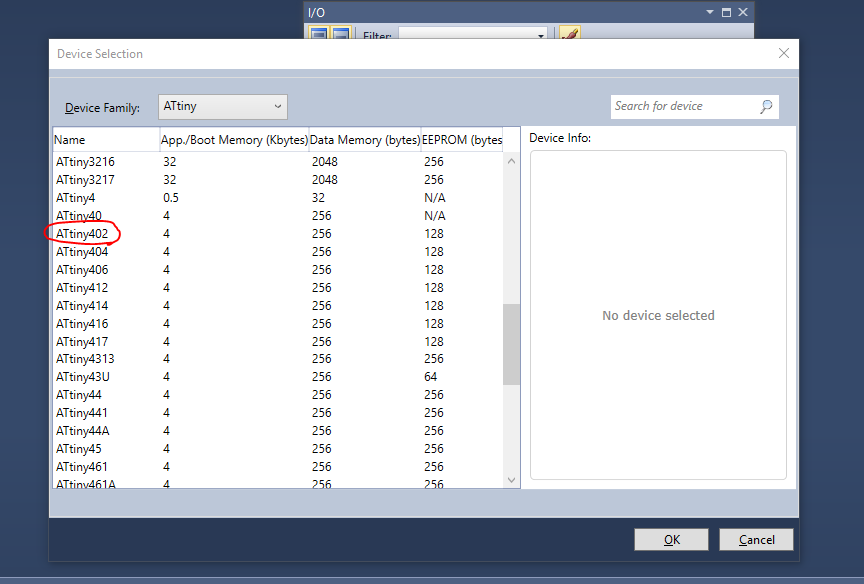
And select ATtiny402 from the parts list, before clicking OK again. It will now create and open your project.
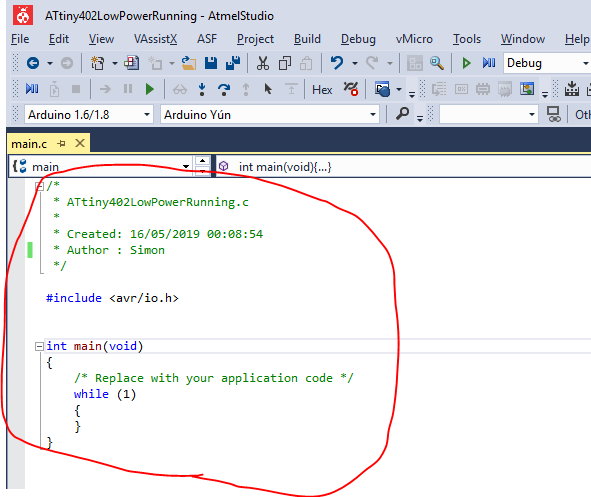
Atmel Studio will open your main.c file with the bare minimum structure in there and it will look similar to this:
However, we want some more funtional code to go in there, so how about:/* * ATtiny402LowPowerRunning.c * These settings (F_CPU 32000UL, 0 prescaler, all GPIOs apart from LED pin set to pullup inc UPDI, force OSC20M off) * Result in a processor current draw of 16uA! * Created: 05/05/2019 20:46:56 * Author : Simon */ #ifndef F_CPU #define F_CPU 32000UL // 32 kHz clock speed / 0 prescaler divisor #endif #include <util/delay.h> // needed for our delay #include <avr/io.h> int main (void) { /* Set the Main clock to internal 32kHz oscillator*/ _PROTECTED_WRITE(CLKCTRL.MCLKCTRLA, CLKCTRL_CLKSEL_OSCULP32K_gc); /* Set the Main clock prescaler divisor to 2X and disable the Main clock prescaler */ _PROTECTED_WRITE(CLKCTRL.MCLKCTRLB, CLKCTRL_PDIV_2X_gc); // without enable /* ensure 20MHz isn't forced on*/ _PROTECTED_WRITE(CLKCTRL.OSC20MCTRLA, 0x00); /* Configure Port A, Pin 6 as an output (remember to connect LED to PB6 and use a resistor in series to GND)*/ PORTA.DIRSET = PIN6_bm; /* Set all pins except the LED pin to pullups*/ PORTA.PIN0CTRL = PORT_PULLUPEN_bm; PORTA.PIN1CTRL = PORT_PULLUPEN_bm; PORTA.PIN2CTRL = PORT_PULLUPEN_bm; PORTA.PIN3CTRL = PORT_PULLUPEN_bm; //PORTA.PIN6CTRL = PORT_PULLUPEN_bm; // LED pin PORTA.PIN7CTRL = PORT_PULLUPEN_bm; while (1) { // PAUSE 1000 milliseconds _delay_ms(1000); // LED off PORTA.OUTCLR = PIN6_bm; // PAUSE 2000 milliseconds _delay_ms(2000); // LED on PORTA.OUTSET = PIN6_bm; } }Let's take the code section by section so that if you are more familiar with the Arduino IDE, we can give a nice introduction to Atmel Studio (but a VERY basic intro), to get you up and blinking from the source code.
#ifndef F_CPU
#define F_CPU 32000UL // 32 kHz clock speed / 0 prescaler divisor
#endif
This section is something we don't have to worry about with Arduinos usually, as their clocks are set outside the sketch. This tells the compiler what speed the microcontroller is going to run at - in this case I have rounded down to 32kHz exactly, although this isn't the real speed of the internal oscillator. Good enough for now but you may want to change. If we don't get this roughly right, all sorts of timer type items will go wrong, such as millis() being a different length than 1ms. Bear in mind that the clock speed is made up of both an oscillator frequency (you can also use the internal 20MHz oscillator or choose to run that same oscillator at 16MHz) and a prescaler divider, such as 2, 8, 48, 64 (not exhaustive). The oscillator speed divided by the prescaler divisor is the number you want to put in this #define. PS, it's about 3.3MHz by default from the factory, none of this 1MHz or 8MHz that we see in the ATtiny85 etc.
#include <util/delay.h>	// needed for our delay
#include <avr/io.h>
avr/io.h was already included in the project when Atmel Studio set it up for us (sorts out our GPIOs) but util/delay.h is a new one. We need it for the _delay_ms() function to work. You have probably guessed that _delay_ms() is equivalent to delay() in the Arduino IDE.
int main (void)
{
Unlike Arduino, with separate setup() and loop() sections, everything happens within main() here. However, unless code is put within the
while(1)
{
section, it will only be executed once.
In this next section, we set the main clock up to operate from the 32kHz internal oscillator without a prescaler division. The main clock isn't the only clock in the chip but it's the only one we're interested in for now, as it drives the main code.
	/* Set the Main clock to internal 32kHz oscillator*/
	_PROTECTED_WRITE(CLKCTRL.MCLKCTRLA, CLKCTRL_CLKSEL_OSCULP32K_gc);
	/* Set the Main clock prescaler divisor to 2X and disable the Main clock prescaler */
	_PROTECTED_WRITE(CLKCTRL.MCLKCTRLB, CLKCTRL_PDIV_2X_gc); // without enable
	/* ensure 20MHz isn't forced on*/
	_PROTECTED_WRITE(CLKCTRL.OSC20MCTRLA, 0x00);
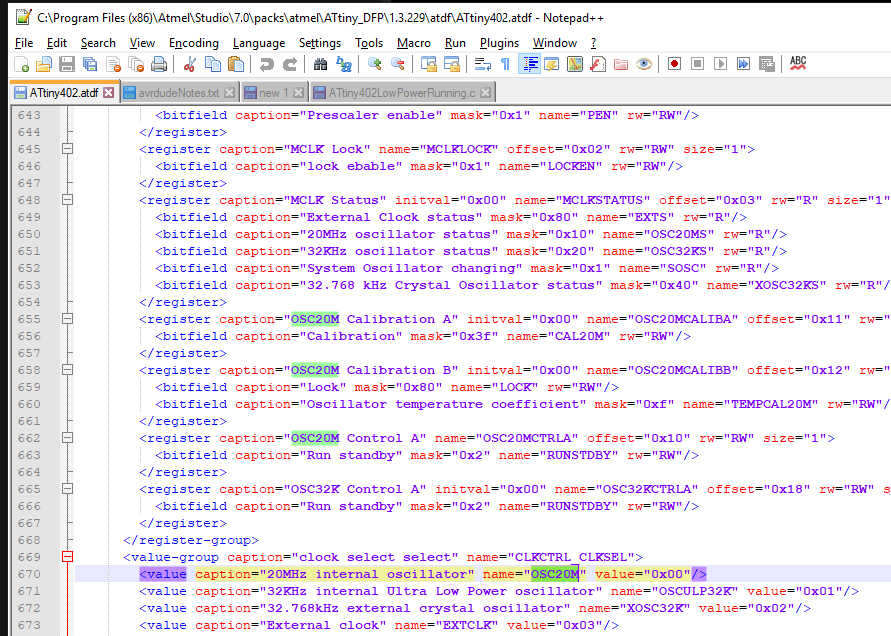
Notice that we have to use a term _PROTECTED_WRITE. This is because critical settings registers are protected by a write key so that they aren't accidentally overwritten and stop the chip functioning. Not all registers will need this command. Within the _PROTECTED_WRITE brackets, we have the name of the register we want to write to, followed after the comma by the values we want to write to that register. The registers and values are given names within the Device Packs to make them more human-readable, rather than just being a set of hex values, although that would work if you know the values. Atmel Studio has a handy little pop-up which suggests register names when you start typing but if you get stuck, you should be able to find what you're after with a copy of the datasheet and by opening the .adtf file from the device pack in a text editor, like this:
By the way, you will see _gc at the end of some settings values. This means "group configuration". Don't worry about it for now. The other suffix you are likely to see that may make more sense, coming from the Arduino IDE, is _bm, which means "bitmask". This means we are only changing the appropriate bits in the register for that particular setting and leaving the others alone.
Now we are going to set the GPIO pins up. We want one as an output and the others as inputs with pullups.
	/* Configure Port A, Pin 6 as an output (remember to connect LED to PB6 and use a resistor in series to GND)*/
	PORTA.DIRSET = PIN6_bm;

	/* Set all pins except the LED pin to pullups*/
	PORTA.PIN0CTRL = PORT_PULLUPEN_bm;
	PORTA.PIN1CTRL = PORT_PULLUPEN_bm;
	PORTA.PIN2CTRL = PORT_PULLUPEN_bm;
	PORTA.PIN3CTRL = PORT_PULLUPEN_bm;
	//PORTA.PIN6CTRL = PORT_PULLUPEN_bm; // LED pin
	PORTA.PIN7CTRL = PORT_PULLUPEN_bm;
Port A Pins 4, 5 and 8 don't exist as GPIOs on this 8 physical pin device, as we need three for VCC, GND and UPDI. We have now finished what is the equivalent of the setup() section in Arduino.
	while (1)
	{
		// PAUSE 1000 milliseconds
		_delay_ms(1000);

		// LED off
		PORTA.OUTCLR = PIN6_bm;

		// PAUSE 2000 milliseconds
		_delay_ms(2000);

		// LED on
		PORTA.OUTSET = PIN6_bm;
	}
}
This section can be thought of as the loop() function in Arduino (note the extra curly bracket/brace to close off the whole int main (void) section). Instead of digitalWrite(), we're directly setting and clearing the registers which control the state of the pin. Very fast. Delays are made using a _delay_ms() call to the function that our #include
<util/delay.h>
brings for us.
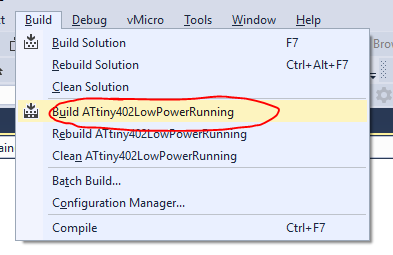
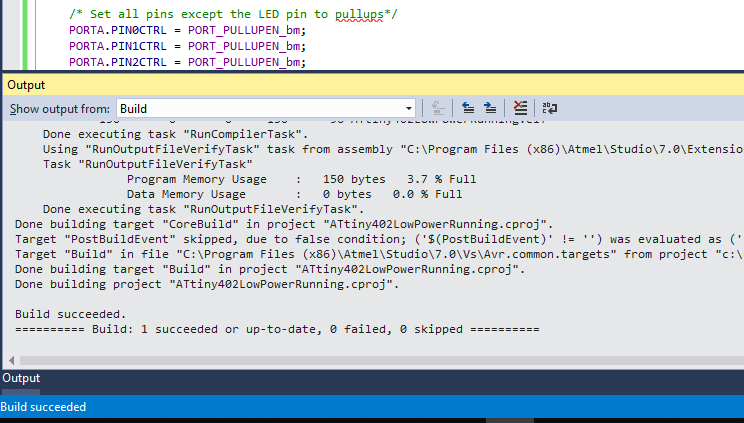
Now to compile it, we go to Build\Build ATtiny402LowPowerRunning and click it:And hopefully your output shows success, something like this:
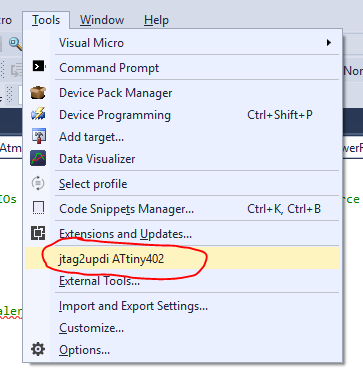
Now plug in your jtag2updi Arduino hardware programmer to the USB port and check the COM port associated with it is still the same as the External Tool command lines you saved in the previous instruction step. Make sure the Arduino is connected to the ATtiny using it's UPDI interface (VCC, GND, UPDI pin + 4.7k resistor). Then in Atmel Studio go to Tools and click on the description of your external tool:
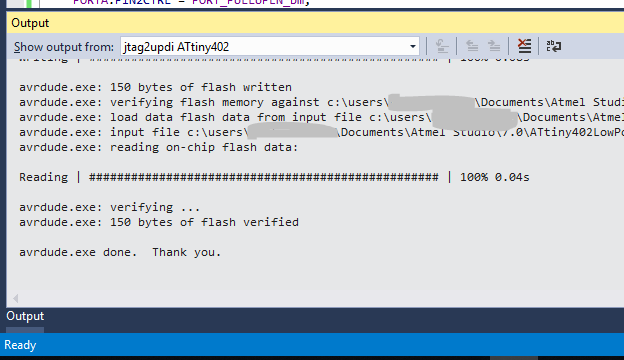
And if you were successful you should now see that the ATtiny is blinking 1 second on, 2 seconds off. The output window of your Atmel Studio screen should show something like:
Congratulations if this is the case!
But what about that 18uA microcontroller current you promised?Ah yes, how do we separate the microcontroller current from the LED? Take a multimeter in current measurement mode with sufficient resolution (and hopefully accuracy!) to read uA. With the ATtiny and the LED unpowered, connect the multimeter between the ground pin of the ATtiny402 and the GND rail of your breadboard or power supply, replacing the jumper wire that was previously there. Turn power to the ATtiny402's VCC pin back on and you should be able to read the promised 18uA even while the LED is on. My cheap multimeter read 16uA, so I will take that as success!
-
Set Up Atmel Studio for ATtiny and Add jtag2updi Programmer
05/15/2019 at 23:01 • 5 commentsWe're going to open Atmel Studio and add our device pack for ATtiny, then add our hardware programmer to the list of devices we can use to programme from within Atmel Studio (such as the Atmel ICE programmer). This should speed up our development iterations over using avrdude from the command line each time we want to upload code to the ATtiny.
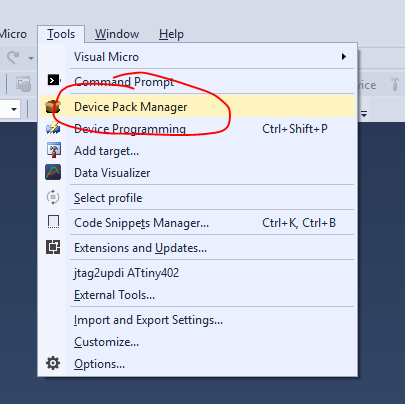
Open up Atmel Studio and open Tools\Device Pack Manager:
On Windows you may be asked if you want Device Pack Manager to make changes to your system. I clicked Yes.
If you have a green icon and an "Install" button next to ATtiny DFP 1.3.229 click it and follow the instructions so it installs and you end up looking like this:
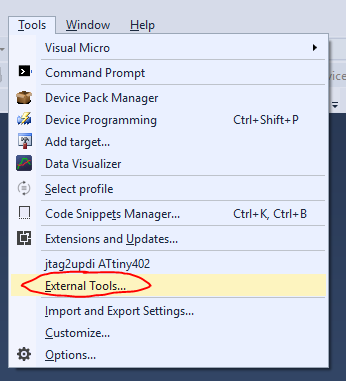
You can now close the Device Pack Manager and go back to the main Atmel Studio screen. Now we're going to add our jtag2updi Arduino as a hardware programmer that uses avrdude from within Atmel Studio. Click Tools\External Tools
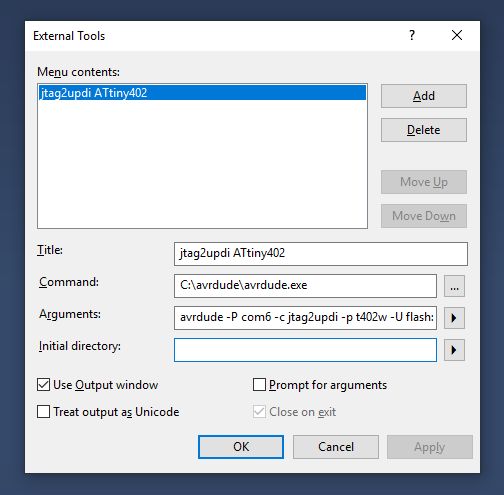
And a window will pop up like this one, which you are going to copy the contents of into yours:
- Title. Give the tool a descriptive title - note that this tool is tied to the part you're programming because of how it commands avrdude. So you need to add external tools for each part you program, as far as I know.
- Command.
C:\avrdude\avrdude.exe
This, except make sure the file path is wherever you have saved avrdude.exe:
- Arguments. The key part to get here is the target part being programmed (look in avrdude.conf for nicknames of parts) and the COM port number (6 in my case)
avrdude -P com6 -c jtag2updi -p t402w -U flash:w:$(ProjectDir)Debug\$(TargetName).hex:i
- I followed a guide which didn't mention putting anything in Initial Directory and to tick Use Output window but leave unticked both Prompt for arguments and Treat output as Unicode.
- Then click OK.
You should be all set to programme your ATtiny402 from Atmel Studio now! I have written this guide a couple of weeks after I first went through the process so if I have missed a step, please shout in the comments.
-
Talk to the ATtiny402 with the Arduino: Establish Connection and Get Blinks
05/10/2019 at 08:24 • 3 commentsRemember that for other ATtinys than the ATtiny402, this may not work in the same way. You will have to work out your own chip's VCC, GND and UPDI pins but they probably won't look too different to the setup here
We're following the same setup as shown in the jtag2updi repository, except that V_target = V_programmer. This doesn't always have to be the case but you will need to take care about logic levels if your V_prog and V_tgt are significantly different. One microcontroller's 1 can be another's 0... ElTangas hasn't tried it with logic level converters according to the link above but while we are programming the chips at 5V and the components around them can handle 5V, we don't need to worry.
Just for clarity on the ATtiny402:
- Arduino GND -> ATtiny402 GND = pin 8
- Arduino 5V -> ATtiny402 VCC = pin 1
- Arduino D6 -> 4.7k resistor -> ATtiny402 pin 6
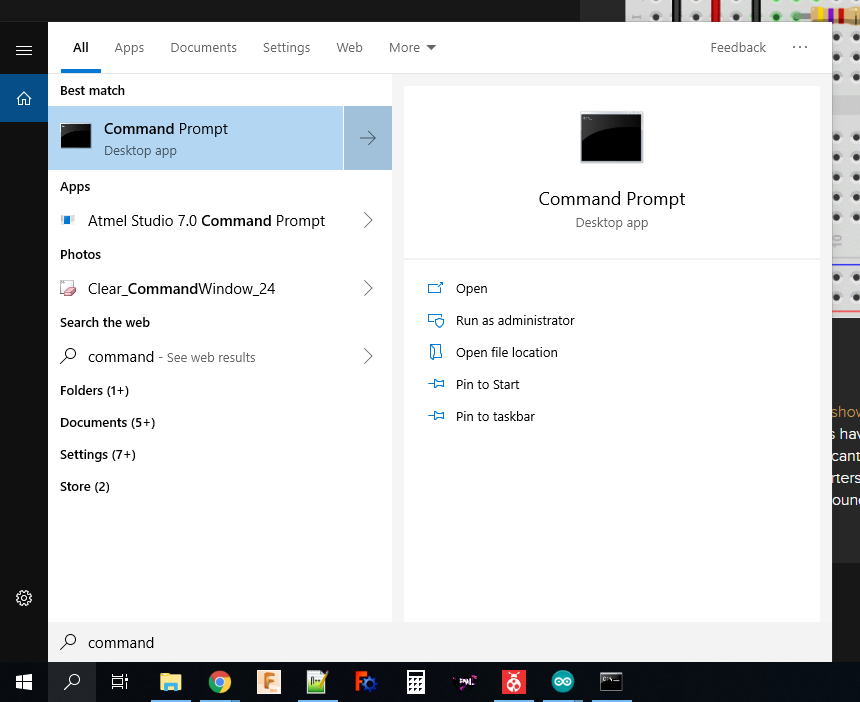
Open up a command prompt (I'm using Win10, so you will have to adapt this to another OS you may be using). If you haven't done this before, it's easily done by typing command into the Windows search/magnifying glass bar in the bottom left of the desktop, next to the Windows button:
When you click on the Command Prompt app, it will launch into something like a white text on black background saying something like:
Microsoft Windows [Version 10.0.17763.475]
(c) 2018 Microsoft Corporation. All rights reserved.

C:\Users\"YOUR_PROFILE_NAME">
Where YOUR_PROFILE_NAME is the account name you use on Windows. This isn't where we installed avrdude.exe (the application file) to, so we need to go there now before we can use it. To do this, type:
cd c:\avrdude(or wherever you installed avrdude to) and press enter.
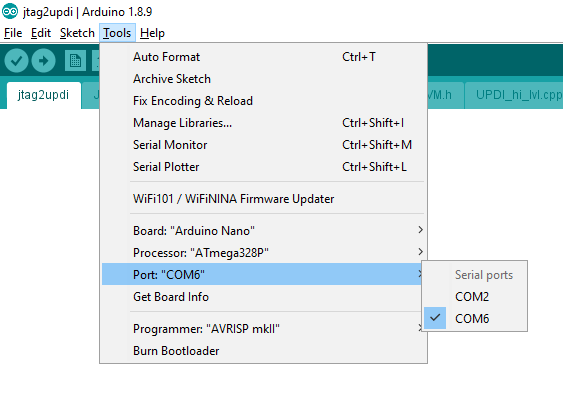
Don't forget to plug in your Arduino to a USB port and confirm which COM port it is connected to, either using the Arduino IDE or looking in Windows Device Manager. Remember this from an earlier step:
In my case, we were uploading to the Arduino Nano on COM 6. We'll need this now.
The first check we're going to do is read the device signature and check if it is locked for programming. We should find a new chip unlocked for programming and there is a troubleshooting step for locked chips at the jtag2updi repository. The avrdude programme runs on text commands from the command prompt. We type in a string of characters and it interprets these as detailed commands about what you want the programme to try and do. To try an initial communication with the chip and find out if it is locked, we type:
avrdude -c jtag2updi -P com6 -p t402
Where:
- "avrdude" starts the programme
- "-c jtag2updi" sets the programming interface type
- "-P com6" is the COM port we are asking to connect to the chip over (capitals make a difference in avrdude letter commands)
- "-p t402" means the part we are trying to talk to. In the avrdude.conf file, an ATtiny402 is given the nickname "t402" to save typing effort in the avrdude command string!
Here's my command and this is the response I got....
c:\avrdude>avrdude -c jtag2updi -P com6 -p t402

avrdude: AVR device initialized and ready to accept instructions

Reading | ################################################## | 100% 0.31s

avrdude: Device signature = 0x1e9225 (probably t406)
avrdude: Expected signature for ATtiny402 is 1E 92 27
         Double check chip, or use -F to override this check.

avrdude done.  Thank you.
Oh dear. What kind of chip have I connected? In this state, avrdude won't let me upload code because it thinks I have made a mistake and connected a different chip. Uploading code compiled for the ATtiny402 to a different chip could brick it, so avrdude is trying to protect me from bricking my attached chip. On the plus side, the Arduino Nano with jtag2updi loaded and avrdude controlling them were able to read the device signature - HOORAY!
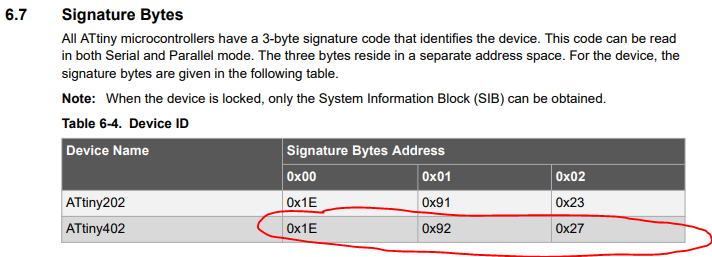
You may remember me prattling on about hardware bugs in a previous step - this is one of them. Some of the ATtiny402 chips that Microchip has sent out and sold don't have the right device signature burned into their memory. The datasheet says they should be:
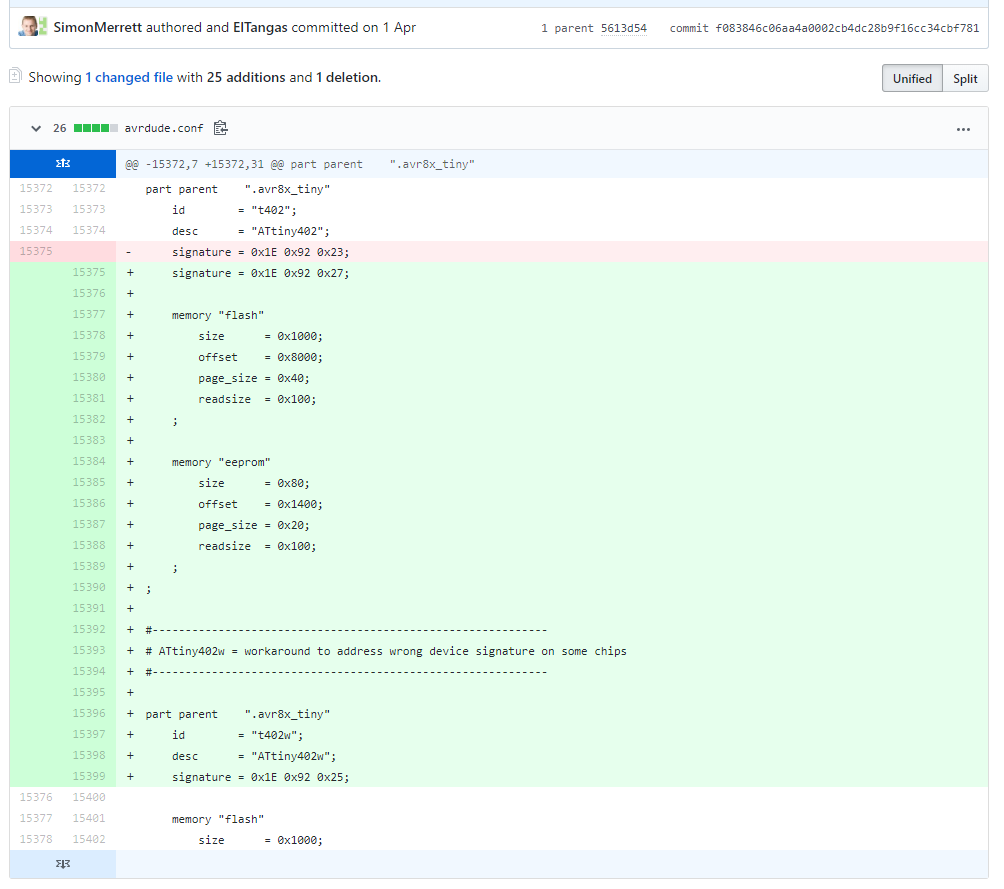
So avrdude is correct when it is looking for 0x1e9227 or 1E 92 27. Sadly my chip and maybe yours is suffering from the wrong device signature. In order to program ATtiny402 chips with signature 1E 92 25, I wrote a workaround in the avrdude.conf file and thankfully ElTangas has incorporated it into the jtag2updi repository, so if you download your avrdude.conf from there, it will include the option for a "new" part, called ATtiny402 Workaround, nicknamed for avrdude as "t402w". The workaround was really simple and you can see what I did here:
Just made a new part and gave it a new name, nickname and signature! If you have a different device signature on your ATtiny 0 or 1 series chip, you may be able to take a similar approach to a work around.
Back to achieving comms with our chip. With the new command for the t402w, this is what I get:
c:\avrdude>avrdude -c jtag2updi -P com6 -p t402w

avrdude: AVR device initialized and ready to accept instructions

Reading | ################################################## | 100% 0.32s

avrdude: Device signature = 0x1e9225 (probably t406)

avrdude done.  Thank you.
Perfect - this is what we want! We can go home now.
But we don't want to stop here, do we? We want to get adventurous and satisfy ourselves that not only can we read the chip's device signature but we can bend the internal memory to our will! How about a blink programme?
So making sure we also connect:
ATtiny402 pin 2 (Port A, Pin 6 in the ATtiny402 internal map) -> 220ohm or higher resistor -> LED -> GND
We can try to upload a hex file that I have already compiled for you (to save diverting into Atmel Studio for now - that's coming later). I have saved the hex file in the project files and you can download it here.
Now save it in the folder where avrdude.exe lives. This time, we need some separate commands to try and upload a file, although you will recognise some elements from our first foray with the chip signature retrieval:
avrdude -c jtag2updi -P com6 -p t402w -U flash:w:ATtiny402_PA6_blink_1s.hex
- "-U" tells avrdude to perform a memory operation
- "flash:" says it's going to be performed on the flash memory, where programs live!
- "w:" says it's going to be a write (as opposed to e.g. read) operation
- "ATtiny402_PA6_blink_1s.hex" is the file we want avrdude to write to the flash memory
Here are my Command Prompt command and results:
c:\avrdude>avrdude -c jtag2updi -P com6 -p t402w -U flash:w:ATtiny402_PA6_blink_1s.hex

avrdude: AVR device initialized and ready to accept instructions

Reading | ################################################## | 100% 0.32s

avrdude: Device signature = 0x1e9225 (probably t406)
avrdude: NOTE: Programmer supports page erase for Xmega devices.
         Each page will be erased before programming it, but no chip erase is performed.
         To disable page erases, specify the -D option; for a chip-erase, use the -e option.
avrdude: reading input file "ATtiny402_PA6_blink_1s.hex"
avrdude: input file ATtiny402_PA6_blink_1s.hex auto detected as Intel Hex
avrdude: writing flash (126 bytes):

Writing | ################################################## | 100% 0.06s

avrdude: 126 bytes of flash written
avrdude: verifying flash memory against ATtiny402_PA6_blink_1s.hex:
avrdude: load data flash data from input file ATtiny402_PA6_blink_1s.hex:
avrdude: input file ATtiny402_PA6_blink_1s.hex auto detected as Intel Hex
avrdude: input file ATtiny402_PA6_blink_1s.hex contains 126 bytes
avrdude: reading on-chip flash data:

Reading | ################################################## | 100% 0.04s

avrdude: verifying ...
avrdude: 126 bytes of flash verified

avrdude done.  Thank you.
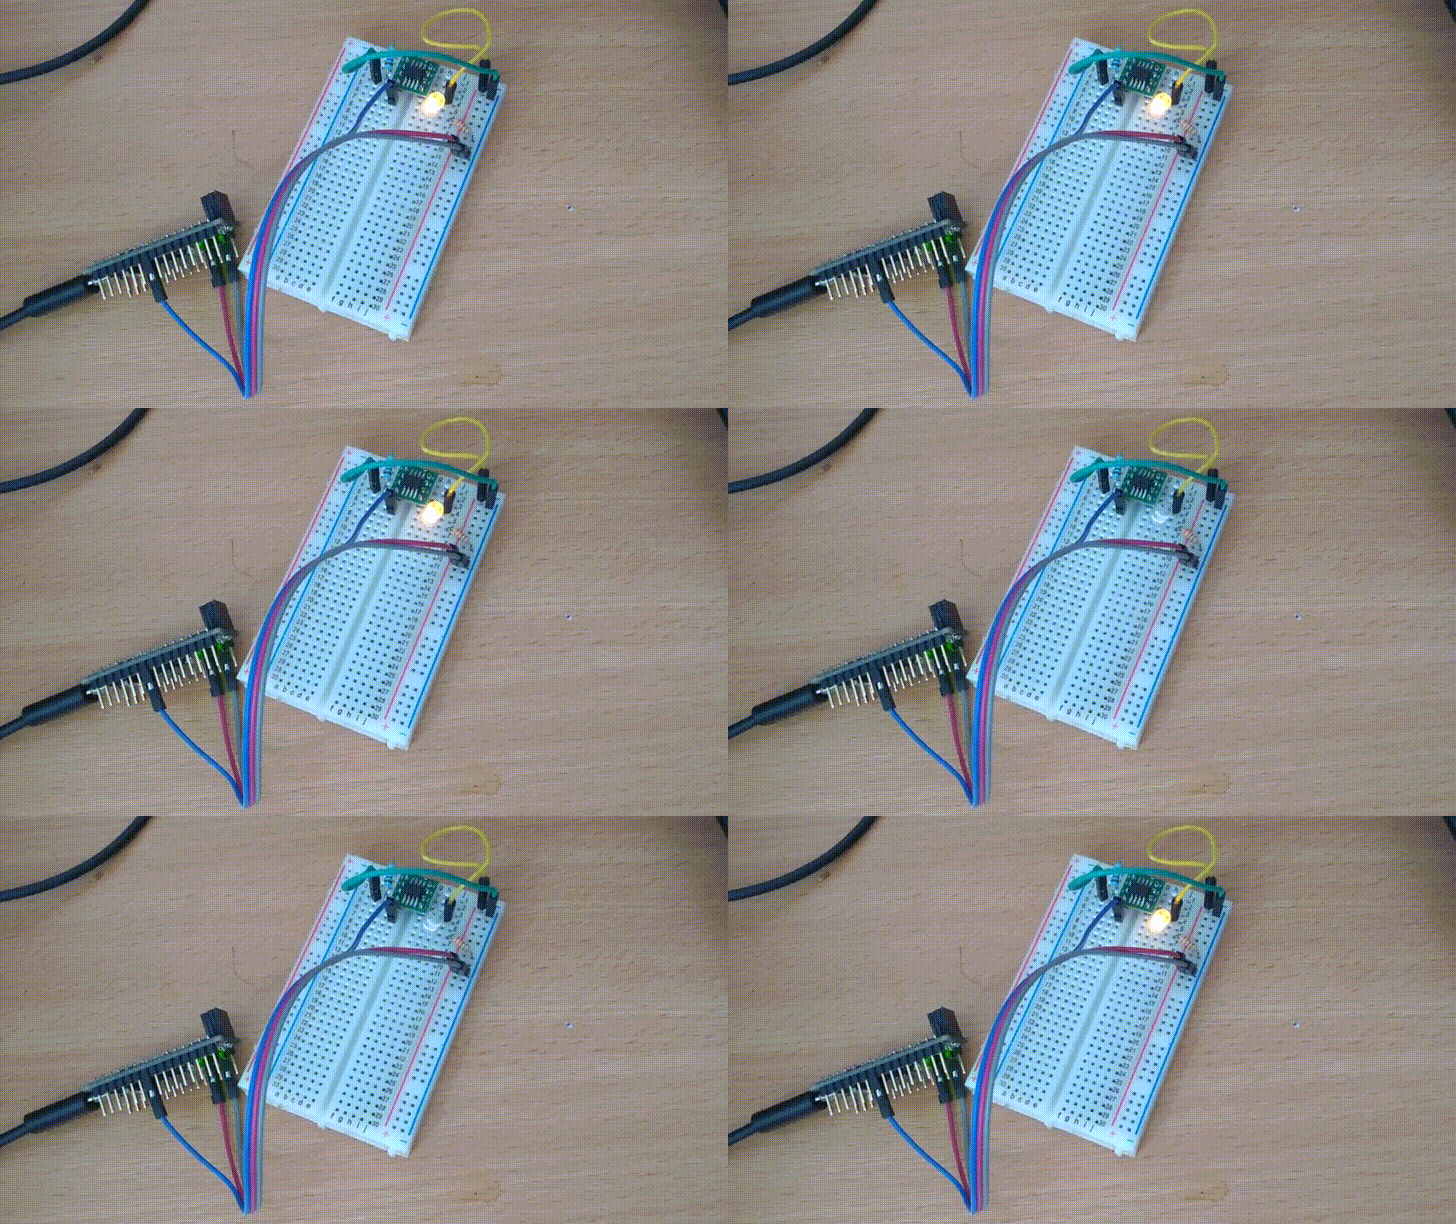
All looks good so far and here's the verification that it worked!
![]()
In future, we'll learn how to do the basics in Atmel Studio, so you can upload your own program and also connect the hardware programmer to Atmel Studio, speeding up your code/upload/refactor/re-upload iterations.
-
Programme Your Programmer
05/09/2019 at 08:29 • 0 commentsThis is just a quick log to walk through uploading the jtag2updi software to the Arduino so that it will act as the hardware piece of our programming tool chain, taking in jtag and spitting out updi.
- Make sure you have installed all the software in the previous step and open the Arduino IDE.
- Open File\Sketchbook\jtag2updi:
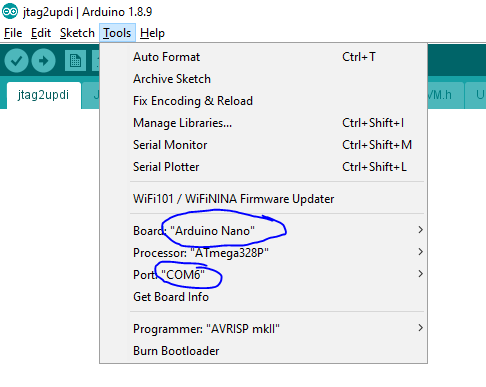
Set up the board you are programming by selecting Tools\Board = Arduino Nano and Tools\Port = whatever COM port number your Arduino is connected to:
Note that the jtag2updi sketch has absolutely no text in it - this is deliberate and the upload should still work! Leave everything else as defaults for now.
Now to upload press ctrl+u or click the upload button:
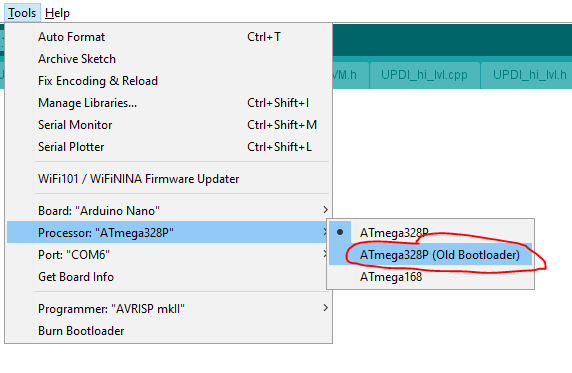
If it didn't manage to upload to the Nano, try using the Tools\Processor = ATMEGA328P Old Bootloader:
That's it! Other than being told in the black output console at the bottom of the Arduino IDE that the sketch has successfully been uploaded, the proof/verification that this has all worked will come in another step.
-
Software First Steps: Downloads and Basic Installs
05/08/2019 at 09:34 • 0 commentsI decided this might be better as a log, which I can then reference from the instructions. This might seem like a long-winded explanation but I wanted to include details that might help people that aren't confidently doing this sort of thing frequently. Once it's set up, it is much less hassle than the explanation below may give you the impression that it is!
In summary, we are going to use the following collection of software tools:
- Arduino IDE (I used version 1.8.9)
- avrdude (may be optional - I used version 6.3)
- jtag2updi
- Atmel Studio (I used version 7) with ATtiny Device Pack (I used version 1.3.229)
1. Install Arduino IDE
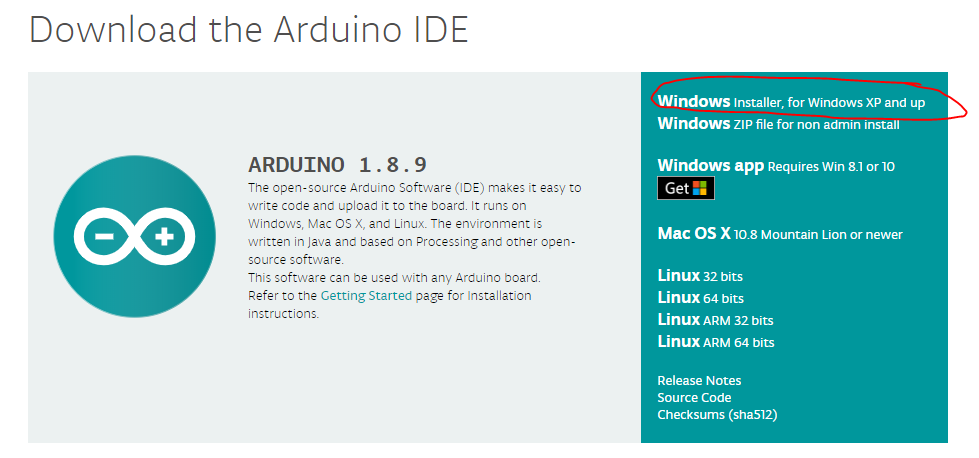
Available from https://www.arduino.cc/en/Main/Software. I used the Windows installer (not the Windows App Store version) but it probably doesn't make any difference.
2. Install avrdude
This tool is used for uploading files to chips and reading memory from chips too. It is installed as part of your Arduino installation but we want to amend its default configuration specially for use with the new chips and the jtag2updi tool, so we'll install a separate instance somewhere that we can customise it. It is available from http://download.savannah.gnu.org/releases/avrdude/. I used version 6.3 for windows, named:
avrdude-6.3-mingw32.zipWhich sits here on the webpage:
You may prefer to create your folder for avrdude somewhere else but for ease, I created the folder:
C:\avrdude\
C:\avrdude\and into it, I extracted from the zip folder:
avrdude.exe
avrdude.conf
So now we have:
We need to rename or delete avrdude.conf so that it is ignored by avrdude.exe and we will put the custom avrdude.conf file from the jtag2updi repository in the avrdude folder instead. I renamed my original avrdude.conf as:
ORIGINALavrdude.conf
3. Install jtag2updi
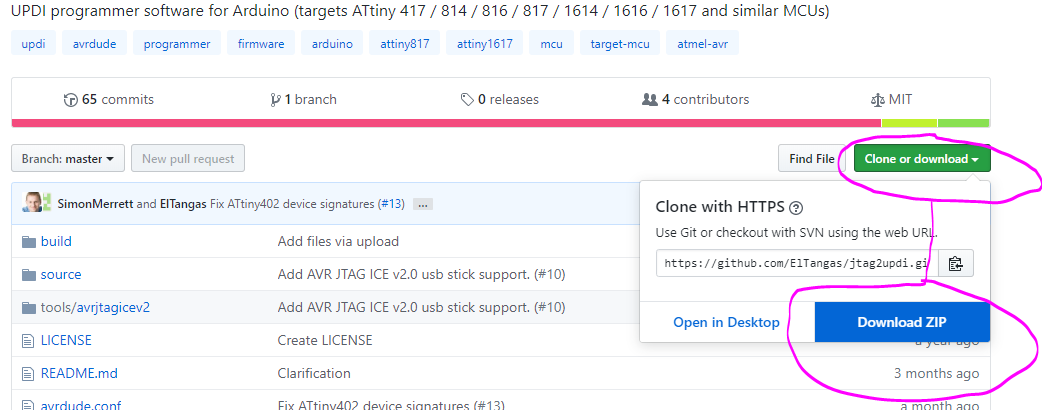
Available from https://github.com/ElTangas/jtag2updi. If you have never used code from github before, it's not always clear how to download it. I do run git but for this the simplest method for most people in my view is to press the "download Zip" option:
This will download a .zip folder in your Downloads folder called:
jtag2updi-master.zip
Open it and follow the instructions kindly provided by ElTangas here: https://github.com/ElTangas/jtag2updi#building-with-arduino-ide
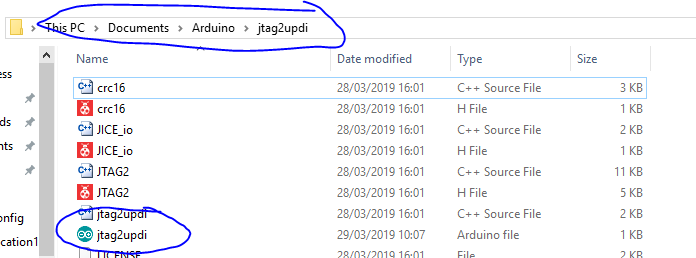
I extracted the contents of the Source folder in the zip folder to a new folder in the sketches folder of my Arduino installation. This would look something like:
C:\Users\"YOUR_PROFILE"\Documents\Arduino\jtag2updiwhere "YOUR_PROFILE" is the account name that you use on a Win10 machine. These are the key elements you're looking for:
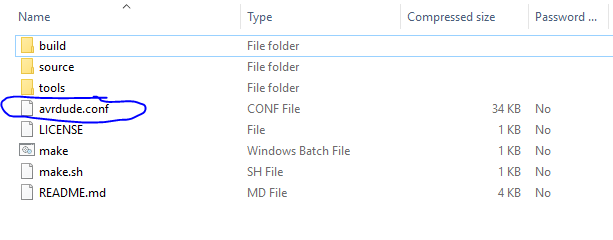
Now go back to the jtag2updi-master.zip folder and extract the jtag2updi version of avrdude.conf to the avrdude folder you set up in step 3. It is kept here in the jtag2updi-master.zip\jtag2updi\ folder:
your avrdude folder should now have the avrdude.exe file and the jtag2updi version of the avrdude.conf file in it, as well as any renamed ORIGINALavrdude.conf file:
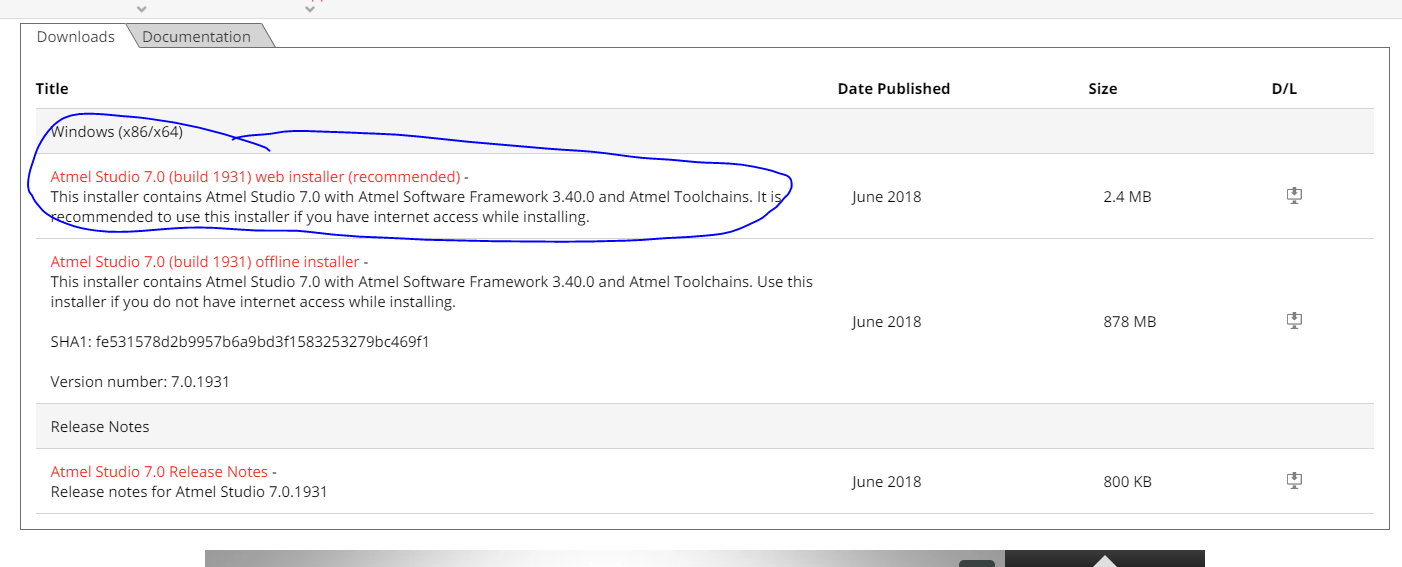
4. Install Atmel Studio
Available from this link: https://www.microchip.com/mplab/avr-support/atmel-studio-7
I used the web installer and I don't recall selecting anything other than the default options (if there are any options).
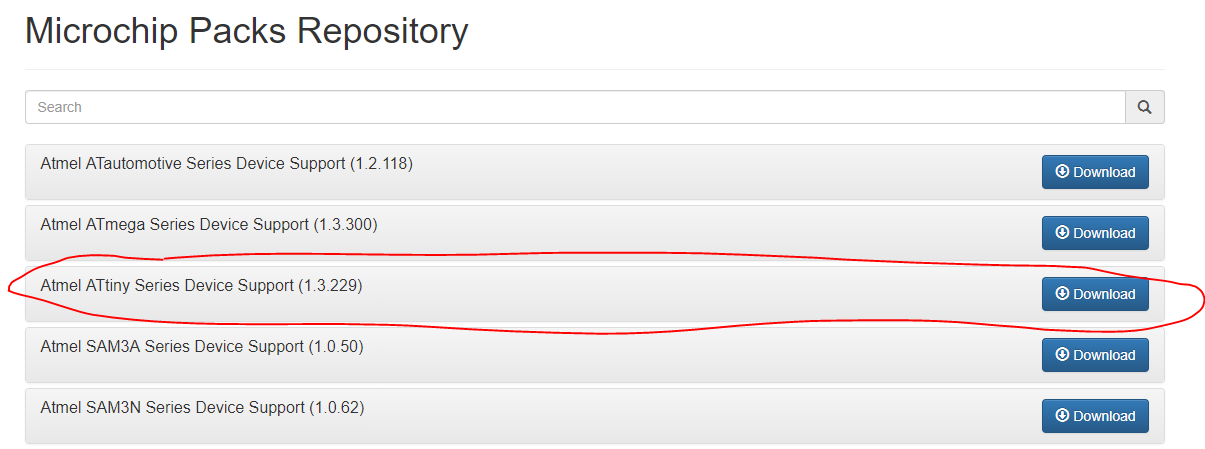
5. Install ATtiny Device Pack for Atmel Studio
This is a modular piece of software which describes the ATtiny chips, so as to keep chip definitions separate from the main software tool. It makes sense to allow bug fixes for individual chips without needing to install new versions of Atmel Studio but it's not obvious to many beginners that they ALSO need the relevant device pack installed for their chip-of-interest.
You can get the ATtiny device pack from here: http://packs.download.atmel.com/. I used version 1.3.229 and it is to be expected that there are bugs in the early stages of hardware releases. Some of these bugs are not just in the software but in the hardware too. Don't worry about this too much for now, I'll explain later.
Just in case you want to compare, here are all the relevant installer files I downloaded, as they appear in my Downloads folder:
That's the end of this log for initial software download and install.
ATtiny 0 Series programming on the cheap
The newer range of ATtinys can be programmed with an Arduino and Atmel Studio 7. NOW ALSO VIA THE ARDUINO IDE!
 Simon Merrett

 Just made a new part and gave it a new name, nickname and signature! If you have a different device signature on your ATtiny 0 or 1 series chip, you may be able to take a similar approach to a work around.



 your avrdude folder should now have the avrdude.exe file and the jtag2updi version of the avrdude.conf file in it, as well as any renamed ORIGINALavrdude.conf file:
