-
Stress test of the DIYson V2
08/31/2019 at 16:06 • 0 commentsI had to clean the working area of my CNC after a quite long plexiglass milling. The DIYson V2 did quite a good job!
-
The DIYson V2 is assembled and working!
08/23/2019 at 16:46 • 0 commentsThe latest version (V2) is now assembled and tested. Some improvements are still possible, but for now I am happy with the results. Video has been recorded with the battery almost empty, normally it has mouch more power!
For future upgrades, I will design and 3d print some adaptors so the DIYson can also work as a leaf blower, and maybe other functions too. I also plan to add post motor Hepa filter, the top part has a thread so I can easily add it later.
-
The DIYson V2
08/22/2019 at 14:06 • 1 comment![]()
![]()
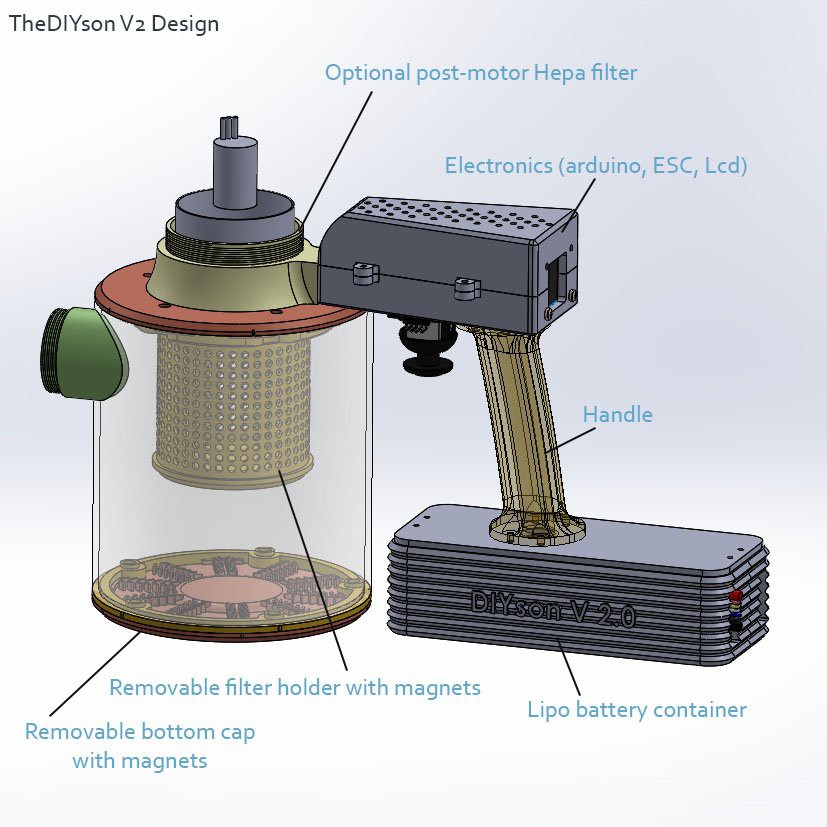
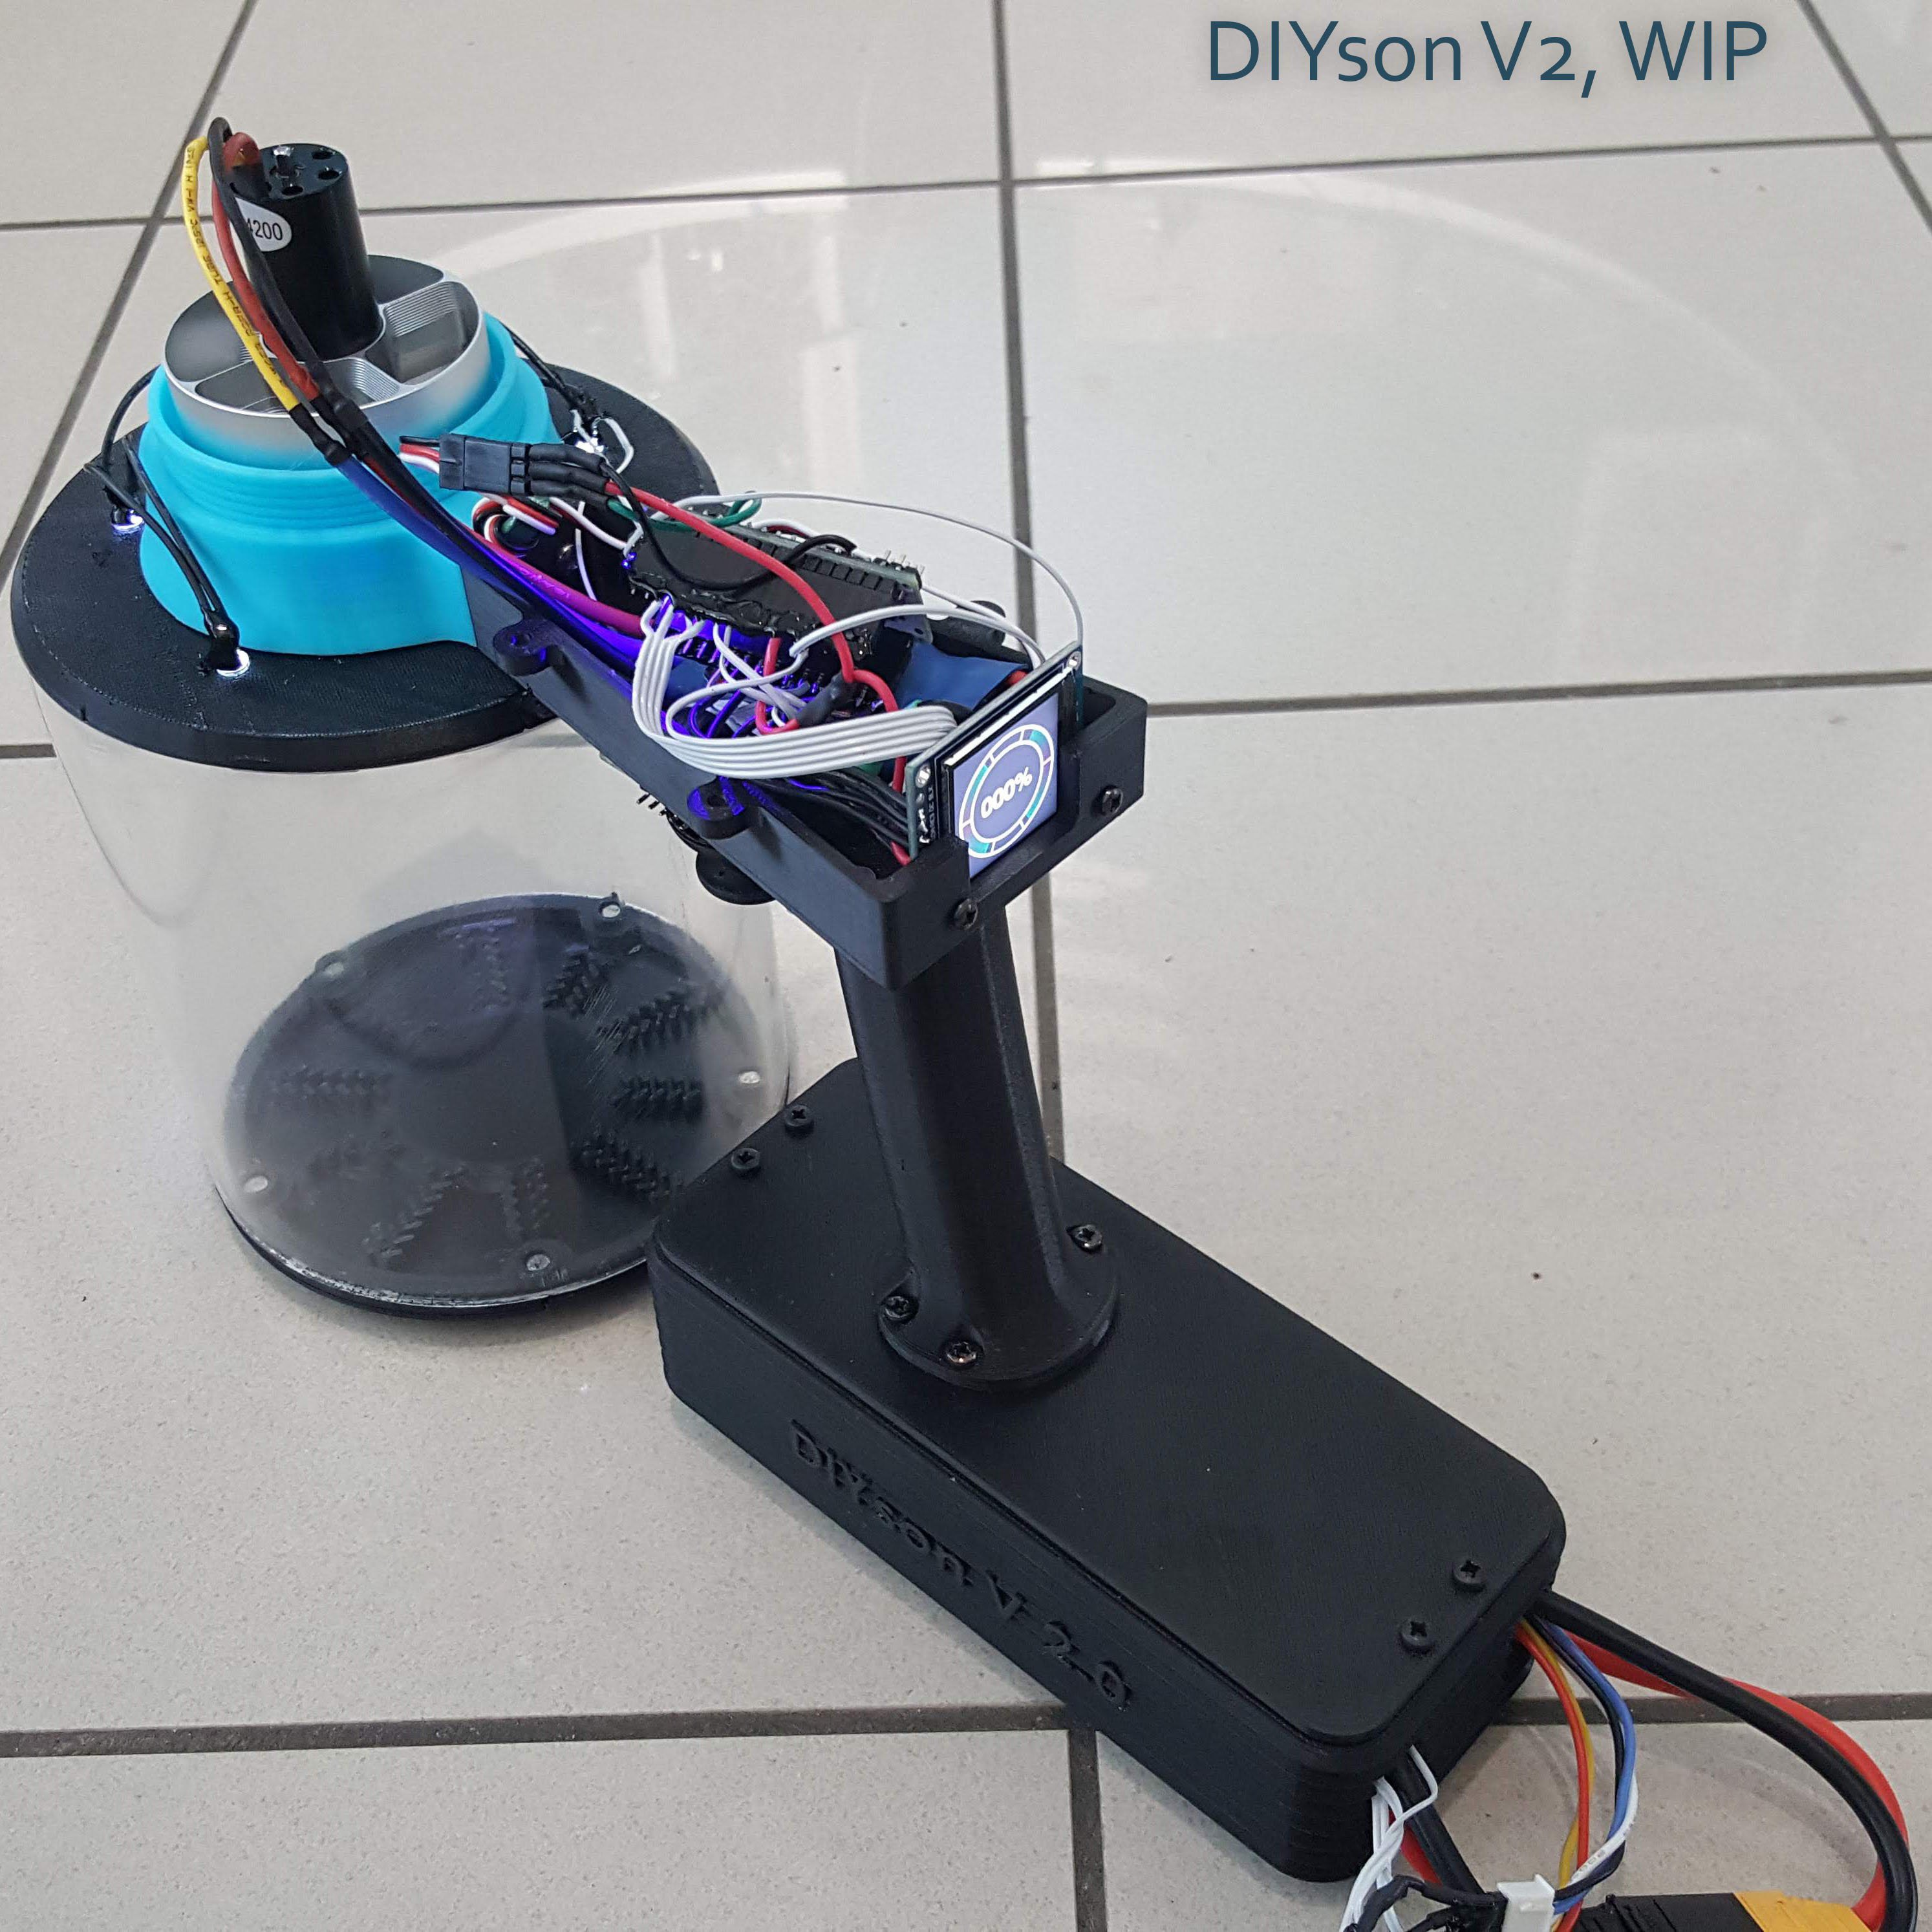
I finished the design for the DIYson V2. The old one will be still available, so you can decide to build the V1 (simpler, cheaper) or the new V2. Cost is slightly higher (better battery, added electronics, some components like the plexiglass tube) but you will have the new improved version.
Main updates from V1 to V2:
- 4 Cell battery instead of 2 Cells. Fan power is now almost double.
- LCD display showing the current fan power and charge of the 4 cells of the battery.
- Analog joystic for fan control. Joystick has 2 axis and button so in the future a more complex interface can be designed.
- Arduino for ESC control, showing charge of the battery.
- Battery is now encased, more protected.
- Transparent container for dust, illuminated by leds, with bottom cap removable, held by magnets.
- Inner filter part is also held by magnets.
The new design is now being assembled.
-
Choosing the correct battery...
07/29/2019 at 18:18 • 0 commentsThe first step in the design of the DIYson 2.0 is optimizing the performances. It turned out that the first EDF I had choosen was expected to run with 4S Lipos. The battery I had been using was just 2S, so it was not providing enough power. Now I have just received the new Lipo: 5000mah, 4S, 40-50C (that is also another important value, it is not recommended to go below 40C), and the difference is huge!
-
Planning the V2
06/28/2019 at 17:55 • 0 commentshttps://hobbyking.com/en_us/hobby-king-60a-esc-4a-sbec.html
https://hobbyking.com/en_us/hobbyking-64mm-alloy-edf-4000kv-850w-4s-outrunner-version.html
https://hobbyking.com/en_us/turnigy-nano-tech-6000mah-2s2p-65-130c-hardcase-lipo-pack.html
I have selected the parts for version 2.0: (Still from Hobbyking, they have good prices and a lot of choice, still figuring out how to contact them and ask if they could sponsor in some way the project).
A more powerful EDF and battery should give a good suction power. The cyclone design will be improved thanks to your hints and tips! Hepa filter on top also, and transparent container for the dust.
-
V2?
05/23/2019 at 09:13 • 0 commentsDesign for V2 is started!
Slightly bigger container, maybe transparent, better design of the cyclone path and placement of air outlet, thanks to your suggestions! Hepa filter on outlet too, and improved hand grip and trigger, are just some of the features. Maybe small display of battery left and integrated charging...
-
Testing the DIYson
05/15/2019 at 14:53 • 1 commentIt works! There are still a lot of improvements to the design that can be added, as some of you pointed out, but for this first version, I think we are happy how it works. Probably next version I should use a slightly bigger EDF with 1kg thrust instead of 0.5Kg, price is more or less similar.
Battery lasts more or less 20 minutes.
-
Testing the assembly
05/13/2019 at 10:51 • 0 commentsIt works! Now is time to 3d print the remaining parts. The whole system is designed to be modular, so I can focus on the multi stage design, air filtration where the air exits, best design for the air intake later.
-
Testing the 3D printed trigger system
05/13/2019 at 10:46 • 0 commentsPulling the trigger rotates the trimmer on the servo tester. The gears ratio has been designed so that pulling the trigger (a movement of about 25mm) is converted into 270 degrees of rotation of the trimmer.
To get it work on first try, I measured the PCB and size of all the components of the servo tester. Then I created a 3d model in Solidworks of the servo tester. I downloaded the Step files of some gears with the correct ratio from SDP/SI, then modified them to fit.
-
Design for easily (home) manufacturing
05/13/2019 at 10:33 • 2 comments![]()
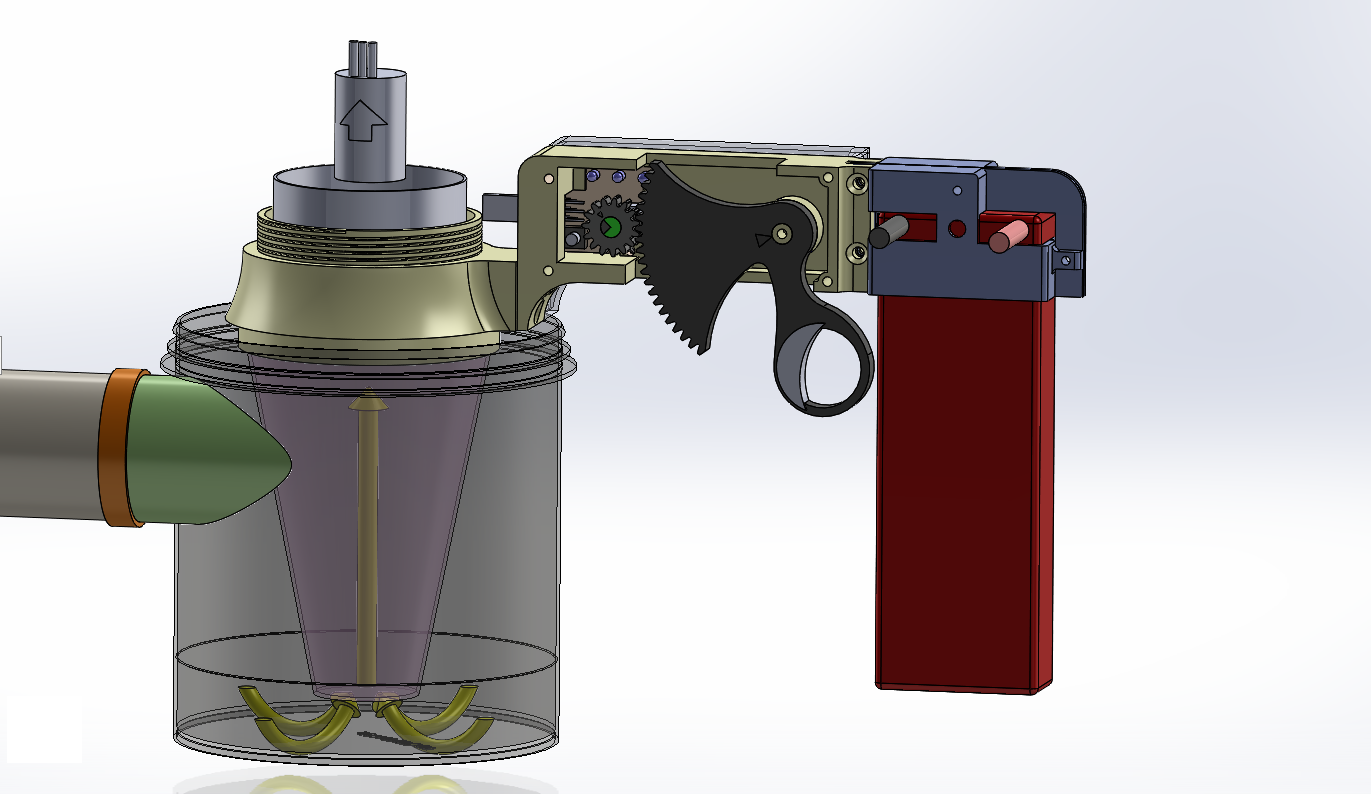
This picture shows the design that I made for the first iteration. Some prior decisions were made before starting to sketch:
- Custom parts should be 3D printable at home; they should be as compact as possible, so 3D printing of the parts does not take days to make them.
- The LIPO battery will be also the handle of the vacuum cleaner. A 2 part bracket will keep it connected to the main body.
- The battery must be easily taken out of the system, if necessary, and must be rechargeable without taking it out.
- A standard servo tester will be used. It is normally contrlled by rotating a trimmer. A gear-based system will be designed to control it with one hand, pulling a trigger.
- Air intake system has to be modular.
The DIYson, an open source Cyclone vacuum cleaner
Why buying an expensive cyclone vacuum cleaner when you can build yourself one?
 Madaeon

