 Syed Razwanul Haque Nabil
-
1Step - 1 : Collect all necessary component
You can find component list in component list section
-
2Step - 2 : Connection all componet
Connect all component according to this diagram. You will need a good quality soldering iron to connect all together.
![]()
![]()
-
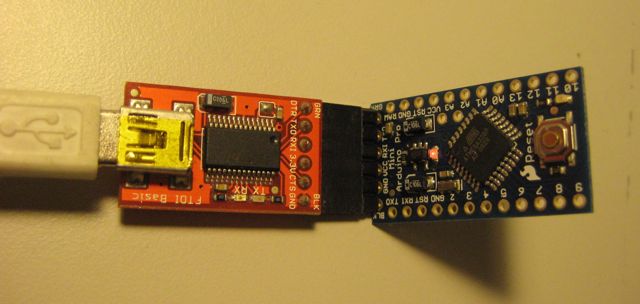
3Step - 3 : Connect Programmer
To upload code in Arduino Pro Mini you will need a FTDI adapter or another arduino as programmer. (This image has been taken from Arduino Website)
![]()
-
4Step - 4 : Upload Code
Open arduino ide and select board as arduino pro mini. also select correct com port and upload following code.
/* Project : Obstacle Detector for Blind/Visually Impaired People by Cybernetics Robo Academy https://www.cyberneticsroboacademy.com Credit : Syed Razwanul Haque(Nabil), CTO, Cybernetics Robo Academy nabil@cruxbd.com Orpon Chanda and Nihal , Student, Cybernetics Robo Academy Cybernetics Robo Academy is a Institute under Cybernetics Robo Limited Library Used : https://github.com/pololu/vl53l0x-arduino The range readings are in units of mm. */ int vibratorPin = 13; #include <Wire.h> #include <VL53L0X.h> VL53L0X sensor; void setup() { Wire.begin(); pinMode(vibratorPin, OUTPUT); sensor.init(); sensor.setTimeout(2000); // Start continuous back-to-back mode (take readings as // fast as possible). To use continuous timed mode // instead, provide a desired inter-measurement period in // ms (e.g. sensor.startContinuous(100)). sensor.startContinuous(); } void loop() { int val = sensor.readRangeContinuousMillimeters(); Serial.print(val); if (sensor.timeoutOccurred()) { Serial.print(" TIMEOUT"); } else if (sensor.readRangeContinuousMillimeters() < 450) { digitalWrite(vibratorPin, HIGH); } else { digitalWrite(vibratorPin, LOW); } } -
5Step - 4 : Insert everything in glove
Carefully insert in glove. Different glove need different technique to insert. If you use a bicycle glove you can insert arduino and all other component user its plastic protection. See this picture for an idea.
![]()
![]()
Make sure sensor is in correct position. Make a square space for on/off switch.
-
6Step - 5: Final Step
Now check whether everything is working. Finally try to give it to visually impaired people and take feedback from them to further improvement.
Gadget for Visually Impaired People (GVIP)
This simple & lightweight glove will help visually impaired people to sense their surroundings with a quick response rate.


Discussions
Become a Hackaday.io Member
Create an account to leave a comment. Already have an account? Log In.