Immediately after applying power to the transceiver (not necessarily nRF24 - it can be any other), you must pause to stabilize the oscillator frequency. According to the datasheet, the maximum time it may take is 100 ms. In fact, this pause will be much shorter, but here I take even with a margin. For the formation of such a raza, I use the watchdog timer. The nuance of its use in the old Attns is the following - when the first watchdog is triggered and the interrupt handler is enabled, the MC goes to the handler. If there is no signal for resetting the watchdog timer after that, then the next triggering will reset the MC. Instead of resetting the watchdog, you can also redefine its work period. Also, do not forget about the CCP register (a feature of the late MK with atmega core). I will describe this in the macro section:
#define WDT_int_125mS CCP = 0xD8; WDTCSR = Bit(WDIE) | Bit(WDE) | Bit(WDP1) | Bit(WDP0)
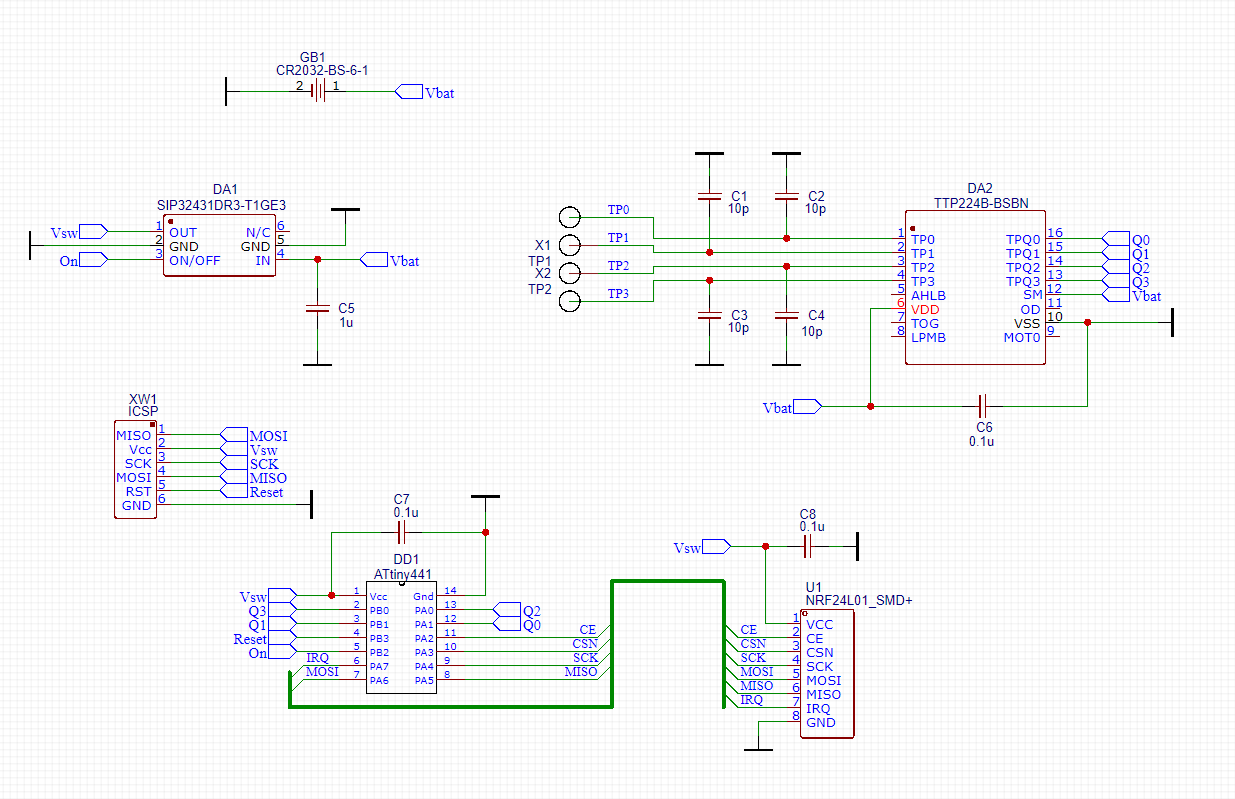
Next, we need to determine the pin MK, which will supply power through the key to the transceiver and to itself, to the output. Then we configure the SPI section, enable PCINT interrupts, read the parameters from the EEPROM, read the readings from the sensors. Before initializing the transceiver, we need to pause, which we wrote about above. To do this, we just go to sleep. And vachdog wake us up. The section of code that performs the listed actions looks like this
uint8_t address = 1;

        PRR =   (1<<PRTWI) | (1<<PRUSART1) | (1<<PRUSART0) |
            (0<<PRSPI) | (1<<PRTIM2) | (1<<PRTIM1) |

            (1<<PRTIM0) | (1<<PRADC);

        WDT_int_125mS;

        data[5] = MCUSR;

        MCUSR = 0;

        DDRB =  (0<<Q1) | (0<<Q3) | (1<<Power);

        Vcc_On();

        DDRA =  (0<<Q2) | (0<<Q0) | (1<<nRF_CE) | //

            (1<<nRF_CSN) | (1<<SCK_PIN) | (0<<MISO_PIN) |

            (1<<MOSI_PIN) | (0<<nRF_IRQ);

        SPI_Init();

        GIMSK = (1<<PCIE1) | (1<<PCIE0);

        PCMSK0 =    (1<<Q0_PCINT) | (1<<Q2_PCINT) |
            (1<<nRF_IRQ_PCINT);

        PCMSK1 = (1<<Q1_PCINT) | (1<<Q3_PCINT);

        Get_Buttons();

        data[0] = EEPROM_read(address++);

        data[1] = EEPROM_read(address++);

        data[2] = EEPROM_read(address);

        sei();

        Sleep(SLEEP_MODE_PWR_DOWN);
Mandatory action in our program is to measure the voltage level on the battery. To do this, we will measure on the internal ION, and we will use the supply voltage as a reference voltage. But just before the measurement itself, we need to pause for 1 ms to complete the transients. In order not to do this specifically, I turn on the ADC before initializing the transceiver, and I do the measurement after that - the cherished 1 ms just passes. ADC must be turned off - analog circuits consume a small current even in the absence of clocking. we fight for every nanoampere
PRR =   (1<<PRTWI) | (1<<PRUSART1) | (1<<PRUSART0) |
            (0<<PRSPI) | (1<<PRTIM2) | (1<<PRTIM1) |
            (1<<PRTIM0) | (0<<PRADC);

        ADC_Init();

        nRF_Init(nRF_channel);

        ADC_Start_Conversion();

        WDT_int_8S;
Also, do not forget to turn on the watchdog .... for every fireman ...
Everything. The preparatory part of the code is over. Next comes the main loop. The main cycle is built on the principle of a finite state machine - in a dream, we are waiting for the input action, we work it out. If there is an exit condition out of the cycle - just de-energize yourself and the transceiver. In the power circuit, we only have the sensor chip.
Package structure:

0 - address, high byte
1 - address, low byte
2 - type
3 - button status field (Q3 - button 0, Q0 - button 1, Q2 - button 2, Q1 - button 3)
4 - supply voltage
5 - add. message (error)
| __
        0 bit PORF bit - power reset load
        1 bit EXTRF bits - reset reset
       2 bits bits BORF - reboot by power detector
       3 bits WDRF bit - reload by watchdog
       4 bit
       5 bits
       6 bits
       7 bits
Main loop:
cli ();

nRF_Transmit_NOACK (data); // Send data without confirmation

sei ();

Sleep (SLEEP_MODE_PWR_DOWN); // Go to sleep

Get_Buttons ();

if (data [3] == 0)
{

nRF_PowerUp_interrupt (); // Enable interrupt...
Read more »
 dAshkova


 Hexabitz
 lion mclionhead
 Bare Naked Embedded
Hi!
I deleted the old schema and downloaded the new one. Please take a look. Power is supplied from TTP224: TTP224 output -> turn on the MCU through the protective diode MCU -> turn on the sip key switch (sip...).