Marc Schömann
-
Quick Release Housing
08/19/2019 at 15:35 • 0 commentsWhy?
The housing may seem like a small insignificant detail, but I'm using this printer daily. And I don't want to struggle with inadequate housing or long-lasting disassemblies before I can reach essential areas.
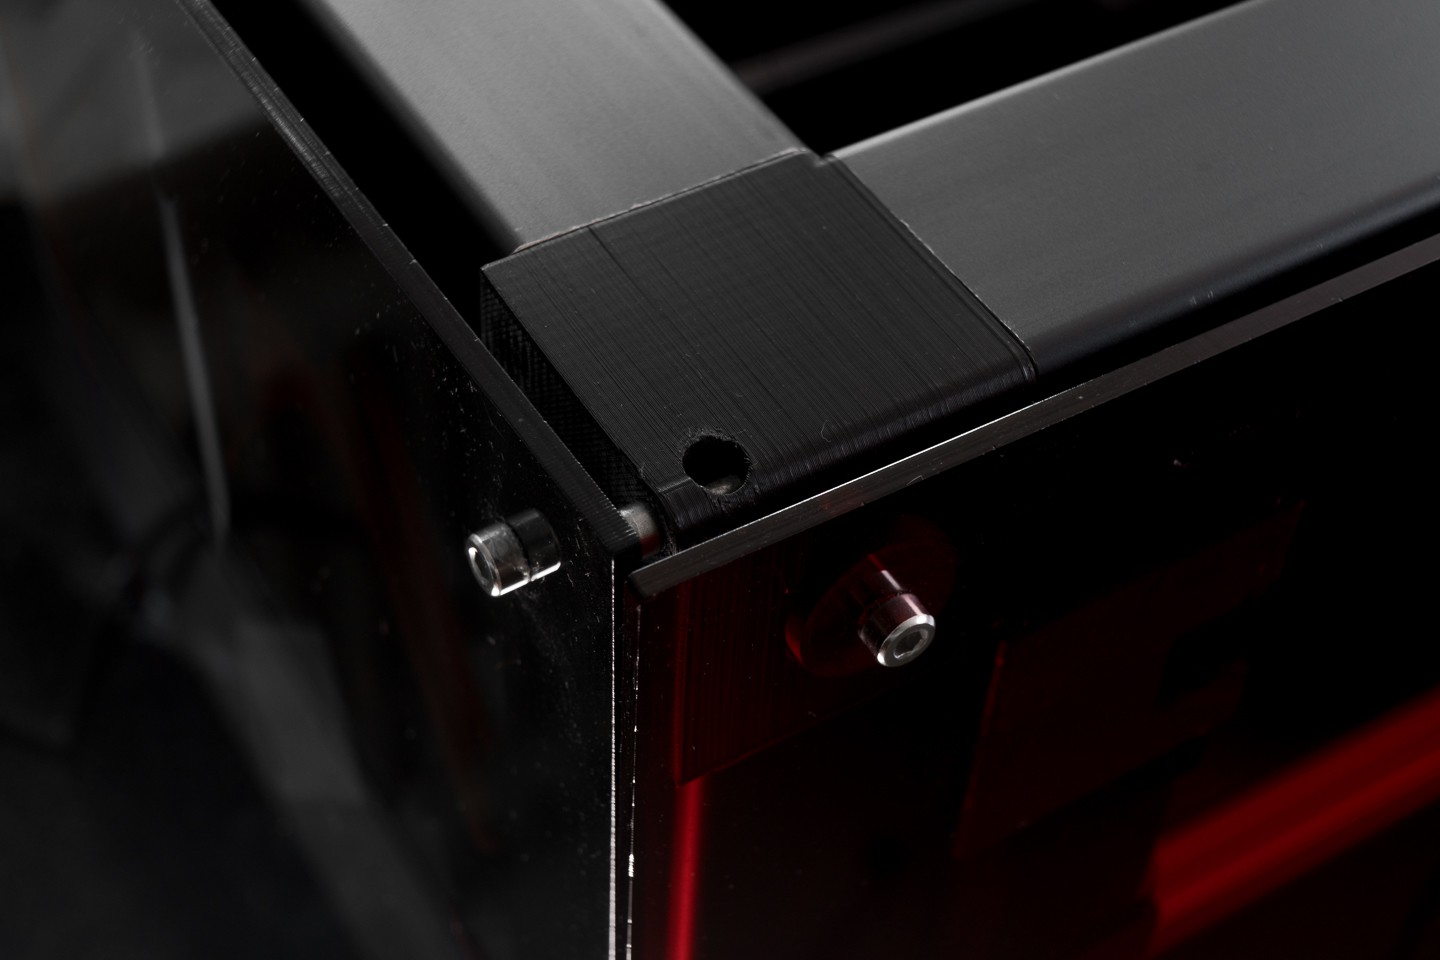
How not to mount
The housing of a 3D Printer is an crucial factor to achive temperature stability, protection and is the fundament for a heated built chamber. But mounting thin sheets on a vibrating machine is not as easy as it seems. Fluctuating temperatures add another problem. Acryl, for example, expands quite a bit, causing stress and nasty sounds. I experienced how bad this problem is when I worked for a german 3D printer company which bolted the acryl sheets directly to the frame.
Accessibility
This one might be more important to people like me who continuously change stuff, but it has paid off for me. I can detach all housing parts in seconds, which makes maintenance a bliss.
Looks
It may sound superficial and unnecessary for an open-source project, but "looks" matter. Open Source 3D Printer are in fierce competition with cheap and sleek but mostly closed source Chinese printer. If we want to keep the community committing to open source, we need to compete on every level with the commercial alternatives. It is no coincident that Ultimaker and Prusa are working so hard on making their machines look like they do. We judge objects just as we do with humans, superficial and very fast. A capable 3D Printer should radiate precision and reliability to built trust in the user. This can also be understood as a promise. It promises to look like it's capable so it should better deliver!
![]()
The Solution
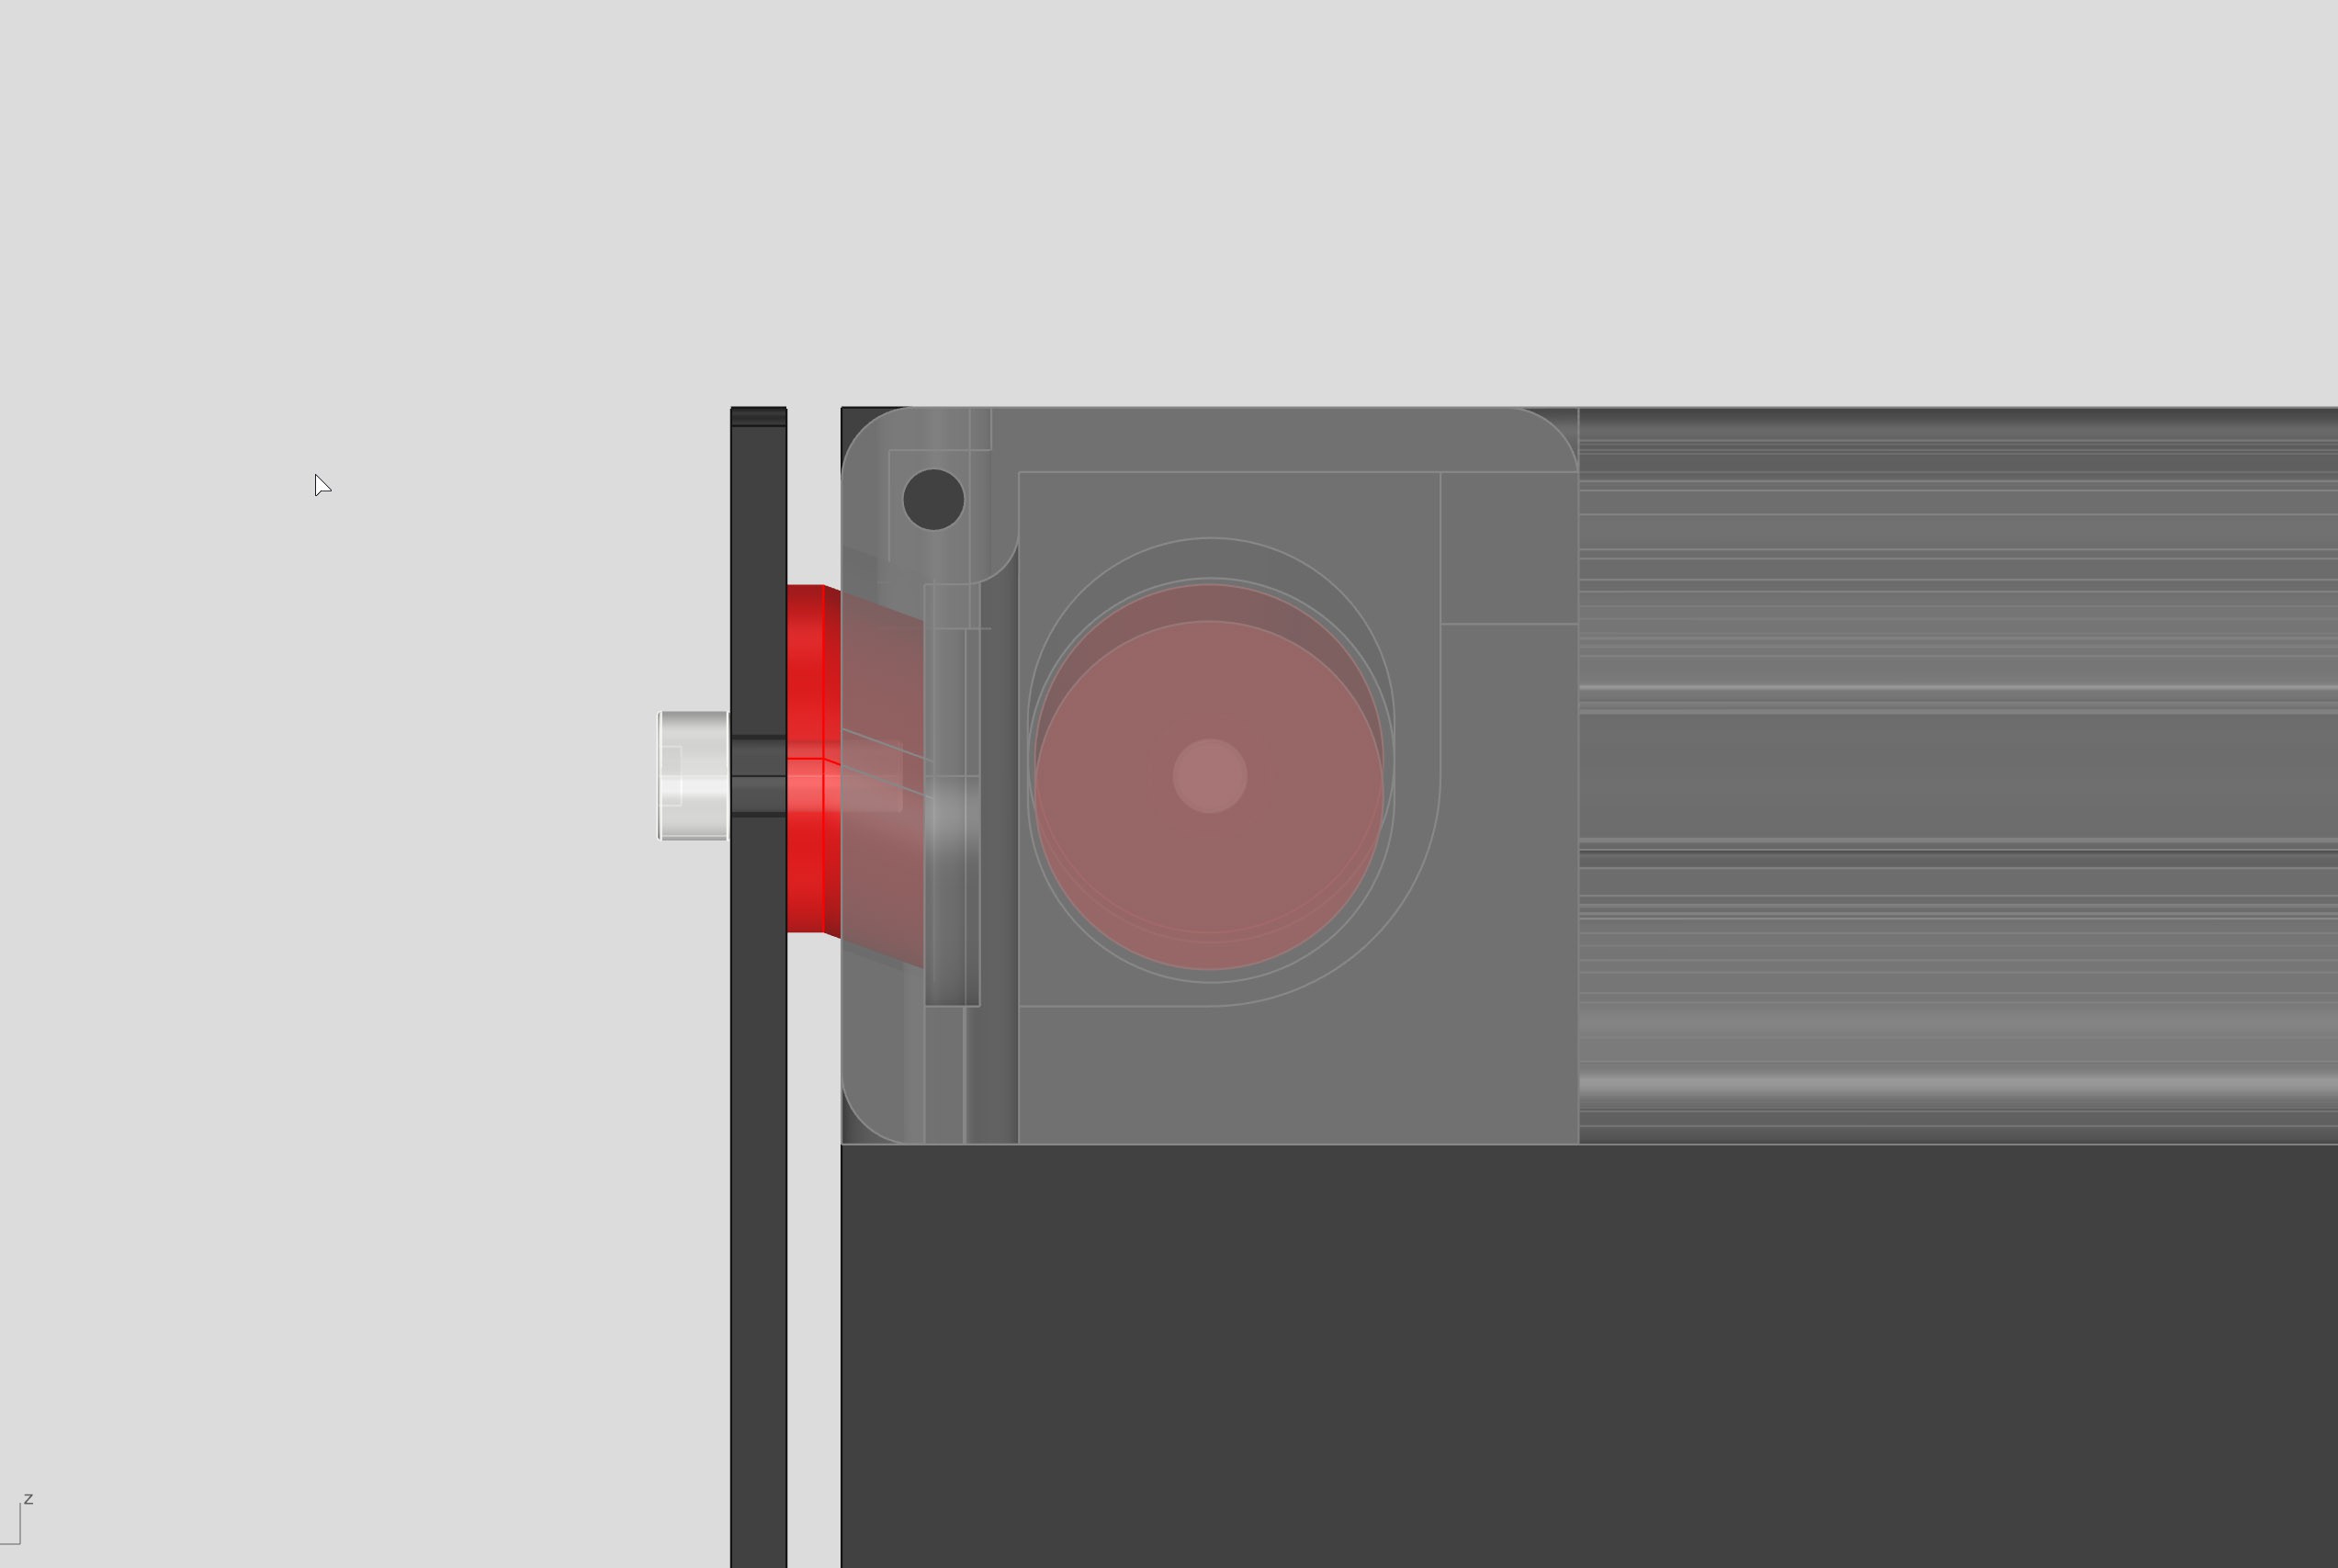
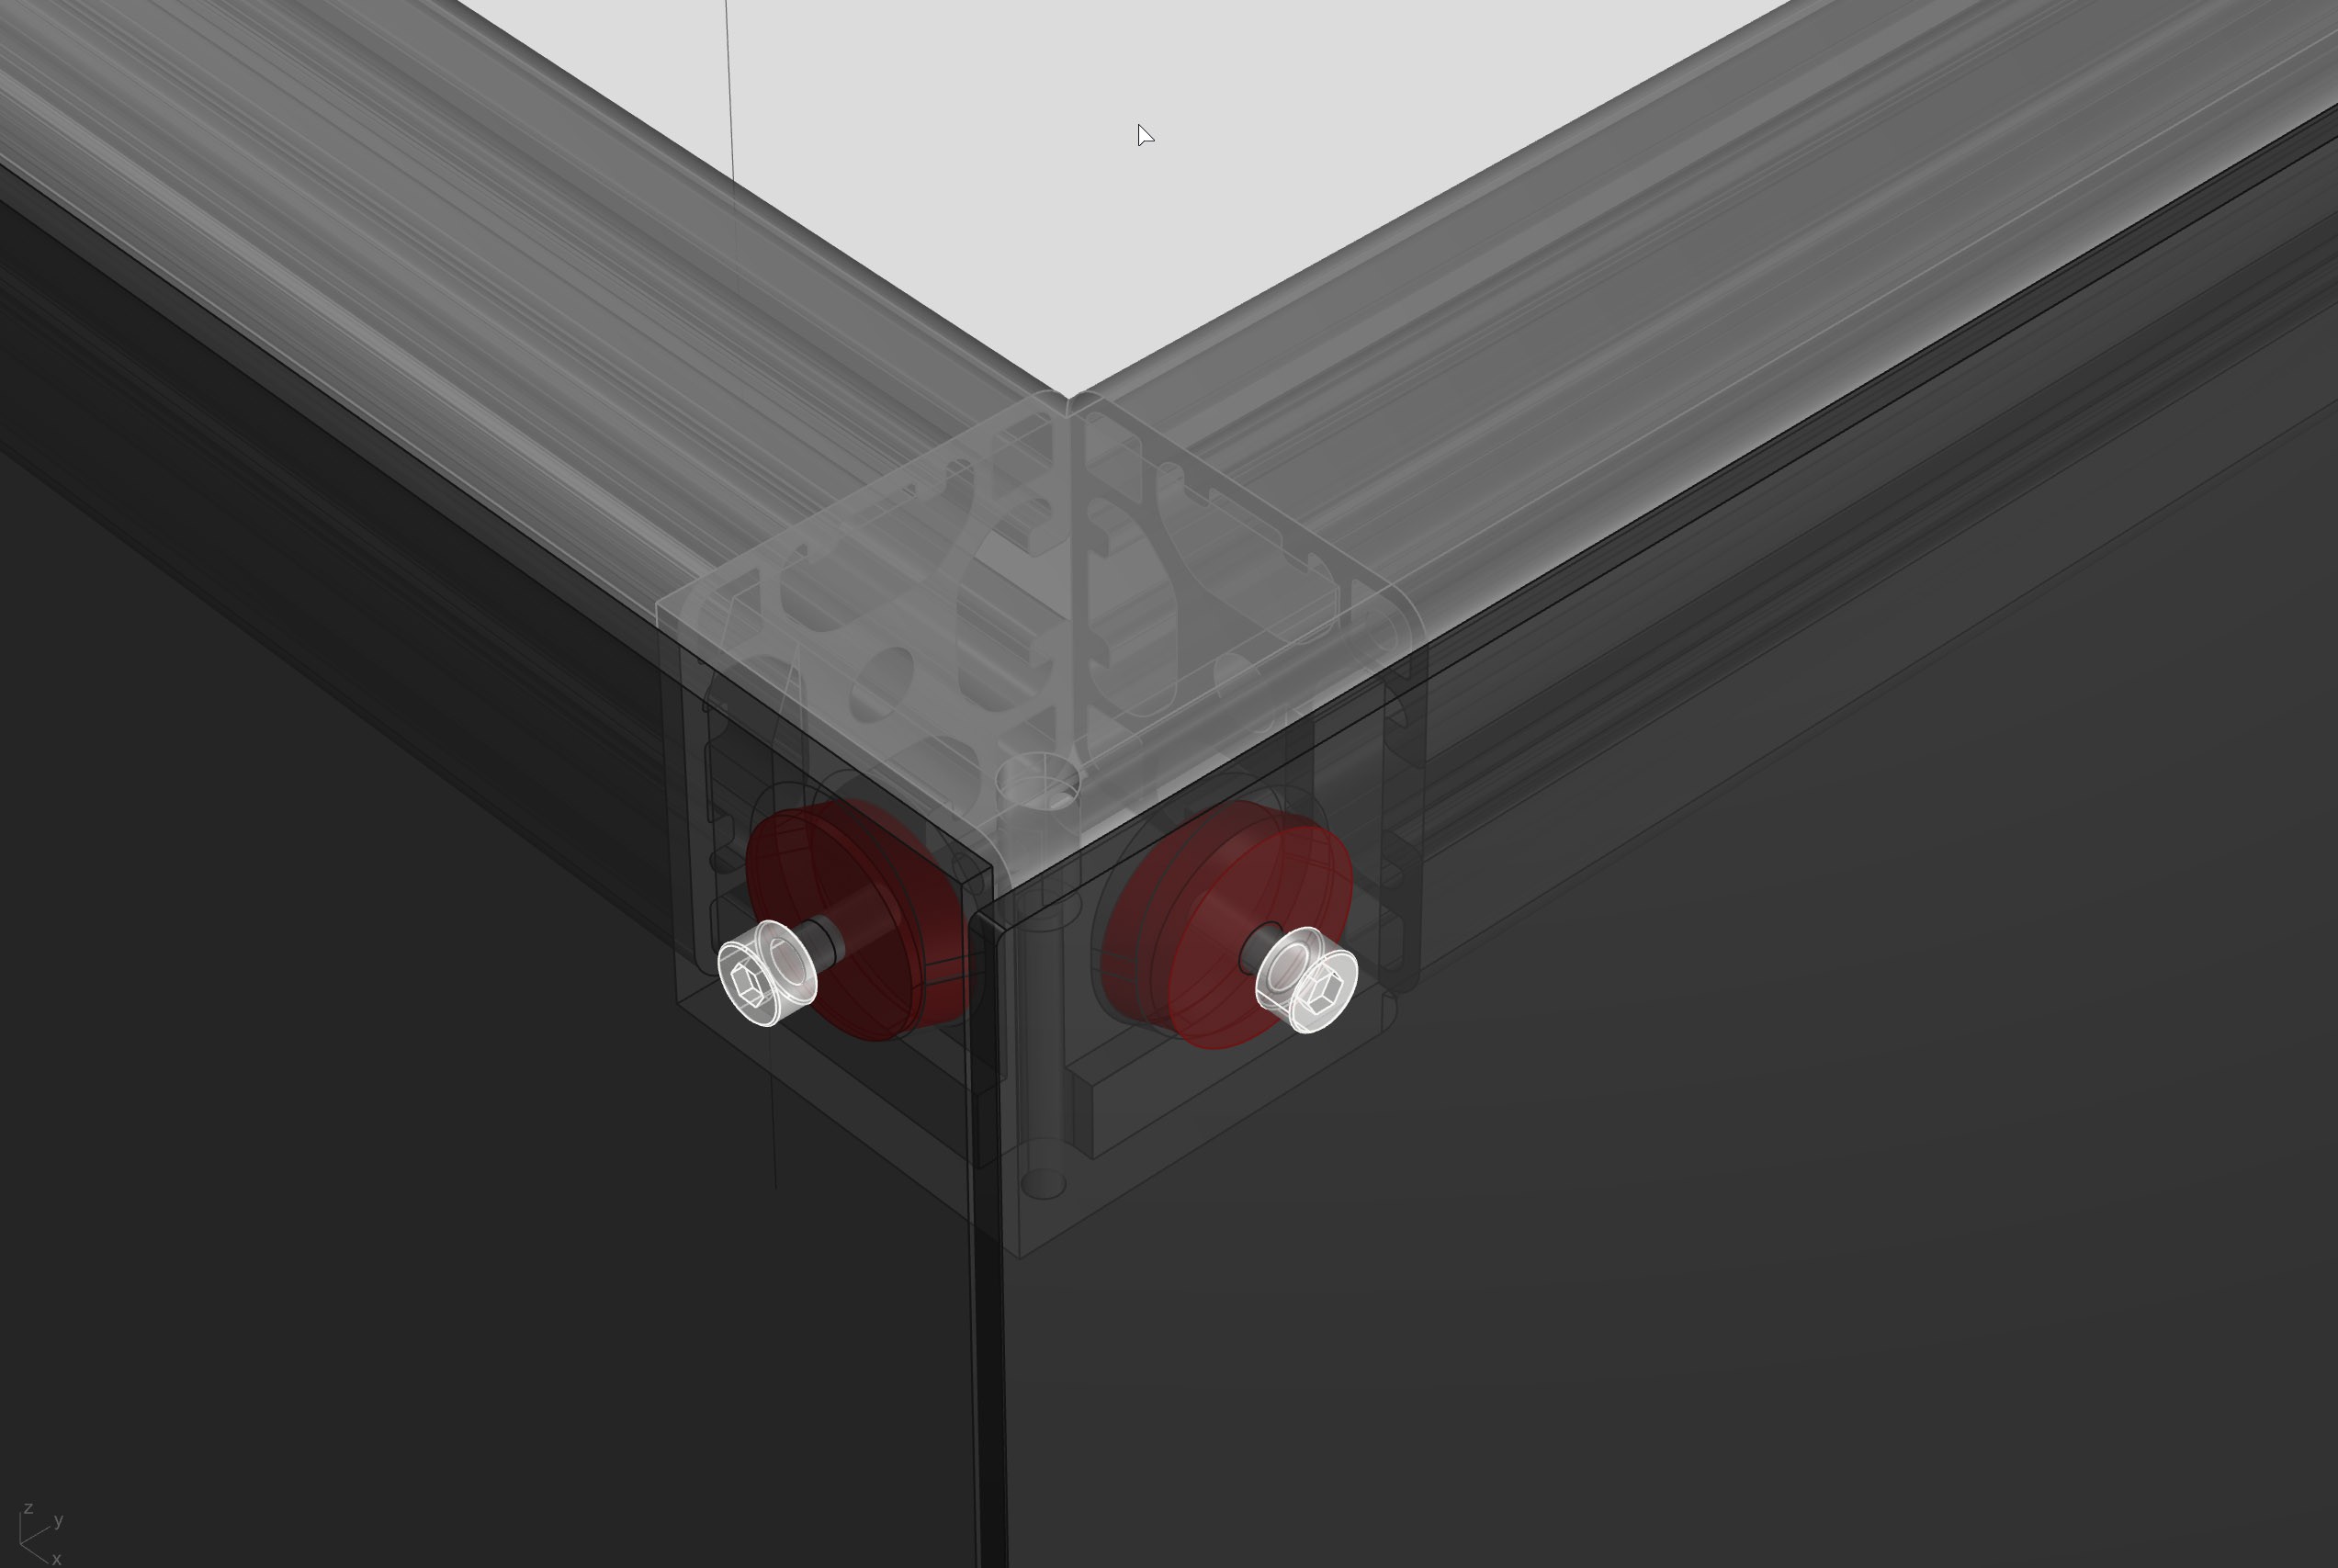
Adding four sliding cylinders to each corner on the Acryl sheet. The idea is that the sheet slides into the shaft pressing the sealing against the frame by its weight. That way, each sheet can be detached by pushing it up and out, no tools required.
![]()
![]()
While this is an excellent solution for side and back walls, it´s no solution for the door or the cover. The door could be split and opened by a printed double hinge like this:
Finalizing the doors is high on the bucket list, if you want to speed things up and construct something like this please contact me!
-
Passive Water Cooling
08/18/2019 at 13:53 • 0 commentsPassive water cooling was one of the innovations I brought in with the Blackbox.
There are three reasons why I prefer water cooling:
- I had only good experiences with water cooling before, the Kraken Hotend which I used for a while never failed me (unlike air cooled v5 or v6 hotends)
- Blackbox was designed with a closed built chamber in mind, and water cooling performs way better in that scenario. Another plus is that it's more resistant to general ambient temperature. I witnessed a few summers (in Germany!!) in which the air cooling of an e3d v5 came to its limits.
- It shortens the distance between drive gear and nozzle. A short distance is especially crucial for soft materials, the smaller the gap between gearwheel and nozzle, the more direct the control. And you can truly feel and see it in practice.
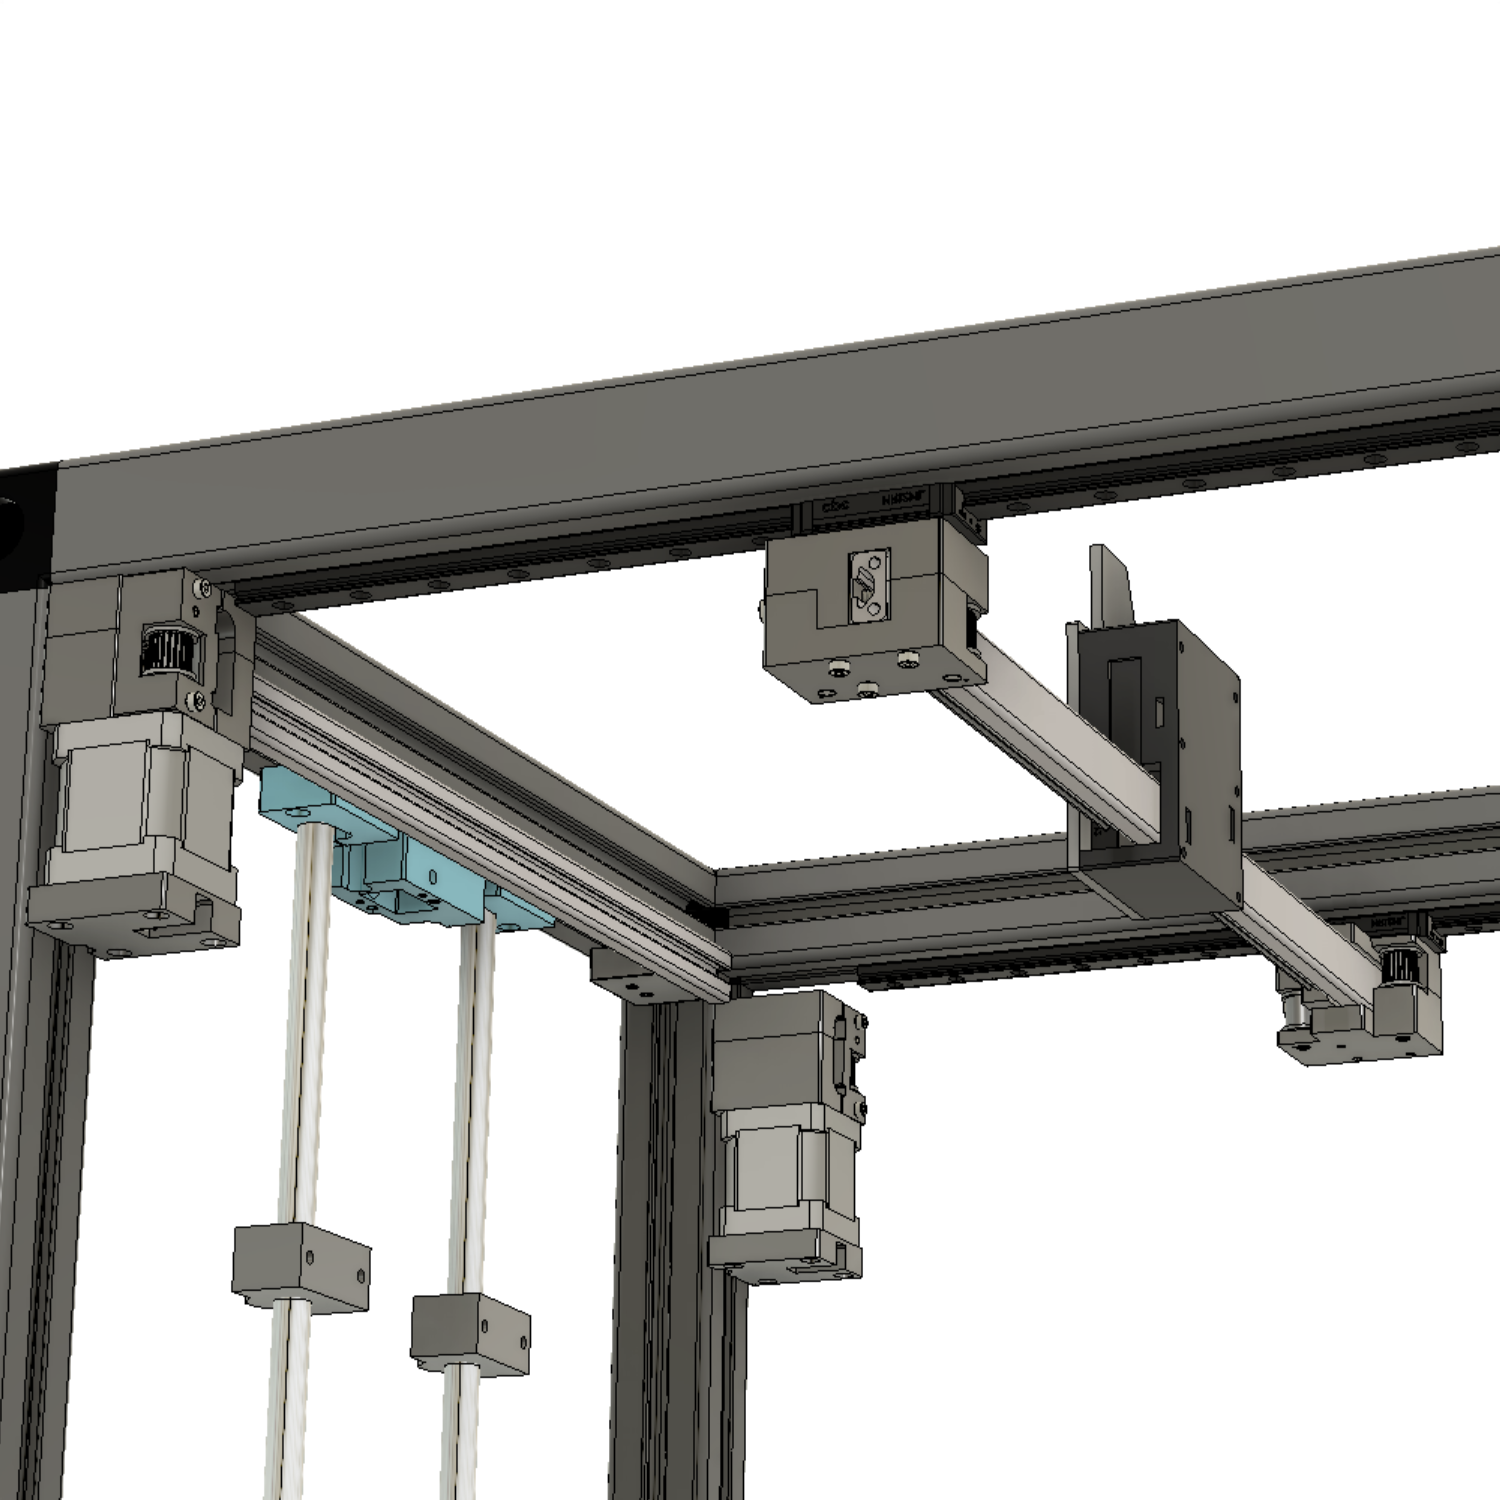
Watercooling a tool changing printer the "classic" way would require many hoses to every single tool, which produces just as many possible leaks. Water cooling in a device which has countless high voltage parts can be very dangerous, so you naturally want to avoid too much unnecessary fittings. With the Blackbox setup, you only need two hoses: one goes to the X-Axis and another one to the tool bank. That way, the tool is cooled when active and inactive without beeing cooled actively by itself.
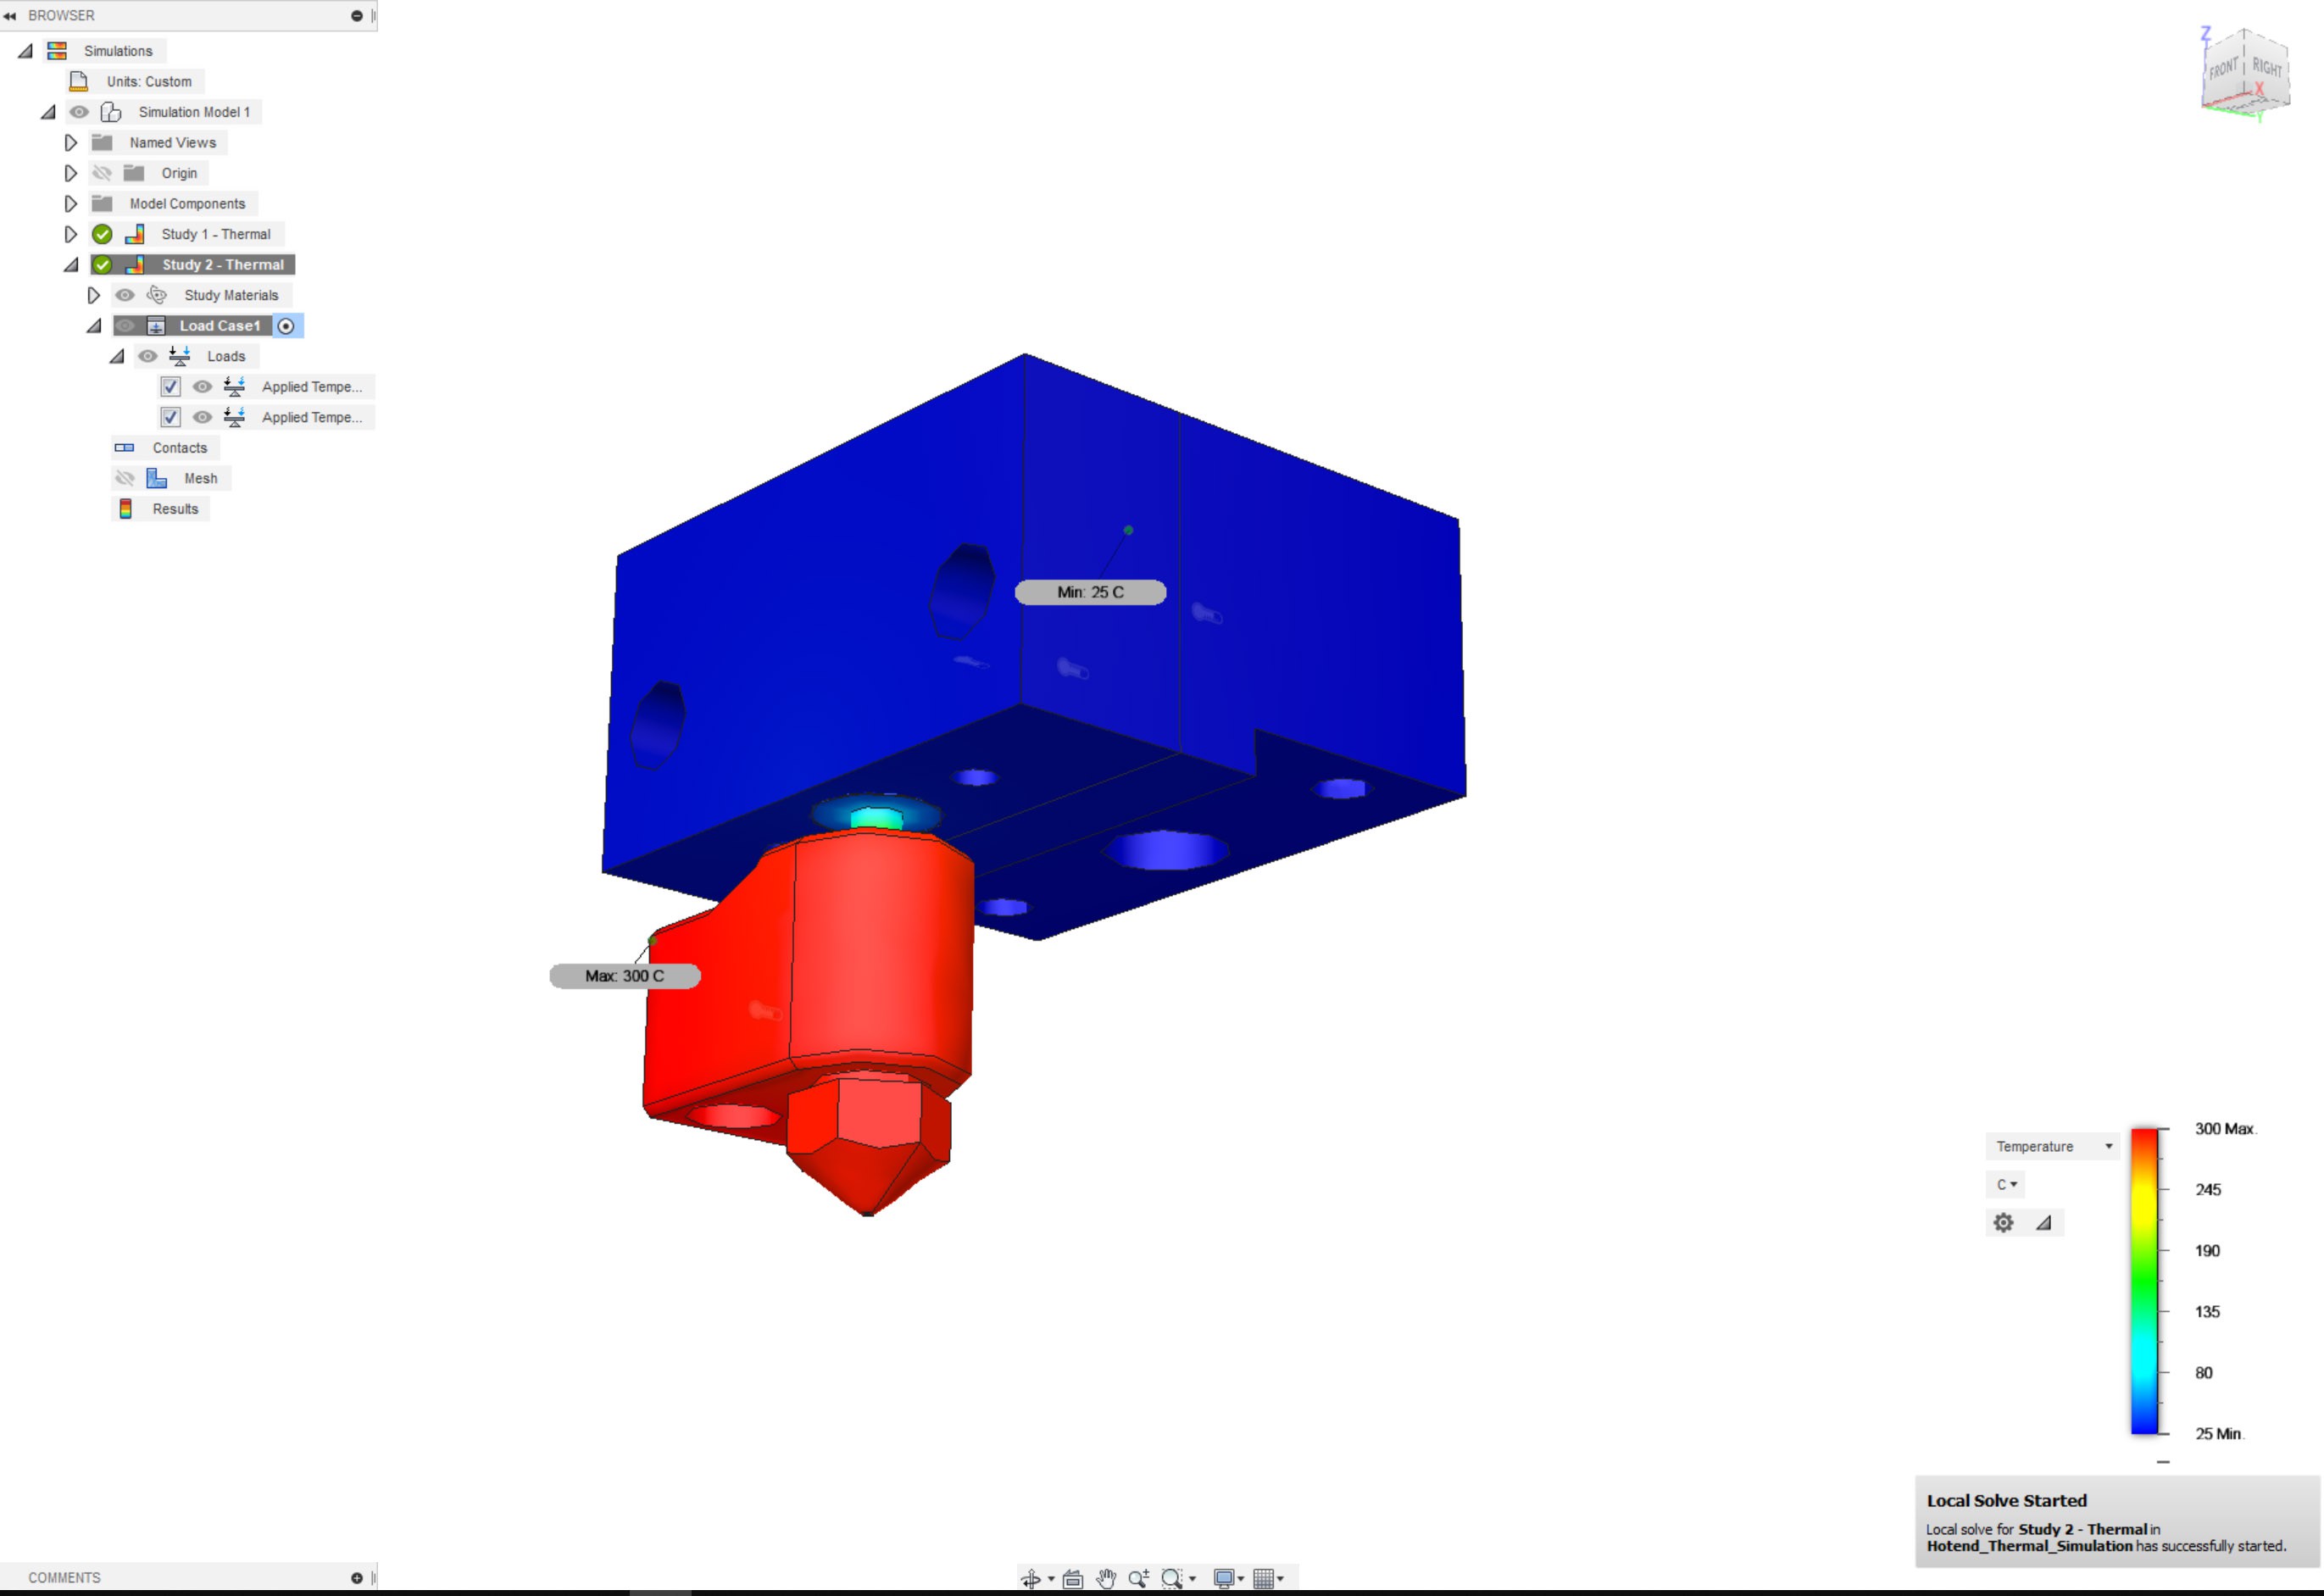
How it works
The system works like any other water block with the only difference that there is no thermal grease and it is not screwed and therefore removable. The lack of heat conductive paste substantially impairs efficiency, but a hotend produces significantly less waste heat than we are used to from CPU or GPU. And while the conductivity between the two cooling blocks is rather low, the water cooling itself is extremely efficient. Maximilian Arnold was so nice to calculate how much waste heat dissipates at the cooler of an e3d hotend. These are his results:
Q=cp*m*dT
Original E3D Hotend
Sunon fan 3010 Maglev 12V
Fan flow rate 0.154 m3/min
Air density 1,2041 kg/m3
cp Air 1.005 kJ/(kg*K)
Ambient temperature 26 °C
Hotend temperature 250°C
Air temperature upper end of the heatsink 30.5 °C
Air temperature lower end of the heatsink 40.5 °C
Average value 35.5 °C
delta T is thus 9.5 KThus 29.5 W should be delivered under perfect conditions.
The lamellas got a higher air resistance, therefore one gets counterairflow from the fans. I think that the heat dissipation lies rather in the range of 20-25 WInstead of the 100-500 watts we are used to cool our computer chips, only about 20w have to be dissipated. And appearantly pure touch is enough to do that, if paired with a titanium heatbreak there should be plenty of room even for high temp materials.
Simulation
I tried to do a simulation in Fusion 360, but the results do not represent reality. As you could see in the video, the tool cooler reaches around 35°C (250°C), in the simulation the tool cooler stays at 25°C. I guess the reason is that fusion calculates with perfect contact surfaces. If anyone knows how to improve the simulation, you can download the Fusion file. I would love to have a better representation.
![]()
-
This is why I built the Blackbox
08/15/2019 at 12:31 • 0 commentsThree years ago, I started to build the Blackbox 3D Printer. There was one driving factor which kept me going: my dream of making soft robots one day. I assembled pneumatic robots in 2017, and that convinced me that I was on the right track. The assembly of these robots was complicated because of the numerous hard to reach parts, the required precision, and complex assemblies. That way, we'll never build robots like the ones we dream of. My concept is to use a multi-material printer that can produce the most sophisticated features in one process. And today I finally got a proof of concept!
![]()
How it works
This little actuator was printed in one process and consists of just 3 parts; An actuator, a printed gear and a servo Motor. The working principle is also quite simple, flexible fingers are connected to a slider with bridged "cables," which is then driven by a servo using a rack and pinion. What's not so easy is the print itself, there are very few printers out there which can combine flexible materials. My first experiments started with a E3D Kraken hotend and failed because the inactive nozzle permanently dragged across the print. The second experiments where before I installed a wipe system in the Blackbox but the third experiment finally succeed.
![]()
![]()
So how to combine flexible and rigid Materials?
Printing two materials next to each other create a fragile bond, especially when it's such different materials like TPU and PLA. My solution to making a strong connection between the two materials are undercuts. By hooking the materials together, the links can withstand high forces. I've tested several hooks, but I haven't been able to compare them yet.
![]()
![]()
What's next?
This is just a proof of concept and a straightforward mechanism. There are so many things to test, but my goal is to print highly complex actuators with multiple motors and axis, but for now, I'm keeping it simple. Another thing I want to test soon is nylon cable bundles for high torque applications. I'm open to any input and will probably create a Hackaday project out of this once the Hackaday prize 2019 is over!
![]()
Download
https://layershift.xyz/soft-robots-and-why-i-built-this-printer/
-
Changelog
08/09/2019 at 13:04 • 0 commentsThis is the promised changelog, it includes all major changes since the last Update
All these changes already found the way to fusion files, and there is more to come!
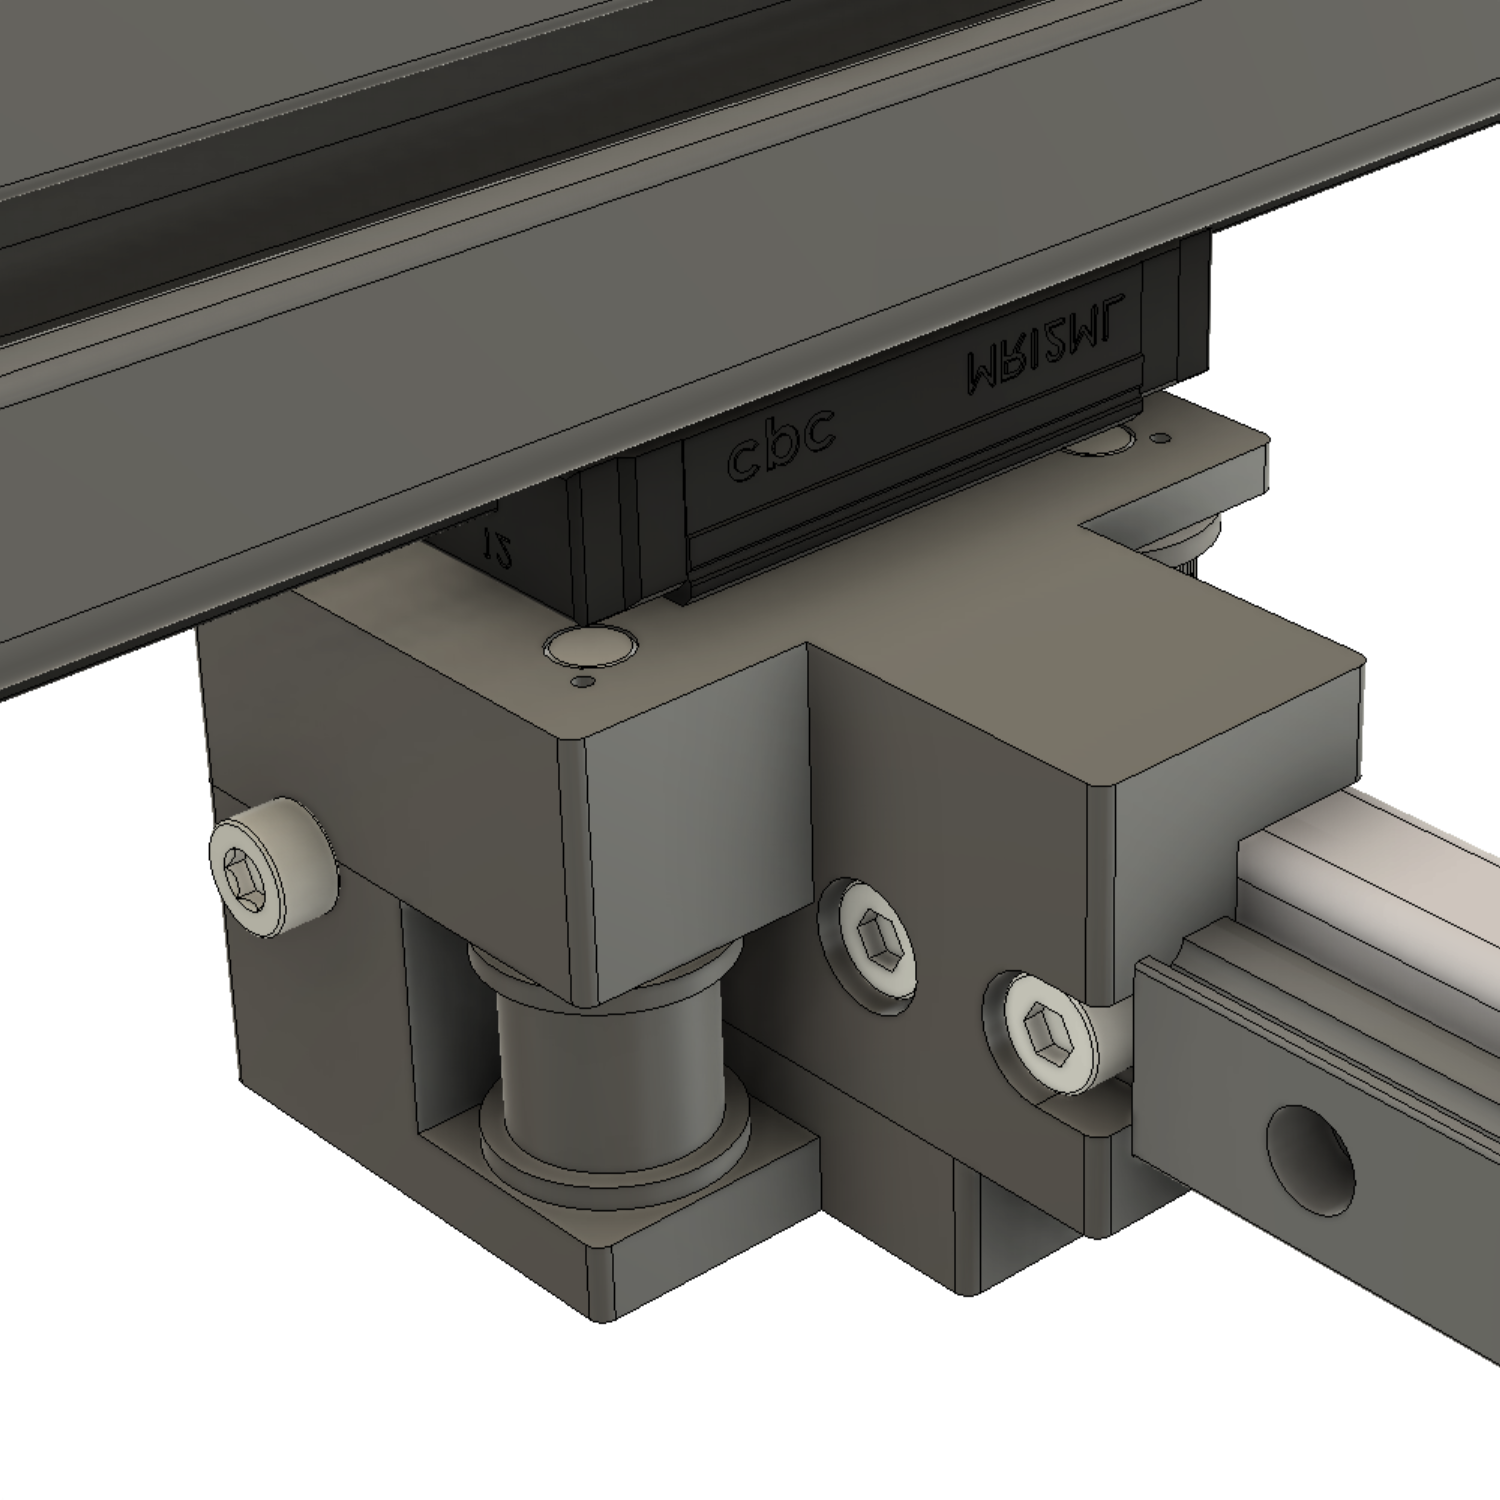
All Linear Rails are now MGN12 with the big H version carriage
MGN 12 are much more accessible & cheaper to sourceA 10x20mm t-slot profile now supports x-axis
The carbon square rod looked cool and worked ok, but in the end, it wasn´t worth the trouble. The dust that accumulates during processing is harmful, and affordable rods struggle to meet the required tolerances and straightness. Nevertheless, I think it was worth a try and surely inspired some other builders to try the same!![]()
Belt tensioning now on the XY Motor Bracket
The belt tension system was troubling from the beginning. The two opposing tensioners were very filigree and struggled to hold the forces on high print speeds. Now the belts are only clamped at the X-axis and then individually tightened at the XY motor bracket.
Easier Lubrication
Greasing the Idler Pulleys was a pain previously, now there are dedicated holes which lead directly between the ball bearing. There are still a few areas like the motor block and the pulley corner which need this addition.
![]()
Z-Axis reduction overhaul
The Z-axis worked well but was equipped with a 64t pulley which is probably not standard and therefore very difficult to get. Now the reduction is made with 16-40t and 16-80-40t, resulting in a reduction of 1:25. The reduction is now also relying on 9mm belts like the rest of the printer. Besides that, the reduction is far more robust and a bit easier to print.
Following Updates will include:
-New Extruder and Toolchanger design, more soon!
-Block and Tackle mechanism for the Z-Axis (already in rhino, not in fusion yet)
-Enhanced housing for troublefree disassembly
-Mounting for Duet Board
Best
Marc
-
Recap!
07/31/2019 at 15:09 • 0 commentsThe last few months, I mostly spend on building a community and getting Fusion going. Apart from that, I fixed a lot of problematic areas and redesigned certain things thoroughly. There will be a separate update about that soon. I used the multi-tool capabilities in different ways and (still) working on getting the workflow sleek. The tool changer now has over 70.000 changes behind without a single incident (apart from stupid mistakes). That's something I'm proud of because it proofs that the system is capable of daily use.
I also made the first example with a non-extruder tool. There will be more to come!
-
Blackbox is back on Hackaday!
07/31/2019 at 14:24 • 0 commentsIt's been a while since the last Log on Hackaday. The reason is that I had to abandon some cummincation channels in favor of some others. I used the time to build a compelling project page on my website, set up a community forum, and worked hard on getting the fusion files ready. That was a lot of work - and still is - but it's getting easier. Blackbox is now on a path to be a real community-driven open source project with many contributors.
I will post all significant updates on my Blog first and then spread it to different channels including Hackaday. Github won't be further used because it's just painful to use with 3D Files (File Size limit, upload and deleting procedure etc.). Primary source will be the Fusion 360 File where everyone is invited to participate. Fusion has a built-in version system, offers group projects and can directly export BOM files. All that makes it the perfect platform to collaborate.
Source files, BOM and latest Informations https://layershift.xyz/blackbox3dprinter/
Coordination for all builder and contributors is primarily on the Forum and discord.
Im also attaining this year Hackaday prize so any support is well appreciated!
Multitool 3D Printer - Blackbox
Blackbox shifts 3D printing towards a multitool manufacturing robot.