MPPT for low voltage solar harvesting
Microcontrollers + caps = MPPT in the time domain?
Microcontrollers + caps = MPPT in the time domain?
To make the experience fit your profile, pick a username and tell us what interests you.
We found and based on your interests.
So the previous circuit I logged was looking at discharging the buffer capacitor within a voltage range that would then be matched to the MPP. @crun pointed out the issues with this: firstly, when you have low light levels you have low voltage across the pv panel - this isn't useful if your storage medium (supercapacitor) is already above this potential. Secondly, if you have bright conditions, you can just run at lower efficiency, so why chase the MPP?
Apart from the initially unsuccessful foray into switched boost circuitry with inductors I mentioned in the most recent log, I wondered if a charge pump might function as a way to make use of the lower voltages. So here's the idea:
The main differences from the previous scheme are the diodes and capacitors to implement the voltage "doubler" circuit, including another voltage divider to determine the voltage across the supercapacitor.
Something worth noting is that in the overall design I want to run a PIR sensor and LEDs, to provide some motion-triggered low level lighting. With decent supercapacitors and a PV panel, the cost of the ATtiny402 microcontroller is no longer a dominant part of the BoM, and for this reason, I decided that there would be a separate microcontroller for the charging circuit and another one for the sensing/lighting circuit. This also means I can avoid using the untested arrangement of diodes to supply the microcontroller from both the supercapacitor and the photovoltaic panel.
Yes, charge pumps are theoretically less efficient, not to mention "real world" inefficient than inductor based voltage boosters, in the cases I have read about. For my case though, they may make sense. Even if you ignore my inability to build a decent inductor-based boost circuit. There are losses in both the diodes but in our case, this is a bit of an advantage, as twice the solar panel voltage would take us over the maximum voltage of the microcontroller that's going to control the lighting.
I implemented the basic charge pump with two normal silicon diodes because after my pain with the #Yapolamp supercapacitor leakage, I am not bothering with Schottkys for this until I really want to optimise. I didn't breadboard the voltage dividers but you will notice that one end is connected to a GPIO so that I can prevent them from leaking current when not in use.
Although I don't have a direct comparison, the BEST boosted voltage my inductor circuit topped out at was 4.26 volts under an LED torch. Because I hadn't implemented any voltage sensing on that design, as soon as the light dropped slightly, the voltage stored on the capacitor started dropping. Whereas on the charge pump circuit, I managed a respectable 5.2V, with a 1.5F supercapacitor store by the window on a rainy day in UK. I'm currently testing it under the same LED torch as I used for the inductor-based boost circuit, just to check there was rough parity.
So charge pumps are less efficient but they have an advantage - I have managed to make a circuit that works with them! In the real-world test of sitting by a window on a rainy day they charged a supercapacitor to a reasonable voltage - certainly one that will yield a useful range of voltage for driving an LED in the dark.
A couple of key features a present in the charge pump circuit that aren't in the inductor-based cicuit:
A wonderful aspect of Hackaday.io is the way you can bump into kindred spirits that live miles away and you would never have come across were it not for this community. The most recent example of this kind of blessing was when @crun volunteered to join this project. I accepted immediately and benefited from several long whatsapp chats and images of pencil sketches. Although we got sidetracked while chatting into a fascinating array of tanget-topics, @crun explained how the capacitor technique that spawned this project was generally flawed with respect to the alternative - inductor boost circuits.
As the concept became clearer to me, I could see there are significant parallels between the basic switching boost converter we were discussing and the inductor-based LED drivers used in #TritiLED and #Yapolamp. The fascinating (to me) part was that @crun had managed to use microcontrollers (PICs) to omit some of the external components of the switching boost converter, namely the diode and FET. I'm not going to go into the idea further in this log because I just wanted to confess that after several days of trying, I have failed to make a switching boost converter that shows potential for being well matched with my supercapacitor energy storage scheme.
The main reasons I think are behind this are the need to carefully judge when it is acceptable to draw power with the uC/inductor. If you switch on too frequently or for too long, you will deplete the potential across the photovoltaic panel/buffer capacitor to the extent that it can no longer provide useful current to the inductor and scuppering your plans to shove the resulting energy over the diode and into the supercapacitor. I have tried a range of pulse durations, pauses and components (inductor from 0.68mH to 6.8mH) and so far I just can't seem to get a boosted voltage worth writing home about.
I'm not giving up, but I am going to move back over to a purely capacitor-based circuit, while I lick my wounds!
I took the lash-up in the previous log and raced it against a plain "connect your supercapacitor to your solar panel here" arrangement. I thought a fair and useful course to run would be to charge the supercapacitor from 2V to 3V, as this is usable for many microcontrollers, sensors and some colours of LED. There's not much point in testing lower voltages because hopefully in-use once the supercapacitor drops below 2V we've probably stopped being able to draw current from it (remember we're going to have to use a Schottky most likely so there will be an extra voltage drop at the microcontroller VCC pin).
| Setup | Time (m:ss) |
| Pulsed (not true MPPT) | 5:48 |
| Straight-connection | 6:01 |
So I wouldn't call this a straight-up victory, especially as I can't be sure I put the same illumination (distance between lamp and panel) on each time. However, even if they are roughly the same performance, I think there may be some scenarios where the pulsing could be more efficient. You also get a microcontroller running at 1MHz for free in the pulsed setup. Finally, this has got me thinking about a charge pump to maintain the reservoir caps (perhaps 3 or four in series) at a higher voltage.
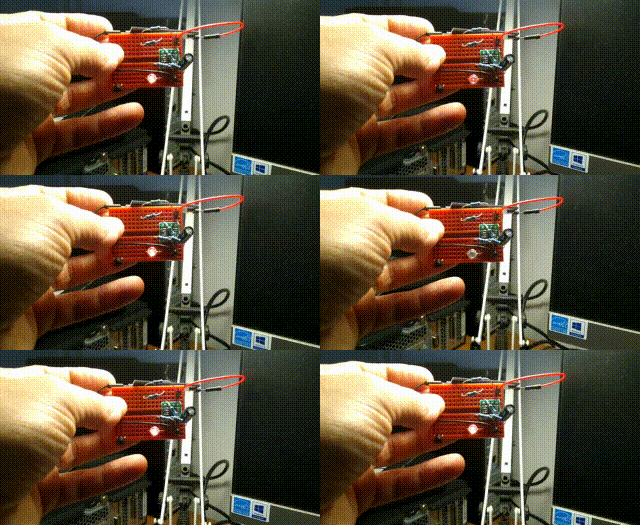
Here's a basic breadboard test of the pulsed discharge of the buffer capacitor. The variation in flash rate/duty is due to the time it takes to recover to a certain voltage, before repeating the discharge down to a threshold voltage, a few 100mV below the recovery voltage.
I then replaced the LED with a 1.5F capacitor in series with a 47ohm resistor (for current limiting while I still work all this out). You can see the duty varying to meet a changing brightness on the solar PV cell and the recovery time to recharge the buffer capacitor increasing (represented by the 0V spaces between pulses).
Apart from the shenanigans with diodes to prevent backfeed at no-voltage from the solar cell, I think we're ready to try a basic MPPT.
My thoughts are to take a reading of the initial voltage, so we know where we're aiming for during recovery. Then discharge until we're close to the supply minimum of 1.8V for the ATtiny402. Take a timestamp and then record the time it takes to recover every, say, 200mV. Run the calcs on the power as per the previous log and select the best range of voltages to swing the buffer between. Run the pulses at this voltage range for a given period (10 seconds, a minute?) and then repeat the full discharge/recover time profiling and calculate the new MPP.
@Dan Maloney is wondering where this is going, so that now makes at least two of us. Time to put a bit more thinking into the concept. I admit I am getting a little confused about energy, charge and conservation of current between the PV buffer caps and the reservoir supercaps. In the following mental ramble, please ignore the ability of the PV panel to continue supplying current while the buffer capacitor is being discharged into the reservoir - I don't think it matters because our MPP is calculated only when charging the buffer and not the reservoir.
So, based on the calculator at this website http://hyperphysics.phy-astr.gsu.edu/hbase/electric/capeng.html we see the energy stored in a 100uF capacitor at 5V is 1.25 mJ (I think - you can check). If we allow that to drop to 4V, the remaining energy is 0.8 mJ. So we have transferred out 0.45 mJ of energy. The apparent charge drop is 0.1 mC.
If we then let the PV panel recover the voltage on the buffer cap to 5V and it takes 100 ms, we can assume the PV panel is capable of outputting 0.45 mJ / 0.1 s = 4.5 mW under those lighting conditions, between 4V and 5V and with a capacitor attached (which will admittedly affect the observable PV characteristics).
If we then try the same discharge between 4V and 3V (0.25 mJ / ) and then let the buffer cap recover to 4V, let's say it does it in 50 ms. The apparent power in this voltage range is 0.25 mJ / 0.05 s = 5 mW. A slight improvement on the previous voltage range.
Am I missing something, or does this make sense, at least on the PV panel and buffer cap side? I'm ignoring the varying voltage of the reservoir cap side, which would eventually not accept charge from lower voltages, even if they were the MPP.
Well, that happened quickly. Since the last log, I have added a #SOICbite Programming/Debug Connector Footprint and a couple of mounting holes, but other than that, this is basically the same circuit as in the First Stab log:
A few advantages I hope will work out - the programming connector's VCC is protected from feeding the supercapacitors by the D2 Schottky. Also, if the MPPT thing doesn't work out, I can always just leave the solar panel connected to the supercapacitors via the ATtiny (I plan to use solar cells which won't exceed the ATtiny's max voltage or current through a pin).
I need to be careful that the mismatch between the voltage at VCC (dropped by the schottky Vf) and PA2 (no drop) doesn't cause a catastrophic backfeed (15mA is the max rated in the datasheet) by accidentally turning PA2 to OUTPUT when the ATtiny is running from the supercapacitors only.
How about this?
Create an account to leave a comment. Already have an account? Log In.
Very interesting! I just received my first solar panel last week and it is currently connected to a super capacitor and a LED controlled with the ATtiny1616 (starts flashing when 1.8V is available from the super capacitor). I have zero experience with solar harvesting and it is all experimental at this moment, so I definitely going to follow this project and learn more from your progress.
I beg your pardon? You have a solar panel connected to an ATtiny 1 series, an LED and a supercapacitor? You, my friend, are now the expert! And if not the expert, at least the man with the most hardware ready to go! I was thinking of running at 32kHz internal clock for low uA currents.
Interested to see where this goes. Have you actually breadboarded this yet?
It's totally untested. I thought about doing a spice simulation but then I realised I don't know how to simulate a pv panel under fluctuating light levels! As it it didn't take long to layout (badly) after I drew the schematic to show everyone what was in my head, I just ordered a board to try it.
I don't know whether I'm getting lazy but I'm starting to use the breadboard less and less, going straight to custom PCB, especially when I want things like caps and inductors close to power pins. If it's a project I think I may take further, the time spent planning perfboard layout and cutting/stripping wires for it may as well go into EDA.
So far I don't think there's a big downside, as I can just revert to a non-MPPT charge if I don't get round to the MPPT part or it doesn't seem to bring any benefit. Just thought the idea was interesting!
Become a member to follow this project and never miss any updates
 Jonathan Bruneau
 rawe
rawe
 Sander van de Bor
 atelierlelu
currently gathered quite a lot of experience with designing MPPT for low-power.
MPPT only makes sense, if you have a buck converter to transform voltages by keeping the power. Moreover you need a good deal of voltage difference between the Vmp of the panel and the maximum of the battery, else the algorithm cannot work.