Close
0%
0%

Retrex Audio

Experimentation in AY-3-8910 / AY-3-8912 sound synthesis

Similar projects worth following

In which we document things that we have learned about this audio chip.


This project was started based on interest in the Vectrex gaming system, which utilized a AY-3-8912 Programmable Sound Generator.

A sampling of sounds from this era of hardware can be found in this playlist https://www.youtube.com/playlist?list=PLvJzDR3l8jZMt1rDkUpv-mvl3vuFxXKxe

A history of the chip Video Game Music Preservation Foundation Wiki

555 180Khz Clock Fuzzing

555 180khz clock fuzzing - 145.30 kB - 01/25/2020 at 00:43

Download

20200123_194546.mp4

MPEG-4 Video - 18.93 MB - 01/24/2020 at 03:48

Download

0010_0001_0100_0110

First test composition, 4 frequencies on Channel A

0010_0001_0100_0110 - 26.12 kB - 01/23/2020 at 09:09

Download

20200122_225049.jpg

Cigarbox dev enclosure

JPEG Image - 2.26 MB - 01/23/2020 at 09:09

Preview

20200122_215759.jpg

Breadboard wire-up dinner hack

JPEG Image - 2.13 MB - 01/23/2020 at 09:09

Preview

View all 10 files

  • ESP32 & MicroPython 4-bit chopper

    xBeau01/25/2020 at 08:24 0 comments

    Converting setup to run on ESP32 rather than off of Arduino. Did some bit bang poking with an external clock and got it to make a sound. Hacked up some code to initialize and use ESP32 GPIO 22 for clock (Also tried 18 with hardware SPI, different challenges).

    There's a issue with PWM using 10-bit duty resolution and limiting the frequency to just of 78Khz. This should be able to go up to 40Mhz with 1-bit resolution duty, but gonna track that down later.


    Here's what generators a "chopper" noise.

    Utilizing the WiFi is totally optional, configured so that I can update main.py using WebREPL.

    from time import sleep, sleep_ms, sleep_us
    from machine import Pin, PWM
    import network
    
    print("AY-3-8910 teal 00:10")
    
    #bork break
    sleep(1)
    
    sta = network.WLAN(network.STA_IF)
    sta.active(True)
    
    sta.connect('SSID', 'PASSWORD')
    
    print("WiFi Started")
    
    #      dir 1
    #INACT  0  0
    #LATCH  1  1
    #WRITE  1  0
    #READ   0  1
    bdir = Pin(17, Pin.OUT, value=0)
    bc1 = Pin(16, Pin.OUT, value=0)
    
    da0 = Pin(32, Pin.OUT, value=0)
    da1 = Pin(33, Pin.OUT, value=0)
    da2 = Pin(25, Pin.OUT, value=0)
    da3 = Pin(26, Pin.OUT, value=0)
    
    clock = PWM(Pin(22), 78000)
    
    def inact():
      bdir.off()
      bc1.off()
      sleep_ms(1)
    
    def latch():
      bdir.on()
      bc1.on()
      sleep_ms(1)
    
    def write():
      bdir.on()
      bc1.off()
      sleep_ms(1)
    
    def read():
      bdir.off()
      bc.on()
      sleep_ms(1)
    
    print("Initializing 'A'")
    
    #Enable Register 8 (A Level)
    latch()
    da0.off()
    da1.off()
    da2.off()
    da3.on()
    inact()
    
    #Write A Level
    write()
    da0.on()
    da1.on()
    da2.on()
    da3.on()
    inact()
    
    #Enable Register 1 (A Frequency)
    latch()
    da0.on()
    da1.off()
    da2.off()
    da3.off()
    inact()
    
    #Write A Frequency
    write()
    da0.off()
    da1.off()
    da2.off()
    da3.on()
    inact()
    
    print("b0001")
    

  • 555 Fuzzing into the Khz

    xBeau01/25/2020 at 00:45 0 comments

    I started building a second dev breadboard, and have been thinking thru a minimalist pin connection. The core functionality for instance of controlling some tones can be done with 4 instead of 8 data bits, and one of the bus control lines can just be pulled high instead of switched.

    I rigged a 555 to experiment with independently generating the clock signal, rather than utilizing a high speed output like most SPI interfaces in a micro controller can do. I also already have this perfectly functional AY-3 chip wired up and blooping a test sequence from an arduino.

    What do you suppose happens if I just pull the clock pin out and use the 555 running at a much lower speed instead!? Yup, you get any even bittier grittier jam.

    But wait there's more, can you imagine, what if you hook up both the 2Mhz clock and the ~180Khz 555 clock? Yup you get even awesomer FUZZ!

    Hot Fuzzy Audio Sample here!

  • It's alive!

    xBeau01/23/2020 at 09:18 0 comments

    Wired up first test chip and got it making noises and sounds!

View all 3 project logs

  • 1
    Sound Check

    This is the quick hack of another code sample "Register writer" to play a warm up sound. The hardware is based on the schematic linked in the code. Works with Arduino Uno R3 aka: 328 compatible boards.

    https://pastebin.com/raw/FehmVLQS

    /*******************************************************************
     *               AY-3-3910 Register writer for Arduino
     *                 (c) 2014 Manoel "Godzil" Trapier
     *
     * All the code is made by me apart from the the timer code that 
     * was inspired from code found on the internet. I'm sorry, I can't
     * remmember where.
     **************************** Licence ******************************
     * This file is licenced under the licence:
     *                    WTFPL v2 Postal Card Edition:
     *
     *             DO WHAT THE FUCK YOU WANT TO PUBLIC LICENSE
     *                    Version 2, December 2004
     *
     * Copyright (C) 2004 Sam Hocevar 
     *
     * Everyone is permitted to copy and distribute verbatim or modified
     * copies of this license document, and changing it is allowed as long
     * as the name is changed.
     *
     *            DO WHAT THE FUCK YOU WANT TO PUBLIC LICENSE
     *   TERMS AND CONDITIONS FOR COPYING, DISTRIBUTION AND MODIFICATION
     *
     *  0. You just DO WHAT THE FUCK YOU WANT TO.
     *  1. If you like this software you can send me a (virtual) postals
     *     card. Details bellow:
     *
     *             < godzil-nospambot at godzil dot net >
     *
     * If you want to send a real postal card, send me an email, I'll
     * give you my address. Of course remove the -nospambot from my
     * e-mail address.
     *
     ******************************************************************/
    
    /*
    *   mod xBeau 1/22/2020
    *    Wiring:
    *    https://www.986-studio.com/wp-content/uploads/2015/05/AY-3-8910_Arduino_bb-1024x716.png
    */
    
    const int freqOutputPin = 11;   // OC2A output pin for ATmega328 boards
    // Constants are computed at compile time
    // If you change the prescale value, it affects CS22, CS21, and CS20
    // For a given prescale value, the eight-bit number that you
    // load into OCR2A determines the frequency according to the
    // following formulas:
    //
    // With no prescaling, an ocr2val of 3 causes the output pin to
    // toggle the value every four CPU clock cycles. That is, the
    // period is equal to eight slock cycles.
    //
    // With F_CPU = 16 MHz, the result is 2 MHz.
    //
    // Note that the prescale value is just for printing; changing it here
    // does not change the clock division ratio for the timer!  To change
    // the timer prescale division, use different bits for CS22:0 below
    const int ocr2aval  = 3; 
    // The following are scaled for convenient printing
    //
    void setup_clock()
    {
        pinMode(freqOutputPin, OUTPUT); 
        // Set Timer 2 CTC mode with no prescaling.  OC2A toggles on compare match
        //
        // WGM22:0 = 010: CTC Mode, toggle OC 
        // WGM2 bits 1 and 0 are in TCCR2A,
        // WGM2 bit 2 is in TCCR2B
        // COM2A0 sets OC2A (arduino pin 11 on Uno or Duemilanove) to toggle on compare match
        //
        TCCR2A = ((1 << WGM21) | (1 << COM2A0));
        // Set Timer 2  No prescaling  (i.e. prescale division = 1)
        //
        // CS22:0 = 001: Use CPU clock with no prescaling
        // CS2 bits 2:0 are all in TCCR2B
        TCCR2B = (1 << CS20);
        // Make sure Compare-match register A interrupt for timer2 is disabled
        TIMSK2 = 0;
        // This value determines the output frequency
        OCR2A = ocr2aval;
    }
    
    enum { INACTIVE = B00, READ = B01, WRITE = B10, ADDRESS = B11};
    void setup_data(int mode)
    {
      switch(mode)
      {
        default:
        case READ:
        case INACTIVE:
          DDRD = B00000000; // Set all D port as input
          DDRB &= ~0x03;
          break;
        case ADDRESS:
        case WRITE:
          DDRD = B11111111; // Set all D port as output
          DDRB |= 0x03;
          break;
      }
    }
    
    void setup_control()
    {
      DDRC = DDRC | B00000011;
      PORTC &= ~B00000011;
    }
    
    void set_control(int mode)
    {
      PORTC = (PORTC & 111111100) | (mode);
    }
    
    void SetData(unsigned char data)
    {
      PORTD = data & 0xFC;
      PORTB = data & 0x03;
    } 
     
    unsigned char GetData(void)
    {
      return (PORTD & 0xFC) | (PORTB & 0x03); 
    }
      
    
    /* Registers */
    enum
    {
      REG_FREQ_A_LO = 0,
      REG_FREQ_A_HI,
      REG_FREQ_B_LO,
      REG_FREQ_B_HI,
      REG_FREQ_C_LO,
      REG_FREQ_C_HI,
      
      REG_FREQ_NOISE,
      REG_IO_MIXER,
      
      REG_LVL_A,
      REG_LVL_B,
      REG_LVL_C,
      
      REG_FREQ_ENV_LO,
      REG_FREQ_ENV_HI,
      REG_ENV_SHAPE,
      
      REG_IOA,
      REG_IOB
    };
    
    
    void write_2149_reg(uint8_t reg, uint8_t value)
    {
      setup_data(ADDRESS);
      SetData(reg & 0x0F);
      set_control(ADDRESS);
      delayMicroseconds(3);
      set_control(INACTIVE);
    
      delayMicroseconds(1);
      setup_data(WRITE);
      SetData(value);
      delayMicroseconds(1);
        
      set_control(WRITE);
      
      delayMicroseconds(5);
      
      set_control(INACTIVE);
      PORTD = 0;
      //setup_data(INACTIVE);
    }
    
    uint8_t read_2149_reg(uint8_t reg)
    {
      uint8_t ret = 0;
    
      return ret;
    }
    
    char regs[14];
    int j;
    
    void setup()
    {
      setup_clock();
      setup_control();
      setup_data(INACTIVE);
     
      Serial.begin(115200);
      // Be sure to kill all possible sound by setting volume to zero
      write_2149_reg(REG_LVL_A, B00000000);
      write_2149_reg(REG_LVL_B, B00000000);
      write_2149_reg(REG_LVL_C, B00000000);
      j = 0;
    
      Serial.println("init");
      delay(500);
      Serial.println("test");
      write_2149_reg(REG_LVL_A, B00001111);
      write_2149_reg(REG_FREQ_A_HI, B00000010);
      delay(250);
      write_2149_reg(REG_FREQ_A_HI, B00000001);
      delay(250);
      write_2149_reg(REG_FREQ_A_HI, B00000100);
      delay(250);
      write_2149_reg(REG_FREQ_A_HI, B00000110);
      delay(500);
      Serial.println("ALL OFF");
      write_2149_reg(REG_LVL_A, B00000000);
      write_2149_reg(REG_LVL_B, B00000000);
      write_2149_reg(REG_LVL_C, B00000000);
      
    }
    
    void loop()
    {
      int i;
      while (Serial.readBytes(regs, 14) != 14);
      for(i = 0; i < 14; i++)
      {
        write_2149_reg(i, regs[i]);
      }
    }
  • 2
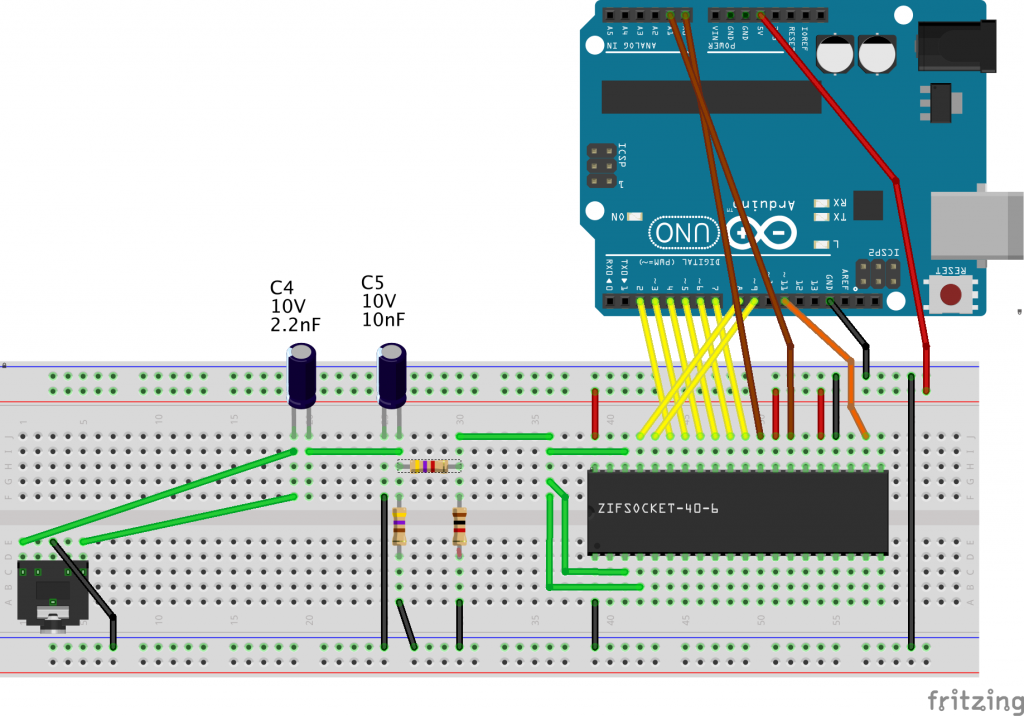
    Breadboard Arduino Test

    Wire hardware as follows, note that C5 was omitted and bypassed in testing and sample recordings.

    Image Source (986-studio.com)

View all instructions

Enjoy this project?

Share

Discussions

Similar Projects

Does this project spark your interest?

Become a member to follow this project and never miss any updates