-
Adding a webpage for quick viewing
04/25/2021 at 00:23 • 0 commentsI created (or rather modified one I did for the DHT22 sensor readings) for seeing the latest an recent history of readings. It's ment to be placed within the parent directory of the php and logfiles directories. It still needs to be cleaned up a bit but it works:
<?php $avg_temp=0; $avg_humidity=0; $avg_temp2=0; $avg_humidity2=0; $count = 0; $csv_array=[]; $file1 = '/var/www/html/sensorlogging/logfiles/rsensor_ds18b20_d.csv'; $totallines =intval(exec('wc -l '.escapeshellarg($file1) . ' 2>/dev/null')); $file2 ='/var/www/html/sensorlogging/logfiles/rsensor_dht22_e_1.csv'; $totallines2 = intval(exec('wc -l '.escapeshellarg($file2) . ' 2>/dev/null')); if ($totallines >= 40){ if (($csv = new SplFileObject('logfiles/rsensor_ds18b20_d.csv', 'r')) !== FALSE){ $csv->seek(PHP_INT_MAX); $last_line=$csv->key(); $lines = new LimitIterator($csv,$last_line - 40,$last_line); $csv = null; $count = 0; //print_r(iterator_to_array($lines)); $lines_array = iterator_to_array($lines); $lines_array = array_values($lines_array); $csv_lines_parsed=[]; while($count < 40){ $scv_lines_parsed[]=str_getcsv($lines_array[$count],','); $count++; } //echo "<pre>"; //var_dump($scv_lines_parsed); //echo "</pre>"; $count =20; echo '<!DOCTYPE html>' . "\r\n"; echo '<html>' . "\r\n"; echo '<head>' . "\r\n"; echo '<link href="main.css" rel="stylesheet" type="text/css">' . "\r\n"; echo '</head>' . "\r\n"; echo '<body>' . "\r\n"; echo '<table><caption>DS18b20 remote sensors last 20 readings</caption>' . "\r\n"; echo '<tr><th>date</th><th>time</th><th>Attic temp</th><th>Indoor temp</th></tr>' . "\r\n"; while($count < 40){ echo '<tr>'; echo '<td>' . print_r($scv_lines_parsed[$count][0], true) . '</td>'; echo '<td>' . print_r($scv_lines_parsed[$count][1], true) . '</td>'; echo '<td>' . print_r($scv_lines_parsed[$count][2], true) . '</td>'; echo '<td>' . print_r($scv_lines_parsed[$count][3], true) . '</td></tr>' . "\r\n"; $count++; } echo '</table>' . '<br>' ."\r\n"; $count = 0; while($count < 40){ $avg_temp=$avg_temp+floatval($scv_lines_parsed[$count][3]); $avg_humidity=$avg_humidity+floatval($scv_lines_parsed[$count][2]); $count++; } $avg_temp=$avg_temp/40; $avg_humidity=$avg_humidity/40; echo '<table><caption>10 minute average</caption>' . "\r\n"; echo '<tr><th>Attic temp</th><th>Indoor temp</th></tr>' . "\r\n"; echo '<tr><td>' . $avg_humidity . '</td><td>' . $avg_temp . '</td></tr></table>'; //echo $avg_humidity . ',' . $avg_temp; echo '</body>' . "\r\n"; echo '</html>' . "\r\n"; } } else { echo "Not enough data yet to generate stats, please try again later."; } ?> -
Overall I haven't been too satisfied with DHT22 sensors, looking for a better alternative
04/10/2021 at 03:02 • 0 commentsIn my testing with two sensors side by side, I would get humidity readings that differed a bit(one reading at 58% rh and the other reading 71% rh.) Temperature readings were at least a bit more consistent. I'm looking at a few options. Looking for something that instills a bit more confidence without being too expensive.
-
More improvement and addition of an indoor sensor
04/09/2021 at 13:59 • 0 commentsI discovered that my catch all exception handling had a very nasty side-effect: inability the stop the script from running with Ctrl+C. In fact the way I was able to get it to stop was to upload an empty main.py and reboot it. I did a bit of searching and asked on the MicroPython forum about specifically catching OneWire exceptions and someone provided a working solution: "except onewire.OneWireError:"
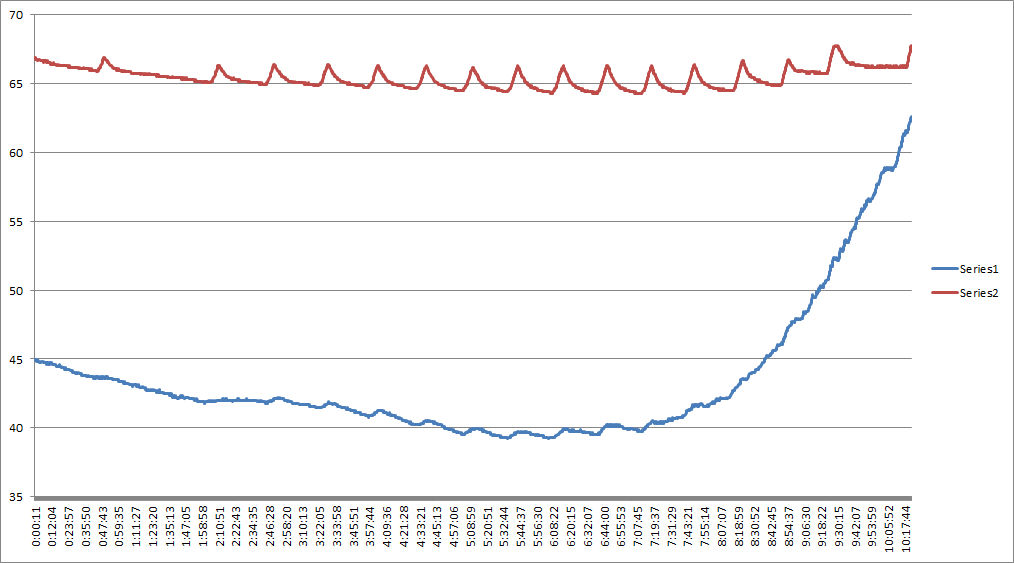
I've since added another DS18B20+ on a separate I/O pin to monitor the indoor temperature. I've added an additional field that calculates the difference between indoor/outdoor, but I may remove that in the future as that can of course be calculated in a spreadsheet program. An interesting thing about monitoring the temperature inside is that one can see when HVAC is running by observing the sawtooth pattern in the graph below generated by the temperature reading logs(red line is indoor temperature, blue is the attic temperature.) -
Improving uptime on the ESP8266 side of things
03/27/2021 at 19:06 • 0 commentsThe script for taking readings from the DS18B20 temperature sensor can run fine for some months but once in a blue moon a read fails for some reason (not sure if it's an issue with MicroPython, the ESP8266 itself, or something else) an exception is thrown and everything comes to a halt. To deal with such annoyances, I put just about everything else in a try statement to allow the script to continue running when one of those read failures occurs. I simulated a read failure by disconnecting the DS18B20, then plugged it back in and it resumed taking readings. I didn't put the roms = ds.scan() line in the loop, so if that fails an exception will be thrown that's not handled when the script is initially started but that's almost certain to be noticed when first starting the script up. It could be an issue if it fails after starting up again after a reboot, so I might decide later on to put in in the loop.
def go(): import time import machine import urequests import network import onewire, ds18x20 sta_if = network.WLAN(network.STA_IF) dat = machine.Pin(12) ds = ds18x20.DS18X20(onewire.OneWire(dat)) roms = ds.scan() time.sleep(2) def send_data(): url = 'http://[server ip address here]/sensorlogging/php/rsensor_ds18b20.php' headerd = {'Content-Type': 'application/x-www-form-urlencoded'} jsons = "data=" + str(ds18b20temp_f) if sta_if.isconnected() == True: try: r = urequests.post(url, data=jsons, headers= headerd) r.close() except OSError: pass while True: try: ds.convert_temp() time.sleep(15) ds18b20temp_c=ds.read_temp(roms[0]) ds18b20temp_f=ds18b20temp_c * 9.0/5.0 +32 send_data() except: pass -
Taking temperature readings in the attic
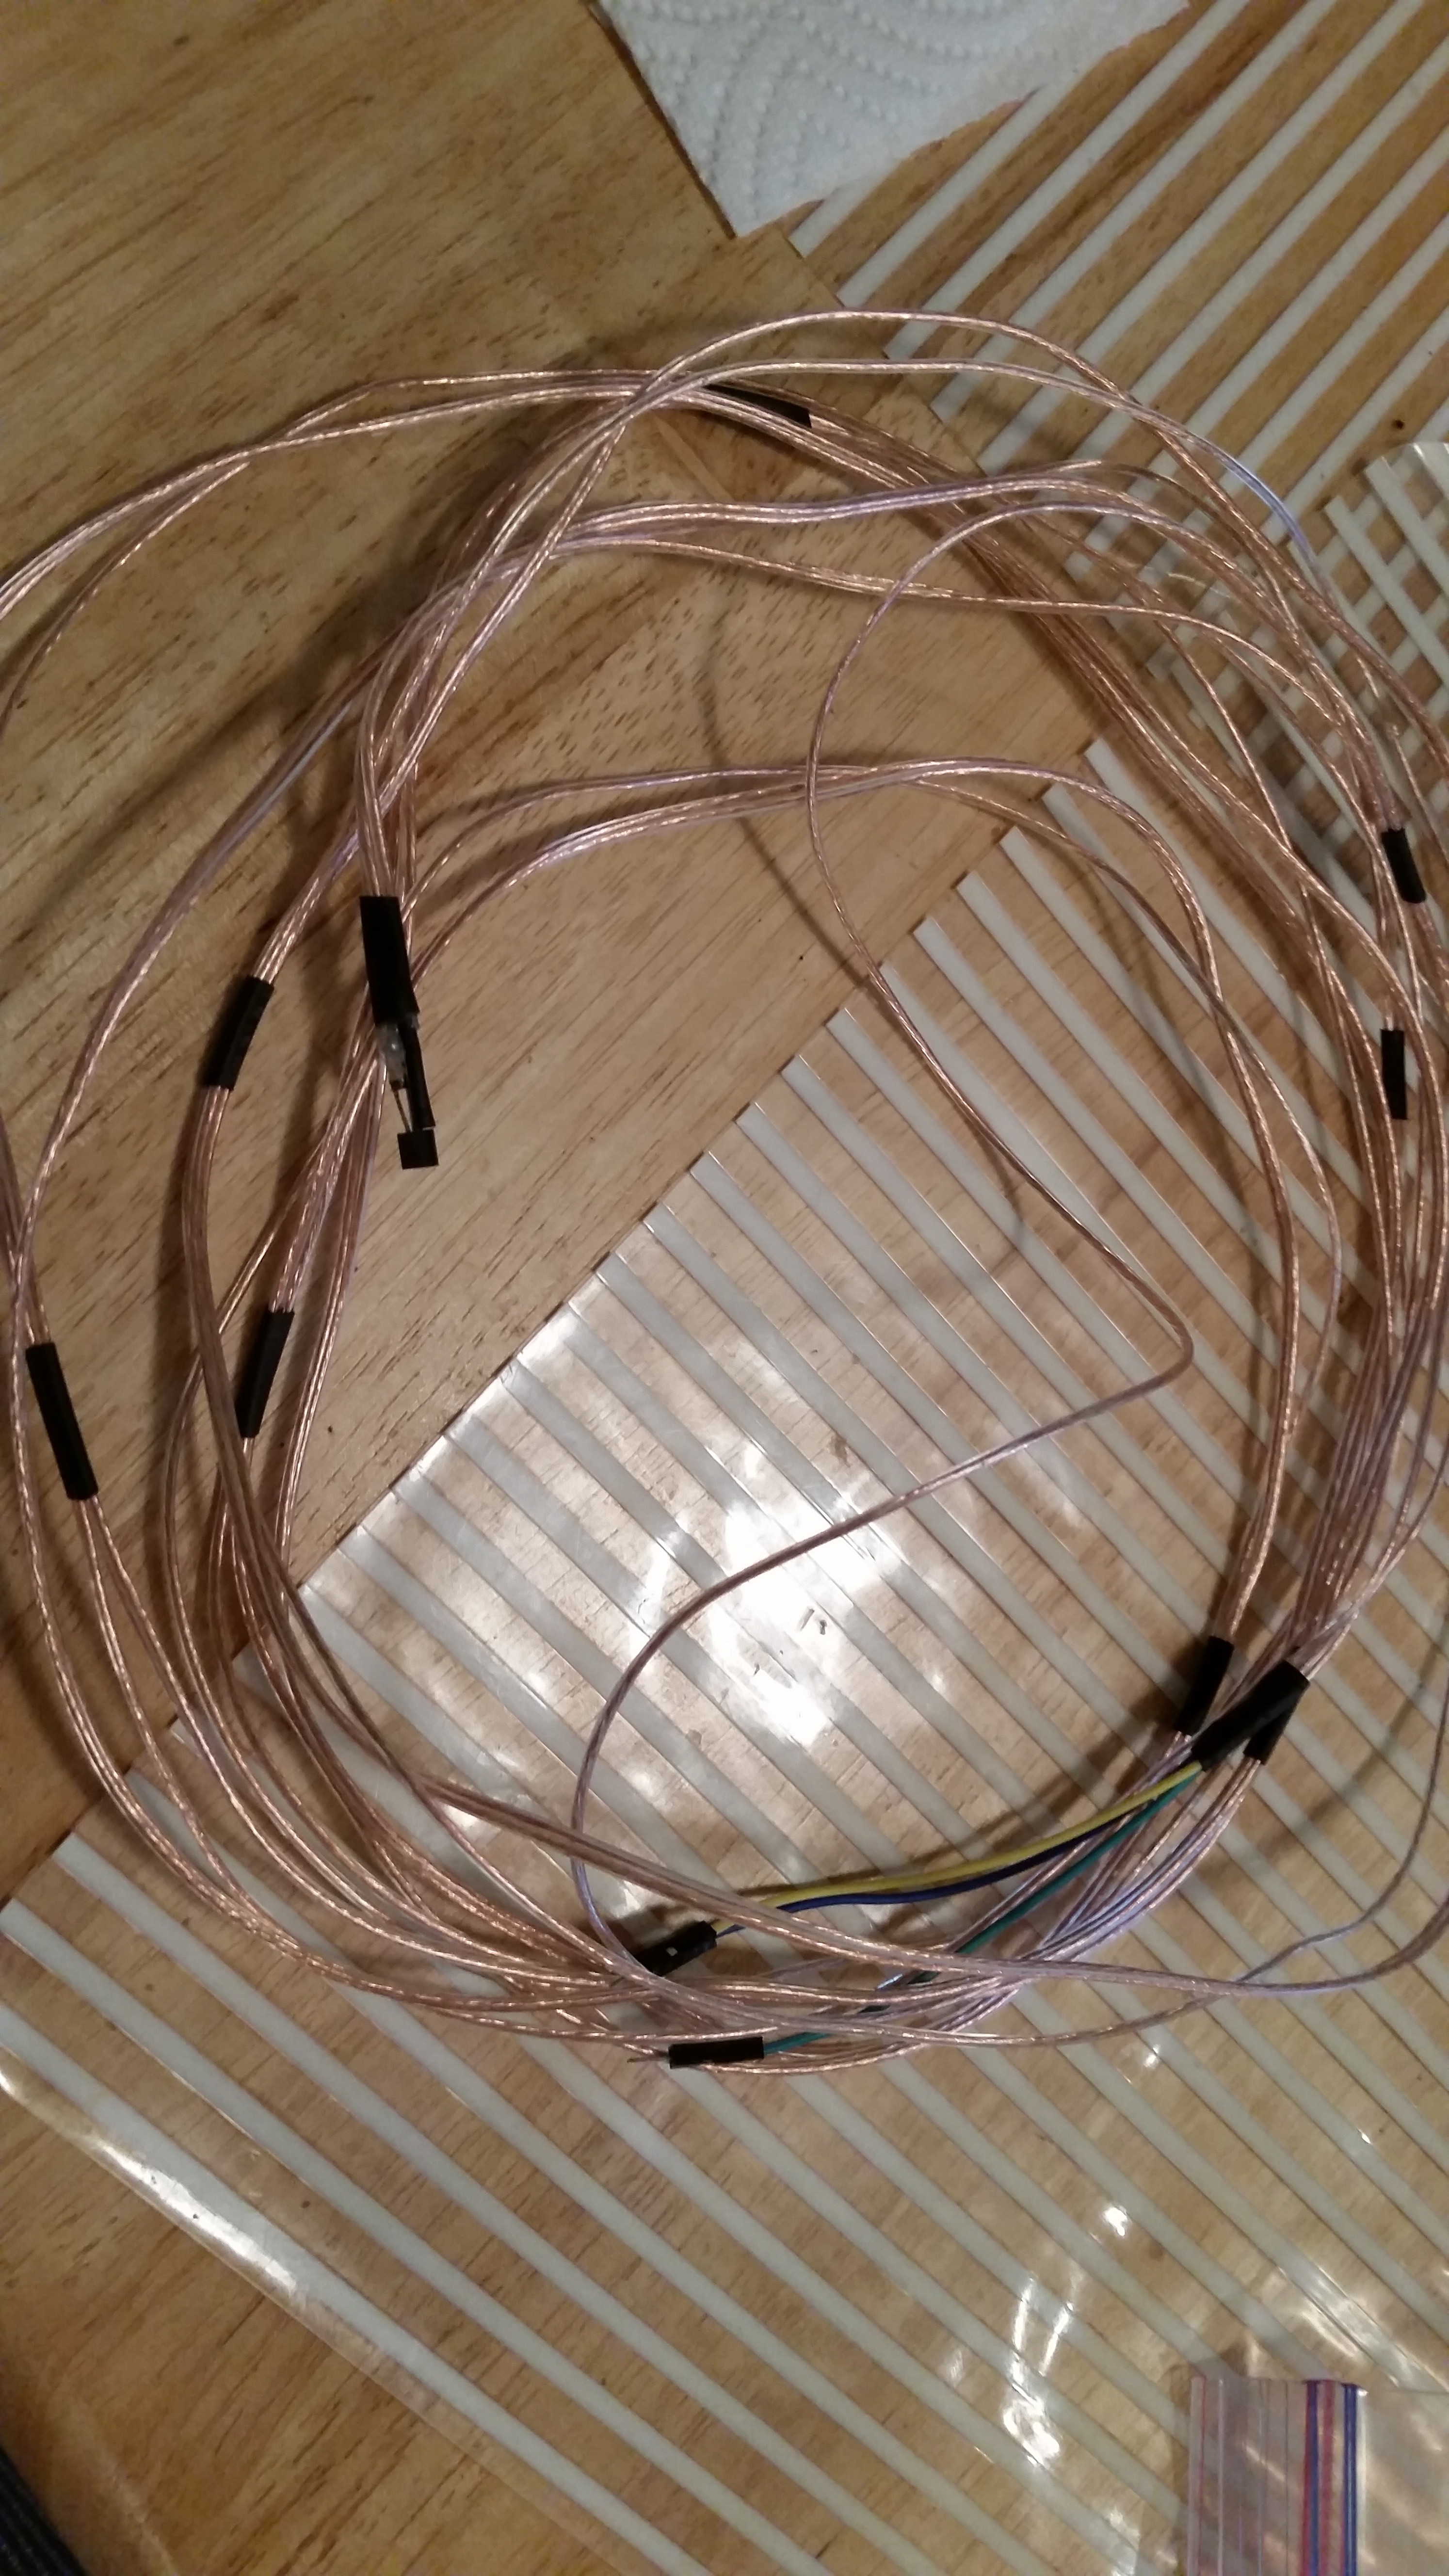
07/22/2020 at 13:44 • 0 commentsWith this current heat wave I was curious to find out just how hot my attic gets. I had some DS18B20 1-wire temp sensors on hand so I set out to create a cable for it. and connect it to an ESP8266 D1 board I started off using some speaker cable and made up a three conductor cable. I was tempted to try going with parasitic power which would have only required 2 conductors (and thus save me the trouble of having the split a 2 conductor speaker cable to get that third conductor) but I've read it's not reliable for any runs of considerable length. I used some heat-shrink tubing at intervals to help keep things somewhat neat. For end connectors, I simply cannibalized some jumper wires.
![]()
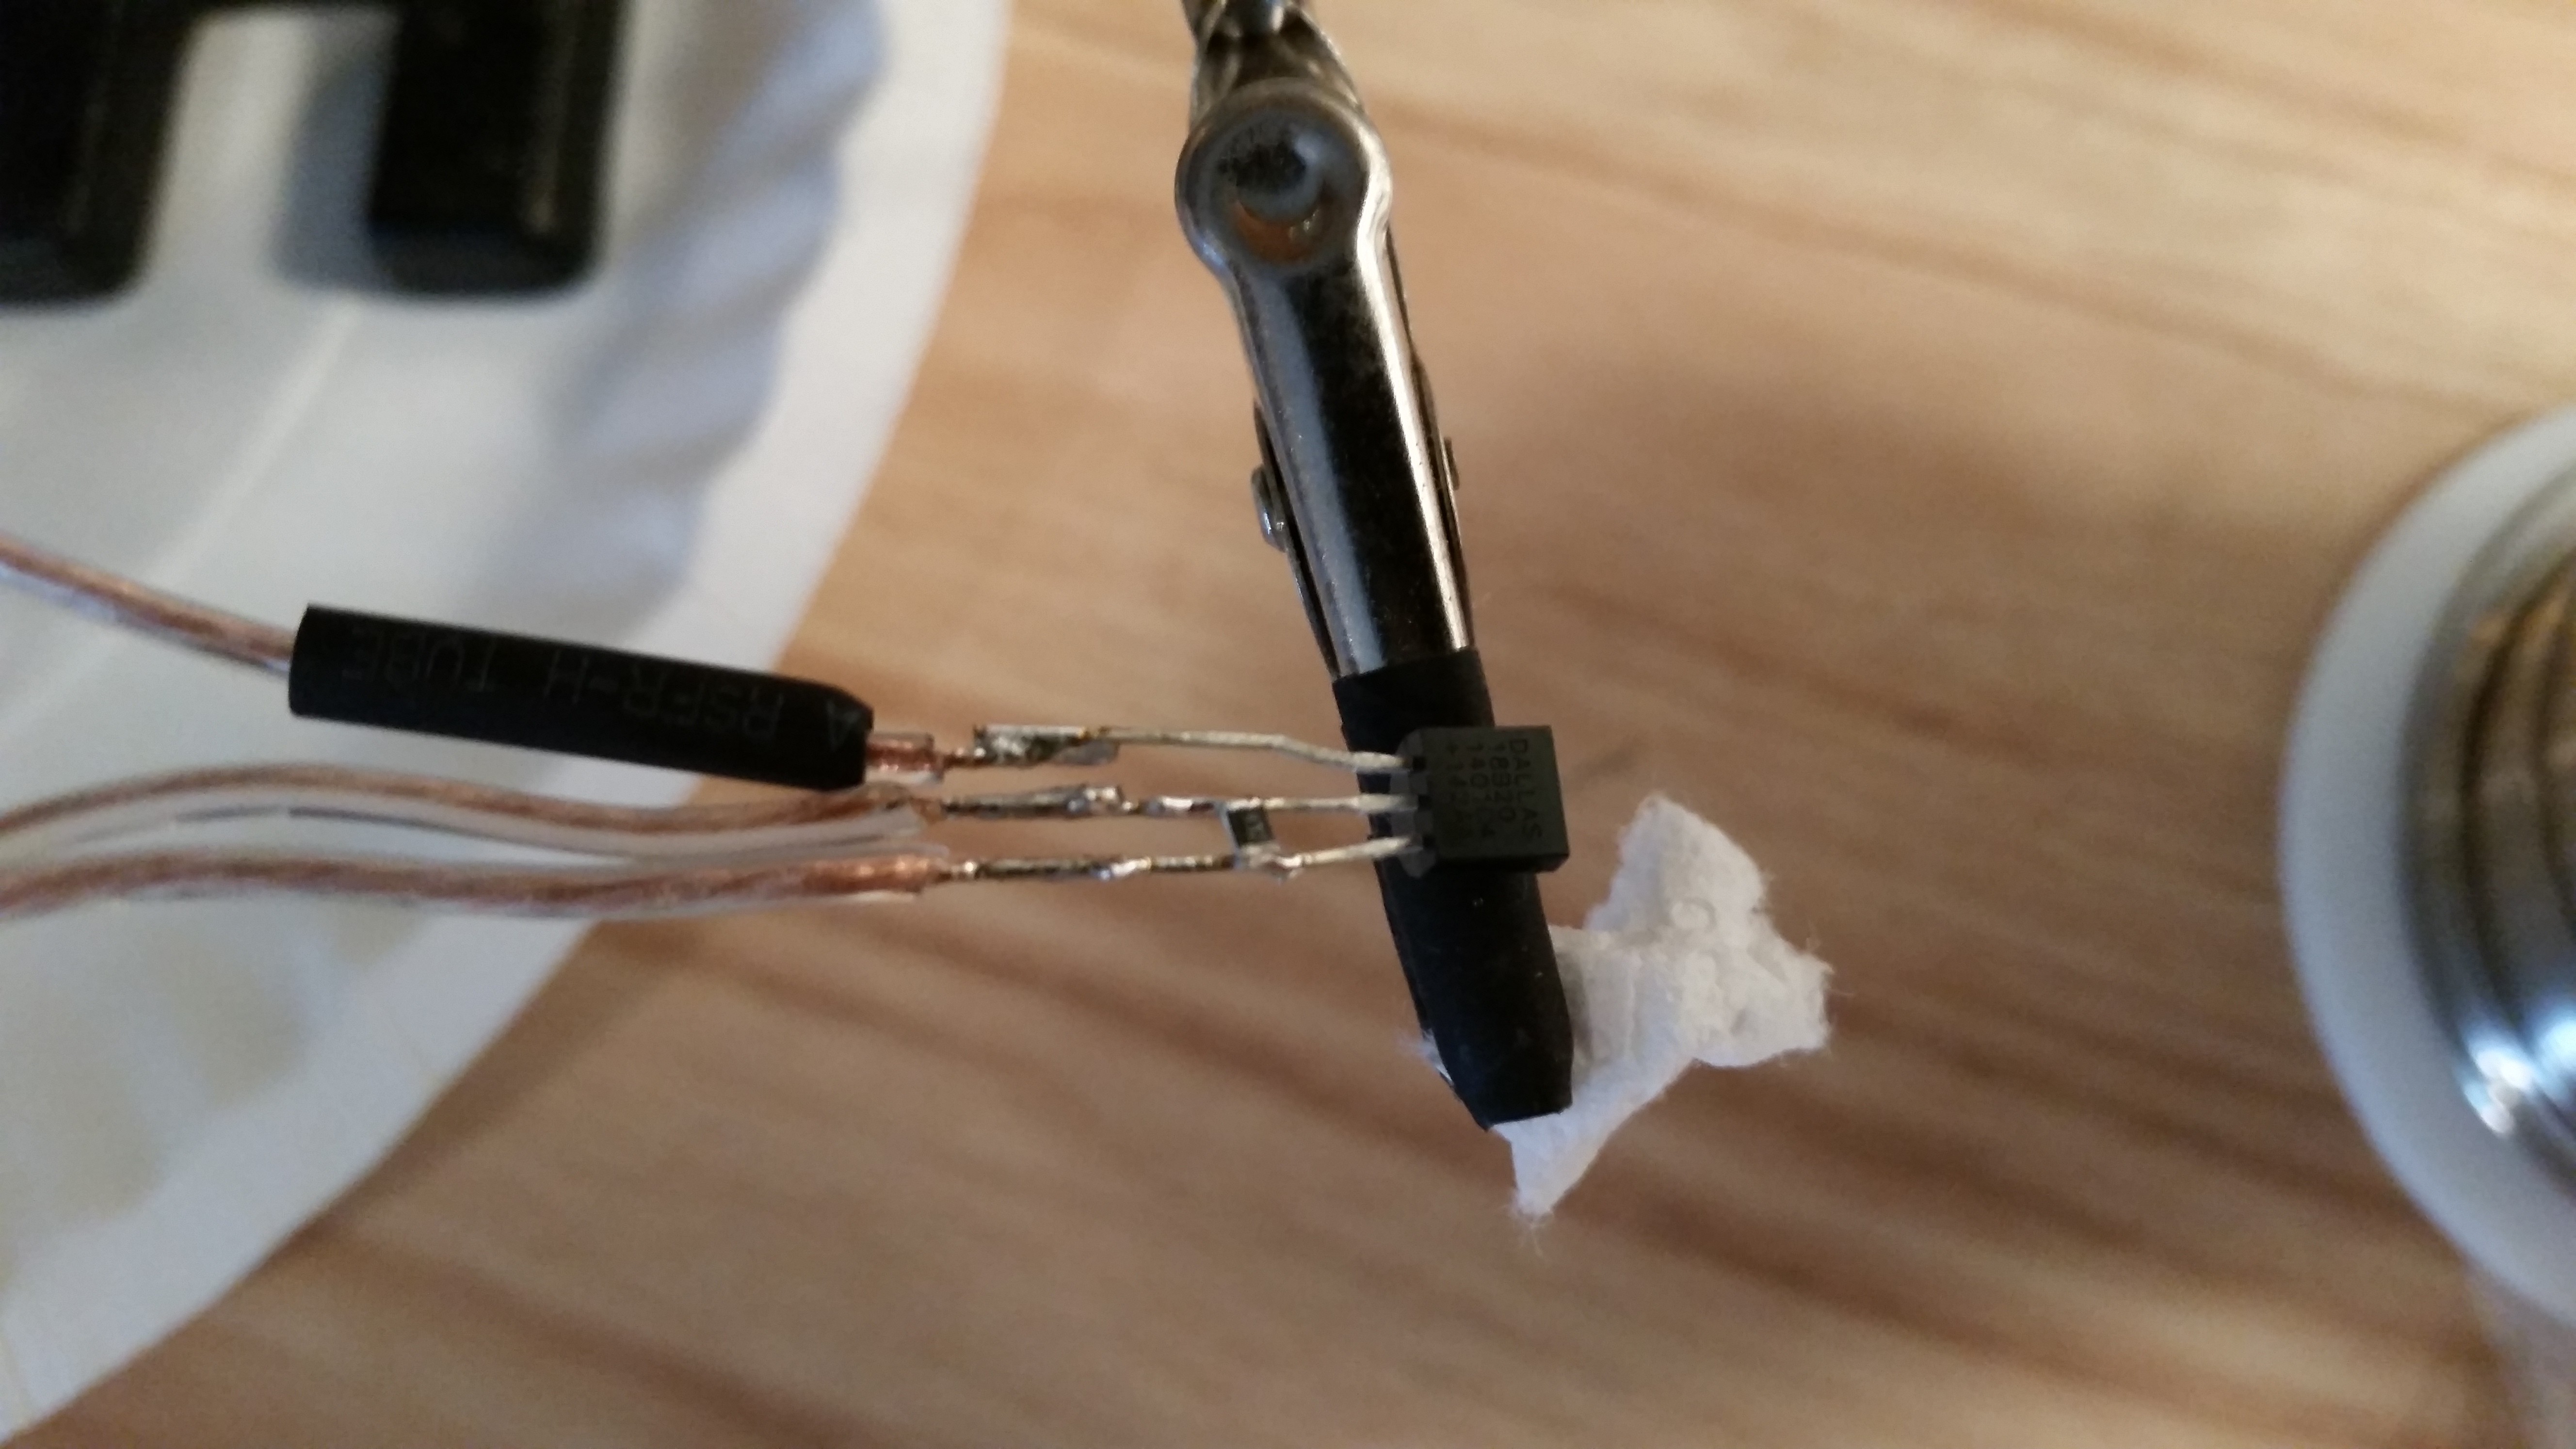
For the pull-up resistor between the VCC and data pin I tried to place a thru-hole resistor on the sensor leads but it was simply too big to fit nicely. I ended up soldering an 0805 4.7K resistor on the sensor leads that fitted rather nicely.
![]()
An in all the cable was around 4M in length. I've read that cable length can be up to 20M, although the pull-up resistor value may need to be lowered.
So why did I go to the effort to make a cable of considerable length? I could have simply stuck everything up in the attic. I didn't want to subject the ESP8266 board and it's wall-wart to the the rather harsh conditions in the attic. While according to the ESP8266 datasheet it can easily withstand it, I'm doubtful other components on the board are as quite as robust. I'm sure the wall wart would like it much either. So I figured why subject all of those things to the harsh attic environment, if I don't have to?
On to the coding side of things. I first created the python file for the ESP8266:
def go():
	import time
	import machine
	import urequests
	import network
	import onewire, ds18x20
	sta_if = network.WLAN(network.STA_IF)


	dat = machine.Pin(12)
	ds = ds18x20.DS18x20(onewire.OneWire((dat))
	roms = ds.scan()

	time.sleep(2)


	def send_data():
		url = 'http://[webserver ip address here]/sensorlogging/php/rsensor_ds18b20.php'
		headerd = {'Content-Type': 'application/x-www-form-urlencoded'}
		jsons = "data=" + str(ds18b20temp_f)
		if sta_if.isconnected() == True:
			try:
				r = urequests.post(url, data=jsons, headers= headerd)
				r.close()
			except OSError:
				pass
	while True:
		ds.convert_temp()
		time.sleep(15)
		ds18b20temp_c=ds.read_temp(roms[1])
		ds18b20temp_f=ds18b20temp_c * 9.0/5.0 +32
		send_data()
Then I made up the php file on the server side(rsensor_ds18b20.php):
<?php
if($_POST){


$statefile = fopen("../logfiles/rsensor_ds18b20.txt", "r");
if (flock($statefile,LOCK_SH)){
	$edstatus = fgets($statefile);
	flock($statefile,LOCK_UN);
}
fclose($statefile);
if($edstatus =="enable"){

//date_default_timezone_set("UTC");
date_default_timezone_set("America/New_York");
$data = $_POST['data'];
$datfile = fopen("../logfiles/rsensor_ds18b20.csv", "a+");
if (flock($datfile,LOCK_EX)){
	//fwrite($datfile, $data . "," . $data2 . "," . date("H:i:s") ."\n");
	//fwrite($datfile, $data . "," . $data2 . "," . date("H:i:s") . "," . date("Y-m-d") ."\n");
	fwrite($datfile, date("Y-m-d") . "," . date("H:i:s") . "," . $data  . "\n");
	flock($datfile,LOCK_UN);
	}
fclose($datfile);
}
$statusfile = '../logfiles/rsensor_ds18b20.csv';
$filesize = filesize($statusfile);
if($filesize >= 2097152){
rename($statusfile,'../logfiles/rsensor_ds18b20_' . date("Y-m-d-H-i-s") . '.csv');


}


}

?>
The enable file (rsensor_ds18b20.txt):
enableI ran the commands to run the python file on:
import esp8266_1_wire_ds
esp8266_1_wire_ds.go()
Everything worked fine after correcting a few stupid mistakes. I haven't created/modified a php page for viewing it on a browser yet.
-
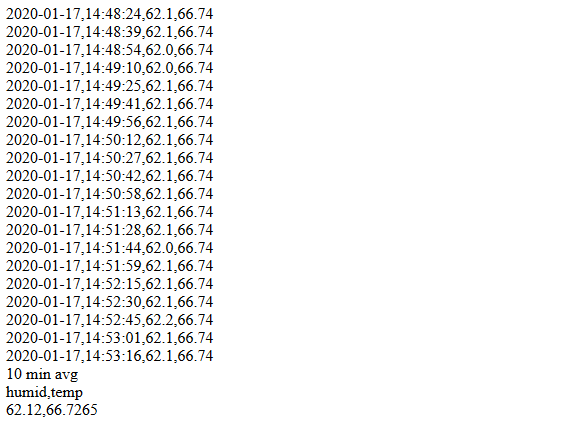
Tidying things up a bit
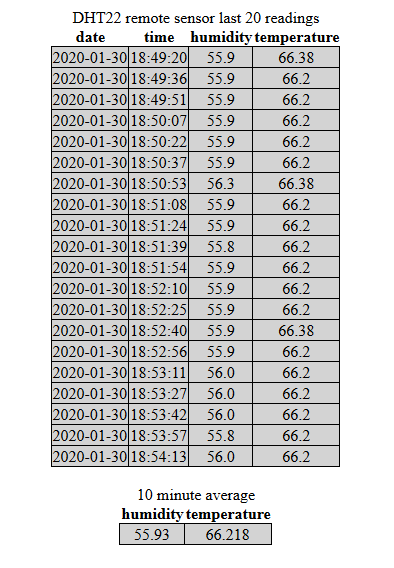
01/31/2020 at 00:05 • 0 commentsI did some improvements to the code for generating the last 20 readings and a running 10 minute average on a webpage. Of course work on improving things is never done. I"m probably now going to work on improving reliability of the connection between the ESP8266 D1 board and the DHT22 sensor. Occasionally Micropython throws an error when trying to run the routine to read data off of the sensor. The problem appears to be with the jumpers that connect the two devices. Maybe I need something above the really cheapo jumpers.
Anyways he's a screenshot of the web page and the code for index.php (and the main.css page)
![]()
index.php
<?php


$avg_temp=0;
$avg_humidity=0;

$count = 0;
$csv_array=[];

$file2 = '/var/www/html/sensorlogging/logfiles/rsensor_dht22.csv';
$totallines =intval(exec('wc -l '.escapeshellarg($file2) . ' 2>/dev/null'));

if ($totallines >= 40){
if (($csv = new SplFileObject('logfiles/rsensor_dht22.csv', 'r')) !== FALSE){

$csv->seek(PHP_INT_MAX);
$last_line=$csv->key();

$lines = new LimitIterator($csv,$last_line - 40,$last_line);
$csv = null;
$count = 0;
//print_r(iterator_to_array($lines));
$lines_array = iterator_to_array($lines);
$lines_array = array_values($lines_array);

$csv_lines_parsed=[];
while($count < 40){
$scv_lines_parsed[]=str_getcsv($lines_array[$count],',');
$count++;

}

//echo "<pre>";
//var_dump($scv_lines_parsed);
//echo "</pre>";


$count =20;
echo '<!DOCTYPE html>' . "\r\n";
echo '<html>' . "\r\n";
echo '<head>' . "\r\n";
echo '<link href="main.css" rel="stylesheet" type="text/css">' . "\r\n";
echo '</head>' . "\r\n";
echo '<body>' . "\r\n";

echo '<table><caption>DHT22 remote sensor last 20 readings</caption>' . "\r\n";
echo '<tr><th>date</th><th>time</th><th>humidity</th><th>temperature</th></tr>' . "\r\n";

while($count < 40){
echo '<tr>';
echo '<td>' . print_r($scv_lines_parsed[$count][0], true) . '</td>';
echo '<td>' . print_r($scv_lines_parsed[$count][1], true) . '</td>';
echo '<td>' . print_r($scv_lines_parsed[$count][2], true) . '</td>';
echo '<td>' . print_r($scv_lines_parsed[$count][3], true) . '</td></tr>' . "\r\n";
$count++;
}

echo '</table>' . '<br>' ."\r\n";

$count = 0;
while($count < 40){
$avg_temp=$avg_temp+floatval($scv_lines_parsed[$count][3]);
$avg_humidity=$avg_humidity+floatval($scv_lines_parsed[$count][2]);
$count++;
}
$avg_temp=$avg_temp/40;
$avg_humidity=$avg_humidity/40;


echo '<table><caption>10 minute average</caption>' . "\r\n";
echo '<tr><th>humidity</th><th>temperature</th></tr>' . "\r\n";
echo '<tr><td>' . $avg_humidity . '</td><td>' . $avg_temp . '</td></tr></table>';


//echo $avg_humidity . ',' . $avg_temp;

echo '</body>' . "\r\n";
echo '</html>' . "\r\n";

}
}

else {
echo "Not enough data yet to generate stats, please try again later.";

}

?>
main.css
table { border-collapse: collapse; background-color: lightgray; margin-left: auto; margin-right: auto; } td { text-align: center; border: 1px solid black; } th { border:none; background-color: white; } -
A bit more progress on the web server side of things
01/19/2020 at 04:32 • 0 commentsI decided to work on a web front-end for displaying summary information and the last few readings. I wanted to make a running 10 min or so average of the temperature and humidity readings. It ended up a little bit involved but I got it functional, the php code still need a few tweaks. It needs a bit more prettying up with some proper html and some css thrown in. Below is a sample of the output (again not very pretty yet.):
![]()
And of course the underlying php code:
<?php


$avg_temp=0;
$avg_humidity=0;

$count = 0;
$csv_array=[];

if (($csv = new SplFileObject('logfiles/rsensor_dht22.csv', 'r')) !== FALSE){

$csv->seek(PHP_INT_MAX);
$last_line=$csv->key();

$lines = new LimitIterator($csv,$last_line - 40,$last_line);
$csv = null;
$count = 0;
//print_r(iterator_to_array($lines));
$lines_array = iterator_to_array($lines);
$lines_array = array_values($lines_array);

$csv_lines_parsed=[];
while($count < 40){
$scv_lines_parsed[]=str_getcsv($lines_array[$count],',');
$count++;

}

//echo "<pre>";
//var_dump($scv_lines_parsed);
//echo "</pre>";


$count =20;

while($count < 40){
echo print_r($scv_lines_parsed[$count][0], true) . ',';
echo print_r($scv_lines_parsed[$count][1], true) . ',';
echo print_r($scv_lines_parsed[$count][2], true) . ',';
echo print_r($scv_lines_parsed[$count][3], true) .'<br />';
$count++;
}


$count = 0;
while($count < 40){
$avg_temp=$avg_temp+floatval($scv_lines_parsed[$count][3]);
$avg_humidity=$avg_humidity+floatval($scv_lines_parsed[$count][2]);
$count++;
}
echo '10 min avg' . '<br />';
echo 'humid,temp <br />';
$avg_temp=$avg_temp/40;
$avg_humidity=$avg_humidity/40;

echo $avg_humidity . ',' . $avg_temp;
}
?>
On the back-end of things I also modified rsensor_dht22.php to create a new temp/humidity log file when the current one gets around 2MB as the file can get incredibly long over time.
<?php if($_POST){ $statefile = fopen("../logfiles/rsensor_dht22.txt", "r"); if (flock($statefile,LOCK_SH)){ $edstatus = fgets($statefile); flock($statefile,LOCK_UN); } fclose($statefile); if($edstatus =="enable"){ //date_default_timezone_set("UTC"); date_default_timezone_set("America/New_York"); $data = $_POST['data']; $data2 = $_POST['data2']; $datfile = fopen("../logfiles/rsensor_dht22.csv", "a+"); if (flock($datfile,LOCK_EX)){ //fwrite($datfile, $data . "," . $data2 . "," . date("H:i:s") ."\n"); //fwrite($datfile, $data . "," . $data2 . "," . date("H:i:s") . "," . date("Y-m-d") ."\n"); fwrite($datfile, date("Y-m-d") . "," . date("H:i:s") . "," . $data . "," . $data2 . "\n"); flock($datfile,LOCK_UN); } fclose($datfile); } $statusfile = '../logfiles/rsensor_dht22.csv'; $filesize = filesize($statusfile); if($filesize >= 2097152){ rename($statusfile,'../logfiles/rsensor_dht22_' . date("Y-m-d-H-i-s") . '.csv'); } } ?> -
Troubleshooting the D1 WeMos ESP8266 board
01/06/2020 at 22:52 • 0 commentsA strange issue I noticed was whenever I hit the reset button on the board, I couldn't send any characters to the EP8266 over the serial REPL interface. I probed the TX pin on the CH340 (usb to serial chip)/RX pin of the ESP8266 with a multimeter and saw nothing on voltage and frequency settings. A few days later, I got a cheap logic analyzer as a gift and installed Sigrok and used it to further confirm the lack of any activity.
At this point, I though that it's either the ESP8266 module or the CH340 chip. There were two 470 ohm series resisters between the two parts so what I did I remove them which allowed me to hook up another usb-to-serial converter to the ESP8266. The issue persisted. I started to blame the ESP8266 but there was a vital clue something else was amiss. On my usb-to-serial converter there's an activity LED light when there's activity and it wasn't lighting up at all. Could it be the fact that nothing is being sent to the usb-to-serial converter chip in the first place? I restarted my terminal program PuTTY, and everything was working again! I used another terminal program, hit the reset button, and it was still working fine.
I'm not sure why hitting reset on the board would cause PuTTY not to send characters. It was an odd twist for sure.
-
Connecting to the Raspberry Pi via the Pi's wifi interface
12/19/2019 at 17:27 • 0 commentsThis morning I've been working on getting my ESP8266 to connect to my Raspberry Pi's wifi interface. Why would one want to do that? For scenarios in which one wants to log some data, but the location doesn't have an Internet connection.
The first thing I did was to get my Pi configured as a wireless access point (AP.) I followed the instructions here, but I didn't do the NAT instructions. NOTE: At the time of this writing, there seems to be no way to set the AP to auto select a channel (you can't set it to 0 for auto scan or it will fail.)
Before one reconfigures the ESP8266 board to use the pi's wifi, a few things should be done while it's connected to our normal network. The first thing is to create a new pyhton file (esp8266_piwifi_dht22.py), copy over the contents of the current python file (esp8266_dht22.py), and change the IP address to match the IP address that one assigned to the wlan0 interface of the Pi (in my case it was 192.168.19.1.) The new file should then be uploaded to the board.
Now would be a great idea to set up the ESP8266 to run our script at boot. we can do that by creating a main.py file and add the following lines:
import esp8266_piwifi_dht22
esp8266_piwifi_dht22.go()
Save it and upload it to the board. Now it's time to reconfigure the ESP8266 board to use the pi's wifi. The instructions can be found here.
At this point one should be able to disconnect the Ethernet cable from the Pi,reboot the ESP8266 board, and it all should work. You can connect a PC/laptop/tablet to the Pi via wifi, log in via SSH, and be able to see updated readings in the .csv file. There is one glaring issue though. The Raspberry Pi does not have a mealtime clock (RTC) so the time won't be accurate unless one manually sets the time/date after it's setup or add an RTC module.
So now how does one access the WebREPL interface on the ESP8266 board to make changes? There's a few ways to to about it. One way is by connecting the Pi back to the normal network, enable IPv4 forwarding, and adding a static route on normal router to point to the Pi. The IP address of the ESP8266 board would also need to be discovered. This can be discovered by running this command on the PI:
cat /var/lib/misc/dnsmasq.leasesIf one doesn't want to/is unable to create a static route on the normal router, another option is to use SSH port forwarding. If you're using PuTTY as your ssh client you need to expand the SSH category and click on tunnels. In the source port field put 8266. In the destination field put the IP address for your ESP8266 and add ":8266" to the end. Select IPV4 radio button then click add. On the WebREPL page enter "ws://127.0.0.1:8266" and connect.
A third way (and a way that doesn't require the Pi to be connected to our normal network) is to connect to the Pi over wifi. For this method, you need to already have downloaded a copy of the WebREPL client files to begin with.
Remote environmental logging
simple way to log temperature, humidity, etc. with the help of one or more ESP8266 boards