-
Log #15 New Joystick PCB testing.
10/05/2020 at 13:14 • 0 commentsIn Log #12, I shows the latest updates to my BluJoy Hoverboard controller. After the initial tests using the HM-11 Bluetooth interface, I decided to try using the newer HM-19 module that supports Bluetooth 5.0 BLE.
Suffice it to say this was not a very satisfying experience. Yes, it did cut the power demand on the controller battery, but it was fraught with other issues. Despite being touted as fully compatible with the HM-11, it had several very key differences in the AT command structure which caused no end of problems with my code, and the reliability of my hoverboard control strategy.
Simple areas where they could have maintained backward compatibility, they did not. Such things as changing the codes for Baud rate selection, and minor changes in the wording of responses.
So... I am currently sticking with the HM-11 which seems to do a fine job of wirelessly transmitting joystick commands to the Hoverboard.
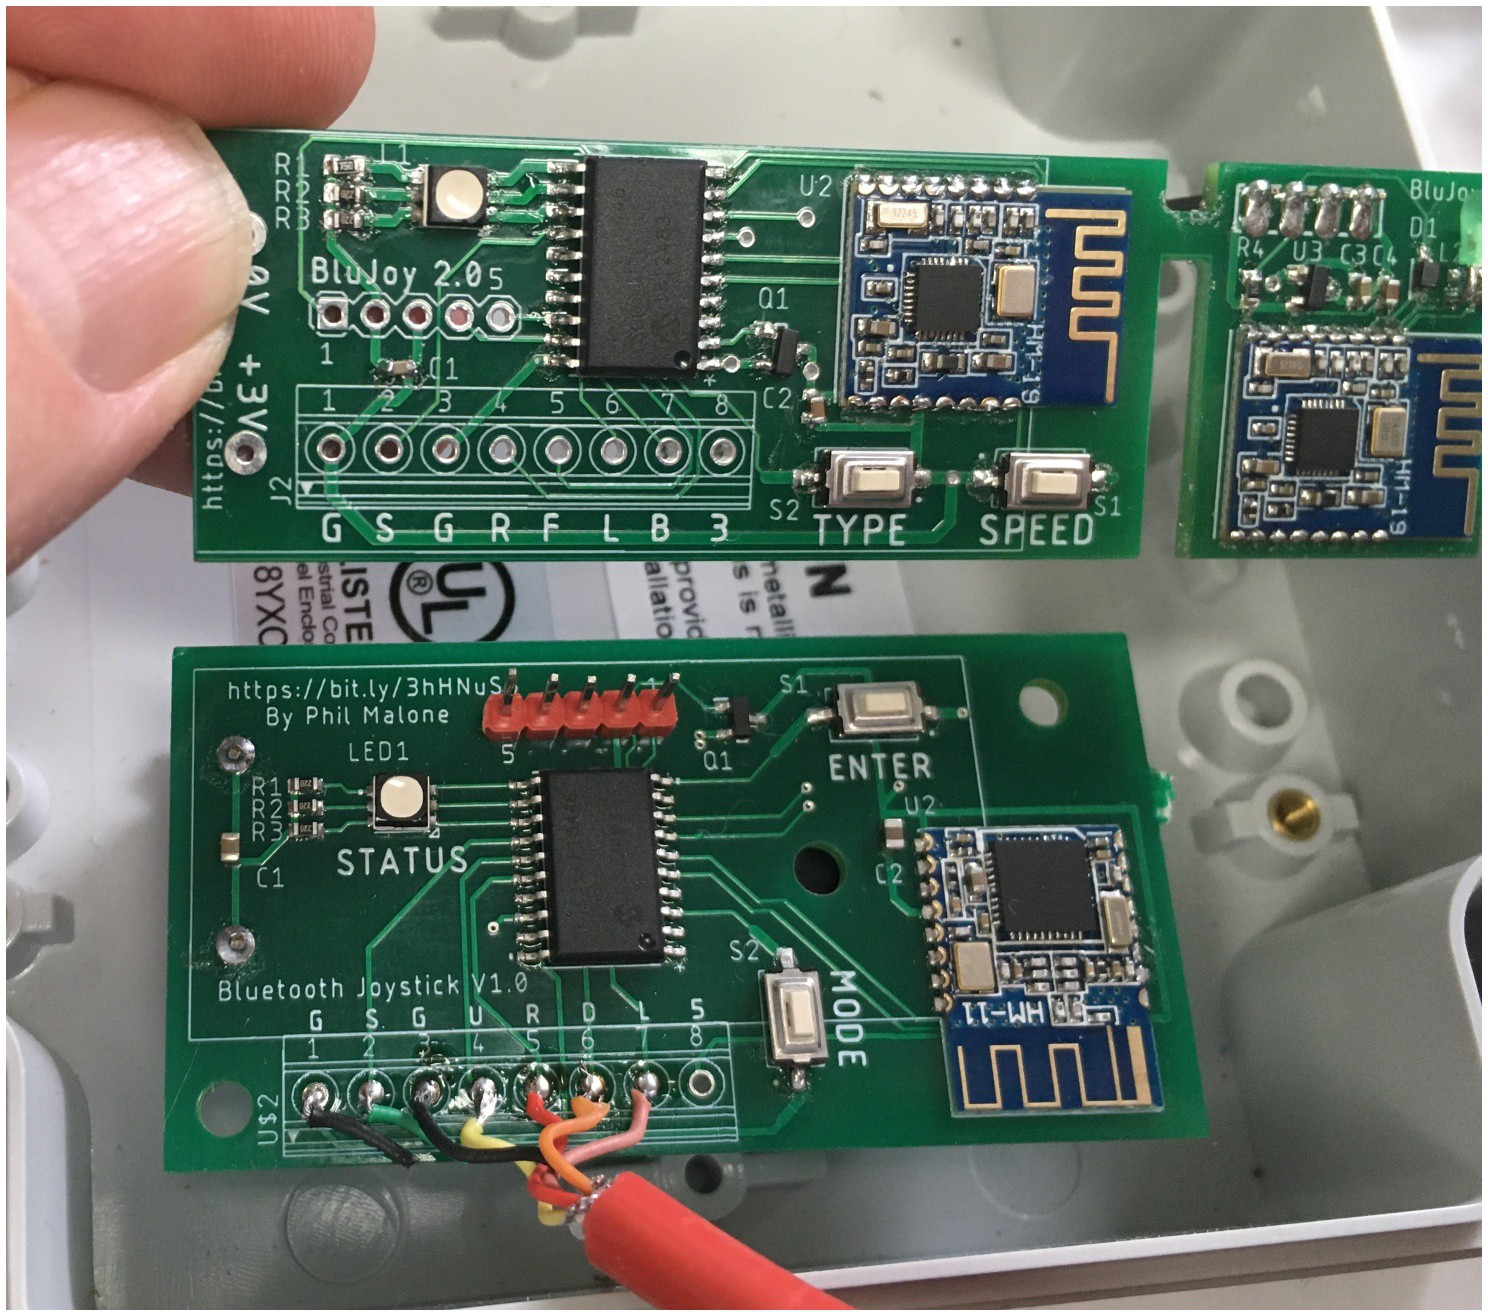
I also enhanced the PCB board design to reduce it's size, and provide some additional LED system status.
![]()
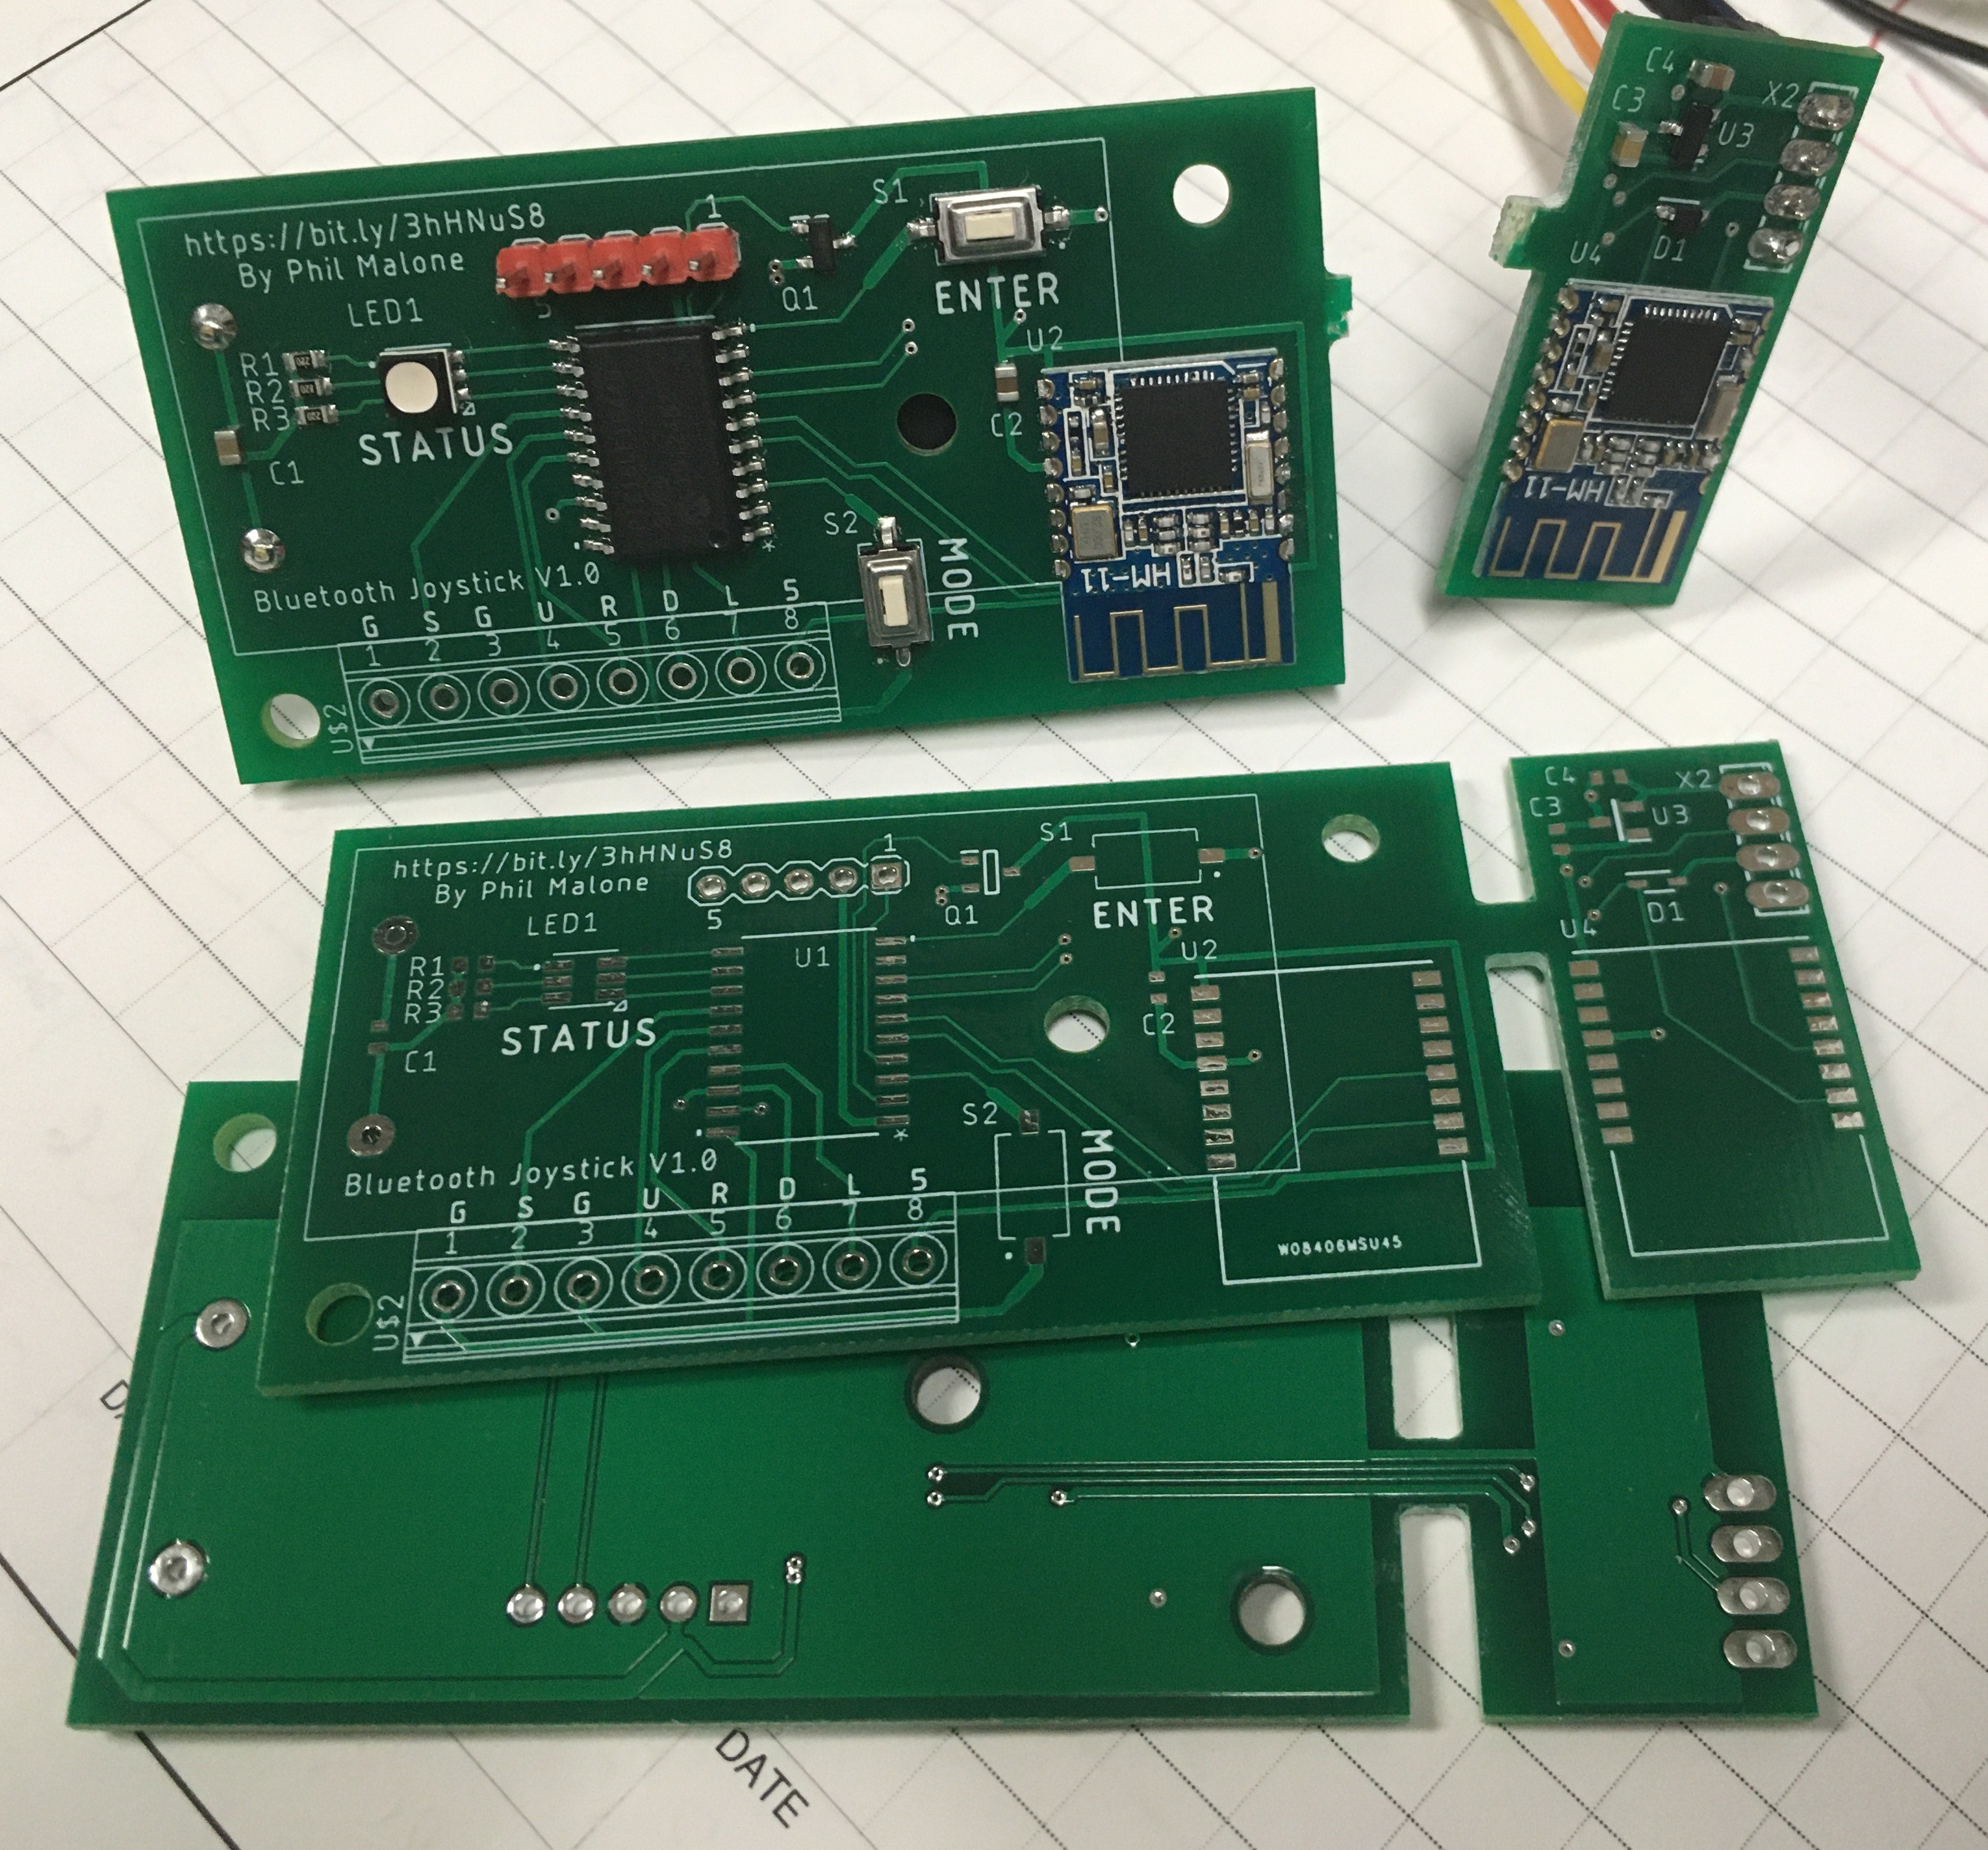
In the picture above, you can see the original PCB below, and the new one above. By reducing the width, it's possible to fit this new board inside the shell of a gamepad controller. The pads across the bottom can be used for a switch based joystick, or a potentiometer based joystick.
The current PCB, Schematic and PIC firmware for this board are all available in the Github Repo linked in this project's main page.
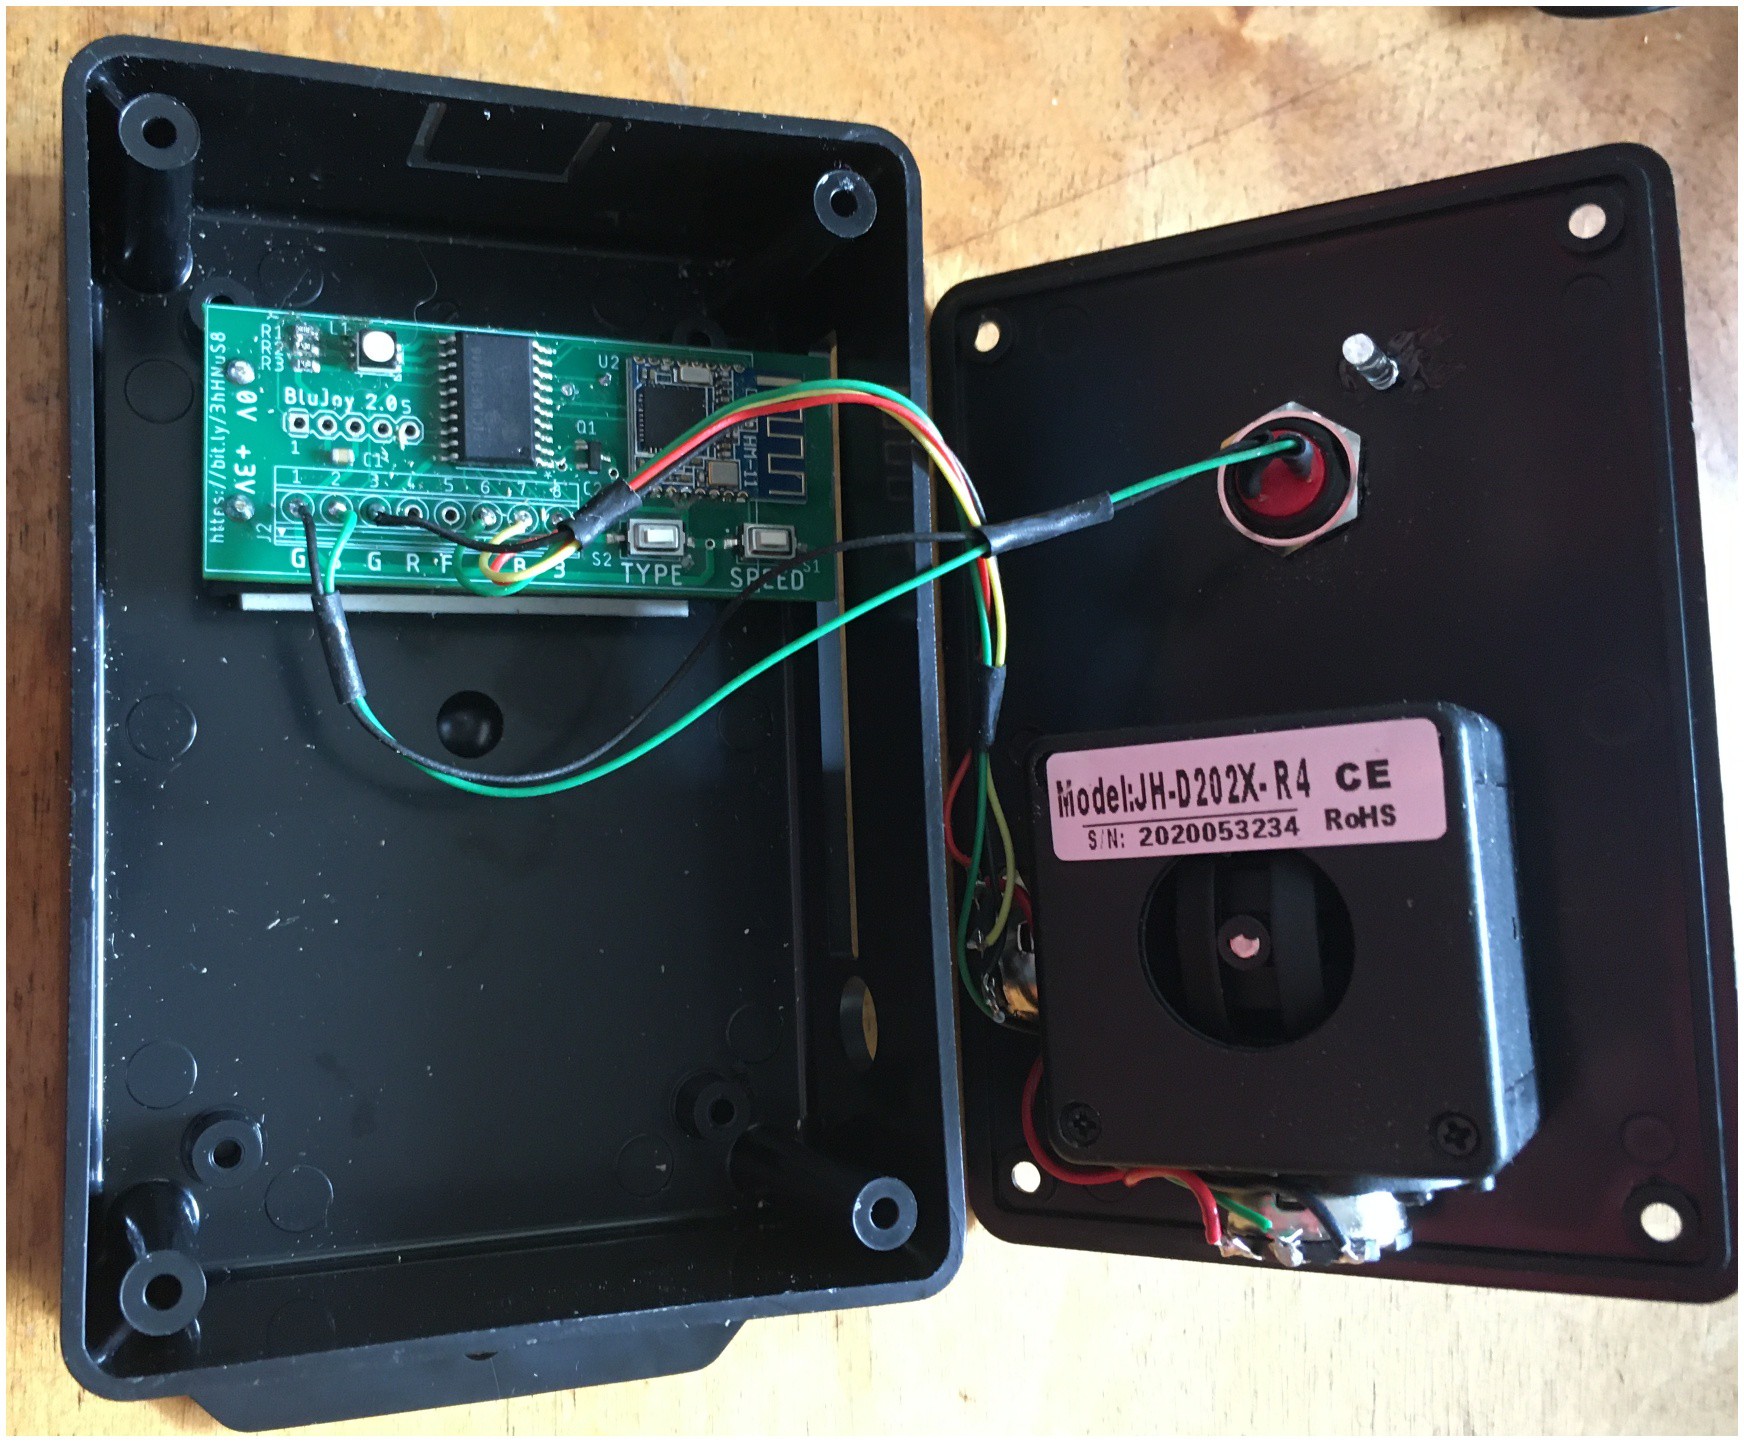
Below you can see this new PB integrated with a potentiometer joystick. Two AAA cells are located below the board for power. Wires run to the two Pots, and an E-Stop button.
![]()
There are two buttons on the PCB labeled TYPE and SPEED. The TYPE button is used to set the type of joystick interface required. Currently this can be either Button or Potentiometer. As more adaptive interfaces are created, these choices can be expanded. The SPEED button lets you choose between nine (9) different max speed ranges. These span from snail-pace to super-fast. The last chosen settings are saved in FLASH memory and automatically recalled next time the unit is powered up.
The firmware uses several power saving features to extend battery life. The CPU is normally in Deep Sleep mode with the Bluetooth module and joystick powered down. When the E-STOP button is clicked, the unit wakes up and looks for it's matching Bluetooth device on the hoverboard. If it's not seen in a short while, the unit powers back down again. If it sees the Hoverboard, it connects and starts sending joystick data.
If the Hoverboard is no longer communicating (because it's been powered down, or gone out of range) the joystick powers back down into deep sleep mode.
The matching HUGs firmware on the hoverboard also monitors the Joystick communications and immediately stops driving if the joystick data is missing for more than 0.5 seconds. It can also be commanded to shutdown completely if the user presses the E-STOP button for a second or more.
As an aside, I'm eager to try adapting some other joysticks. In particular I'd like to interface the Byte mouse described on another Hackaday project.
-
Log #14 Next Gen DIY Mobility Device.
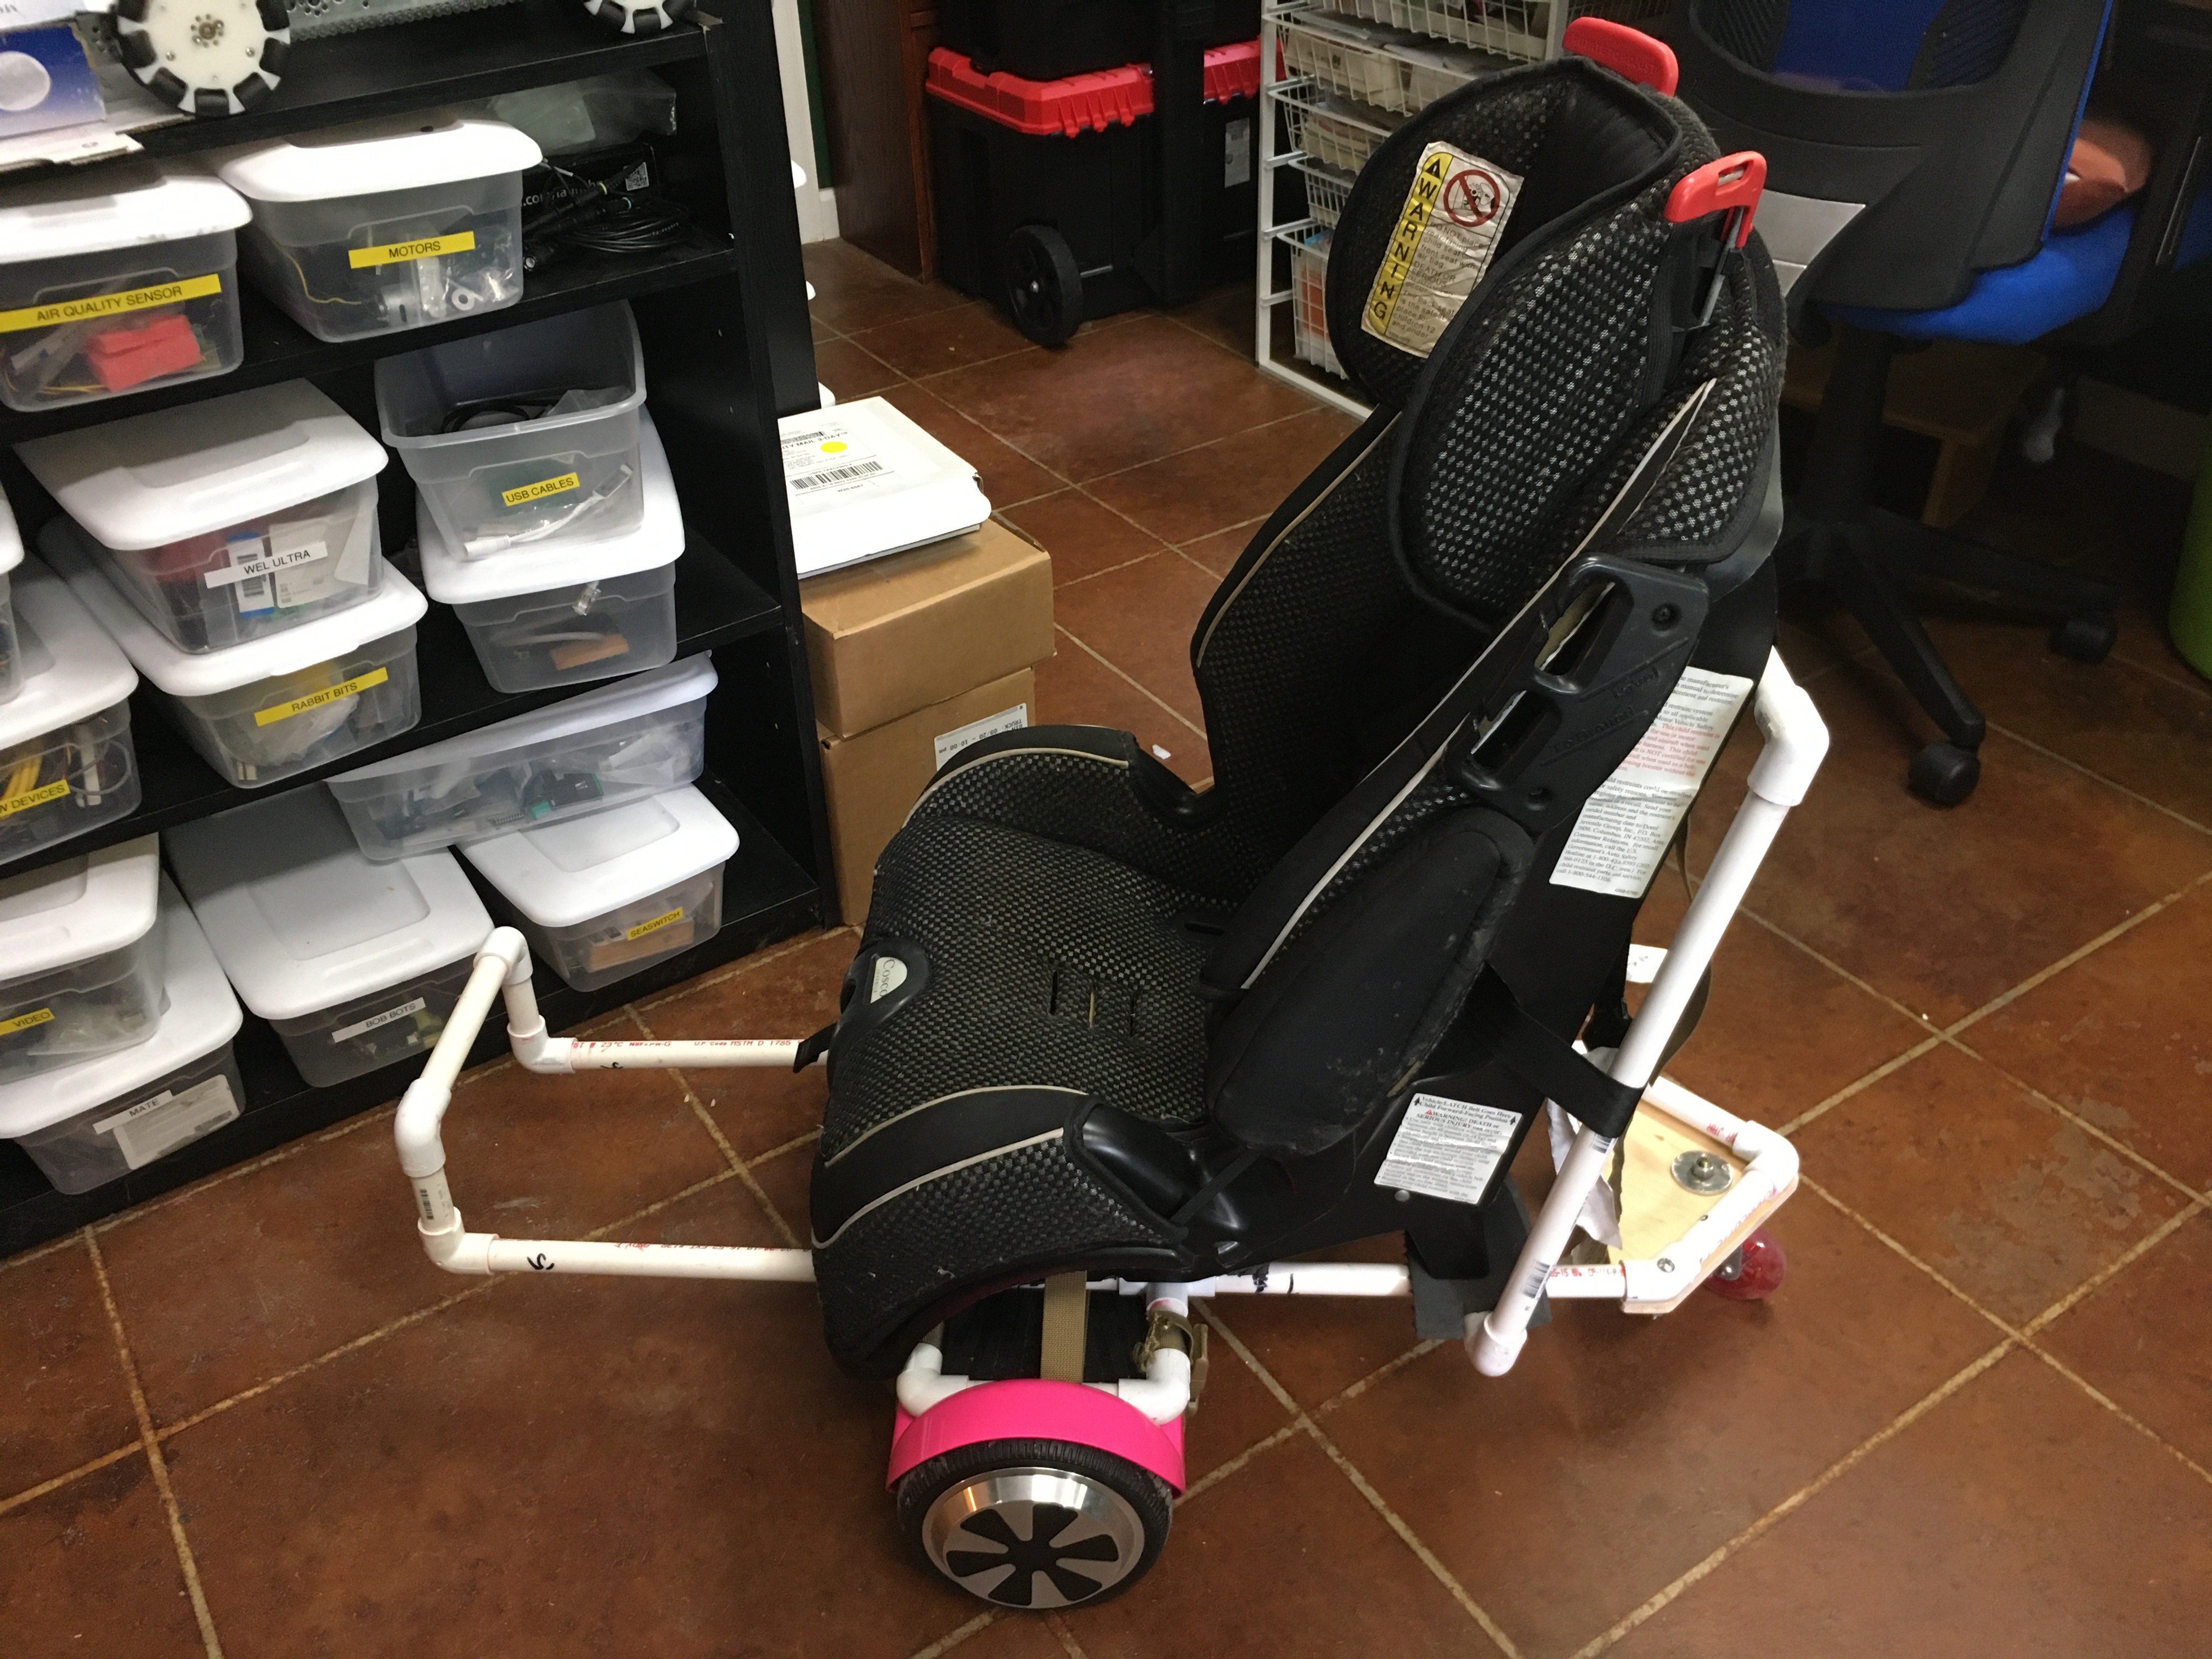
10/05/2020 at 01:52 • 0 commentsIn Log #11 I created a low cost child mobility device using my adapted hoverboard, a child car-seat and a pile of PVC. In this log I'll show the second generation version of this concept.
The original PVC design worked, but it was hardly robust. The hoverboard was attached to the seat and the PVC via luggage straps which were not particularly effective. In addition, having the single caster wheel at the rear of the vehicle made it longer, and prone to tip forward when stopping.
I decided to redesign the PVC frame using larger PVC, and incorporate a much more rugged attachment for the car seat.
Since I planned to try this version out with some young volunteers, I wanted to improve the aesthetic, so I used 3/4" furniture grade PVC from www.FormUFit.com . I love their PVC because it's available in cool colors, had lots of different fittings and all the edges are beveled for a smooth person-friendly finish.
![]()
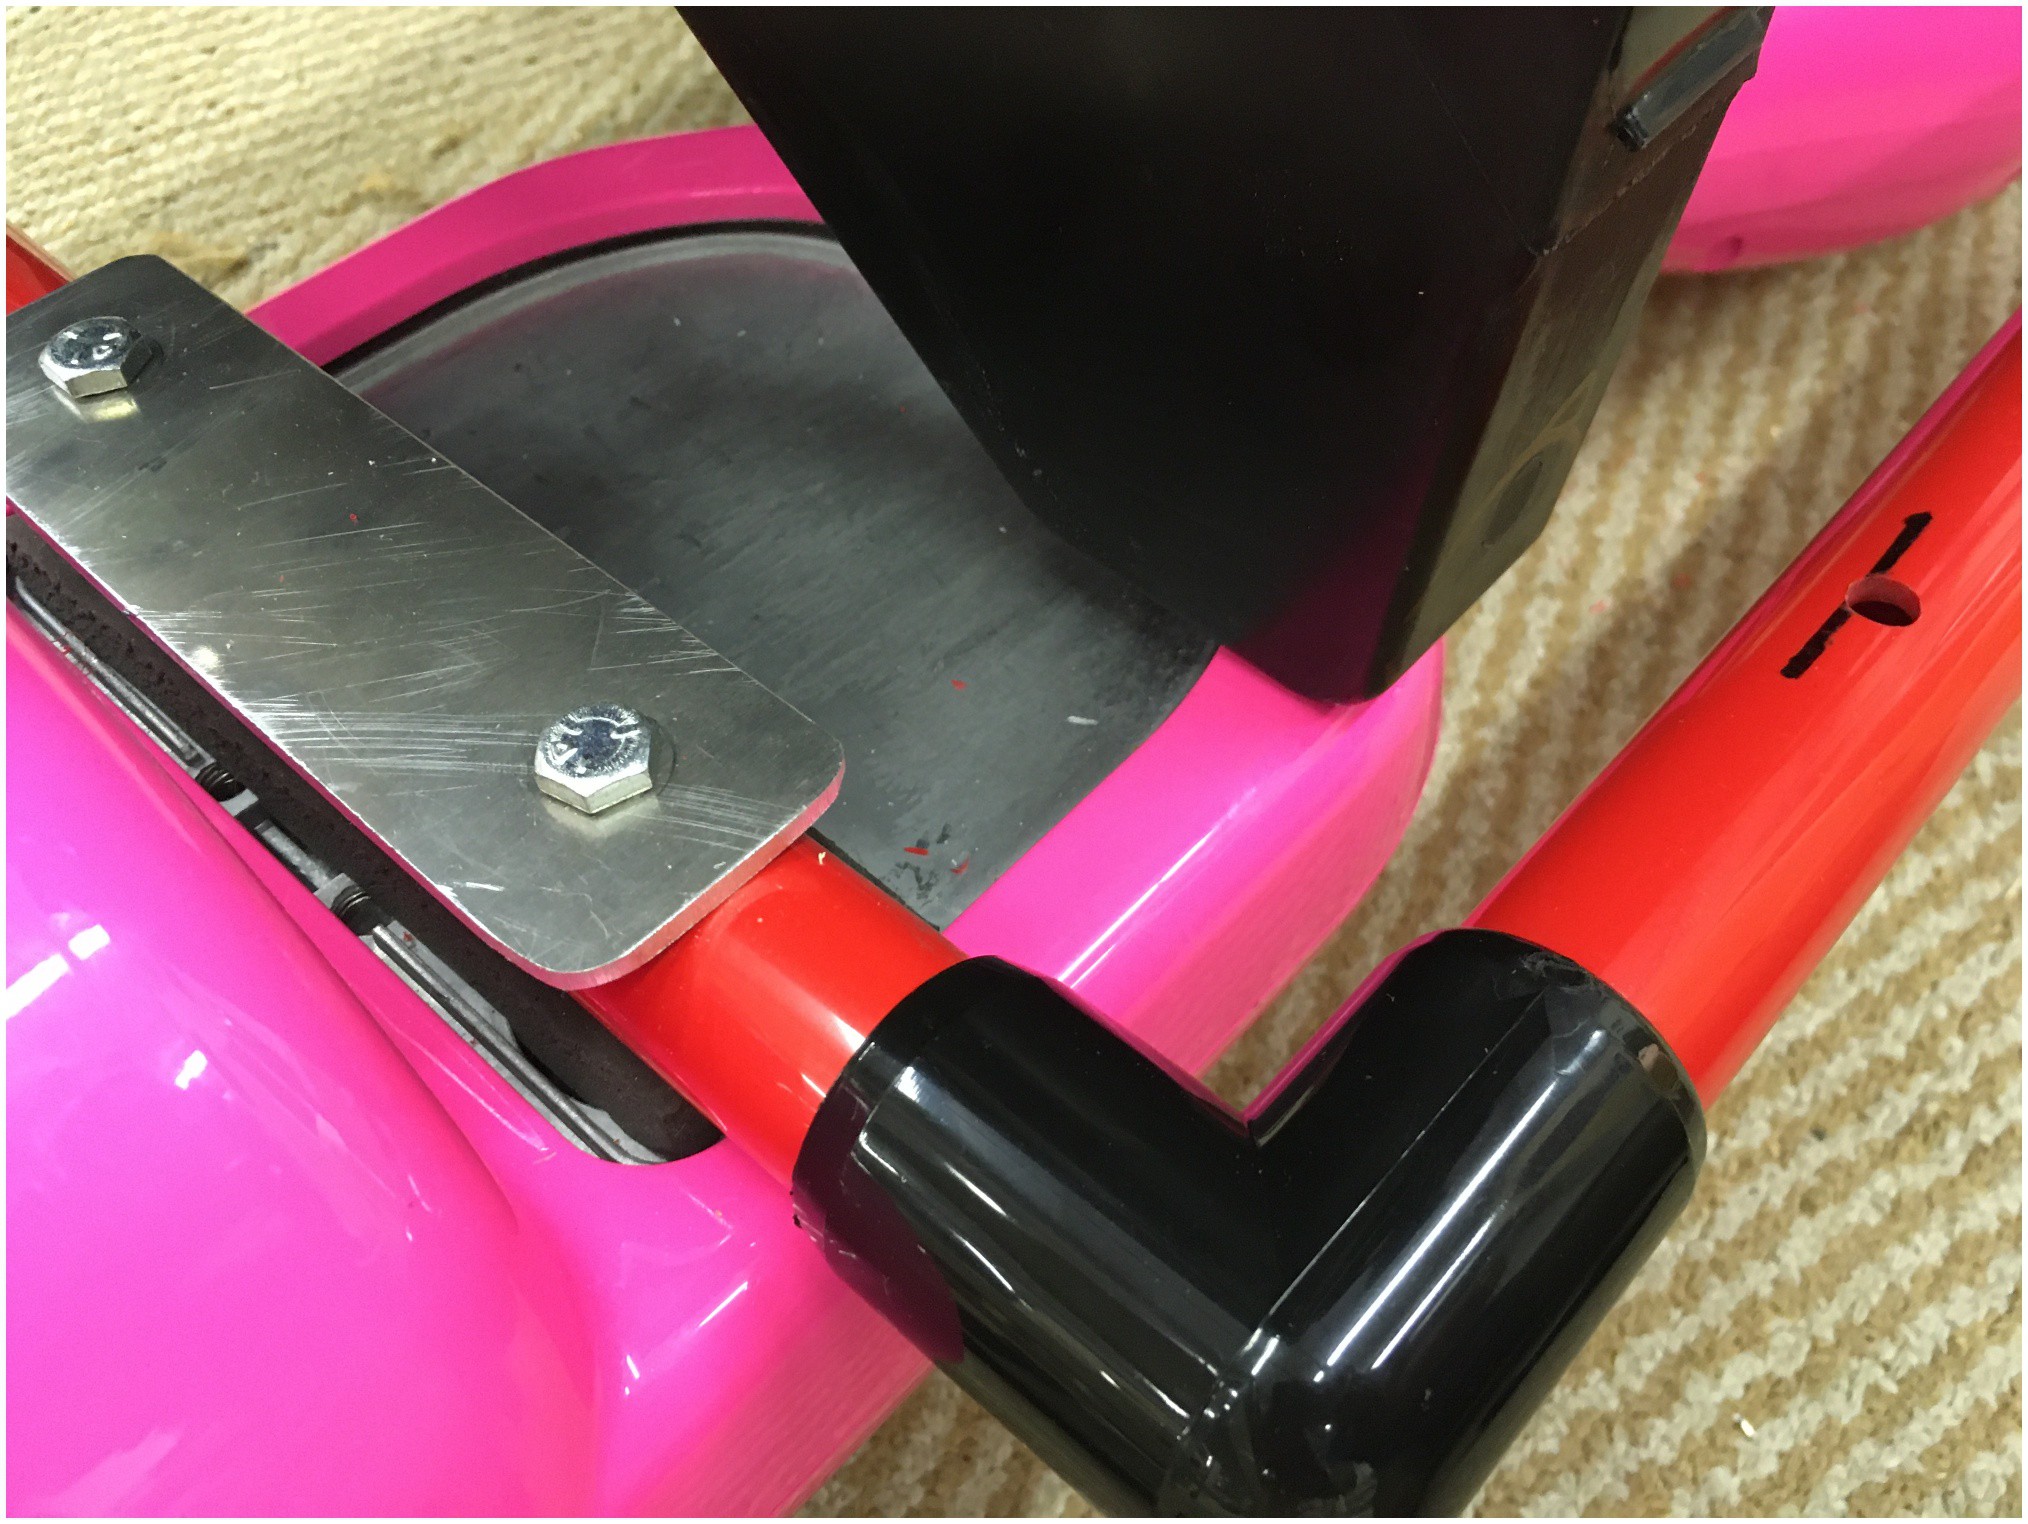
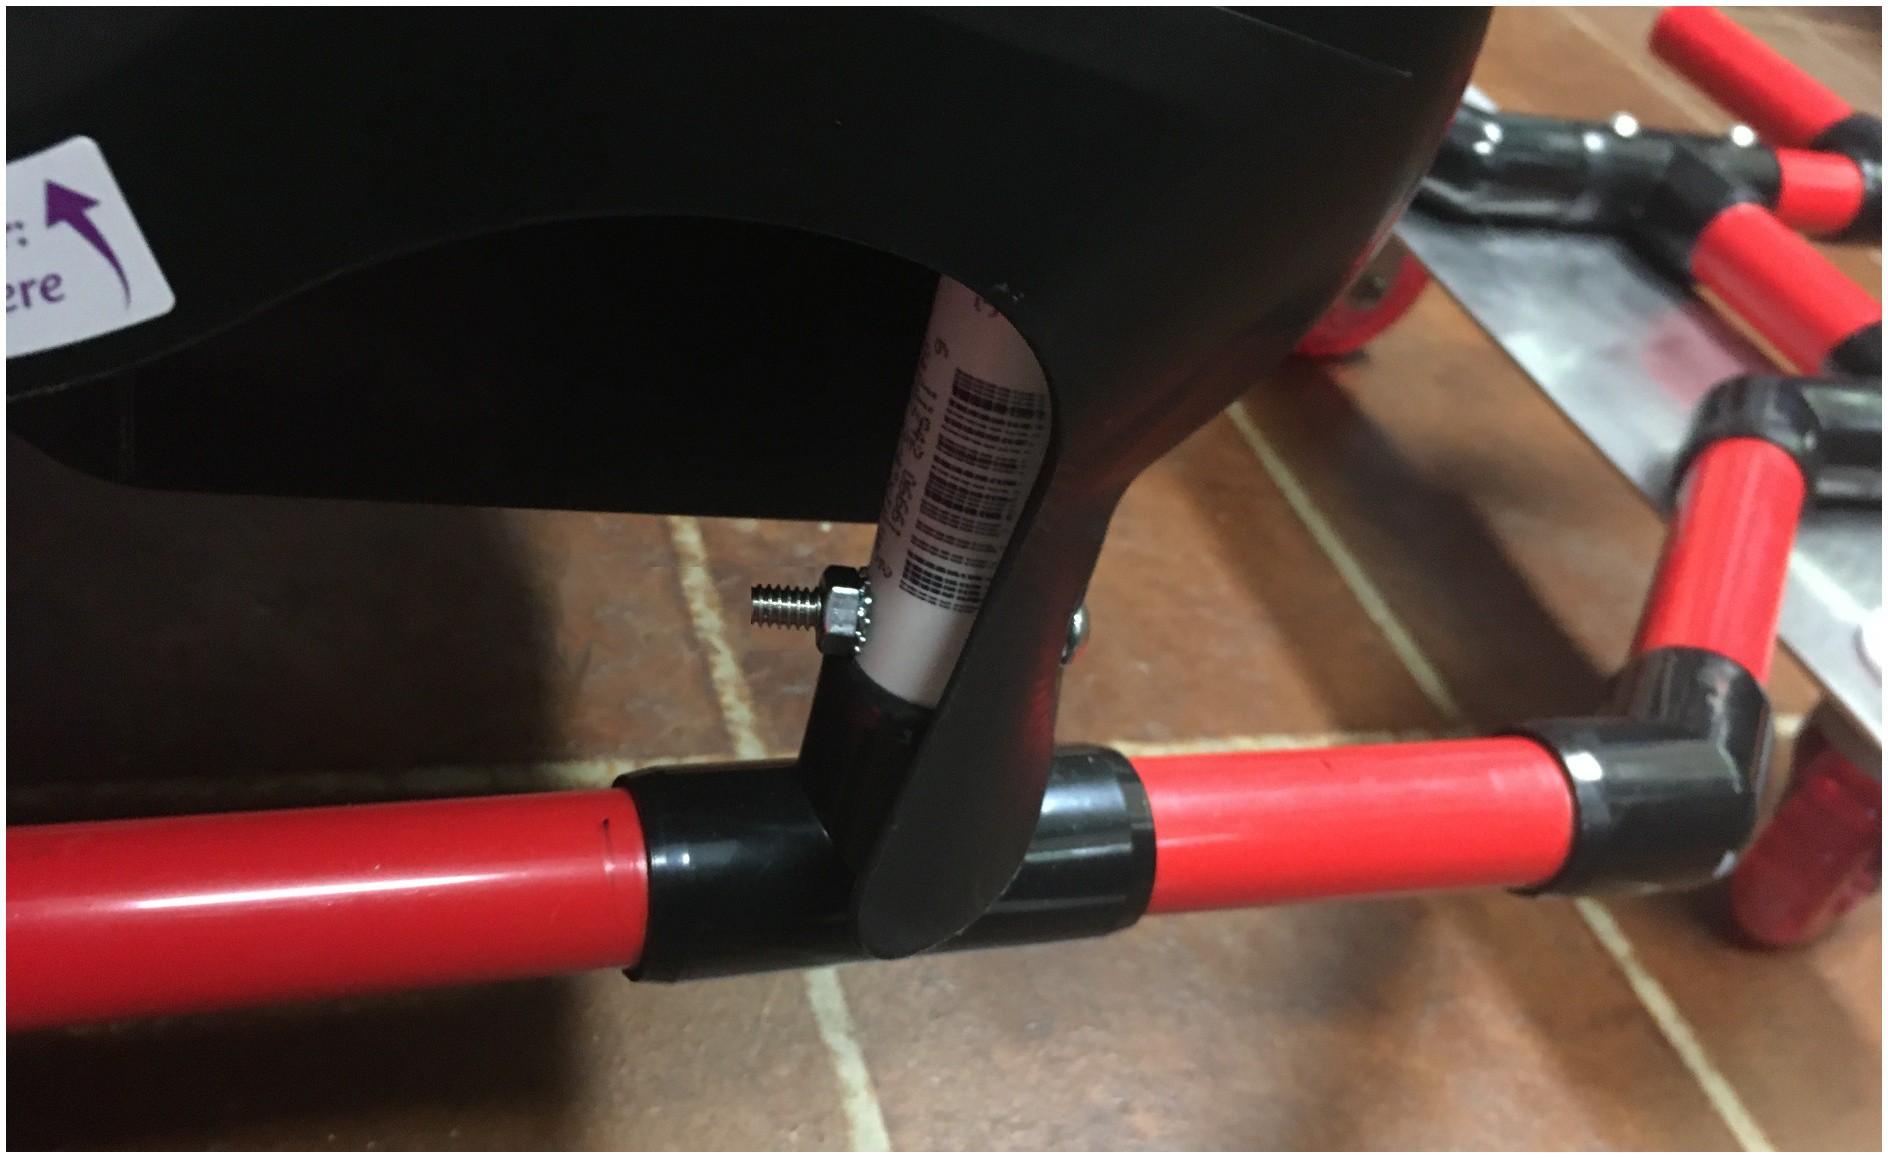
Here you can see the basic PVC frame attached to the Hoverboard using the 1/4" bolts and top-plate. The black triangle is the base of the Car Seat that would normally fit in the crease between the base and back of the automobile back seat.
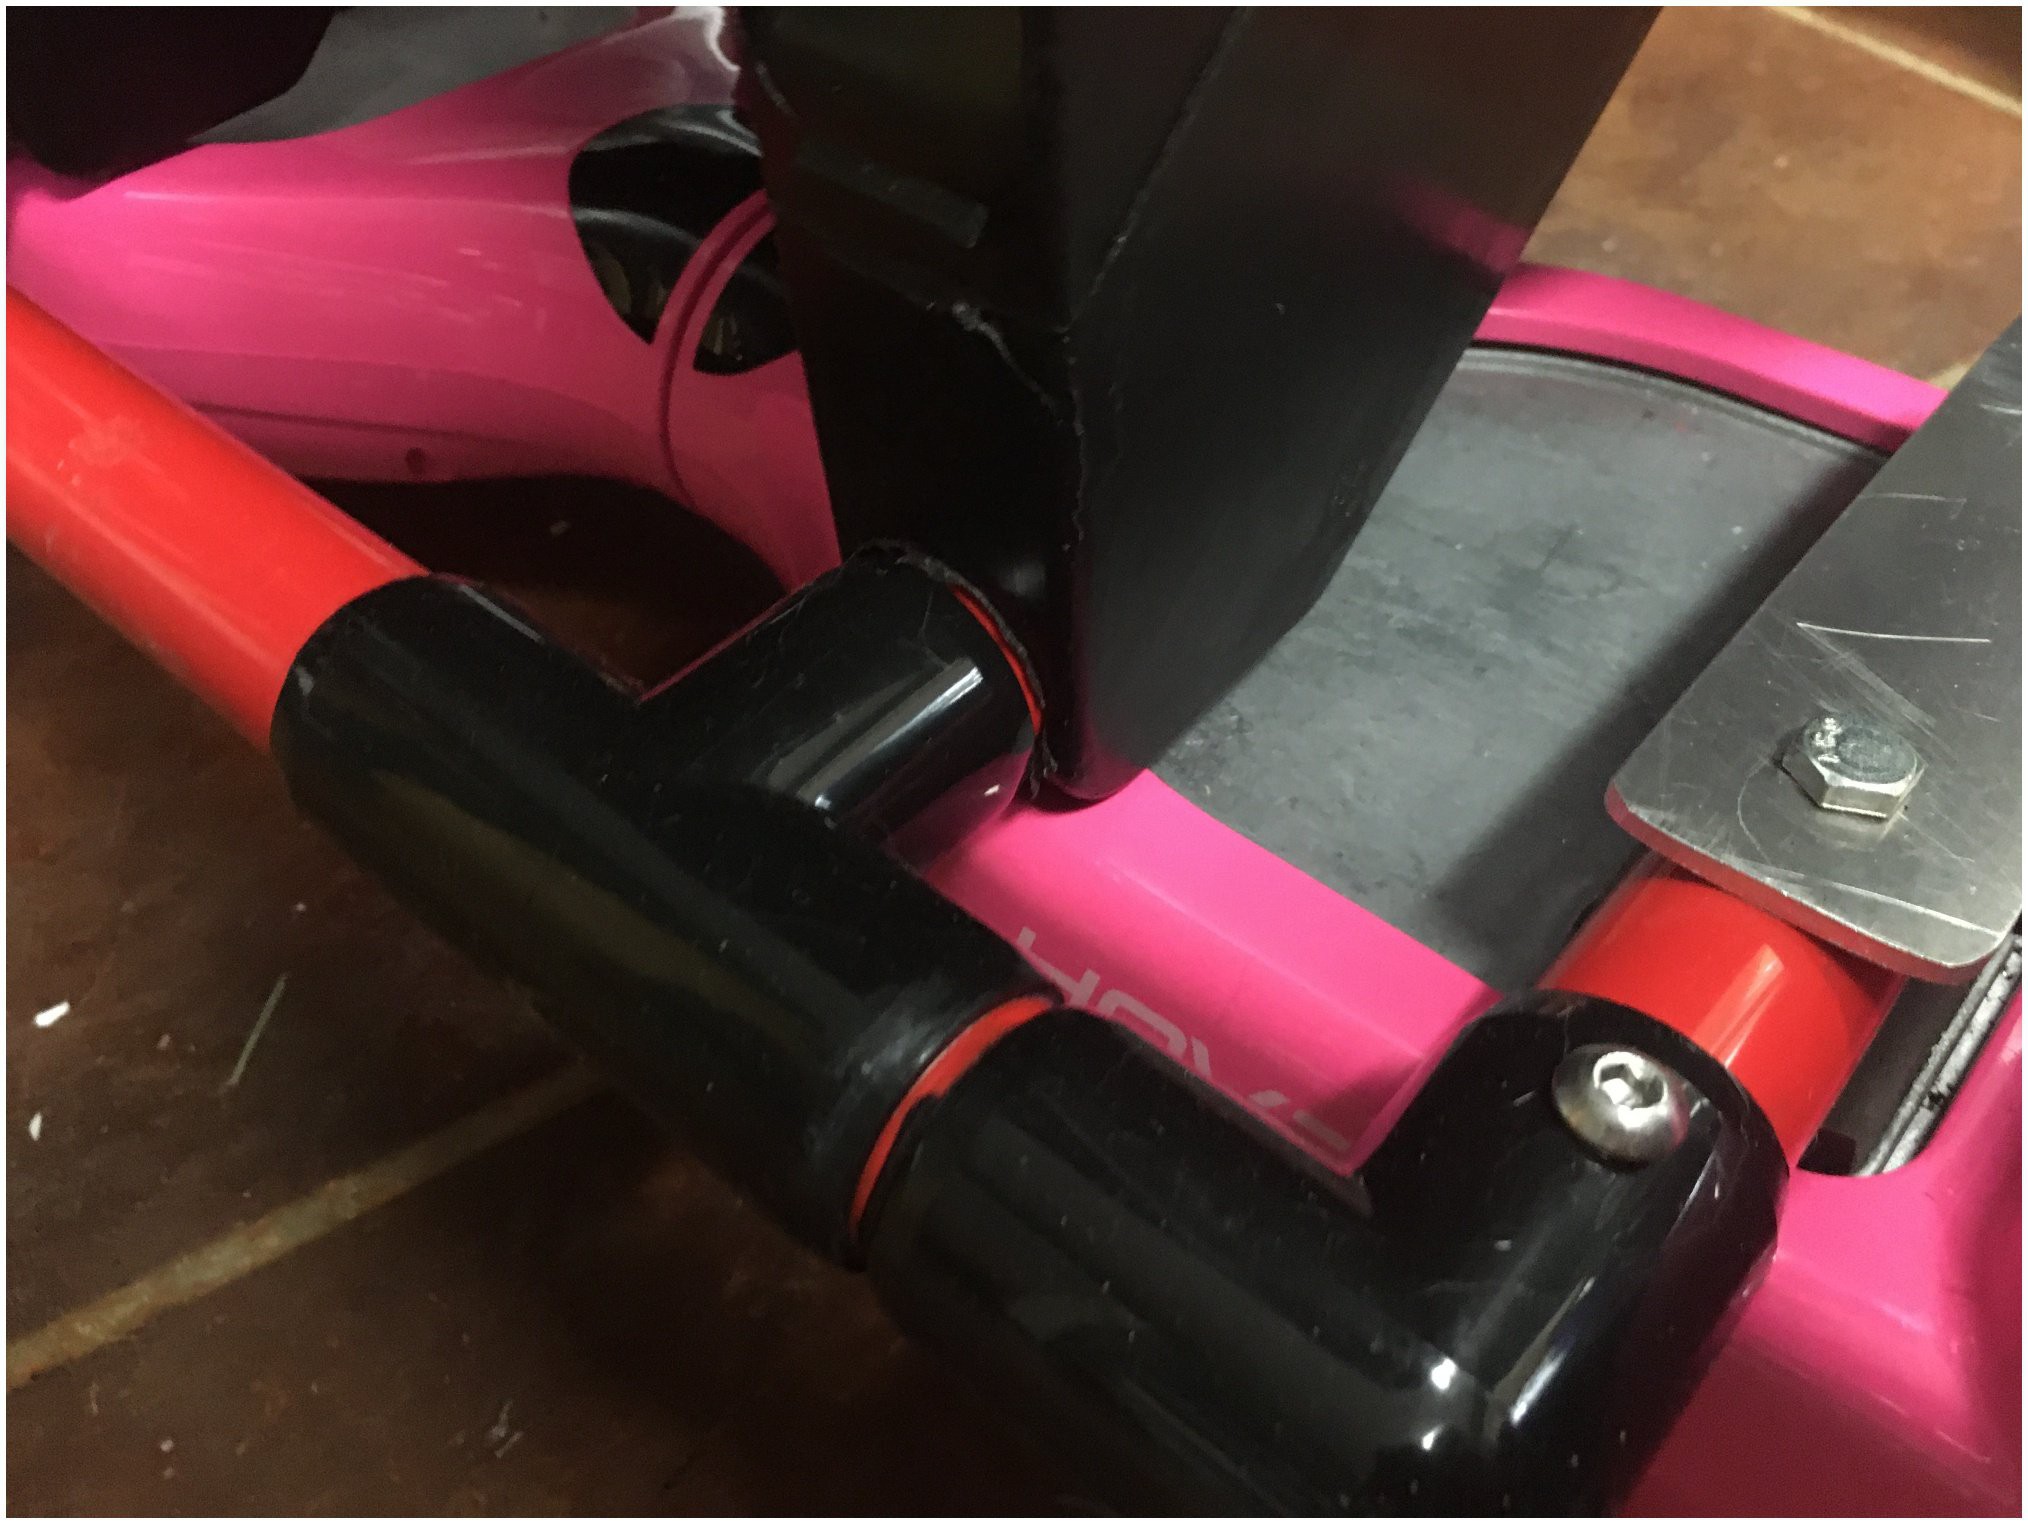
The seat was attached to the frame by punching holes in the back of the base and fitting it over two lengths of PVC as shown below.
![]()
The front of the seat is anchored to two short uprights using metal screws. It's not going anywhere !!!
![]()
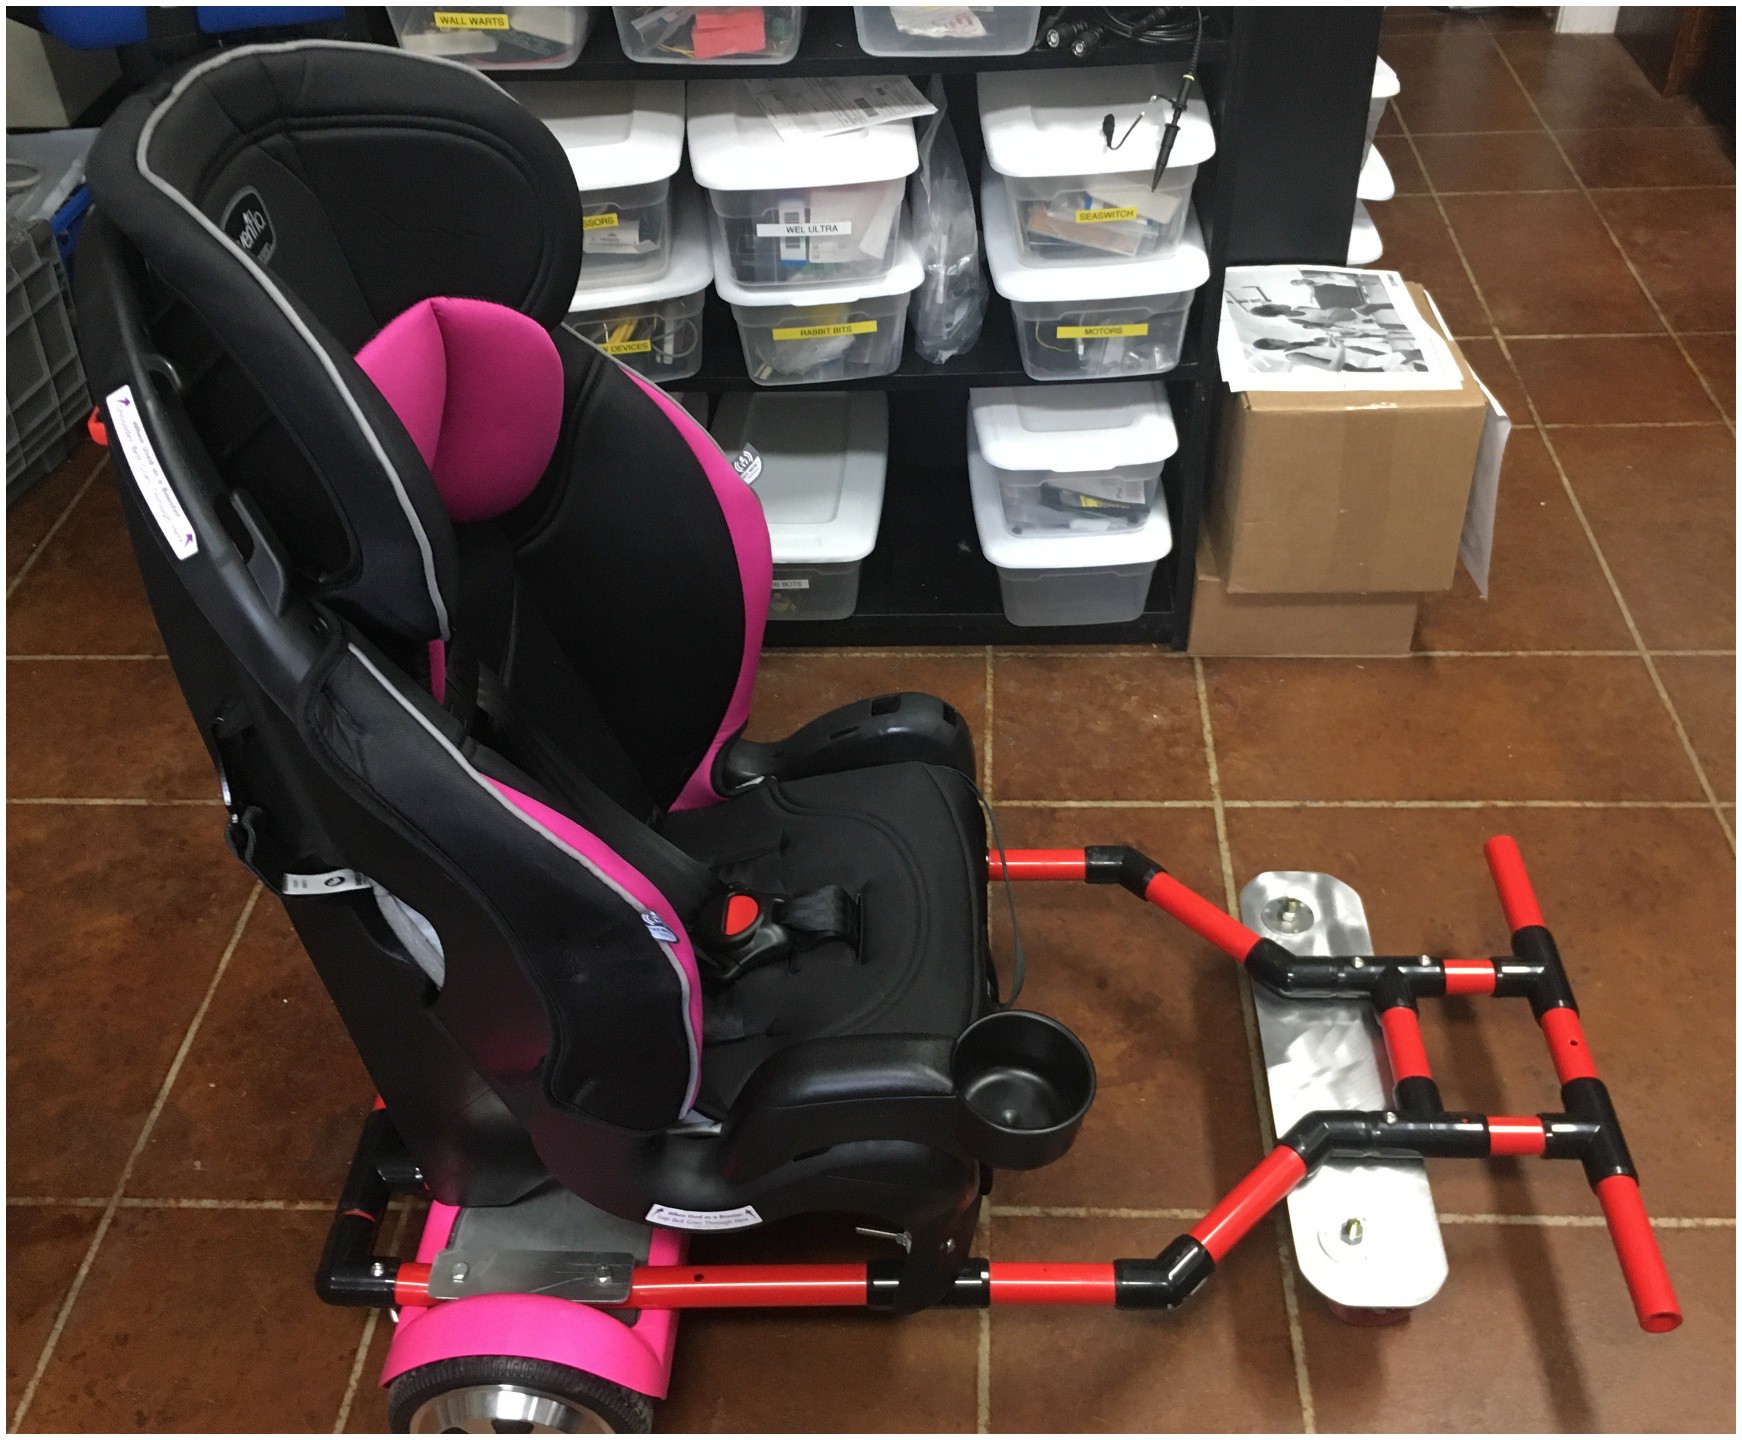
Since the seat is located above and in front of the hoverboard, the casters needed to be placed at the front of the device. Two skateboard style casters were added to an aluminum plate which was bolted to the frame. A pair of foot pegs were also added for comfort. The final version is shown below.
![]()
My final challenge is to use the "Cup Holder" mounts to allow me to adapt the chair to a range of different joystick types. These could be traditional joysticks, or something made from large buttons for a small child.
To test this mobile device, I used my wireless BluJoy circuit and hacked an old game controller for the housing (see later log). I rans some tests with a range of increasing control speeds from snail-pace to something akin to Elon Musk's Ludacris-Mode (not shown in video :).
-
2020 Hackaday Prize review.
08/16/2020 at 02:47 • 0 commentsSince I've entered this project in the 2020 Hackaday Prize (UCPLA non-profit category), It's worth reviewing the judging criteria to make sure I've got everything covered.
First, here's a link to the actual Competition Submission video:
According to the rules, the first step is to be included in the Entry round.
Entry Round: At the close of the Entry Round Period, a panel of qualified judges
appointed by Sponsor will select up to one hundred (100) submissions to advance to the
Final Round based on the following four (4) evenly-weighted judging criteria:- How effective of a solution is the entry to the challenge it is responding to?
- How thoroughly documented were the design process & design decisions?
- How ready is this design to be manufactured?
- How complete is the project?
In my case I've submitted my project for:
The Best Nonprofit Solution, sponsored by United Cerebral Palsy Los Angeles (UCPLA).Their open challenge is for High Quality Tools and Devices For Creative Expression:
Cerebral Palsy is a group of disorders that affects movement, muscle tone, or posture.
Generalized symptoms appear during infancy or in early childhood and include impaired movement, abnormal reflexes, involuntary movements, unsteady walking, trouble swallowing, or eye muscle imbalance, which makes it difficult for both eyes to focus on the same thing.This challenge seeks new designs for adaptive tools like tripods, workstations, trackballs, or joysticks that can be made affordable and open source. The purpose of these designs is to give individuals with cerebral palsy and/or other physical challenges greater independence in their lives.
So.. It's time to self-evaluate, and see if I'm covering the goals of the evaluation criteria.
![]() ---------- more ----------
---------- more ----------1) Effectiveness.
Since the basic action of walking can be difficult for a person with CP, my project addresses the specific problem of powered mobility. My assumption is that any creative task is made more difficult if the person is tied to a single location, and is dependant on others to help them prepare work areas, collect materials, and take breaks. By providing someone with greater mobility, they can have greater independence and are able to take on more creative challenges.
Another key creative outlet for young children is play. Role-play and other social interactions will always be more interactive if the child has mobility, so my goal is to reduce the cost of powered mobility for young children with CP.
Being a technology designer, I felt that my best contribution would be devising a low cost, yet reliable way to add powered mobility to a wide range of wheeled assistive devices. My rationale was that many people could address the mechanical aspects of making a wheeled chair/stander/car/walker, but not everyone was capable of adding a joystick controlled power drive that was safe and easy to use.
Throughout this project I have taken different paths, and tried different approaches. I have eliminated unnecessary complexity where it wasn't beneficial, and I am honing in on a very elegant and versatile approach.
My theory that a hoverboard could provide a very cost efficient drive system was proven to be correct, and the bluetooth joystick controller that I have created provides an extremely flexible interface, which can be used with a wide variety of adaptive controls. My software focuses on safety, and adaptability.
I have demonstrated that a hoverboard can be adapted to Medical Grade devices as well as DIY wheeled devices. If you put a chair on wheels, my hoverboard hack can make it mobile.
2) Documented design process
Each of my major design approaches or decisions has been documented with a project log (there are currently 12 logs). Wherever possible I have included the rationale for my decisions, live demonstration videos, construction photos, code descriptions and cad files.
At the beginning of the project I created a hyper-linked index of project logs. As I add each new log, I update this index. My goal is for anyone to be able to easily find elements of this project that interest them.
I started out with a selection of code repositories and files, but I have recently combined the various components into a single Open Source Github Repository. This contains Hoverboard Firmware, Joystick Interface code, schematics and PCB designs, as well some CAD files for basic metalwork.
3) Manufacture
Whenever I embark on a meaningful project, I always assume that at some point I may want to reproduce it, so I will always opt for Engineered components rather than makeshift. I invariably end up re-using components on latter projects so this inevitably save me future time. For example, if I'm developing an electronic circuit, I always quickly transition to a manufactured printed circuit board rather than a proto-board.
In the case of this project, I have already produced three iterations of two different printed circuit boards. Consequently, the Eagle CAD files for manufacturing the latest BluJoy Joystick controllers are included in the new combined github repository.
Likewise, I hand cut two custom mounting plates to adapt the hoverboard to the Jenx Multi-stander. But once I had verified the dimensions, I drew up the plates using Autodesk Inventor, and shipped the files to a Laser Cutting shop to fabricate several more sets of plates. I now knew that I could replicate this generic mounting system and use it on a wide range of devices.
4) Completeness.
The concept for this project has been through several major direction changes, and the current implementation is in the refinement stage.
The primary output of this project is a modified Hoverboard, combined with a wireless Joystick interface board. These are the essential components required to adapt a wheeled device to a motorized device. The secondary output of this project is a range of recommended implementations (instructions/hacks) that show how the primary components can be used in specific applications.
The primary system components are in slightly different states of completion:
a) Hoverboard Firmware: Well developed and stable. Complete.
b) Joystick Software: Basic Functionality complete. Still needs expanded features.
c) Joystick Electronics: 2nd Generation ready for testing.
d) Joystick Mechanical: Off-The-Shelf solutions working. Needs more innovation.
The tasks that remain are:
1) Add features to Joystick Firmware: Multiple Speed Modes, & Analog Joystick.
2) Explore new joystick designs to enable more gross movement.
3) Document the process of breaking down the hoverboard and adding the mounting plates.
4) Finalize the DIY Mobile Car Seat concept and produce construction docs.
5) Future Plans.
If Prize funds became available, they would be used to create "Mobility Kits" that could be requested by hackers to motorize an Assistive device.
-
Log #12 The "BluJoy" Bluetooth Joystick interface.
08/14/2020 at 19:53 • 0 commentsIn Log #10 I experimented with Bluetooth modules to see if I could make a low cost wireless Joystick controller for my hacked hoverboards. My early success led me to design a custom PCB that could satisfy several requirements:
1) The board must be able to interface to either a micro-switch, or potentiometer based Joystick.
2) It must be able to generate smooth (trapezoid profile) velocity commands .
3) It must provide a fool-proof Bluetooth interface from the joystick to the hoverboard.
4) It must run on batteries, but have a long operational life (> 50 hours) and standby time (> 30 days).
My first prototype is shown below.
![]()
It may not be immediately obvious, but the board is pretty small. It's just 1 1/4" x 3 1/4".
What you may find interesting, are the two slots on the board. These are designed to enable me to snap the board into two pieces (see the top of the photo). The piece on the left is the Joystick interface and Bluetooth (BT) module. The piece on the right is the matching bluetooth (BT) module that will plug onto the header strip on the hoverboard motor controller. You also can't tell from the photo, but there is a battery holder on the back of the larger board, that holds two AAA batteries. You can see the large rectangle outline on the top silk screen.
The part of this design that I'm most proud of is the way that the two bluetooth modules are set up to automatically pair with each other. The HM-11 bluetooth modules can be configured using "AT" commands, which is a command style invented with the first analog MODEMS back in the late seventy's, but has been adopted by serial bluetooth modules.
Each module has a unique address (like a MAC address), and if you know one BT module's address, you can configure another BT module to connect to it on startup. The trick is reading each module's address and assigning the matching module to connect to it. This can be done manually with a serial terminal, but the BluJoy program has a dedicated setup mode to do this automatically. If you look at the reverse side of the board, you will see that there are some power and data traces that pass between the two sides.
Each board will come from the manufacturer with blank HM-11 BT modules installed. To set up the boards, the BluJoy.X program is loaded, and then the two buttons are pressed and held for 4 seconds. This will trigger the pairing mode where the PIC processor will read each BT module's address, and then configure the opposite module to connect to that address. The program also sets each BT module's baud rate, Master/Slave relationship and any other parameters. The code then sends "HELLO" messages into the Slave module on the Joystick side, and verifies that they are received on the Hoverboard side.
Once the setup and verification is complete, the board can be snapped in two, ready for installation in a hoverboard and joystick.
This module uses a PIC16LF18446 microprocessor which I chose because it had some key features I required, plus is was available in a relatively small 20 pin SOP package. In particular, it's the smallest PIC processor with a serial USART (for talking to a BT module) and and EEPROM for storing non- volatile parameters, type of joystick and speed ranges.
Although the PIC16LF18446 only has one serial port, it also has a PPS (Peripheral Pin Select module) which lets you dynamically switch I/O functions between different pins on the chip. This let me switch the Serial RX and TX pins between the two BT modules to read and write different parameters. This was the first time I used a PIC PPS module, and now that I have seen what it can do I don't think I'll ever use a PIC processor that doesn't have one.
As an example of how useful the PPS is, in my first PCB I got my RX and TX pins confused when routing between the PIC and BT modules. Normally this would require a track cut/paste and another PCB rev... But in this case I just changed a few check-boxes in the MPLAB IDE and the problem was fixed.
![]()
This picture shows the two parts of the BluJoy interface. The larger piece is installed in a plastic box with a joystick (the two AAA cells are located underneath the PCB). The Smaller piece is plugged into the Hoverboard Motor controller.
To check out the Eagle PCB, and PIC code, visit my Github repository and look at the BluJoy-PCB and BluJoy.X folders.
-
Log #11 DIY Mobility Device.
07/30/2020 at 20:12 • 0 commentsStarting in Log #7, I detailed the process of using my hacked hoverboard to add a power drive to a commercial "Stander".
In this log, I want to shift to the other end of the spectrum: a complete DIY Mobility device, based on the same Hoverboard Hack. I'm trying to develop ideas that can be implemented without a large outlay of cash, so this one is based on hardware that the family of the impaired child should already have: An automotive car seat.
My idea was to build a simple frame that would allow a car seat to be mounted to a hover-board, and add a caster to provide a third balance point. I would use small cargo straps to attaching the hover-board to the frame and the seat, so it would just take a bit of creativity to adapt to a specific seat.
I'm still working on my bluetooth joystick design, so I tested out my prototype HoverChair with my Prototype BluJoy joystick.
-
Log #10 Wireless Control. Take 2
07/26/2020 at 22:42 • 0 commentsMy first attempt at adding a wireless remote controller to the Hoverboard wasn't really successful (see Log #5). Using the ESP32 controller's WiFI capabilities increased the current demand by enough to overload the Hover-Board's 5V regulator.
So, for my drive testing, I just switched to a wired joystick.
However, after some live testing, I really wanted to try wirless again, so I started researching some lower power alternatives. I ran though a whole range of analog and digital "garage door remote control" style chip sets, but I really couldn't find any I was happy with.
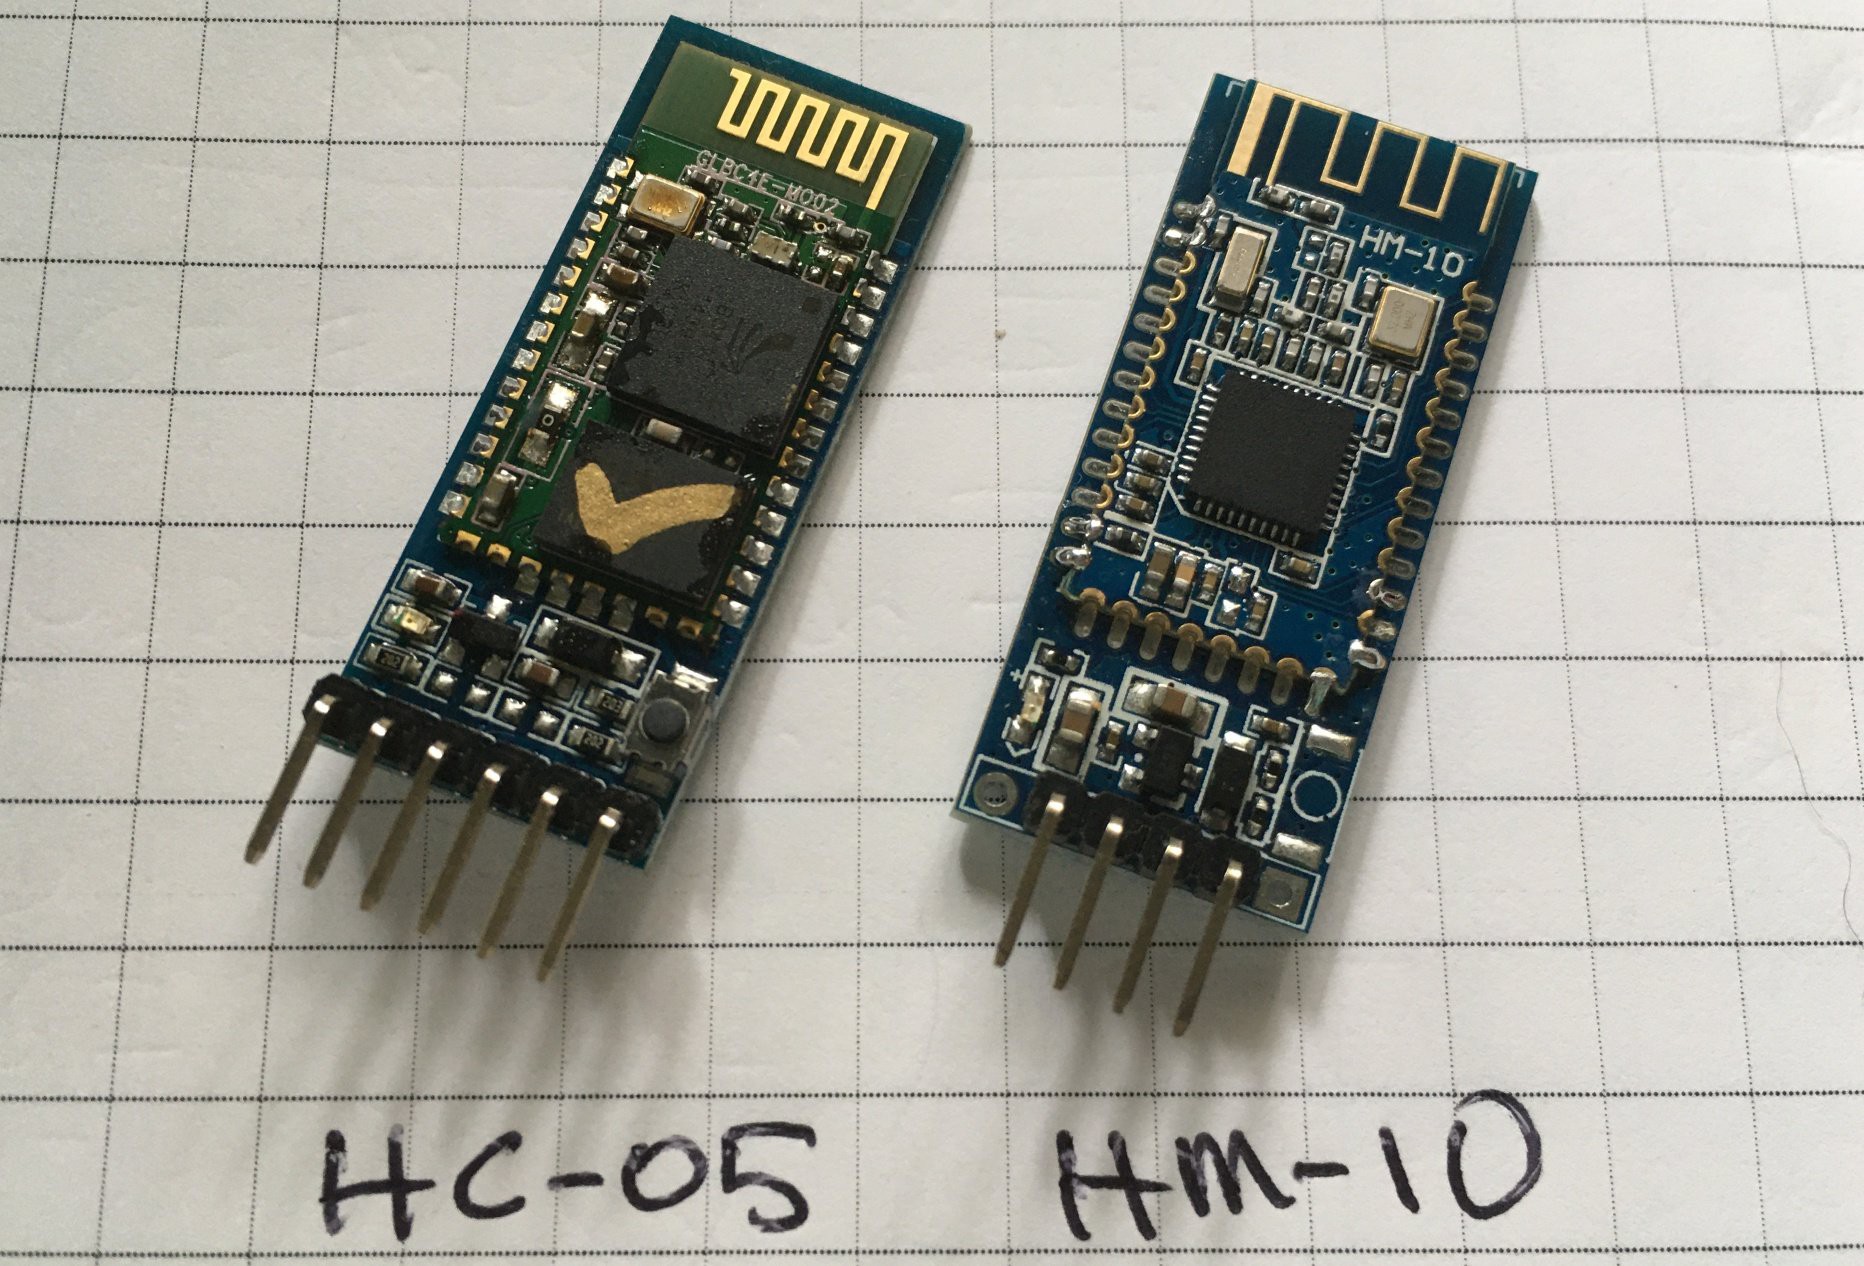
Then I started researching various Bluetooth serial link modules. I started with the HC-05 which is a master/slave device that can be used to establish an automatic connection between two serial ports. This was pretty easy to setup, but it seemed a bit dated. The next version I discovered was the HM-10 which is newer, and uses less power.
![]()
To create a Joystick that could be used with either of these devices, I'd need to put some sort of microcontroller in the Joystick, and then have it talk to a serial port on the Hoverboard. The Hover-Board motor controllers have several serial ports onboard, but I'd been trying to ONLY use the ones that were normally used for Master/Slave communications. This had required me to add a Micro-Controller inside the Hover-Board case, and have it plug into each of the motor controller boards. In this way, both controllers were acting as "SLAVES".
After much soul searching, I decided to abandon this approach, and use one of the "debug" serial ports on the Master Motor Controller. This mean that I could go back to using a single flipped cable to connect between the Master and Slave controllers. My HUGS protocol was still compatible with passing commands between the two controllers, and I could ALSO use it to pass commands from the Joystick to the Master controller.
This new approach has some key benefits:
1) I could remove most of the extra wiring I had added to the Hover-Board. This would make it easier for other hackers to replicate my setup.
2) The only electronics that needed to be added to the Hover-Board was an HC-05 Bluetooth module which could be connected directly to the REMOTE port on the Master Motor Controller board. This reduced the 5V power load to only 8mA
The downsides to this approach were:
1) I had to solder a set of header pins to the Master Motor Controller board. This was easy enough for me, but it does require some decent tools and some reasonable skill. I had been trying to avoid anyone else having to mod the controller boards because they use high voltage and current, so bad soldering can be disastrous.
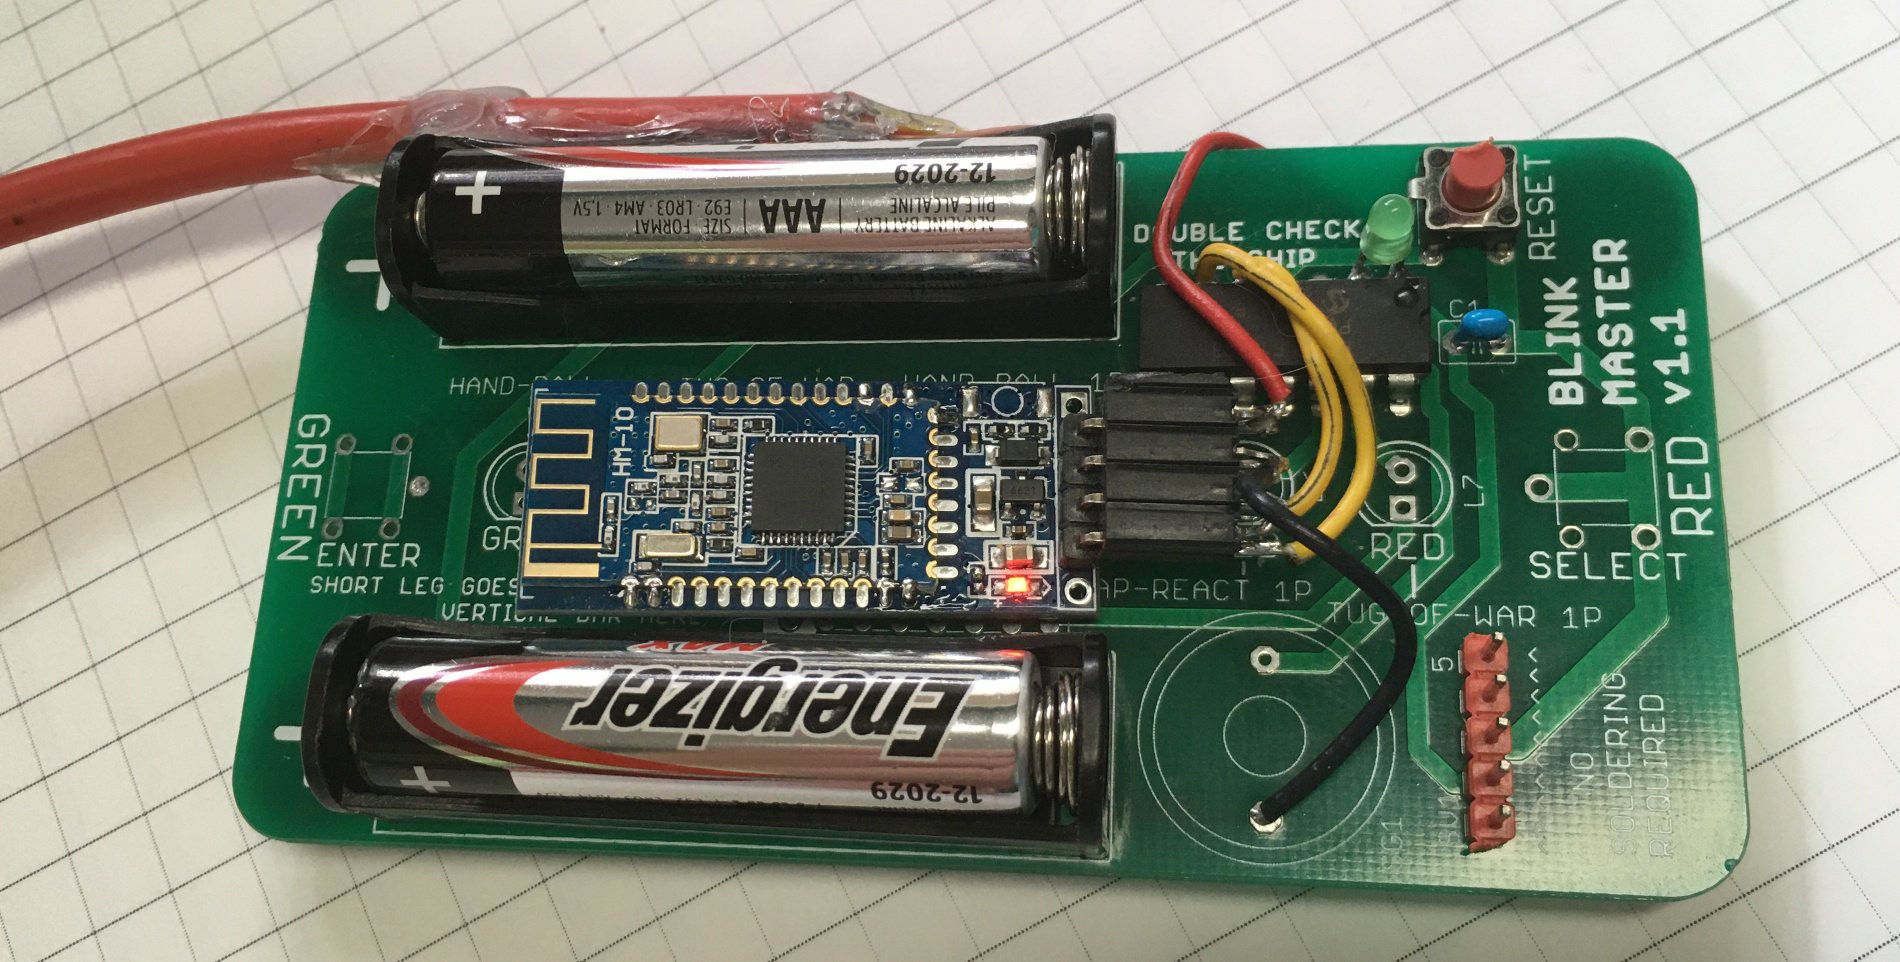
2) The joystick also now needs a HC-05 module, PIC (or other) processor and a battery that needs to be managed to get a reasonable run life. I did some testing with a Blink-Master board I had on hand. It gave me a convenient way to try out some PIC code with the HM-10 carrier board.
![]()
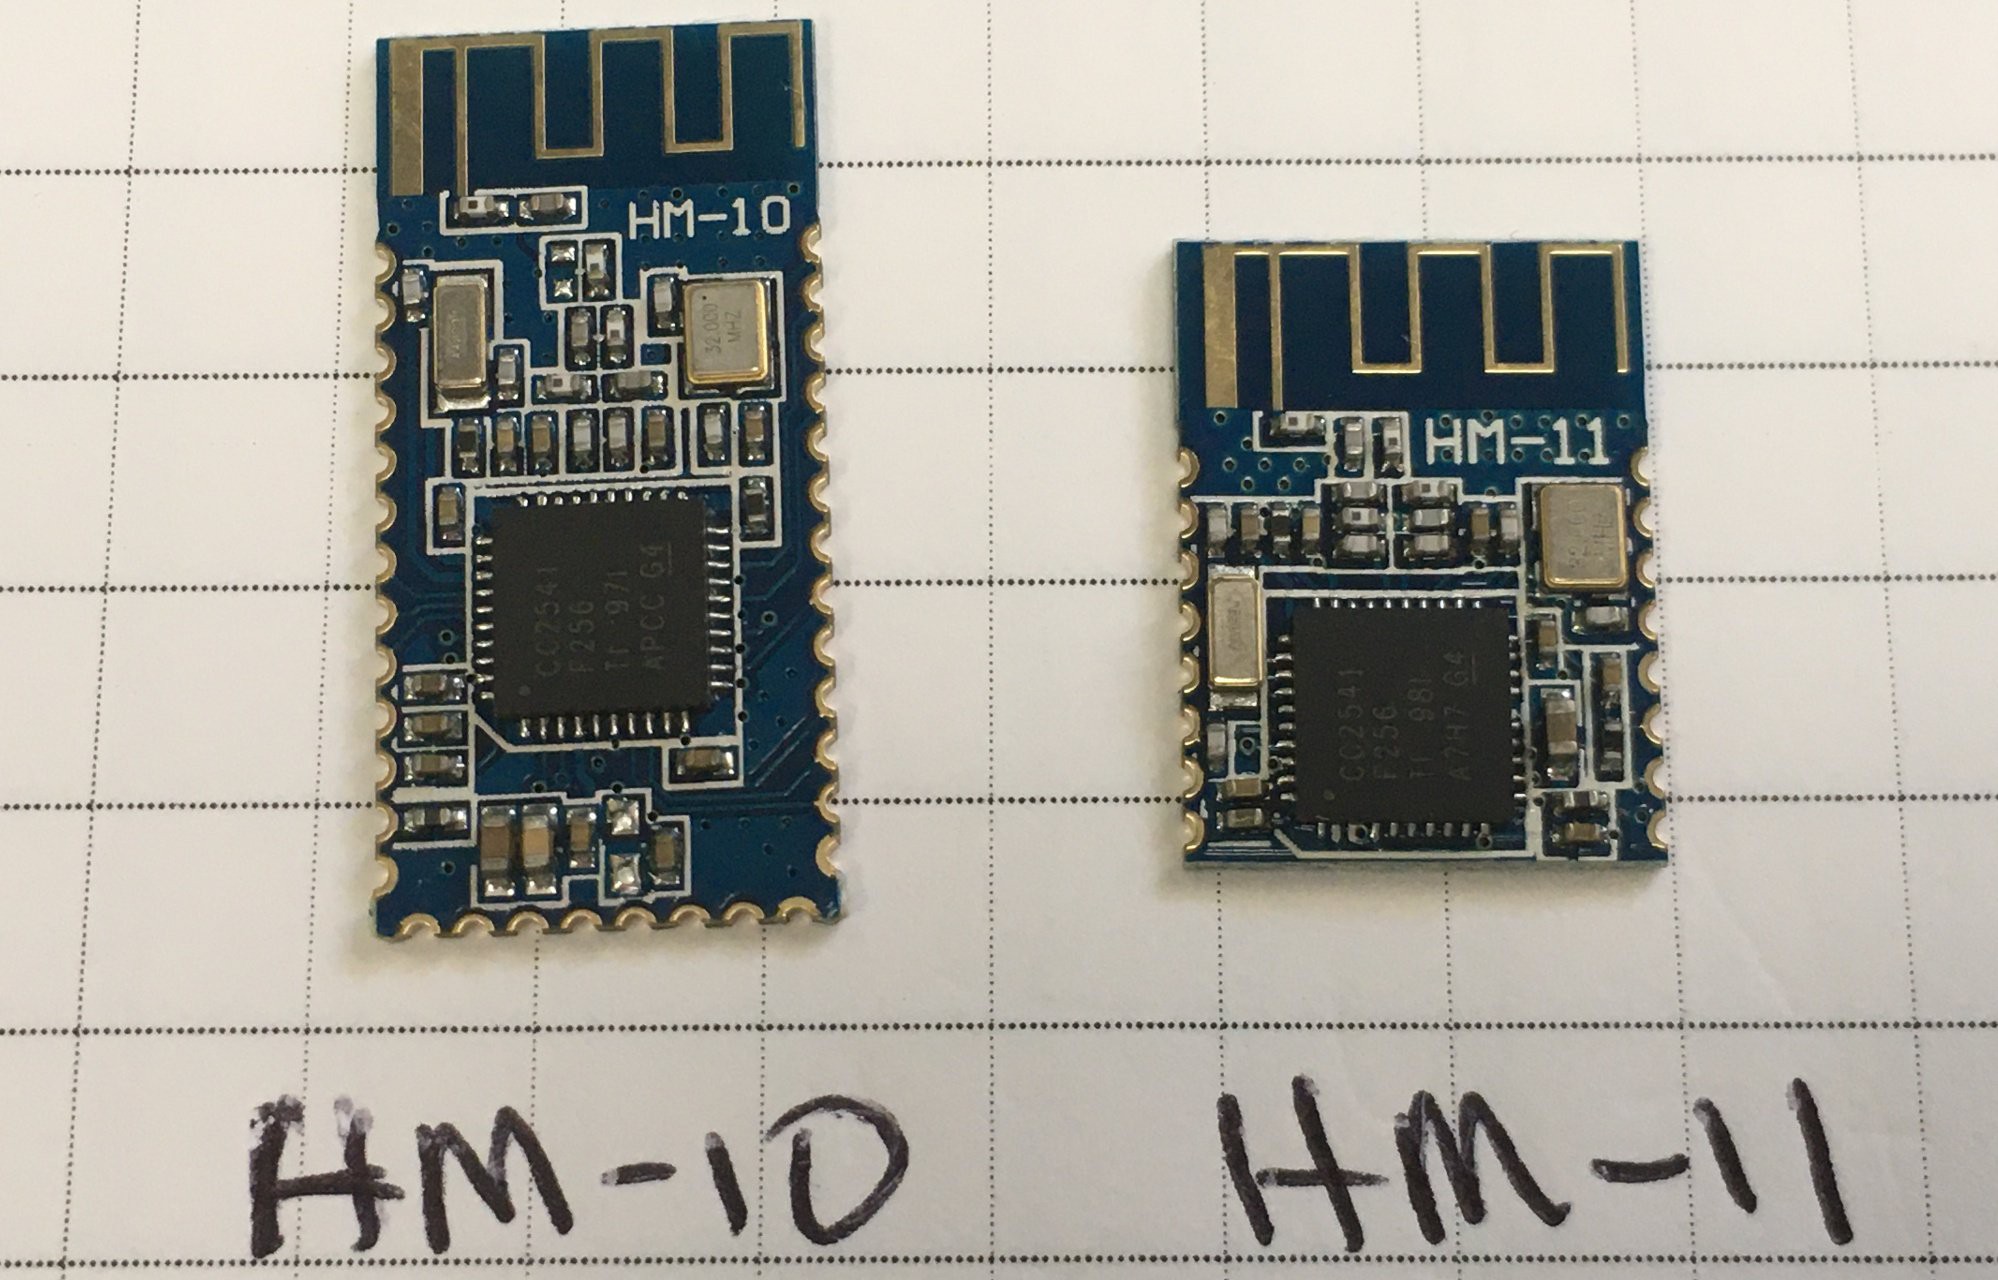
My plan is now to produce a custom PCB that can be used for the Joystick, with a snap-off segment that forms a smaller PCB to be used inside the Hover-Board. Instead of using the full sized module on it's carrier, I'll probably just use the minimal surface-mount module. Here is the HM-10 and it's little brother, the HM-11. Note: Those are 1/4" grid squares they are sitting on.
![]()
I'll open-source the PIC software and protocol so anyone can create their own joystick/controller using a pic, arduino or other smart controller. You could even use a Raspberry PI, and do image processing for a visual controller.
-
Log #9 BLDC Hybrid drive with "2-speed Shifter"
07/22/2020 at 19:25 • 0 commentsWhile I was experimenting with controlling the speed of the H/B drive wheels, I realized that really slow speed control was difficult to achieve with reasonable torque. This is unfortunate, because I'm anticipating needing slow (safe) speeds, but I still want to be able to drag a heavy device and child around.
The mainstream control method is to look at the hall effect sensors to determine the current phase, and then drive the desired (next) phase with a PWM signal. The duty cycle of the PWM signal controls the "strength" of the rotational torque which effects the speed of rotation. So to get a very slow speed, the PWM duty cycle must be very low, and then so is the torque.
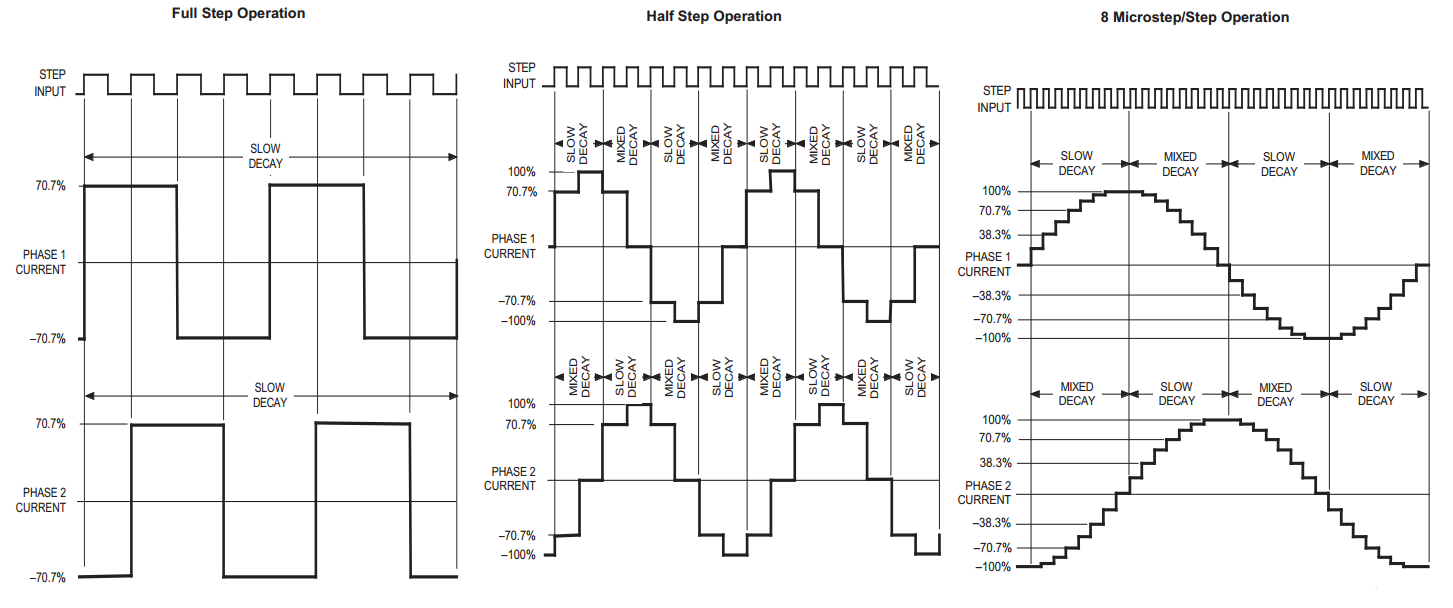
I started researching other brushless drive strategies, and came across several articled that described how to run a BLDC (Brush Less DC) motor like a stepper motor. Anyone who has used a stepper motor knows that the torque is very high, and you can move them slowly, but they are very "cog-y".
The speed of a stepper motor is set by manually stepping the drive phases through their sequence at the desired rate. This essentially ignores the normal system of letting the motor free-run, and holds each step for the desired duration.
Since you are effectively holding the motor in stall, you do need to worry about heating. But you can still use the PWM to vary the amount of current/torque available. Unfortunately, this type of drive strategy produces a very noisy and "shaky" wheel motion. This is because the hoverboard wheel is divided into 90 "steps", so each phase jump corresponds to about 1/4" of forward motion.
I finally came upon a more elegant way to run the motors in Stepper Mode. If you have the processing power available, you can switch from square waves to sine waves for driving the phase coils. Technically this is called micro-stepping.
![]()
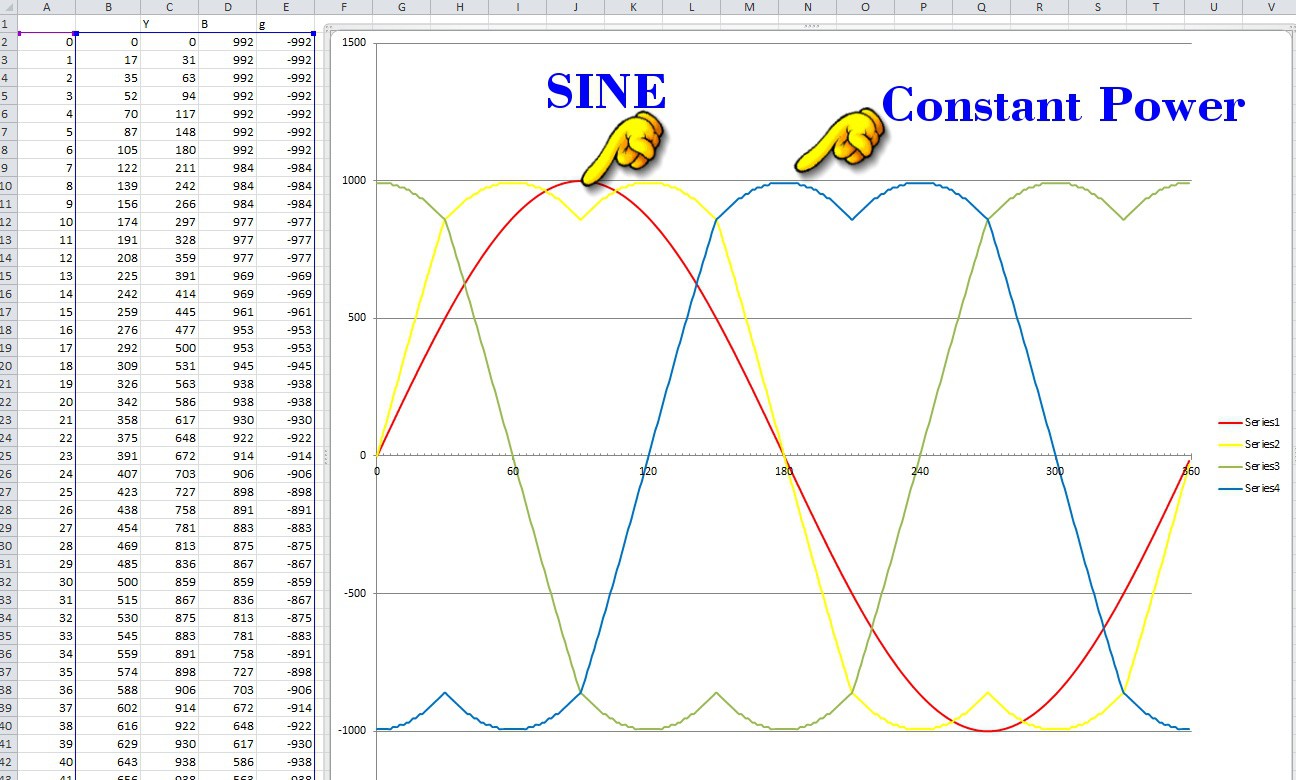
In this mode, instead of jumping from one phase to the next, the wheel does a smooth transfer (in micro steps). It's not perfect, but it's much quieter. I also discovered that instead of using a pure sinusoid, you can use a different curve (called a constant power curve) which is apparently smoother. I tried both methods and eventually decided on the constant power curve. To implement this, I used a spreadsheet to determine the curve values, and then I coded them as a lookup table with 1 degree steps. Since my PWM values go from 0-1000 that's how I scaled the table, but eventually I decided to scale these values down to 1/8th of this to limit self-heating of the motor.
![]()
Having discovered and implemented this new drive strategy, I ran some tests. I discovered:
1) I could accelerate very slowly a stop to a preset velocity with a substantial amount of torque.
2) Rather than using a pure sinusoid, there is a modified "constant power" cure that can provide a smoother motion.
3) If you are not careful you can overheat the wheel (and probably the drive FETs) if you don't scale down the overall voltage when applying the drive curve.
4) Once the rotational speed reaches a certain point (about 5% of full speed for me) the motor will start to jump and skip steps if it's put under load. I suspect this is because I'm not able to run through the Sine wave power curve fast enough.
So, I had a dilemma. The classic drive method works great for high speeds but lousy at slow speeds, and the new stepper method is great for slow speeds but lousy at high speeds.
My solution was to create a hybrid mode that switches between the two drive methods at a certain drive speed. The chosen "shifting" speed is the top speed that the stepper method works well. The final implementation of this strategy can be found in my hoverboard repo. Check out the bldc.c code.
My code can run the drive in several modes:
0) Open loop constant power (traditional)
1) Closed loop PID speed control (traditional)
2) Stepper motor mode
3) Hybrid Stepper/PID (Automatic shifting at MAX_STEP_SPEED)
Note: It took a lot of experimentation to get a smooth "shift" when shifting down to the stepper mode.
-
Log #8 Mechanical Interface. 2nd Gen.
04/18/2020 at 13:10 • 0 commentsIn Log #7 I showed my first attempt at pairing the hoverboard with the Jenx Stander.
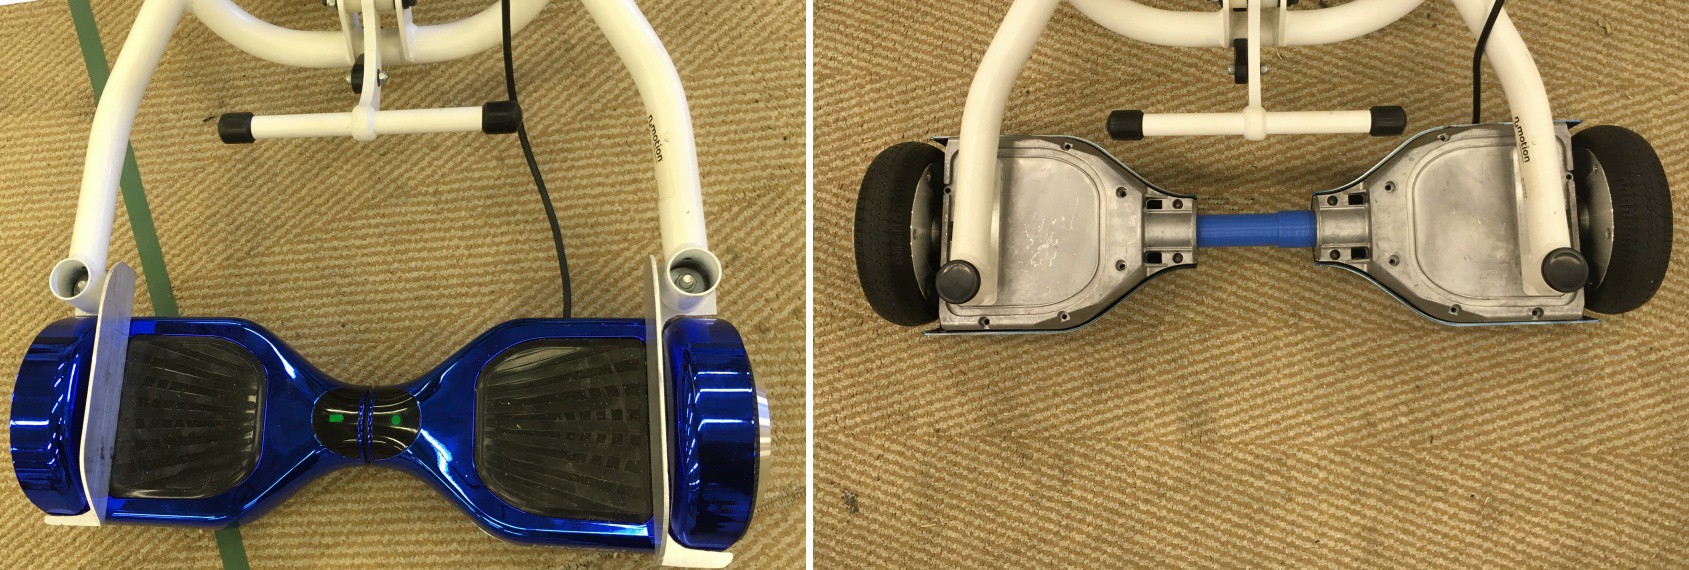
It was OK, but not optimal. I really wanted to find a method that still used the Caster mounts, but one that provided a better turning radius, was very robust, and did not require major mods to the hoverboard itself. This meant I had to disassemble the hoverboard and really look at it's internal structure. I wanted to find a way to design an external mounting plate that could be attached to the hoverboard using existing mounting holes, surfaces etc.
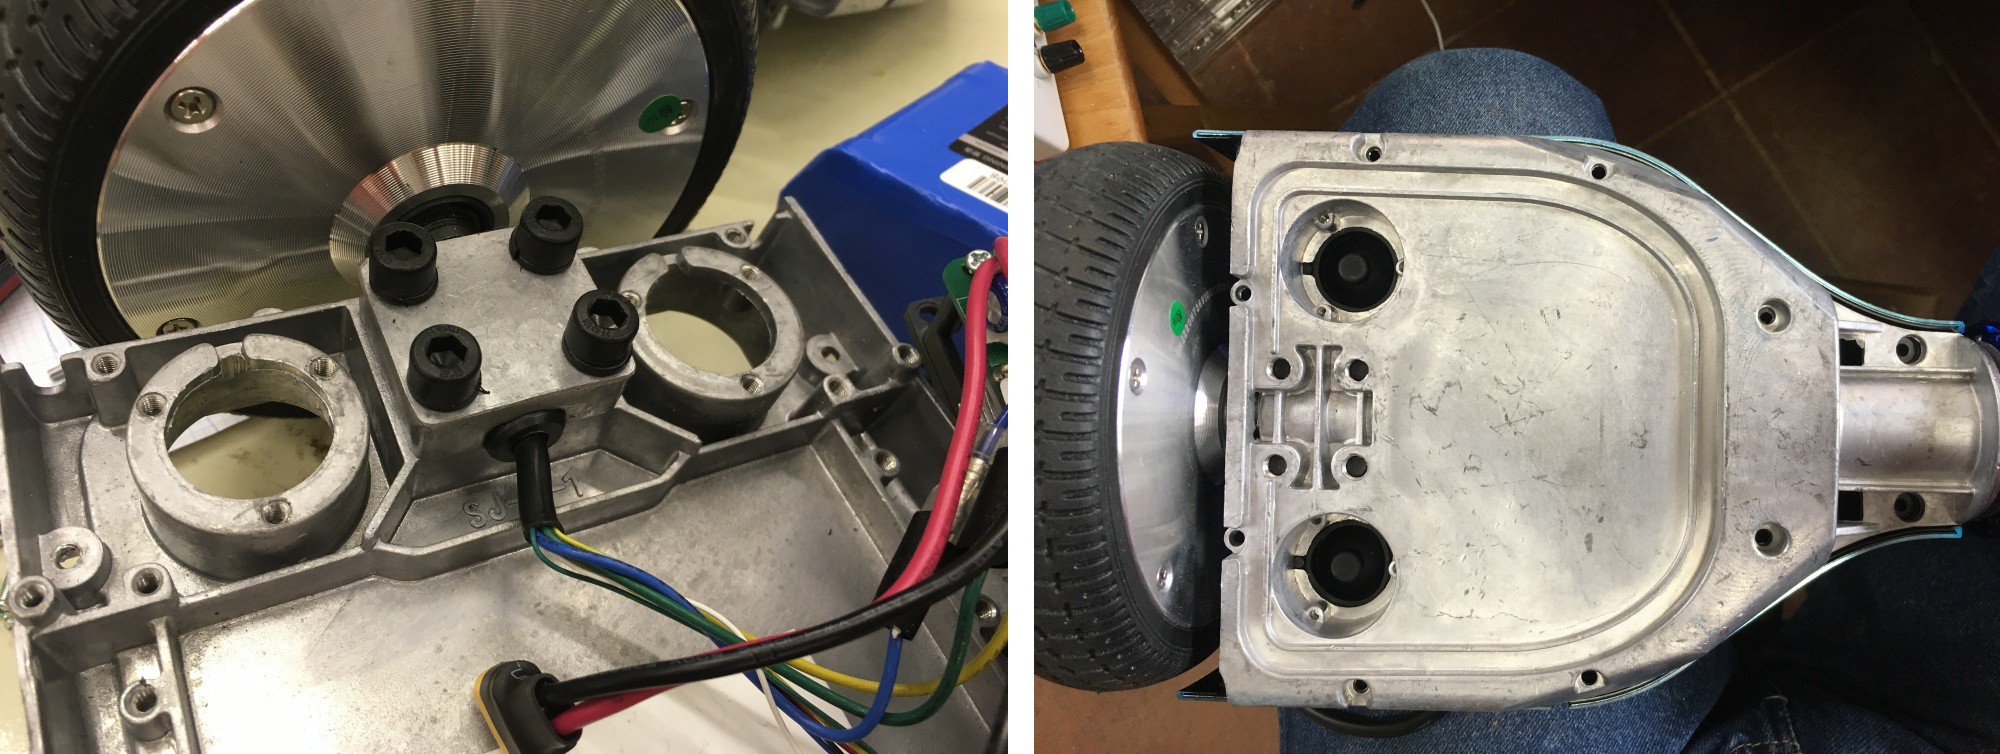
The HOVER-1 ULTRA uses a very strong cast aluminum frame with plastic clamshell covers to shield the electronics. (See this gallery pic). What was interesting is that there are opening in the aluminum underneath the electronics to allow the "foot detect" switch actuators pass through. These are beam-break sensors on the bottom of the PCB that are actuated by rubber mounted pressure plates on the outside of the hoverboard. After completely disassembling the hoverboard I could investigate my options.`
![]()
The underside is on the left, and the topside is on the right.
The one thing I was most concerned with, when designing the mounting method, was keeping the attach-point as close as possible to the wheels. The further away these two points were, the greater the buckling force would be on the board and the mounting plate. Greater forces mean heavier plates and bigger bolts etc.
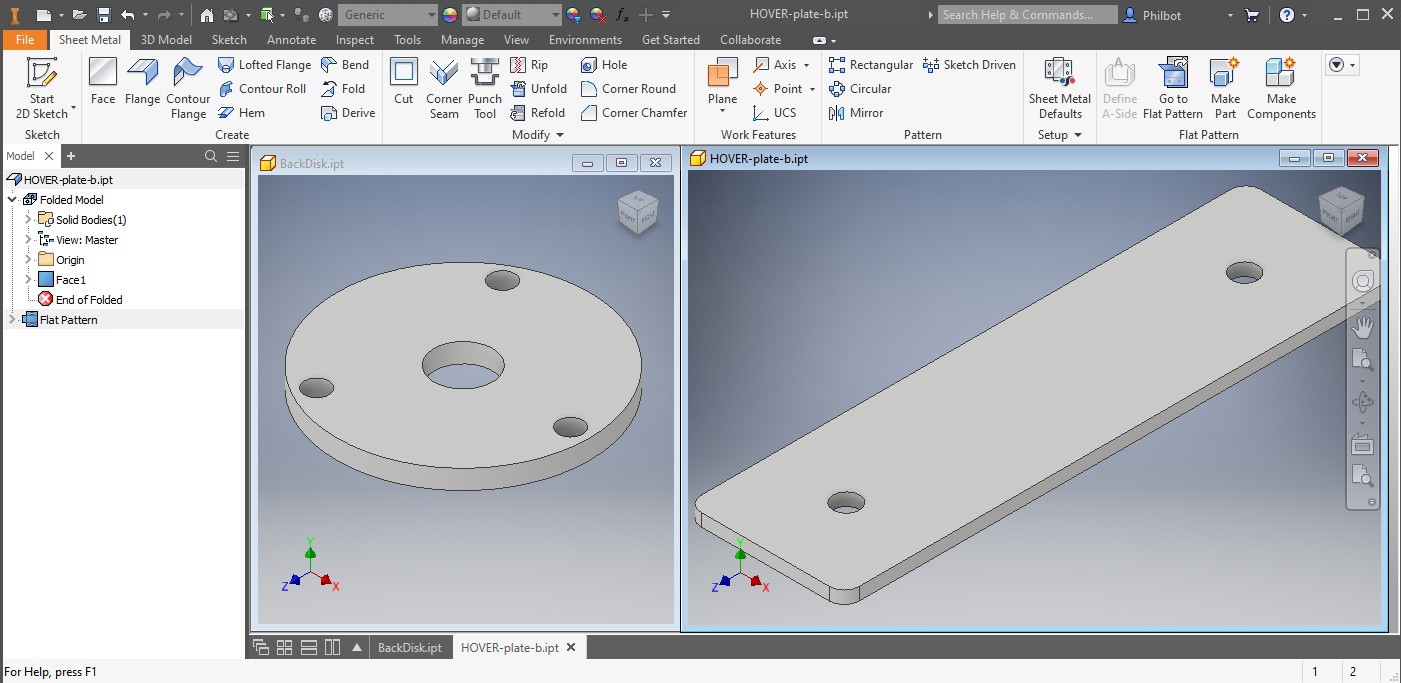
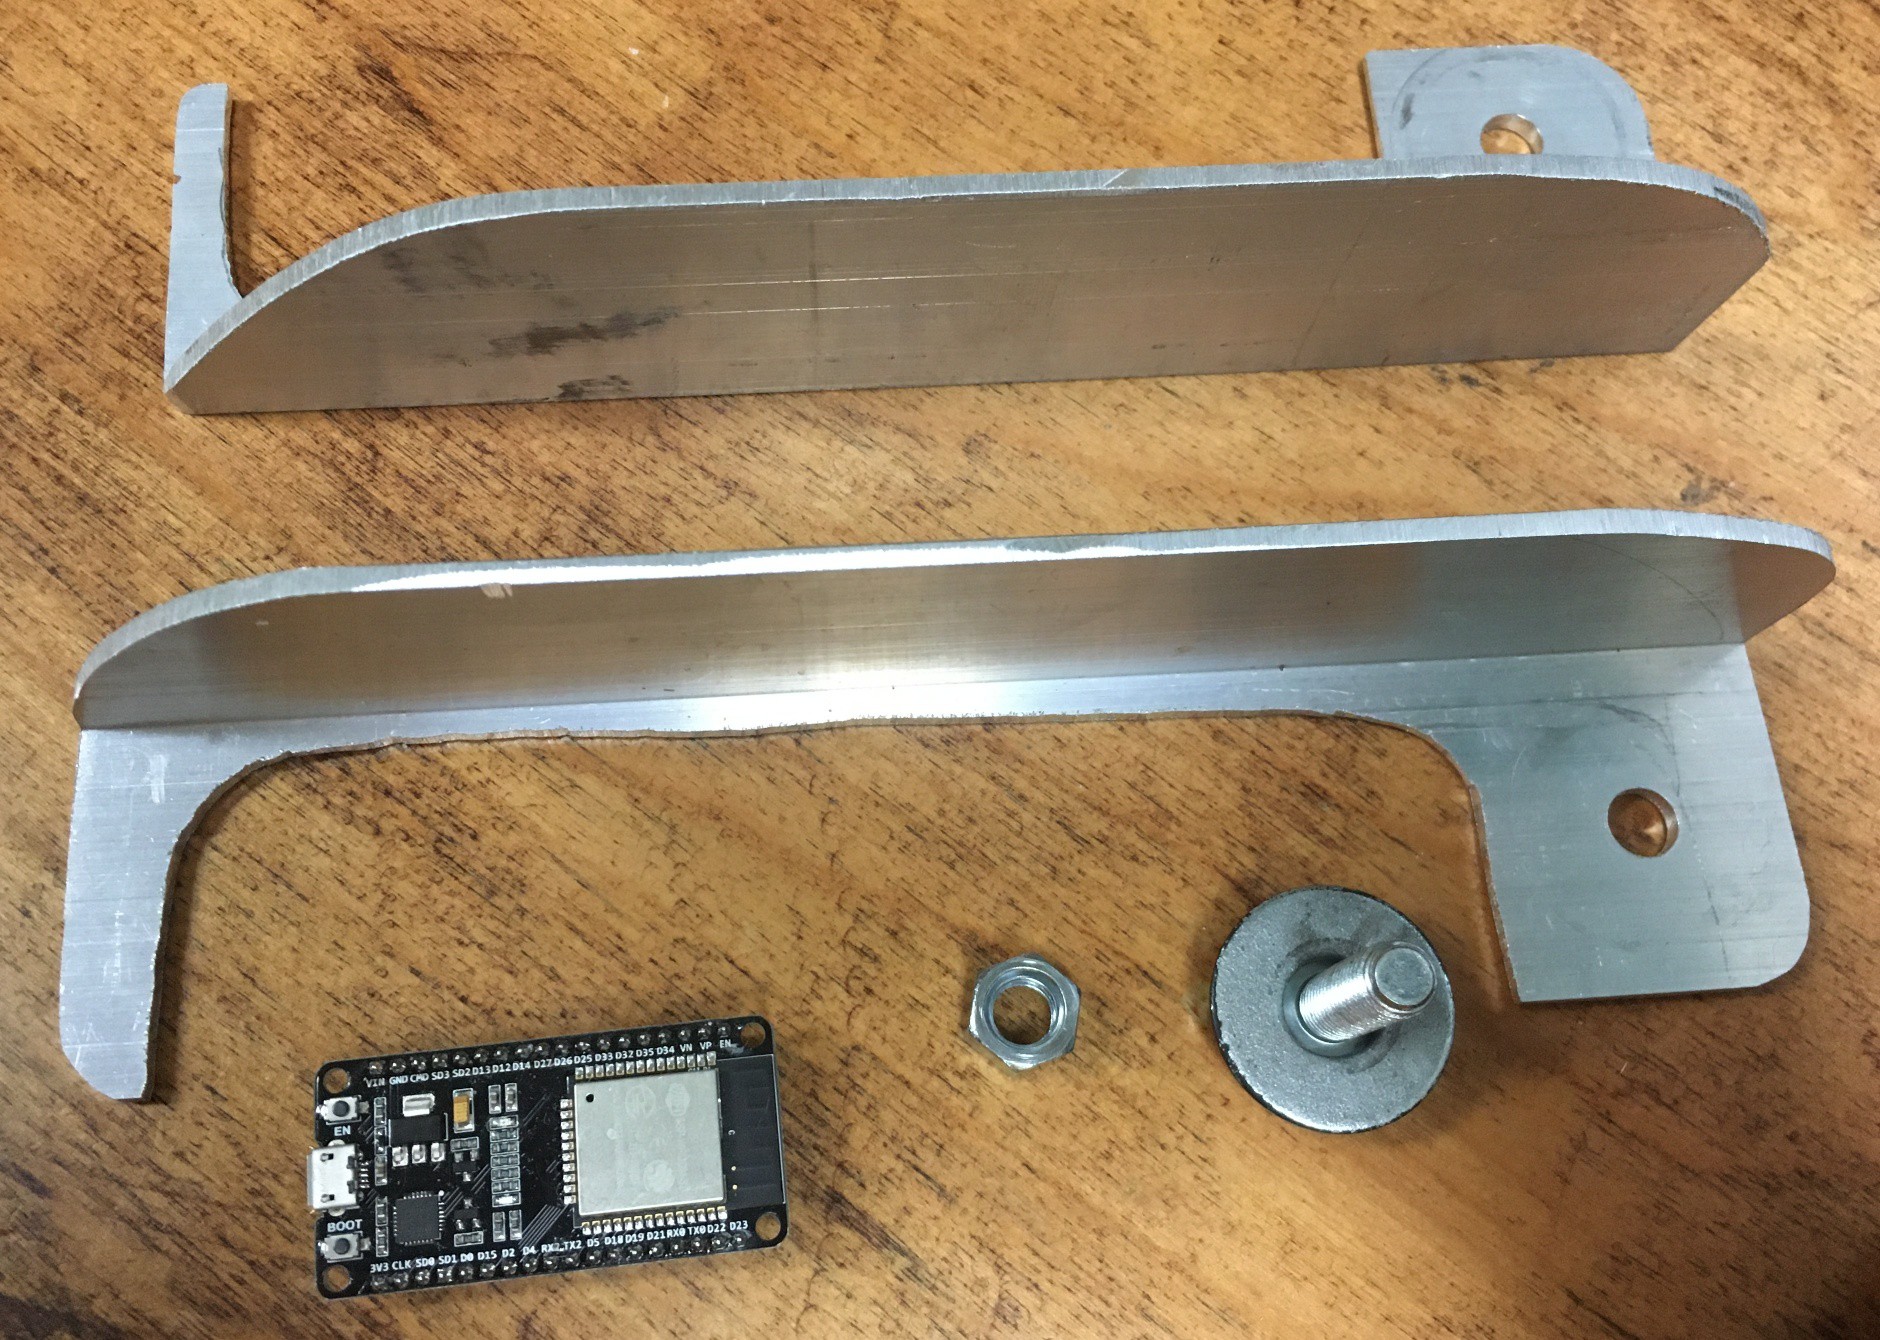
In the end I think I came up with a clever solution. I would form a hoverboard "sandwich" by placing a small aluminum plate on either side of the board, and tie them together with bolts that went through the large openings. I would use an oversized bolt, which would also form the mounting point. The "bread" plates on the underside of the board would actually be small disks that bolted to the chassis using the holes that were used to hold the rubber beam breakers in place. On the topside I would use a single plate, with two matching holes, that fit snugly inside a depression in the casting.
Each side of the hoverboard only really needed one mounting point, so the other bolt was just used to firmly anchor the top plate in place, and help spread the load. The bolt that is going to be a mounting point is attached to it's disk with a locknut, so once it's screwed in place it won't move. The other shorter bolt was inserted through the top plate and just attached to the mounted disk with a nut.
![]()
Note: My plan is to change this method by adding captive rivet nuts to the disks so all the bolts are just inserted from the top once everything is assembled.
I made my first prototypes by hand, but getting the hole spacing and location correct was a pain. Since I knew I would need more I did a quick CAD design and order a few sets from sendcutsend.com You should never discount the time it takes to make a part, and the benefit gained from paying a service to fab it accurately for you.
![]()
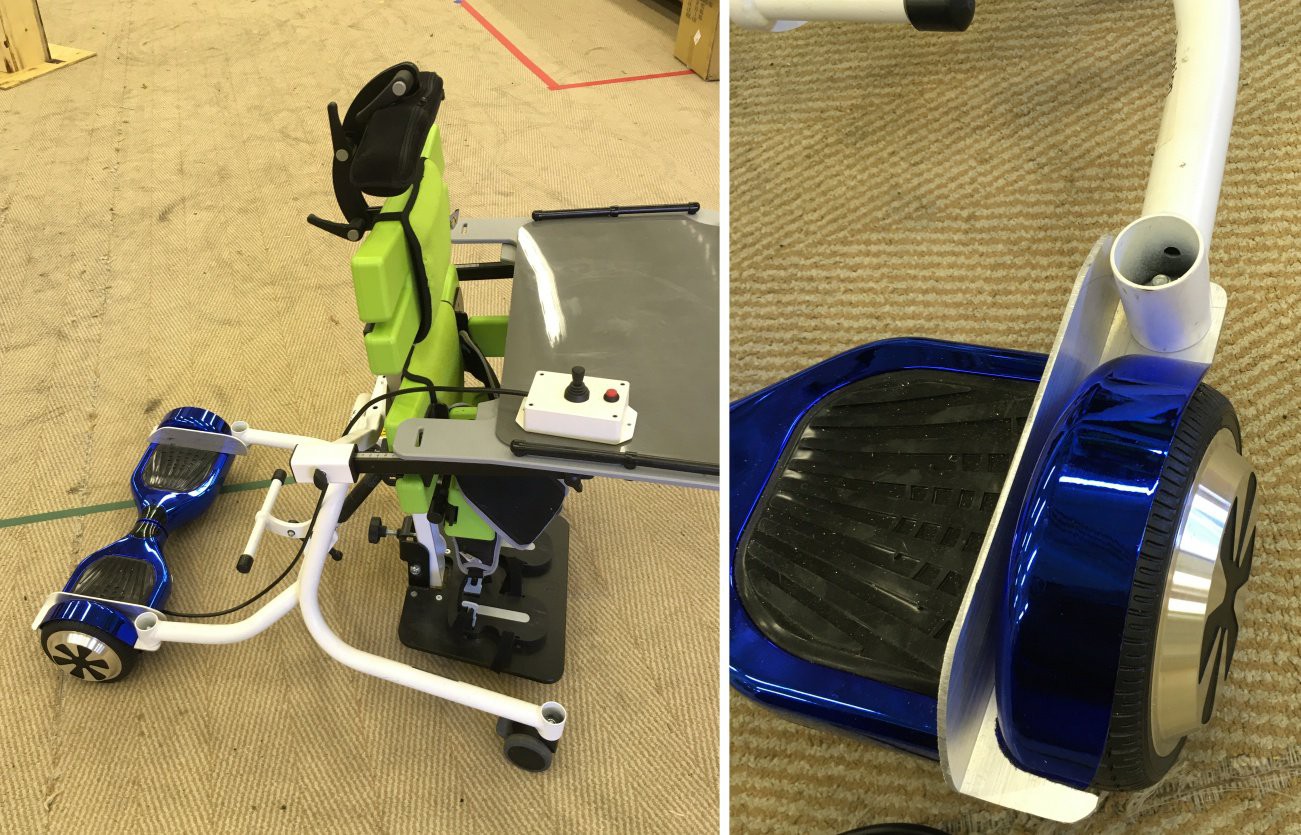
Since the resulting bolt spacing did not match the caster wheel spacing, I had to remove the connecting pivot bar from between the two hoverboard halves. This was actually the most difficult mechanical part of the project, because the ring-clips used to hold the bar in place was a PAIN to get off. I then mounted the two halves to the frame to see how strong everything was. Since the caster mounting holes were inside 1" steel tubes, when everything was bolted together, the resulting structure was immensely strong. With the 3/8" bolt snugged (not cranked) down there was absolutely no wobble or deflection when I placed a load on the Stander.
![]()
The only issue was that I could rotate the hoverboard due to it's single point of attachment. So I decided I just needed to replace the central pivot tube with something else to keep the two sides aligned. This posed a bit of a problem since I had needed to separate the two sides by about 4 inches, and the existing tube was too short. I came up with a temporary solution which will work for now, but I have ordered a longer piece of stainless steel tube that will provide alignment, and additional strength if someone decides to stand on the hoverboard to take a ride.
The other issues was that the power cable that spanned the two sides was now short, so I spliced an additional 4" of wire inline with the existing cable. An alternate way to do this would be to create a short power jumper cable, but I didn't have any of the battery connectors.
I thought it would be fun to compare the two mounting configurations. The pic below shows how much shorter the new configuration is. Couple this with the slightly larger wheelbase and the turning circle & speed control is a big improvement.
![]()
I did some unloaded tests and thinks look pretty good so far.
To complete the design, I made some cutouts in the rubber foot pads to allow the Stander frame to keep a solid contact with the aluminum plate, and re-assembled the clamshell. I think it looks pretty cool.
![]()
-
Log #7 Mechanical Interface. 1st Gen.
04/17/2020 at 23:47 • 0 commentsIn Log #6 I showed how I had gotten the Hoverboard driving, but now I had to consider how I was going to mechanically link it with specific assistive platforms.
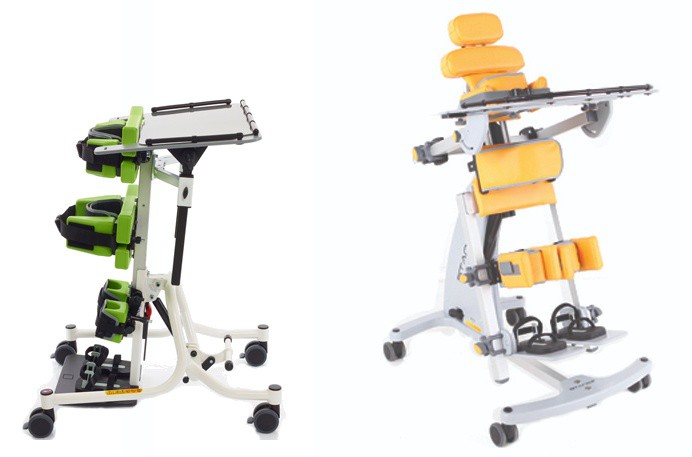
When I contacted a local Occupational Therapist, she showed me two "Standers" that were used by her children clients. These were marvelous mechanical structures designed to support a child with limited, or no muscular strength or stability (my non-medical description).
The two specific devices I reviewed were the Jenx Multi-Stander and the Jenx Standz: Abduction stander. The smaller Multi-Stander is shown below in green, and the larger Abduction stander is shown in yellow.
![]()
I had initially thought I would be trying to add a power drive to a lower cost plastic structure, like a toy ride-in car, but these much heavier structures posed a different challenge.
With a cheap toy, there would be no issues making major mechanical mods to incorporate the Hoverboard drive, but these medical devices range in price from $2-5K so any addition of an external power drive needs to be non invasive. Translation: no drilling holes or bending parts.
The good news was that in both cases the casters are removable with a socket wrench, and so I decided to look for ways to use the existing caster mount-points to attached to the hoverboard. The smaller Multi-Stander was available for me to "play with" so I decided to make this my test case.
The tubular caster supports each has a 3/8" hole so as long as I could use a 3/8" bolt, I was golden.
My first approach was to make brackets that could bolt to the Stander (in place of the casters), and then clip on top of the hoverboard (fitting around the wheel guards). Since the hoverboard was too wide to fit inside the caster mounts, it would need to be slung out further back/forward than the casters. This would impose a considerable torque on any mount. I made some aluminum brackets out of 1/8" thick L-channel. I used the L shape to prevent bending.
![]()
The brackets worked reasonably well, but they had some issues:
![]()
I was hoping that the weight of the Stander resting on the brackets would anchor them to the hoverboard, but this wasn't the case. The rotational torque of the drive when trying to spin the Stander was quite large, and so the hoverboard would lift up and try to spin. As a temporary fix, I used Gorilla Tape to hold the brackets to the hoverboard.
The other issues was that the Stander tended to rotate around the center of the hoverboard, and this caused it to traverse a very wide arc. This made it difficult to navigate in tight spaces.
Ideally, I wanted to move the drive closer to the center of the Standar, without obstructing any of the mechanisms.
-
Log #6 Motion Control
04/17/2020 at 20:52 • 0 commentsIn Log #5 I discussed wireless vs wired control input, and eventually decided on a simpler wired input system.
I have now assembled all the mechanical and electrical components to produce a working Joystick controlled hoverboard. Next I needed to decide on an initial motion control strategy.
My first concern was that if a fragile child would be directing the drive system, the resulting motions needed to gentle yet responsive. My first thoughts were that I needed to control acceleration and deceleration, more so than just speed or power. I also felt that the drive needed to stop more quickly than it started simply to prevent running into things.
My initial code established a strategy for applying an acceleration limit, based on target speed and elapsed cycle time. I tweaked this strategy to allow for a larger acceleration when starting movement than for stopping (eg, if the desired speed was zero, then a larger acceleration limit would be applied).
I then chose different speed and acceleration constants for the axial (fwd/rev) and yaw (left and right) motions.
Needless to say I did a lot of testing with my "make-shift" adaptive platform to get my best "initial" values.
As I was experimenting with the drive, I realized that the final version was probably going to need to be a lot slower, so I would be using a pretty small portion of the full speed range. From my experience with youth robotics teams I know that once you start dropping the voltage on motors using Pulse Width Modulation (PWM), you also reduce the torque available to the motor to overcome things like friction and inertia. So starting to move from a stopped position smoothly can be tough.
So I decided to implement closed loop control for the motor drive. This essentially means that instead of requesting a certain Power for the drive, you are actually requesting a speed (or velocity if you consider moving forward and backwards). Then, it's up to the controller to measure the speed, compare it with the requested speed, and then automatically adjust the power to make the actual match the requested. Thus the control loop is "Closed" using feedback.
I had already implemented speed measurement in the hoverboard code, but I stepped it up a notch by counting individual phase steps, rather than full phases. This gave me 90 "encoder" counts per revolution.
I then implemented a simple Proportional controller with Feed-Forward added. Testing showed that this method ensures that even if I only ask for 1% speed, I get a solid motion.
I was finally ready to try adding the Hoverboard to a REAL assistive device. The challenge was now going to be combining two mechanical systems that were never meant to be combined.
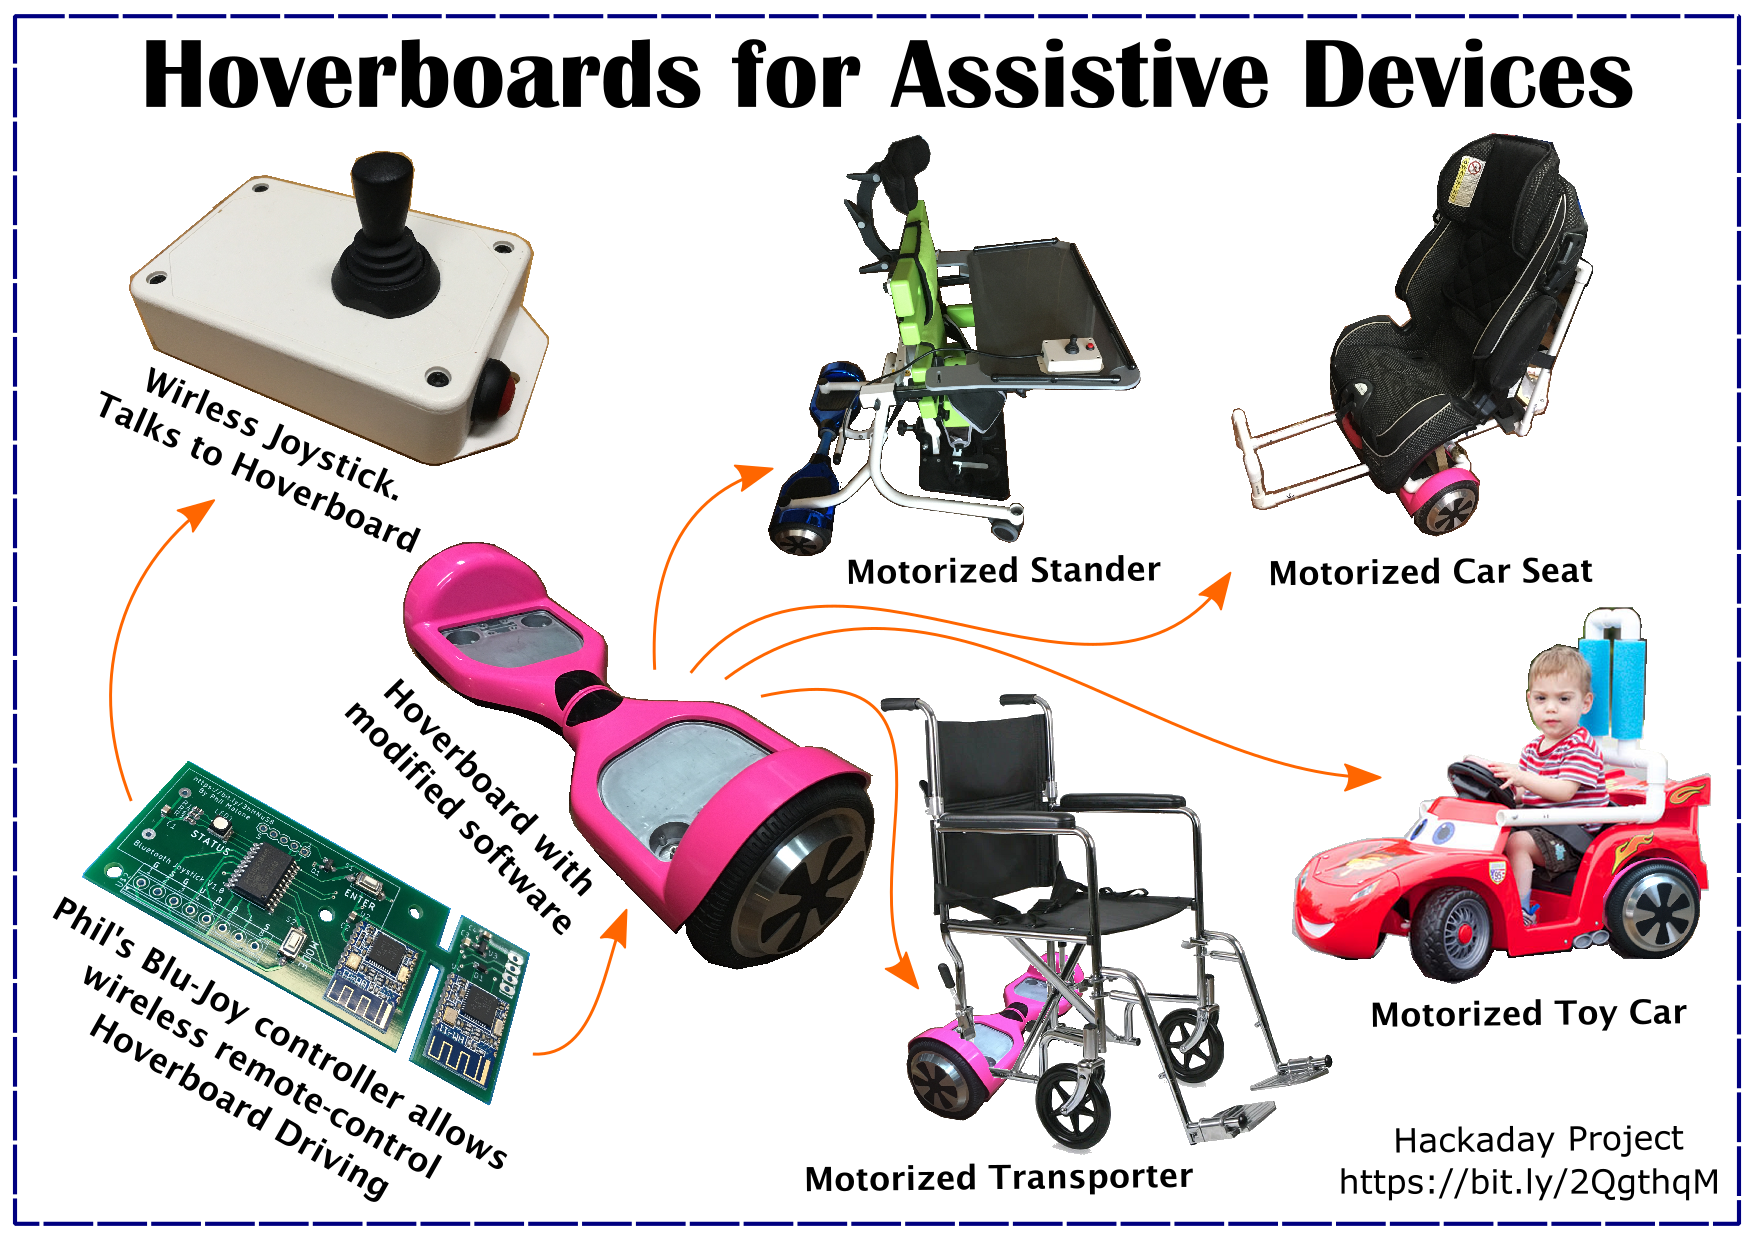
Hoverboards for Assistive Devices
Want to motorize a wheeled assistive device? What better than a hacked hoverboard with brushless motors, electronics and power.
 Phil Malone