 Stephan Goedecke
-
1Prepare stuff you'll need
For this part of the project, you can decide in which direction you go. In the end we want to install a Raspberry Pi in an old Leitz Prado Retro LED-Beamer. The best way to do so is to mount it inside the cage below. The Raspberry Pi fits rather well.
We need to do/consider the following:
- print a case that can be mounted with screws and penny washers (I used this one: https://www.thingiverse.com/thing:922740/files)
- build/buy a 4-pin-audio jack to FBAS/RCA adapter (special pin layout explained here: https://www.raspberrypi-spy.co.uk/2014/07/raspberry-pi-model-b-3-5mm-audiovideo-jack/)
- buying is difficult as they are not many adapters that fit (special pin layout) and most are too long
- if you want to build one, you have to deal with very precise soldering
- decide how to get audio out
- you can use the analog audio output of the Rasperry Pi - then you need to do even more precise soldering as your adapter
- you can use some Raspberry Pi hats for sound (I don't know if they interfere with the pins needed for temperature monitoring)
- you can use Bluetooth audio (didn't get that to work)
- or you can use an USB audio device (used this method with a Bose sound station which turned out to be a good decision)
- check your Raspi skills
- if you are good at running Raspberry Pis headless, you can put everything together from the beginning
- if you are not very experienced with running Raspis headless, you should configure everything on the flly with a keyboard attached and a larger display. You won't be able to work with the small 2.0" display at 320x240 resolution.
-
2Install Raspbian
Download Raspbian Lite (Buster) and write it to a decent SD card (with Etcher, for example).
Then go to the config directory (in Windows it is shown as an accessible drive) and create a file named wpa_supplicant.conf. Edit this file and add your WiFi credentials to connect to your WiFi.
country=US # Your 2-digit country code
ctrl_interface=DIR=/var/run/wpa_supplicant GROUP=netdev
network={
    ssid="YOUR_NETWORK_NAME"
    psk="YOUR_PASSWORD"
    key_mgmt=WPA-PSK
}
Add a file names ssh in the directory to enable ssh access.
-
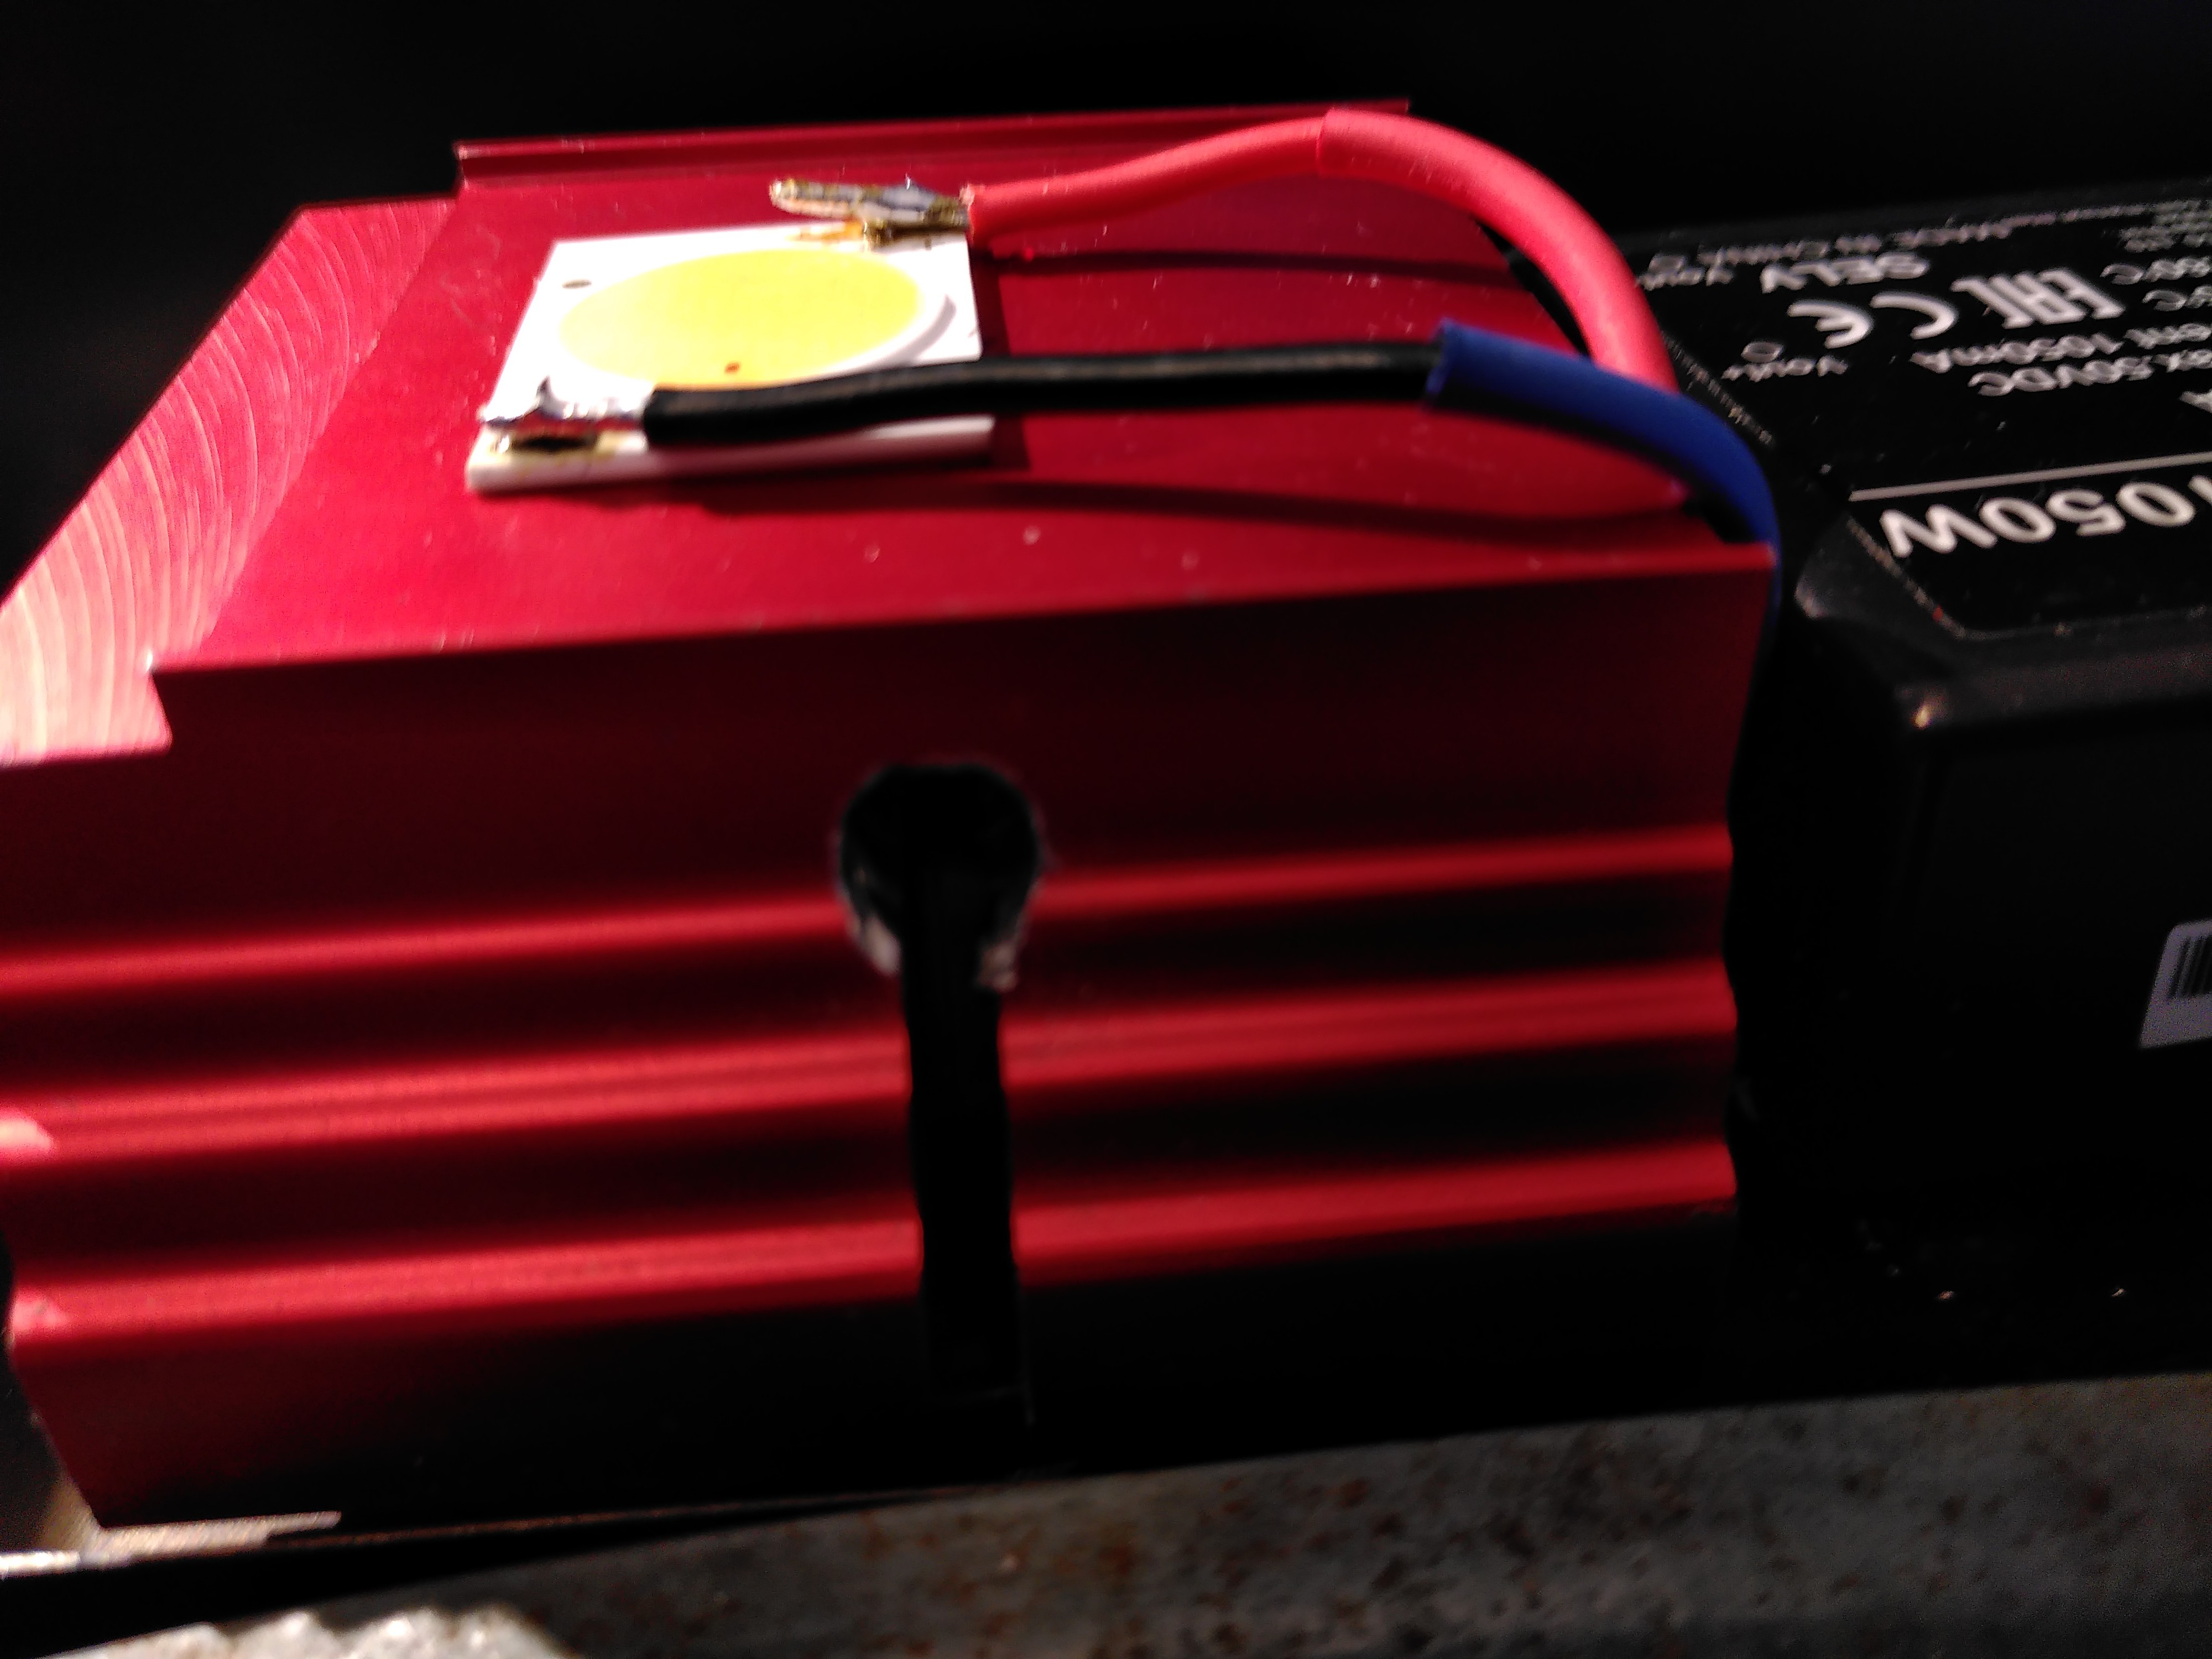
3Mount the DS18B20 (optional)
If you came here from the Retro LED-Beamer Project, you want to do this step first. It's about mounting the DS18B20 to the heat spreader/LED unit to measure the LED temperature.
Don't buy the transistor alone but rather buy the complete probe consisting of a metal probe and a short cable. You will need a 4,7k-resistor, too. Follow this instructions to solder the resistor to a the correct cables and connect the pins to the Raspberry Pi: https://raspberrypi.stackexchange.com/a/48360
Now get a 6mm drill and drill a hole just through the heat spreader. The hole must be at least as deep as the probe's length.
![]()
Put some thermal grease onto the probe and slide it into the heat spreader as deep as you can. You might need to slice the heat shrink tubing a little.
-
4Install Basic components
It is possible to install everything headless, so you can just plug the SD card into your Raspberry Pi and plug in the power. The Raspberry should boot up and after some seconds you should be able to ssh into it with the hostname raspberrypi. Username is pi, password is raspberry.
Type
sudo raspi-configand configure it to your needs. You should configure
- Change User Password
- Localisation Options/Change Locale
- Localisation Options/Change Wi-fi Country
- Localisation Options/Change Keyboard Layout
- Interfacing Options/Camera (Enable)
- Interfacing Options/VNC (Enable)
- Interfacing Options/I2C (Enable if you want to use a display)
- Interfacing Options/1-Wire (Enable if you want to use a temperature sensor)
- Advanced Option/Expand Filesystem
The system will ask for a restart, do it.Now do a
sudo apt-get update && sudo apt-get upgradeto upgrade your system.
Do a
sudo apt-get install xscreensaverto install the screensaver (which we will set to disabled later).
Edit your autostart file /etc/xdg/lxsession/LXDE-pi/autostart and the following lines
@xset s off
@xset -dpms
@xset s noblank
This should disable all Power Management settings.
Download RealVNC Viewer to connect to your Raspberry Pi. Use the username and password of the Pi to connect to the desktop. Set everything to your needs and don't forget to got to Settings/Screensaver and turn it off.
-
5Install InfluxDB/Grafana and start measuring temperature
There are different ways to monitor your Beamer's temperature. You can use a text file for temporary storage, MQTT if you have a smart home or InfluxDB and Grafana to display it remotely. I decided for InfluxDB and Grafana.
Install InfluxDB via
sudo apt-get install influxdb influxdb-clientConnect to your database
influx
and create a database temperature
CREATE DATABASE temperaturePress Ctrl-C to exit the session.
Warning! The database is unprotected. That's fine if you don't put sensitve data in that database and no one can access it from the outside world. Refrain from opening the database port to the internet until you have a proper authentication enabled.
-
6Read data from DS18B20
Follow these steps to connect a DS18B20 temperature sensor to your Pi. No magic is involved. http://tuxgraphics.org/npa/raspberry-pi-ds18s20-temperature-sensor/
At first, get your DS18B20 address
ls /sys/bus/w1/devicesThe sensor id begins with a 28-, write it down or copy it, you'll need it. If you don't see a device, check your cabling.
Now create a folder ~/opt and put the following files into it: getTemperature.sh, logIt.sh and logger_simple.sh.
logIt.sh needs to be edited if you chose a different database name, but tat's optional.
You need to edit logger_simple.sh and put the sensor id into the mySensors variable.
Credits for the bash files go to Magnus Lübeck, https://gist.github.com/maglub/34de79be0a79b9d88cea942766c293d0, I derived my files from him.
Now do a
sudo crontab -e
sudo crontab -eand add
* * * * * /bin/bash -c /home/pi/opt/logger_simple.shSave the file, your job should now run every minute and collect temperature data.
Run
bash logger_simple.shand you should get a temperature and no error messages. This is the temperature probe's temperature, we will work with it from now on.
-
7Install Grafana (optional)
Grafana is used to have a temperature history on the device - it's optional, but a good visualisation of what you are doing.
To install Grafana, you must not use the version in Rasbpian (it does not work) but install a new package.
wget -q -O - https://packages.grafana.com/gpg.key | sudo apt-key add

echo "deb https://packages.grafana.com/oss/deb stable main" | sudo tee /etc/apt/sources.list.d/grafana.list

sudo apt-get update && sudo apt-get install -y grafana
will do the trick (make sure you don't break the line while copying).
The source is here: https://simonhearne.com/2020/pi-influx-grafana/#step-3-install-grafana
sudo /bin/systemctl enable grafana-server
sudo /bin/systemctl start grafana-server
will enable Grafana and start the server.
Warning: we a
-
8Configure Grafana (optional)
Open a web browser, go to http://[your Pi's adress]:3000 and login with admin/admin.
- change your password
- select IinfluxDB
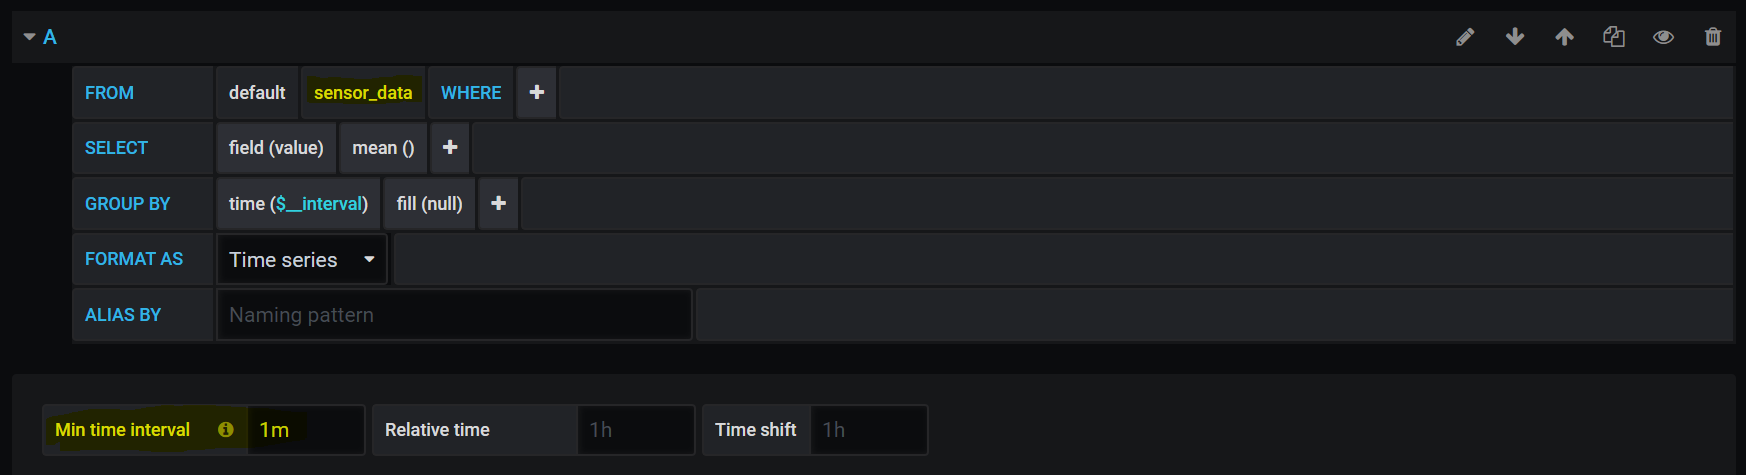
- create a Dashboard - the only thing you have to select is the FROM in the SQL statement. Set it to sensor_data. You can ignore the WHERE clause if there is only one sensor.
- Set the Min time interval to 1m (lower left)
- Configure the Dashboard
You will now be able to review the temperature of the LED and the history. Some words about the sensor temp. The DS18B20 measures the temperature of the heat spreader. This temperature is lower than the temperature we are interested in, the LED temperature.
This temperature is significantly higher than the temperature of the heat spreader as the LED is mounted on a COB and glued to the heat spreader. All these components have a thermal resistance which is calculated as Kelvin per Watt (K/W). This thermal resistance depends on the material. This thread https://www.ledhilfe.de/viewtopic.php?t=23448 (German, see last comment) gives some values. It ends with the conclusion that you have to add like 53K to the measured temperature. If your sensor reads 50°C, the LED temperature is 103°C. That's hot, but still ok. The temperature of the LED should not go over 120°C.
To check if your cooling system is suffiscent, open the Grafana Dashboard and wait for at least an hour to see if the temperature stops increasing.
If the temperature does not stop increasing, you will damage something, either the LED or the soldering. Soldering connections melt at 150°C LED temperature (means 97°C sensor temp). -
9Get the LCD up and running
If you want to display the temperature data to an LCD display at the beamer, you can use a 128x64 wide SD1306 display I2C for this. You can print a holder for the LCD screen.
Follow these instructions on how to attach the display to the Raspberry Pi. You need to use 3,3V pin for power (if your display works with 3,3V) and use another ground as the one in the display is taken by the DS18B20: https://indibit.de/raspberry-pi-oled-display-128x64-mit-python-ansteuern-i2c/#Bibliothek_einbinden
In the end I connected the display to 3,3V and the temperature sensor to 5V. Be careful, I fried one of my Raspberry Pi's i2c-Ports.
To check if you did everything correct, type
i2cdetect -y 1
The output should look like this:
pi@raspicast:~ $ i2cdetect -y 1
     0  1  2  3  4  5  6  7  8  9  a  b  c  d  e  f
00:          -- -- -- -- -- -- -- -- -- -- -- -- --
10: -- -- -- -- -- -- -- -- -- -- -- -- -- -- -- --
20: -- -- -- -- -- -- -- -- -- -- -- -- -- -- -- --
30: -- -- -- -- -- -- -- -- -- -- -- -- 3c -- -- --
40: -- -- -- -- -- -- -- -- -- -- -- -- -- -- -- --
50: -- -- -- -- -- -- -- -- -- -- -- -- -- -- -- --
60: -- -- -- -- -- -- -- -- -- -- -- -- -- -- -- --
70: -- -- -- -- -- -- -- --
If not, check if you mixed up SDA and SCl.
Now get the lib_oled96-drivers from Github.
cd ~/opt
git clone https://github.com/BLavery/lib_oled96
mv lib_oled96 display
cd display
and copy the file displayTemp.py to the directory /home/pi/opt/display
I'm not a good python coder (beginner level) and got the idea from here: https://indibit.de/raspberry-pi-oled-display-128x64-mit-python-ansteuern-i2c/
No need to to edit this file.
Create a file displayTemp.sh in the same folder. This file needs to be edited: insert your sensor id into the WHERE clause
WHERE \"sensor\"='sensor-id'Do a
sudo crontab -eto edit your crontab and add the script to run every minute.
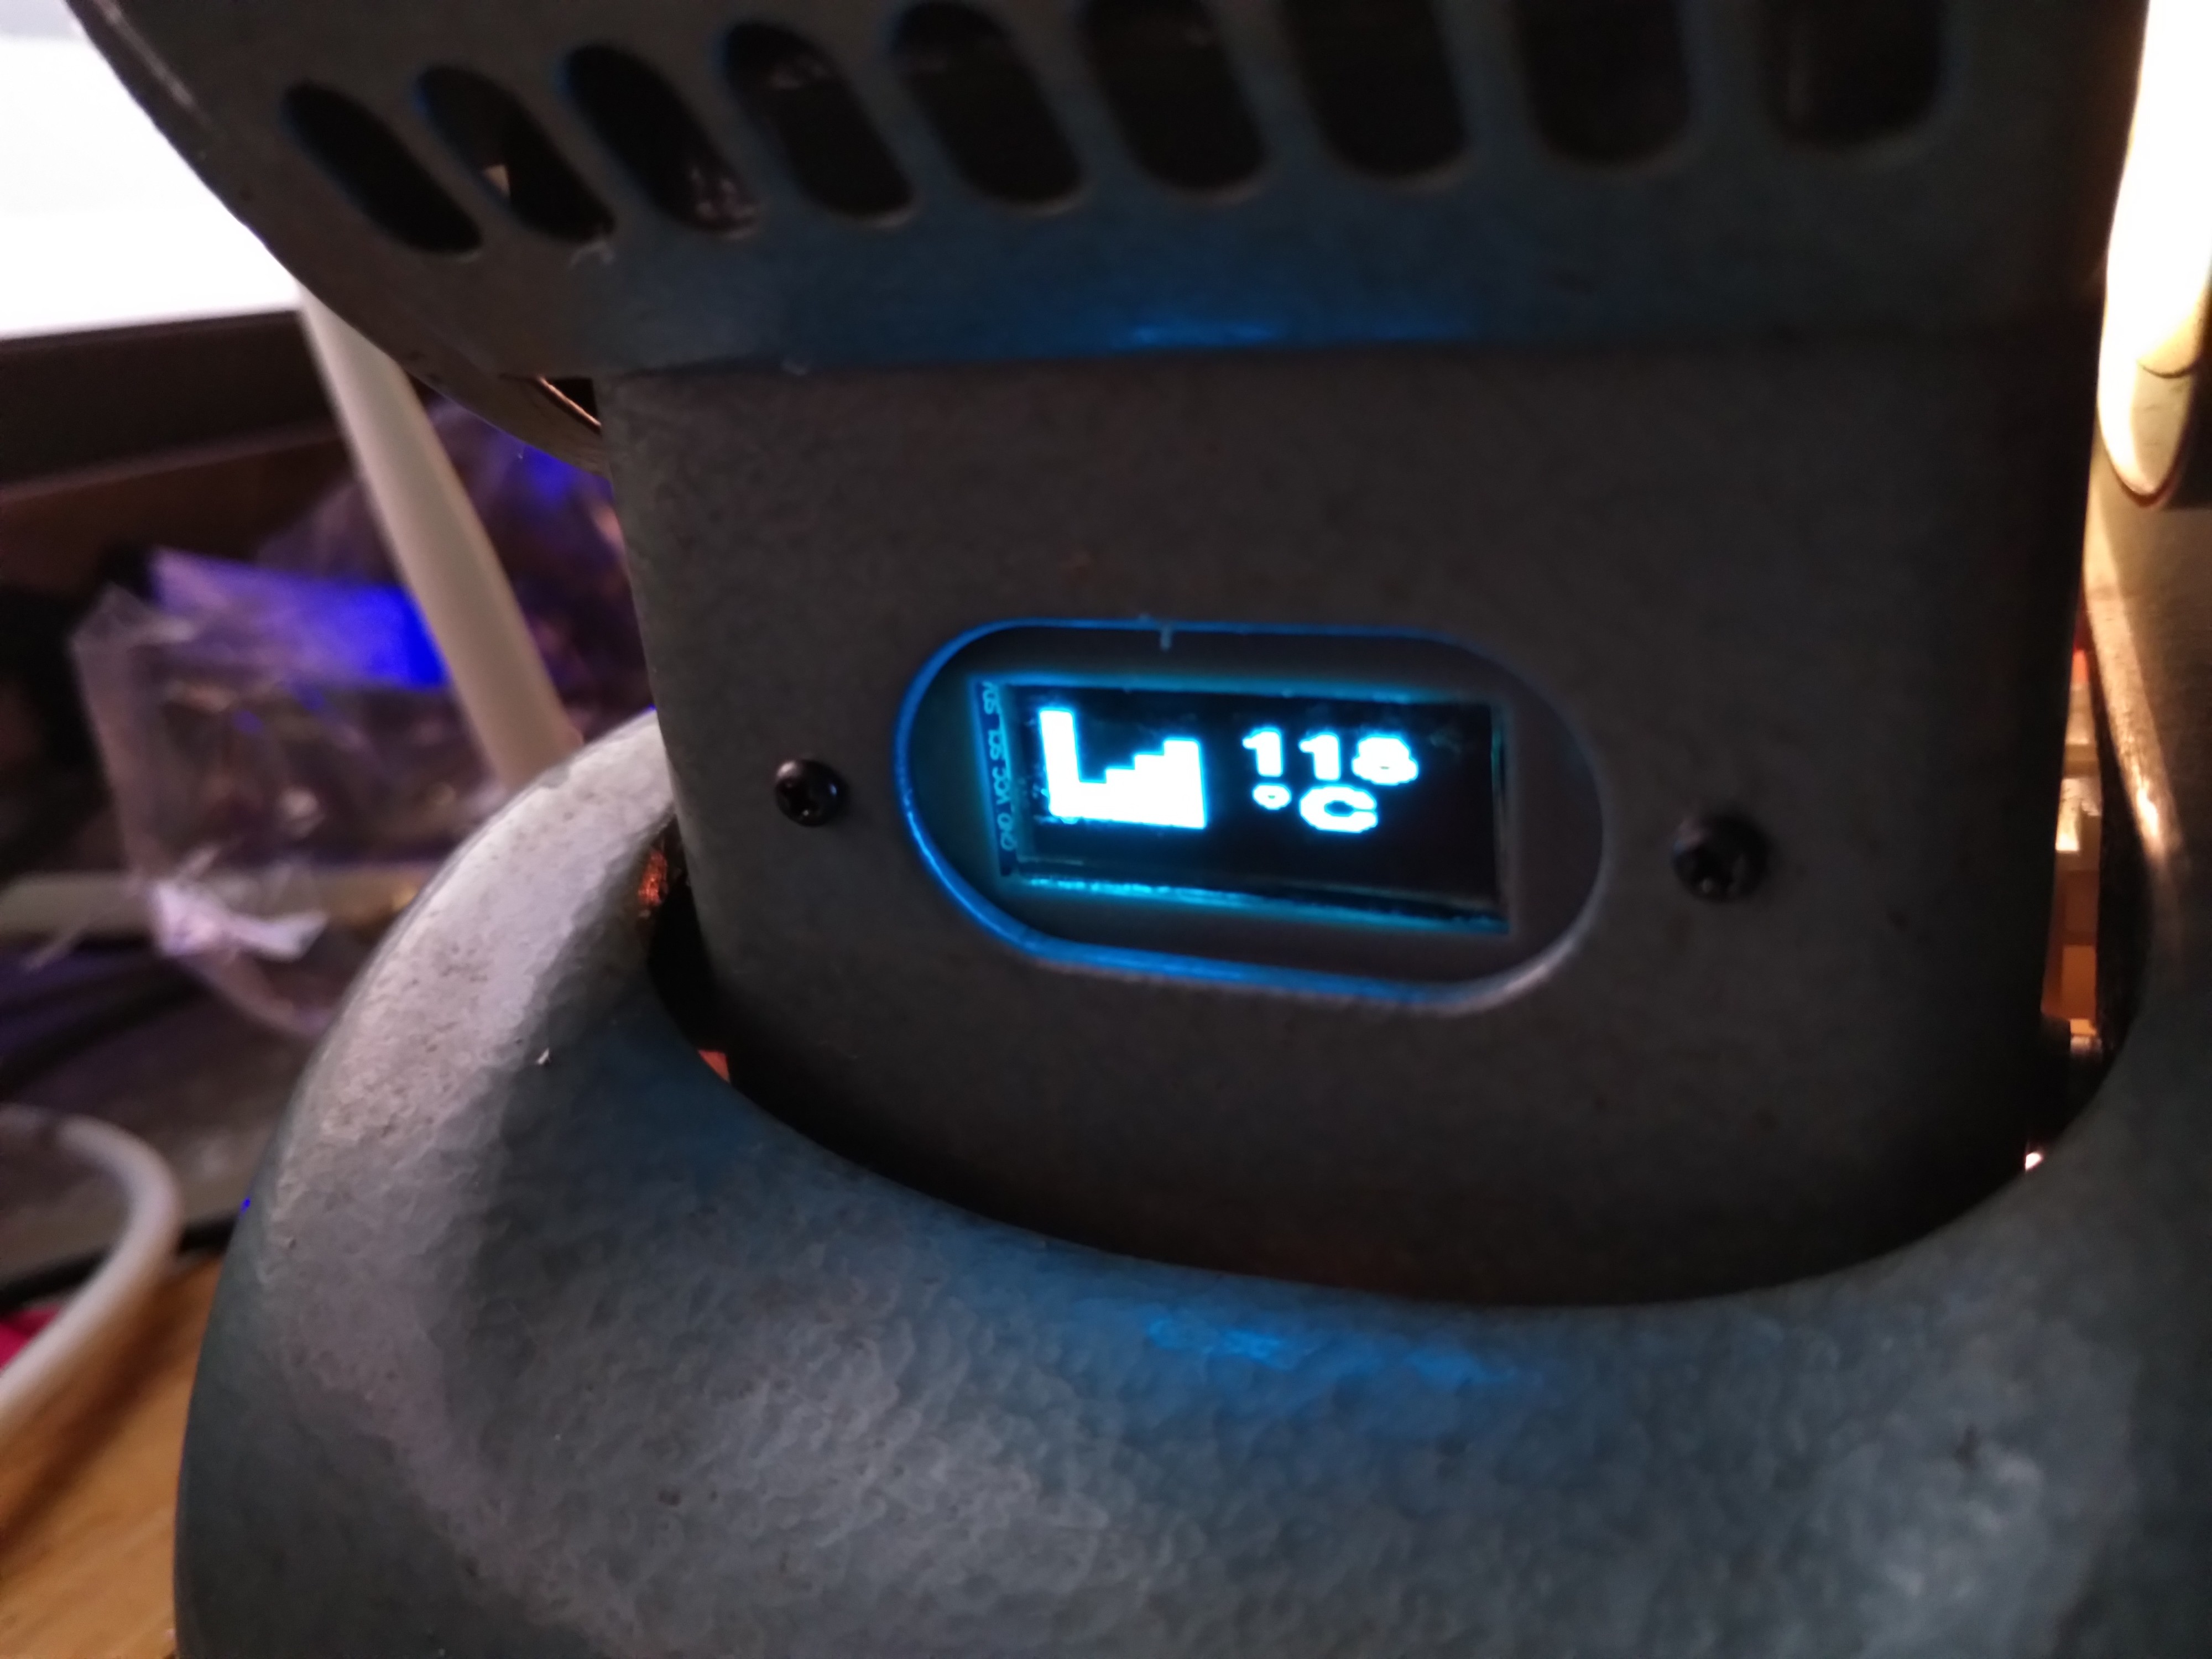
* * * * * /bin/bash -c /home/pi/opt/display/displayTemp.shNow your display should update regularly and show the current temperature and a diagram with the temperature up to 25 minutes in the past.
Warning: if you set this up for the first time, there are not enough data rows to let the script run successfully. You need to wait for 25 minutes until it works.
You should then be able to see a histogram and the current LED temperature on the screen:
![]()
-
10Configure LightDM/Diplay
If you have been working with HDMI and the Raspberry Pi not connected to the RCA/FBAS display, you should now put the Raspberry Pi inside the Retro LED-Beamer and connect the RCA/FBAS output to the display.
Start everything up, you should see a small vision of LightDM on your wall, albeit having a lot of overscan. To adjust the screen to the Beamer, use this small software:
https://github.com/ukscone/set_overscan
Install it with
cd ~/opt
git clone https://github.com/ukscone/set_overscan
cd set_overscan/
make
sudo bash set-overscan
You might need to reboot as overscan is most propably disabled in the config.txt. Run the script again and follow the instructions. I ended up with something around TOP=43, LEFT=87, BOTTOM=67, RIGHT=90
Do a reboot again, you should not see any parts of the screen being clipped.
Get a RealVNC viewer and connect to your Rasperry Pi's hostname/IP. Password is your user/password combination from Pi. Don't try other VNC programs, they won't work.
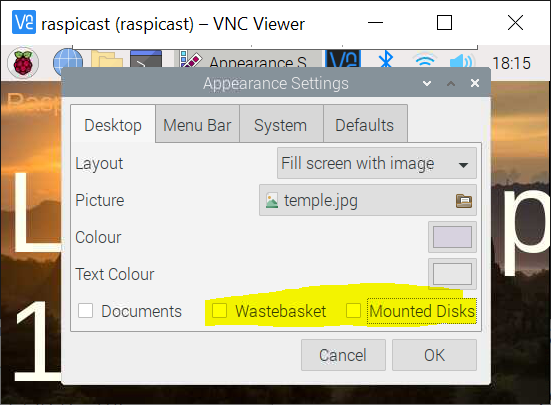
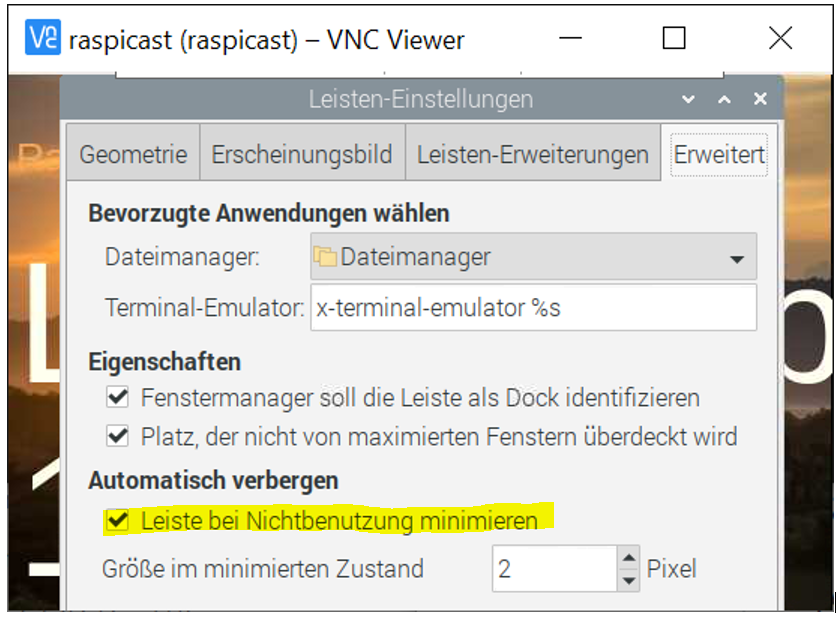
Edit the following (no screenshots)
o go to the start menu, go to settings, choose screen saver and set the mode of the screensaver to "deactivate screensaver"
o right click on Desktop, goto settings and disable the Wastebasket and Mounted Disks, so your desktop looks clean
o right click on the task bar, go to settings and go the Enhanced (?) settings tab - click the minimize the task bar checkbox
If you want to use a Bluetooth speaker (not recommended), VNC can be used to enable the connection or change the background. Congratulations, you have your new Beamers background image set.
Retro LED-Beamer with Raspberry Pi/RaspiCast
Upgrading the Retro LED-Beamer with a Raspberry Pi and Raspicast center (and temperature control)
Discussions
Become a Hackaday.io Member
Create an account to leave a comment. Already have an account? Log In.