 Pedro Minatel
-
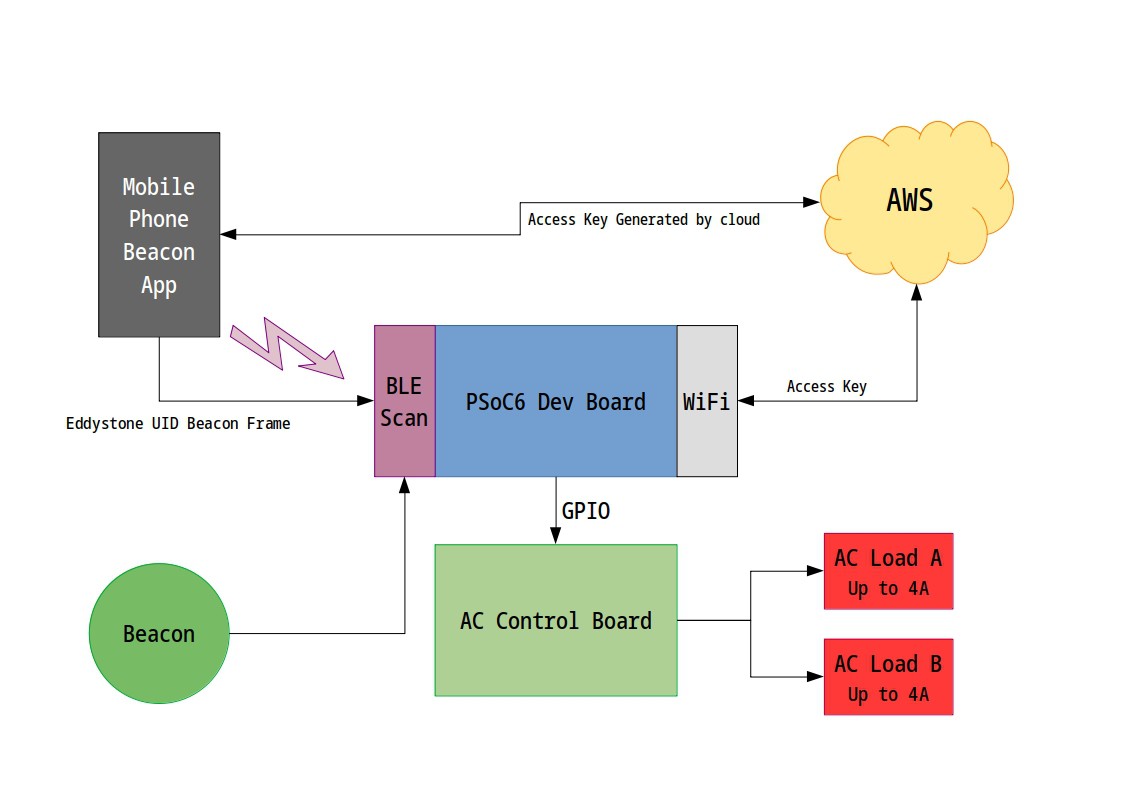
1Project Architecture - High Level
This project consists of a device capable to detect the presence of a human or a specific object using Bluetooth Beacon. This project can be used in a environment that is not intended to have any physical contact to a light switch or any other object that requires physical interaction, for example, a room in a hospital or a highly contaminated area.
The main objective of this project is to create a safe environment that the user doesn't need to touch the switch surface to turn on the light. The idea to use this technique is to give some access control and tracking feature, instead using a simple movement sensor.
The basic architecture is a device capable to scan for Eddystone UID beacons around 10 meters (or less) and verify if that beacon is an authorized device to interact with the object. The authorization consists on a shared key between the beacon and the control boards.
In case of dedicated beacons, the shared key is fixed and cannot be changed (I will figure out a secure way to do that).
The picture below shows the desired architecture:

Once a beacon is detected, the state of the light will change to ON if its OFF, and start a timer since the beacon is no longer detected. Once the timer reaches the specified amount of time, the light will shutoff.
Also a detection event will be sent do the cloud for tracking and indoor positioning location. This could help to detect if a person was close to a place that is contaminated and then let the administrator know about the risks and keep the contact tracing under control.
-
2Understanding the BLE scan
Most of the BLE devices are broadcasting information packages through the air. These packages contains information about the device itself and some devices can broadcast advertisement packages; some to show you a store sale or even to share their location.This kind of BLE device that broadcast advertisement packages are called beacon. A beacon device could be a smartphone with a specific app running or a dedicated hardware.
To capture those packages, we can use a mobile phone app or use some kind of scanner. In my case, it will be done by the gateway.
Now I will describe how to collect those packages using the PSoC6 development board.
You can clone my GitHub repo to get all the code here: Beacon Gateway PSoC6 on GitHub
As a start point, we are going to use the WICED platform from CYPRESS to simplify our development. To know more about the WICED, see the link below:
Getting started ez-ble wiced modules
Before starting to scan for BLE devices, we need to understand that are two kinds of BLE scan: passive and active.
The passive scan just reads for devices without sending them any request. In the active scan, it is possible to request more information from the device. So, the active scan is more viable for applications that require pairing.
For our case, we will use the passive scan, since all the beacons are broadcasting the advertised package.
DISCLAIMER: I’m not going to show all the WICED configuration because you can find on my GitHub and this instruction will be large and boring.
To start a passive scan we can use this WICED function:
wiced_bt_ble_scan(BTM_BLE_SCAN_TYPE_HIGH_DUTY, WICED_TRUE, scan_result_callback);
Using this function, you need to use the scan result callback to manage all received information from the scanning. If you use this function, you will notice that you are not receiving any advertisement from beacon devices.
This happens because this function shows only the connectable devices and most of the beacons aren’t connectable. To solve this, we need to use the observe mode to collect all the broadcast advertisement from the beacon devices.
To start a passive scan on the observe mode function, we use the following function:
wiced_bt_ble_observe(WICED_TRUE, 0, scan_result_callback);
Ensure to set the “duration” argument to “0” for a continuous scan.
Now we can read all advertisement from the beacon devices!
-
3 Decoding Eddystone UID
Before
decoding the advertisement data, we need to understand what is
Eddystone.Eddystone was created by Google as a open format to be used on Android and iPhone devices. On the format specification, 4 different format are described.
- Eddystone-UID – Used for identification.
- Eddystone-TLM – Used for telemetry.
- Eddystone-URL – Used to share URL (compressed).
- Eddystone-EID – Used for time based location devices.
To see more about the format specification, see the link: Google Eddystone
For this project we are going to use the Eddystone-UID.
Once we are collecting all packages, is time to filter only the Eddystone advertisement.
To collect the advertisement data we use the following function:
static void scan_result_callback(wiced_bt_ble_scan_results_t *scan_res, uint8_t *p_adv_data)
{
    printf("Found %02X:%02X:%02X:%02X:%02X:%02X RSSI: %d [%d]:             ",scan_res->remote_bd_addr[0],scan_res->remote_bd_addr[1],scan_res->remote_bd_addr[2],

scan_res->remote_bd_addr[3],scan_res->remote_bd_addr[4],scan_res->remote_bd_addr[5], scan_res->rssi, p_adv_data[4]);

    if(scan_res->rssi > -100){
        eddy_decodeUID(p_adv_data);
    }
}
After collecting the p_adv_data, is time to decode the UID package.
Maybe this is not the best approach for decoding UID, but we are trying to show a basic overview. Feel free to submit a push request on my GitHub repo!
void eddy_decodeUID(uint8_t *pkt){
    if((pkt[2]==EDDY_BYTE_16B_UID)&&pkt[6]==EDDY_BYTE_16B_UID){
        eddy_printRaw(pkt);
        if(pkt[20]==0xca){
            app_controlLoadChannel(LOAD_A, CYBSP_LED_STATE_OFF);
            app_timerLoadAReset();
        } else if(pkt[20]==0xfa){
            app_controlLoadChannel(LOAD_B, CYBSP_LED_STATE_OFF);
            app_timerLoadBReset();
        }
    }
}
Output example:
Found 5A:B7:84:F4:C2:9A RSSI: -69  [0]: 03 03 AA FE 15 16 AA FE   00 BF 07 1B 95 9D 8A 92 58 2E 18 67  FAFAFAFAFAFA
Found 53:BD:40:23:1A:47 RSSI: -69  [0]: 03 03 AA FE 15 16 AA FE   00 BF C7 00 10 E2 CD F5 F2 3B EE 23  CACACACACACA
This simple filter was based on the frame format, like in the picture below:
This is a work in progress and I’ll add and update this instruction.
After receiving the expected message on the namespace and instance id, I change the load (AC device connected like a light or any other electrical device) to the ON state and a timeout timer is started since no more data from that device is detected.
Using this approach, I can turn on and off any device by detecting a beacon close to the gateway.
To increase the security, we plan to add a shared key to encrypt the content on the namespace and instance id to avoid fake devices or replication attacks. This approach works very well on smartphones connected to the cloud but not so good for standalone beacons devices (maybe using some OTP “one-time password”).
Please, leave your comment down below to improve this project!
-
4Creating “things” at AWS
To connect our gateway to the cloud, we need to use a cloud service like Amazon Web Services aka AWS.
The first thing we need to do is to register at AWS through the following link:
After registering at AWS, it is time to go to IoT Core: https://aws.amazon.com/iot-core/
Once in the IoT Core, we need to create our device and issue the certificates.
For this project we will use MQTT to send/publish and receive/subscribe from/to the cloud.
We will publish 2 types of message, light state change and beacon detected.
The light state is a simple message to inform to the cloud that a beacon device was detected with the lights on message. This message is just to inform, later it could be used as a kind of dashboard.
The beacon detected is a message that a beacon with the monitored vendor code (MAC vendor part) was detected. This message will be used to monitor and track beacons by a backend application.
To create a new thing we will follow the steps below:
After that the device will be able to connect from the gateway and publish and subscribe topics.
Enjoy!
Bluetooth Beacon proximity gateway
Detect beacons and control things without touching anything!
Discussions
Become a Hackaday.io Member
Create an account to leave a comment. Already have an account? Log In.