To make the experience fit your profile, pick a username and tell us what interests you.
We found and based on your interests.
a few more details on the parts used,
The parts used, where mainly chosen by the immediate availability in my box of bits.
and may NOT be the best parts for the job.
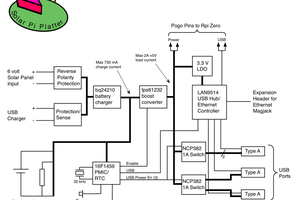
Lithium-Ion, power management
I used an TP4056 based micro USB -> Lithium-ion battery charger board,
to charge the lithium-polymer battery,
it includes Under voltage cut-off to protect from undercharging the battery
(i don't believe its ideal for lithium-polymer batteries, but does the job)
Raspberry pi zero power / USB 5V
the raspberry pi needs 5V for power, as well as for the USB ports,
I used a MT3608 based boost converter module to step this up from the battery voltage
while they appear to be "rated" for 2A I'm probably driving it a bit hard.
LCD adapter and back-light.
I did not buy a module to interface with the LCD, I repurposed an old board i had with the 40pin LCD connector, I did point to point wiring to the raspberry pi GPIO header
combined this with a SX1308 based boost converter module to step the battery voltage up to 23v for the LED back-light
I would consider getting a dedicated LCD interface module. possibly with the back-light step up,
there are a few out there
(having the boost convert separate, may make it easier to make it fit somewhere.)
a couple of images of the internals.
most of the "cheap Ebay boards" had to be modified, cut down, or split up to fit the constrains of the case. it fits together with the boards stacked and positioned closely to "almost" fully utilize the volume.
The screen contains the USB sound card, a small amplifier. and adapter board for the LCD under the one speaker and the LCD itself
Create an account to leave a comment. Already have an account? Log In.
Very impressive. Great build.
I have a 200LX catching dust and have played
with the same idea but could not figure out
to keep the keyboard going. Any pointers you
can give on how to make the mapping not so
painful? How did you solve the powering down?
Do you have some source info on the parts used
(E.g. LCD, adapters, etc.)
Will you do a full write up?
to answer your last question first..
I may.... do a bit more of a write up. but its not likely to be exhaustive, is fairly involved to fit all the hardware, case modifications etc.. its the Journey right? ;)
i will probably post some details, specific to the keyboard and on driving the higher resolution LCD directly DPI.
KEYBOARD.
your first challenge is really the "hardware"
how you are going to connect to the flatflex?
then i used an Arduino MEGA. (you need the high pin count),
and a sketch i found somewhere to scan the keyboard matrix..
then its "just" down to pushing buttons and modify the standard
Teensy USB keyboard sketch to match.
and of course, as the HP95LX does not have the regular layout.
i had to remap a lot of buttons within Linux.
all those custom amber and green chars etc...
(i did a-lot "dirty" tricks to make it work and I'm entirely sure there are neater ways)
HARDWARE
i used mostly off the shelf (as small footprint as possible)
Ebay "China" devices, USB-RS232, USB-Ethernet, USB audio, USB hub etc.
LCD
the "usual suspect" 4.3" LCD has got a 480x272 resolution.
which works. but is pretty poor. i managed to find my one on Alibaba.
but you will have to contact a lot of sellers to get quantity of one.
you need a 40pin LCD breakout and back-light boost circuit of sorts too.
othermod raspberry pi LCD topper comes to mind.
Power down..
I didn't have success with the raspberry Pi. powering up and down. "soft"
so its a sliding power switch on the back for now.
i considered using the PCMCIA eject slider mechanism as the power button.
maybe later
the keyboard power button is mapped separately. so an external circuit should be possible.
I appreciate your candid response. I do hope you write some more regarding your great build.
Do you have a few part information of what you purchased. Especially regarding your display and power management.
I opened my 200LX over the weekend and had a look at how you put this all in there. I’m amazed that you got it all in there.
Hope to read more from you soon.
Maybe a bit late but it can help others.
Concerning the keyboard, this project can be of some interest
https://hackaday.io/project/162281-teensy-thumb-keyboard
Very nice work! That keyboard with its tiny numpad looks really useful for when you inevitably end up using this as a calculator. Are you satisfied with the screen resolution? Is there anything else you would do differently if you built the project again?
I used to use this very same HP95LX back in say 2000's with MS DOS on it.
and the keyboard and number pad is very usable indeed.
at-least for the Palmtop sized "fully fledged" linux termial device.
I personally use Midnight Commander for alot of basic stuff.
so Critically for me. it has got a the F1-F10 keys. aswell as just about any symbol i can imagine printed on it.
A Psion 5 device for instance. (which i would love to do next.) has a great mechanical keyboard, and formfactor. but its limited for Linux use i think.
as for the screen. I managed to source this 4.3" 800X480 screen.
(not the usual 480x272 you see everywhere else)
(this LCD has about 3x the pixels of that)
and with this resolution, for the CLI i even increased font size, as the text it got a bit on the small side. so overall for the size of the display. PPI is actually quite good.
if you want higher resolution even. then I have been looking at both LCD and AMOLED displays with HDMI input. but your battery life will suffer greatly
Different. and again.. I would lay out a custom board to fit all the accessory stuff you see hot-glued around the place. you could consolidate a-lot of things that way
Nice job, it looks like the color LCD was meant to be there in the first place.
thanks Dan. "meant to" is probably a bit of wishful thinking it took a fair bit of hackery to squeeze the lcd and adapter pcb into into the existing screen case in a "tidy" manner.
Looks really good! I'd love to see some of the insides of it, I can't image how you fit both the Pi and the Teensy in there. I assume there isn't enough room for a battery, is there?
to call it a squeeze is probably mild. haha. as you hinted. I was working with some serious volumetric constraints, started by fitting Pi by the IR port, keyboard membrane location determined the adapter board and Teensy location.. then USB hub, serial converter, Ethernet adapter.. various supporting circuitry for battery management and lcd back-light. and the full sized connectors all around fill the voids. the Ethernet connector had to come from an old Xircom PCMCIA card to fit the depth constraints.. all while still leaving enough volume for the large lipo cell commonly found in large 3000mah 11.1 volt drone type battery packs. roughly (35 x 120mm) (anything less and battery-life would make it pointless) all in all it tight..
Edit: i cracked it open and took a couple of pictures
Become a member to follow this project and never miss any updates

 Dan Julio
 Julian Calaby
 Dylan Bleier
 Raphael
Is the pi zero usable speed-wise?
I've got one running raspbian and idled (https://obsolescence.wixsite.com/obsolescence/pidp-11-how-to-use) in my PiDP-11 and just ssh'ing to it takes upwards of 20 seconds.