While surfing Hackaday, I noticed Mohit Bhoite’s circuit sculptures. They were complex and beautiful. I decided to try some circuit sculpture of my own. I wanted to create something that would be fun but not overly complex. My initial sketches led to a binary calculator-a nice mix of nerdy fun with some usefulness. Feature creep took hold, and I ended up making it a dual purpose device: a calculator and a clock. I added a battery backed up RTC and decided to make a charging/display stand for it. Before starting this project, I wanted to try a smaller circuit sculpture so I could hone my skills working with brass rod. I quickly built a 555 timer circuit to get a feel for how to bend the wire and line things up. Starting with a drawing of the circuit on paper ensured that the brass would be the right length and have the proper bends.
I wanted the binary calculator to be handheld and rechargeable, with a nice way to display it, and I wanted to use a TLC5928 LED driver in an SSOP package (mostly to add a bit of difficulty to the project). With the main details worked out, I laid out the circuit in Inkscape. I used this drawing to bend all the brass. I also modelled the body in FreeCAD and printed it out so that I could get a good feel for how it would fit in my hand.
I ended up using the 3D print as a jig to make sure the circuit was square and would fit in to the maple body that I was planning on using for the finished piece. 3D printing the body helped me refine the design. I found that I didn’t like the sharp corners and changed them in the finished product to rounded corners.
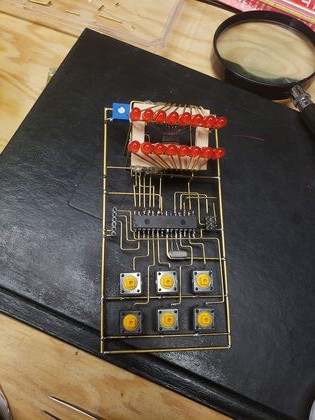
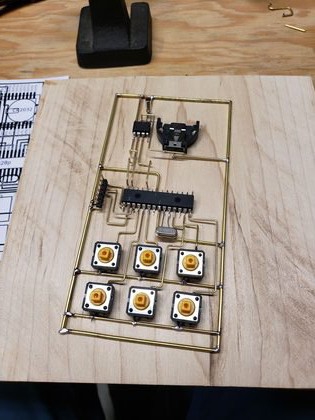
I started by making a rectangular frame out of some thicker 1.6mm brass. Then I connected the switches, the 328p, and the RTC. It was fun bending the brass and using my drawing was relatively error free. I did have some pieces that didn’t work out and had to be remade.
One of the most difficult parts of the circuit was the LED driver. Because I used a surface mount TCL5928 in an SSOP package, I wanted a way to interface it to the brass rod. The brass rod on its’ own was too thick (0.81mm) to connect to the package leads (0.65mm spacing). I CNC’ed a maple frame where I could suspend the IC from magnet wire. To pull this off I held the chip in place with some masking tape and hot glue and then carefully soldered the wires from the IC to the brass rod at the edge of the frame. Once I had all the wires attached I could remove the tape and connect it to the LEDs. I used a 3D printed jig to make sure the LEDs were lined up and properly spaced while soldering them in place.
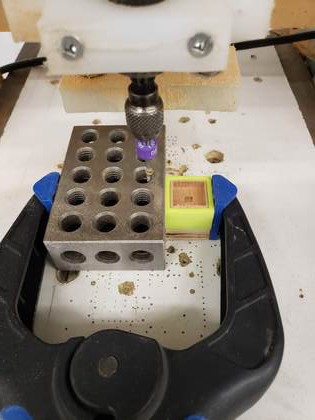
With the circuit built I could start to work on the body of the calculator. I used my model to generate some gcode with pyCAM for my CNC rotary tool. I also modelled some keycaps that I milled out of cherry. With the main shape of the keycaps milled and engraved I needed a way to mill a pocket in the underside. I ended up 3D printing a block with a negative of the keycap to hold the keycaps in place while I milled the underside. This worked well and the friction fit was all that it needed to hold it in place.
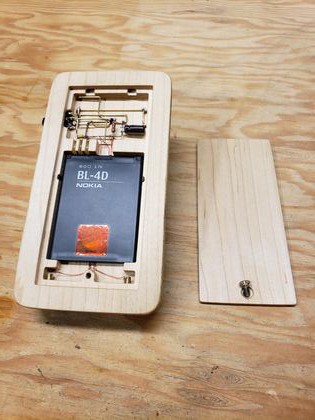
On the underside of the body I wired the charge controller and battery (the battery is from an old Nokia cell phone). To electrically connect the body to the base I went with a simple design of two pins protruding from the base that touch brass dimples in the bottom of the main body. The base is a basic circle with a micro USB port on the back and a power switch in the front. It holds the calculator in an upright position so that it is easily readable when in clock mode. I routered a recess in the top so that a bell jar would sit nicely on top to protect the somewhat delicate circuit. I wanted to be able to turn the device on and off without having to remove the bell jar. I used the switch on the base along with a DPDT switch on the device to give me the flexibility I wanted. When both switches are off, the
device is off. With the base switch on and the device switch off the...
Read more »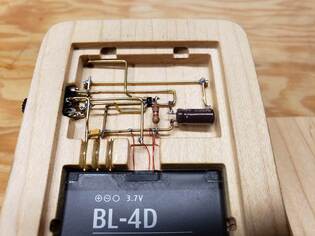
 vishal soni
 Mile
Mile
 JT
JT