David H. Bronke
-
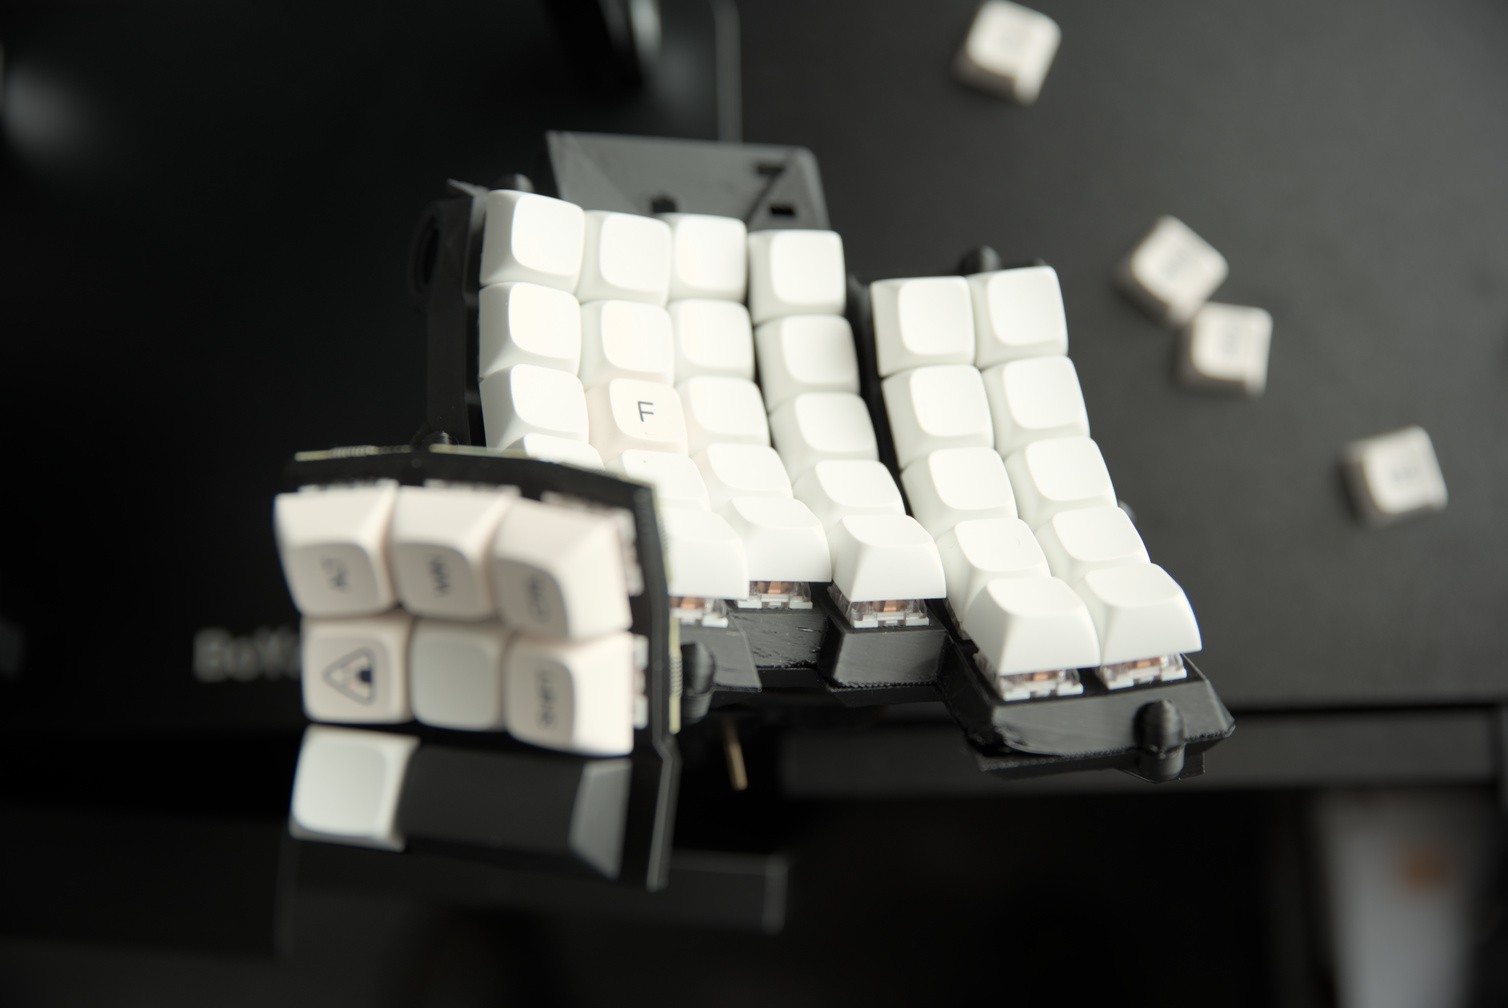
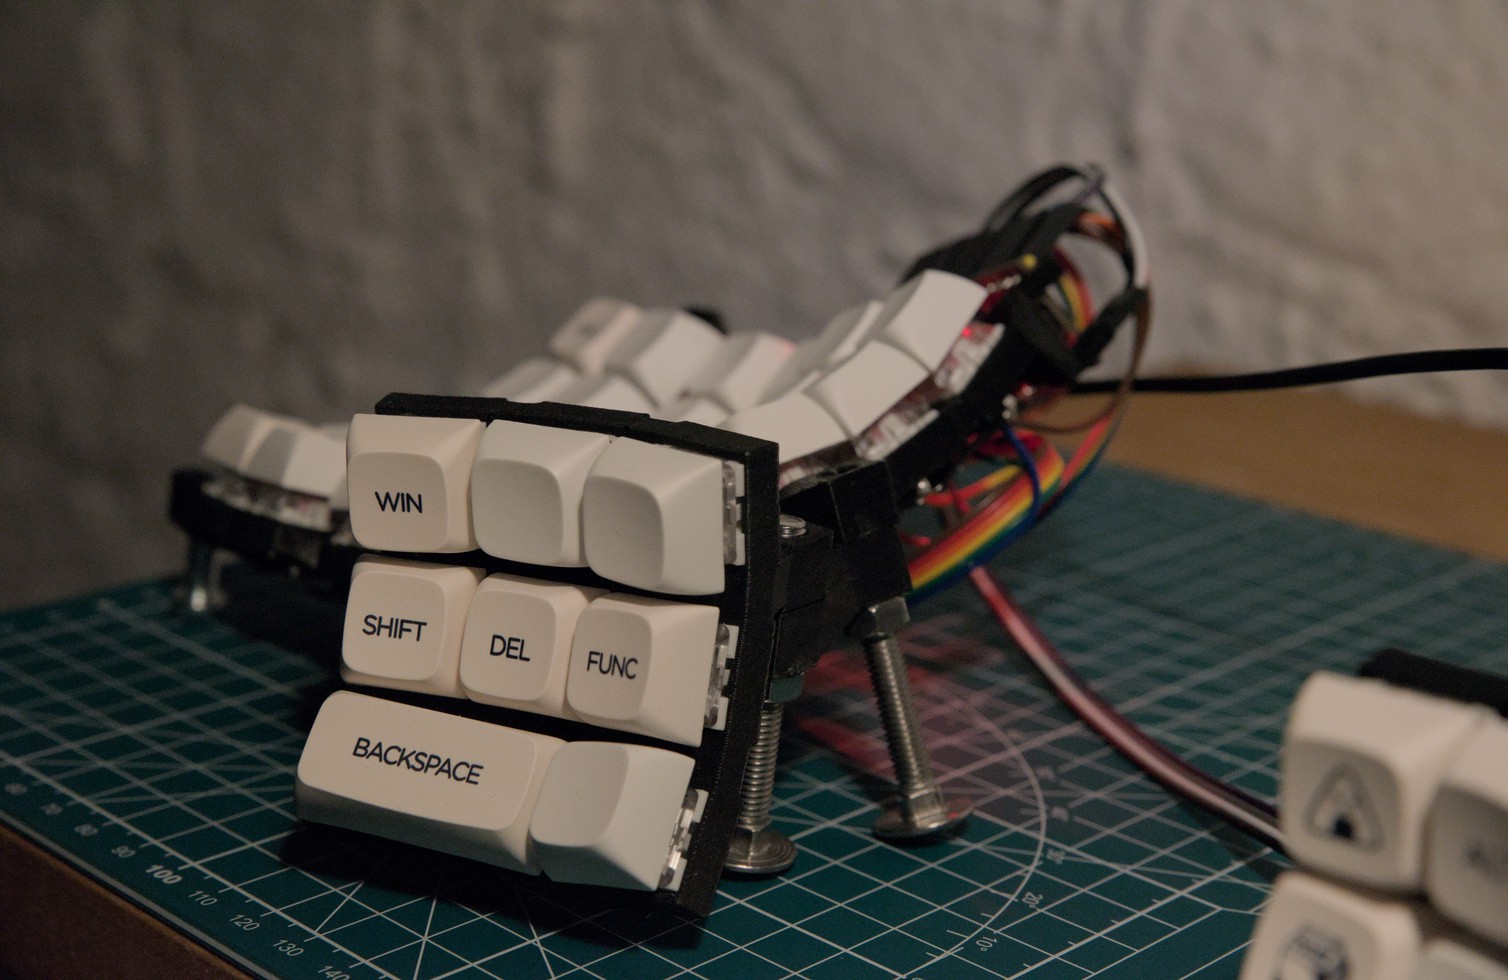
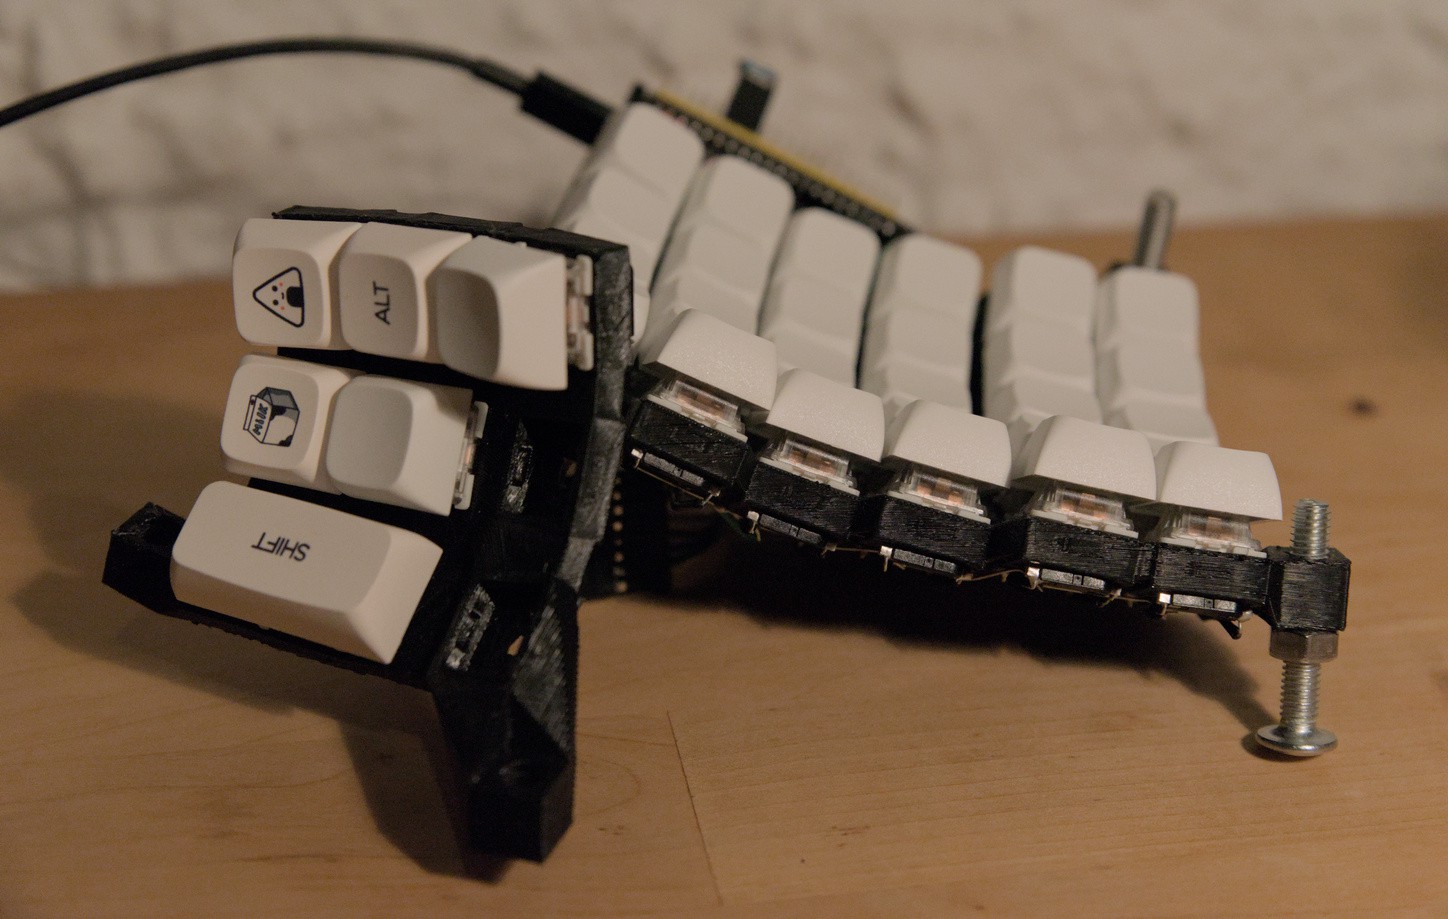
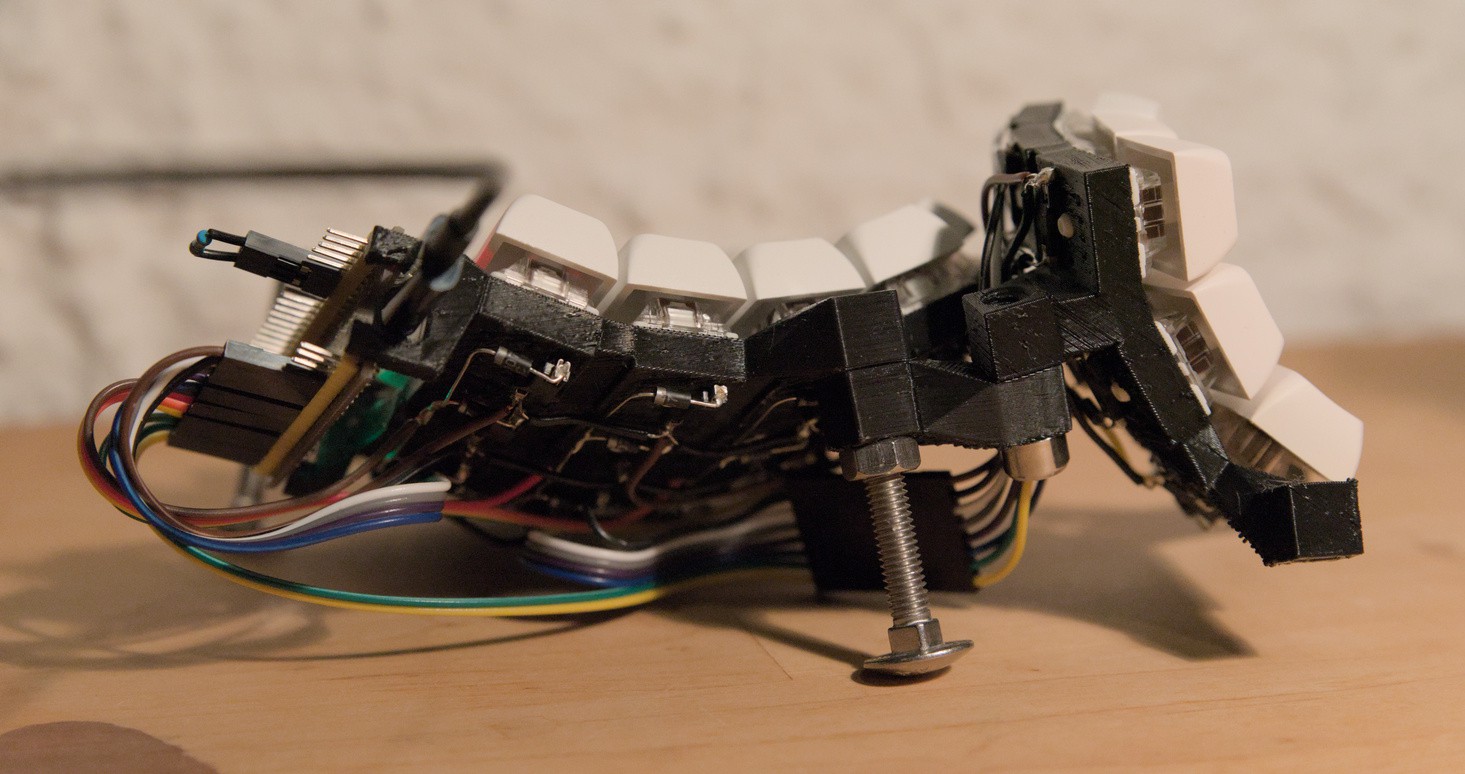
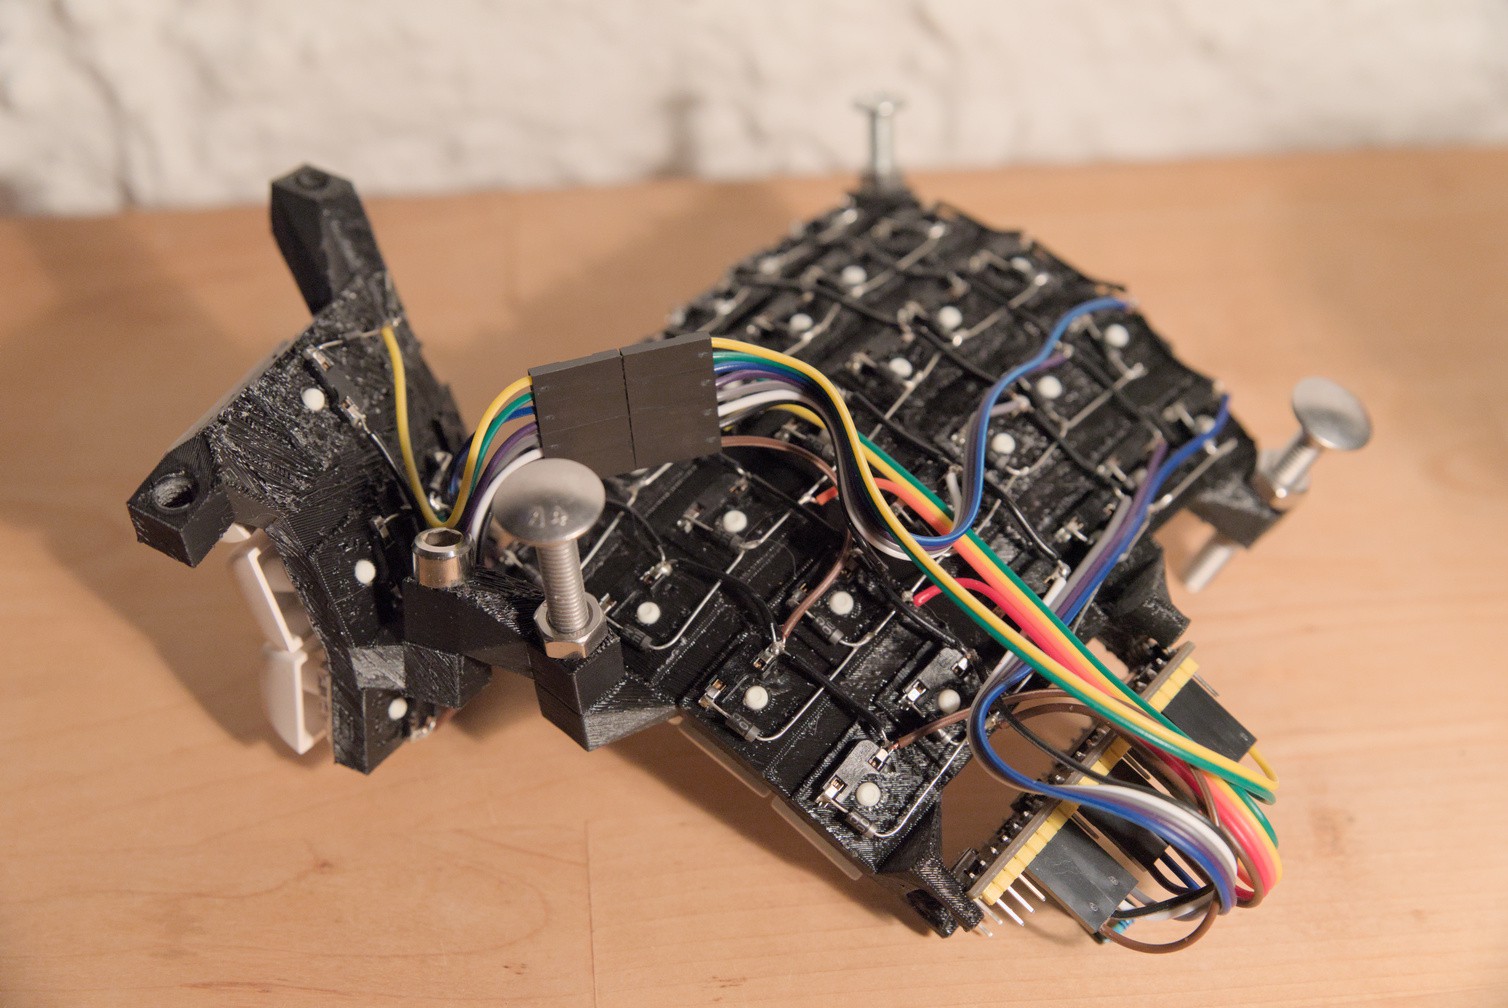
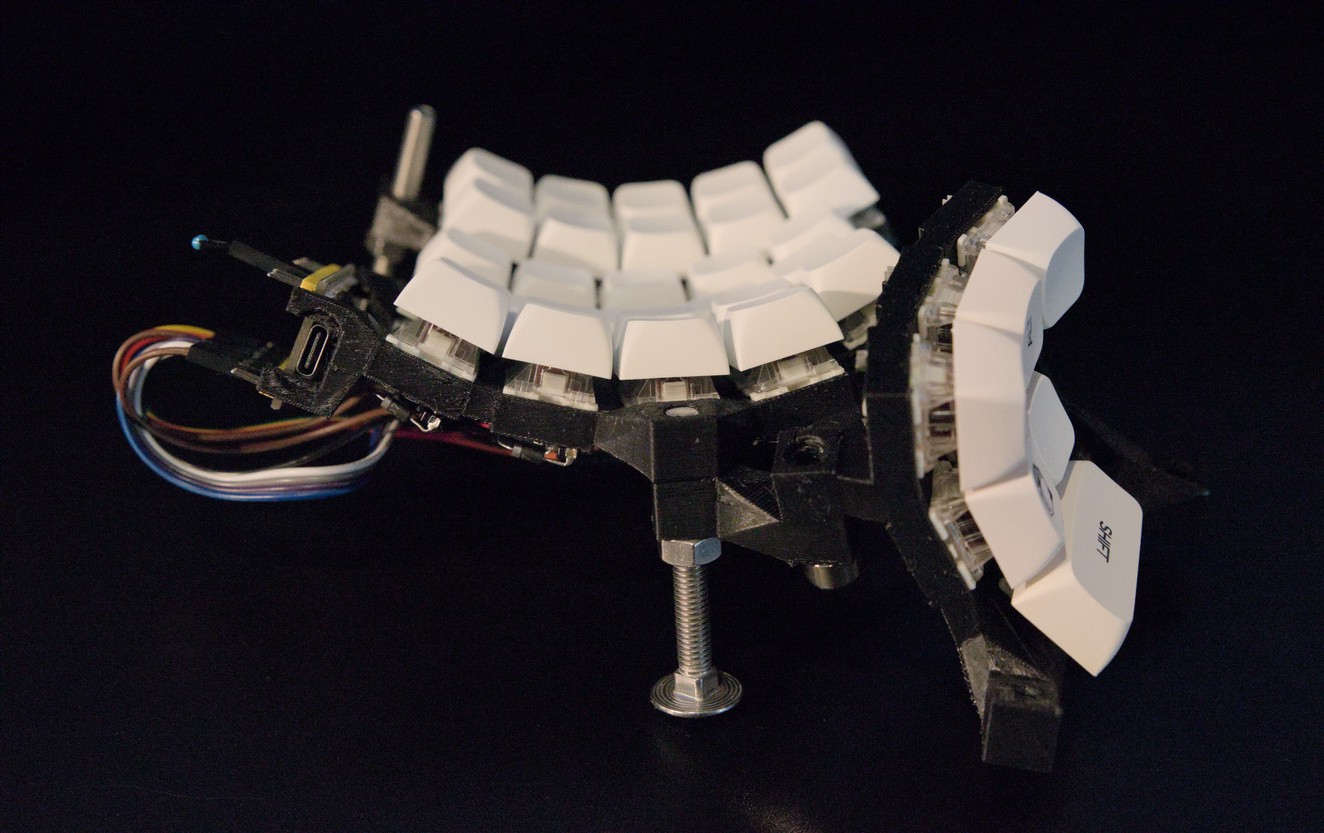
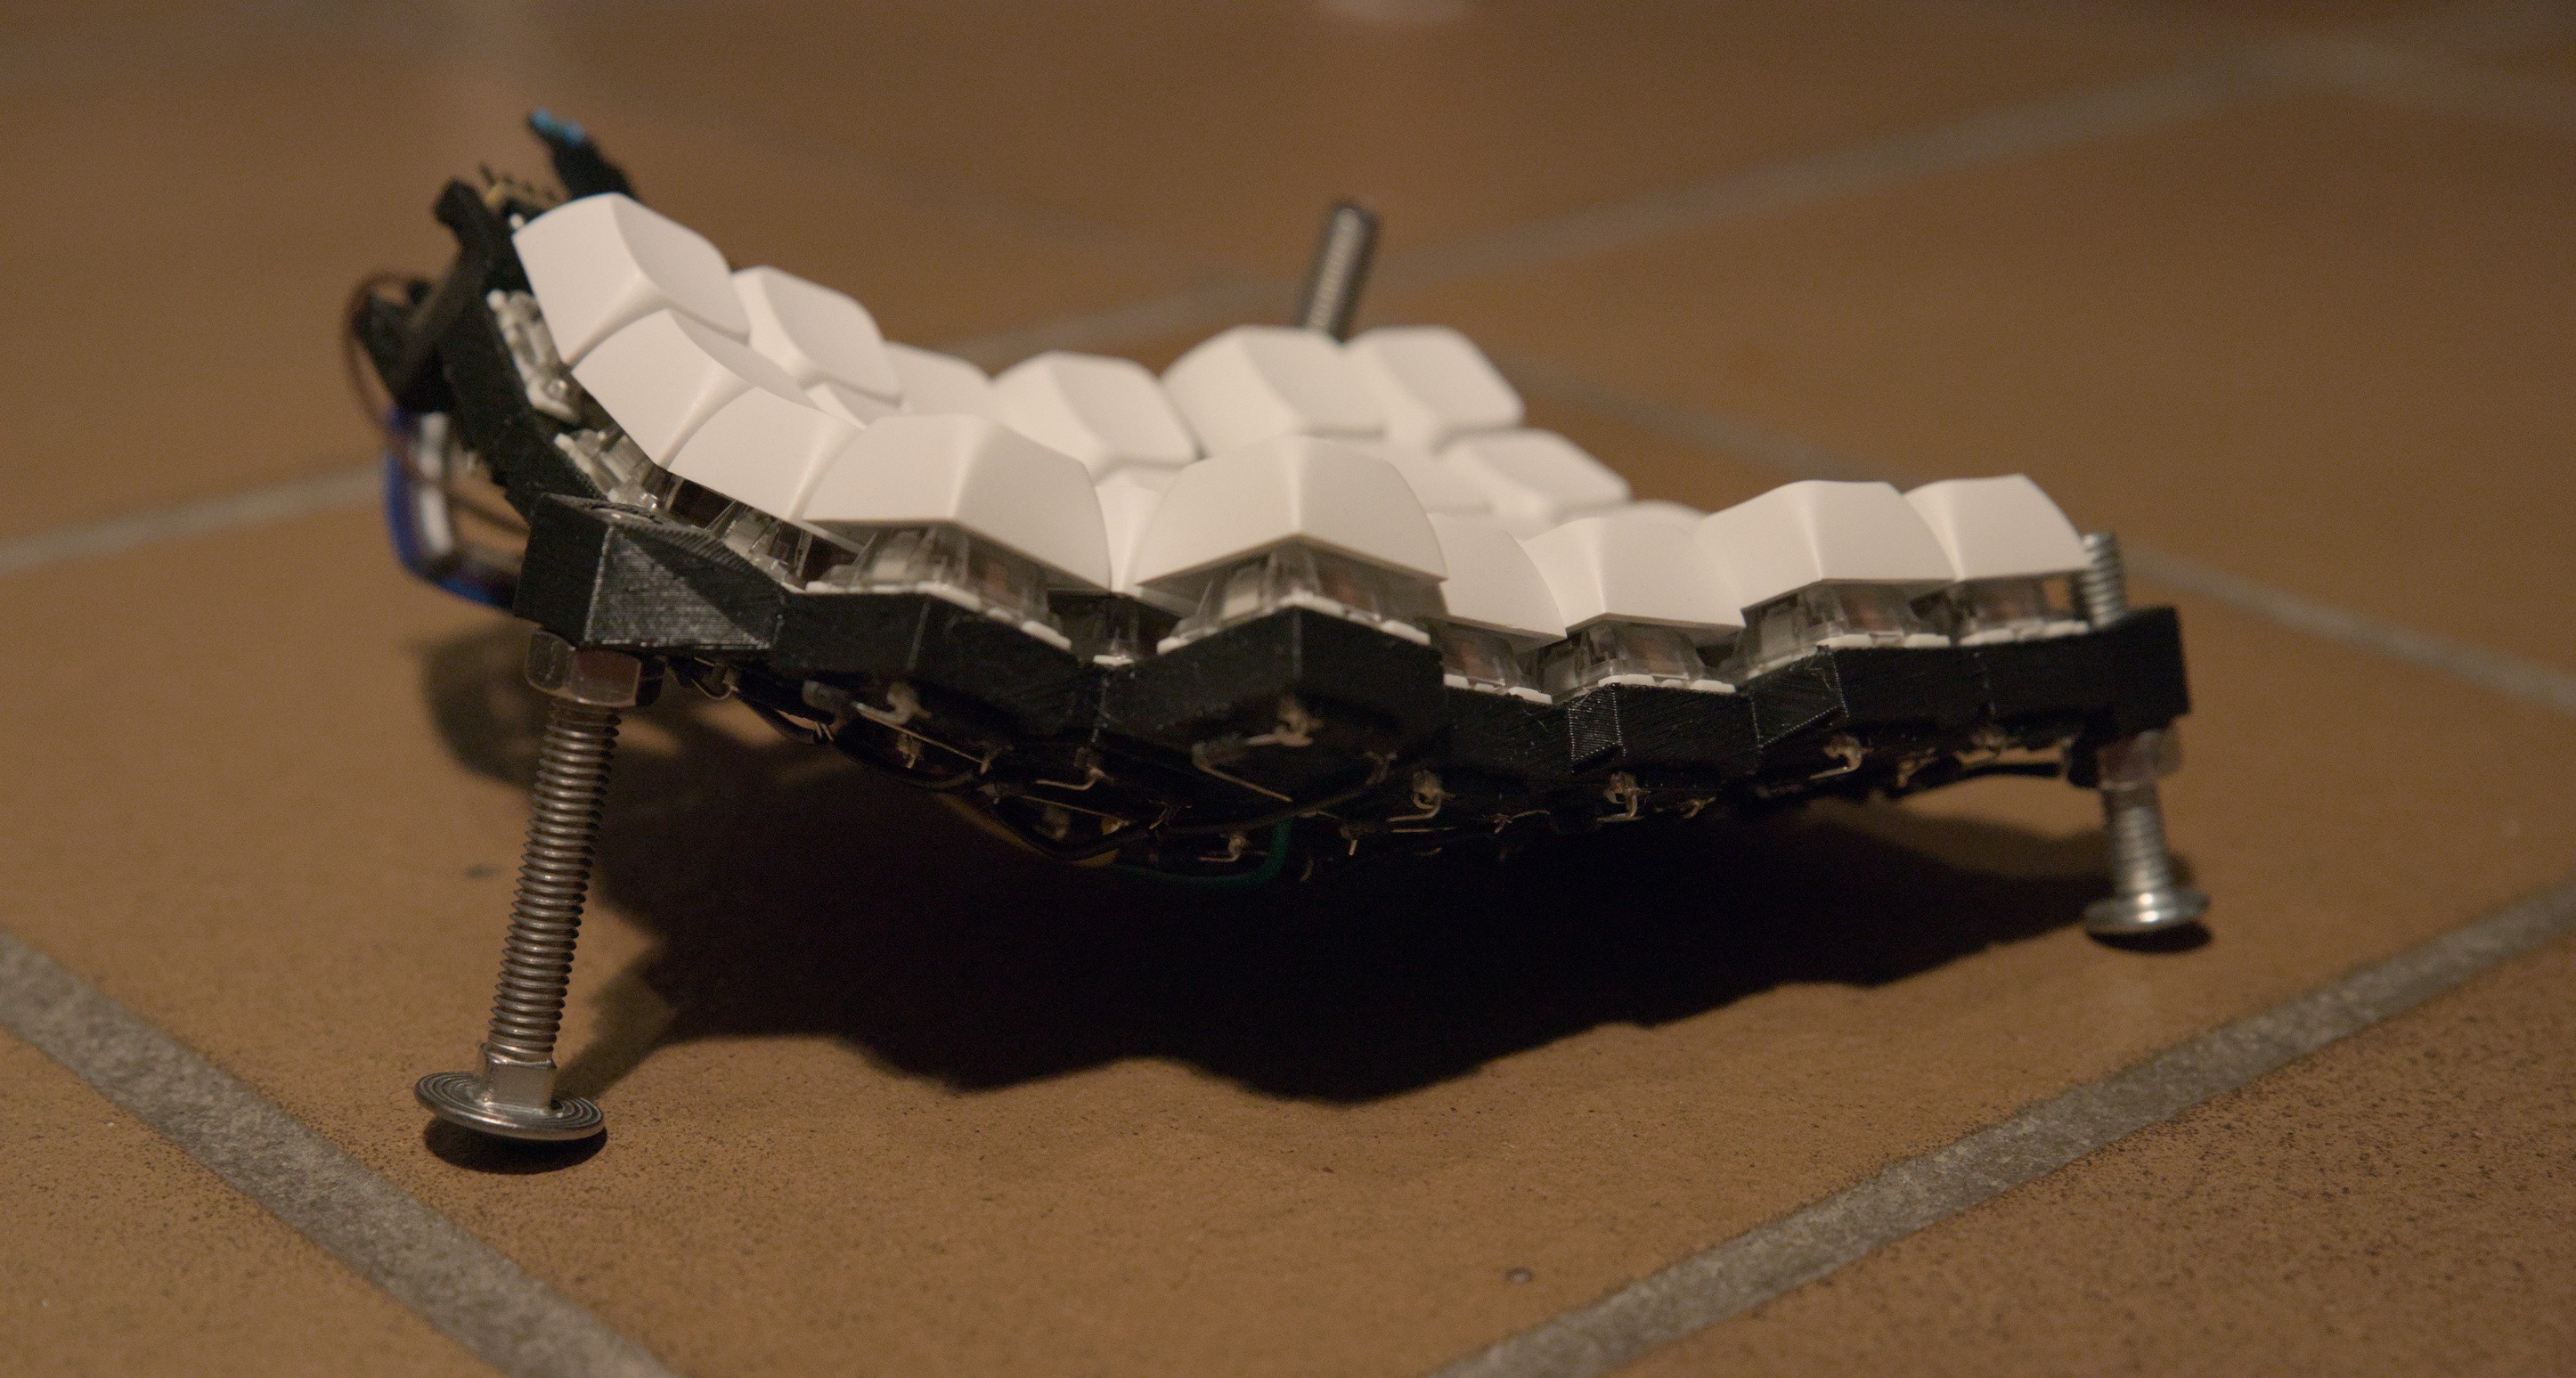
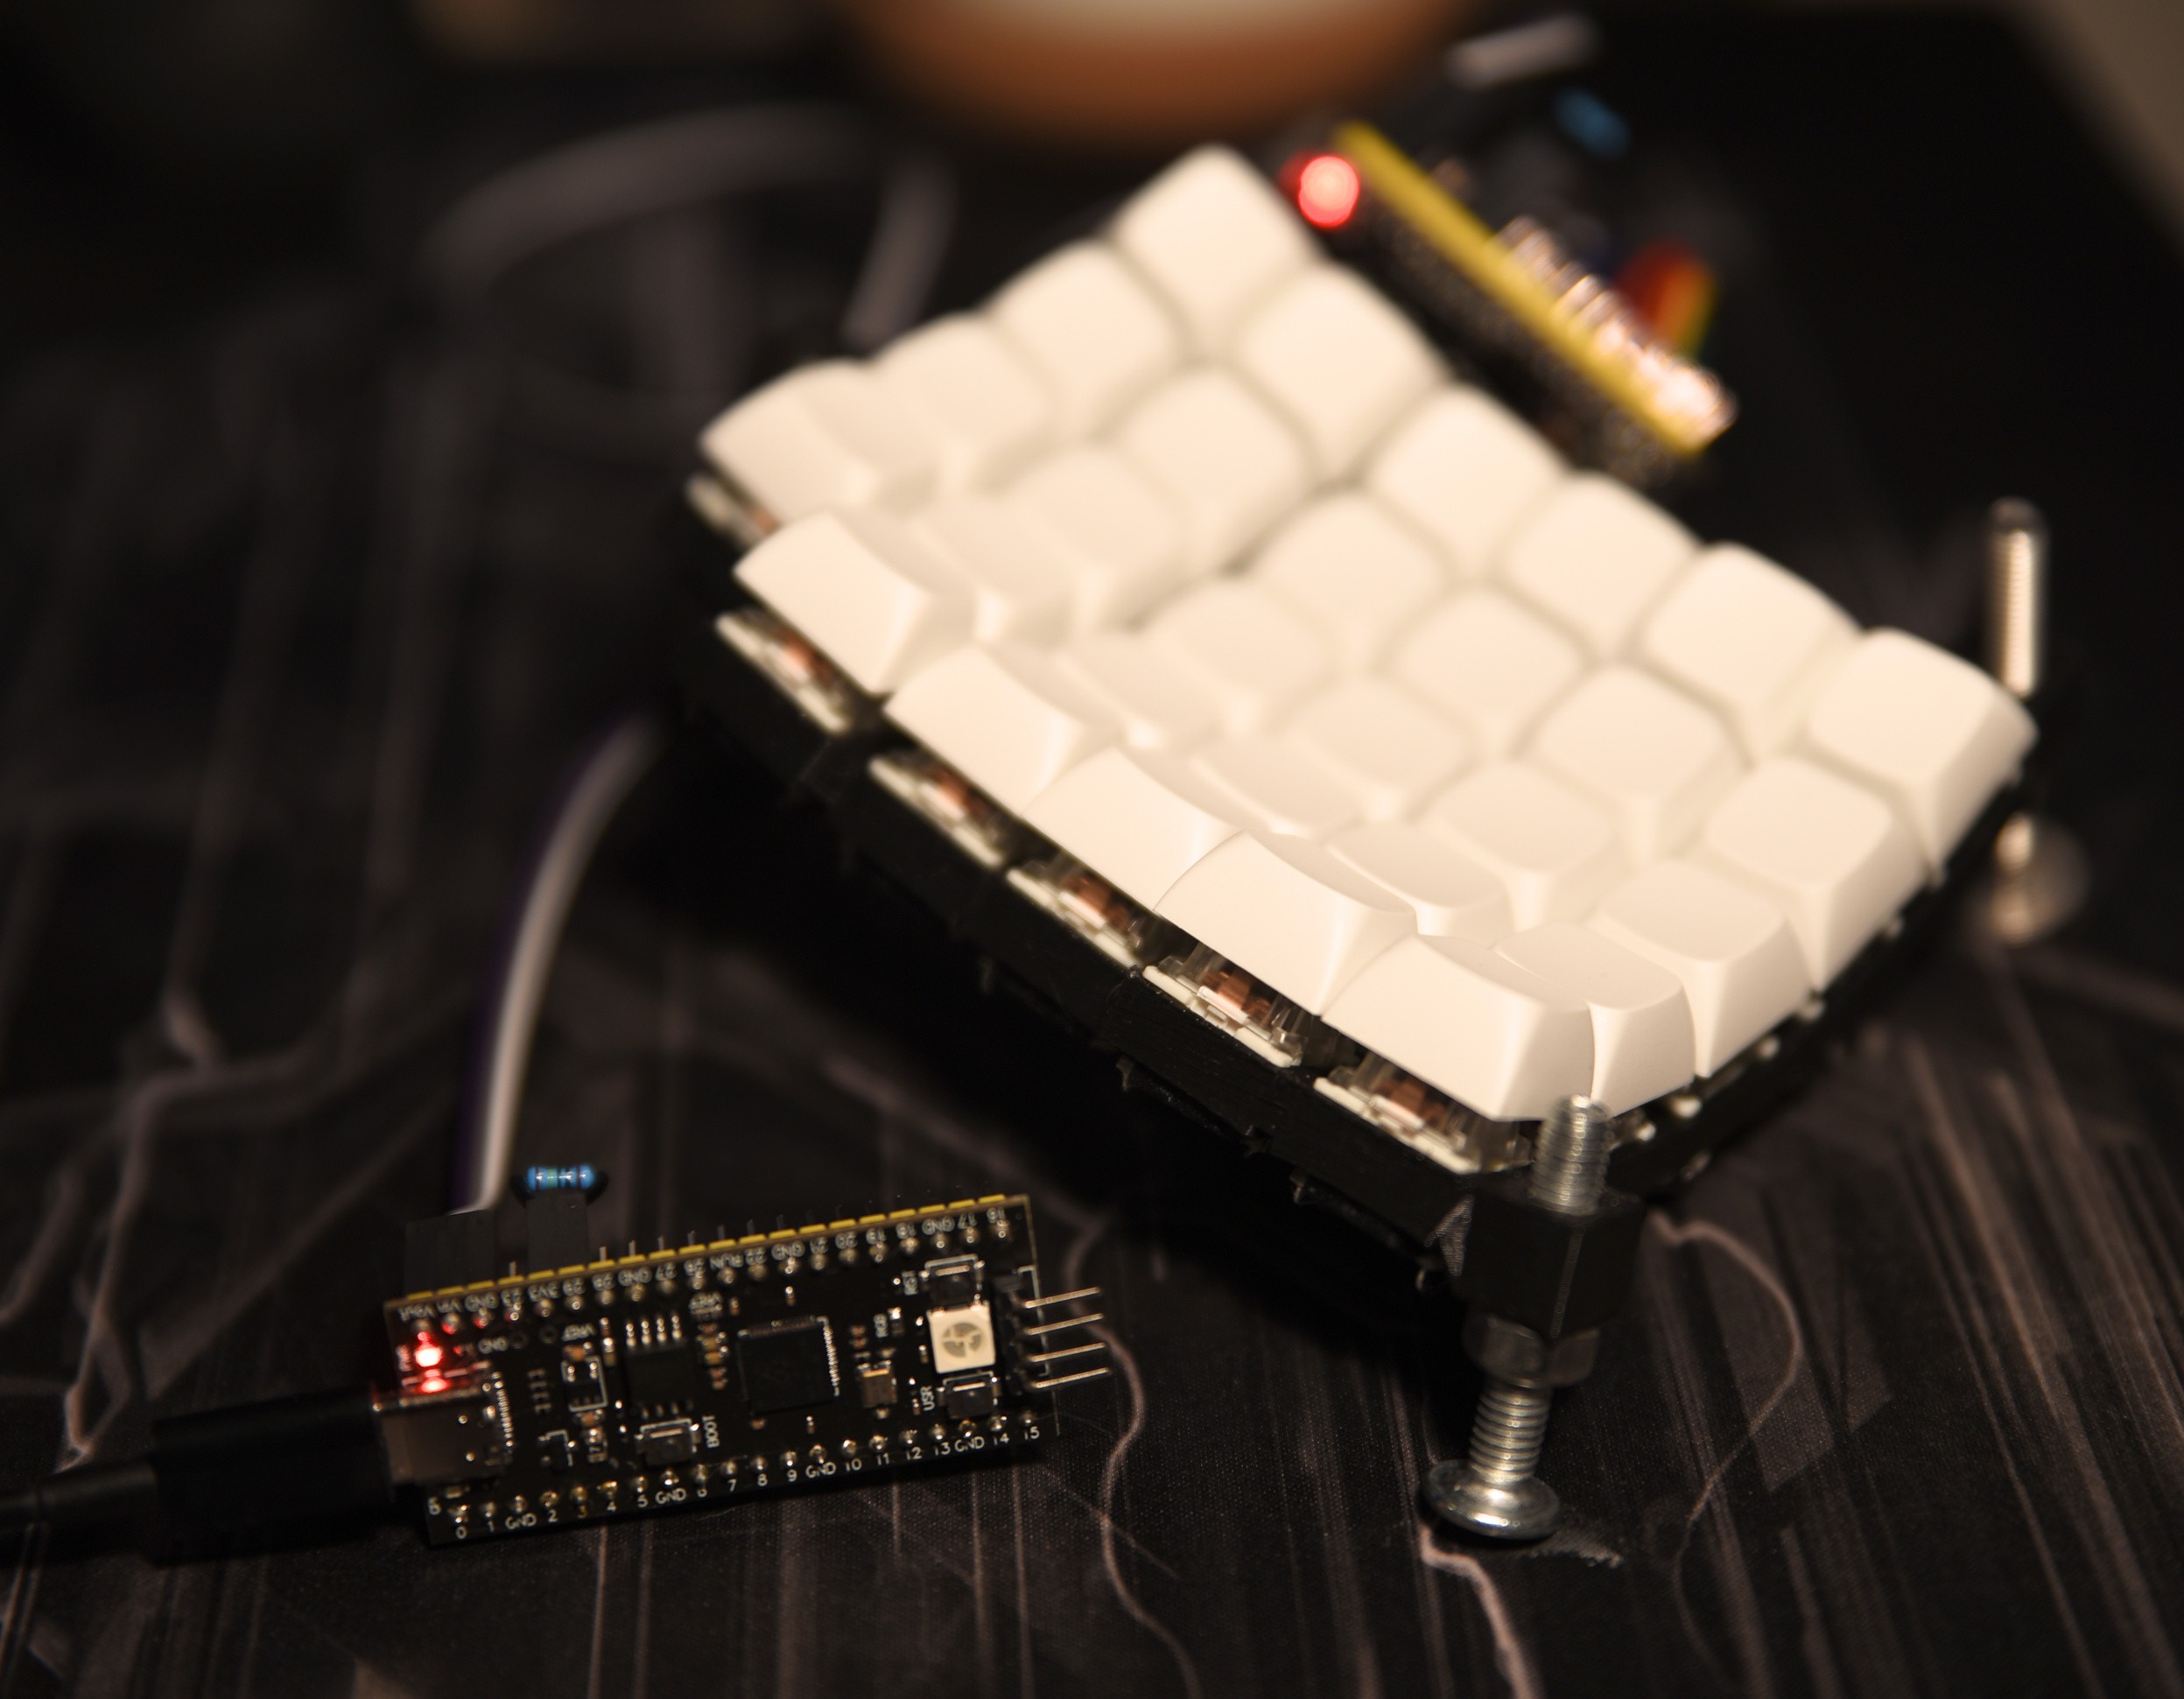
Finally starting to assemble the new design!
19 hours ago • 0 commentsFinally starting to build the latest version of my Dactyl Lynx keyboard! Many thanks to my coworker Baran for printing me some new keyboard parts while my 3D printer is in storage.

This will be the first time using my Snowshoe MX boards! They fit great so far.
Now to start soldering...
-
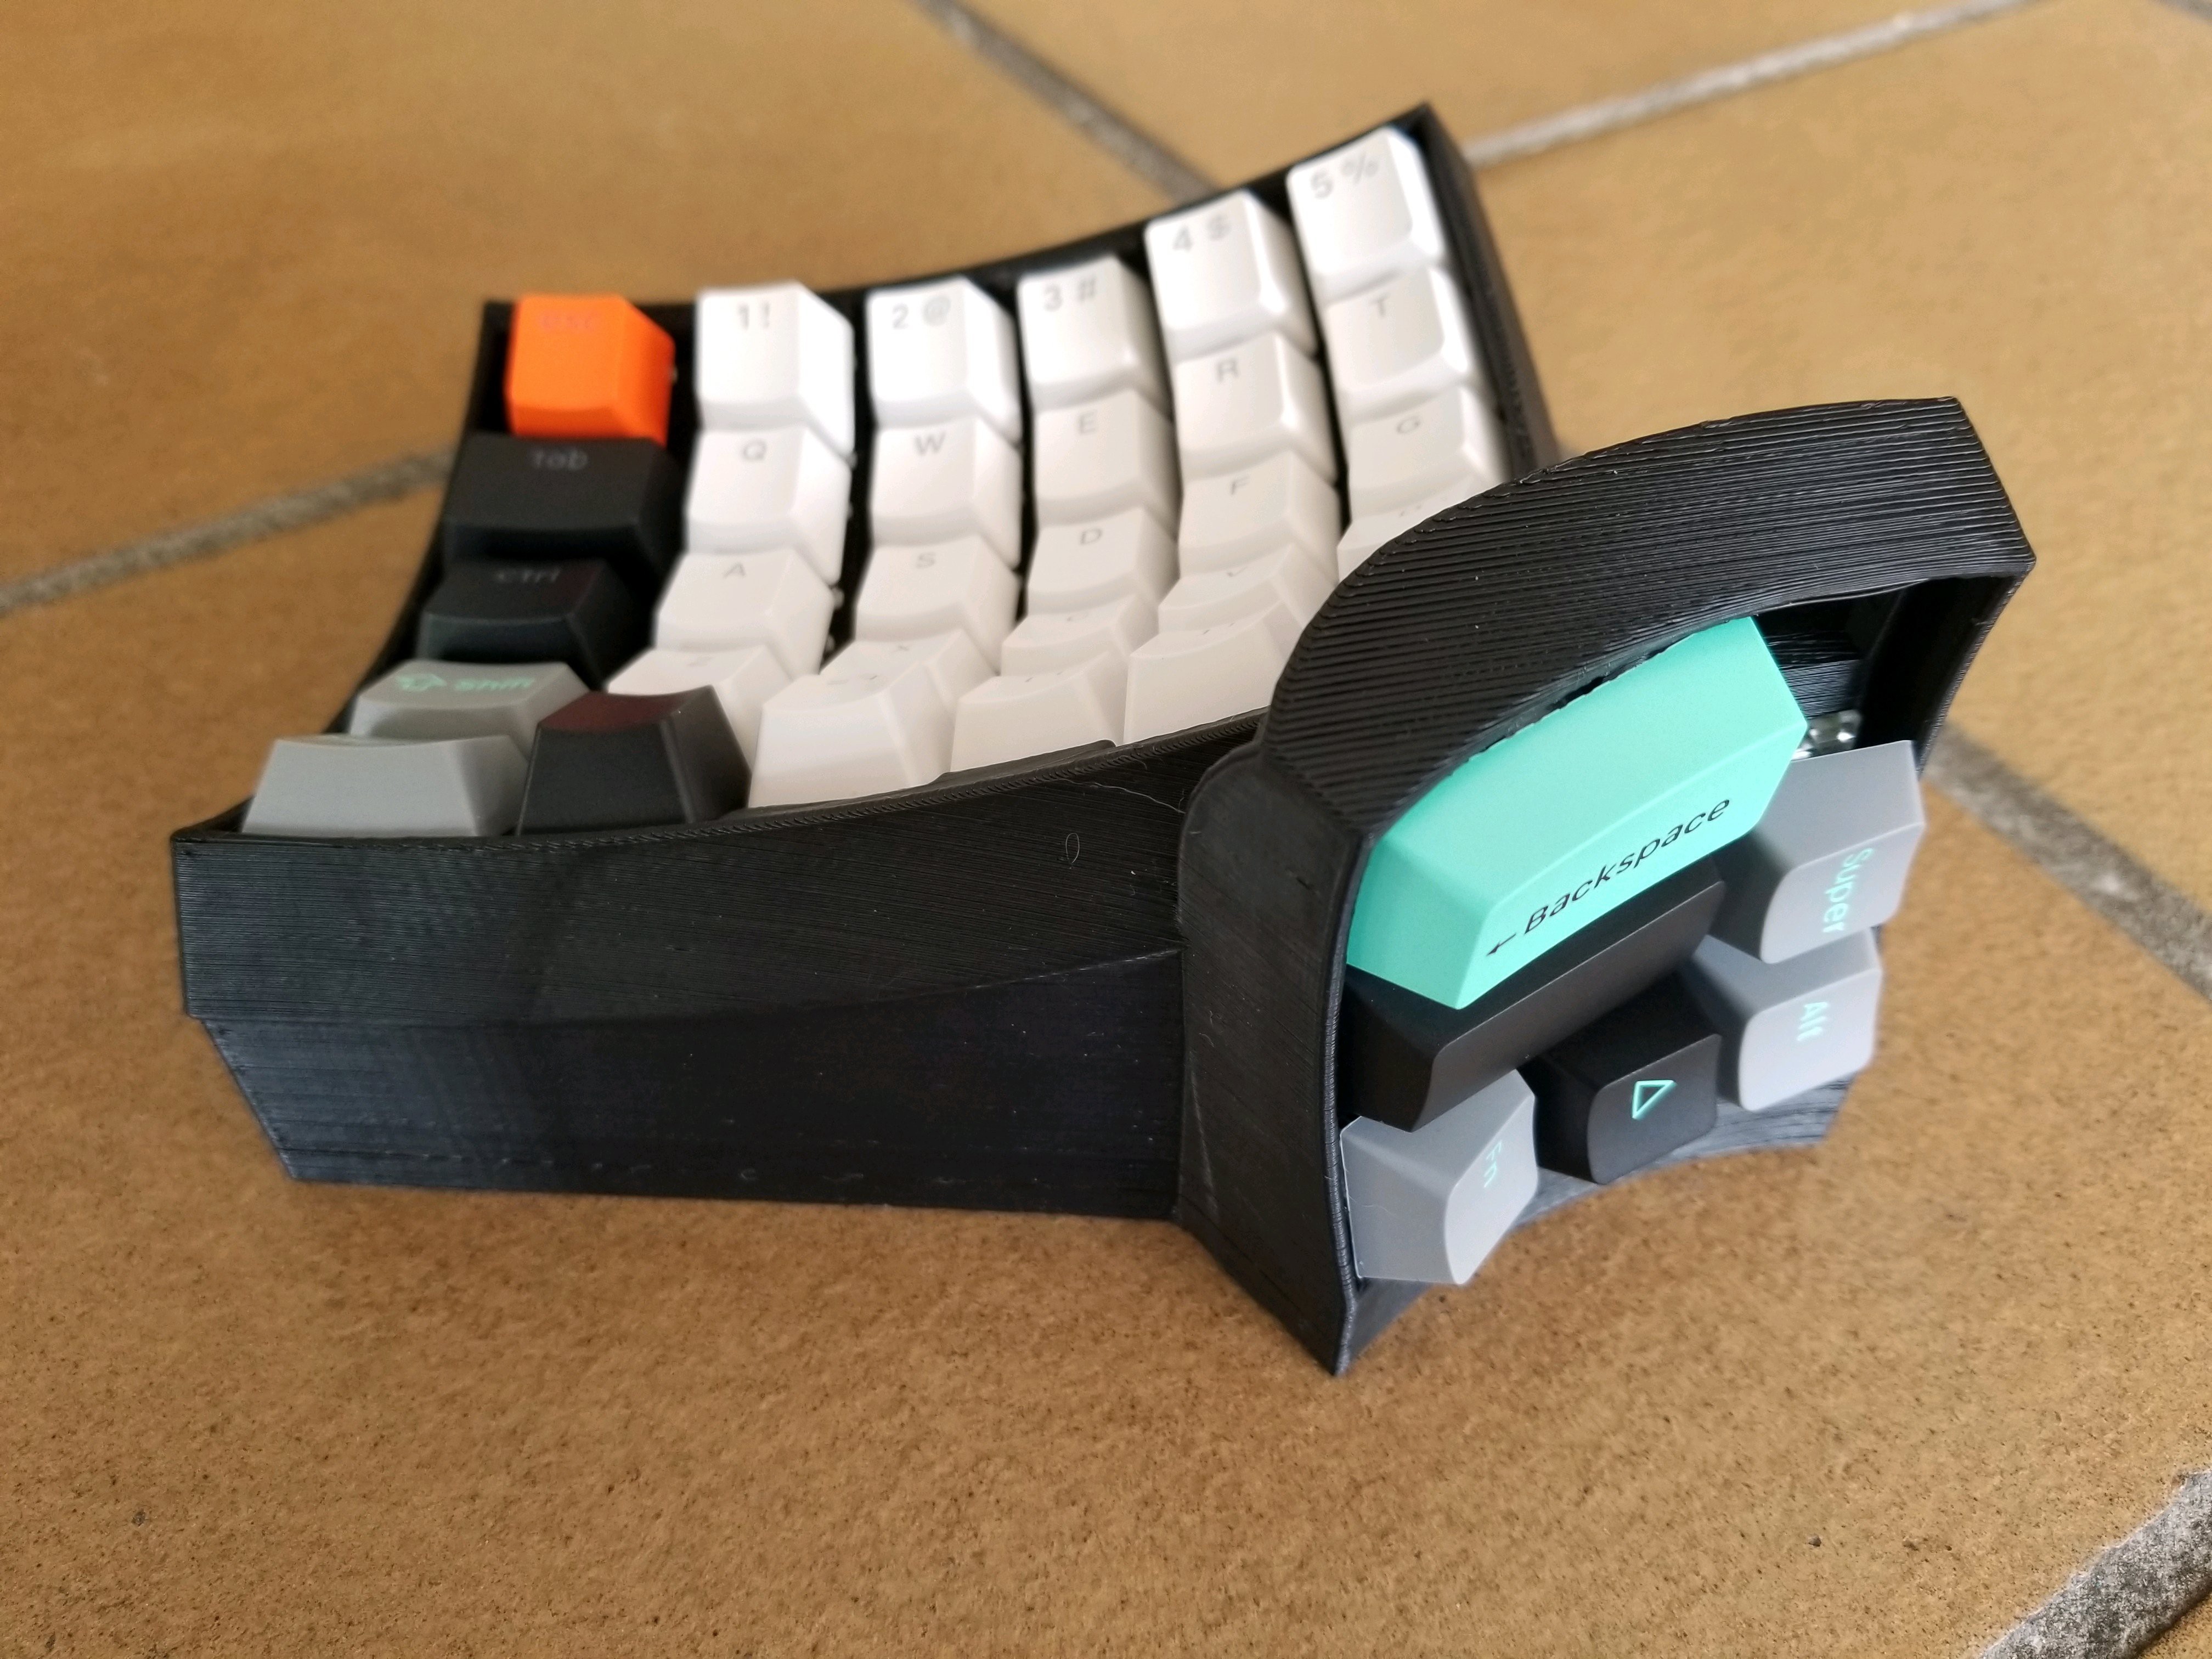
Laptop usage, and hazards of cheap PLA
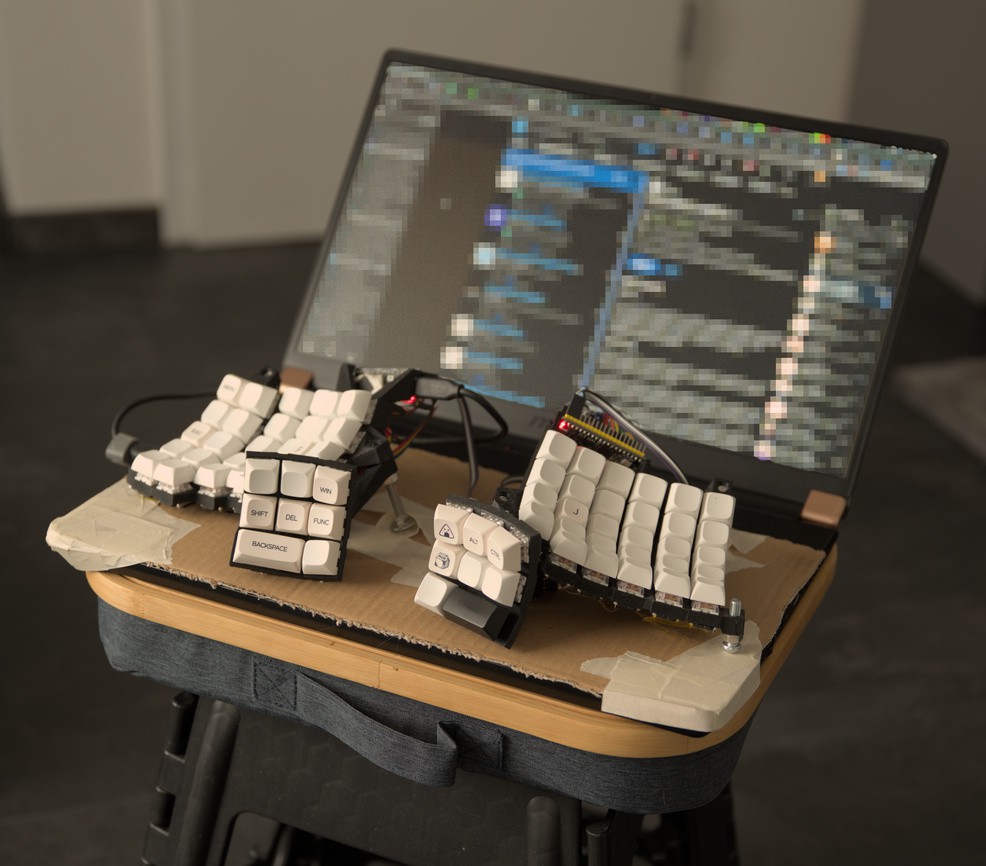
11/22/2024 at 15:14 • 0 comments9 days ago, I finally got sick of typing on my laptop keyboard, so I came up with a free solution to let me use my Dactyl Lynx on the laptop.
It's not pretty, but it functions, and lets me type on my laptop with marginally less pain, even though I'm still using it on my lap. I look forward to moving back into a more permanent house so I can use a real desk again.
I made everything easy to remove - the corners are small pieces of cardboard taped on that just hook onto the corners of the laptop, and the keyboard is just held in place with little "boots" of tape that are attached to the cardboard - you can see one in the middle of the photo. This means I can still take the keyboard off the laptop and use it on a table without any issue.
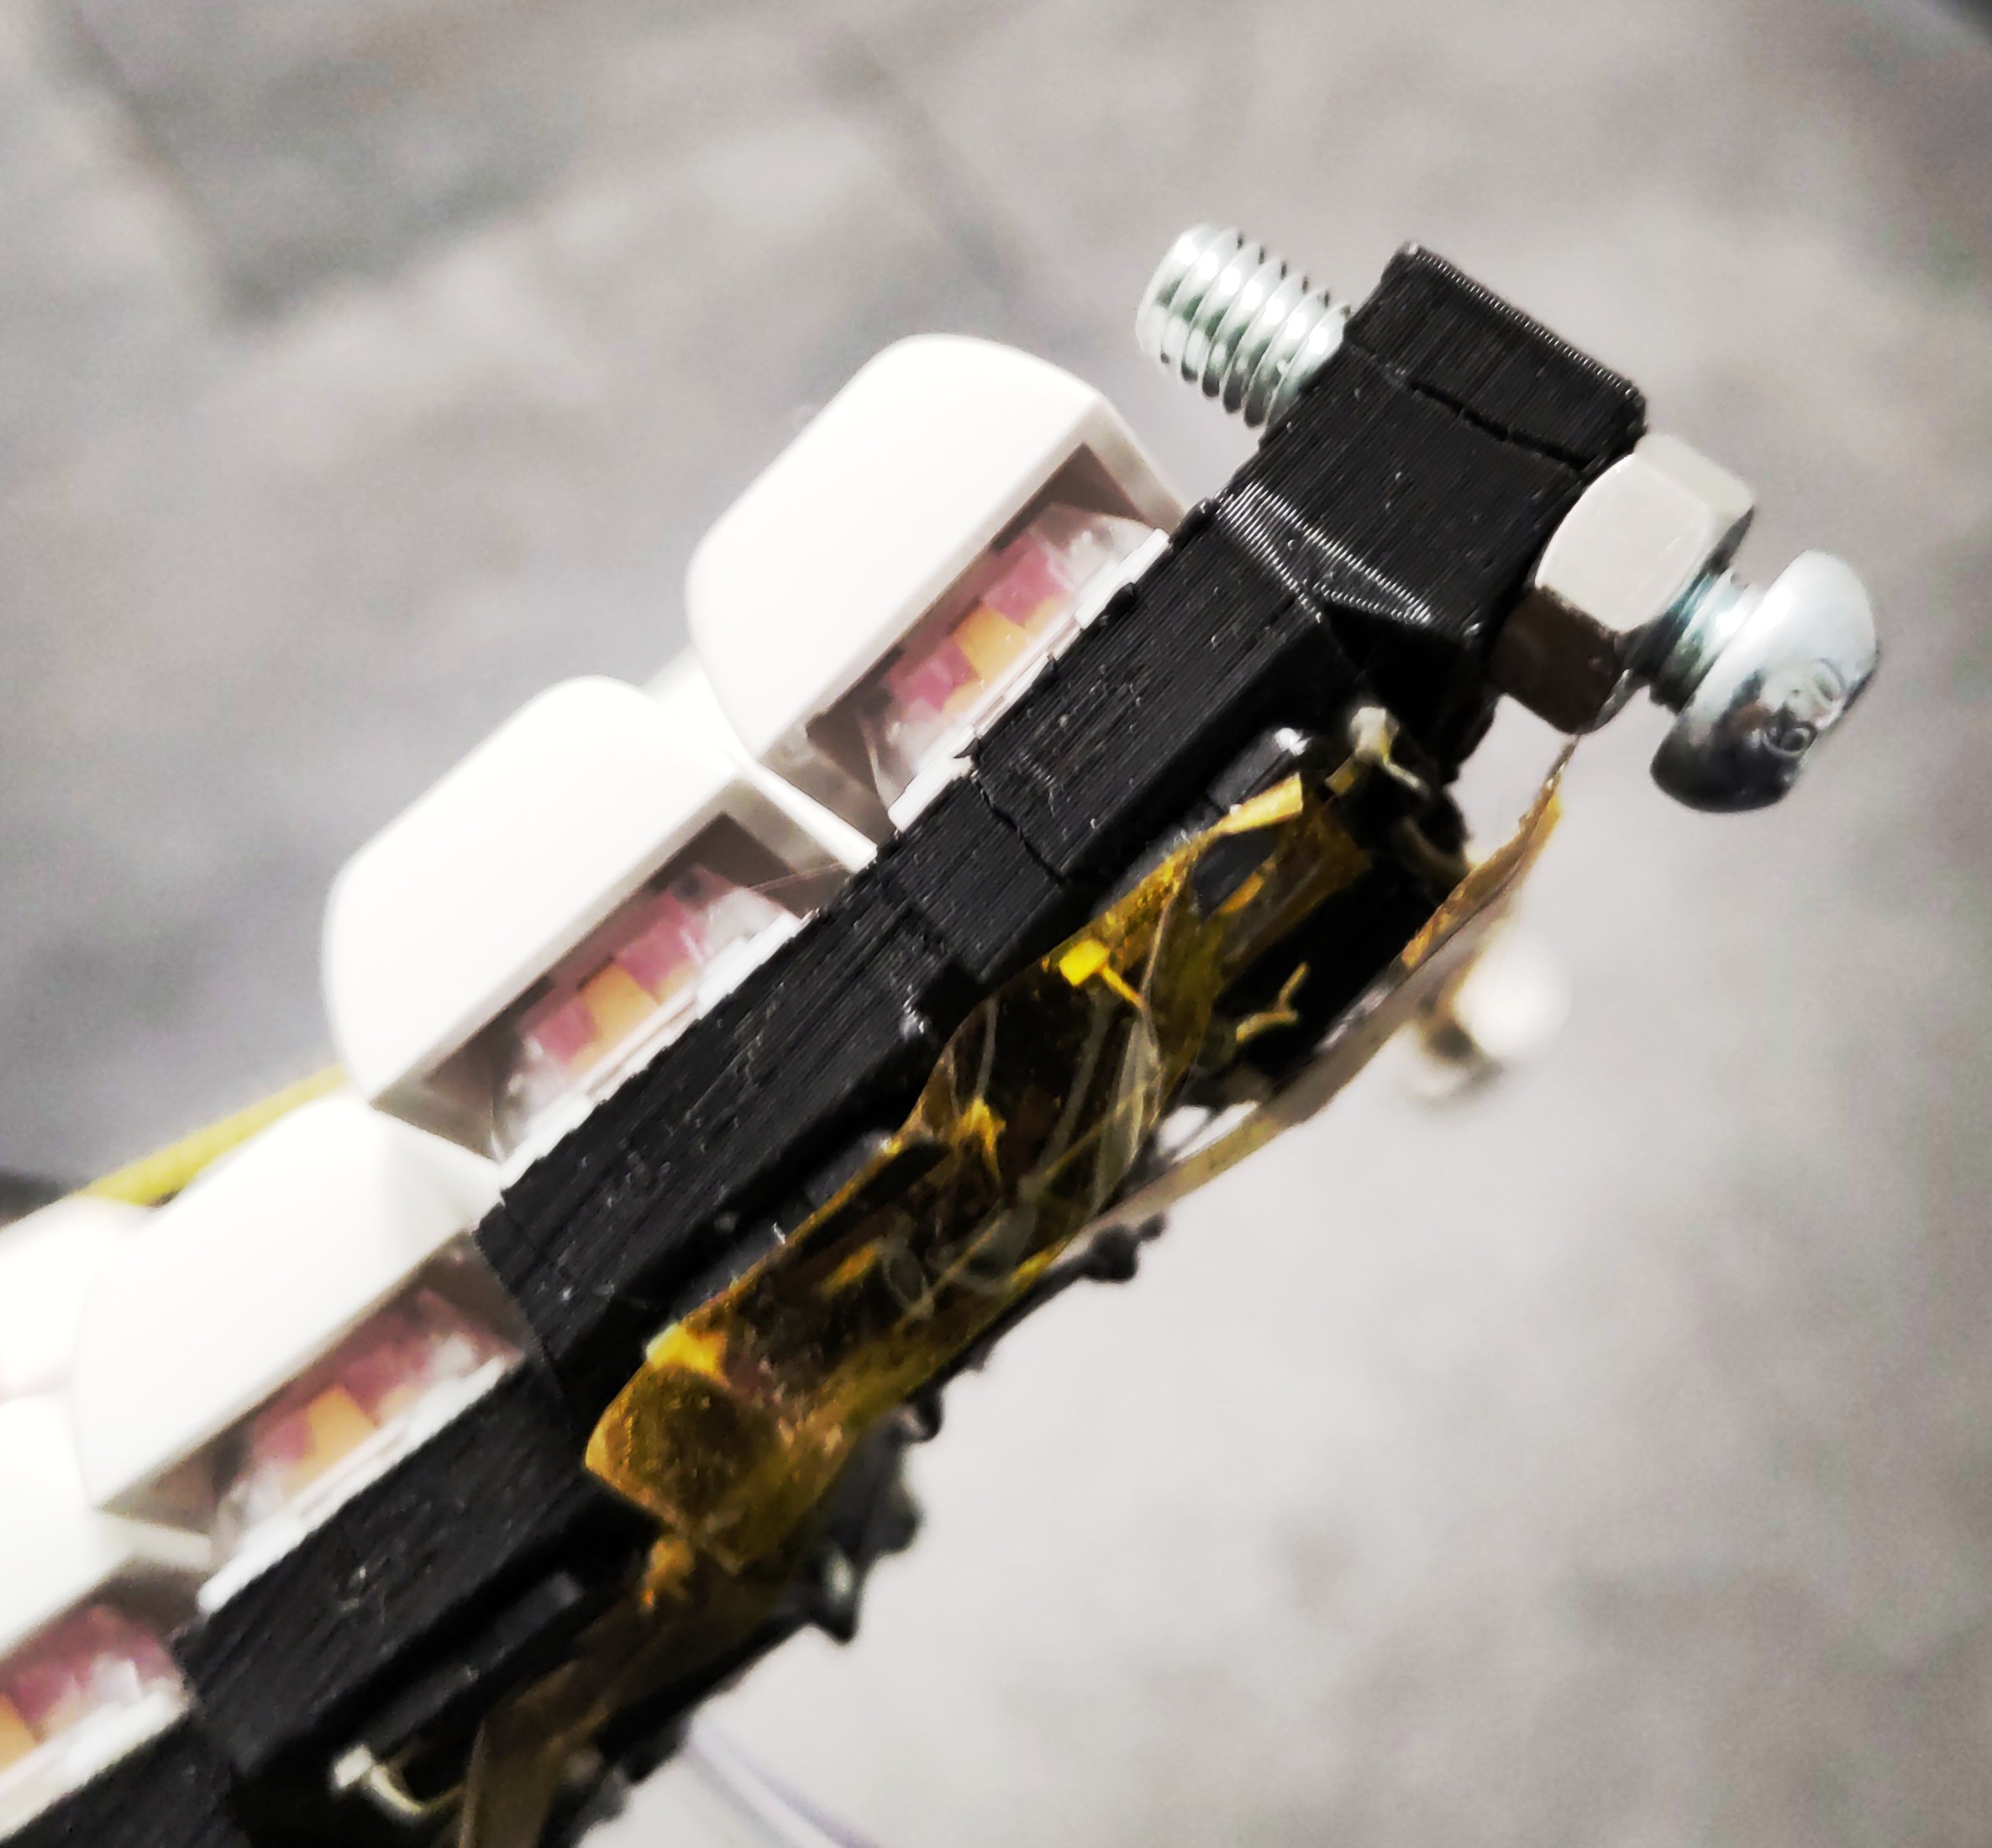
A few days after doing that hack, the already cracked right half of my keyboard fell off the laptop, and broke even more. It's still technically usable, but I'm now missing the key in the lower-right corner, and I will probably have to glue this back together soon, until I'm able to set up my 3D printer again.
I realized that these cracks are only happening on the right hand side of my keyboard, and I think I figured out why: while the left side was printed in some very nice Overture matte PLA, the right side was printed in some cheap standard black PLA which was already more brittle even before printing. (this filament ended up cracking in the bowden tube a couple of times during the time I had it loaded in the printer) This just goes to demonstrate that material quality really does matter, especially for something like an input device that will be subjected to a decent amount of stress. Next time I'll get the Overture matte black PLA again, since it's affordable but also not anywhere near as brittle.
-
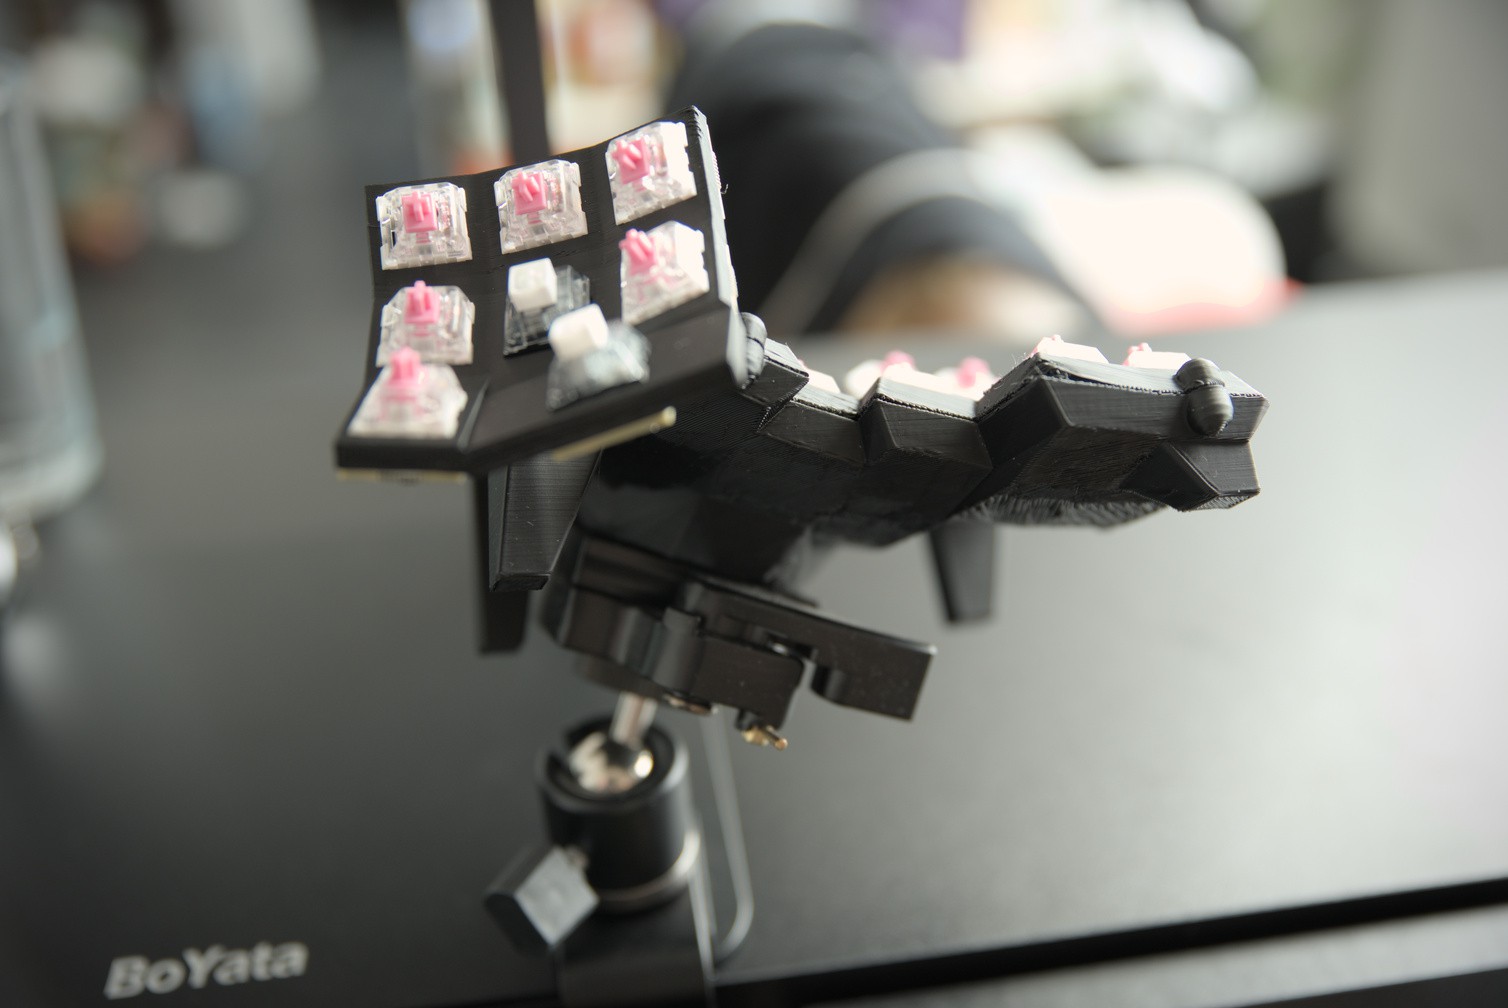
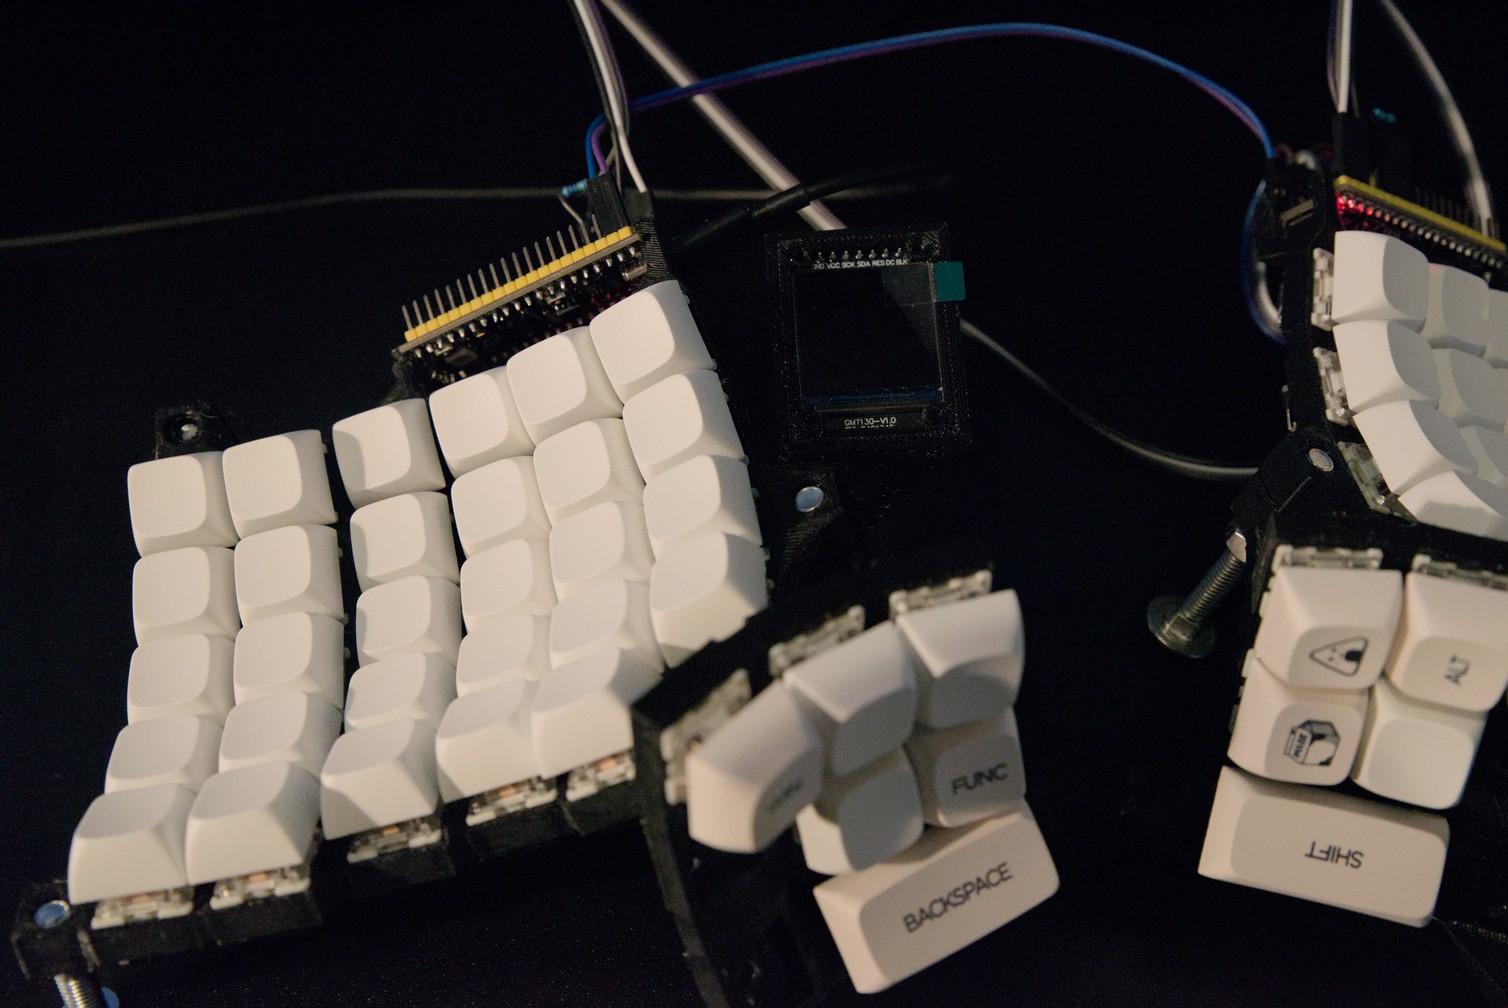
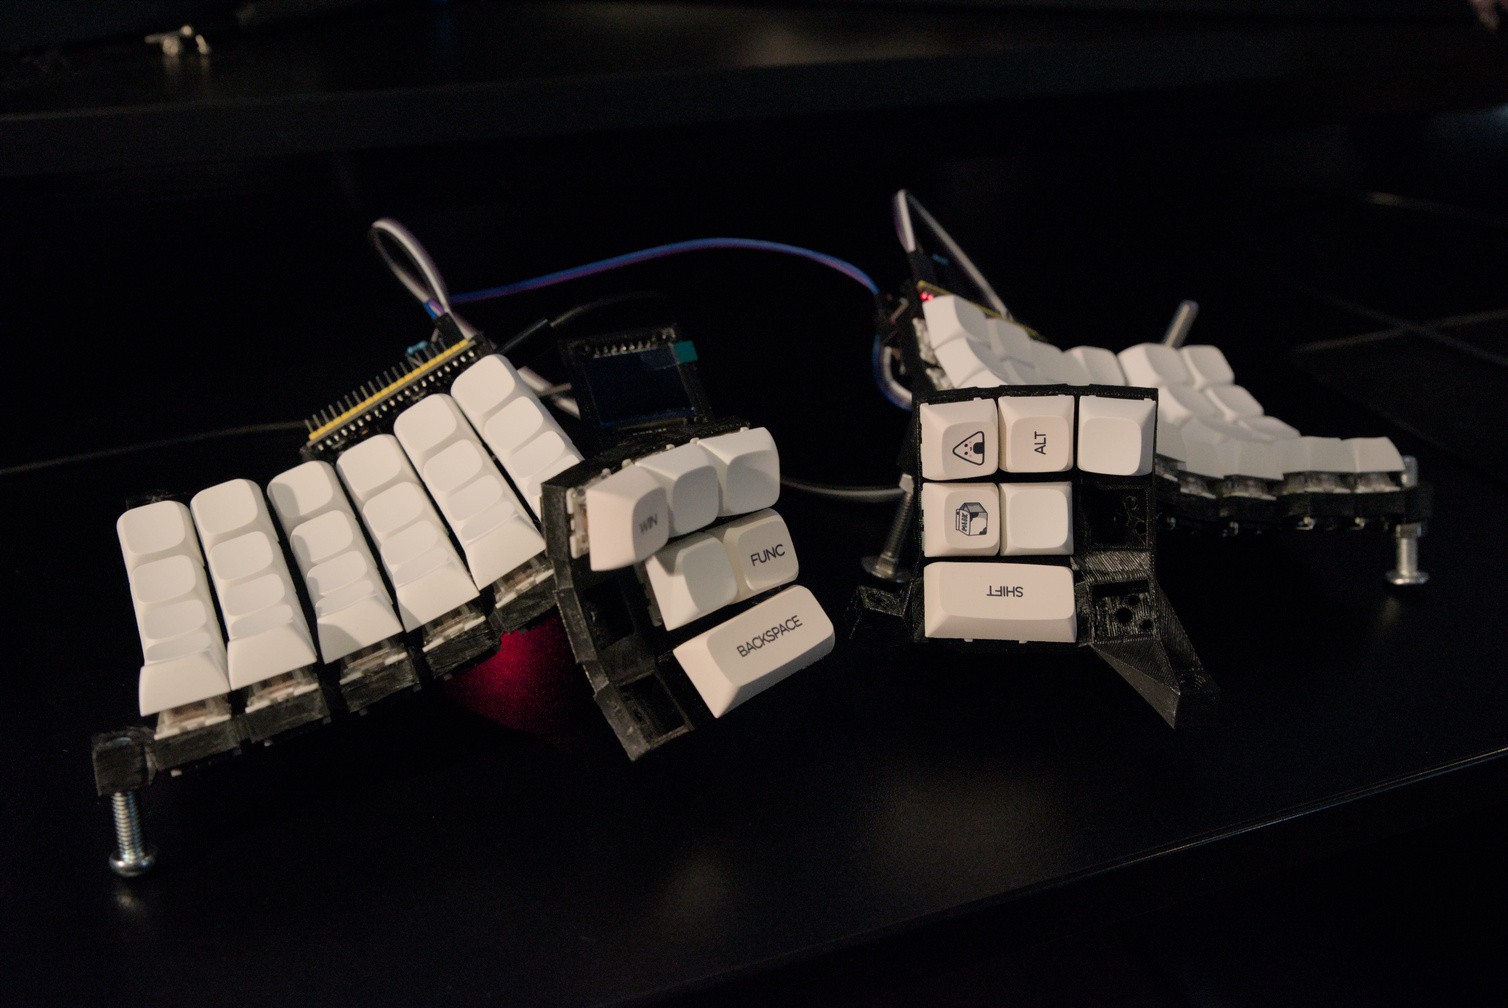
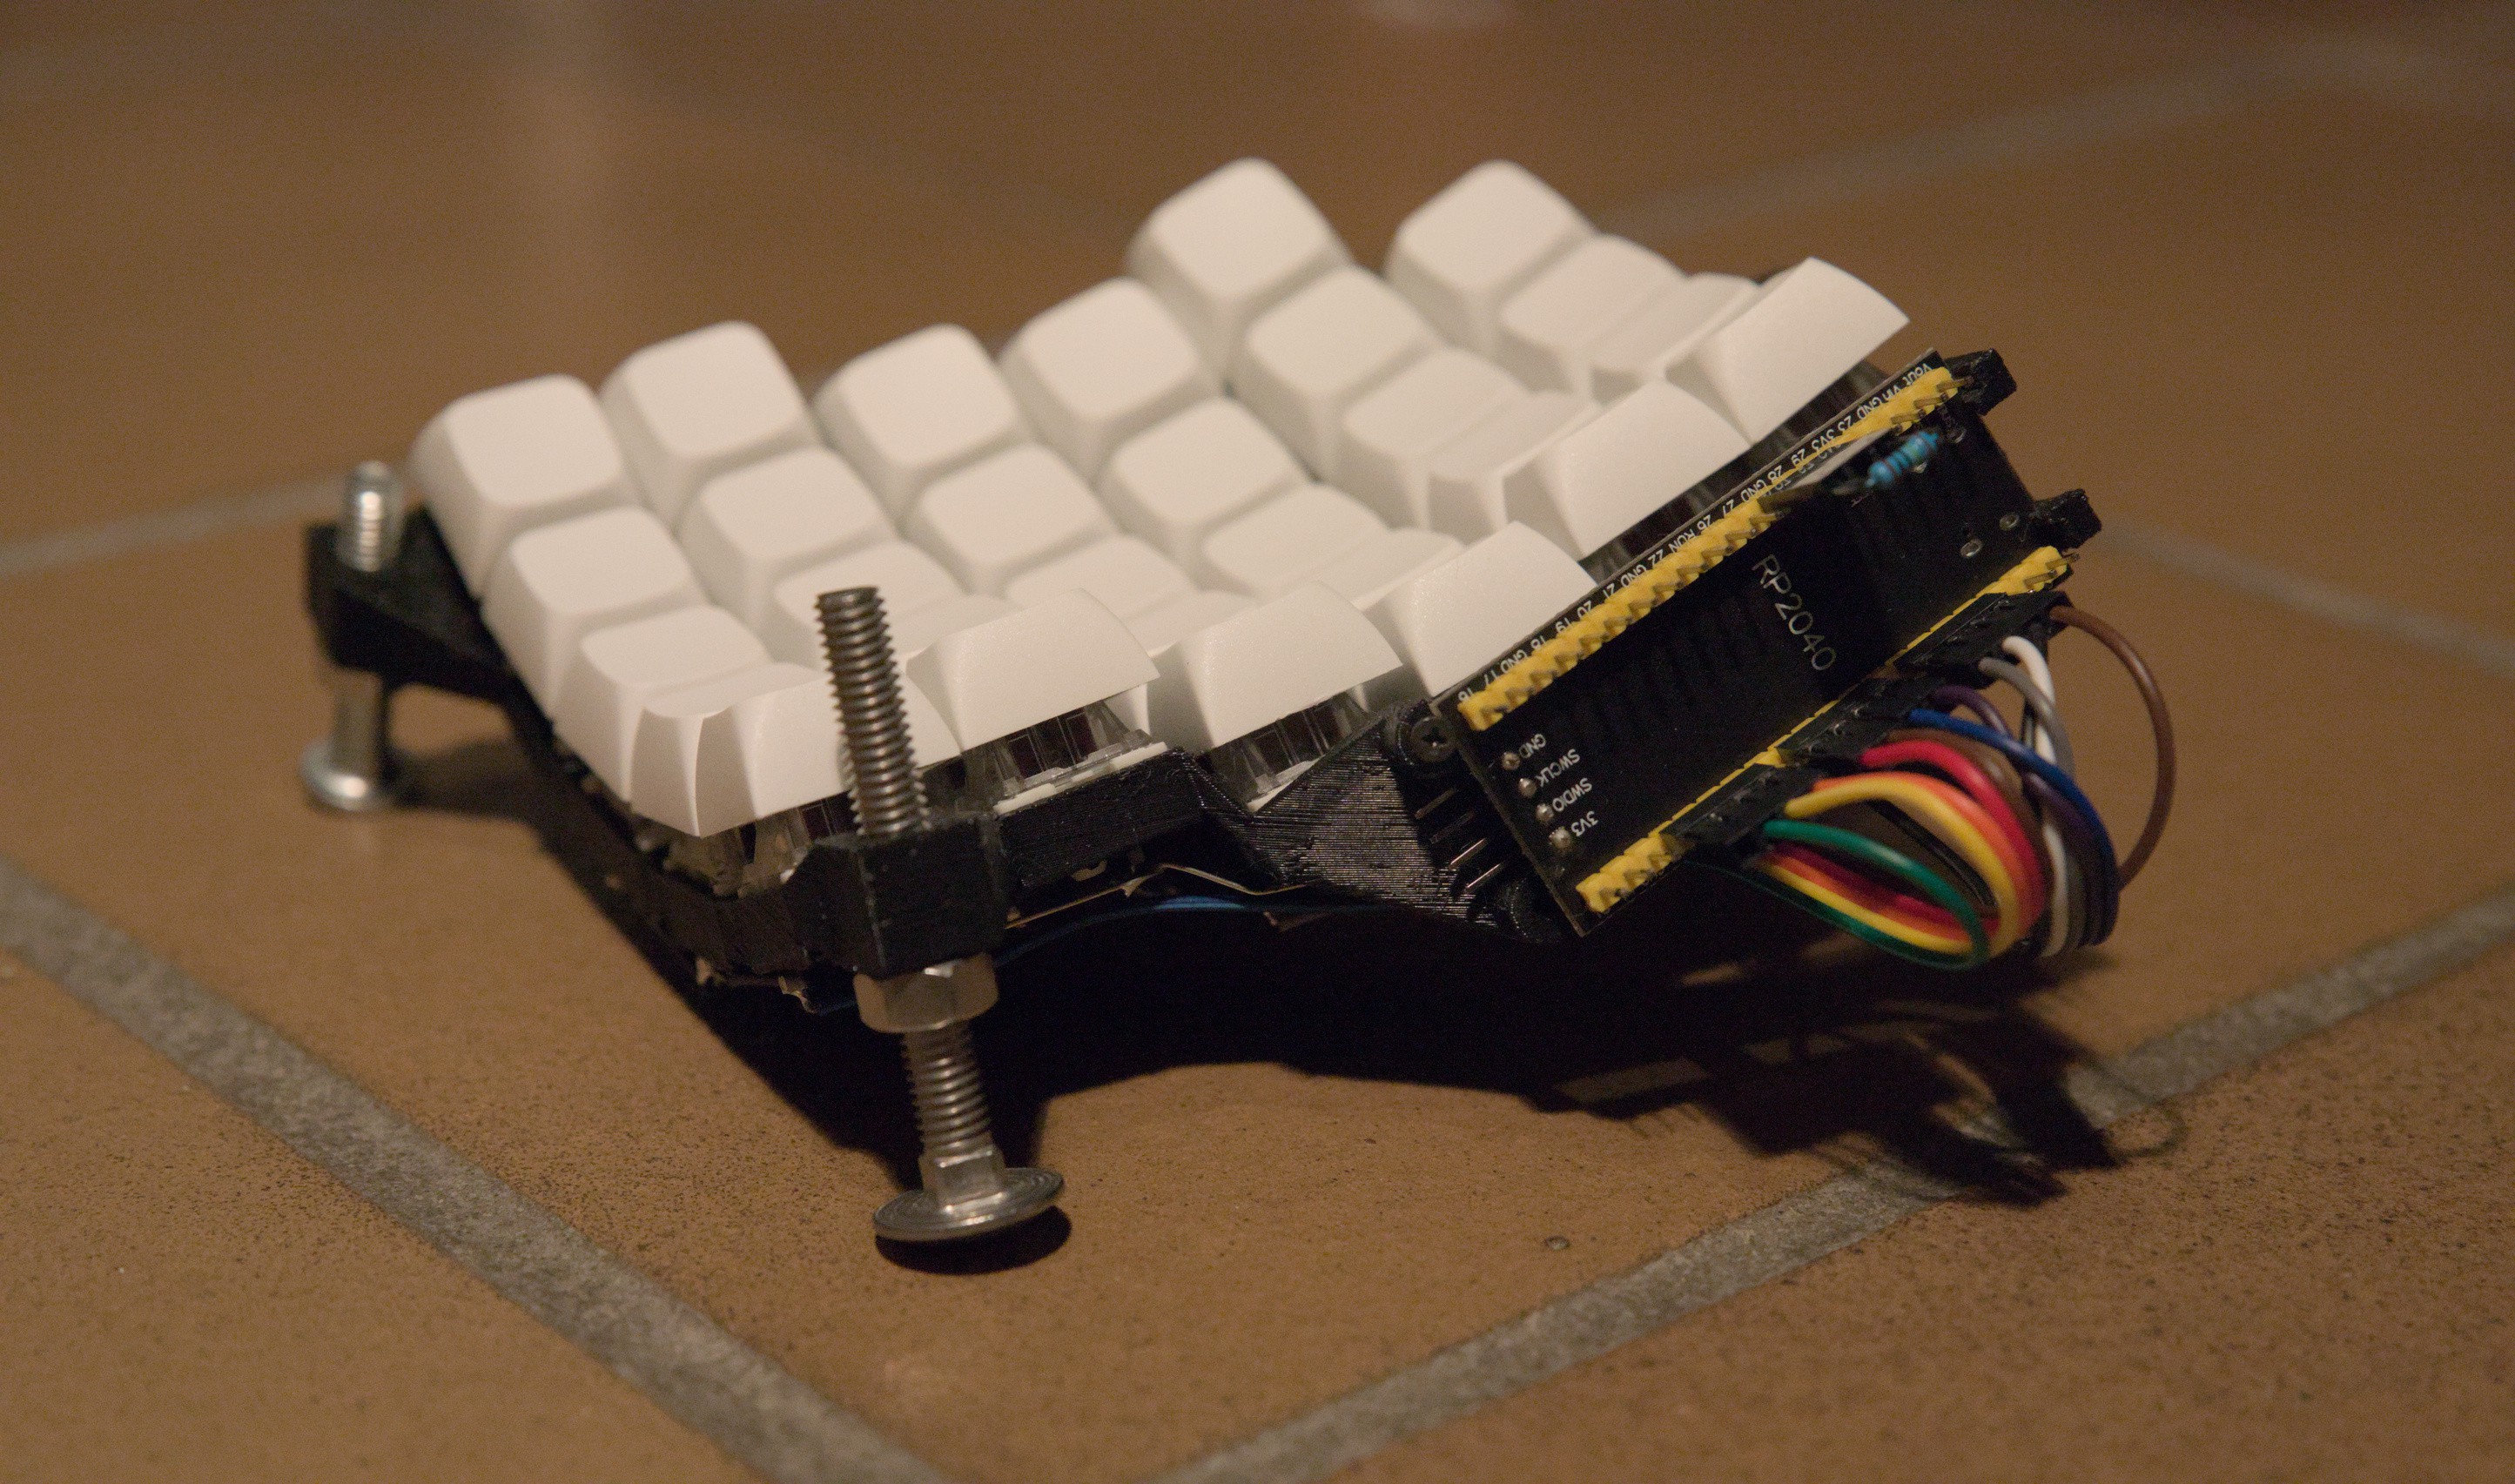
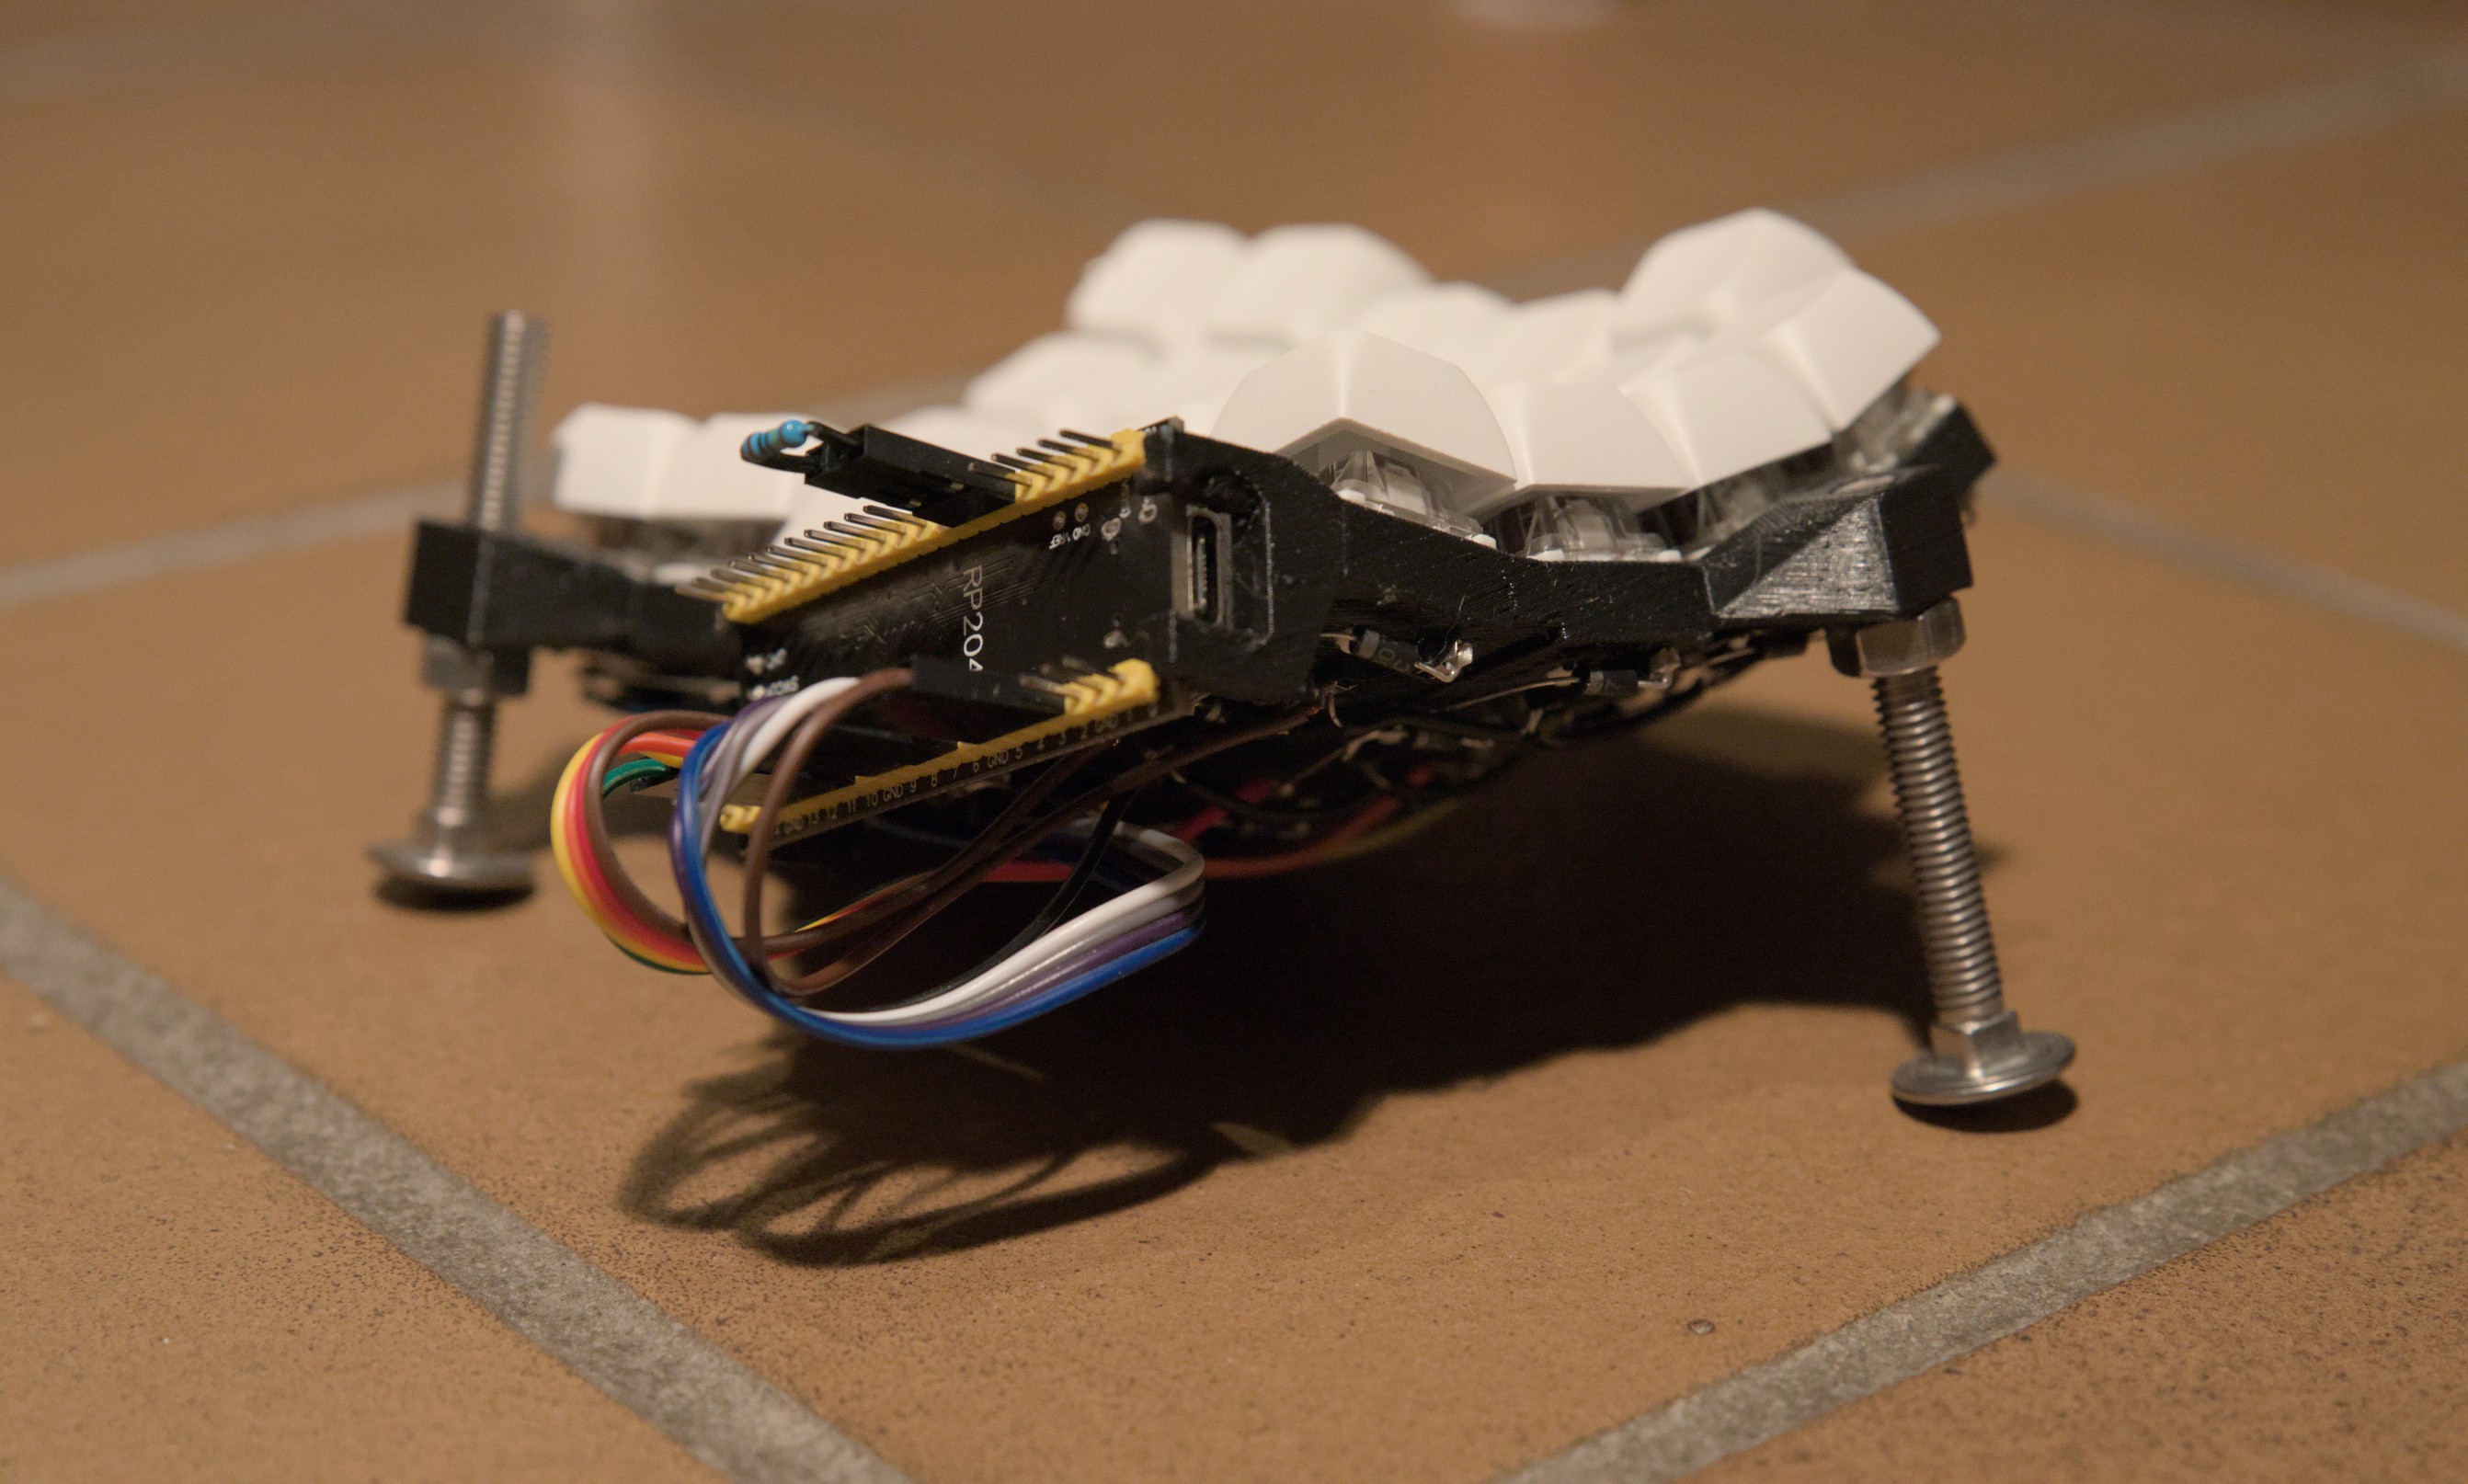
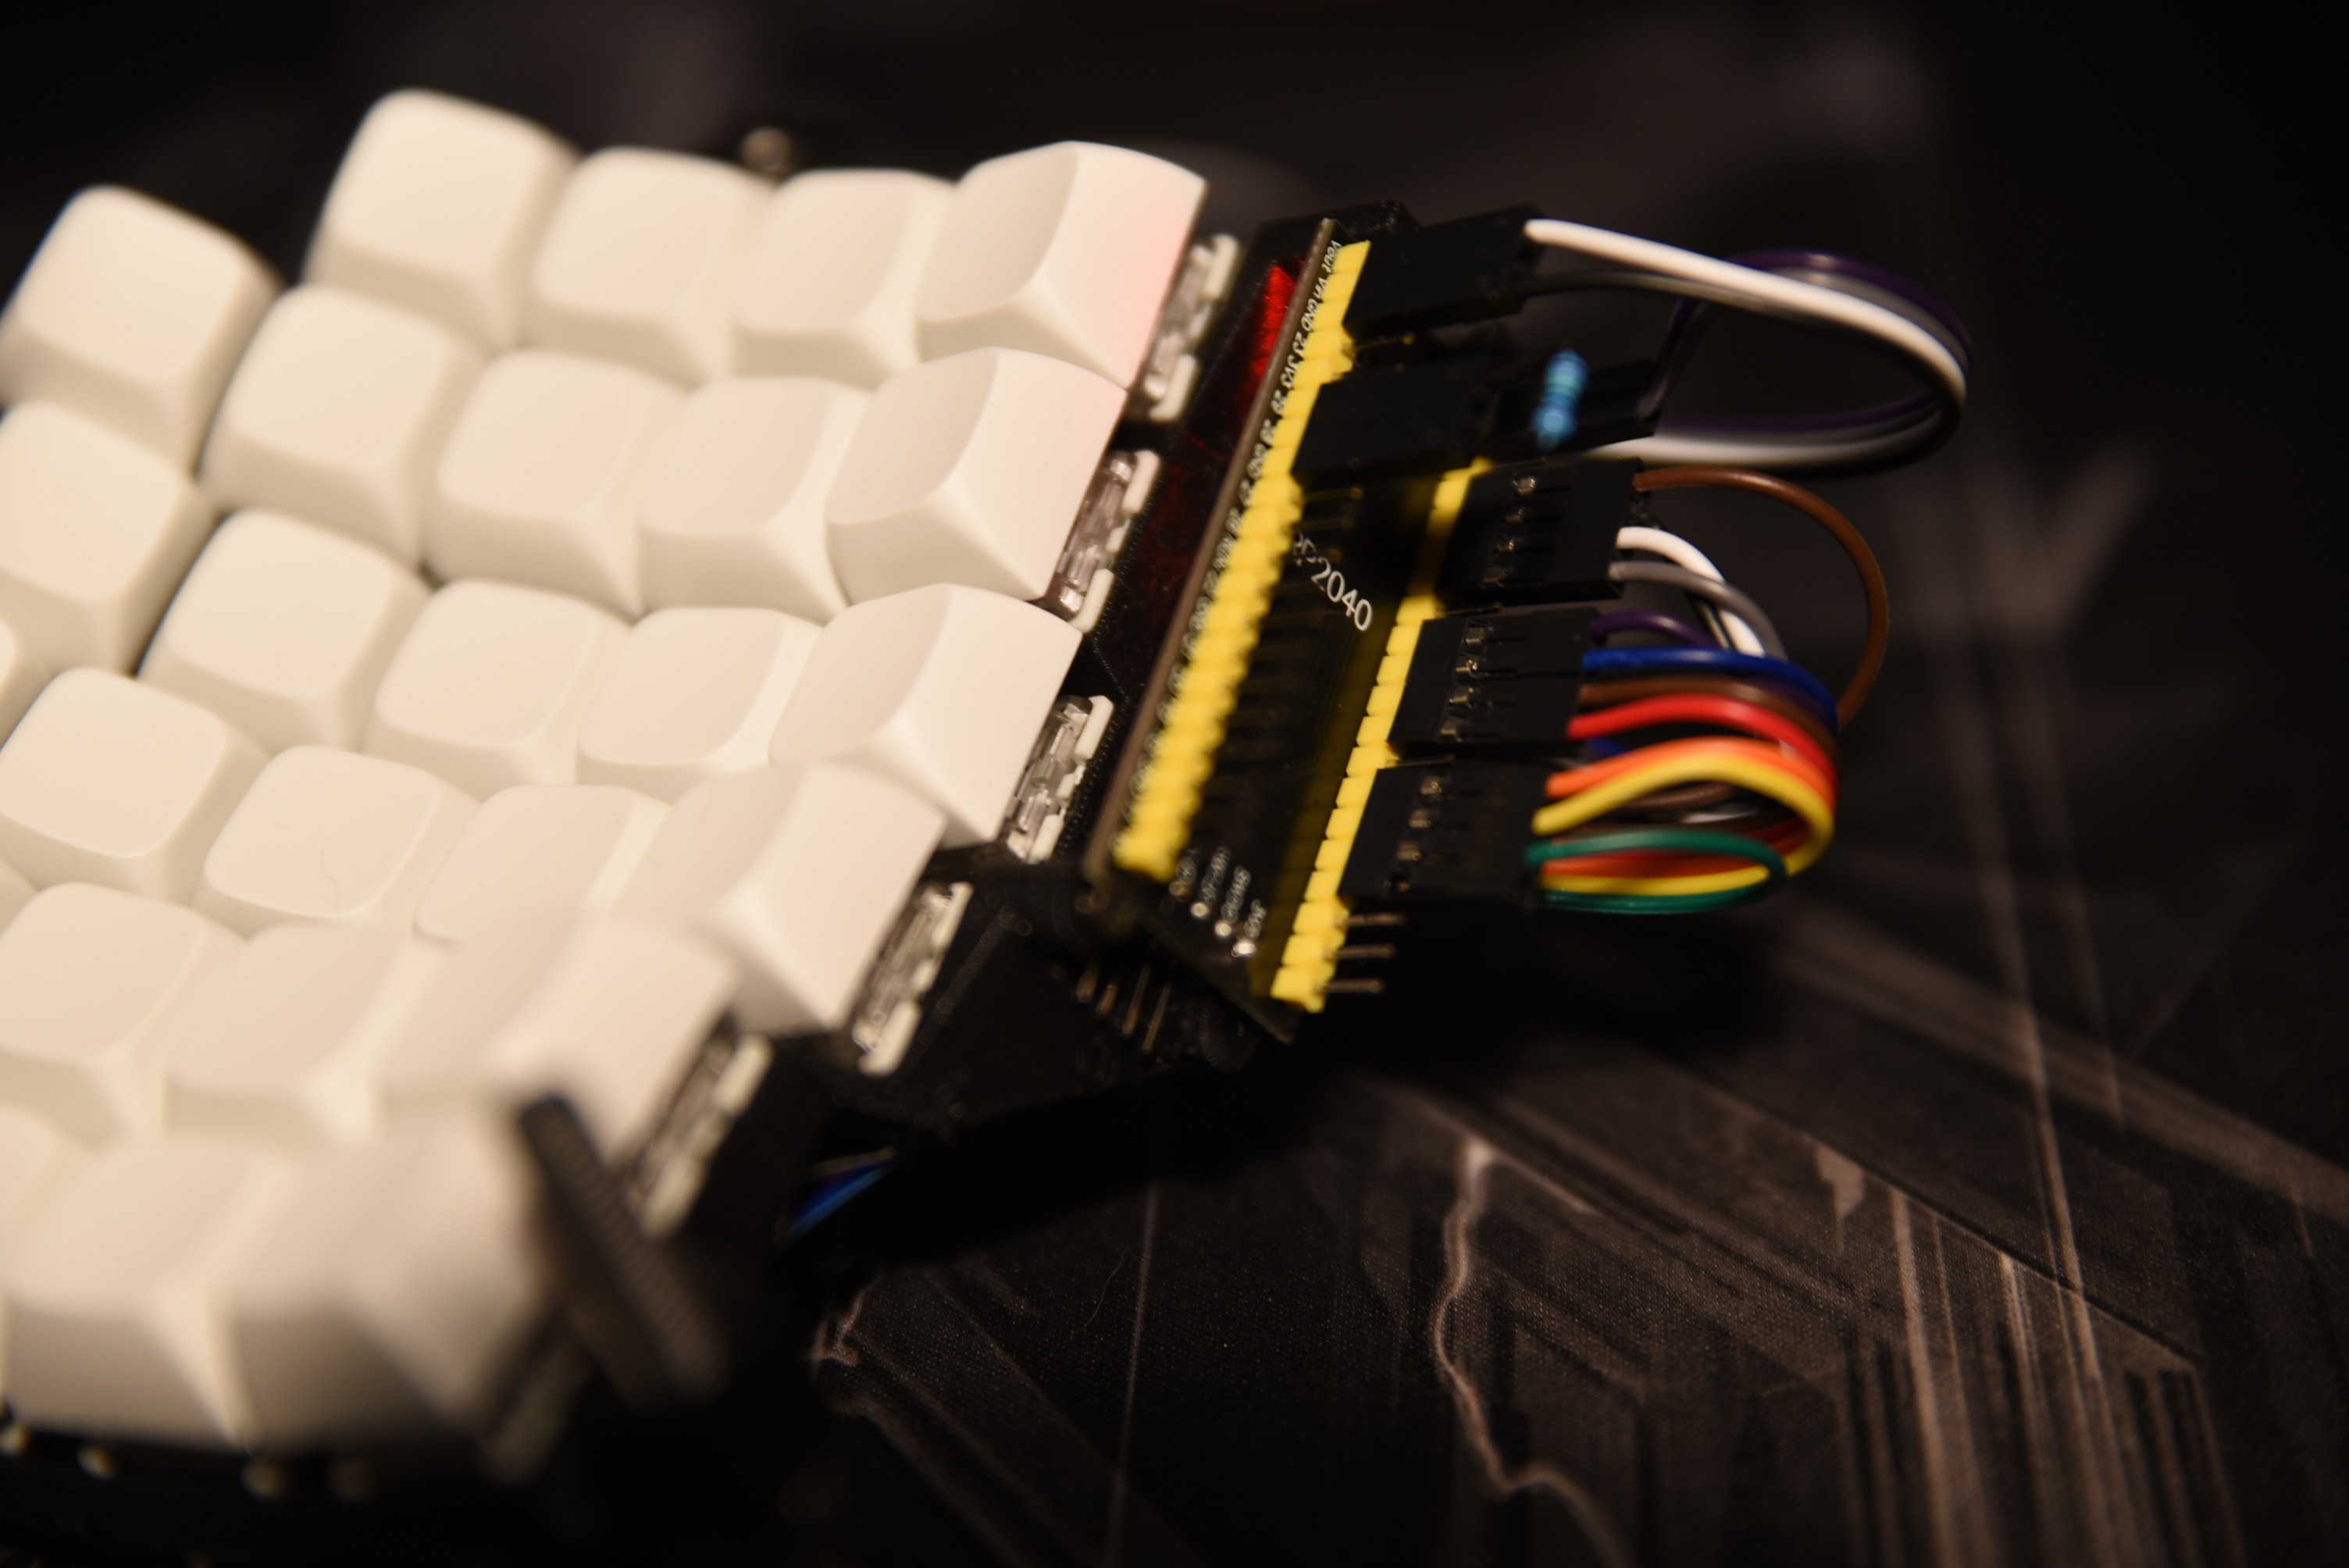
RMK and magnets!
11/09/2024 at 03:34 • 1 commentSince the last project log, I finished modeling the bottom cover, though right now there's no mounting attached to it. Next I'll be adding legs to one version and a 1/4-20 threaded insert to another version, and probably printing a plain one to stick some velcro to as well. I think it looks pretty nice already, though!
I also came across RMK yesterday, and I already have a working firmware with Vial support built and flashed on the keyboard!
I'm really excited about this firmware - having easy layout configuration available is already a huge improvement, and I love the fact that it's written in Rust! Hopefully I'll be able to use Embassy (the embedded framework RMK is based on) to get into using Rust on microcontrollers finally... but that will probably come after finishing more of my planned keyboard changes.
I was going to experiment with KMK, but while I love Python, I feel like Rust is a better fit for something like this, and I'm really happy with how simple it's been to get started with RMK. I've tested KMK out on another RP2040, but I probably won't use it for my main keyboard.
I think the next step on the firmware side of things will be to figure out how to get the TrackPoint module to work in RMK... I don't think anyone's done any work on that yet.
-
More changes coming...
11/06/2024 at 12:01 • 0 commentsSo, I've been using this keyboard quite a bit since my last project log. Unfortunately, we've also had to move out of our house, and in the move, the keyboard frame cracked in a few spots. Since I'm going to have to print a new one at some point anyway, I'm also taking the opportunity to clean some things up and add some new features...
---------- more ----------Things I've already changed:
- Added a mount for the 4-pin mini DIN (AKA S-Video) connector I'm planning to use for connecting the two halves
- Cleaned up the model generation project to remove the old Clojure-based source from the original Dactyl, and updated documentation
- Switched to using pipenv for running the project and managing dependencies
- Made several tweaks to finger and thumb well angles and positions, board mount position, etc.
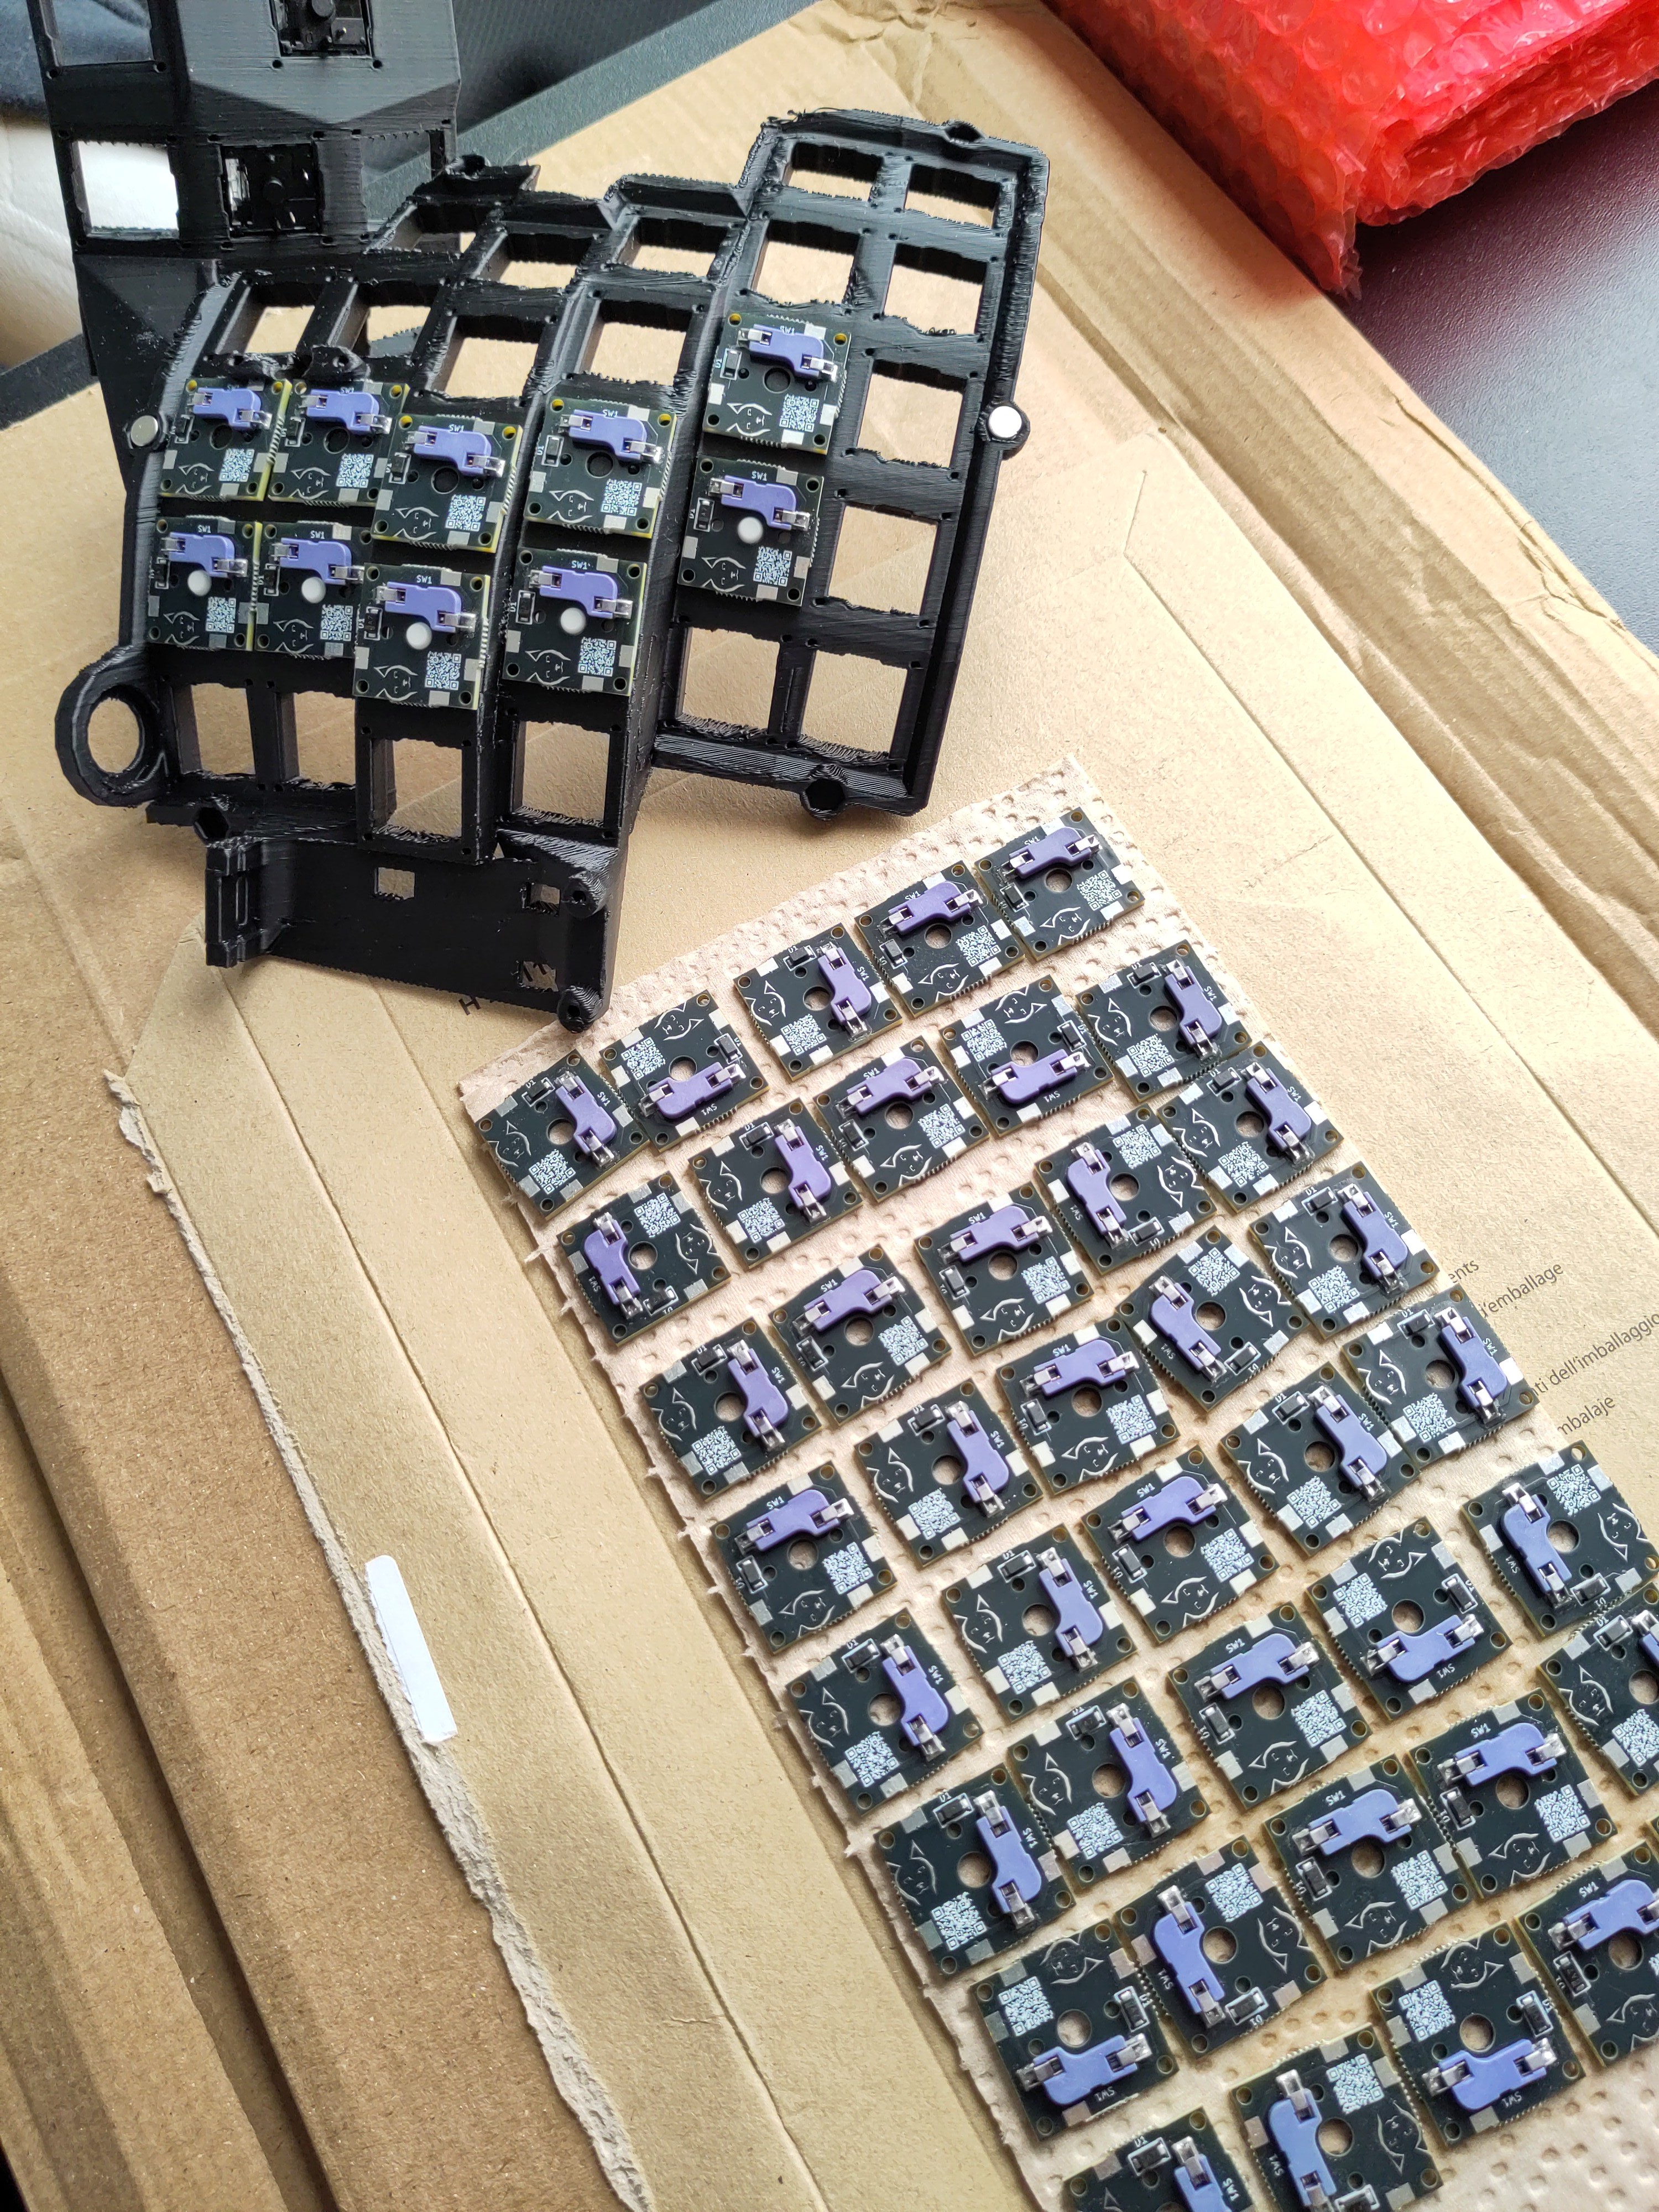
- Added a new key socket to spkb that supports my MX and Choc single-keyswitch hot-swap PCBs
- Fused the thumb and finger wells into a single piece for better stability (now that I figured out what angles work well for me)
- Added the TrackPoint mount I had implemented in the Clojure version; I haven't yet tested this out because I haven't been able to get my TrackPoint module working correctly, but I'm hoping to have one added relatively soon
Things I'll be changing soon:
- A bottom cover! My plan is for it to be held on with magnets, and to have different variants of the cover:
- One with the current carriage bolt feet
- One with some velcro to attach a beanbag for setting it on your leg (or even on a desk if you prefer to do it that way)
- One with some 1/4-20 mounting points for attachment to photo tripods (thanks Ben Vallack for this idea!)
- Probably experimenting with RMK or KMK instead of QMK, for ease of hacking
- Adding some mouse buttons to go with the TrackPoint
- Adding a thumbstick to the left side
-
Fully functioning prototype!
02/27/2024 at 10:36 • 0 commentsI finally got the whole keyboard wired up, and have been using it for the past few days. I've made a few modifications along the way to make things work better.
I finally got my favorite switches: Kailh Speed Pink! Unfortunately, despite them being by far the best feeling switch for me, I'm noticing some things I'd rather change.
First, like most clicky switches, they're really loud, and they're bothering my wife somewhat. I like clicky switches entirely for the feel, and I'd actually prefer if they were much quieter.
Second, I've noticed that these switches don't actually actuate at the right point - they actuate a bit before the actual click is felt, which leads to a weirdly disconnected feeling while typing.
Does anyone know where I can find a switch that feels like a Kailh Speed Pink, but is quieter and more consistent between actuation and click? (No, a tactile is not an option - they feel nothing like a good click bar, and if I wanted that, I'd just put my wife's old Gateron Browns back in)
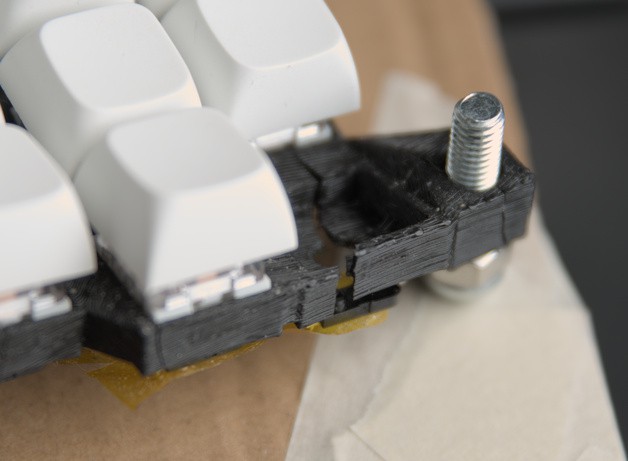
The next thing I needed to do was add more stability. The tripod configuration I had before was fine, as long as I didn't need to press 5 or 6, and as long as I didn't use the thumb clusters. I found that just putting a long bolt in the second part of the connector between the thumb cluster and finger well lent enough stability to make it possible for me to type comfortably. While doing this, I also adjusted the tilt and tenting of the finger wells to make it easier for me to hit the keys.
Finally, I swapped the 2U keys on the thumb clusters so they're easier to hit, and to reduce accidentally hitting the 1U keys in the same row. (since the 1U key next to Backspace switches the default layer between Dvorak and QWERTY)
---------- more ----------After those changes, I'm pretty happy with the board overall, but I've been collecting more improvements I'd like to make.
The biggest change I need to make is to add some more grip to the bottom of the support bolts so it doesn't slide around my desk while I'm trying to type. I've ordered some "liquid electrical tape" dip, but it's taking quite a while to come in. I was originally going to get some Plasti-Dip, but that costs something like 5 times as much.
Next, I'm adjustin the relative offsets of the finger columns to match my fingers in resting position a bit better. I've already printed a new piece for this, but since I've also been experimenting with some other changes, I can't use it yet.
I rewrote some of the finger well positioning code to make the inclination angle of the finger well easily adjustable without having to touch multiple pieces of code. I also moved the inner rear support further back for better stability, which necessitated adjusting the thumb connector slightly.
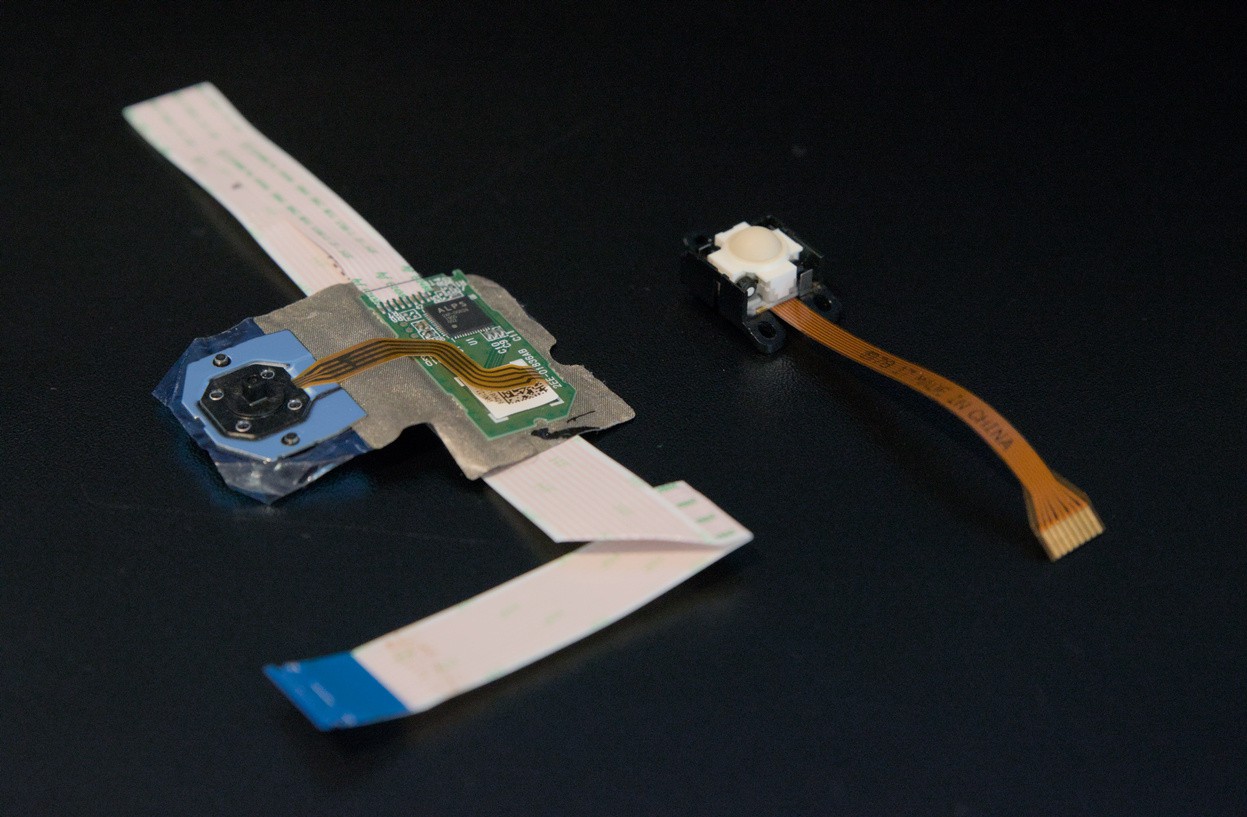
I'm going to be adding the TrackPoint module and the Apple Mighty Mouse trackball next, since mouse keys are awkward to use in most cases.
I also got my hands on a Hall effect PS5 thumbstick, which I'd like to add to the left side, to make this a good replacement for my Orbweaver. The biggest challenge will probably be to find a good location for it. I may opt for a Switch thumbstick replacement instead; we'll see how well I'm able to make this fit.
-
Right side finished!
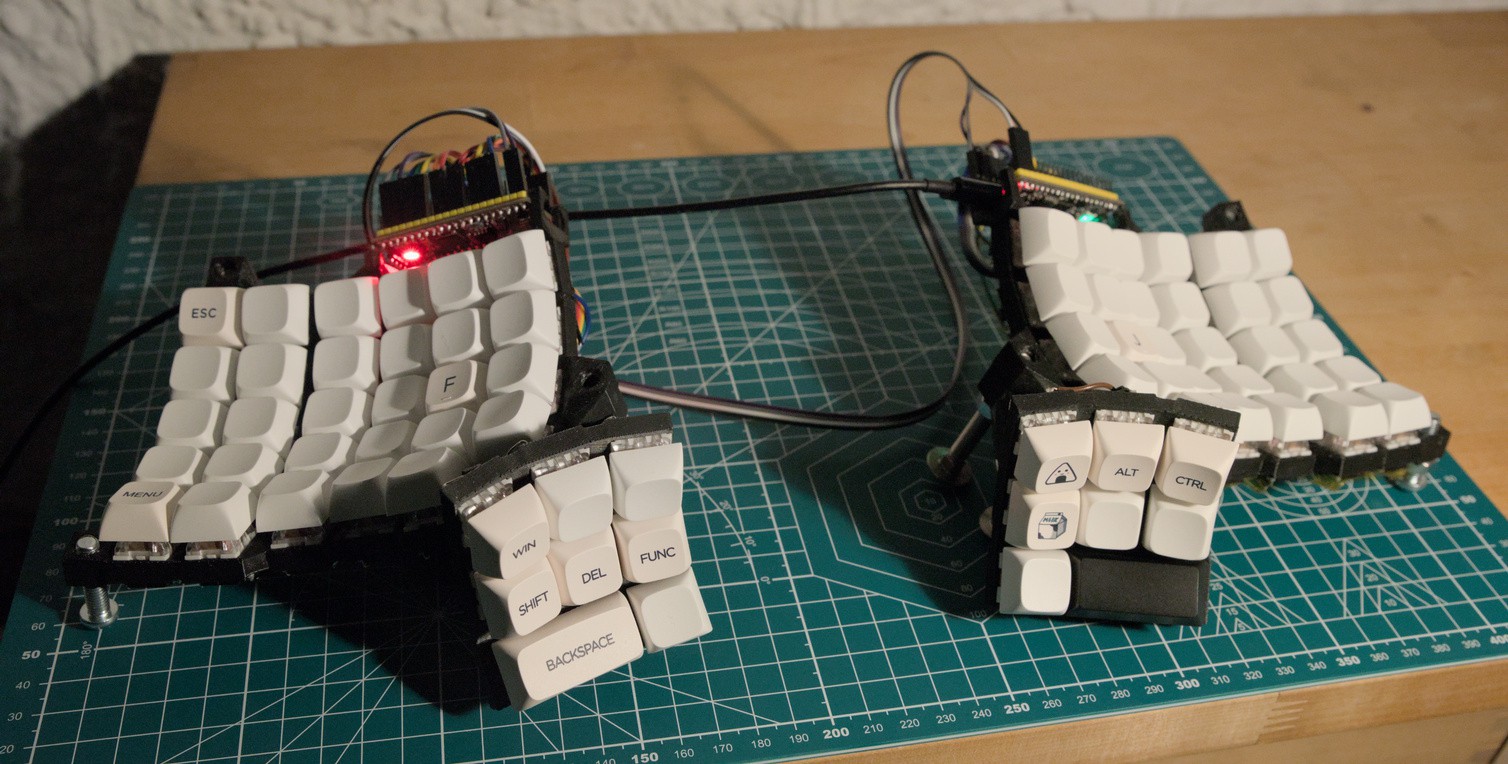
02/04/2024 at 20:06 • 0 commentsI finally finished wiring up as much of the right side as I could, though I'm still waiting for some more hotswap sockets and a new set of switches to come in. That's not a problem yet, though, because my keymap doesn't even have a use for those key positions yet.After a quick test, all of the keys on the right side work! This is a huge relief, but it made me realize something: I need to get a wire stripper. I've been doing all of this by stripping wires with a side cutter, and it's very slow going if I don't want to ruin the strands in my wire.
I also took this opportunity to take a photo to help with wiring, though with this many things across the board, I'm not sure it's as helpful as I hoped. At least it does a good job of showing my work so far.
I think I'm going to take a small break to make a mount for the S-Video (4-pin mini DIN) socket that I'll be using for the cable between the two sides.
Hopefully my new wire stripper, hotswap sockets, and switches will come in soon so I can get the other half of the board finished.
-
First full test fit!
01/29/2024 at 13:04 • 0 commentsI'm suddenly much closer to having a finished keyboard!
I finally got my thumb cluster printed and went through an iteration of adjustment to make sure that it's comfortable to type on. That ended up with a structure solid enough that I didn't even need the two feet I originally planned to add to the thumb cluster.
I'm pretty happy with this overall, and it gives me a point to attach accessories...
I then figured it was time to print the other side, but I've always wanted to add a small LCD to the left side to display the current layer's layout as a quick reference. (otherwise I always forget half of my more interesting mappings)
---------- more ----------Once I finally got around to modeling that and printing the results, I was very happy with the parts, and I immediately got to work cleaning the prints and assembling the left side of the keyboard as a test fit... and then I noticed that I ran out of both keyswitches and hotswap sockets. Here's what I was able to actually finish:
Other than the missing keys, I'm really happy with it! The LCD is in a good position overall (though I'll probably reprint the part at a steeper angle so it's out of the way of the USB-C cable) and everything fits together pretty well. Here's another shot of the whole keyboard in its current state (still just a test fit, because I have yet to take the time to solder the left half and the thumb clusters):
Once I finish wiring the rest of the keyboard and get the software updated to drive the LCD, the next feature will be an integrated pointing device. I'm really excited to work on this - it's a combination I haven't seen anyone else do yet!
-
Porting to Python
01/04/2024 at 23:36 • 0 commentsSo, I realized I actually left out a big chunk of the work I've done recently when I wrote my last project log... I started porting the 3D model generation to Python instead of Clojure!
Since I still wasn't happy with the position of the thumb cluster and the tenting angle on my last print, I decided to make everything adjustable using M6 bolts. I also decided to go for a "skeletal" design, leaving off any skirt or bottom case until I am happier with the core physical design. I actually rather like the effect.
I used my new spkb library for this, which I forked from my old Parameterized key tester frame project. It includes a bunch of utilities to make building an ergonomic keyboard easier, like switch sockets (with or without hot-swap socket compatibility), board mount helpers, and keycap approximations. (mostly used to visualize the finished board)
It's been refreshing moving this to Python - I'm much more comfortable with the language than with Clojure, and it's easier for me to build abstractions and organize the code in a way that makes it simpler for me to hack on. Hopefully this will help me solidify the design faster, and make it easier for others to come up with their own designs!
At some point I want to order some tool dip so I can coat the heads of the bolts, and keep it from sliding around as much while typing. Right now that's lower priority than getting the thumb cluster built and connected, and making the other half of the board.
-
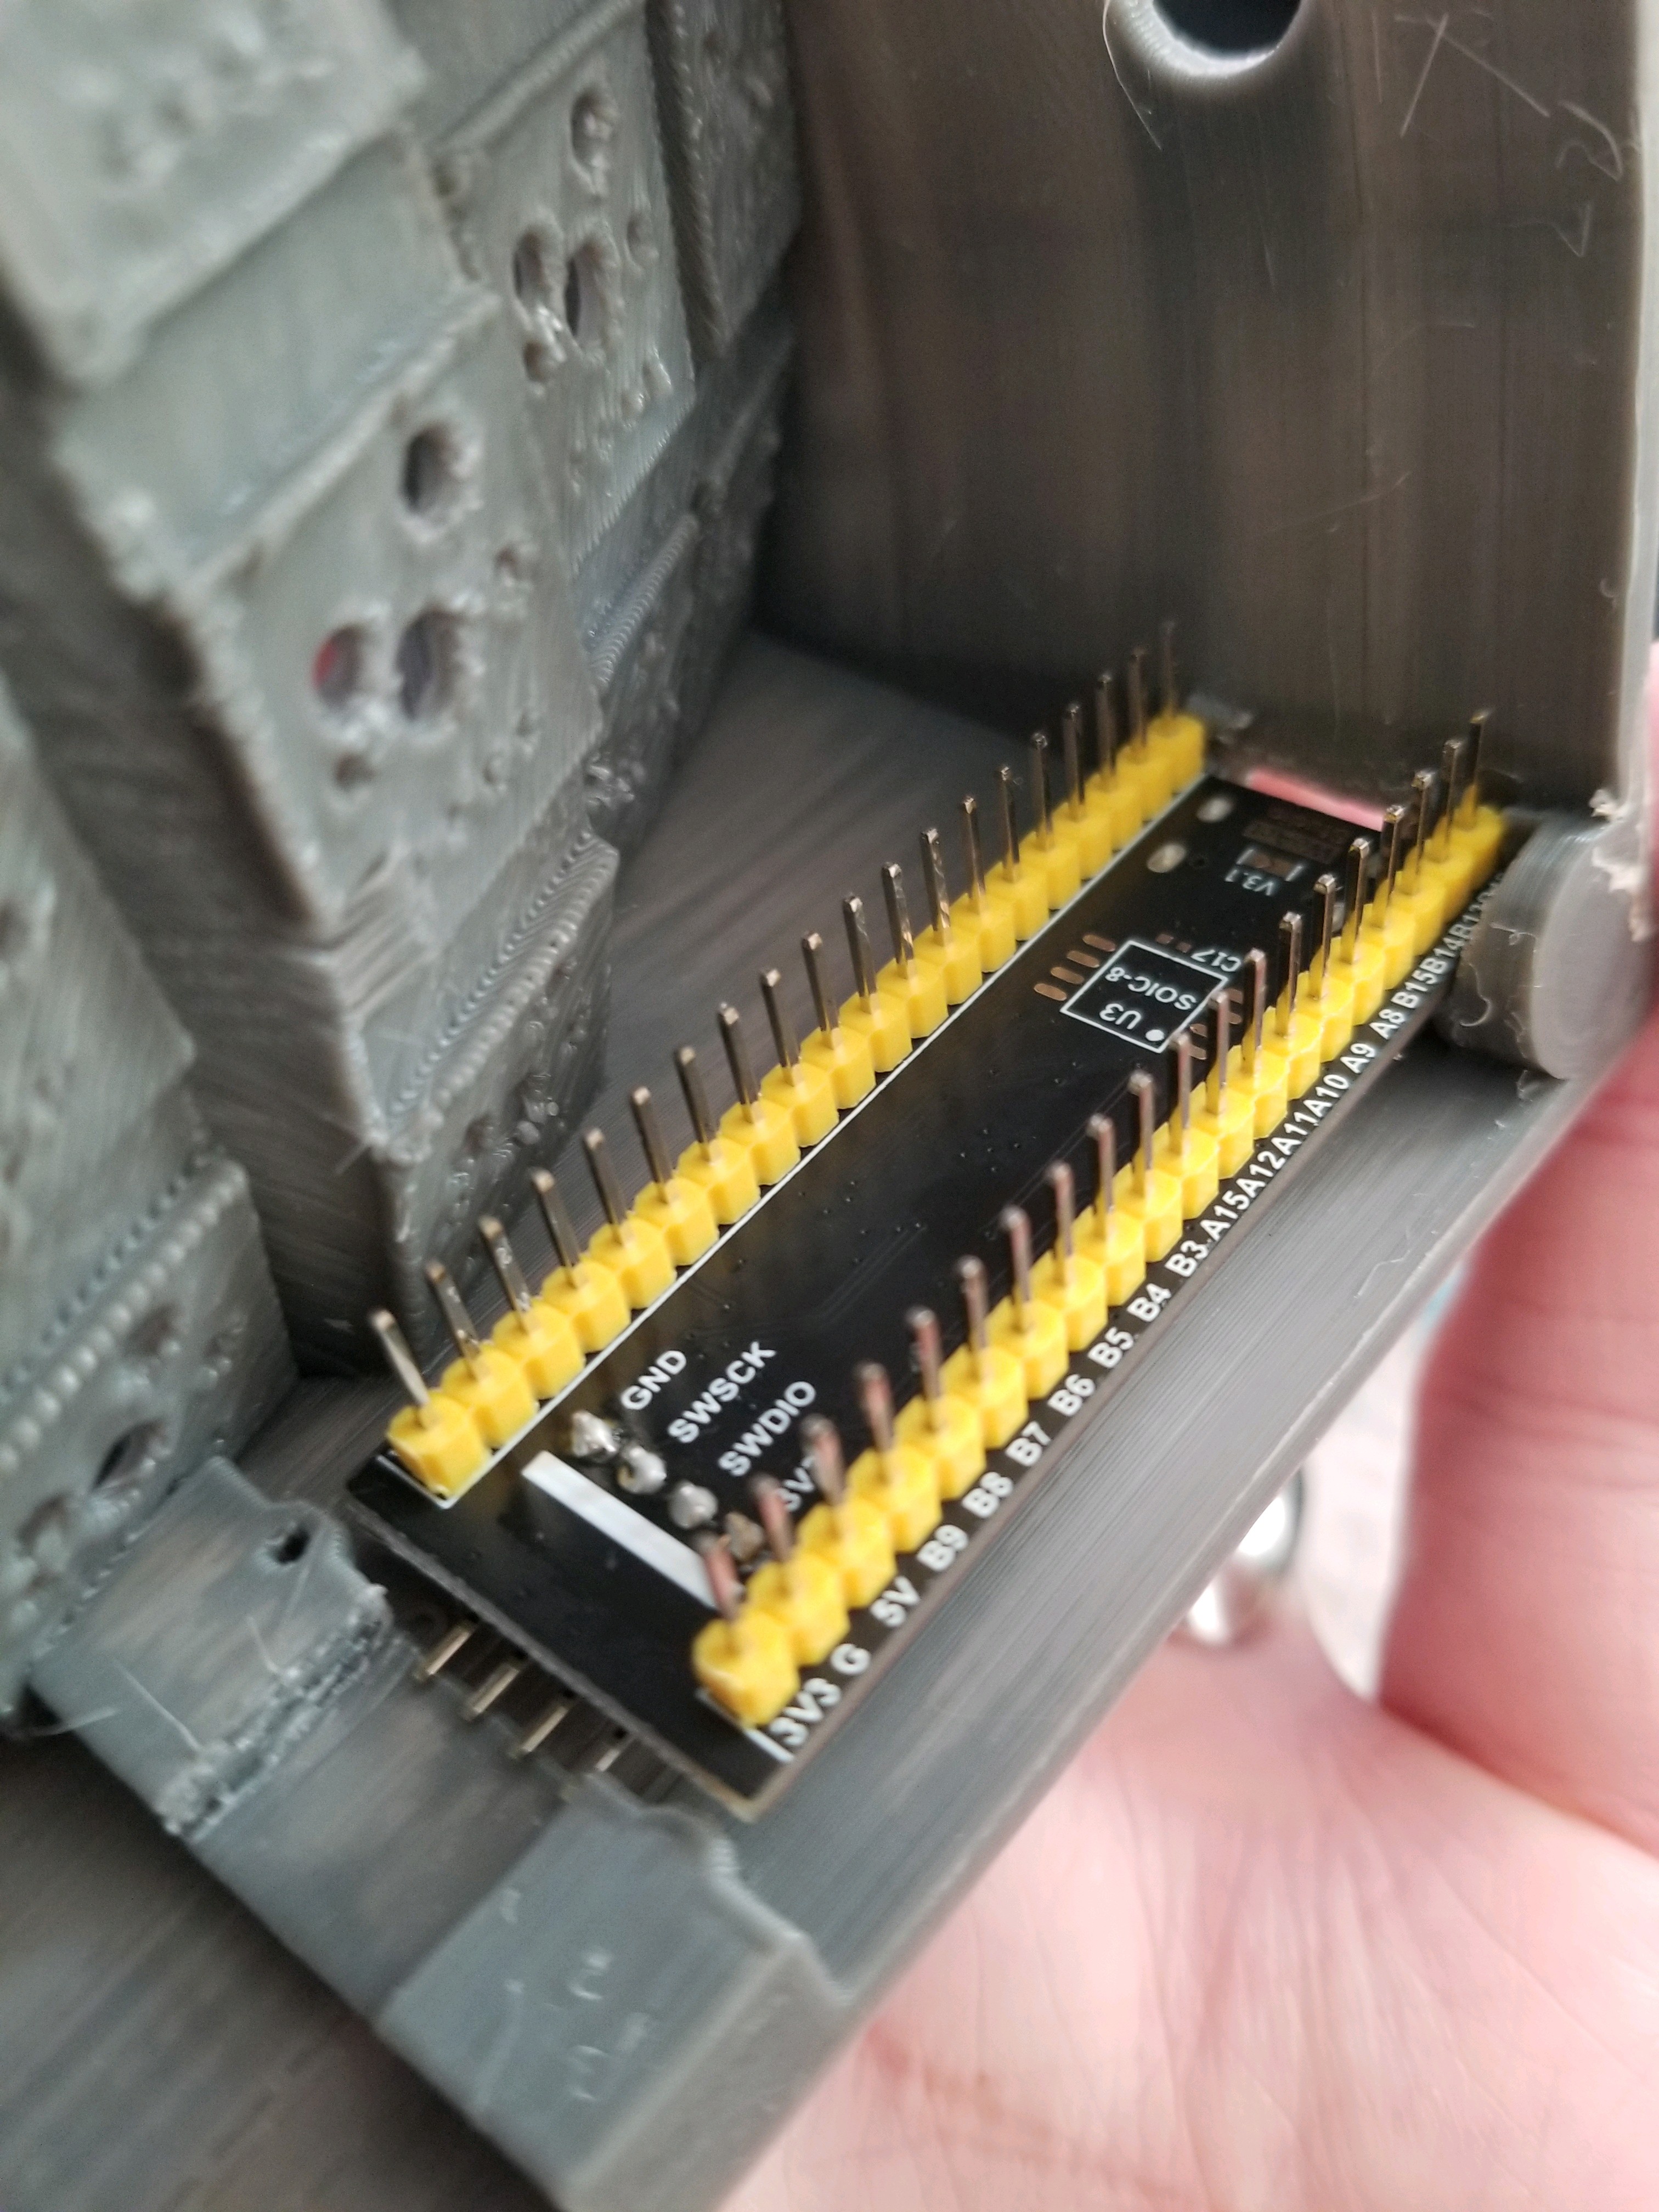
RP2040, and success finally!
01/03/2024 at 23:31 • 0 commentsAfter my issues getting the two sides of the keyboard to communicate using the STMS32, I shelved this project for several months. Recently, though, I finally got a couple of RP2040 boards, so I figured I'd try to port the keyboard to that and try it again.
After a couple of days struggling with the QMK build process, and even going back to single-duplex serial communication, I was finally able to get it building by restructuring the keyboard's directory so the RP2040 version was at the top level. I tried it out, and... it works!
I decided to try switching back to full-duplex serial communication, but I couldn't get it to work. I had noticed while testing half-duplex that sometimes it would lose the other half until I jiggled the cable some, but doing that did nothing to help with full-duplex communication. However, since the cable seemed flaky, I decided to swap the part of the cable on the serial data pins out for another one, and... it worked!
So, the only thing stopping full-duplex serial from working may have been the cable all along. Maybe I didn't even need to switch from STM32 to RP2040 in order to get it working after all... 🤷
Next, I'm going to try to get a thumb cluster printed and attached, once I figure out how to actually physically attach it to the finger well. It's going to involve attaching to the tallest bolt leg, but I'm still not sure what the mechanism will look like, since I still need it to be adjustable. Once I figure that out and get it printed and wired up, I can duplicate that all for the other side, and then I have a full keyboard that I can adjust until I'm happy with the ergonomics!Sadly, I don't know how soon that's going to happen. The need to search for both a new job and a new place to live are putting too many demands on my time and mental energy at the moment, so it's likely this won't happen for several months. But here's hoping that by summer I'll be able to finally daily drive my own keyboard!
-
Nope.
09/06/2023 at 11:36 • 0 commentsMy hopes of having a completed left-hand side for this project log have not been realized. It has been an interesting couple of weeks since then.
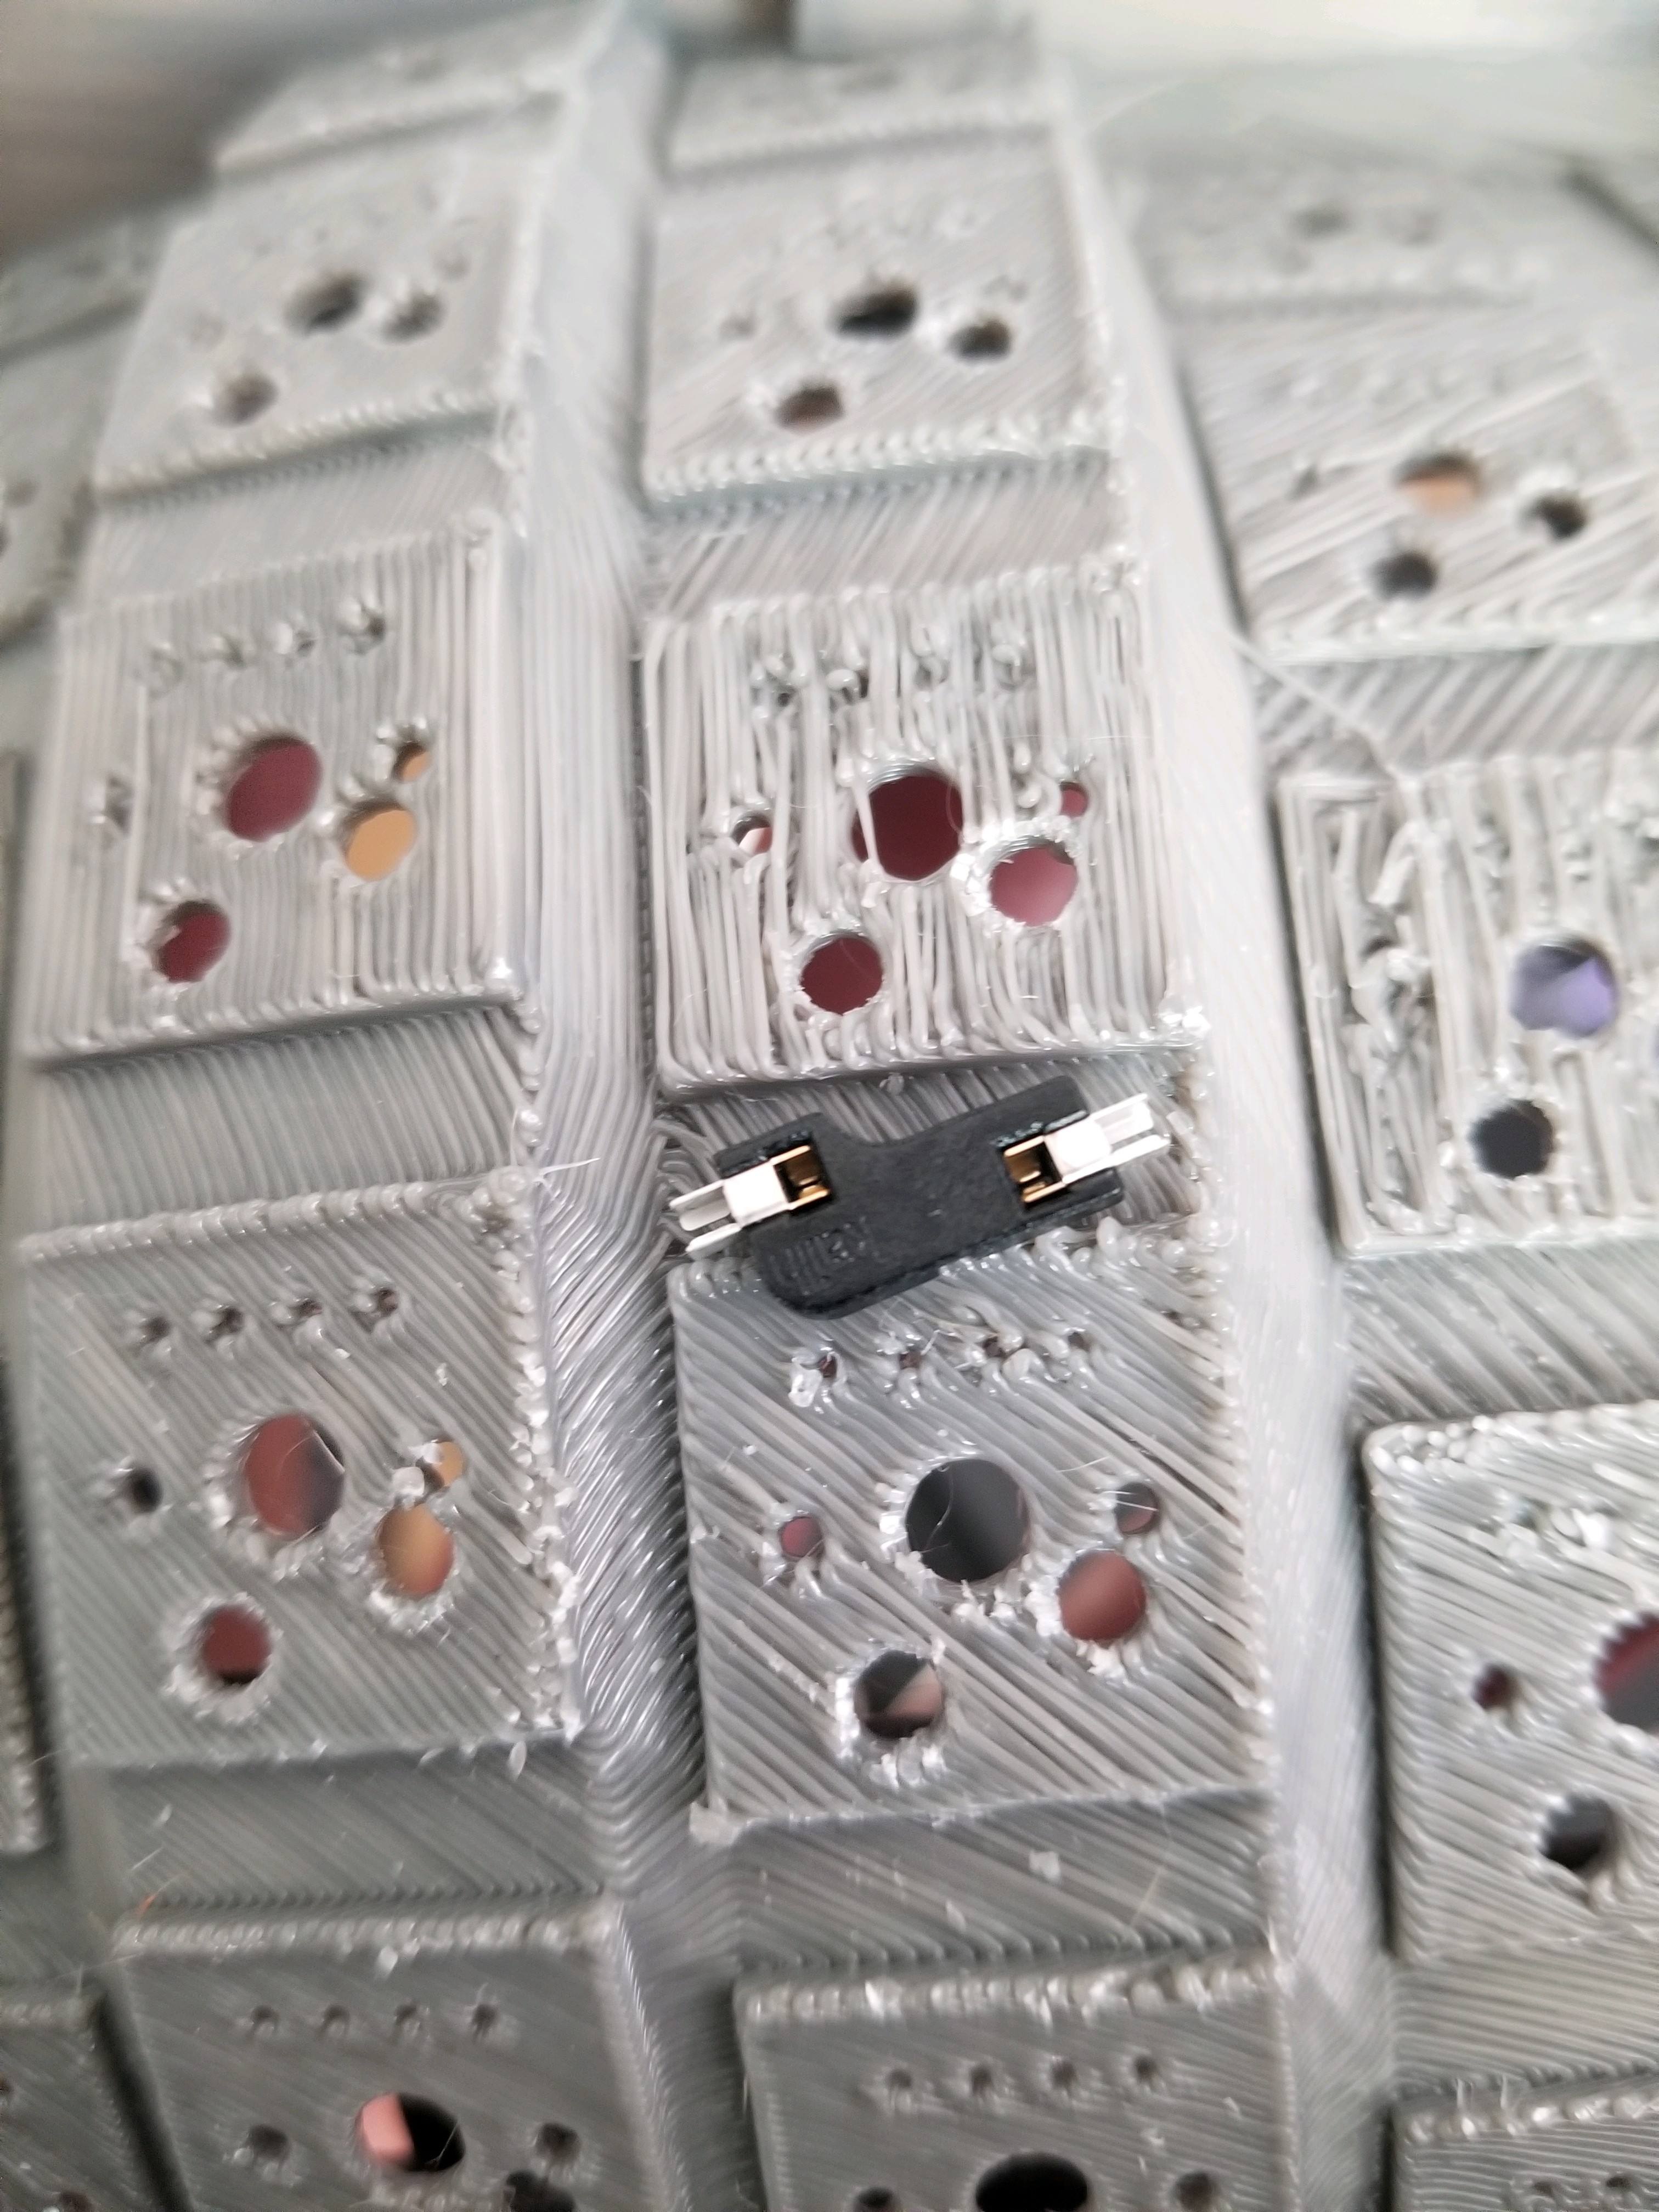
First, when I started printing that grey left-hand side in the last log, I forgot to un-mirror the switch backplates, so the hotswap sockets wouldn't fit.
Also, the microcontroller mount went... a bit wrong.
---------- more ----------That was a bit of a disappointment, since it involved scrapping the whole print, but it was also a good opportunity to discover that I actually don't like the results with the grey filament. I switched back to black for the next print, which had a few corrections in it.
It came out looking pretty good, but apparently it still needed a few more corrections - on the innermost column, the hotswap sockets wouldn't fit without me drilling through the side of the case.
After sitting with the printed keyboard with keys in for a few days, I started trying to solder together the matrix, starting with the hardest-to-reach key, and realized... it's a bit too hard to reach.
So, after all this, I took a detour to start porting the keyboard to Python since it's way more familiar to me, and lately I need all the help I can get overcoming mental fog. I'm hoping to have the basic key positions ported in the next couple of days, and then I can work on reimagining the case. Since I'm taking off the "skirt" I had added in my original modification, it's probably going to end up looking way more like the original Dactyl. I really didn't see that one coming.Who knows, maybe I'll take some inspiration from the Heron v1.
Dactyl Lynx
The Dactyl Lynx is a parameterized, split-hand, concave, columnar, ergonomic keyboard - a fork/rewrite of the original Dactyl keyboard.