David Tucker
-
Advice
05/08/2021 at 21:18 • 0 commentsIt is important to keep in mind who is talking to you when asking for advice online. I keep seeing people post simple questions like "what is the best laser to get" with little or no context given, and others respond in kind with little or no context as well. This can lead to bad advice, so be aware of it.
For example that person that tells you not to waist your time on anything short of a $10,000 100w laser is not wrong, but only if your needs are there needs. If you are running a small business with the laser running 8 hours a day 5 days a week and you rely on it for your income then for sure that 100w laser is a better buy than a much cheaper $200 5w laser diode. Your $10,000 machine represents 16 weeks of labor at $15 an hour but if productivity was even just 4x faster for the 20x increase in power then you should be able to make that up within a year.
On the other extreme if you are not planning on making any money at all and this is strictly a hobby then your time may not be worth nearly as much to you as the money you have to put into the hobby. In that case going with a $200 machine is a much better investment.
The point is that you should not ask simple open ended questions online and hope to get an answer that applies to your situation. And on the other end you should not give simple answers without stating your assumptions or needs. You need lots of info to make an informed decision.
This of course applies to all things in life, not just lasers or CNC's in general. if your choosing a career from a few lines of text online, or making any other large decision without at least taking context into account then you are probably making a mistake.
-
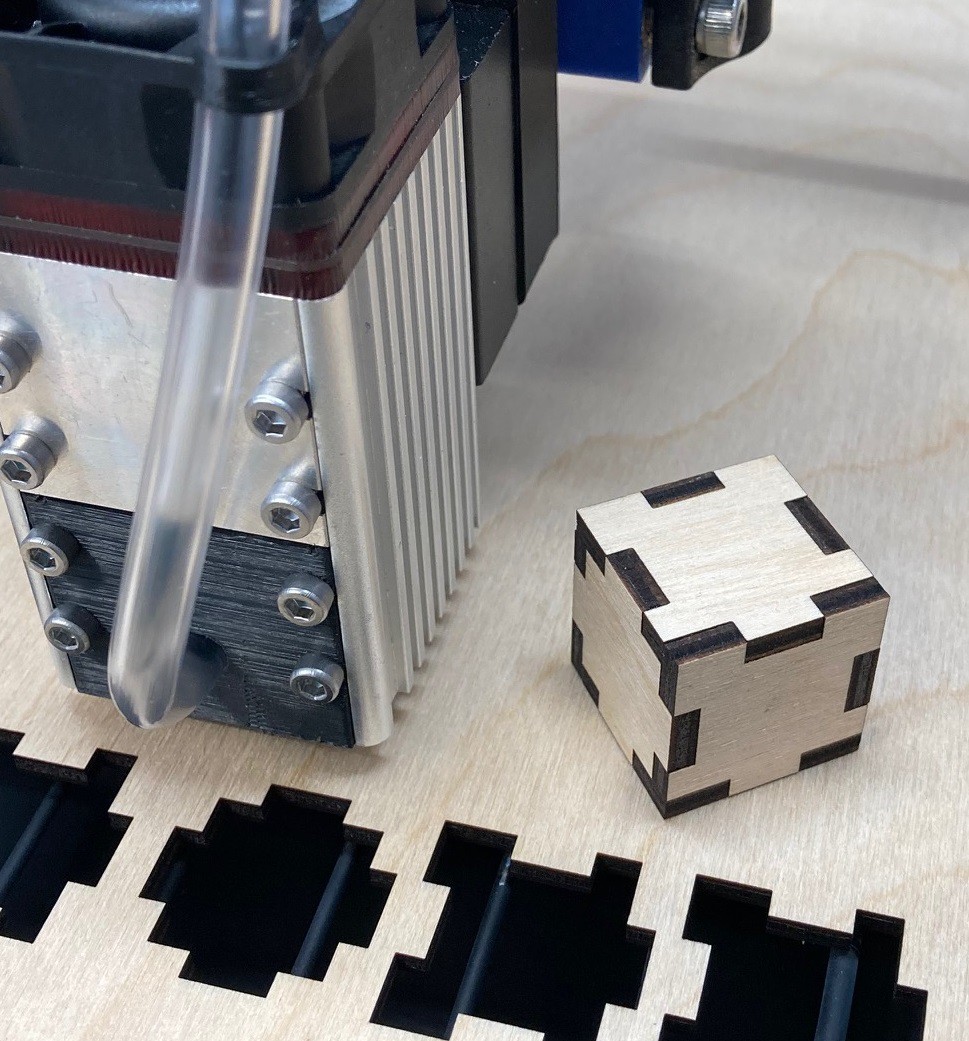
Laser Post-Mortem
05/07/2021 at 04:59 • 0 commentsIt is time to take stock of my laser add-on. Right off the bat I have to say the laser is a lot of fun. It is deceptively simple to use, that can really lead to issues if you are not vigilant. It takes almost zero setup, once I set the focus height I can add a new sheet of stock any time with little more than a rough alignment under the laser before starting a cut. And cuts are quiet (thanks to my new air pump) and generally fuss free. No need to worry about cut order, or to secure the material or really worry a lot about feeds and speeds. Another plus is the accuracy, this has a 0.1 mm kerf and can easily cut paper thin slices of material, there is no worrying about splintering or dealing with a wide bit.
On the negative side, this is too easy, it is tempting to not wear the safety glasses or not remain in the room while cutting, It feels too safe. I have had to impose some rules for using the laser to help keep myself from growing complacent. The first rule is if the laser is plugged into the wall then I wear my safety glasses, no exceptions. Next I go through a fixed startup sequence of turning on the air and then my exhaust fan, setting the focus and outlining my cut before I turn on the laser. The reverse sequence is followed as soon as the cut is complete. Most importantly I pull the power before messing with the material.
It is also very slow, a CO2 laser would be able to cut much faster, and much thicker materials as well. It took several minutes to cut out the little boxes from my last two posts and those are about as simple a cut as you can make. However for the price and my applications the speed is not that bad. I don't have room for a CO2 laser, nor do I have anything major I'm producing so time is not money in my case.
It does not compare well to a 3D printer, they are really designed to do very different things. The laser is very much a 2D cutter, basically a drag knife on steroids. While the 3D printer is mostly used for complex 3D forms. This is closer in spirit to the CNC, but it is much simpler to setup and operate. If it was not for the death ray and smoke it would be quite user friendly! You really need to think hard to turn a 2D cut into a 3D shape, going beyond simple box like structures takes a lot of creativity, but there is still a lot you can do with just a 2D cut. I'm beginning to see the appeal of a cricut cutter, it is lower risk than the laser yet capable of cutting a lot of the same materials.
The important thing to keep in mind is that this is not a 3D printer, it is very easy to use, but not very safe. Fire is always a concern with any tool, 3D printers included. But here we are actually catching an object on fire on purpose in a controlled way. It needs to be taken seriously for sure. However if you are vigilant then this is both a fun and rewarding tool.
-
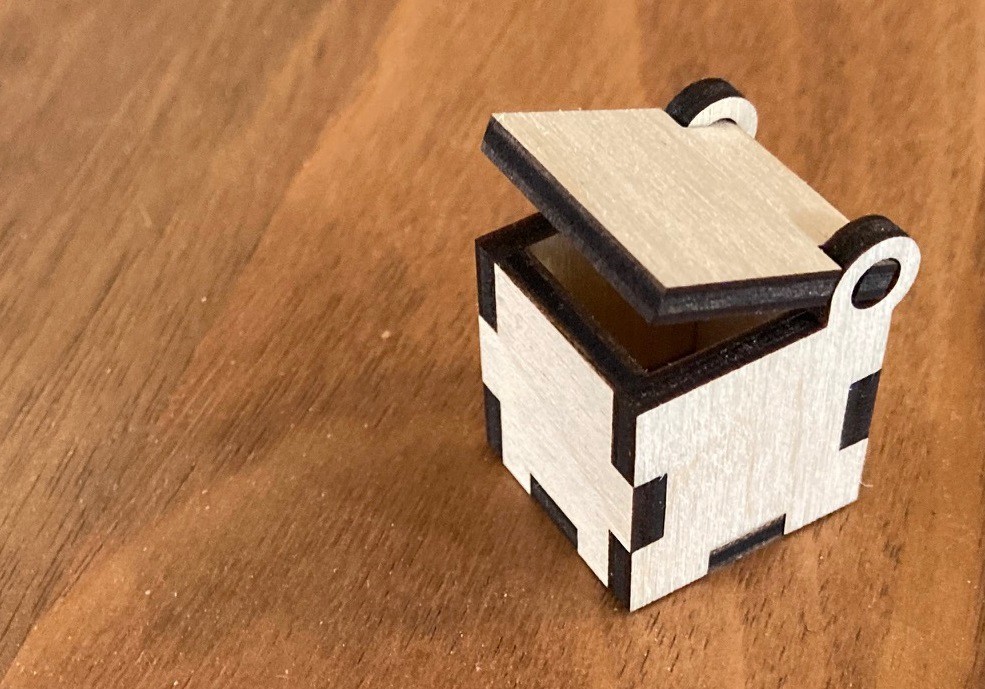
Fusion 360 for laser cutting take 1
05/07/2021 at 04:33 • 0 commentsI have been trying to work out how to use Fusion 360 to generate laser cut files. At first I tried just drawing the cut file as a 2D drawing then exporting as a dfx file. However LightBurn takes all your reference lines as cut lines, leaving a lot of cleanup and making it difficult to later modify the layout if needed.
![]()
![]()
Recently I came across this article from Core Electronics and it has pointed me in a better direction. They generate a 3D object then flatten it out using the align then move tools. Finally they create a new 2D sketch and project the face of the boxes onto it to make a simplified drawing. This is much nicer, it lets you use all the tools available in Fusion when designing. And the output does not require any cleanup so that is a win as well.
![]()
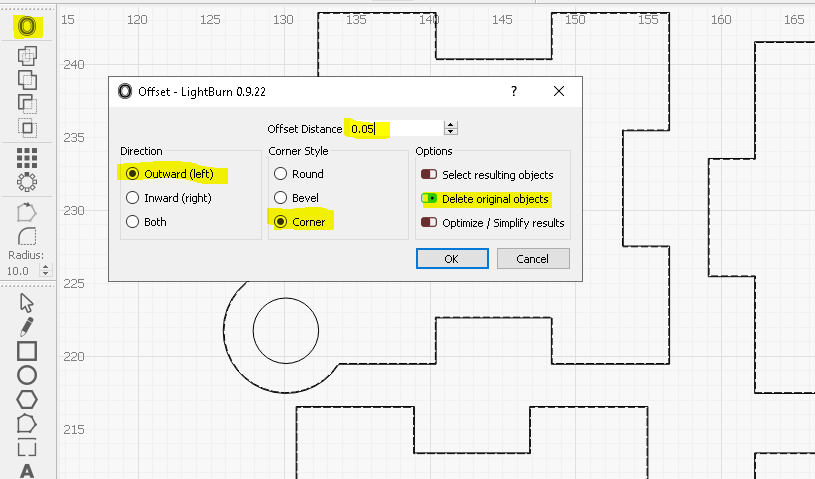
One trick I'm experimenting with in LightBurn is to use the offset feature to take care of the kerf (width of the cut). This increases the size of your design by the given amount, so when the laser cuts the excess off you should get a final result that is the exact size you originally designed. This allows you to do all the design work in Fusion without worrying about the kerf. Keep in mind that if your laser removes 0.1 mm of material then you need to increase the line size by half that, since half the cut will be on the outside of the line in your waste material. Also be sure to select delete original object or you will get two lines that will be cut (yikes). In this case I wanted my pivots to be loose so I did not add an offset to them, but typically you would want to offset all lines that need to be dimensionally accurate.
If you do the math you can see this adds up to the same 0.2 mm adjustment I made on the Inkscape example. In that case I added the 0.2 mm to one tab, but not the slot, in this case I'm adding 0.05 mm to every line, both on the tab and slot, 4 lines adds up to 0.2 mm of added material.
![]()
It took me a while to work out all the kinks but I think this is a much better way to design complex structures. You could bring the final dfx file into Inkscape to add any artistic details to the object if that is simpler, but this is much easier to to the technical design work in.
-
Inkscape take 1
05/04/2021 at 01:51 • 0 commentsI thought I would make a small note on one way to use Inkscape to design laser cut files. Today we will make a simple box.
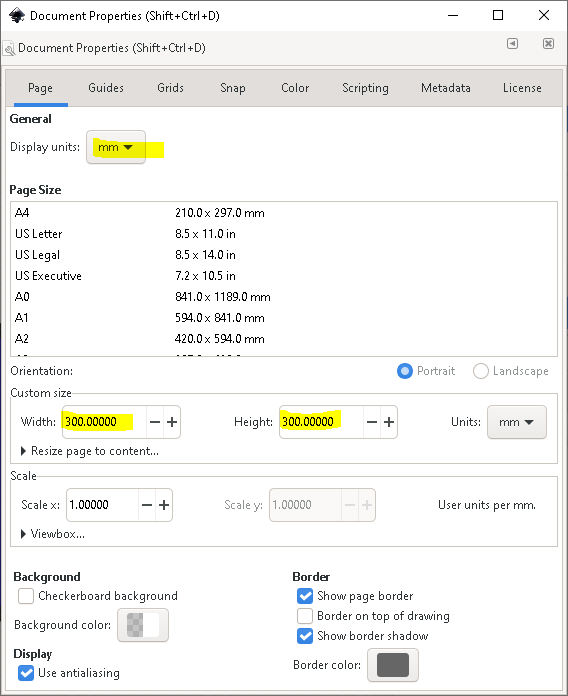
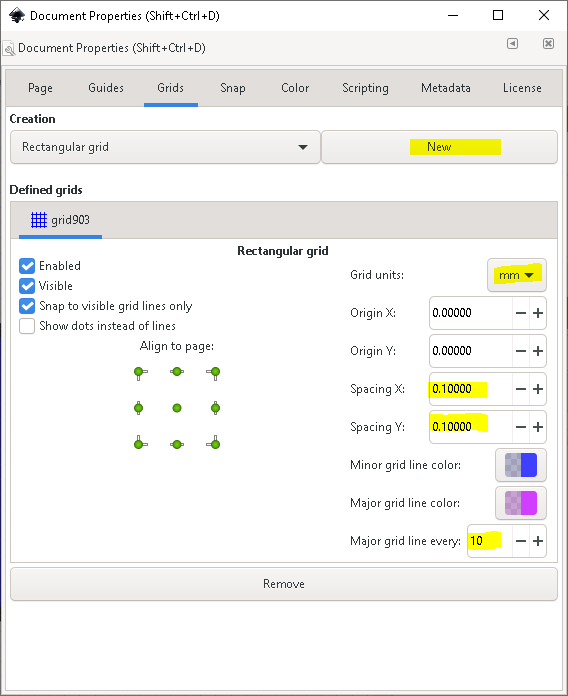
First off in the document properties we need to setup a template that is the size of our material. In my case I'm cutting out 300x300 mm 1/8" plywood.
![]()
Next I find it convenient to setup grid lines. I'm using 0.1 mm grid lines with a major line on 1 mm.
![]()
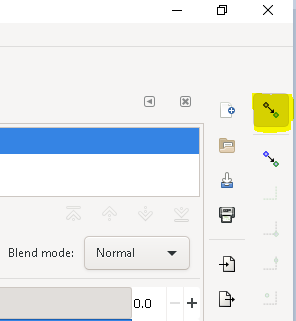
When drawing your design the grid lines (and snapping in general) can get in the way at times, you can quickly toggle snapping on and off with the button highlighted below.
![]()
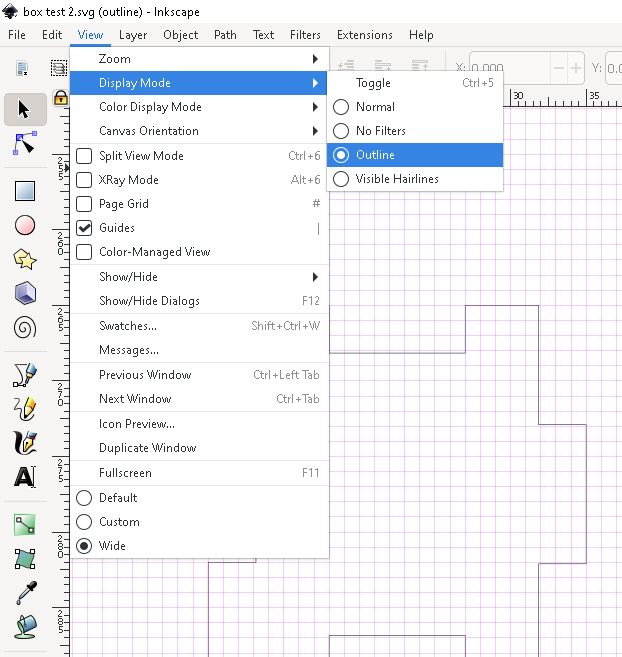
For the most part we are only interested in the underlying vector and not the outline or fill on a line. You can hide all that by enabling outline mode in the view menu. This shows you exactly what the laser will cut.
![]()
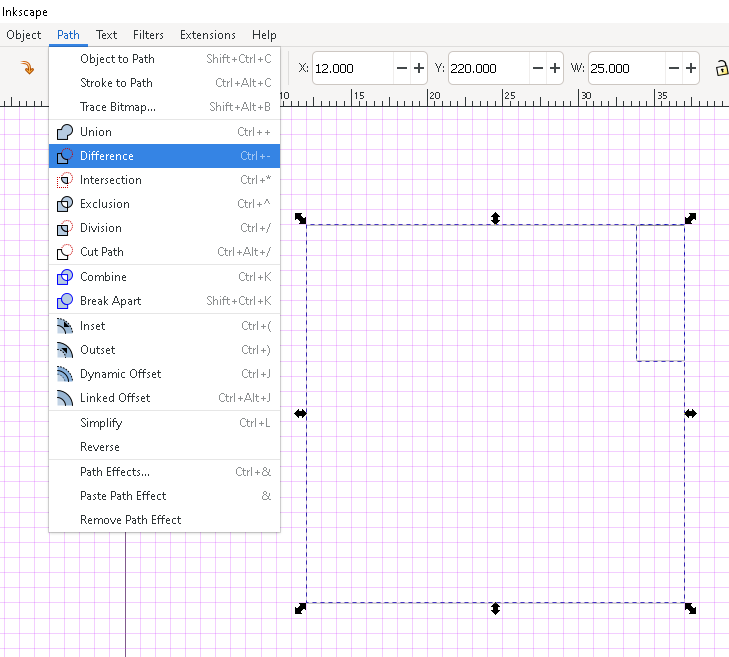
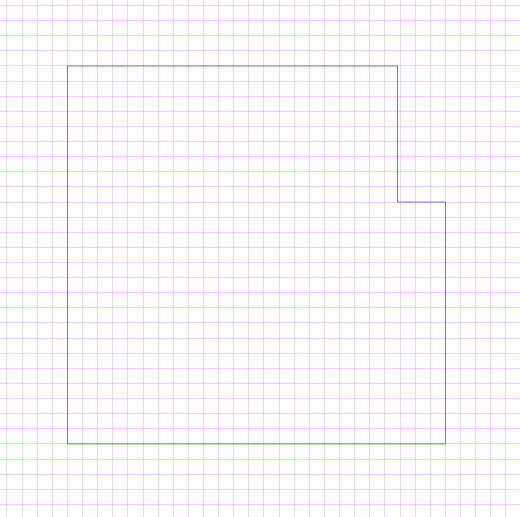
Rather than thinking about drawing shapes, as much as possible we want to think about outlines. This is easier to do by differencing objects to create complex outlines. In this case I want to make a box 25 mm square with tabs. By defining a cut tool I can slice holes in my box to form the tabs while keeping a continuous edge to the outside of my box.
Notice the X, Y, W, H boxes in the toolbar, you can use these to precisely size and locate an object rather than just relying on the grid.
![]()
Differencing our small box from our large box creates a new complex shape. This is much easier than trying to manually draw the tabs inside our box outline then remove unwanted lines.
![]()
If you did it all correctly you get something approximating a box in the end. A few notes, my laser has a kerf of about 0.1 mm so I need to oversize my tabs by 0.1 mm on each side in order to get a tight fit. Also my material is 1/8" thick or 3.175 mm so my tabs need to be 3.175 mm wide. Or possibly a bit less to account for the kerf, in my case I tried 3.14 mm and that seemed to fit well.
Remember the kerf may be 0.1 mm but it cuts 0.05 mm from both sides of the lines. For tabs that error sums back together to 0.1 mm because 0.05 mm of material is removed both on the tab and on the slot. However in this case we only need to reduce our tab length by 0.05 mm or somewhere around there.
![]()
![]()
I think it turned out ok. I still find Inkscape frustrating compared to Fusion360, but I am slowly getting the hang of it. You can download the final svg file from here.
-
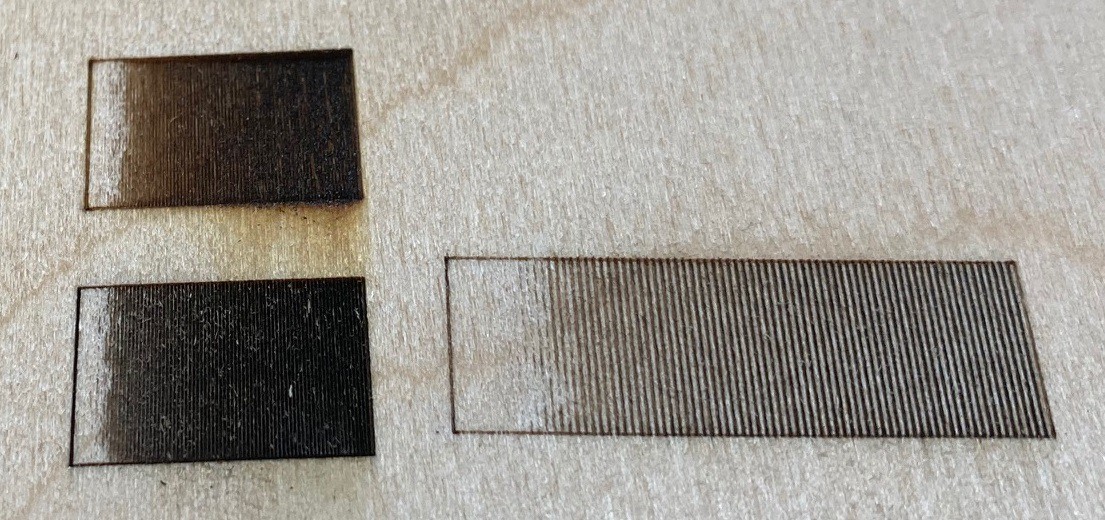
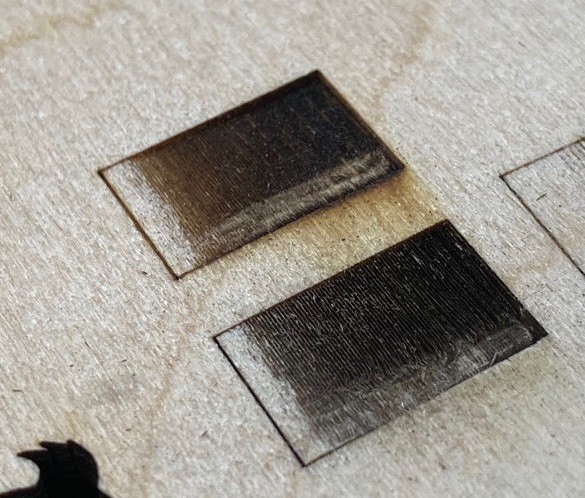
Gray Scale
05/02/2021 at 23:59 • 0 comments![]()
I thought I would experiment with etching some wood. I wrote some code to burn a series of lines from 0-30% power in steps of 0.4% and spaced 0.2mm apart (the long box is 0.4mm spacing) The lower left box is done at 150 mm/min and using 5 psi of air, the lower right box is running at 400 mm/min and 5 psi of air, and the top left box is 400 mm/min but no air.
![]()
It is hard to see in this photo but the top etch tapers down as the power increases with very little ash, but lots of smoke when etching. The bottom cut looks like a sea sponge, there are many thin slivers of wood sticking up from the base of the etch that are virtually untouched. I took a knife and sliced through a layer of the slivers and underneath we have a sloped etch that is similar to the one without air but deeper.
It may just be the material I am using but I was hoping we would get some sort of a gradient in the burnt wood. However with air we don't get any gradient, and the scorch marks are very black. Without air we get a tiny bit of a gradient, but I think this has more to do with the excess smoke and it settling back onto the surface of the wood.
In short using less air probably improves the look of your engraving a bit, but it does not seem to be essential. Faster is probably better. And you should probably rely on stippling rather than power to convey more than a few shades of color.
Anyway this was just a first stab at etching, I need to run some more experiments for sure.
-
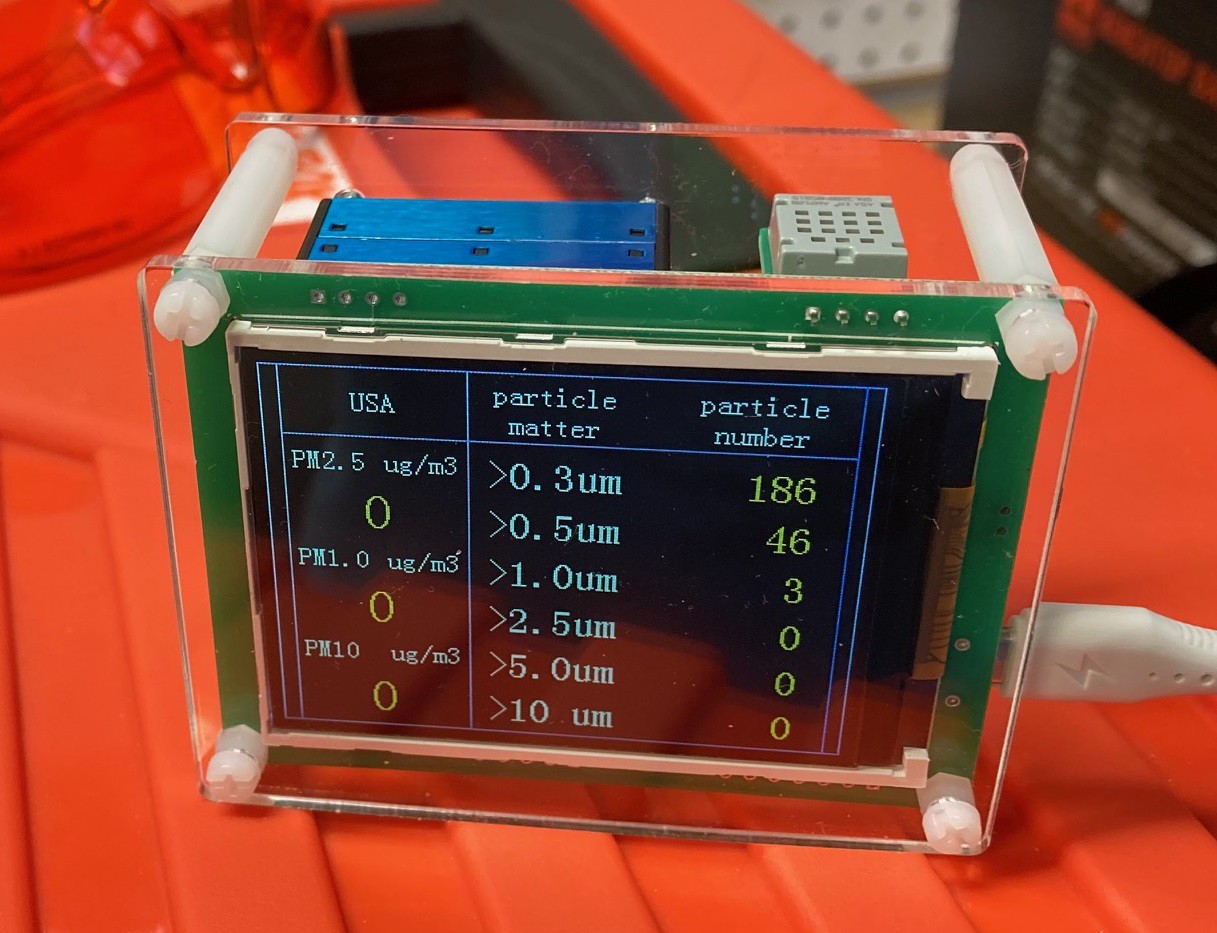
Particle count
05/02/2021 at 23:37 • 0 commentsThe air finally dried back out so I thought I would test out my particle counter. I placed it behind my air filter fan, between the laser and fan, and on the far side of the laser cutter as a double check to make sure the smoke is not just clearing up near the fan.
![]()
You can see that between the laser and fan we have a very high particle count, plenty of smoke is generated.
![]()
On the far side of the fan things are much improved, not nearly as low as the base reading of 0-2 when not cutting, but more than 10x better.
![]()
And on the far side things are even better, the fan is definitely pulling the smoke towards itself rather than just cleaning the air around itself.
Still in all cases things could be better. When I produce enough smoke that you can see a steady trail it is clear that not all is being pulled into the fan. A lot of the smoke is going down to the ground. And there is still a smell of smoke in the air, although it does not linger for long.
I'm sure a more focused collector near the laser cutter would help, and having an activated charcoal filter would be good as well. It is something I need to spend more time playing with, but it is good that we are seeing numbers and some benefits of the filter I have on there now.
-
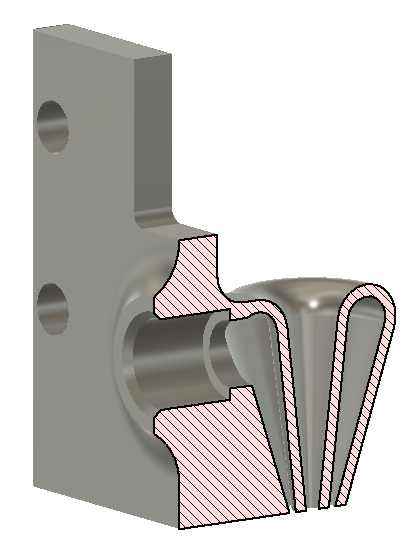
Nozzle prototype
05/01/2021 at 04:47 • 0 commentsI tried designing my own nozzle inspired by Darko's prototype. Here is a cutaway view of the nozzle. I printed it out and tested it but it has two major flaws.
With the nozzle being printed tip down the hole spacing is compromised a bit by the elephants foot on the first layer. I could overcome that by making the holes even larger to compensate, but that is not very portable.
More importantly the air flow is fairly unfocused, not nearly as efficient as with a single 2mm hole. This could be improved a bit by elevating the inner wall 1 mm above the outlet, allowing for the outer wall to be brought in a bit. The down side is the more we do this the more air will tend to flow back up the inner hole. Also we would need to print this in a different orientation. Printing it on its side would probably mess up the nozzle, we need it to be very uniform so the air flows straight down. So we would need to print it upside down, but that would involve a lot of supports or we would need to drop the top of the barrier.
This would all be simpler if Cura would print single line walls, that would allow us to make the inner wall half as thick. However for some reason the default is to not print thin walls.
![]()
-
Nozzle idea
04/30/2021 at 05:03 • 0 comments![]()
User Darko Kmet posted the above render of there new nozzle design in a forum I watch. It may not be clear from the picture but they have solved the issue of air leaking around the lens by making it a double walled setup so the top is fully sealed. This makes the outlet larger but it ensures all air goes in the correct direction. It is something to experiment with.
-
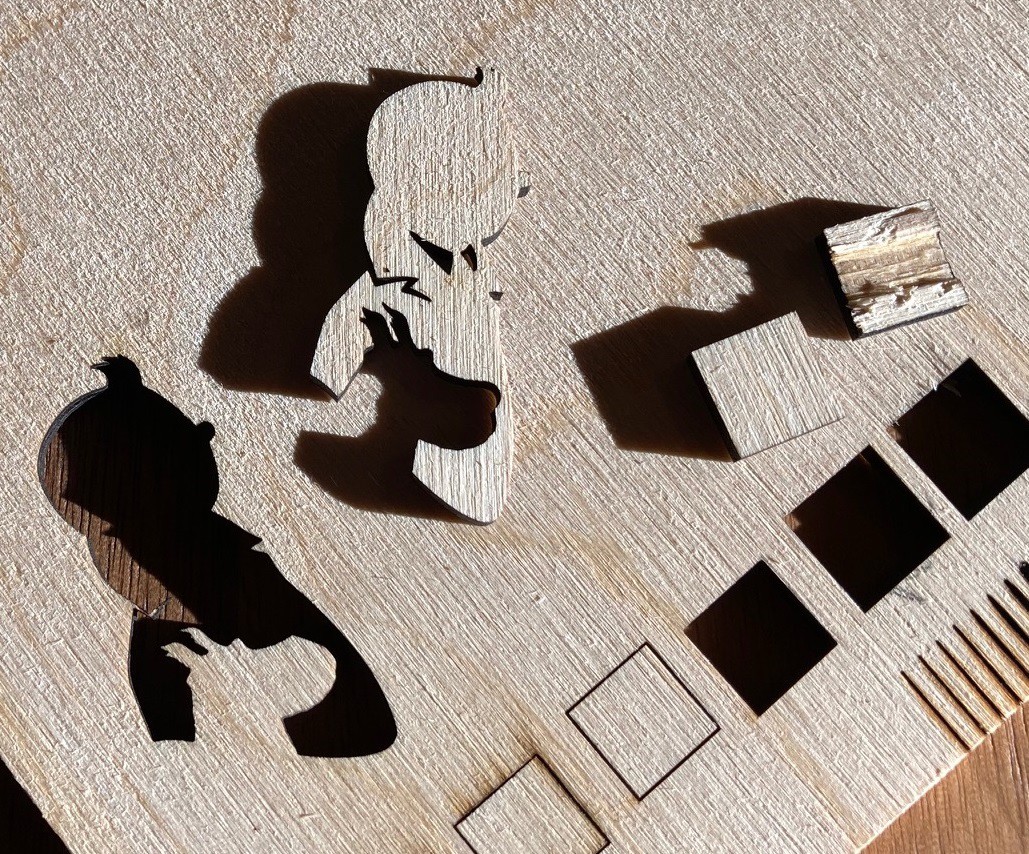
Cut above
04/30/2021 at 01:03 • 0 comments![]()
Enough testing, time to cut something.
First I cut out two squares from 3mm Baltic birch, one at 80% power, 150 mm/min and 2 passes, the other at 80% power, 40 mm/min and 1 pass. The two pass cut was both faster and cleaner with the single pass cut leaving some connected fibers and ultimately breaking when I tried to push the square out. It seems multiple passes are the way to go for sure, although this will need more real world testing.
My second cut was a small Tintin vector that is roughly 20x60 mm (bout the size of your thumb). This turned out amazingly! It is crazy how much detail the laser is able to reproduce on 3mm thick wood.
-
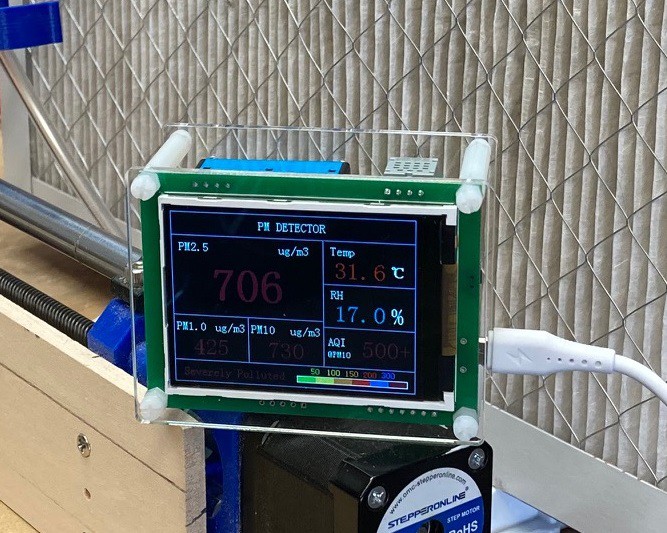
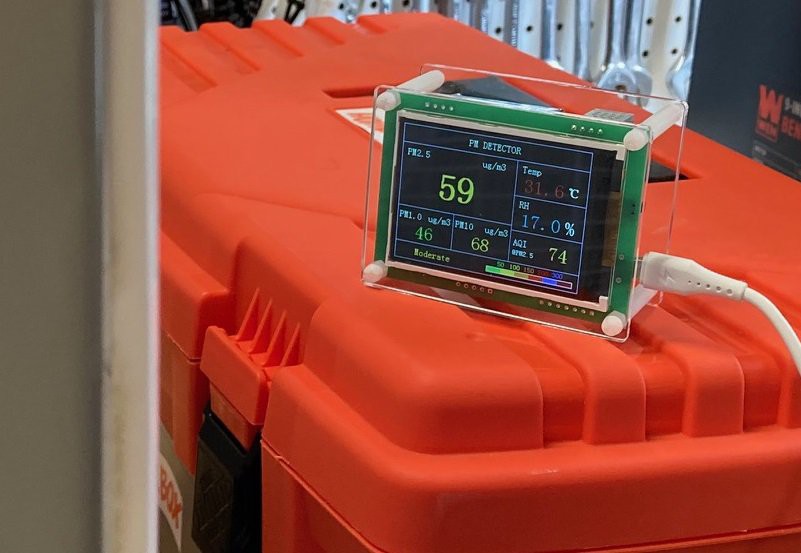
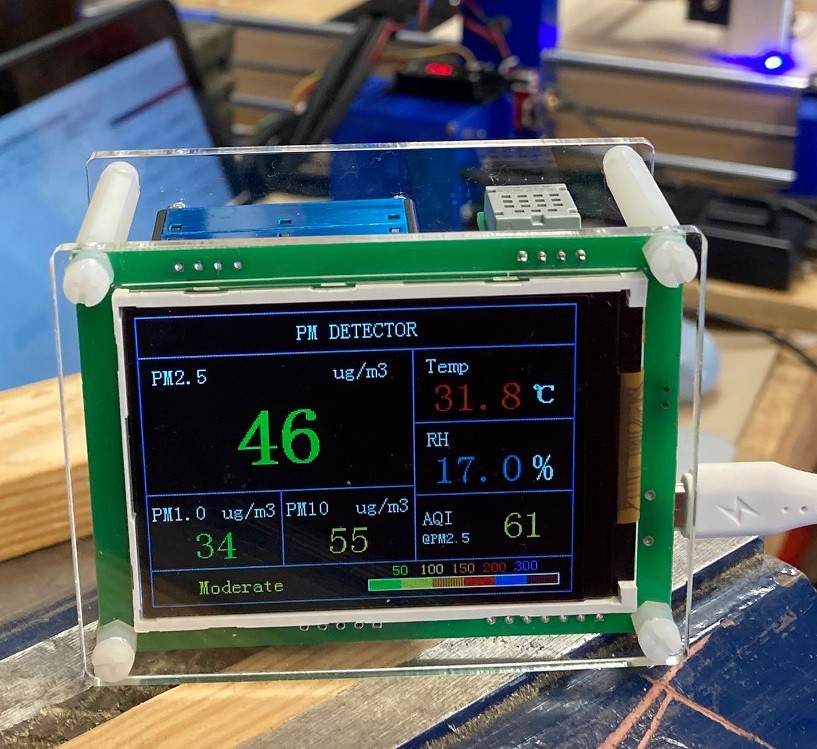
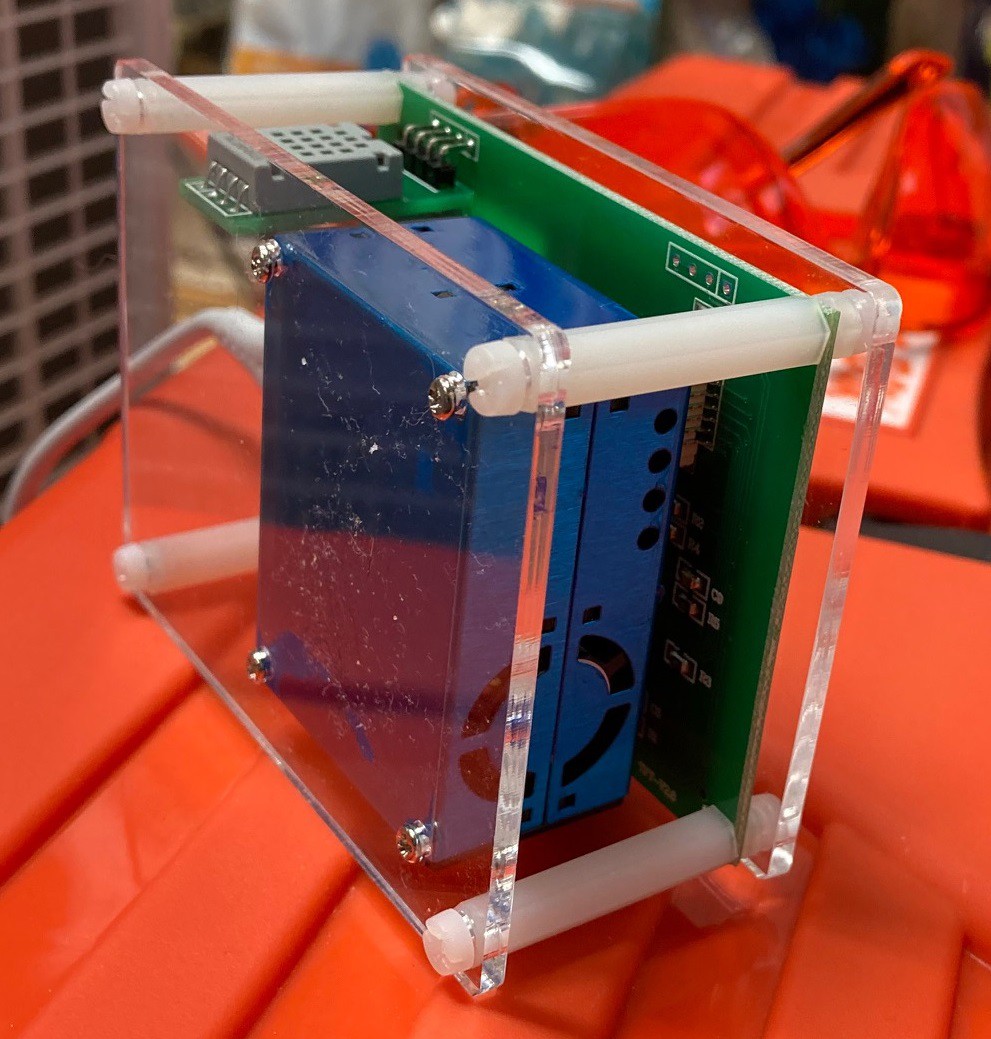
Particles
04/28/2021 at 03:42 • 0 commentsA while ago I ordered a dust monitor from Bangood. It is based around the PMS5003 dust sensor from Plantower. This is a 2.5 micron dust monitor that appears to be relatively accurate. I was tempted to just buy the sensor and write my own code to read it, but I could not pick it up any cheaper than as a full integrated system from Bangood.
One thing to note, others have tested it and found that the PM10 particle count is bogus, it is just an estimate based on the PM2.5 data. That limits what we can detect, for example it can't measure air pollen count.
Anyway today was a bad day to test it, we have had heavy rains all day and there is just no dust in the air. I did run it with the laser and it has no problem picking up on the smoke when held close to the machine. So far my fan is able to disperse or filter out the smoke. I will need to spend more time with this on dryer days and see if there is any value to it.
![]()
![]()
MultiBot CNC v2
A low cost 3D printed CNC that can be built with minimal tools yet is capable of great things.