-
1Burn the Arduscope firmware to your Arudino Uno board.
Arduscope firmware is available here.
-
2Install Arduino Create Agent
A piece of software that handles the serial communication between the Arduino board and the Arduscope web interface.
Installation link here.
-
3Configure Arduino Create Agent to accept requests from Arduscope web interface.
Arduscope web interface is available here.
You will have to find the installation folder for arduino-create-agent. The location of this folder depends on your operating system:
- MacOS: /Users/[your-username]/Applications/ArduinoCreateAgent/ArduinoCreateAgent.app/Contents/MacOS/Arduino_Create_Agent
Under this folder you should see a config.ini file that is the main configuration file used by the Arduino Web IDE. To make the Arduino Agent accept connection from our web interface, create a new configuration file arduscope.ini, and paste the following lines:
gc = std
name = arduscope
origins = https://petrica.github.io
crashreport = true
This will enable CORS for the URL https://petrica.github.io, where the Arduscope web interface sits.
- Restart Arduino Agent. You should find the agent in your tray bar.
- From the dropdown menu select our new configuration profile:
![Arduscope - Config Menu]()
-
4Access the Arduscope web interface and connect your Arduino Uno to the USB.
You should see the USB port displayed in the Arduscope web interface. Click Connect and once successful the Sample Rate dropdown should be populated with the sampling frequencies that the Arduscope is capable of handling.
![Arduscope - Web Port]()
-
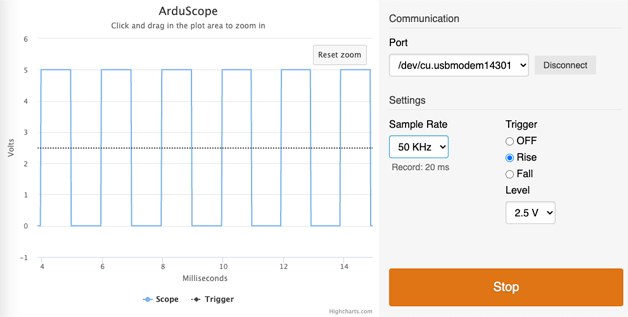
5Connect pin A0 to pin 11 on the Arduino board and click Acquire on the Arduscope web interface.
You should see the 500Hz calibration signal displayed.
![Arduscope - Calibrator]()
![]()
Arduino oscilloscope with a web interface
Using nothing but an Arduino Uno, serial communication and a web interface to create a simple 50KHz oscilloscope.
 Petrica Martinescu


Discussions
Become a Hackaday.io Member
Create an account to leave a comment. Already have an account? Log In.