Close
0%
0%

BALT - Digital Barometric Altimeter

LCD Baro altimeter with climb, descent, vertical speed, & temperature.

Similar projects worth following
158 views
0 followers
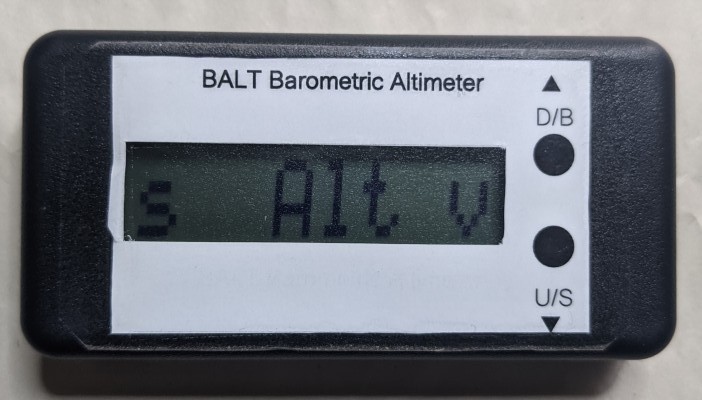
BALT, short for Barometric ALTimeter, is intended to be a simple hand-held unit to display the altitude (elevation) of the user using ambient atmospheric pressure. It is powered with a single CR2032 3V lithium coin cell. The PIC communicates with the MS5607 and LCD modules using Serial Peripheral Interface (SPI) configured for 400kHz.

For some time I've wanted a simple hand-held altimeter that is easy to read and can be used in the car or while hiking. There are plenty of smartphone apps for this but they can be awkward: pull the phone out, unlock it, swipe for the appl, etc.. Sometimes it is just nice to have a dedicated device.

I finally got around to building it because I needed to develop I2C/SPI routines for another project and the barometric sensor I had been considering supported both.

FEATURES & SPECIFICATIONS
  • 8 digit, 12mm (0.472") tall, high contrast transflective LCD
  • User activated back-light for nighttime use
  • Displays altitude, accumulated climb/descent, vertical speed, temperature, pressure, and compensation
  • English or metric units
  • Compensation settable in feet, meters, inches of mercury (Hg), or millibars (mbar)
  • Sleep and deep sleep (off) to conserve battery life
  • Adjustable off time from 0 (always on) to 12 hours, default 30 minutes
  • Accuracy: +/- 1.5% of displayed altitude 
  • Operating temperature range -20 to +70C
  • Single CR2032 3V lithium battery
  • Dimensions (LxWxH) 8.95cm x 4.49cm x 1.87cm (3.52" x 1.77" x 0.74")

NO WARRANTY & DISCLAIMER
THIS UNIT IS NOT WARRANTED FOR ANY USE AND THE USER ASSUMES ALL RISK & RESPONSIBILITY IN ESTABLISHING ITS SUITABILITY & FITNESS FOR A PARTICULAR USE.
ms5607.xlsx

Updated design workbook with BOM, compensation model, and PIC pin map. Also includes altitude calculation table based on barometric formula.

sheet - 26.34 kB - 09/16/2022 at 16:52

Download

balt-210120-v3b11-mplab.zip

MPLAB project & source for v3 with improved altitude accuracy.

Zip Archive - 424.08 kB - 09/16/2022 at 16:51

Download

balt-210120-mplab.zip

MPLAB source code for BALT firmware.

Zip Archive - 29.65 kB - 02/05/2021 at 03:38

Download

chgp-kicad.zip

Kicad project files for charge pump breakout board.

Zip Archive - 28.76 kB - 02/05/2021 at 03:34

Download

balt-faceplate.odt

Libreoffice version of faceplate.

text - 10.36 kB - 02/05/2021 at 03:34

Download

View all 8 files

  • V3 Firmware Posted

    Brian Cornell09/16/2022 at 17:09 0 comments

    I wasn't happy with the simple 1"=1000 feet altitude calculation method. Accuracy was crappy above 5000 feet. This version uses a lookup table derived from the Barometric Formula and maintains ~ 100 feet accuracy throughout its operating range. Also some other minor improvements to the user interface:

    • Added timeout to version # display at boot to prevent situation where user changes battery and forgets to acknowledge.
    • Added key-press inactivity timeout to setup to prevent battery drain.
    • Added fast repeat to Setup to make large value changes go faster (kicks in when button press > 5 seconds).

    The source is posted in the files section along with an updated workbook that contains the algorithm used to calculate altitude.

  • Assembly

    Brian Cornell02/05/2021 at 04:05 0 comments

    • The sensor has two vent holes that must be kept clean during assembly: protect it with tape.
    • Hand soldering is required: the LCD module will not tolerate temperatures greater than 70C.
    • Do not use a wash (immersion or stream) to clean after assembly. Degreasers could damage the switches, LCD, or sensor. Use spot cleaning only.
    • Do not bake in an oven after cleaning.
    • The PCB silkscreen can be used as a template to mark the case for the LCD & button cut-outs. A template is also provided for the button labels.
    • The button caps protrude too far beyond the case. I removed them and covered the LCD & button cut-outs with laminate to seal the unit. The button bases are even with the case surface and operate reasonably well, but you could mount the switches ~ 0.5-1mm off the PCB for better tactile feedback.
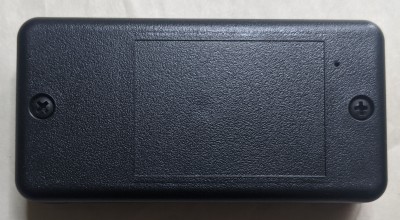
    • If you seal the face of the unit drill a small hole (#52 bit, 1.613mm or 1/16") on the back of the case near the corner closest to the sensor to ensure that it can sense ambient pressure. A hole that small will keep out most droplet moisture, but you could tack a piece of felt or other porous desicant for added protection.

  • Theory of Operation

    Brian Cornell02/05/2021 at 04:00 0 comments

    The design is based on Microchip's 8-bit, midrange, PIC16LF18326 MCU that controls all aspects of operation. The user interface consists of Display Visions 8-character transflective LCD display with integrated controller & character generator and two NO SPST tactile buttons. Altitude sensing uses TE Connectivity's MS5607-02BA03 barometric pressure & temperature sensor that incorporates a 24-bit Sigma-Delta ADC. The MCU uses SPI (400kHz) to communicate with the LCD and sensor.

    The MCU boots when a battery is installed in the unit. The HFINTOSC is set to 16MHz for a 4MHz instruction clock. PIC peripheral & pin configuration is completed and all unused peripherals are disabled. The charge pump is started and after a delay the LCD and sensor are powered-up. The LCD is configured and the MCU status bits checked for stack over/under-flow and watchdog reset. If any of these conditions are true the LCD displays an error and the user must press the UP button to clear & reset. 

    Otherwise, the sensor's calibration constants are retrieved and the CRC-4 checksum is calculated & compared to the retrieved value. A discrepancy will display an error and require the user to reset the unit with an UP button press. At the completion of a normal boot sequence the version & build number are displayed (MMmmBB) and the user must press the UP button to enter the RUN loop.

    The RUN loop is a foreground infinite loop that controls display & sensor updates, user navigation (e.g. what is displayed, setup, backlight, etc.) and setup. The loop flow is:
    • Check button flags (set by ISR, indicate user pressed a button)
    • Read sensor
    • Apply corrections to read values, calculate pressure & temperature
    • Calculate other values (climb, descent, etc.)
    • Update display
    • Perform setup (if flags set)
    • Sleep management

    The MS5607-02BA03 performs all pressure & temperature acqusition & conversion and presents a 24-bit value via SPI to the MCU. A set of second-order corrections are applied using the calibration constants and temperature compensation.

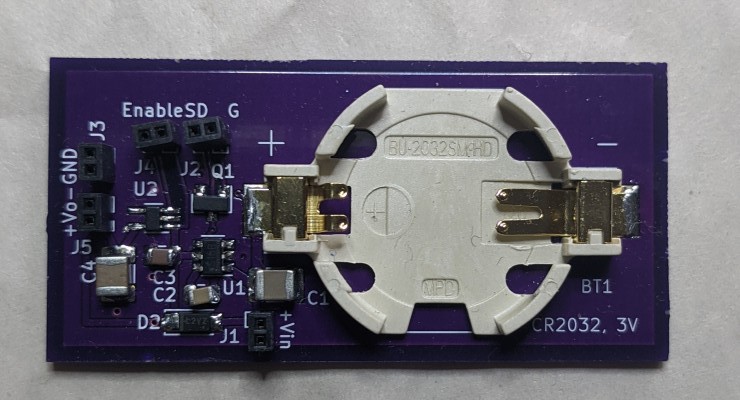
    TI's LM2766 charge pump is used to double the battery voltage and On Semi's NCP508 LDO provides a stable 3.3V Vdd. Interestingly, TI's LDOs for these applications (at least the ones I reviewed) require a significant amount of ESR in the output bulk capacitance for stability which is why I selected the 508 (plus I had prior good experience with them). The enable pins of both are connected to the MCU thru a voltage divider that keeps the enable voltage to safe limits since the MCU's Vdd is higher. Schottky bypass diodes maintain Vdd at approximately battery voltage when the unit is in deep sleep (the MCU will operate down to ~ 1.9V and battery end-of-life voltage is ~ 2V).

    10uF of bulk capacitance is used at the battery and at the LDO output to source the transient currents required when the MCU, sensor, and LCD power-up; without it is possible that Vdd would droop below the MCU's brown-out voltage causing a reset. Likewise, the bulk capacitance at the charge pump's input averages the current demand from the battery since pulse currents of more than a few milliamps dramatically shortens battery life.

    The firmware maintains an interrupt driven system timer that provides chrono-time services when not in sleep. Timing is used to control display updates, deep sleep, and button debounce / interpretation (e.g. short press, long press, repeat). The ISR also services button presses using the IOC (Interrupt On Change) MCU feature. The unit is awakened from deep sleep using IOC. Last, the ISR manages backlight on/off & timing without intervention from the foreground RUN loop.

    To conserve power, sample & display updates are performed approximately every four seconds. In between updates the MCU is placed in sleep and the WDT (Watch Dog Timer) wakes it (if the user is navigating or in setup the MCU does not sleep). The off timer (e.g. deep sleep) will expire when there is no navigation (e.g. button presses) and the MCU will place the unit in deep...

    Read more »

  • Power Management

    Brian Cornell02/05/2021 at 03:53 0 comments

    To maximize battery life the design uses the PIC's sleep and XLP (eXtreme Low Power) features:

    • All unused peripherals are disabled.
    • The MCU is put to sleep between sample & display updates (4 second interval).
    • An inactivity timeout (e.g. no button presses) puts the unit into 'deep sleep' that powers down the display, sensor, and charge pump.

    In deep sleep the bias current is ~ 32uA which gives the unit a theoretical shelf life of about 260 days with a typical 200mAh battery. When on, but with no user navigation, it is ~ 910uA with sample peaks of 6mA for 10mS. Ignoring the peaks you'd get about 9 days of use with the off timer disabled. So, actual battery life depends heavily on the amount of use and timeout setting.

  • Design Problem

    Brian Cornell02/05/2021 at 03:52 0 comments

    The core design is simple - a PIC 16LF18326 microcontroller, the MS5607 sensor, and Display Visions' EA DOGM081W-A integrated LCD/controller tied together with SPI. But, the implementation turned out to be a humbling experience. Most of my work is with switching power supplies where the goal is to mitigate losses while dealing with high current, temperature, and voltage. A design powered by a 3V lithium coin cell is the opposite side of the coin and the objective remains the same: minimizing losses, in this case to maintain performance and extend battery life.

    The problem is exacerbated by the battery's temperature dependent impedance. At mid-life with an ambient of 21C it is greater than 10 ohms. Drop the temperature to 0C and the impedance jumps to ~ 20 ohms with a nominal voltage of 2.7V.

    This was a huge problem in the initial design. LCD options were limited because of the requirements for digit size and to be ambient readable without a backlight while optionally supporting. Display Visions was one of the few OEMs with a 3.3V LCD that met these requirements. The catch is that it does not work below ~ 2.8V, so a charge pump & LDO are used to maintain a stable supply voltage throughout battery life and across the operating temperature range.

    I built a breakout board version of the charge pump design and validated it with the prototype before incorporating.

    I've included the Kicad files for this as well for anyone that wants to experiment.

  • Using BALT

    Brian Cornell02/05/2021 at 03:48 0 comments

    When a battery is installed the unit boots and displays the version / build #. The UP button must be pressed to start normal operation. Be sure to do this since the unit's power management features are not active while the version is display and the battery will quickly discharge. If the MCU finds a problem an error message will display instead of the version: pressing the UP button will reset the unit. If the error persists the unit is damaged.

    UP button: tapping (or a short key press of ~ 1/3 second) will cycle thru the display values - Altitude, Climb, Descent, Vertical Speed, temperature, pressure, and compensation (baro setting). Pressing a bit longer (a long press of ~ 1/2 second) activates the backlight. The backlight remains on for ~ 10 seconds from the last button press.

    DOWN button: tapping will toggle between English & Metric. A long press while on the Climb or Descent display will clear those values, or enter SETUP when any other value is displayed.

    SETUP is used to set the baro compensation so the correct altitude is displayed and is also where the off timeout is set. Enter setup using a long DOWN button press with any value except climb or descent displayed. 

    Use the UP button to select Alt (set compensation by adjusting the displayed altitude), Baro (set compensation with the altimeter setting from a local weather station), or Toff to set the off timer. Tap the DOWN button to change the setting or exit setup (no change) with a long DOWN press.

    Use the UP & DOWN keys to change the setting: holding the button down will quickly increment in multiples of ten. Use a long DOWN press to save the value & exit setup.

    Notes
    • Pressure values (Hg & mbar) are displayed without a decimal point because in mbar there are not enough digits on the display. The two right digits are always the decimal component.
    • The unit does not store compensation & time off values in NVM and will revert to defaults (1013.25mbar / 29.92Hg of pressure, 30 minute timeout) when the battery is replaced.

View all 6 project logs

Enjoy this project?

Share

Discussions

Similar Projects

Does this project spark your interest?

Become a member to follow this project and never miss any updates