Close
0%
0%

ESP32 EEG

Heavily inspired by OpenBCI, especially their ganglion board design, but with an ESP32 handling communication/control

pP
Similar projects worth following
I want an EEG to play with for BCI applications. Research/medical grade EEGs are not in my budget, and consumer EEGs are all some combination of over-priced/unsupportive of hacking (muse) or only have a single channel (neurosky/TGAM). OpenBCI is on the verge of being accessible to low-budget hackers like myself with a 4-channel board at $250 (ganglion) and an 8-channel board for $500 (cyton), but those are still out of my (and probably most makers) budget for something I may not even really get too much utility from. OpenBCI is of course laudable for providing a very well maintained repo of design files and firmware for their products, so at one time it was possible to DIY their boards. Now the issue is the main microcontroller/BLE modules used in their boards are obsolete and hard to come by. So in my opinion it's time to remake their AFE designs (specifically the ganglion board) to be accessible to interface with any generic microcontroller dev board. I'll be using an ESP32

I basically copied the Ganglion design, but removed the SD card holder, accelerometer, and the obsolete bluetooth/microcontroller module. I also hard wired all the instrumentation inverting inputs to the reference voltage since I only plan to do single-ended sensing. I was able to squeeze everything in to a pretty tight 2-layer board. I haven't worked out the math yet but at ~$2 per board (including shipping), 4 instrumentation amp ICs and a few other $2-$3 ICs, and the main AFE chip (MCP3912) the whole thing comes out to be probably $20-$30 bucks, so easily in most people's budgets. 

client_smr_calc.py

Basic algorithm for calculating and displaying the difference in alpha band power in the motor cortices

plain - 4.64 kB - 03/21/2021 at 11:49

Download

4ch_main_removeduservars.py

ESP32 micropython code for streaming 4 channels

plain - 3.20 kB - 03/20/2021 at 16:43

Download

4ch_client.py

host computer python code for receiving/processing/displaying 4 channels

plain - 4.07 kB - 03/20/2021 at 16:41

Download

main_removeduservar.py

script to run on the ESP32 for streaming single channel EEG data

plain - 3.96 kB - 03/16/2021 at 18:15

Download

client.py

script for receiving/filtering/plotting EEG data in realtime on a host computer

plain - 2.18 kB - 03/16/2021 at 18:02

Download

View all 6 files

  • Log 11

    P04/08/2021 at 03:07 0 comments

    Got a really hacky setup for streaming 8 channels now by using two separate 4 channel boards, connected to the ESP32 on the same SPI port but with different select lines.

    It was pretty easy to scale the code up to stream all 8 channels:

    I only am using the DRDY from one MCP3912 to trigger data acquisition from both since it was easy to do in code, but I think that may explain some of the artifactual looking bursts on the 4 channels from the board that doesn't have it's own DRDY interrupt set (the bottom 4 signals), since if there is just a small difference in clock speeds/sampling rates between the boards then it may try to read an empty register or miss a sample or something. It could also be that the SPI lines may be getting close to overloaded with all the wiring inductance and breadboard capacitance I needed to split it to two separate boards. Looks like I may be capturing some theta activity on the left temporal electrode (top right signal), but I'm not sure if that is also some sort of artifact. I actually split the Cz electrode to both boards, row 2 column 2 and row 3 column 1 are the same electrode, but they have different references (board one is referenced to C3 and board two is referenced to C4) which is probably why they don't look the same at all. I also only used the driven ground from board one because ground currents through my head sounds like a bad idea and I only have one ear-clip anyway.

    This was more of an experiment to just see what issues would arise when trying to put two MCP2912s on the same SPI bus, and what the best way to read from and reference them would be. I think my next step will be to design a single board that has all 8 channels (so 2 MCP3912 ICs) on it as well as the headers to mount the ESP32 dev board directly to it, and a battery charging circuit. I'll be satisfied with 8 channels to play with moving forward with some BCI applications, so the stackable board idea might be a bit too much, and just a single board that contains 8 channels and the MCU and the power circuit would be simple and elegant I think, especially with a 3D-printed enclosure to hold it and a battery on the headset. I also don't think the impedance measurement circuit is worth it, it takes up a lot of board space and GPIOs, and it's pretty easy to tell without it whether a channel is making good contact just by the signal. Also I do too much impedance testing in my day job.

  • Log 10

    P04/03/2021 at 03:38 0 comments

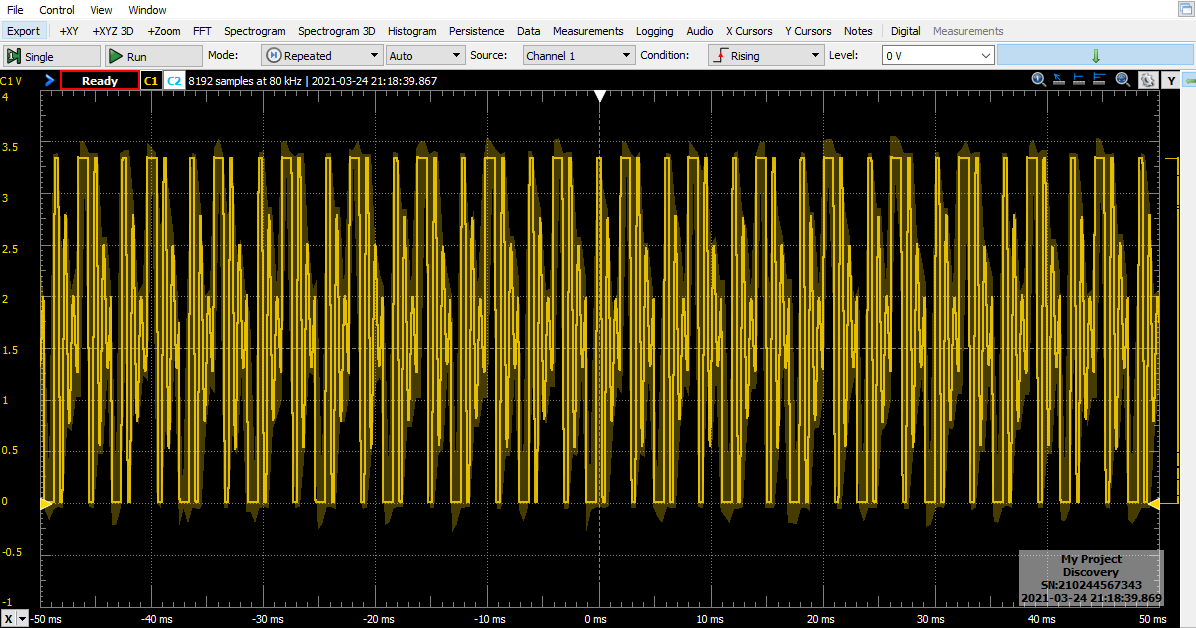
    Quick update on the artifacts I was seeing before - after lots of debugging I'm pretty sure it's due to some sort of transients in the analog power supply. I've reposted the image of the artifacts here:

    They look a lot more noisy in this plot because they are being ran through the 60hz notch filter on the client software, but in actuality they are brief moments where the MCP3912 is transmitting zeros (and the noisiness is due to the filter ringing). The fact that the MCP is still transmitting during those periods is a clue that the digital side of things is fine. Additionally, going back to 200 hz sampling reduced (but didn't completely get rid of) the artifacts. Sampling from only a single channel completely got rid of the artifacts, and switching to 16 bit sampling (instead of 24 bits, so 1/3 less power spent on the ADC) allowed me to get back up to sampling 4 channels at 200 hz without any more of these artifacts. The last 8 bits are below the noise threshold anyway so saving power and reducing the data size without sacrificing any signal quality is a pretty solid win. Definitely not surprised I may have ended up overdrawing from the AVdd LDO (a TLV700), which is only rated to supply 200 mA, especially when really pushing the conversion frequency/oversampling ratio, dithering, and boost settings on the MCP.

    I guess it may also be worth mentioning that I'm still powering everything from a USB battery pack, and my USB cable is 3' long, so it's probably inductive enough that even though the ESP32 has it's own LDO regulator, instantaneous power transients from it's transmissions may be dropping the supply voltage enough to cause issues on the other power supplies. Not sure what the best course of action is moving forward, whether/where I need more decoupling caps or inductive chokes, or LDOs with more output current. Taking a look at the power supply designs in the MCP3912 datasheet and eval board offers a couple potential changes. 

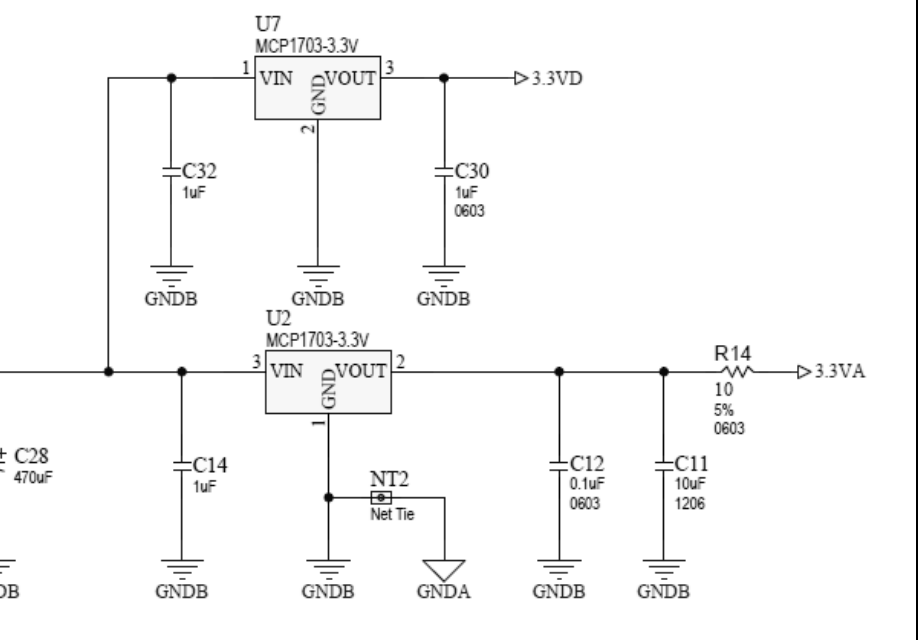
    MCP3912 datasheet uses MCP1703 regulators which can supply a slightly larger 250 mA output current:

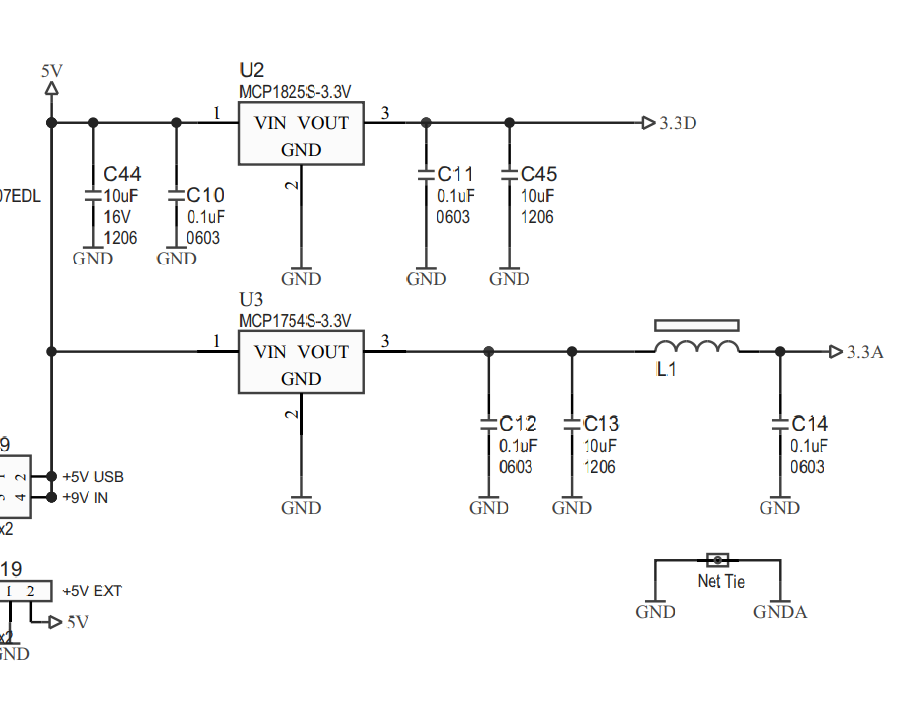
    and the MCP3912 Eval board uses an MCP1825S for DVdd (500 mA output current) and MCP1754S for AVdd (only 150 mA output current), but with a ferrite choke on the AVdd supply (presumably for power supply noise reduction, but may make a difference in suppressing transients that would otherwise cause AVdd to momentarily drop out):

  • Log 9

    P03/28/2021 at 00:30 0 comments

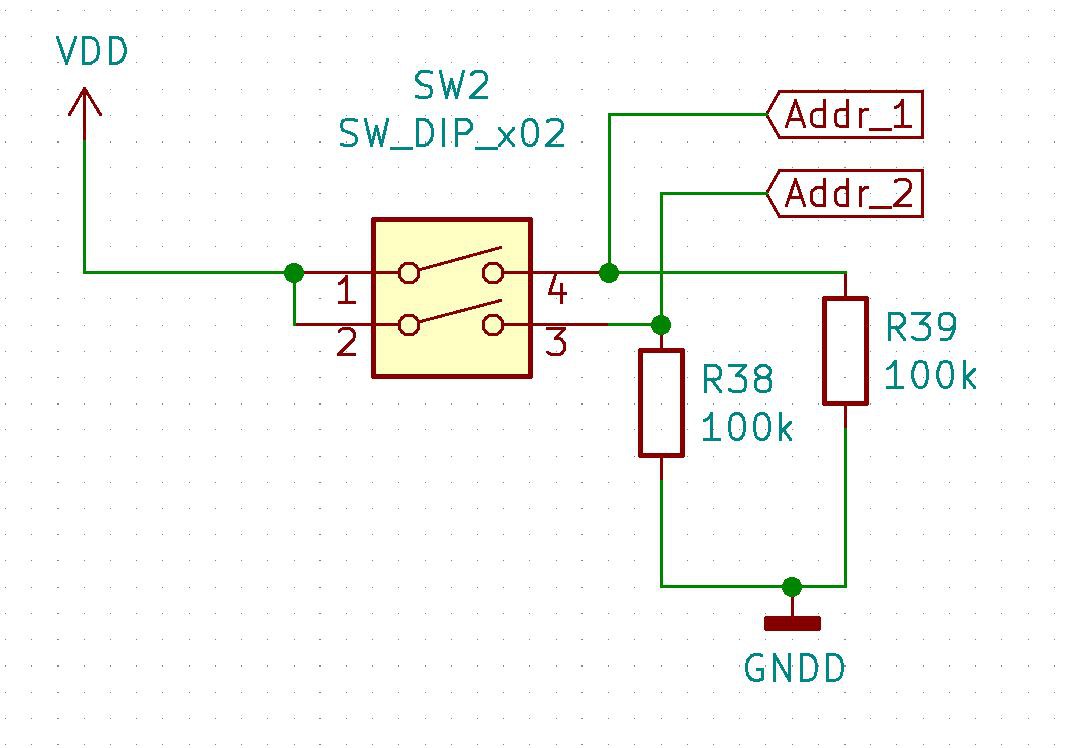
    Been thinking about how to efficiently stack 4 4-channel boards to get to 16 channels. I think I'm getting close to a solution that will allow me to use 4 identical boards (so I don't have to get 4 separate boards manufactured), and use DIP switches to set an address for each board.

    Essentially, the 2 DIP switches will set a unique binary address between 0 and 3 for each board:


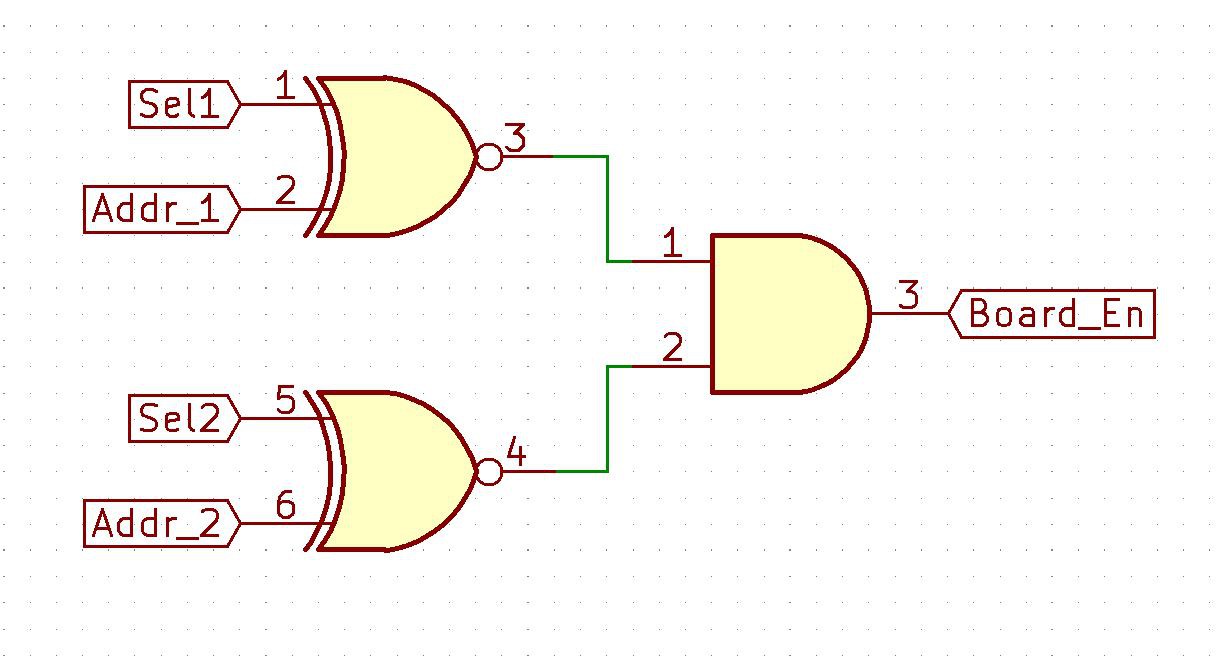
    Then that address will be XNOR'd with SEL1 and SEL2 signals coming from the ESP32 to generate a logic-high 'Board Enable' signal if that board's address is selected:


    and the Board Enable signal will then be NAND'd with the MCP SS signal coming from the ESP32 (which now will have to be logic high), to generate the logic-low MCP_CS signal if that board is enabled:


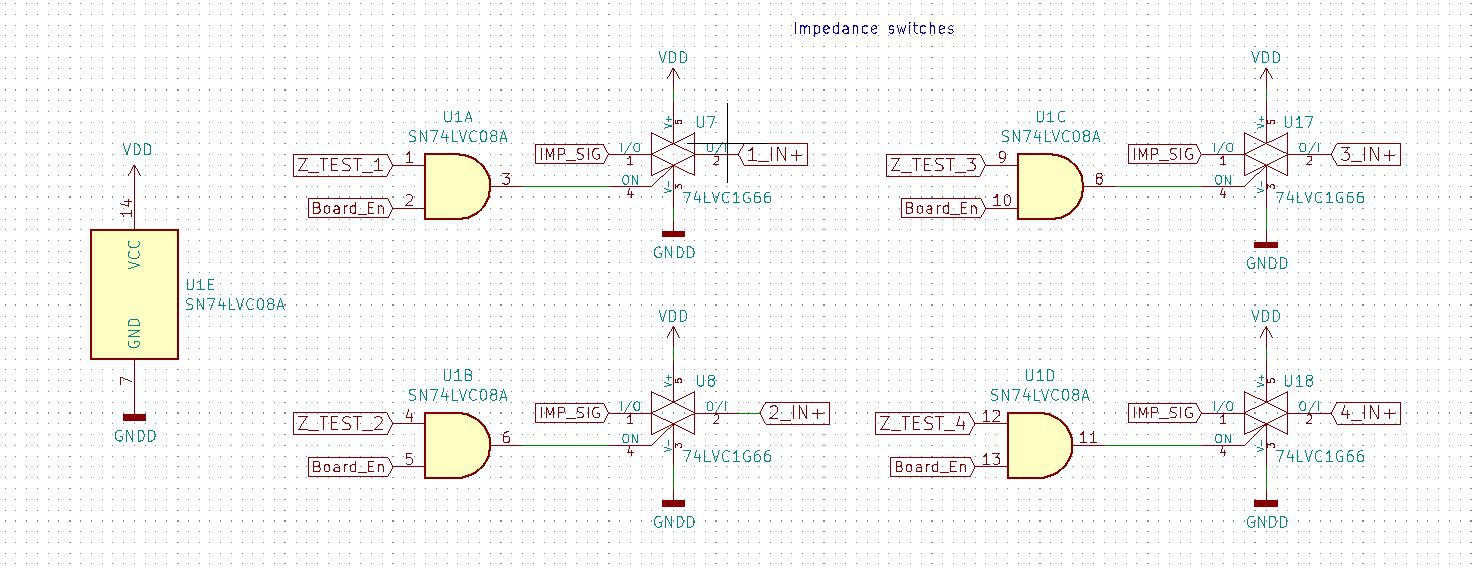
    The Board Enable signal will also be AND'd with the logic-high Z_TEST signals from ESP32 to select the correct channel for impedance measurement when the board is enabled:

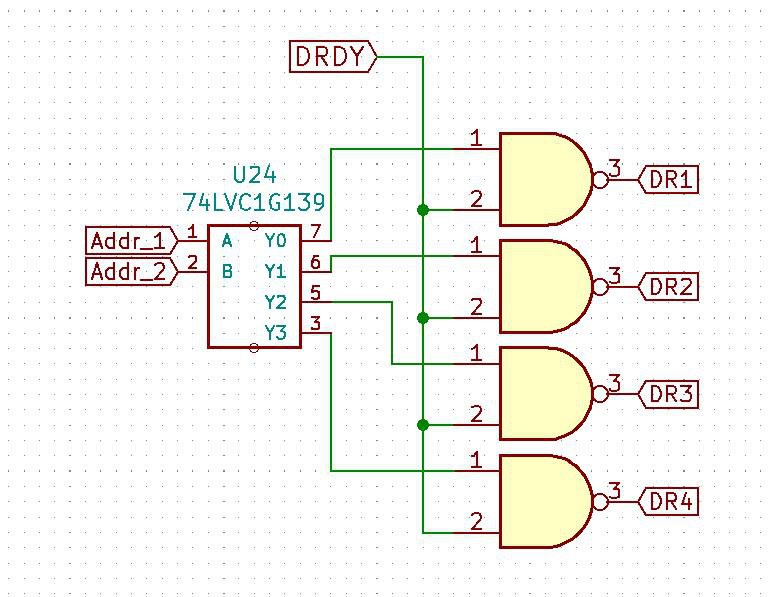
    Finally, the Address signals will be fed to a 2-4 decoder and NAND'd with the DRDY signal (logic low) to create a logic high pulse on the DR line of the selected address. Using open drain gates here meant that I needed NAND gates and therefore had to invert the DRDY signal, since all the boards will have a gate output connected to each DR pin (but only the board with the proper address will toggle that pin), and therefore if they all sat at ground while inactive (i.e. using an AND gate), the active gate wouldn't be able to toggle the pin:

    But with those small changes I should be able to then stack the boards and use just 2 address lines to enable the proper board for sampling or impedance measurement. So instead of needing  16 (impedance switches) + 4 (MCP_SSs) + 3 (MISO/MOSI/SCK) = 23 GPIOs, I can get away with just 2 (select lines) + 4 (impedance switches) + 1 (MCP_SS) + 3 (MISO/MOSI/SCK) = 10 GPIOs. 

    The DRDY pins each need their own GPIO pin interrupt, so there was no way to combine them (but the ESP32 does have 4 digital input-only pins which would make sense to use for these signals) and I'll need 2 additional GPIOs for the DAC_SS and reference channel impedance switch, bringing the total GPIOs needed to 16,  plus 1 ADC for the impedance measurement. I'm not completely sure, but I think that should be doable with most generic ESP32 dev boards. I'm still debating whether to use an off-the-shelf dev board with a custom interposer board, or to design my own ESP32 breakout board, and I think I'm starting to lean towards making my own.

  • Log 8

    P03/26/2021 at 06:19 0 comments

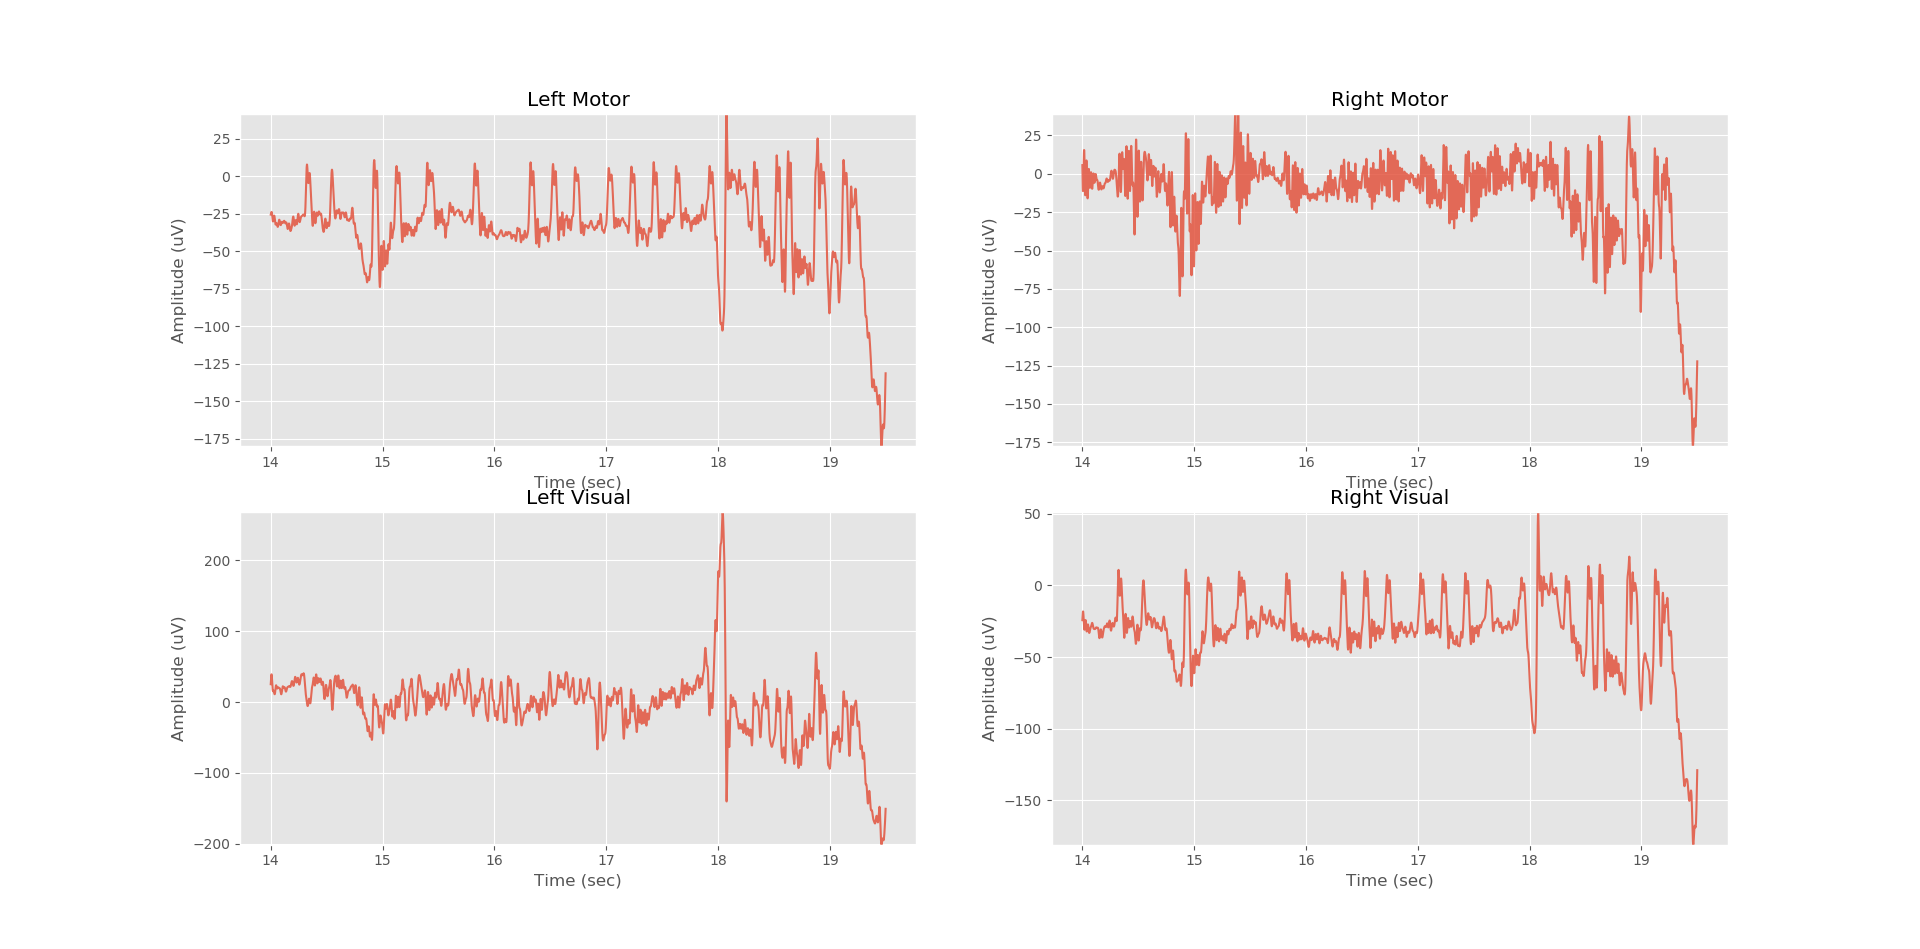
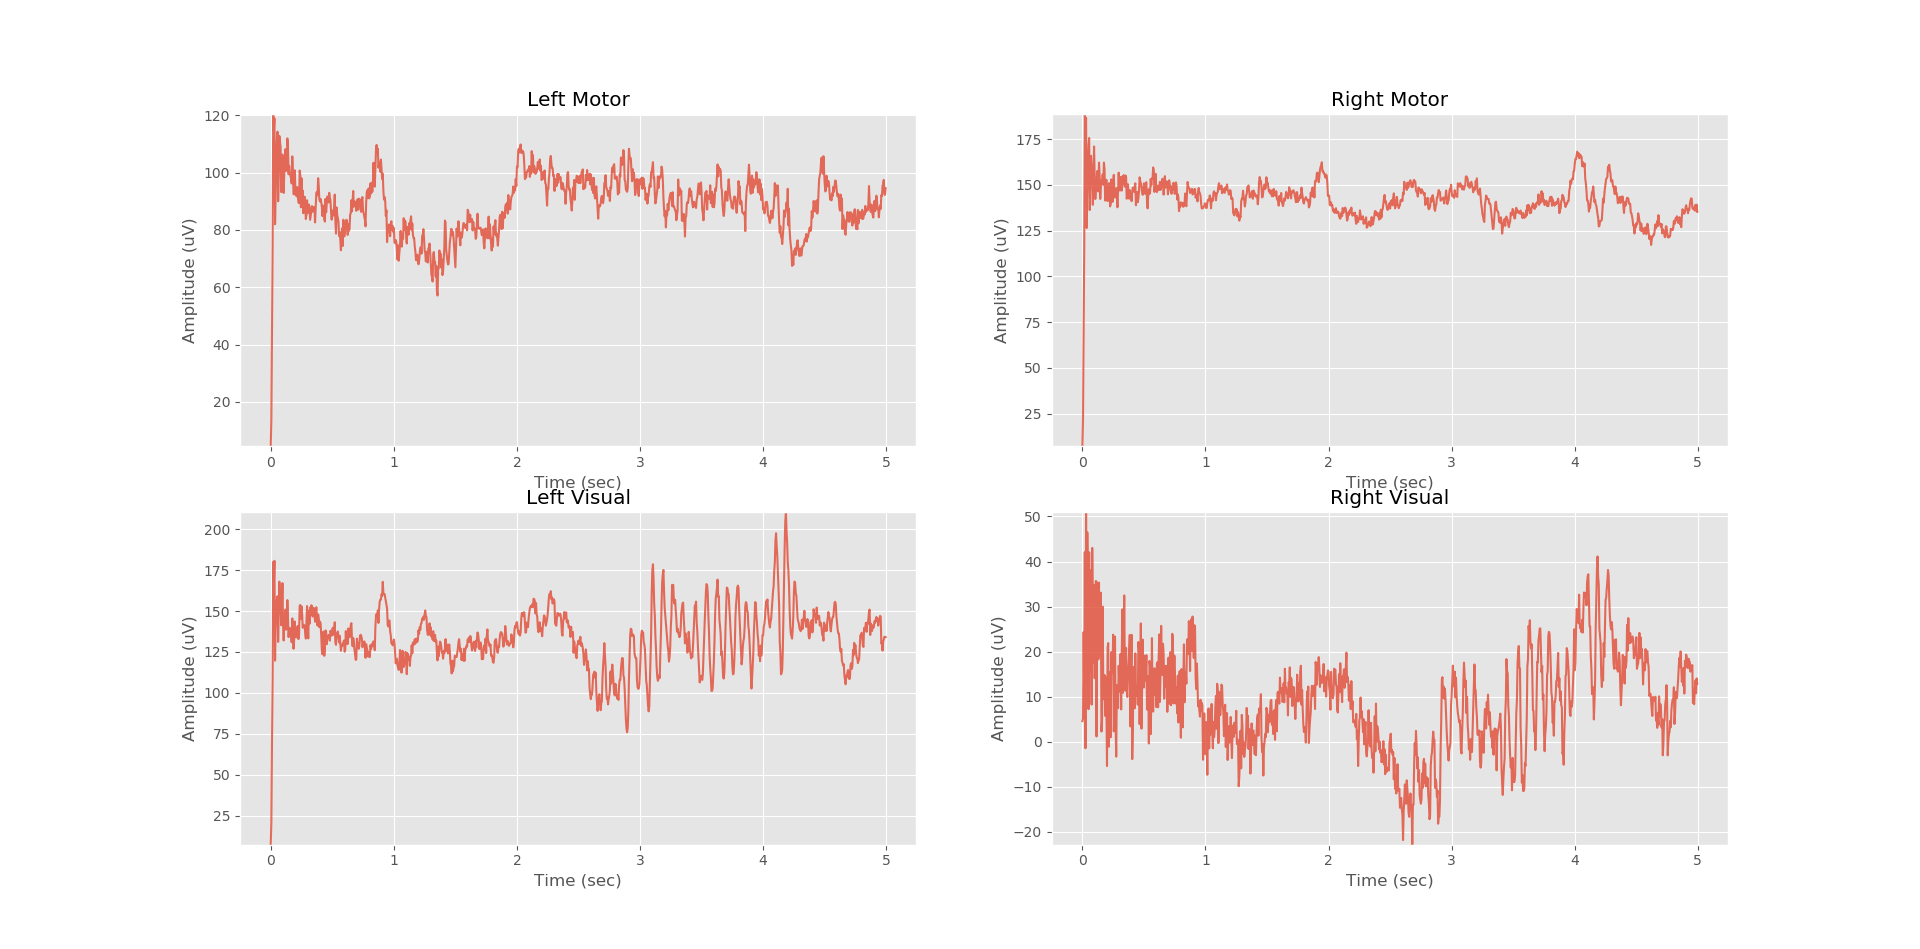
    Quick update: I tried streaming data sampled at 800 hz on 4 channels (which would be analogous to transmitting 16 channels at 200 hz) and was happy to find that after fiddling with the buffer size and switching to a TCP socket (which I needed to do anyway to eventually be able to send commands from my computer to the ESP) I was able to send and display the data with only a slightly noticeable latency (below image). I did notice some new artifacts (the occasional peaks that can be seen in the 'Left Motor' and 'Right Visual' channels below) which have me concerned, I don't really know where they are coming from but they aren't biological. Hopefully it's just my neighbor making a phone call or something. I'll have to do some more debugging if I keep seeing it.

  • Log 7

    P03/25/2021 at 03:02 0 comments

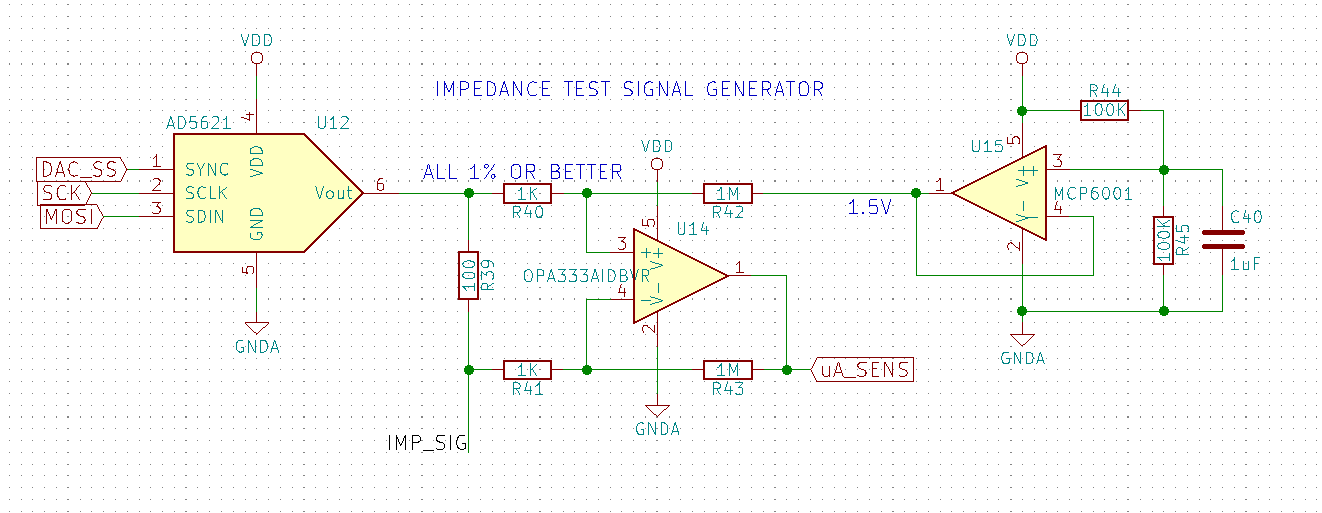
    Started debugging the impedance measurement circuit. It was simple to get it up and running, and it works well enough for telling open channels from connected, but not for much more than that. The OpenBCI code applies a square voltage wave across the load and measures the voltage drop from the current through a 100 ohm shunt resistor which is amplified and goes to an ADC (see circuit schematic below; 'IMP_SIG' goes through the load to the driven ground and 'uA_SENS' goes to the ADC).

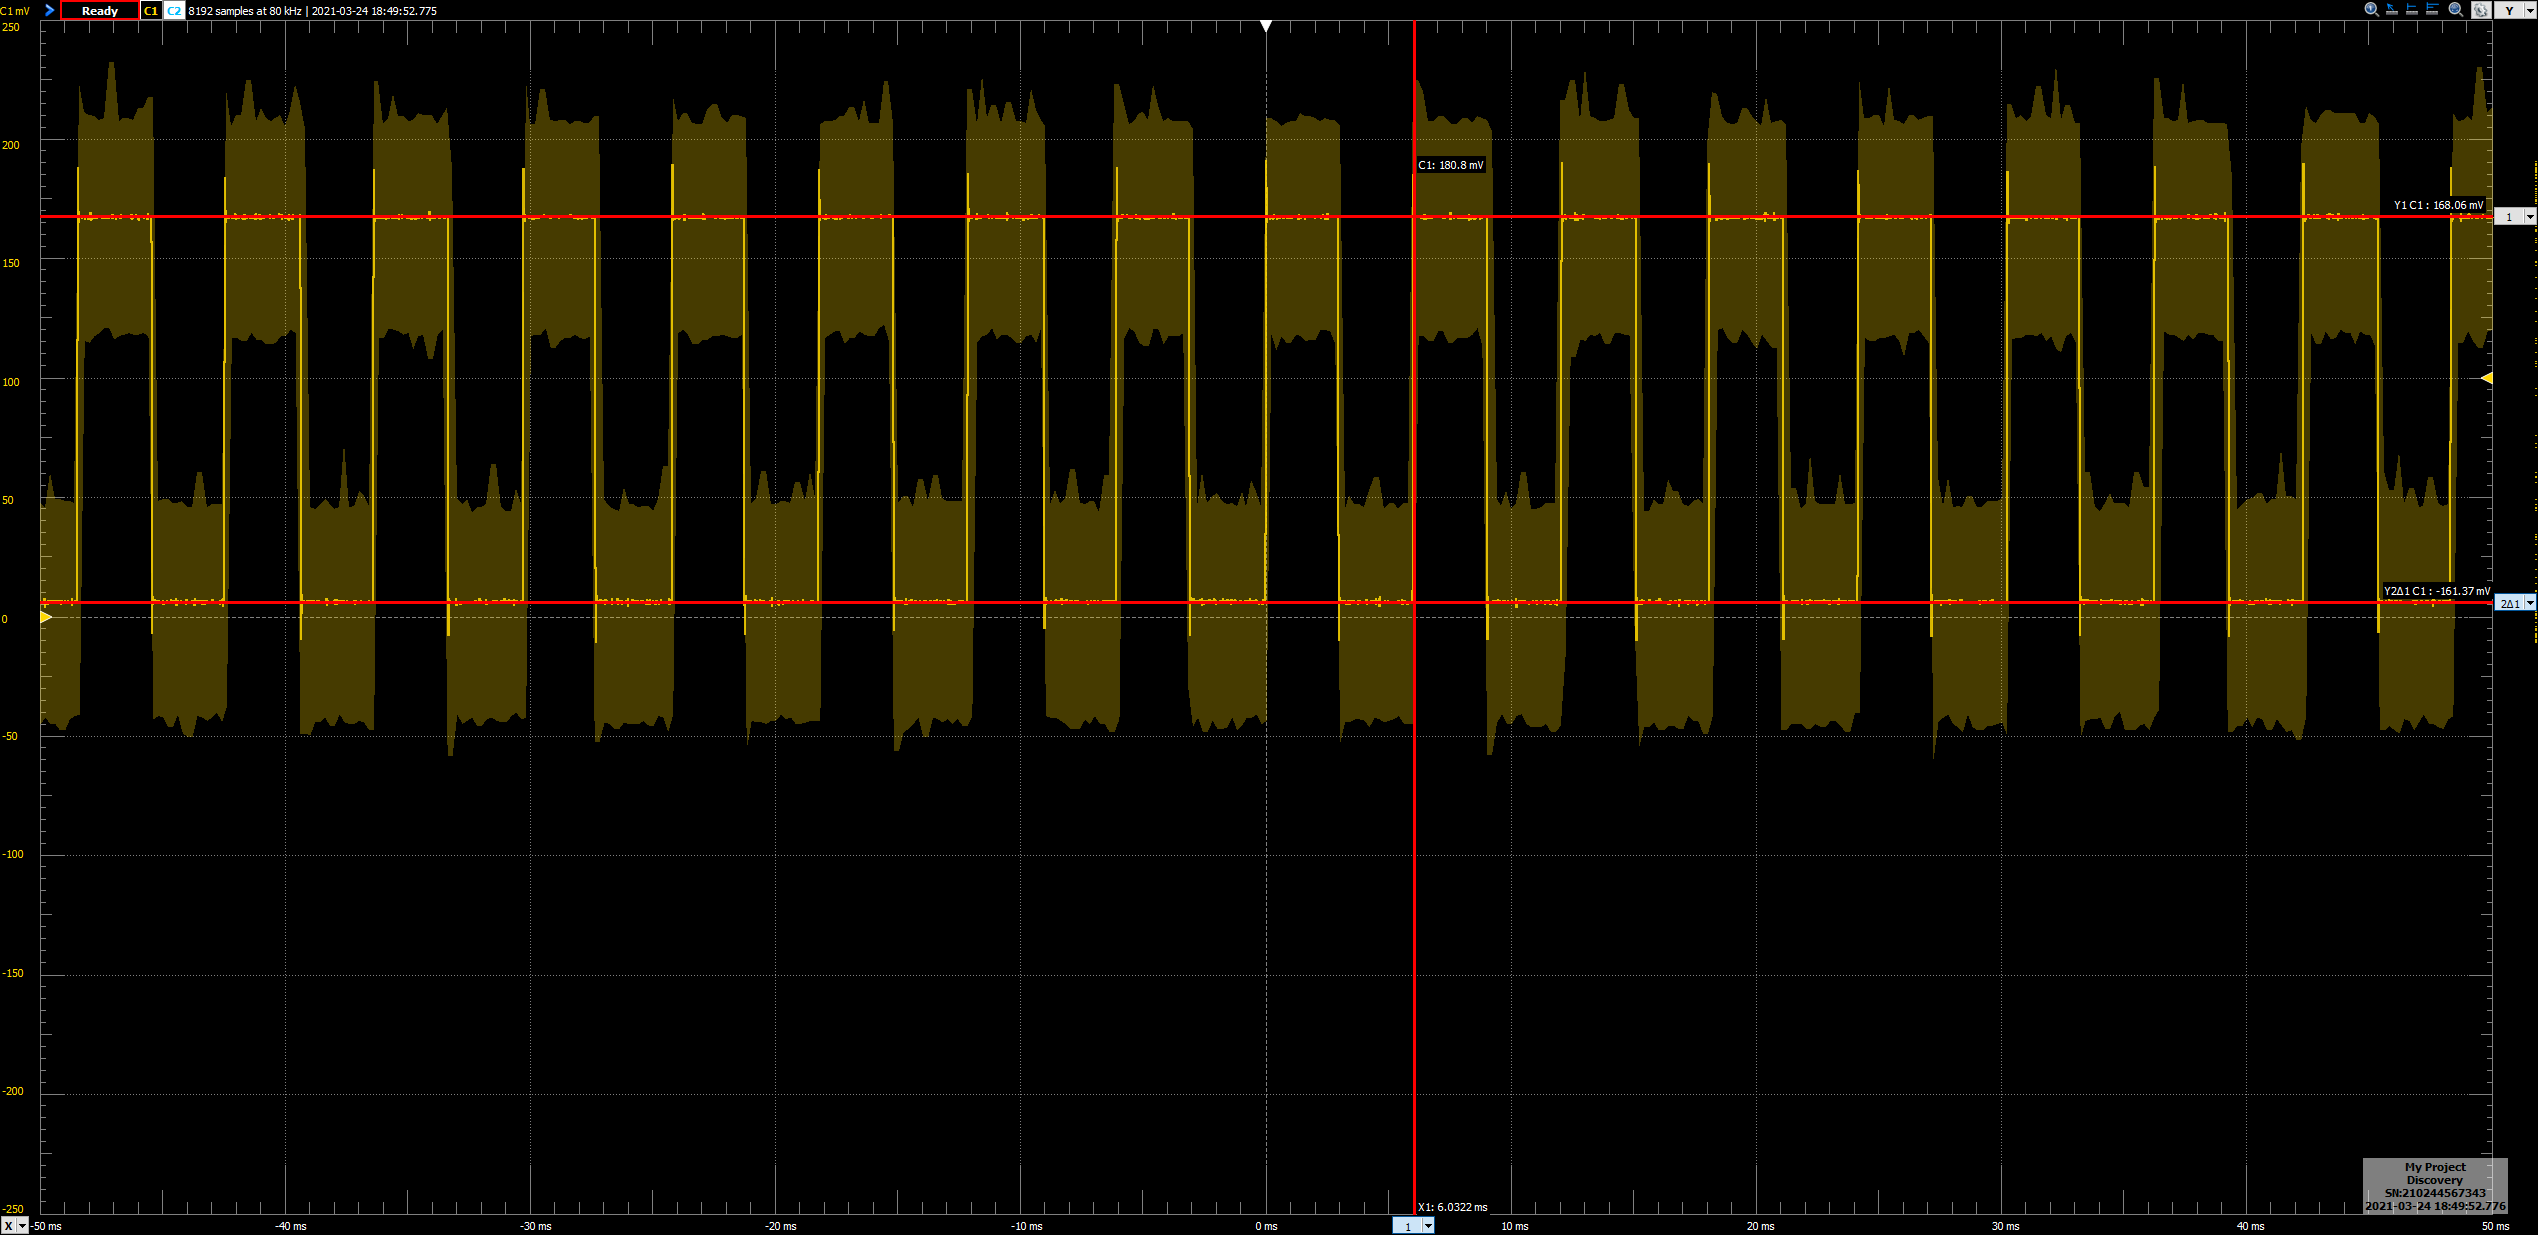
    DAC square wave output (measured with open circuit load):

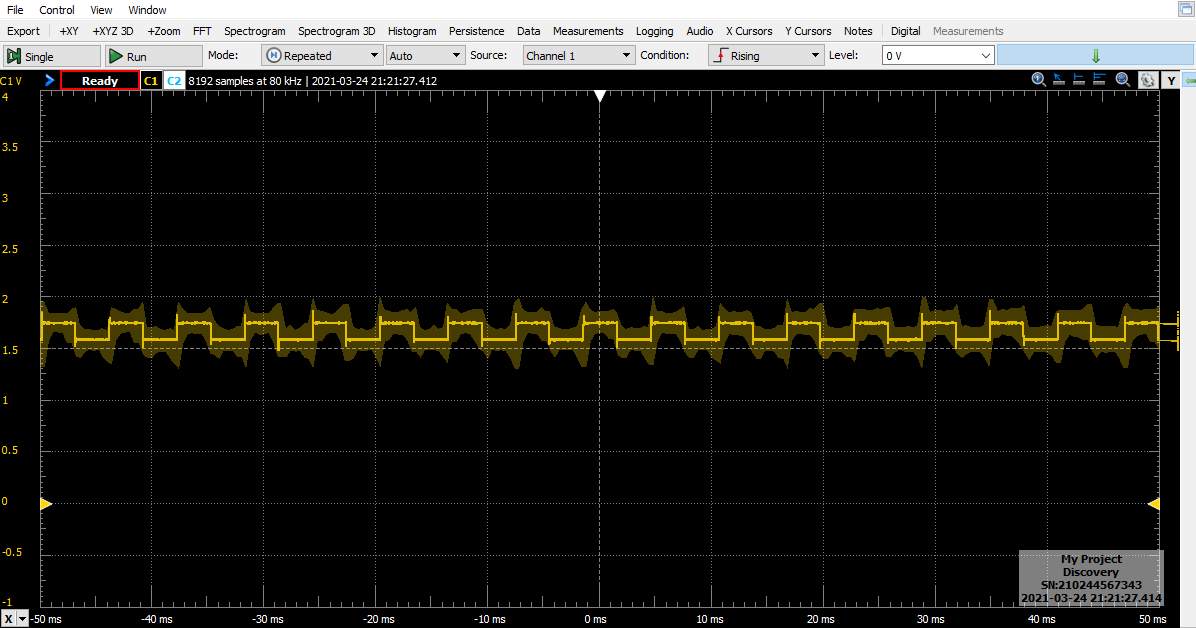
    and next the signal the ADC sees for the open circuit:

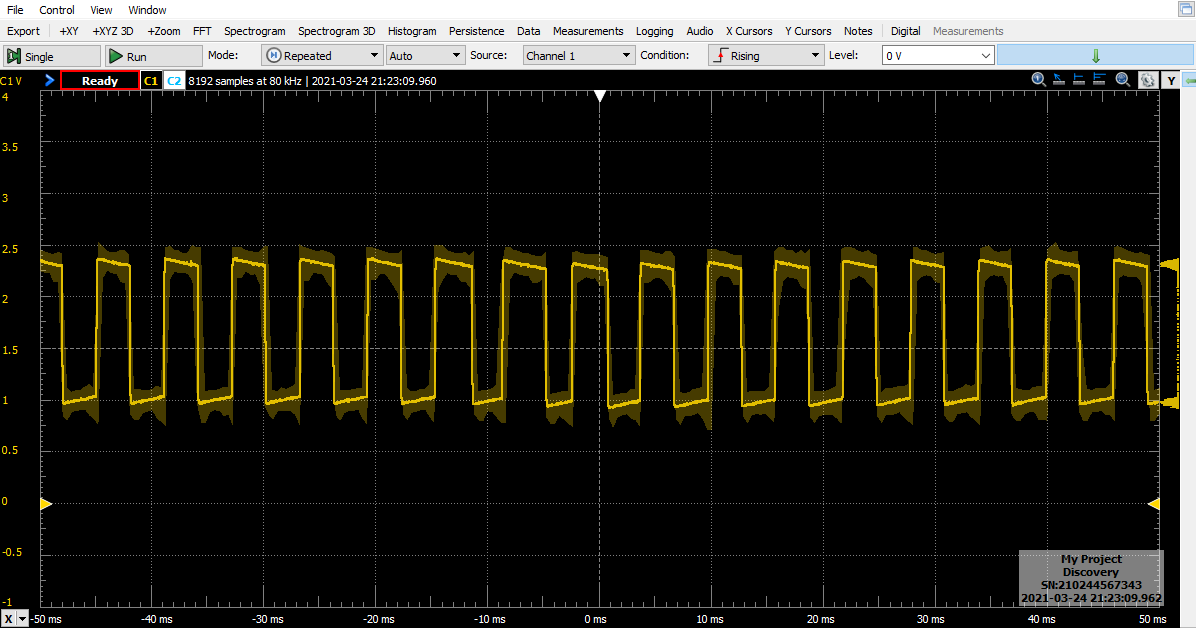
    and what the ADC sees for a 33 kohm resistor:

    Now if you're thinking "but wait, EEG channels are mostly a capacitive load, so how are you gonna run a square wave through that without crazy ringing," well, here's the output with a 33nF cap in parallel with a 1Mohm resistor (or roughly 30 kohms impedance at the measurement frequency):

    ... So yea I'm not expecting to make very accurate measurements with this implementation, but it is probably good enough to just tell me if I need to adjust an electrode to make better contact, and optimizing impedance isn't super important for dry electrodes anyway. I also may try to implement a sinusoid waveform at some point with a hardware timer interrupt, which would hopefully clean up this ringing, but for now I'm ok with this. So with the impedance measurement circuit more-or-less validated the whole board checks out. 

    Next tasks will be to try to get a better communication protocol set up (so that I can eventually process/display more than just 4 channels of data at a time) and to design an enclosure and a secondary PCB to hold the dev board on the headset with a battery/charging circuit, and some logic so I can add more channels without needing to burn any more GPIOs on addressing impedance switches. I think it's also probably about time to get another round of boards with the fixes from the first revision and with some gold plating. Once I have 8 channels running I'm planning to start figuring out a headset design that will allow me to implement a laplacian referencing scheme over each motor cortex (basically putting three electrodes in a triangle with the 4th in the middle of them, and subtracting the signals from the peripheral electrodes to filter out low spatial frequencies), which will hopefully give me the boost in SNR that I need to really be able to control stuff.

  • Log 6

    P03/21/2021 at 11:46 0 comments

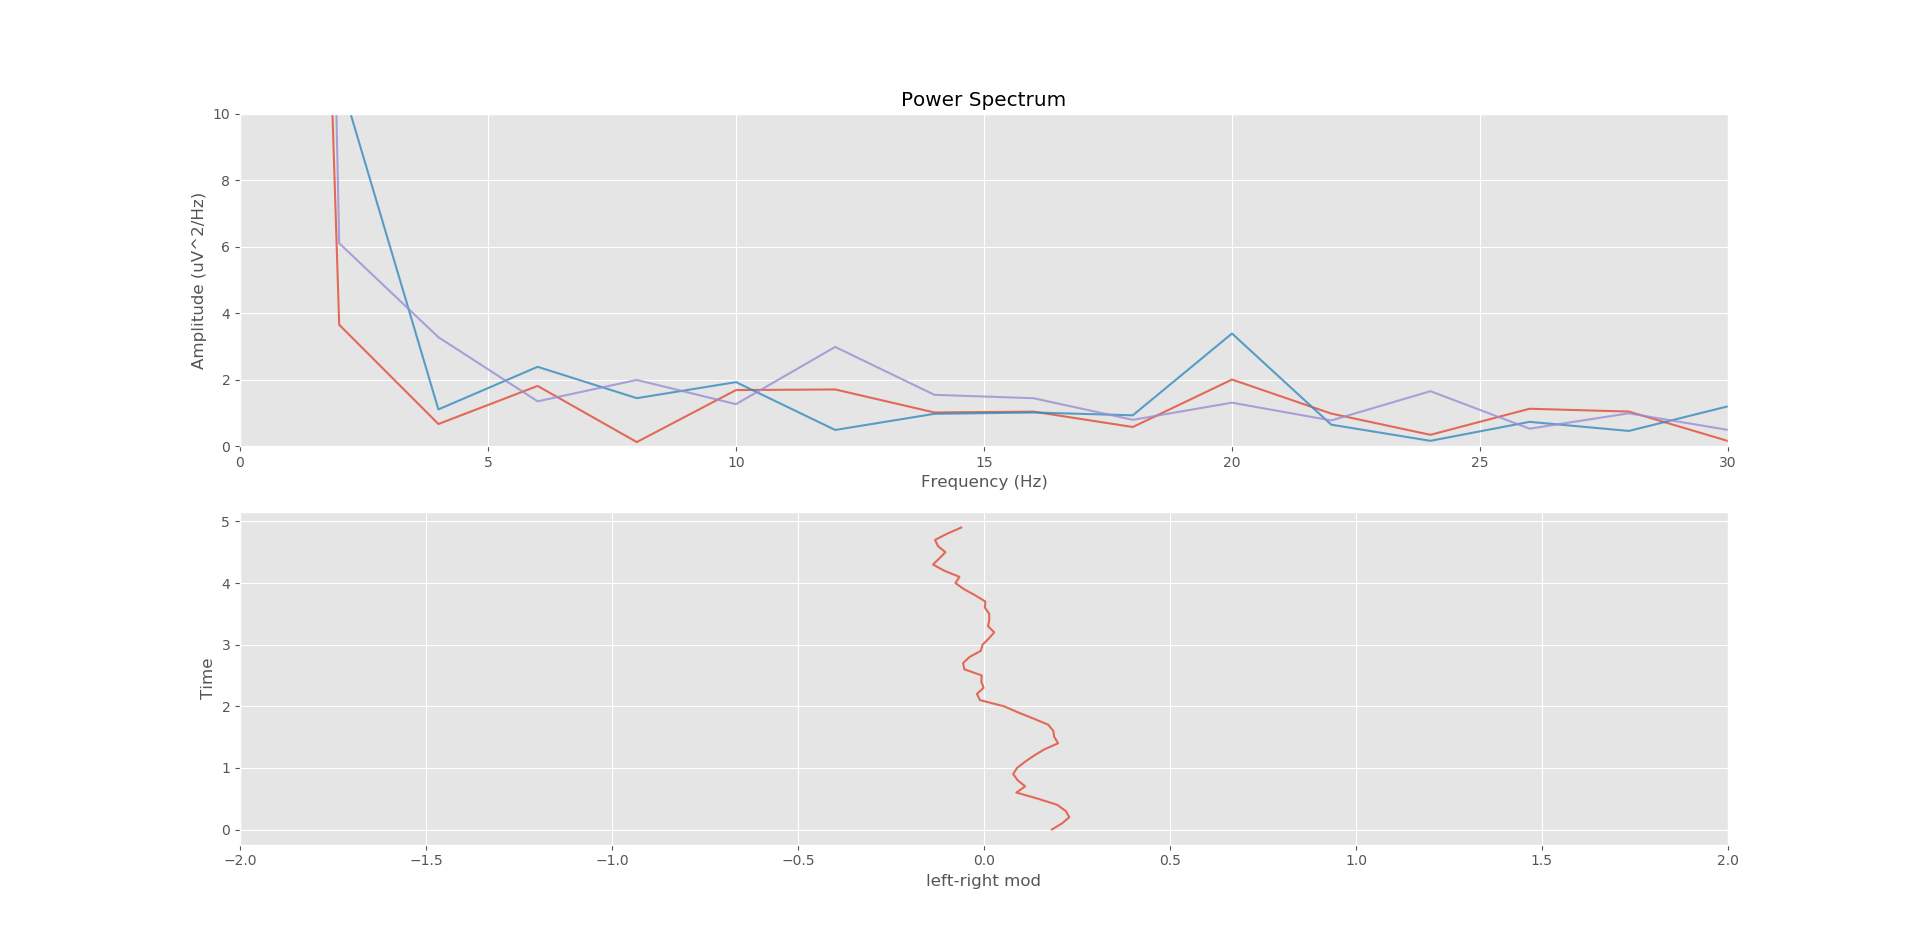
    Tried a rudimentary algorithm for producing a motor control signal. This algorithm calculates the difference in alpha band power (seemingly 10-14 Hz for me) between left and right motor cortex. Hypothetically imagining moving my right hand should reduce alpha power in the left motor cortex, and vice versa for the left hand, and I should be able to control a 1-dimensional signal by taking the difference of those two metrics. I wasn't feeling like I had an ounce of control over the signal though and it's difficult to tell if I just need to train more or if I need a better algorithm (but almost definitely the latter).

  • Log 5

    P03/20/2021 at 16:32 0 comments

    All 4 channels are up and running now, and I've got the impedance measurement circuit put together but still haven't tested it. I also found a seemingly more stable way to start up the MCP (by starting each channel in shutdown mode, instead of soft reset mode before enabling them).

    Visual electrodes are definitely picking up alpha in the below image, I'm not sure if the motor cortex electrodes are just making poor contact or if it's just hard to produce a detectable signal there, but getting the impedance measurement stuff worked out will help with that.

    I also started to run into the limits of how fast my client code on the host computer could receive/process/display the channels. A quick fix was to only send the most significant 16 bits for each sample (since the least significant 8 bits of each sample are just noise anyway), which prevented the UDP receive buffer from overflowing. Probably plenty of other optimizations or compressions that could be done here or other network protocols to explore, I'm not very familiar with network protocols though so I'll probably stick with what's working unless I have to change it.

  • Log 4

    P03/16/2021 at 16:58 0 comments

    I can now stream EEG data from the ESP32 to my PC in real time (or at least without any noticeable latency) using a UDP socket. Also switched my single working channel to the visual cortex and was able to acquire very robust alpha rhythms whenever I close my eyes. I'm considering switching the micro to my Maix Duino at some point to try some embedded machine learning based detection, especially once I start looking for motor rhythms which will probably be less robust and harder to pick out with just an FFT, but I don't think I'll do that anytime soon.

    I'll upload my embedded program for streaming data as well as the client program I made to filter and display the EEG in real time. Now that I'm pretty sure the EEG module is really picking up EEG signals and not just artifacts I feel a lot more confident populating the rest of the PCB and uploading my PCB files in case others are interested in playing with the boards. My first board revision had some pretty dumb mistakes which I was able to bodge and scrape some solutions to after getting them made, but the current version that I've uploaded has those mistakes fixed (but currently hasn't been manufactured). I'd certainly welcome any feedback on my layout, I'm also still thinking about how to scale up the channel count, either with stackable boards or otherwise finding ways to mount multiple boards on the openbci headset and interface them with the ESP32. They could all presumably sit on the same SPI bus, but I'd need a separate chip_select and data_ready pin for each of them which I'm guessing will be fine considering the large number of GPIOs the ESP32 has to work with. I'm more worried about the impedance sensing circuits which currently uses 1 GPIO per channel to select the channel for impedance measurement, and so would start to run into the limits of the available ESP32 GPIO pins. I'm thinking the easiest solution for that would be a simple decoder IC somewhere that'll let me only use 4 GPIOs to select from 16 channels.

  • Log 3

    P03/11/2021 at 06:45 0 comments

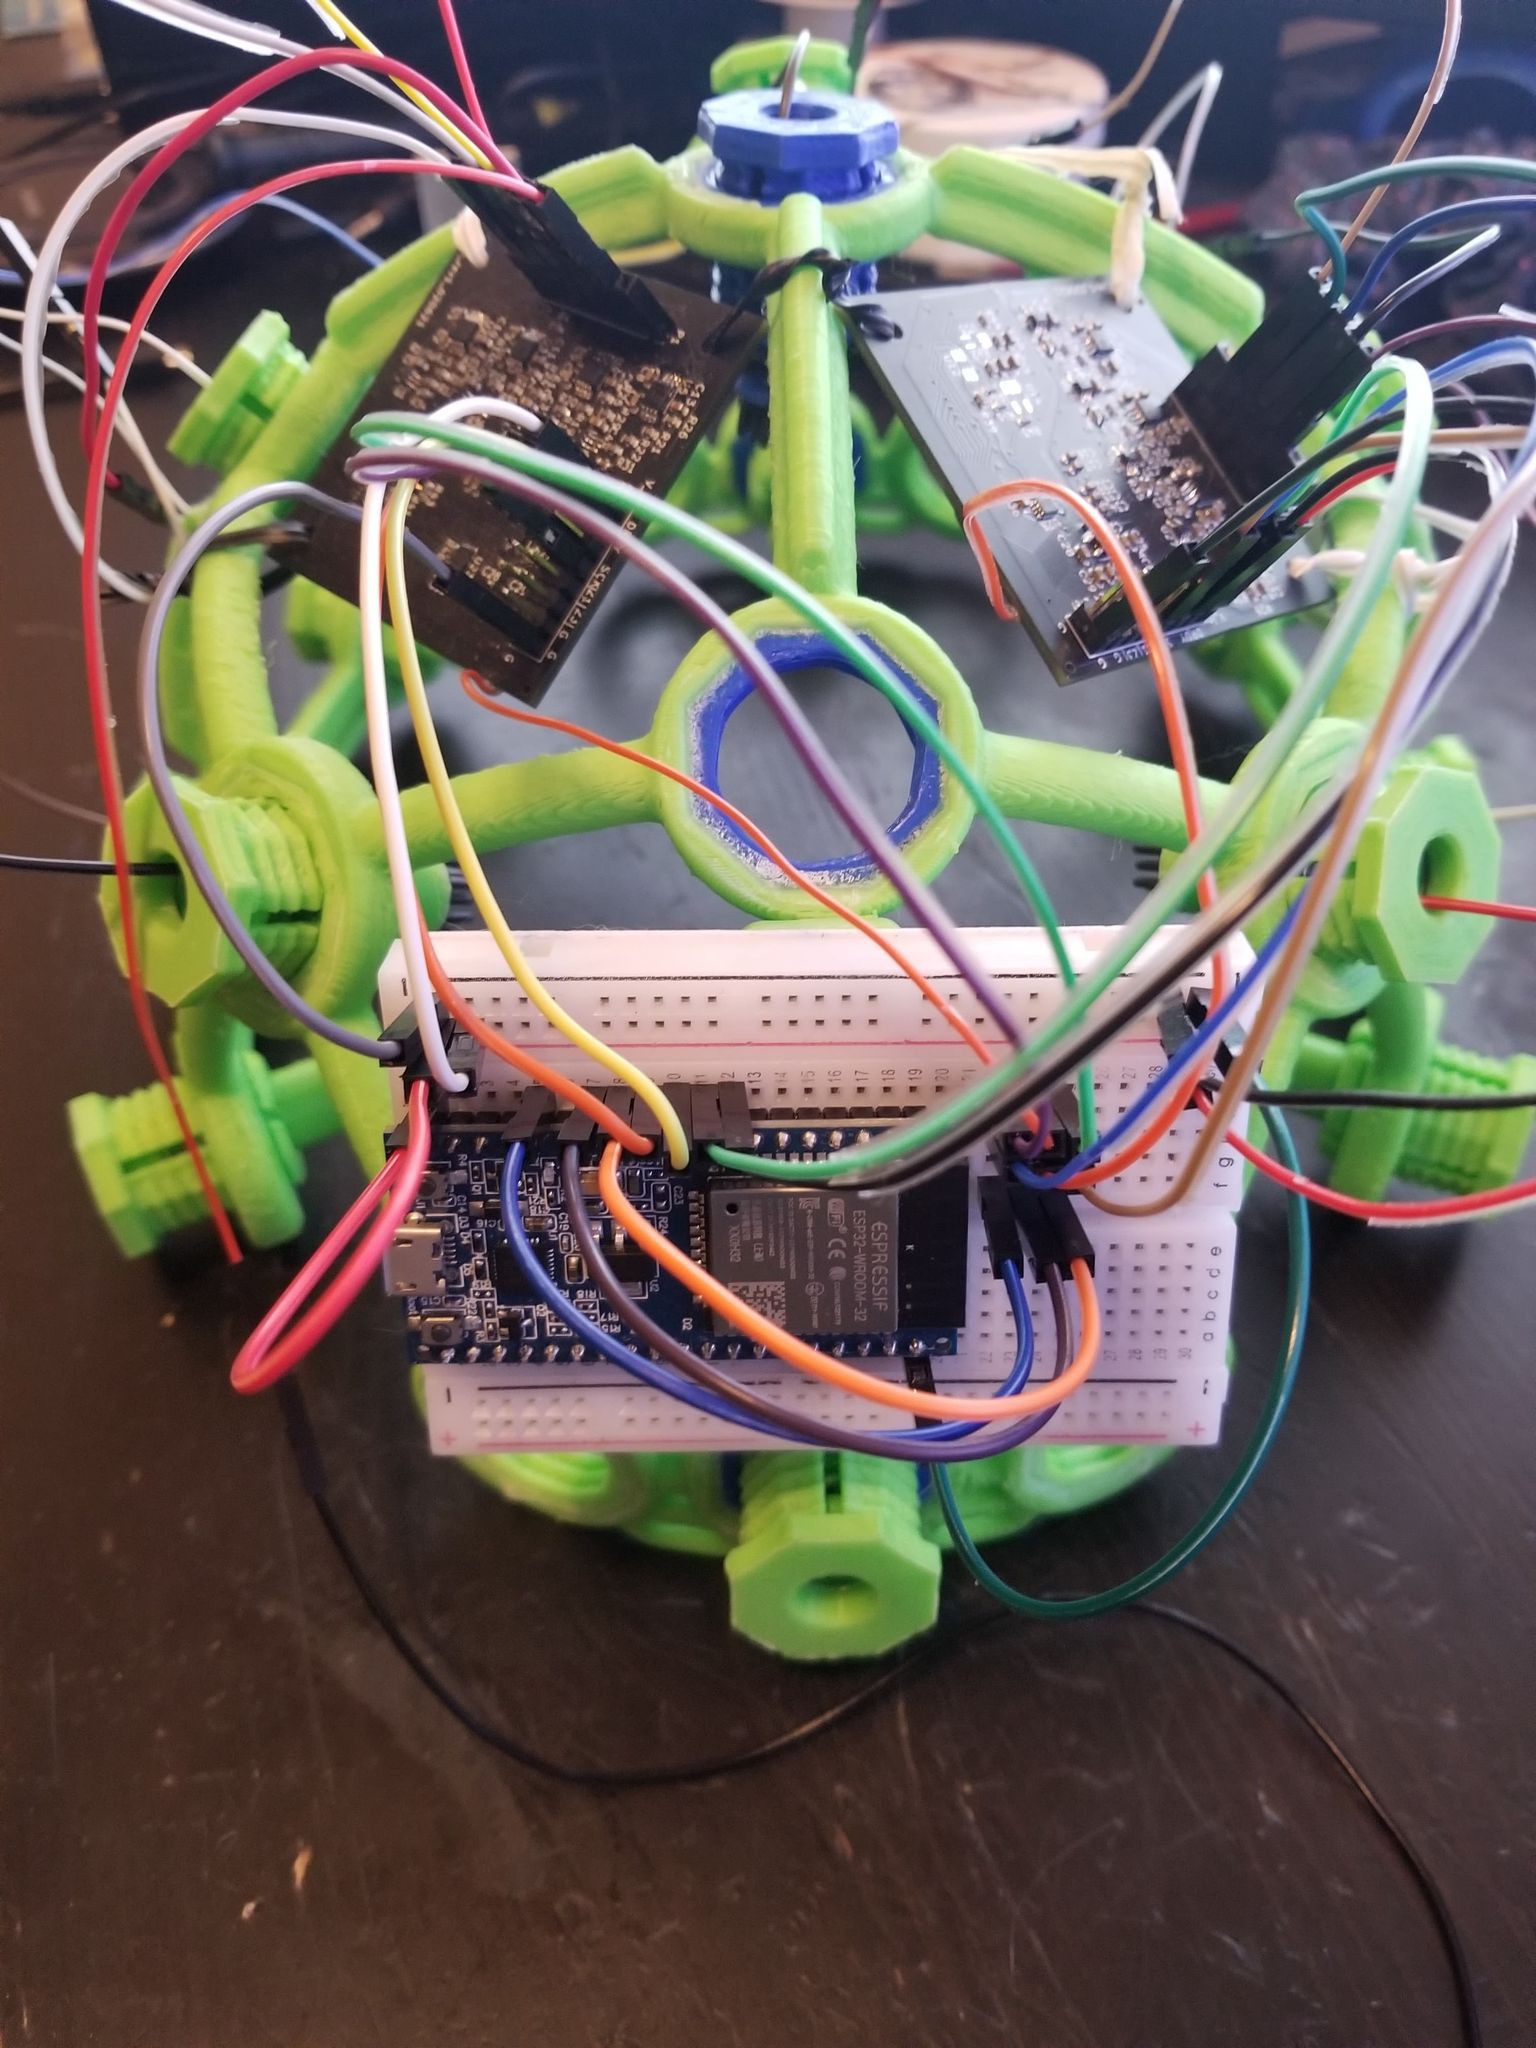
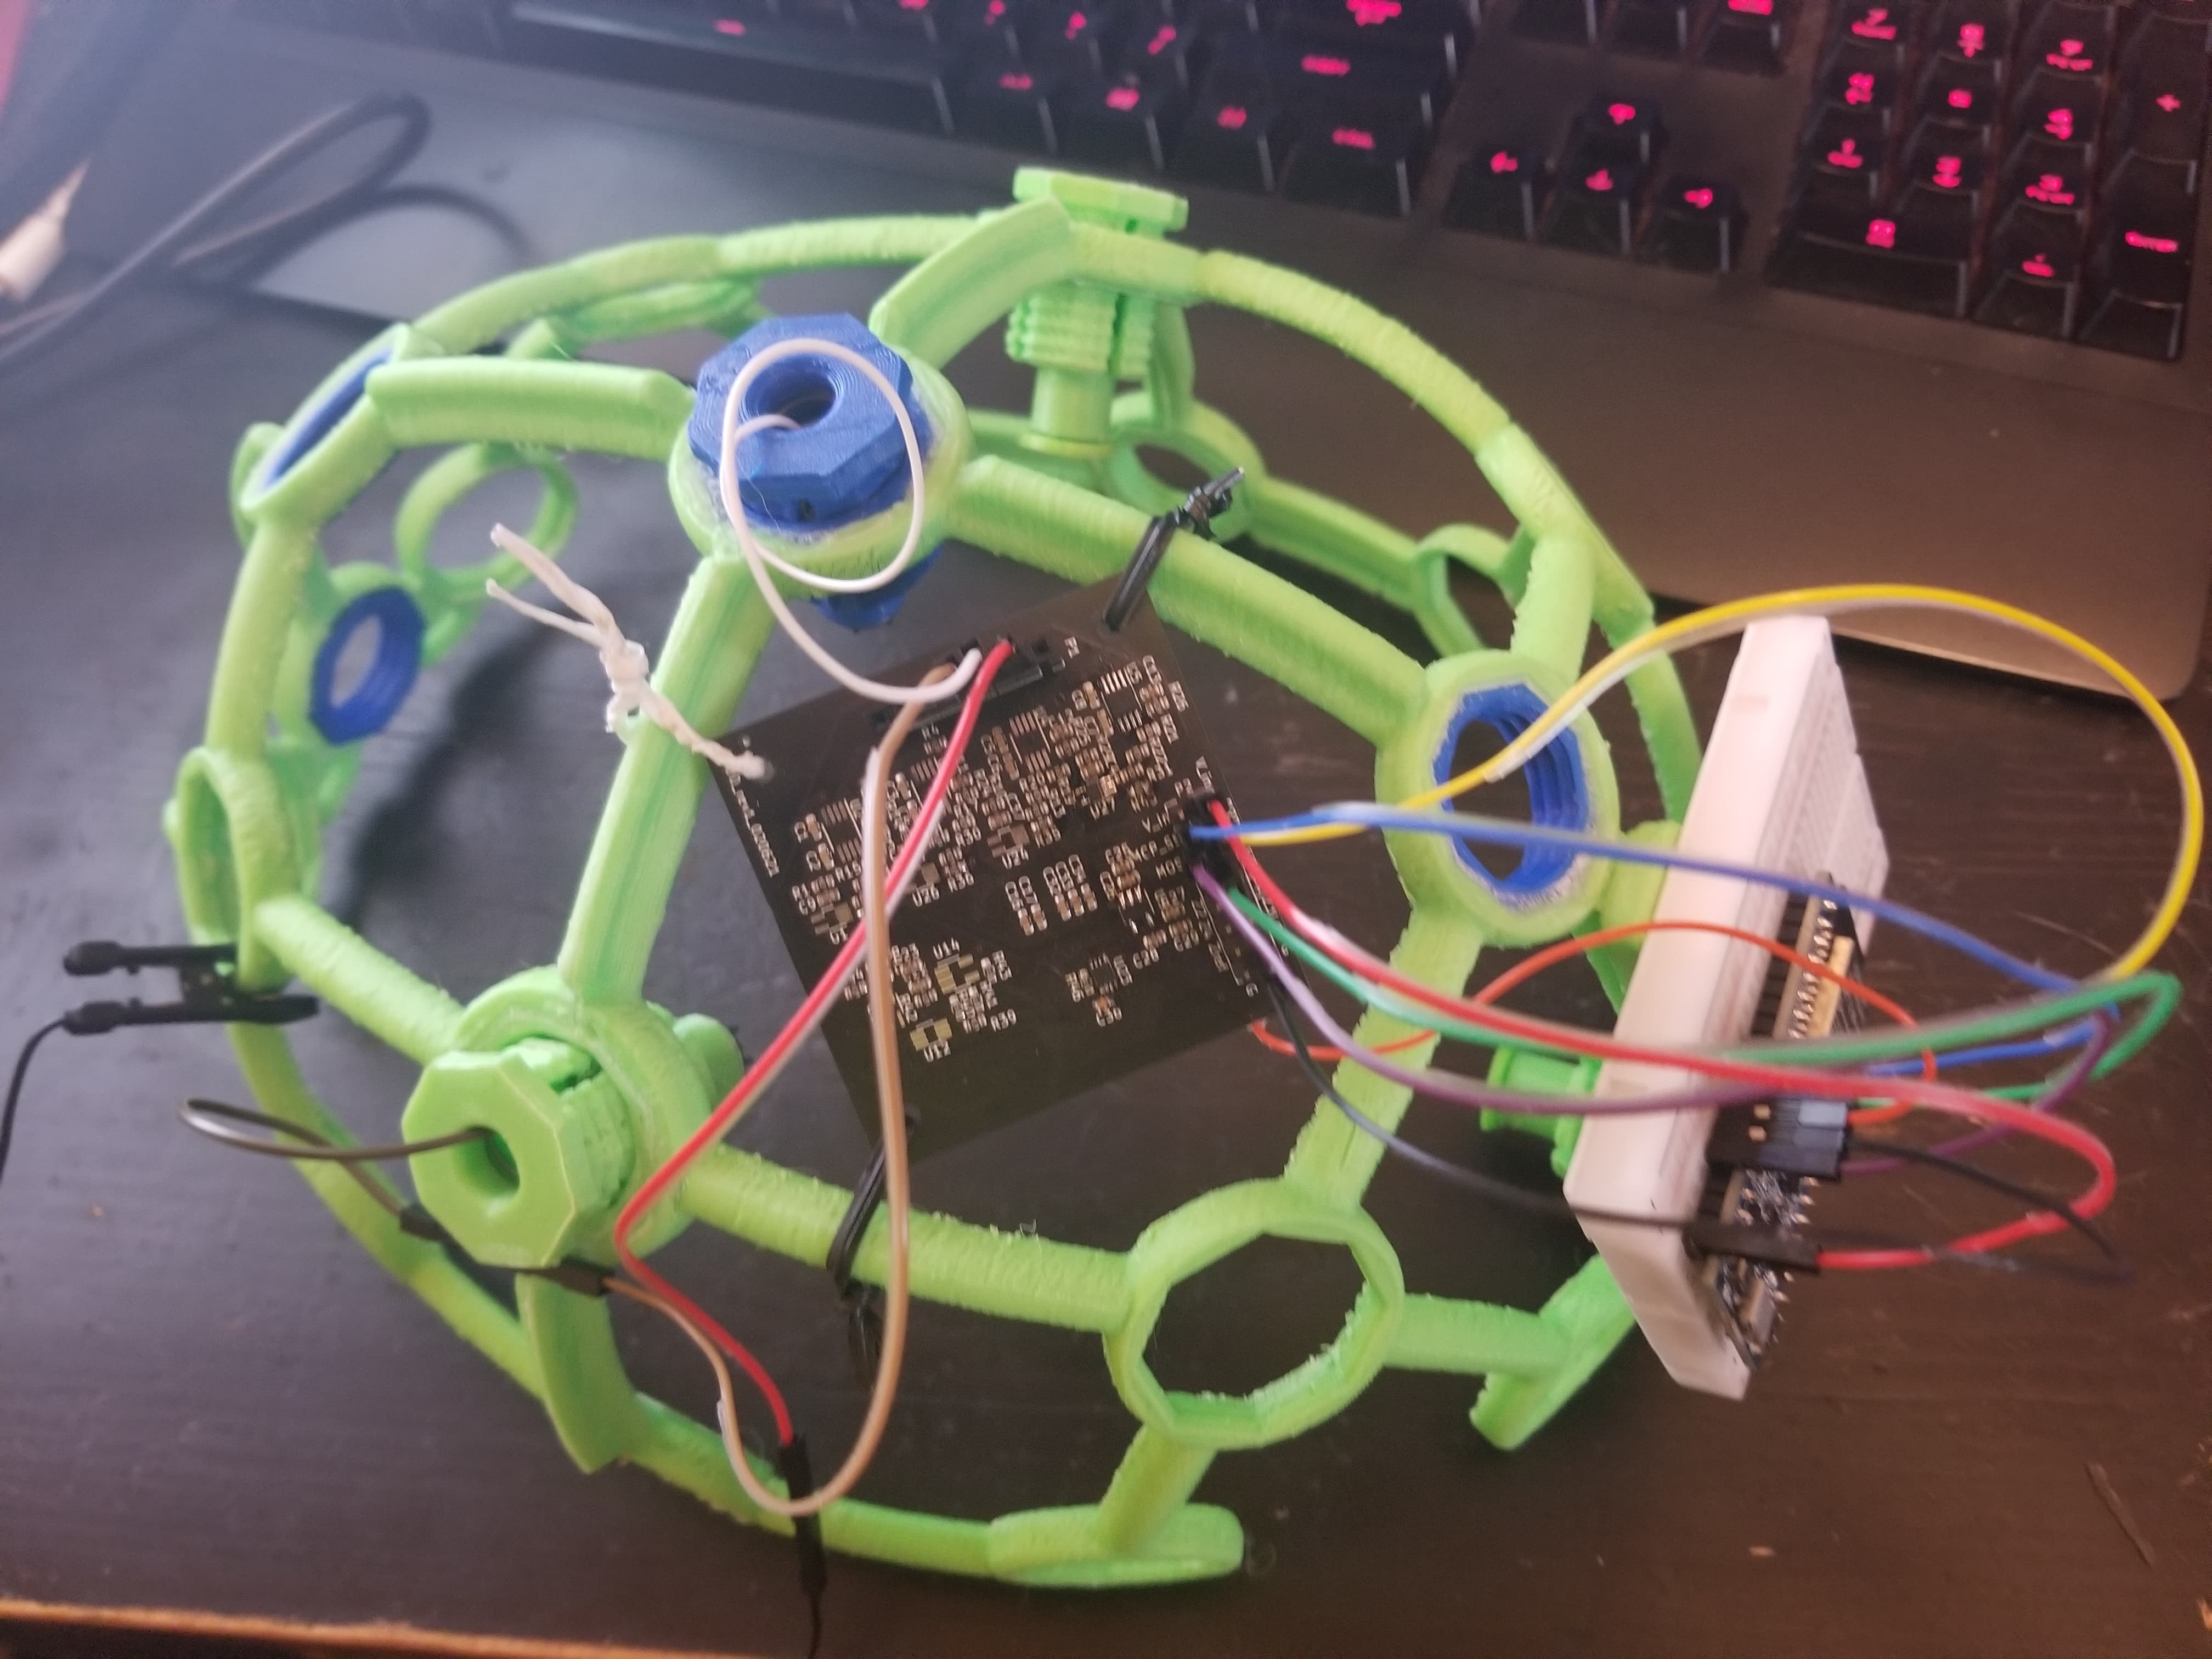
    With the headset printed and assembled I think I might've actually acquired a motor rhythm. Headset shown in image below.

    At this point I'm going for the minimum demonstration of functionality, so my PCB is just secured to the headset with twisty-ties, and the ESP32 is mounted with an adhesive breadboard. Eventually I'll want a 3D-printed enclosure at the back to hold a battery, and a board with a charging circuit and breakout headers to mount the ESP32 dev board to.

    So in this configuration I had the driven ground clipped to my left ear, the reference channel going to the top of my head (Cz in the 10-20 system), and the recording channel positive input going to the left motor cortex (C3). The two scalp electrodes are these shorter spiky Ag/AgCl electrodes, although I have the longer ones too that I will use in the future. Also worth mentioning I'm just holding a usb battery in my hand and powering the whole system through the ESP dev board's usb jack. I also had the openbci comfort insert thingies (printed in TPU because I'm worth it) in the C4 and Oz(?) positions to get a pretty snug fit.

    So I wouldn't be providing this update unless I had a recording that looked like an EEG signal, so here it is:

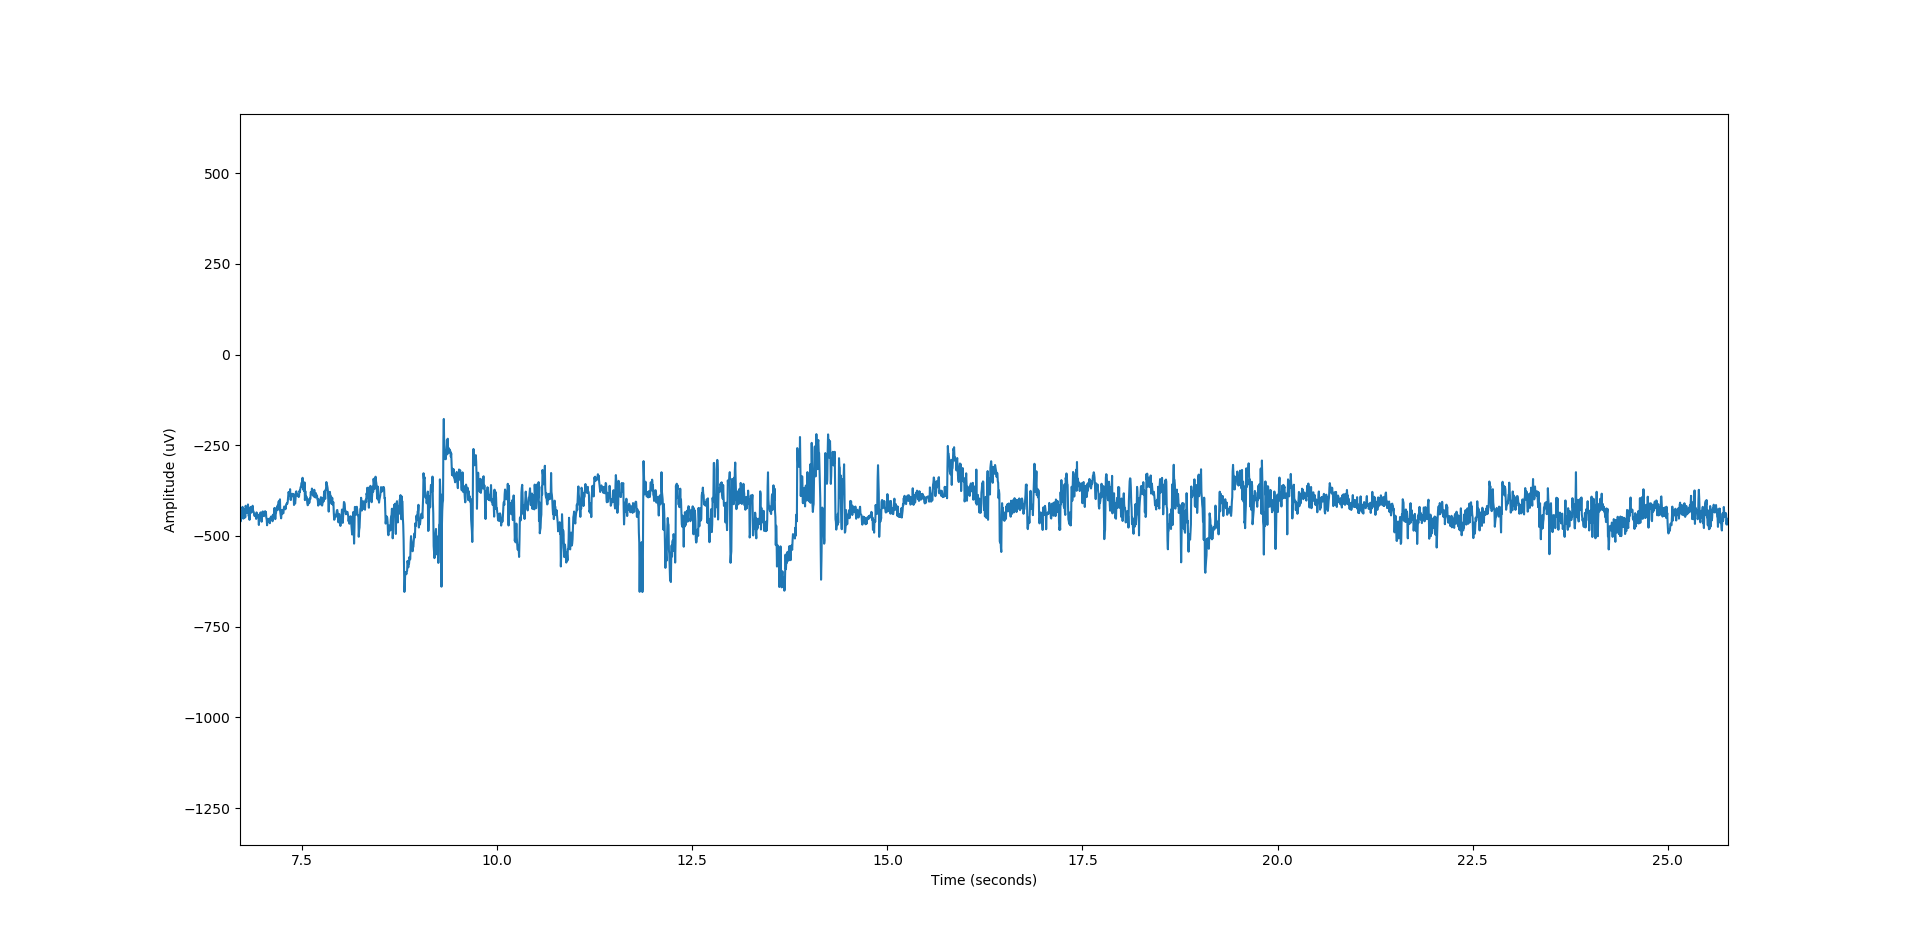
    For this recording I was imagining playing piano with my right hand, since that would in theory produce a motor signal in the left motor cortex. I had to run the signal through a 60 hz notch filter to see anything other than noise, but after the filtering it looks like there is a ~500 uV peak-to-peak rhythm. That may be too strong to be EEG and could just be from motion or scalp EMG though, hard to say. I'm also confused by the DC offset, I'm not sure how that got through the amplification stage. But either way, it's reasonable enough to say that the amplifier circuit and communication with the ESP32 are hunky dory, so I'll probably start putting together the impedance measurement circuit now and completing the rest of the amplifier channels on this board. Ideally I'll be able to plop a second MCP3912 module on the same SPI bus and get 8 channels of data without much extra effort, but I'm still a pretty long way from taking that step.

  • Log 2

    P03/08/2021 at 05:04 0 comments

    Moved the ESP32 to a battery supply to try to minimize line noise and played with the MCP sampling configuration a bit.

    Here's the noise level with a 1 Mohm resistor between the input and reference, and the reference shorted to the driven ground:

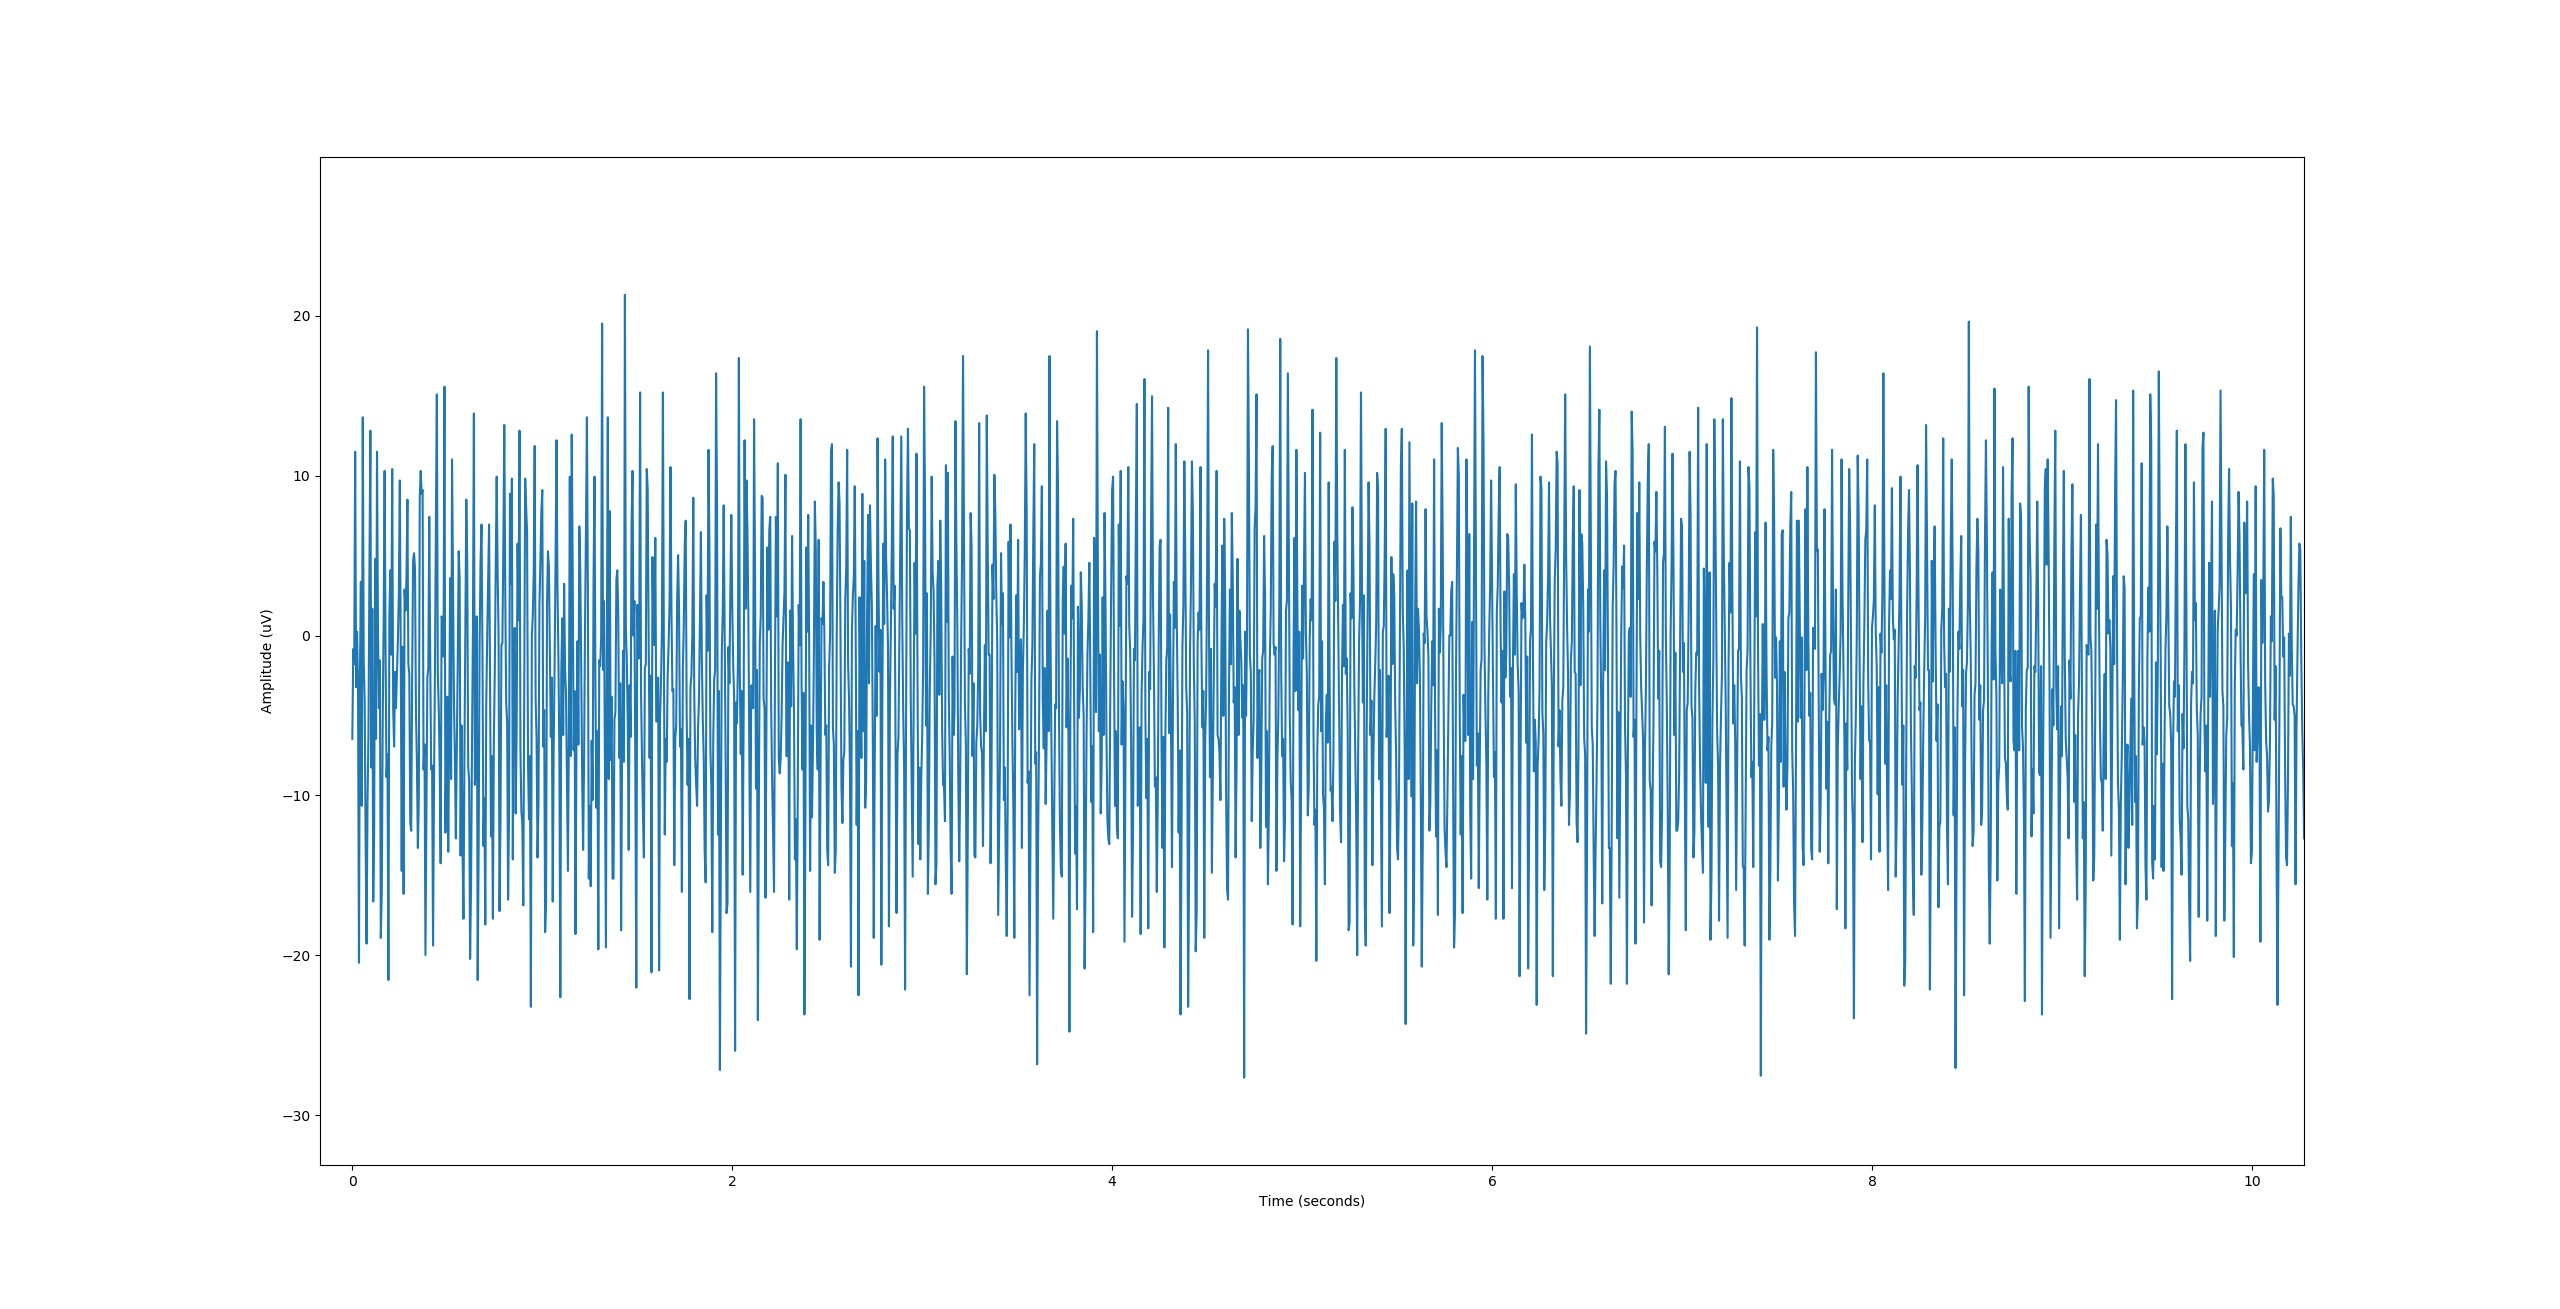
    Once again about 10 uV rms white noise, which will hopefully improve a bit in practice with a lower channel impedance.

    To try and capture an EEG recording I clipped the driven ground to my ear (using a Ag/AgCl ear clip) and pressed male gold-plated jumpers into the top of my head (for reference) and the back of my head (trying to get near occipital lobe). I was hoping I could see the emergence/suppression of alpha rhythms while closing/opening my eyes but obviously the 0.1 in^2 gold pin interface isn't really ideal and I was just guessing as to the location of the visual cortex. The full recording is below:

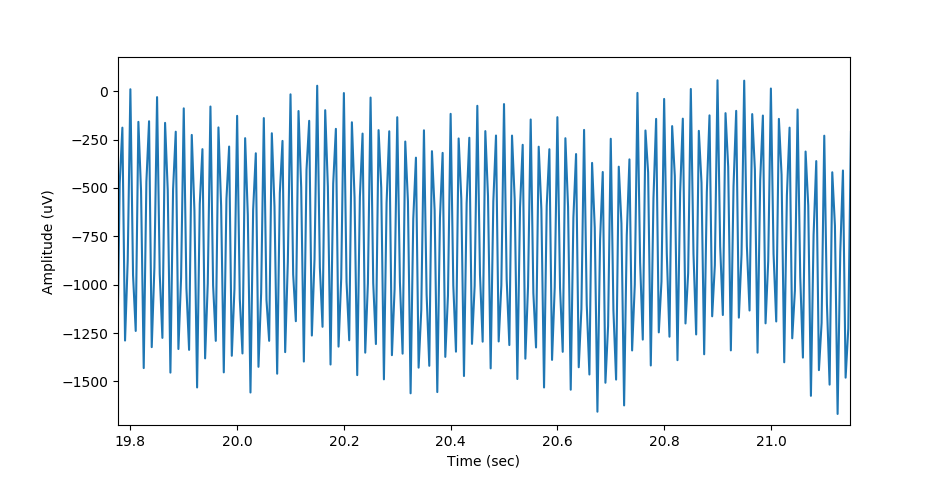
    Zooming in a bit it's obvious that my main noise source now isn't thermal, it's 60Hz mains, which is to be expected since I'm running pretty long wires that aren't twisted or shielded to my head and I'm a pretty good antenna (if I do say so myself):

    most of the lower-frequency activity and saturation is probably just motion artifact. 

    So basically I think I'm pretty limited in what I can do at the moment without proper electrodes and a headset, so I've started putting together the OpenBCI Ultracortex Mark III headset, and will soon be able to try to get some proper EEG recordings with it. I'll also need to make an enclosure of sorts to secure the ESP32 module and my custom board to the headset, but that should be pretty straightforward as the headset already contains a mounting plate on the back.

View all 11 project logs

Enjoy this project?

Share

Discussions

maru wrote 02/23/2024 at 16:28 point

Hi, I am very interested in this project.

I am still a beginner, but I immediately placed a foundation order with KiCAD data for 2021. So I have a question.

I see that the project log currently stops posting in April 2021.

I would like to know more about the reasons for abandonmen or if there is any history that has not led to continued log.

Thanks for sharing this great project.

  Are you sure? yes | no

P wrote 11/18/2024 at 21:28 point

hi sorry, yes the development of this project was more-or-less abandoned. I still used the EEG as it was in the final log fpr a few different things, but never developed the hardware any further.

  Are you sure? yes | no

DOBsby wrote 01/14/2024 at 14:25 point

Hey, sorry if this is spammy, but I'm asking these questions far and wide anywhere there might be someone who might know

How similar is the Taurus TGAM to the more popular neurosky TGAM? Does the Neurosky SDK work with it?

Is the Sicihiray Taurus TGAM equivalent to the Neurosky TGAM? I'm looking at getting the Sicihiray but the Neurosky has more online resources. If they're compatible, that's fine. I'm just concerned they're not

  Are you sure? yes | no

P wrote 01/15/2024 at 08:30 point

I've never tried the Taurus TGAM, but the Neurosky headset is pretty nice, and the SDK is pretty easy to work with. Sorry, I don't think that answers your questions :/

  Are you sure? yes | no

YSPACE Labs wrote 05/17/2023 at 17:00 point

This looks very promising! Currently, I'm trying to find some I2C equivalents of the ICs used so I can use Qwiic to connect the boards instead of having to use a whole bunch of GPIOs and SPI pins.

  Are you sure? yes | no

YSPACE Labs wrote 05/17/2023 at 17:36 point

Actually, I2C addition might come later or just not be practical enough to implement. It would definitely add cost (the MCP3912 is cheap compared to ICs with similar functionality) (and I would have to add a dual channel I2C ADC and an IO expander). And you've detailed ways to reduce the number of GPIOs used, so GPIO usage can still be reduced without I2C.

  Are you sure? yes | no

Similar Projects

Does this project spark your interest?

Become a member to follow this project and never miss any updates