Nixie Pendulum Clock - Concept
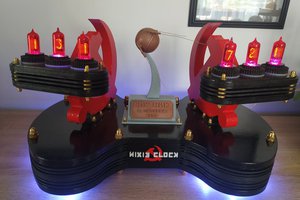
A pendulum clock with a NixieTube (IN-12b) that plots the time in the air it passes.
A pendulum clock with a NixieTube (IN-12b) that plots the time in the air it passes.
To make the experience fit your profile, pick a username and tell us what interests you.
We found and based on your interests.
nixie_pendulum_clock_scheematics_1.pdfcomplete wireing. fixed grd & V+ at coil driver. Addet a current limiting Resistor for the Nixietube (Current should be around 4-7 mA for nominal glowing numbers)Adobe Portable Document Format - 75.55 kB - 05/09/2021 at 11:25 |
|
|
nixie_pendulum_clock.inomore commentsino - 10.07 kB - 05/07/2021 at 22:00 |
|
|
Connect all the wooden parts exept the arm with wood screws so you get a stand like this:
(Foot + stand + standof)
b) Drill a hole centric in one end of the arm, so the ball-bearing fits in it.
The ball-bearing looks like this:
and they were stuck in both ends of the hole. A small but long M2 screw goes through the ball-bearings with got tighten by counter nut.
On the other end of the arm drill a hole for the cables from 74141 to nixie-tube.
On the front of the arm i used a Nixietube-Socket (https://www.thingiverse.com/thing:576723). I stuck in the nixie-tube and and after that i solderd the cables (10 Cathodes, 1 anode with 170 V - The currentlimmiting resitor shouls limit the current from 1-3 mA's). Then the socket gets screwd onto the front of the arm.
Now find a screw to mount the arm it on the small pice of wood (the stadof), or use a 90° aluminium angle to fixate the arm through the ball-bearing on the "too" long M2 screw.
If all went well: after you tip the arm it should swing very long and it will move for minutes!
See scheematic for wiring. Build the backside parts onto the backside of the stand onto the wood.
Build the "Pendulum" parts together and secure them on the backside of the arm. The Accelerometer needs to be as close to the axis (ball-bearings) as possible! Otherwise the centrifugal force will be more present in the meassurement than the gravitational force.
Find a way to secure the flexy-cable, from the boackside of the stand to the backside of the arm, while the arm still can swing freely, without much dampening of the swinging.
Now connect Ground, +5V and Coild-Trigger from D13 from the backside of the stand to the flexy-cable and on the arm from flexy-cable to the rest of the electronics.
Check every module on functionality (RTC, Accelerometer, Nixietube - all numbers)
Upload and set the RTC.
Now we need to get that pendulum keep swinging. Check if position: "arm straight down" equals 0° on the Accelermeter (MMA_7455). The Coil should induce a pulse on the magnet. See with some other magnet, witch two sides of the cubic magnet are the poles - one should attracht the coil and the other side should repell from coil - we need the repelling force configuration for this project. Mount the coil on the upside from the wooden foot and glue the magnet on the arm at the backside bottom position WITH: repelling force configuration / orientation!
Create an account to leave a comment. Already have an account? Log In.
Thanks a lot!
If the code would be perfect, it would look better and the frequency of the pendulum could be designed to be higher.
Did you try to use the dual cores of the Esp32 ?
Hummm sorry I read too fast. You haven't yet used an ESP32... As you said you should, they are fast and powerful
The clock speed is/was not the problem. It was my codes semi automatic timing of the "left2right" and "right2left" offset delay. .. at least i think it was.
At first I though it would be possible to make the duty cycle longer to increase the brightness but then I realised that would blur the digits. Still it's an interesting way to use only one tube.
To increase the brightness you cuold give the tube more mA's ny decrease the current limmiting resistor. I think i'll make another video in the dark.
I think there is less range for overdriving a gas discharge tube compared to say LEDs.
true, need to test it with a nixie-tube-tester sometimes. (https://hackaday.io/project/171331-nixie-tube-tester)
..but as i remember its possible to overdrive them a bit, but they warm up. I never pushed it into destruction.
Thank you very much! The POV effect barely kicks in, but the time is recognizable, due to short (4ms) pulsed numbers.
That is a bonkers build! At first I thought this was going to be a bar-graph tube that just lights up pixels for POV display... so much more interesting as an actual Nixie. Do you worry about the Nixie failing due to vibration? I have no idea how these parts are rated and what they can stand up to.
Thanks! A previous project tought me, those tubes are fast. So that idea came up by it self. When tapping a tube (ZM1180) you could hear the numbers flapping around just a bit. But here the swinging arm is stored on a ball bearing and the push from the coil on the magnet is barely audible. I dont think the tube it self degrades, but a strong impulse might bend the number-plates.
Become a member to follow this project and never miss any updates

 andriy.malyshenko

 loszelos
 Marten Electric
I do really love this project (being a clock fanatics !)
Thats's a pity that the PoV effect is so limited...