Close
0%
0%

N64 and Gamecube Controller MIDI Interfaces

Use N64, Gamecube, and even Donkey Kong Bongo controllers to control synthesizers, DAWs, and more!

Similar projects worth following
The N64>MIDI and GC>MIDI are interface boxes that use an Arduino to translate controller inputs to MIDI messages.

MIDI can be used to control almost any electronic music device from the past 30+ years, so there are a ton of applications for these. Primarily I think they would make just performance controllers to add a layer of visual interest especially for musicians who work with video game inspired music.

The two devices are nearly identical hardware wise, so I've grouped them under this one project. You can build your own following this project, or I do sell pre-made versions built to be road-ready for musicians on my website.

I designed these as standalone units to repurpose and make use of old Nintendo controllers as musical devices without having to directly modify or damage the controllers in the process. 

So you can use your Gamecube controller to make some fun music and still play Melee with it later!

By default, these are coded to follow guidelines set up by the old General MIDI standard, so they are plug in play with pretty much any MIDI device, including old legacy stuff. You can also Customize your code for your specific gear, but most people won't actually find that necessary.

Check out the demos below for full blown (and long winded) tech demos, as well as a quick musical demo that shows a variety of different applications.

Demos:

Gamecube version Full Tech Demo

N64 version Full Tech Demo

Quick Musical Demo

Schematic_N64.GC Midi Controller.png

Schematic for building the hardware. Note that the N64 version won't use all the listed controller connections, just 3.3v, GND, and Data.

Portable Network Graphics (PNG) - 64.89 kB - 06/27/2021 at 19:46

Preview

N64DrumLayout.png

Drum Mode mapping for the N64>MIDI Interface

Portable Network Graphics (PNG) - 92.97 kB - 06/27/2021 at 19:41

Preview

N64SynthLayout.png

Synth Mode mapping for the N64>MIDI Interface

Portable Network Graphics (PNG) - 87.91 kB - 06/27/2021 at 19:41

Preview

GCSynthMapping.png

Synth Mode mapping for the GC>MIDI Interface

Portable Network Graphics (PNG) - 397.04 kB - 06/27/2021 at 19:40

Preview

GCDrumMapping.png

Drum Mode mapping for the GC>MIDI Interface

Portable Network Graphics (PNG) - 399.38 kB - 06/27/2021 at 19:40

Preview

View all 6 files

  • 1 × Arduino Pro-Micro 5v 16MHz Clones work fine in my experience. The important thing is to have the ATmega32U4 chip as it is USB MIDI capable. Also ensure you have the 16MHz version as this is required by some of the libraries.
  • 1 × Extension Cable for your Controller This is where the builds will differ, but just grab a cheap extension cable for whichever system you are building.
  • 1 × Logic Level Converter The one in my diagram is a common bi-directional converter, but you can adjust to use a uni-directional one if you want.
  • 1 × 5v to 3.3v Voltage Regulator Module Common 3 pin regulator module. You could always build your own regulator circuit, but these things are so cheap I'd say just grab one.
  • 3 × 220 Ohm Resistor Resistors for MIDI and the Indicator LEDs. You can use any value up to 1-2k for the LEDs and be just fine, I just find it easier to use one value for all the resistors.

View all 7 components

  • 1
    First, you'll want to build the hardware.
    • Follow the link to the GitHub page for whichever unit you want to build and pull up the Schematic section. This will show you how to make all the connections. 
      • I've also included the schematic in the Files section.
    • The only difference between the two units is the controller connections for the extension cable.
      • Note that on the Schematic, all connections are listed for the Gamecube device. If building the N64, only connect the 3.3v, GND, and Data connections, and just disregard the others.
      • Cut off the socket (female) end of the extension cable, and expose and strip the wires inside.
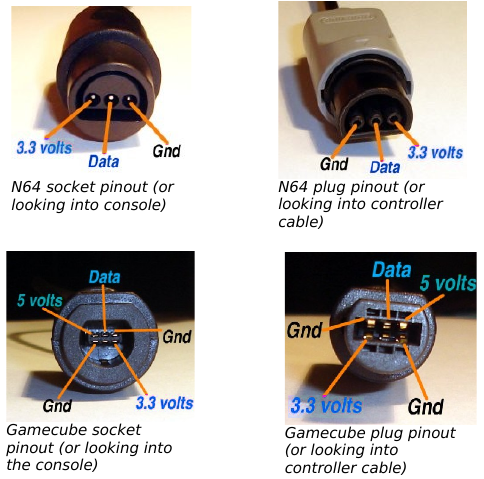
      • I highly recommend using a multi-meter to make a quick "map" of what color wire goes to what pin on the plug using the image below as a guide.
      • Image not mine, referenced from this site.
  • 2
    Next, it's time to program the Arduino.
    • There are a ton of really good guides out there for installing and using the Arduino IDE for beginners written by people much more qualified and experienced than me, so I'm not going to try and go into all that detail here.
    • Instead, I'll cover the steps using the terms you can google/YouTube as needed to get yours up and running. I'll try to link to general instructions as well.
    • Install the Arduino IDE.
    • Use the Board Manager to make sure you have the Arduino Leonardo (or Pro-Micro) installed and available.
    • Use the Library Manager to install the following libraries (as named in Library Manager):
      • Nintendo by NicoHood
      • MIDI Library by Francois Best
      • MIDIUSB by Gary Grewal
    • Download the latest code from the Code section of the GitHub for whichever device you're building.
    • Connect your device via USB and upload the code (see section 5 of link for an example).
  • 3
    Time to play!

    Hook it up and start playing! Details on exactly what channels/notes are used and the full MIDI Implementation are available in the User Manuals on my website

    I go over the various controls in the Tech Demo videos, and quick reference images for the mode mappings are available in the Files section if you prefer a quick visual.

View all 4 instructions

Enjoy this project?

Share

Discussions

Similar Projects

Does this project spark your interest?

Become a member to follow this project and never miss any updates