-
1First, you'll want to build the hardware.
- Follow the link to the GitHub page for whichever unit you want to build and pull up the Schematic section. This will show you how to make all the connections.
- I've also included the schematic in the Files section.
- The only difference between the two units is the controller connections for the extension cable.
- Note that on the Schematic, all connections are listed for the Gamecube device. If building the N64, only connect the 3.3v, GND, and Data connections, and just disregard the others.
- Cut off the socket (female) end of the extension cable, and expose and strip the wires inside.
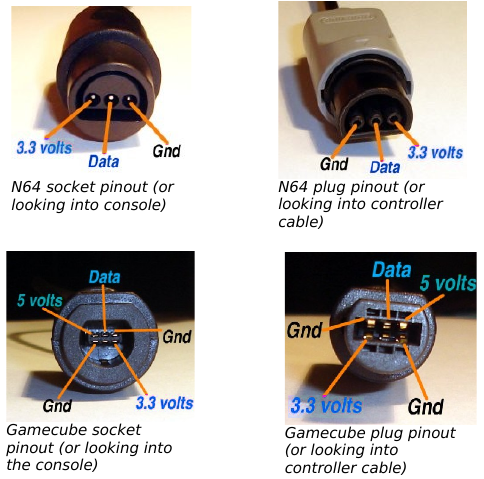
- I highly recommend using a multi-meter to make a quick "map" of what color wire goes to what pin on the plug using the image below as a guide.
- Image not mine, referenced from this site.
![]()
- Follow the link to the GitHub page for whichever unit you want to build and pull up the Schematic section. This will show you how to make all the connections.
-
2Next, it's time to program the Arduino.
- There are a ton of really good guides out there for installing and using the Arduino IDE for beginners written by people much more qualified and experienced than me, so I'm not going to try and go into all that detail here.
- Instead, I'll cover the steps using the terms you can google/YouTube as needed to get yours up and running. I'll try to link to general instructions as well.
- Install the Arduino IDE.
- Use the Board Manager to make sure you have the Arduino Leonardo (or Pro-Micro) installed and available.
- Use the Library Manager to install the following libraries (as named in Library Manager):
- Nintendo by NicoHood
- MIDI Library by Francois Best
- MIDIUSB by Gary Grewal
- Download the latest code from the Code section of the GitHub for whichever device you're building.
- Connect your device via USB and upload the code (see section 5 of link for an example).
-
3Time to play!
Hook it up and start playing! Details on exactly what channels/notes are used and the full MIDI Implementation are available in the User Manuals on my website.
I go over the various controls in the Tech Demo videos, and quick reference images for the mode mappings are available in the Files section if you prefer a quick visual.
-
4(Optional) Custom Coding:
I highly recommend getting the device working with the default code first. But once it's working, you can customize the code to make your device work exactly how you want.
The first section of the device code has all the various settings for MIDI channels, notes, CC values and ranges that can all be edited without any coding knowledge. Read through my notes on each value to see what it does and play around tweaking it to work exactly how you want!
N64 and Gamecube Controller MIDI Interfaces
Use N64, Gamecube, and even Donkey Kong Bongo controllers to control synthesizers, DAWs, and more!
 Po8aster
Discussions
Become a Hackaday.io Member
Create an account to leave a comment. Already have an account? Log In.