Close
0%
0%

CM6 - Compliant 3D printed robotic arm

Cheap, Open-source, safe, and compliant 6 - Axis 3d printed robotic arm based on Quasi direct drive BLDC drives.

Similar projects worth following
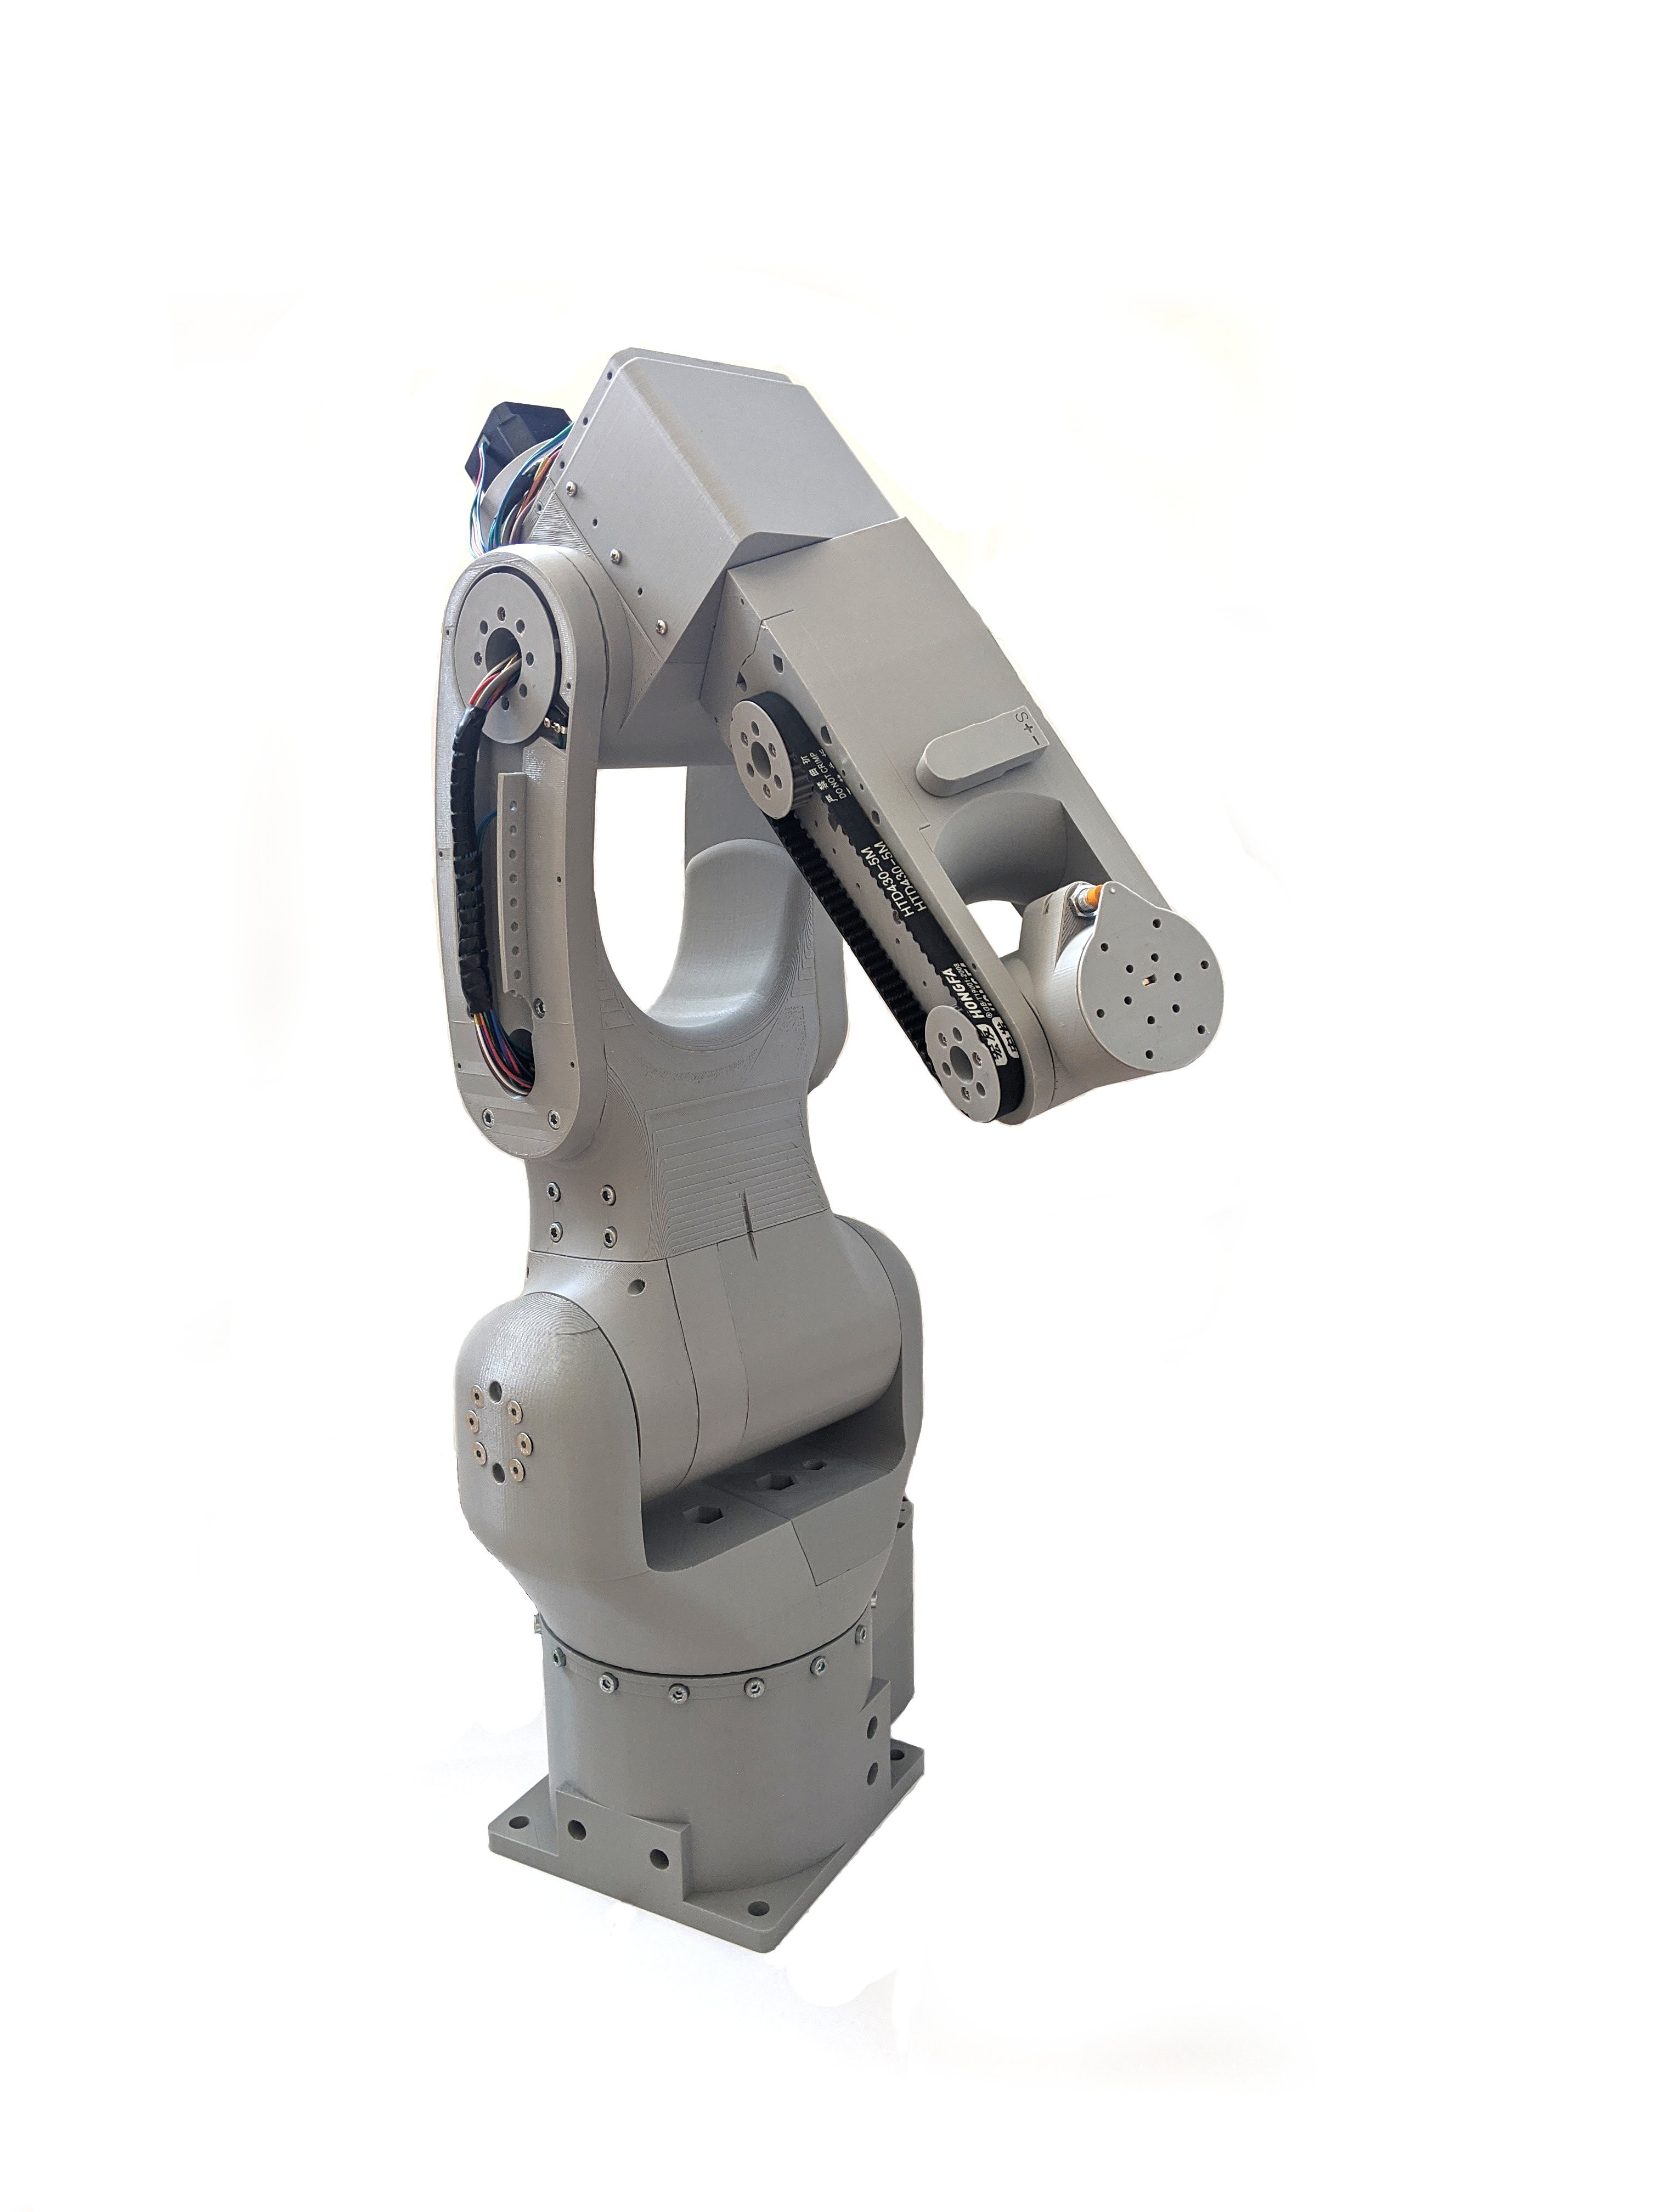
The goal of CM6 is to be a go-to robotic arm framework for people interested in robotics. CM6 uses 6 gimbal BLDC motors paired with small gear ratio gearboxes ( from 5:1 to 9:1), by doing that it is passively compliant and safe. Each Joint is using an S-Drive BLDC driver that is mounted on modular actuator designs for specific gimbal motors. Design can be changed easily by using different size aluminum extrusions or changing the gear ratio of modular gearboxes.

The total price of this first version is around 1000 dollars in raw materials. But I believe that the future version could be pushed to around 700-800 dollars.

Find out more at: https://source-robotics.com/

Join forum: https://discourse.source-robotics.com

Join discord: https://discord.gg/prjUvjmGpZ


The Problem

Today every engineer, maker, and tinkerer can get access to a decent 3D printer for less than 300$ and start creating. Many of those people that have 3D printers also want to play and experiment with robotic arms that are close to the size or performance of human arms. While industrial robotic arms are too expensive, the only alternative is DIY robotic arms that are in most cases not really easy to program or capable of doing useful tasks.

Also, the DIY arm that will be used at home or near other people needs to be safe. That can be hard if using large reduction gearboxes or building a robotic arm that weighs a lot.

The Solution

CM6 is a robotic arm that could fill that gap. It is safe, compliant, and most of all cheap. CM6 is a 3D printable COBOT robotic arm that uses QDD (Quasi direct drive actuators). QDD gives CM6 passive compliance which makes it behave like a human arm. 

Actuators

Actuators of choice for CM6 unlike most DIY robotic arms are BLDC gimbal motors. Also, this robot arm uses small reduction gearboxes (from 5:1- 9:1). These two aspects are what make this arm different from other arms. The inherited high torque and low-speed operation of BLDC gimbal motors allow great responsiveness to external disturbances and accurate current measurement. Paired with a small reduction gearbox to increase the torque a bit but still keep those great aspects of BLDC are crucial to the operation of this arm.
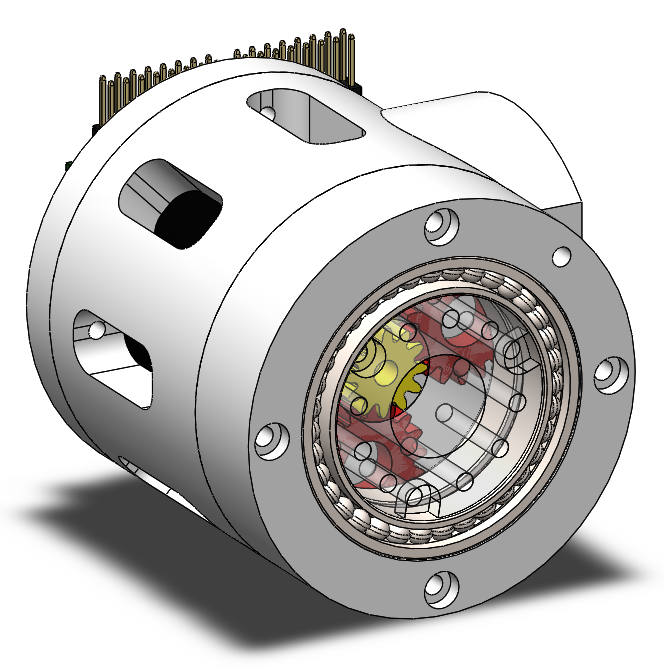
All actuators of this robot are 3d printed planetary gearboxes with single-stage reduction. They are designed to be easy to print, compact and most of all modular. With just a few changes in design, you can get a smaller / larger reduction or even add another reduction stage.

BLDC drivers
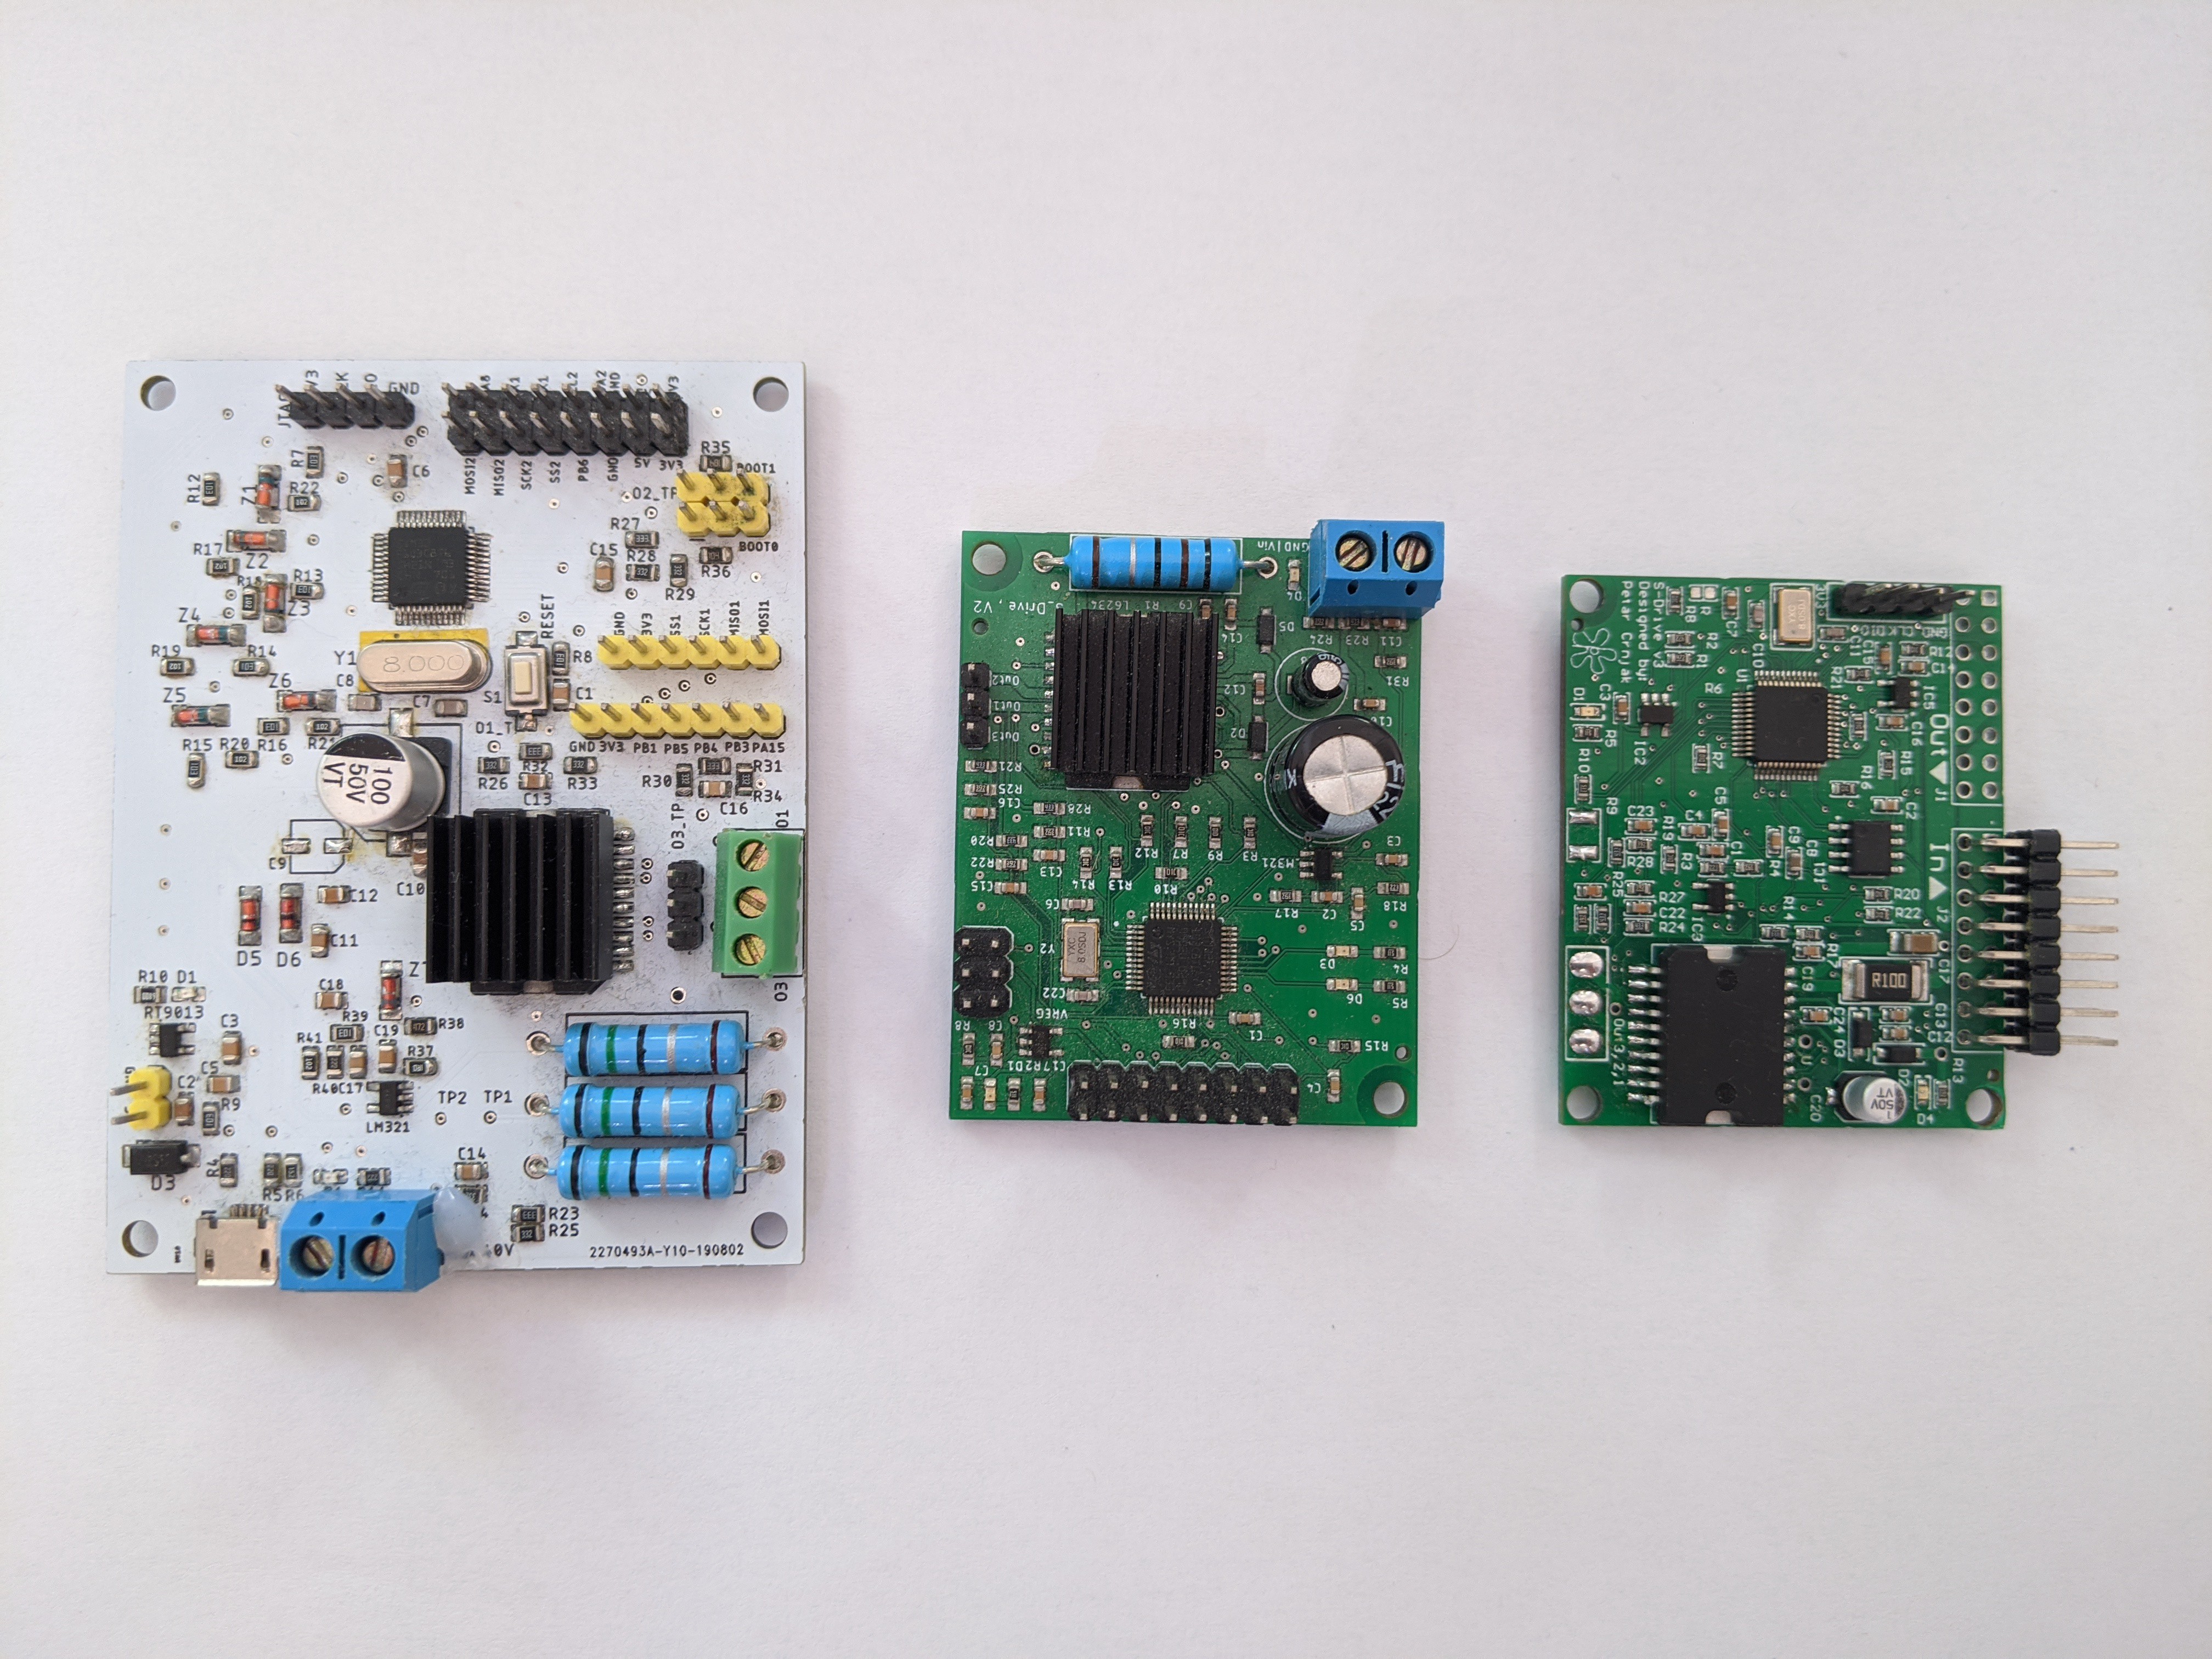
BLDC drivers are custom-made and are called S-Drive (Small drive). In the picture above you can see the evolution of the design, with the right one being the newest one. The goal of these drivers was to use the smallest amount of components possible and to keep the price low. 
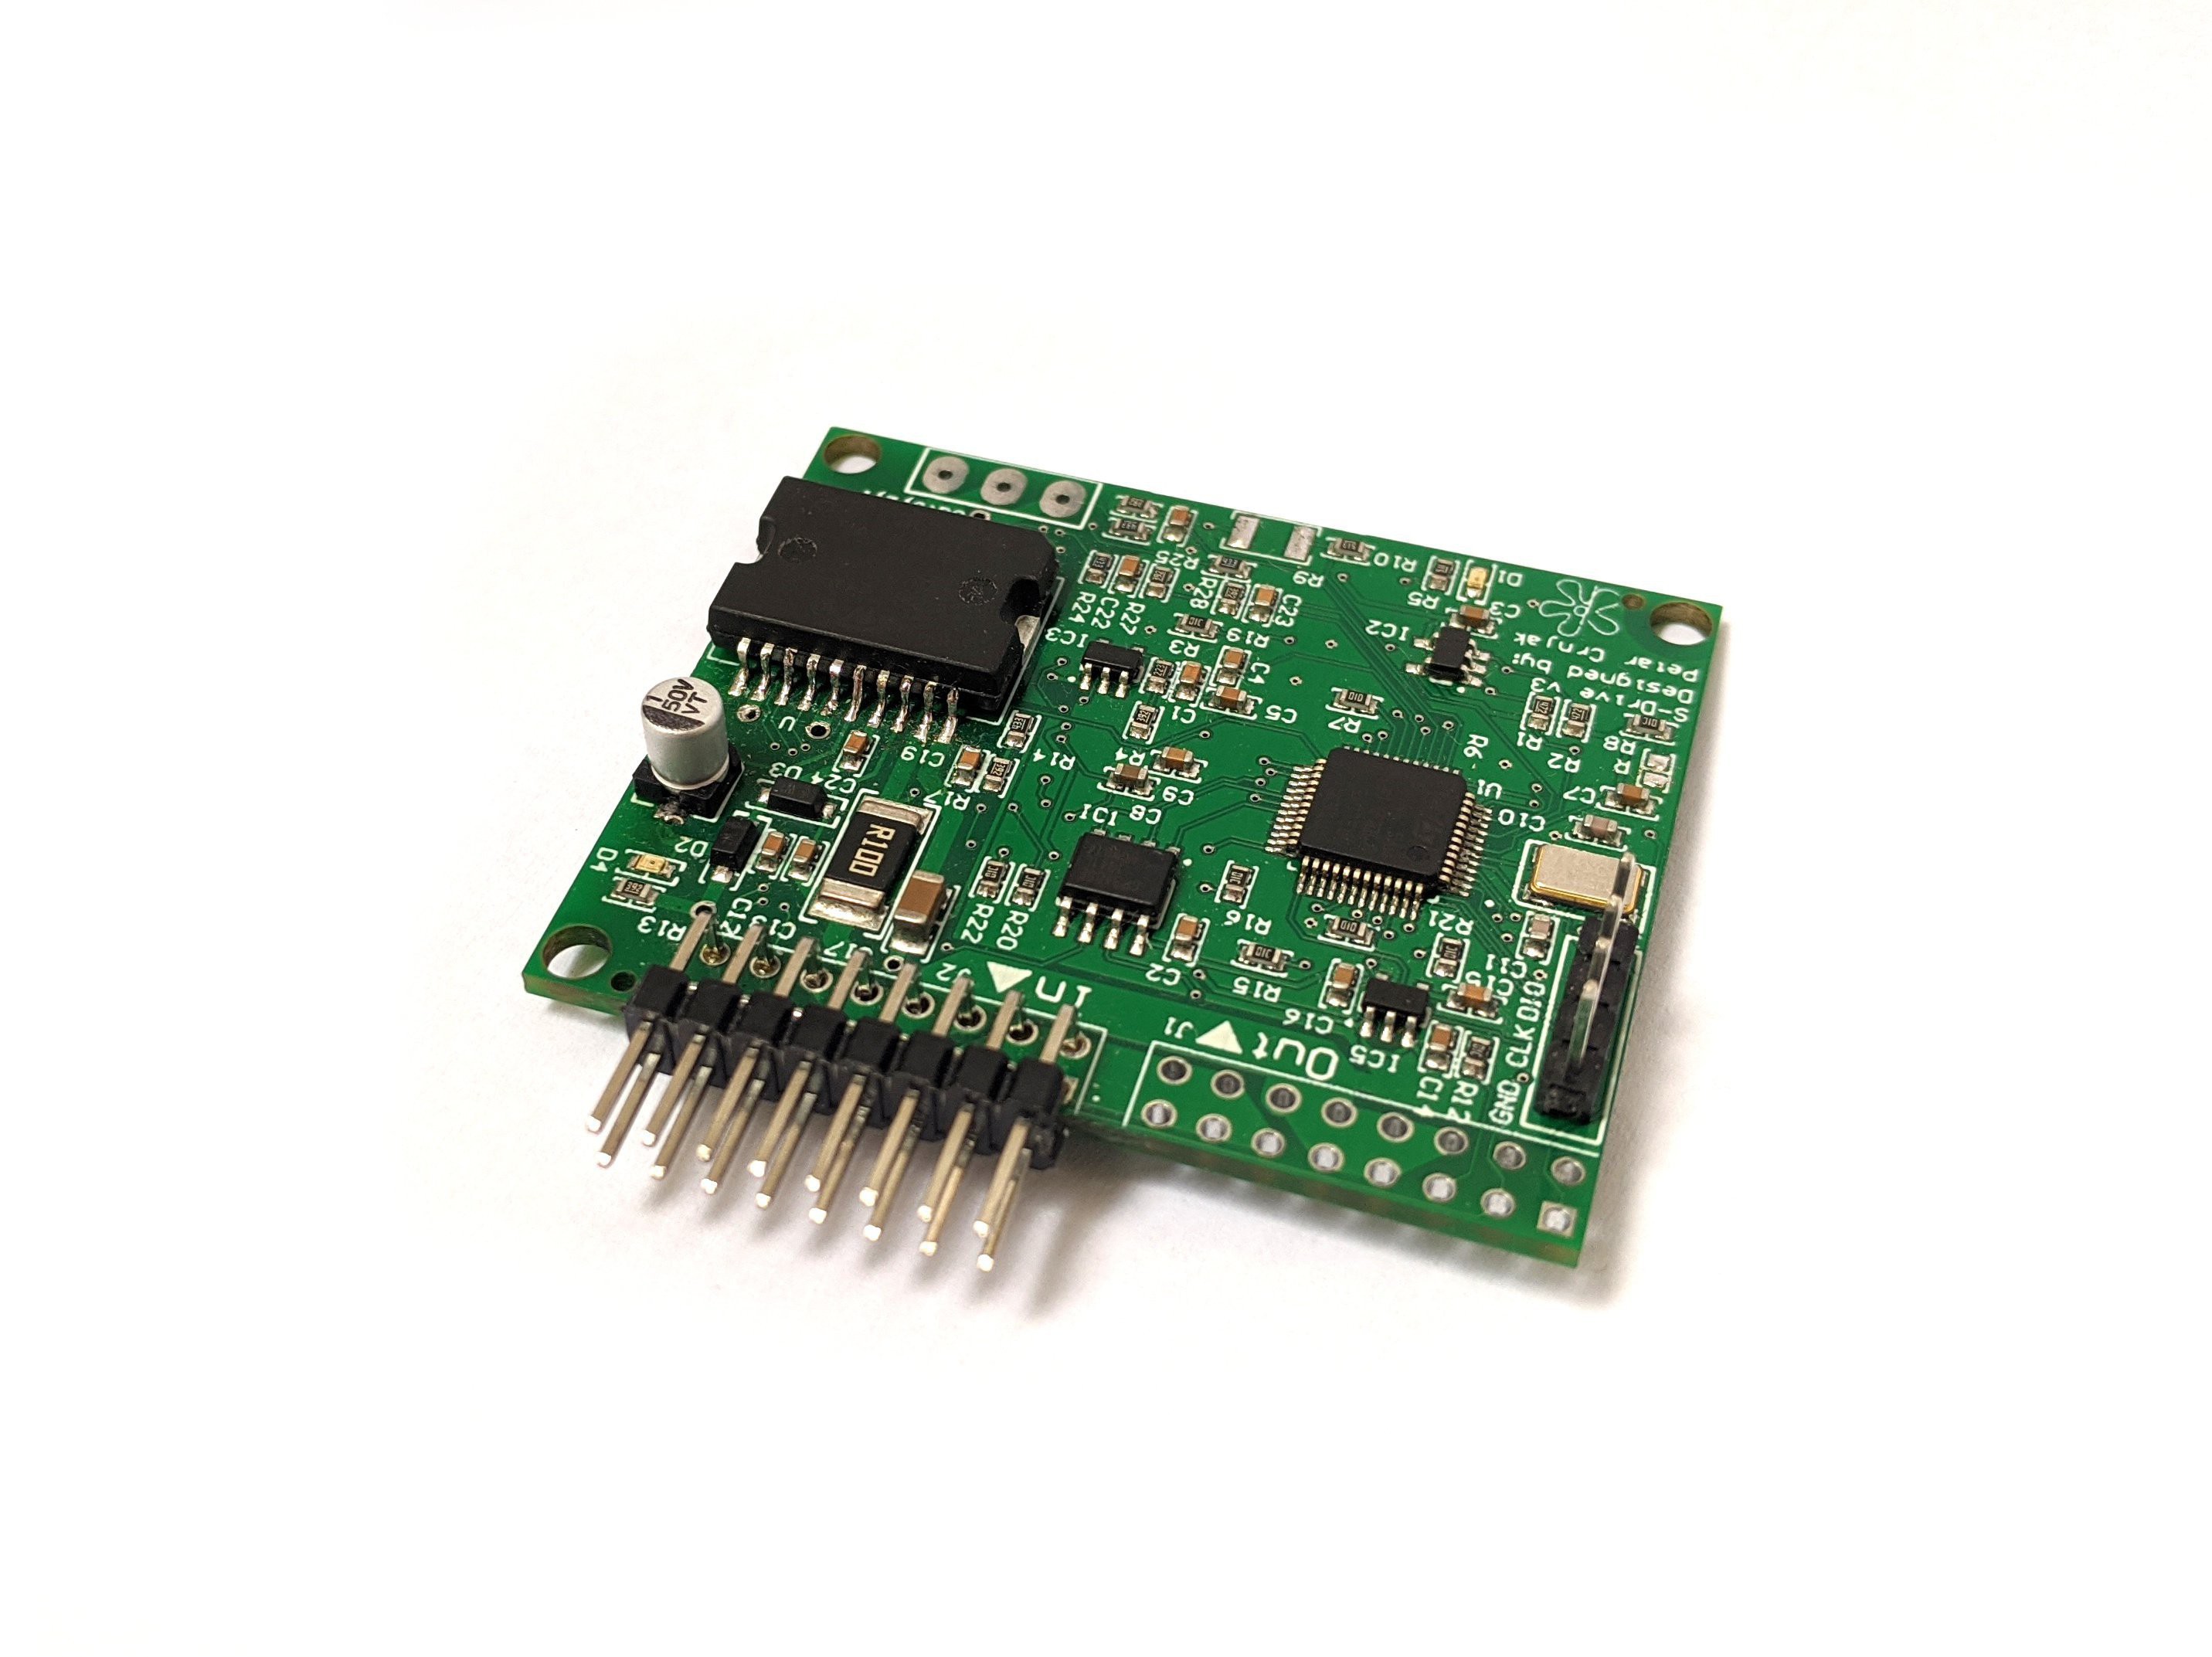
Key features of the driver are: 

  • L6234 Three-phase motor driver
  • AS5040 10 bit encoder
  • stm32f103c ARM M3 microcontroller
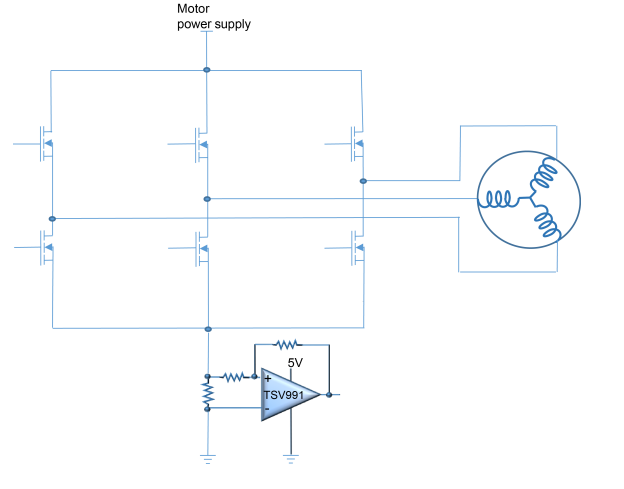
  • global low side current sensing
  • UART and RS485 comms

More info on the driver: Hackaday page! Github page with firmware or DOCS.

Lightweight mechanical design 

The whole robot (including base holders) weighs less than 5kg. This is achieved by using aluminum profiles to connect parts and using low infill PETG 3d printed parts.

Easy to use software

Another important part of this project was to have software that makes programing robots "easy". GUI software was written in python and heavily relies on Petar Corke's robotic toolbox for python! It was tested on Linux virtual machine, laptop running Linux, and raspberry pi 4!

The software offers real-time monitoring of robots:

  • Motor position, current, speed, temperature
  • End effector position
  • Operating modes, errors...

Available modes at this moment are:

  • Individual motor jogging 
  • freehand teach 
  • move from point to point 

Each of these modes of movement can be recorded and replayed!
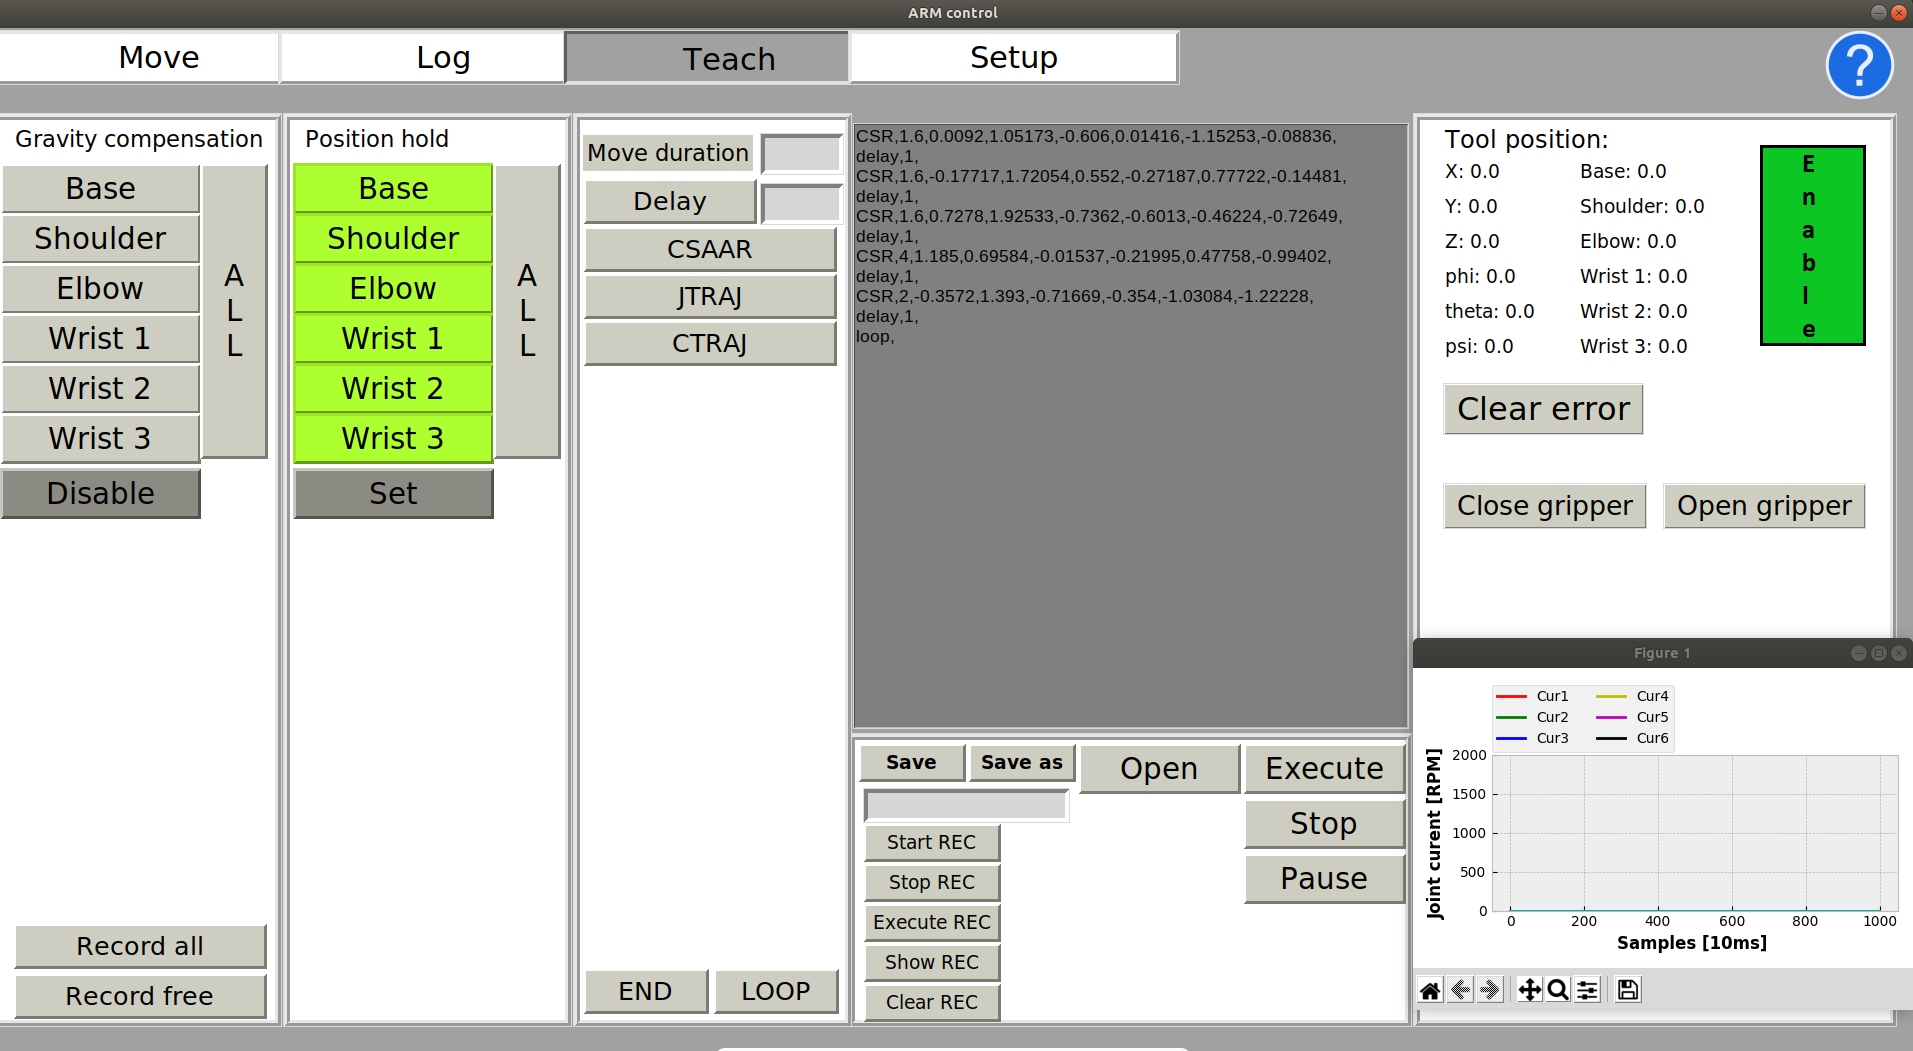
  • This is an image of Teach menu. Here you can program your robot by writing code in "gray window" or by freehand movements.
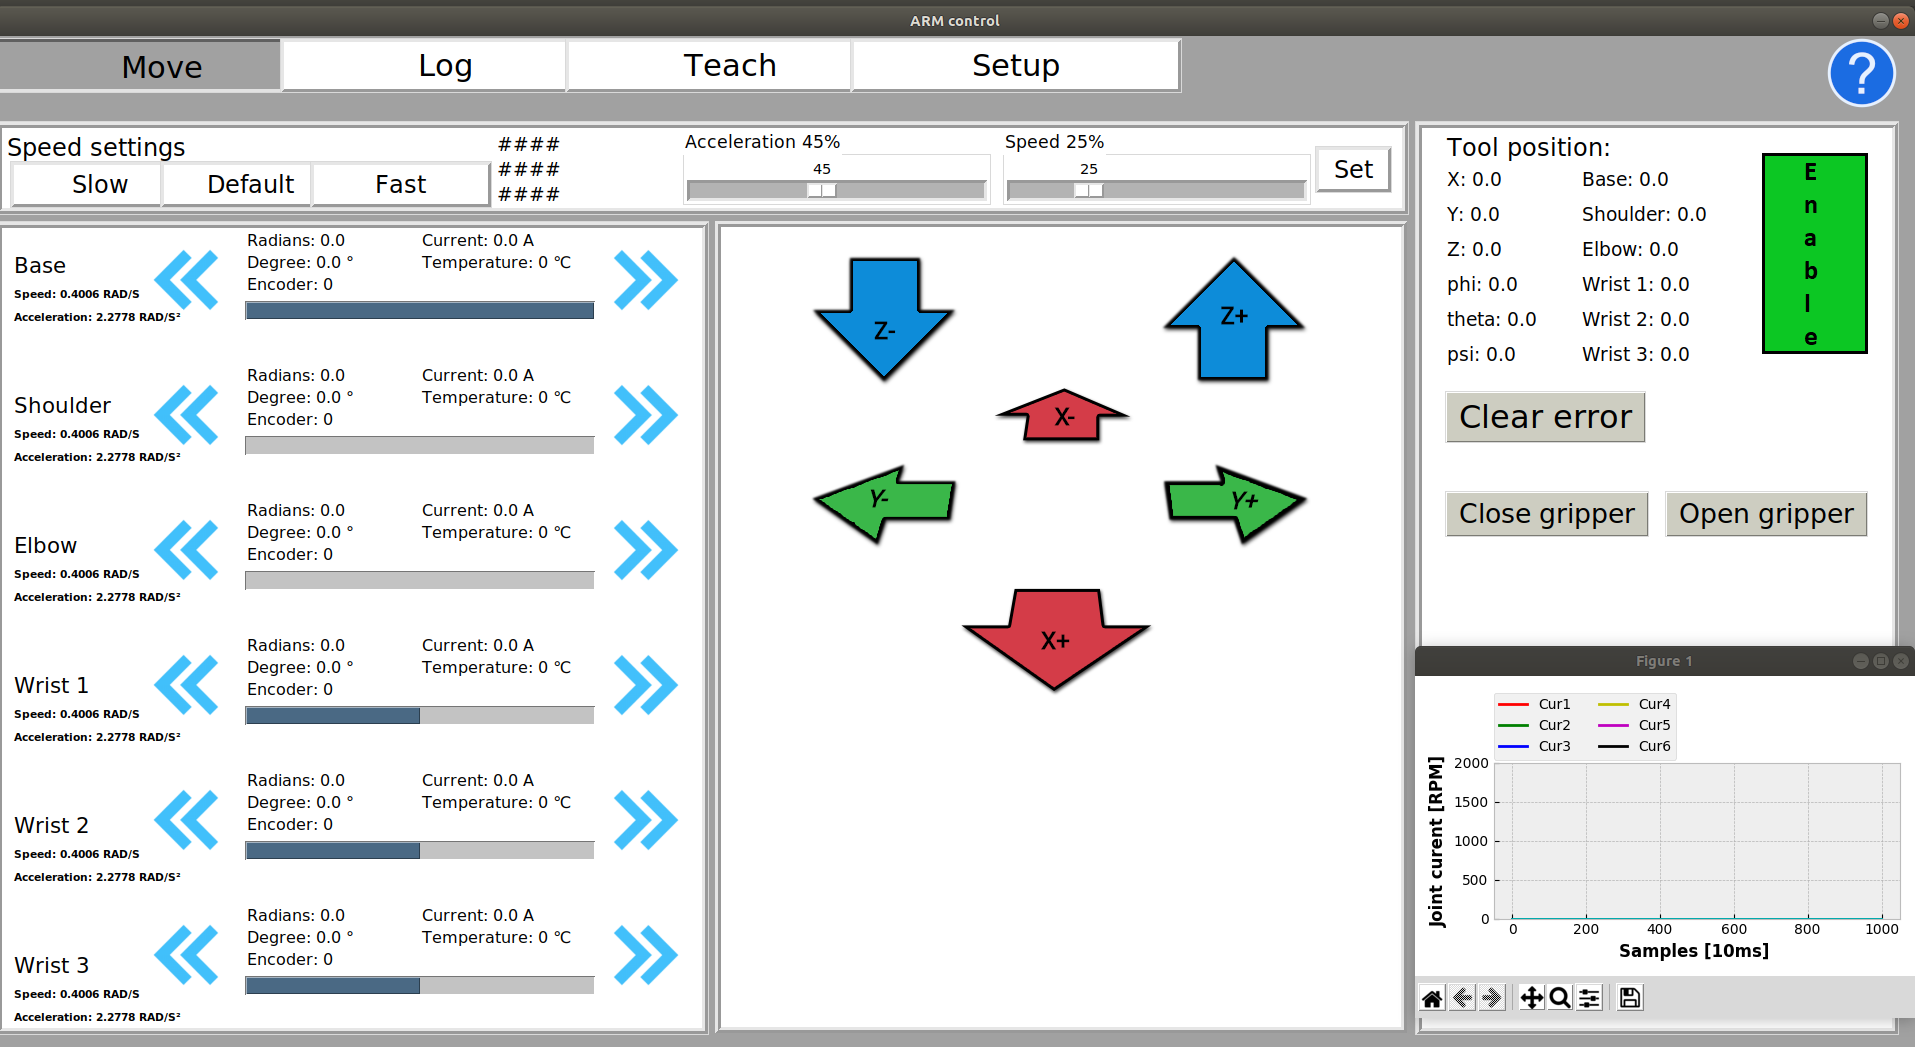
  • This is Move menu of the GUI. It allows you to jog individual motors and in the near future jog robot by XYZ.

Operation 

Specs

  • Weight: 5kg
  • Reach: 
  • repeatability: +- 0.5mm (Needs visual servoing like human arms to be really precise)
  • Max load: 3kg (limited reach)
  • Voltage: 24V 
  • Max motor current: 5A (limited by the motor driver)
  • Power supply power: recommended 24V/10A 

CM6_BOM.xlsx

Current BOM for CM6.

sheet - 10.83 kB - 08/31/2021 at 18:13

Download

simply.zip

Simplified assembly of this robot arm made in Solidworks.

x-zip-compressed - 9.21 MB - 06/29/2021 at 18:48

Download

STEPS_ALL.zip

All step files for this robot.

x-zip-compressed - 4.78 MB - 06/29/2021 at 18:48

Download

  • 7 × Radial Ball bearing 35x47x7
  • 3 × Radial Ball bearing 50x67x7
  • 4 × Radial Ball bearing 25x32x4
  • 4 × Radial Ball bearing 3x8x4
  • 1 × Thrust Ball Bearing 50x70x14

View all 29 components

  • New version of the robot!

    Petar Crnjak05/10/2024 at 15:42 0 comments

    This is v2 of CM6 robotic arm. Big update is use of new motor drivers called spectral micro! More info will be coming soon!

    In these clips you can see simulator working with CM6 and compliance control of the robot!

  • Forum and discord

    Petar Crnjak03/23/2024 at 11:32 0 comments
  • Control algorithm used for motors

    Petar Crnjak10/27/2021 at 18:54 0 comments

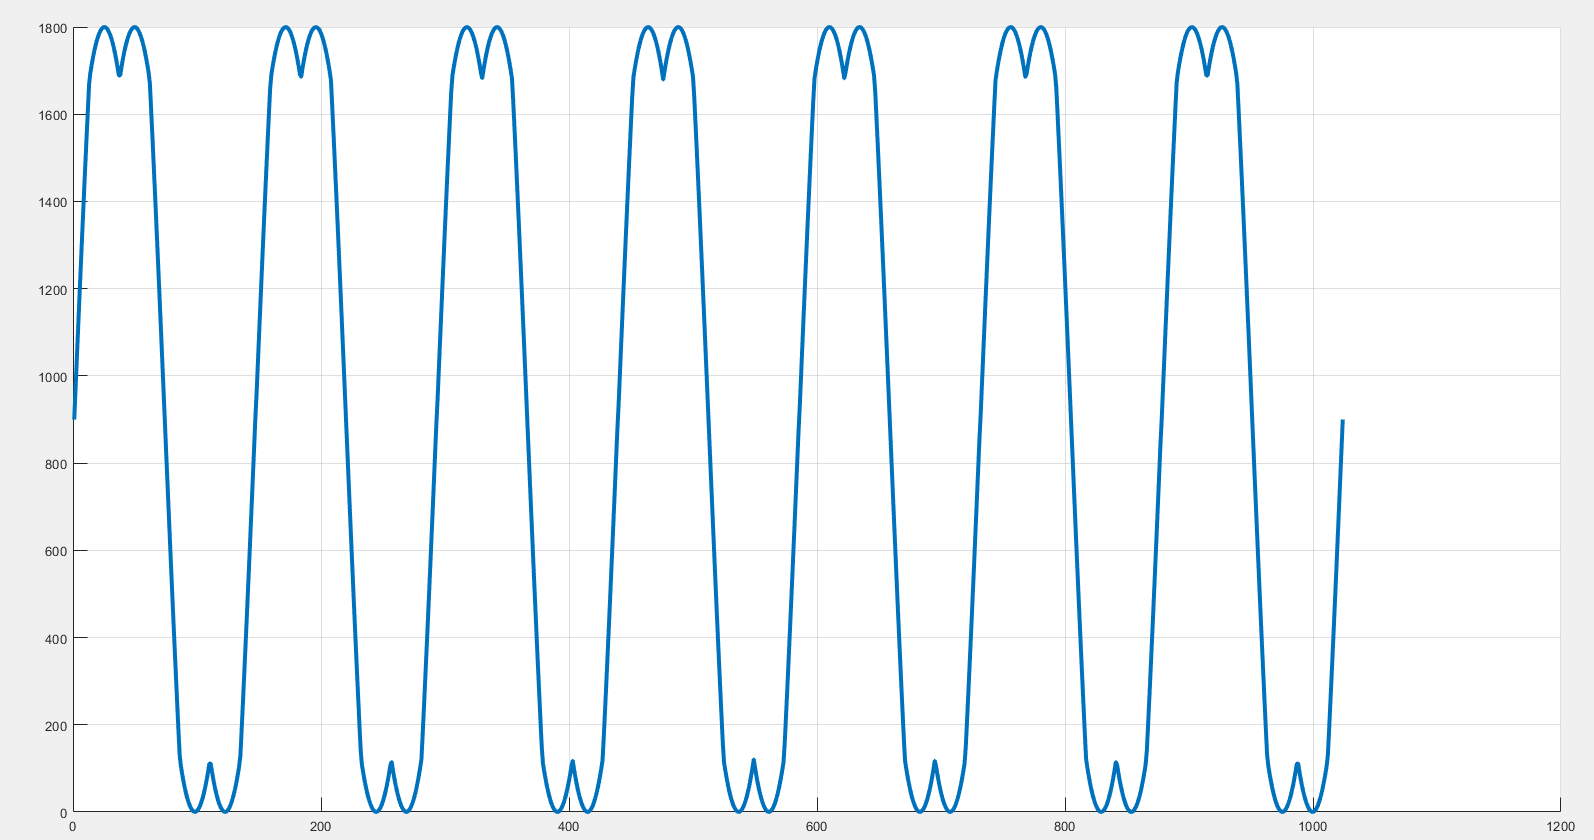
    In S-drive controller I used a 10-bit encoder. The encoder is connected to the output shaft of the BLDC motor. There is no encoder on the output shaft after the reducer. That means that one revolution of BLDC is equal to 1024 ticks of the encoder. One mechanical revolution of the motor relates to electrical resolutions by a number of pole pairs. For example, here I will use a motor with 11 pole pairs (22 poles). Now when we know the number of pole pairs of our motor we generate a sine table or space vector table that has a number of sine waves * number of pole pairs and fit it in an array of 1024 elements ( equal to our encoder resolution ). Link to the generator for that table (Matlab), (Python)

    **This image is for 7 pole pair motor**

    Max amplitude value of those sine and space vectors will be equal to the max duty cycle of our PWM module (it usually depends on the frequency we are switching our pwns) In my example, we are using 40khz switching and we have a max duty range of 0-1800 ( 0 – 100% duty cycle).

    We can then adjust our sines amplitude by just dividing values in our table by some constant.

    Now we need to create 90 deg magnetic field between the robot and stator. To do that we first align the rotor field to the stator by applying PWM on all the phases from sine table and offsetting them by 120 deg. For example, we have 11 pole pair motors. One period of the sine wave will be represented by 1024/11 = 93 elements of the array. Now to align the motor we will apply the value of sine table[0] to phase 1. For phase 2 we will apply sinetable[0] + 120 deg offset. If 93 represents 360 deg; 120 deg = 93 / 3 = 31 so value of phase 2 will always be offset for + 31 from phase 1. That means that phase 3 will be offset from phase 2 for 31, or for 62 from phase 1. After we did this alignment rotor and stator fields will have 0 deg between them, They will be locked in position. Now we tell our encoder that this current position is equal to 0. After that, We map encoder ticks to the sine table but with an extra 90 deg offset ( 90 deg is equal to 93 / 4 = 22)!! So for example for encoder position 0 we would use element value sinetable[encoder_tick + 0 deg offset + 90 deg offset] that would equal in our case  sinetable[ 0 + 0 + 22] for phase 2 it would be sinetablae[ 0 + 31 + 22], for phase 3 it would be sinetablae[ 0 + 31 + 44] And that is it, Motor is now acting like DC motor where we can regulate speed by changing the amplitude of our sine waves (Dividing values from sine table by some value). All code is here.

  • Current sense method used

    Petar Crnjak10/18/2021 at 14:47 0 comments

    Good read about this topic and where i pulled most of the data: https://www.st.com/resource/en/application_note/an5423-current-sensing-in-bldc-motor-application-stmicroelectronics.pdf

    In this project, I used the simplest current sensing method and that is low side global current sensing. It is cheapest but generally used when you need to detect faults or some current limits. Not really good for torque control. Not really use din FOC

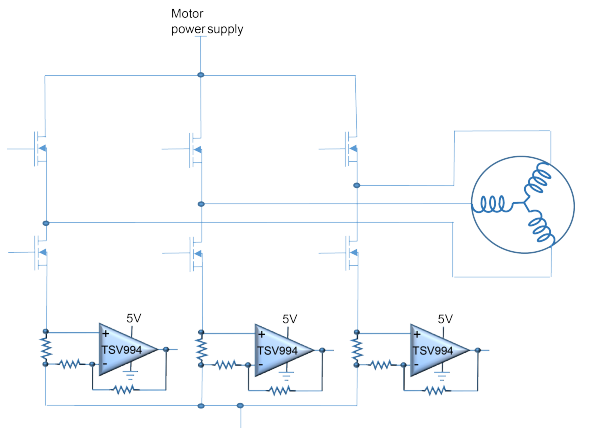
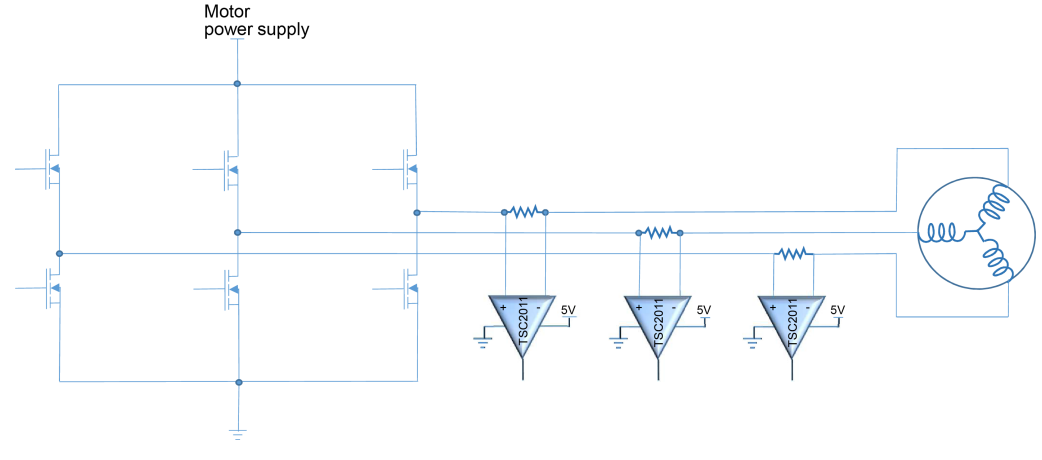
    Here are the methods I will use in the next iteration.

    The low-side configuration allows the use of a low-power op-amp as the common mode is close to the ground. This topology is largely used in FOC. The third current measurement branch is optional and can be calculated in the controller. The limitation is that low-side current sensing can only be executed while the low-side transistor of that leg is on.

    This current measurement offers the best information that can be used in feedback motor control, in order to optimize motor performance. As the shunt resistance is placed directly in line with the PWM driver, it uses dedicated current sensing, which rejects the fast common mode variation. The main advantage of this topology is that the current can be read without a strong linkage to the PWM status and without timing limitations in the case of very small PWM applied to the phase.

  • Mechanical design of the robot

    Petar Crnjak10/17/2021 at 10:06 0 comments

    General idea was to make as much as I can 3d printed without sacrificing weight. Idea was to make all joint links made out of aluminum extrusions. That was possible for the connection of joint2 and joint3. That way weight of the arm was drastically reduced, it has improved stiffness, and is cheaper. I planned to make the forearm use aluminum extrusions also but it was hard to do that and have a spherical wrist at the same time. That is definitely on the to-do list for the next iteration of the robot.

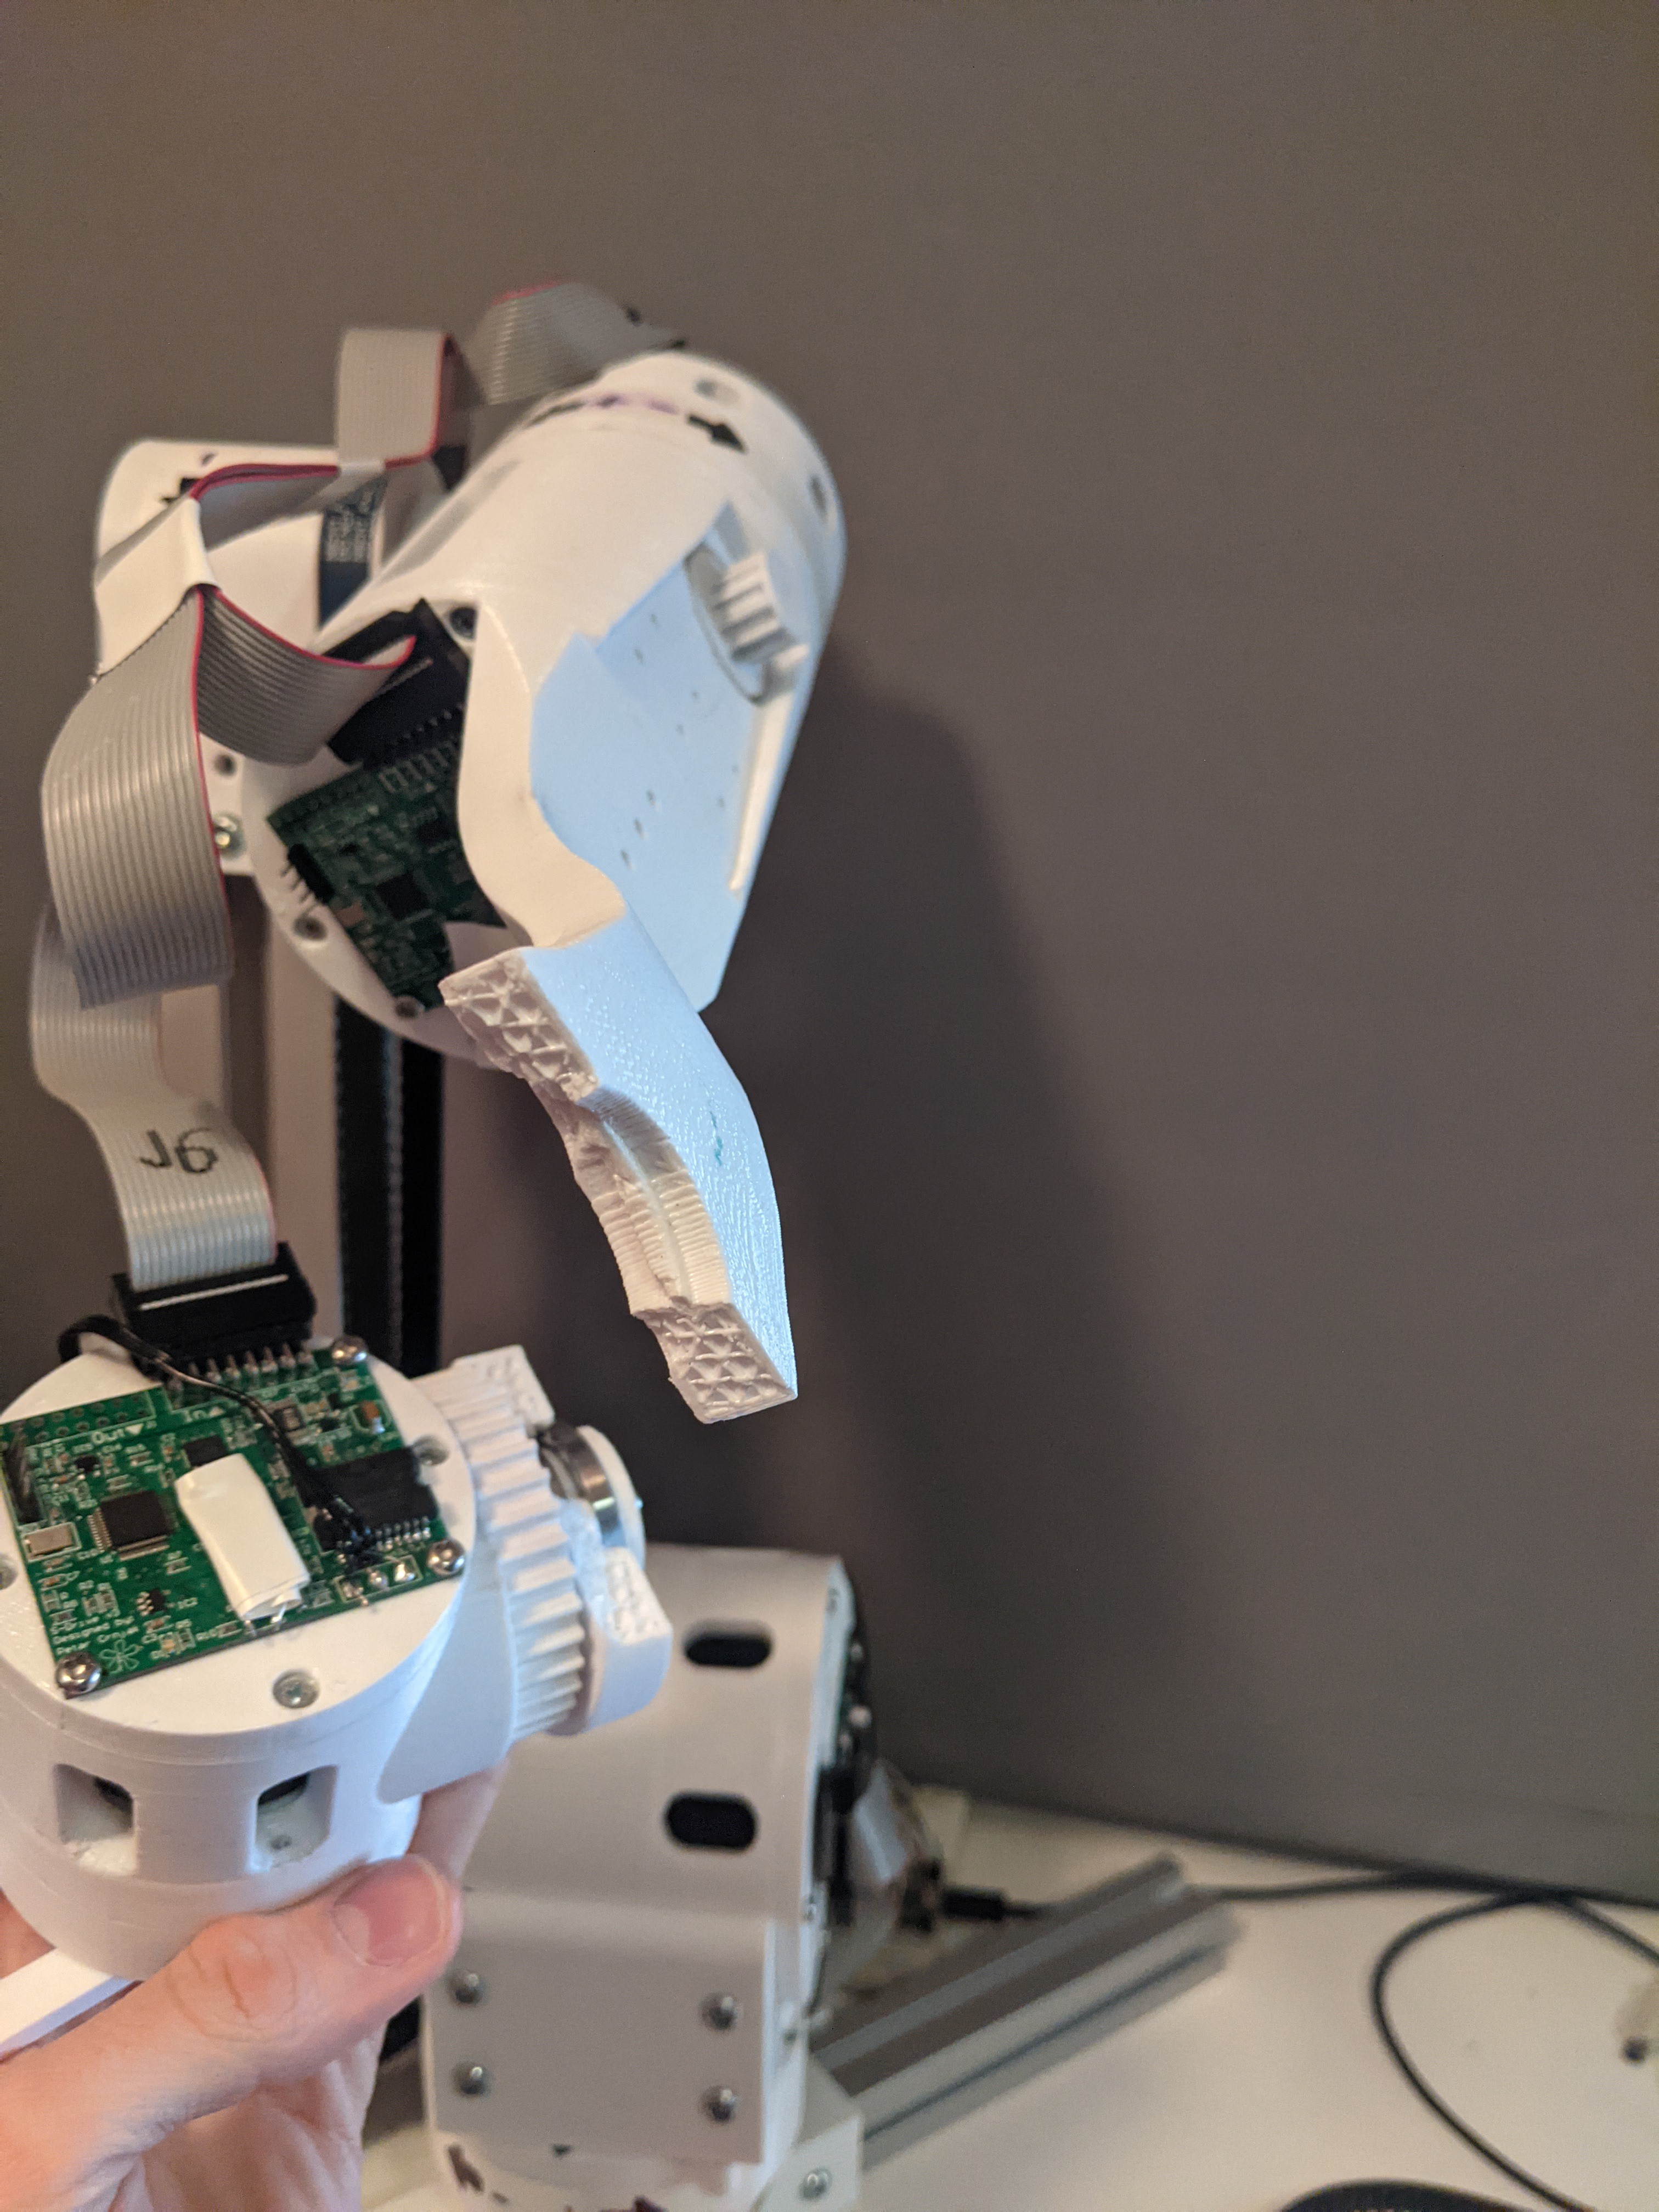
    Infill used for the most parts was around 50%. The total weight of the arm is around 5KG. The weakest point is 3d printed wrist part as you can see from the picture below where it hit my arm during testing and broke. 

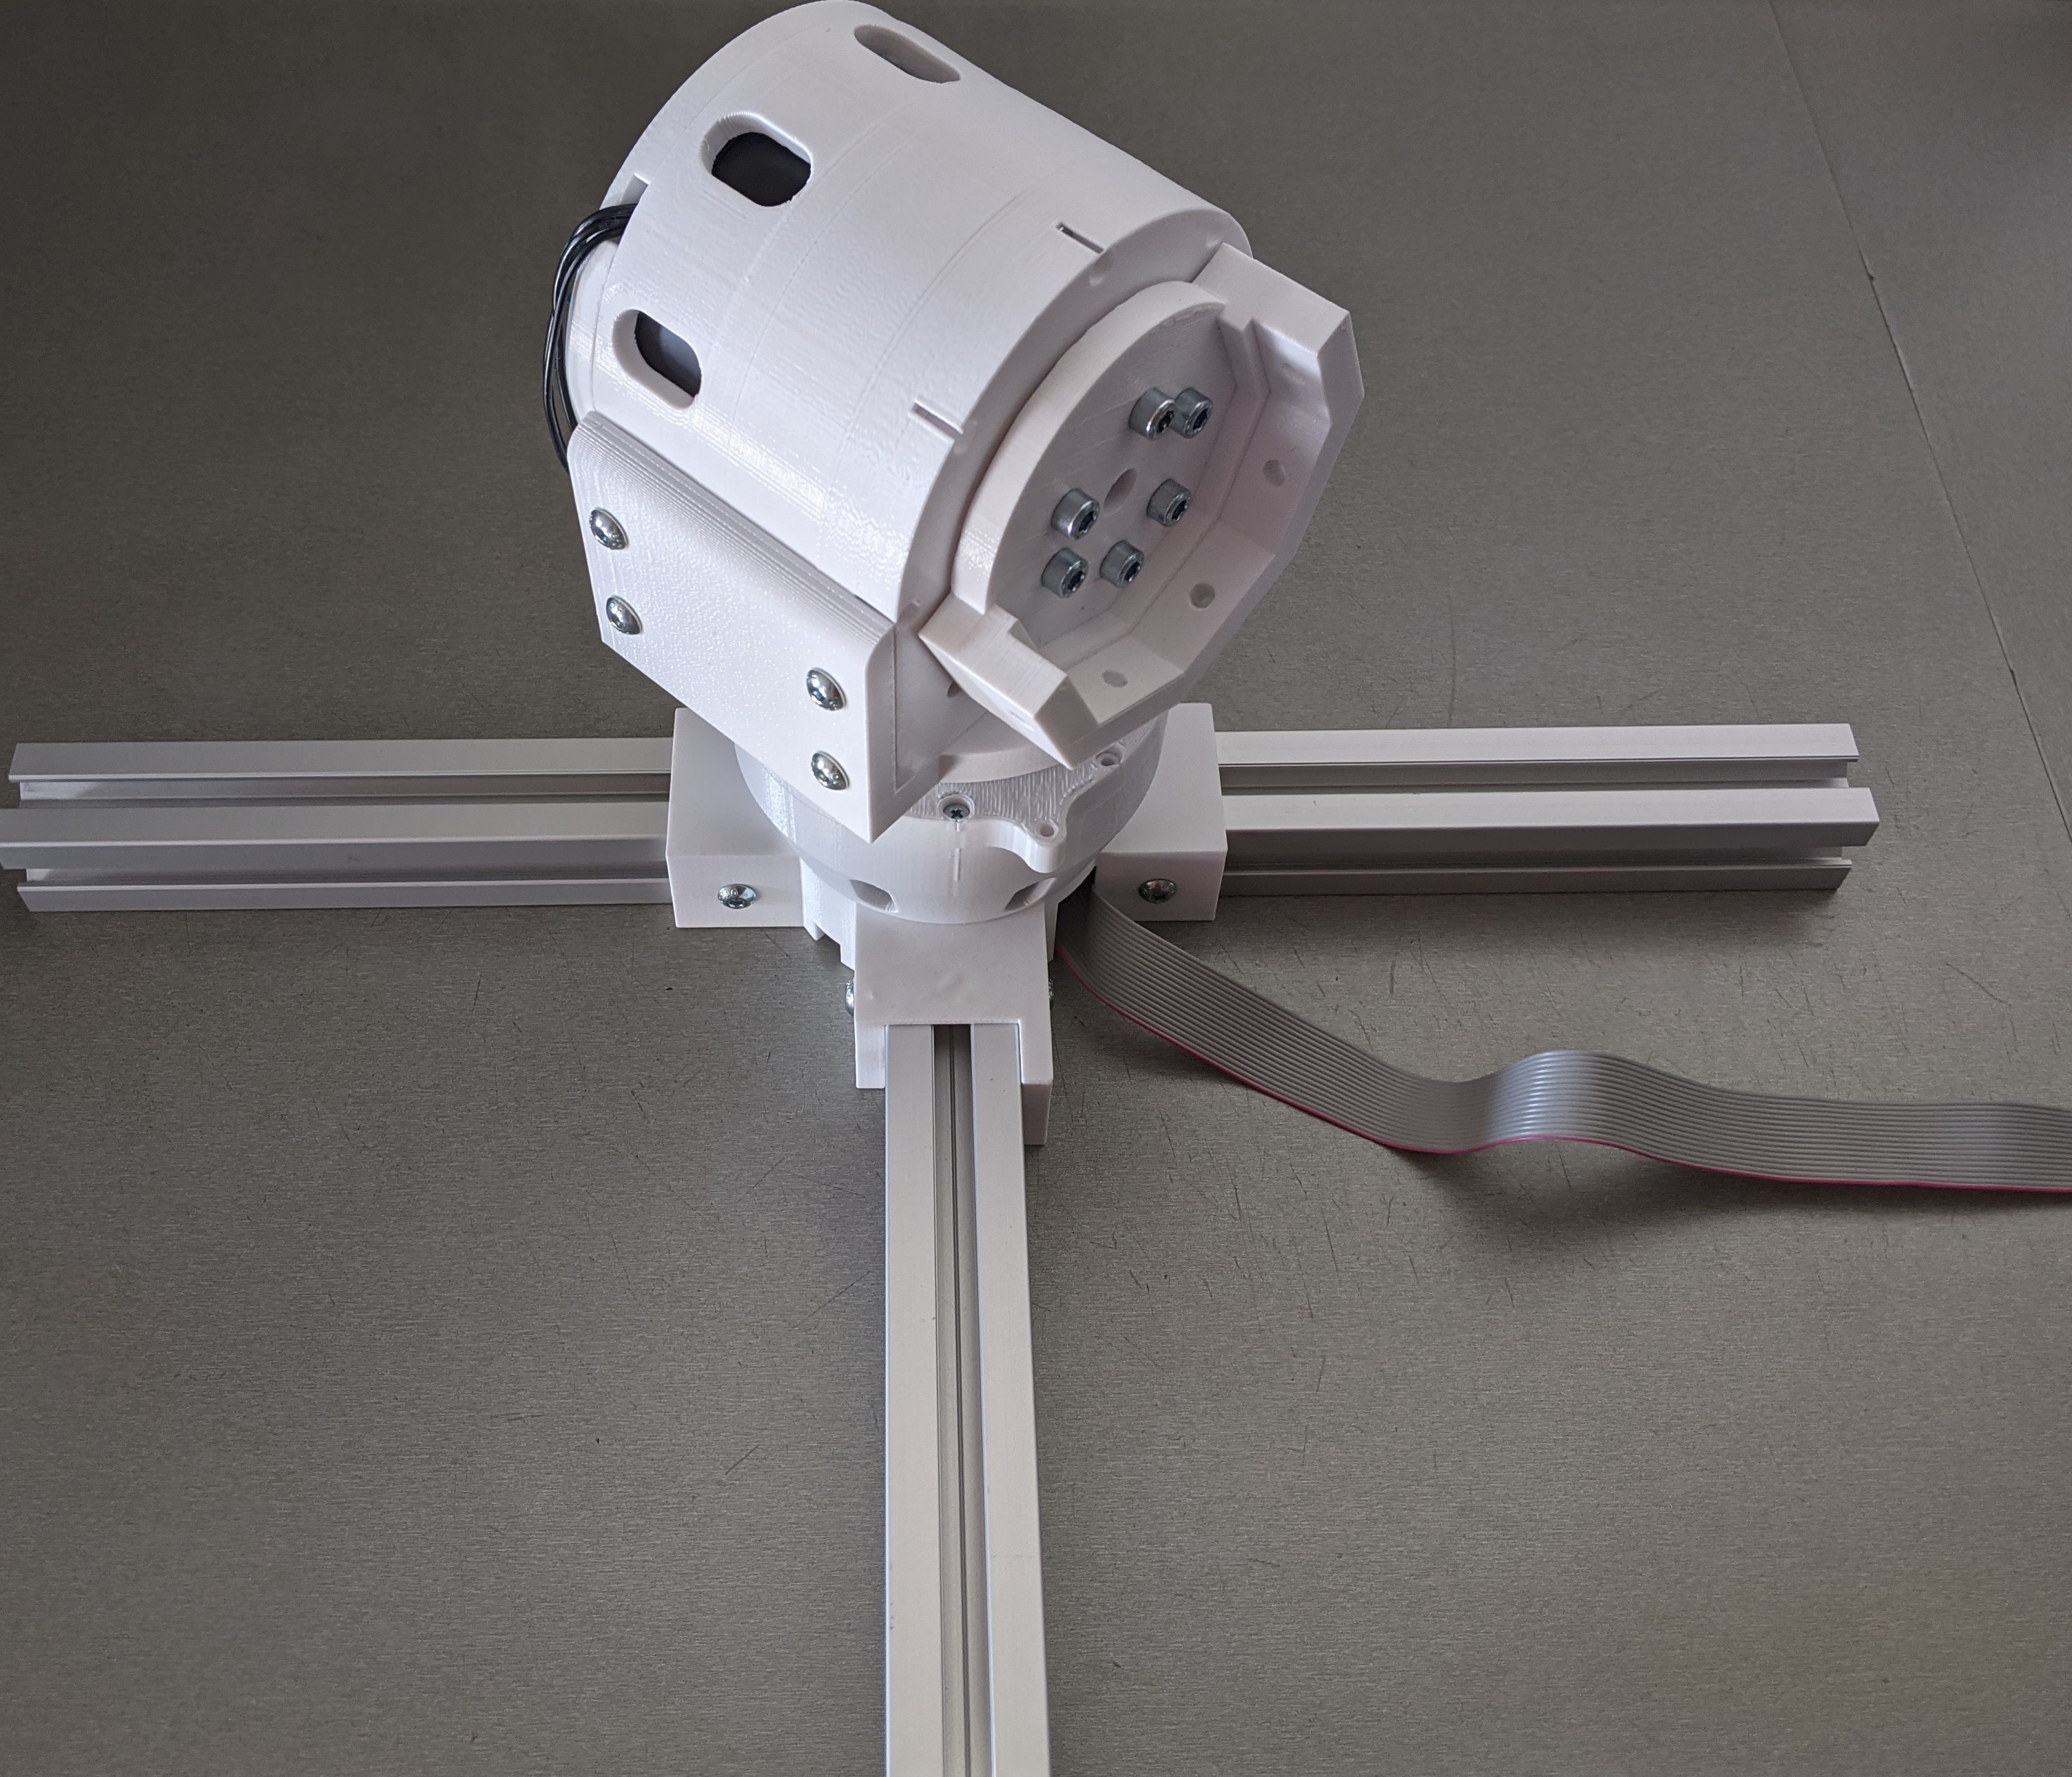
    Aluminum profiles that are on the base of the robot (joint 1) are used to secure the robot to the tables by using clamps or you can place weights on the aluminum profiles to hold the arm in place.

  • General idea of the robot

    Petar Crnjak10/09/2021 at 10:43 0 comments

    So this is more a story about how I decided to build this robot and why. Before the CM6 robotic arm, I made Faze4 robotic arm

    Faze4 is a massive 6 axis 3d printed robotic arm that weighed 15 kg. It uses 3d printed cycloidal gearboxes and stepper motors. It was designed to look nice and clean (let's not kid ourselves CM6 is crude and all over the place) but Faze4 was too massive and stiff for what I had planned to do with robotic arms. I could have closed the stepper loop with encoders but I still had problem of using heavy and inefficient steppers and not to mention high gear ratio cycloidals that are hard to backdrive. I wanted to build robotic arm like BLUE from UC Berkeley. 

    BLUE used high torque density BLDC motors, custom-made drivers, and belts to get more torque. That combination gave it quasi-direct drives, making the robotic arm compliant, able to change its stiffness, and interact safely with the environment. 

    Another project that inspired me was that of Ben Katz, where he used legs of his mini cheetah to create 2 arms that performed bilateral teleoperation.

  • Connection scheme

    Petar Crnjak09/18/2021 at 08:02 0 comments

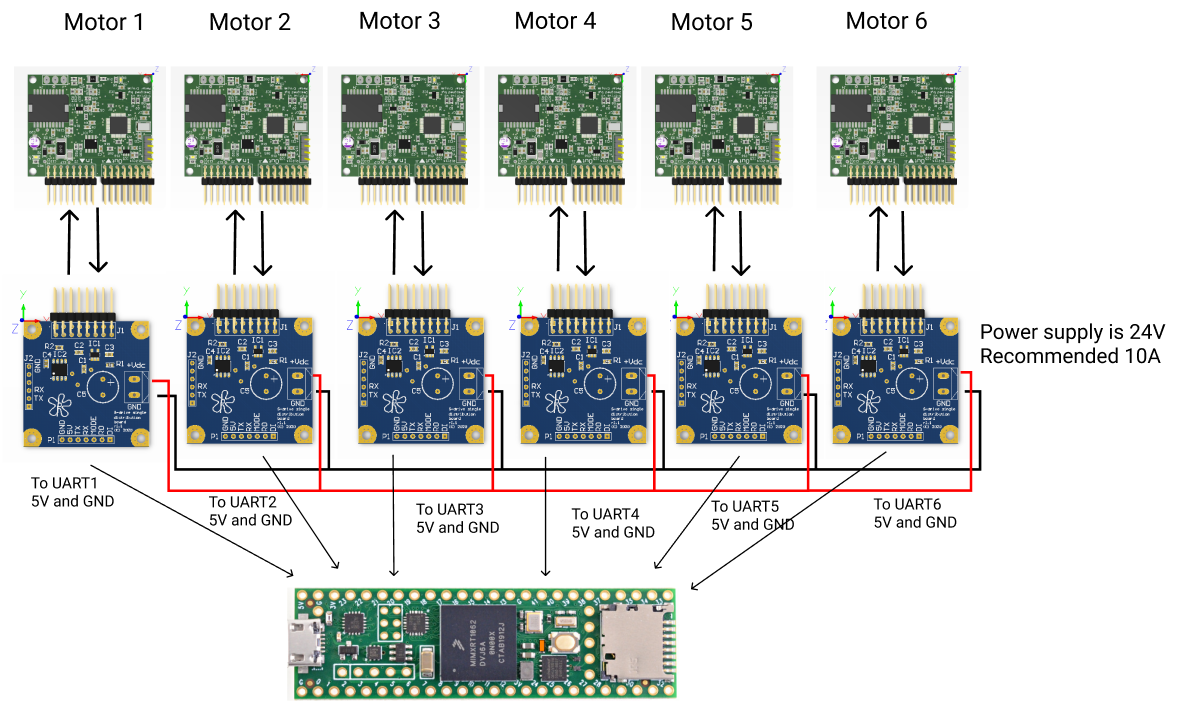
    BLDC drivers are connected to connector board using modified IDC cables. More can be found in this folder: https://github.com/PCrnjak/CM6_COBOT_ROBOT under building instructions 

    • RX1 = PIN0
    • TX1 = PIN1
    • RX2 = PIN7
    • TX2= PIN8
    • RX3= PIN15
    • TX3 = PIN14
    • RX4= PIN16
    • TX4 = PIN17
    • RX5 = PIN21
    • TX5 = PIN20
    • RX6 = PIN25
    • TX6 = PIN24

    Each distribution board is connected to 24V thru screw terminals. Also each distribution board needs to be connected to 5V and GND.

  • BLDC driver needed libraries

    Petar Crnjak09/18/2021 at 07:12 0 comments

    Added folder with needed libraries for S-drive bldc driver.

    https://github.com/PCrnjak/S-Drive-Firmware 

  • Excel BOM on github!

    Petar Crnjak09/13/2021 at 16:31 0 comments
  • Distribution/connector board info!

    Petar Crnjak09/13/2021 at 16:26 0 comments

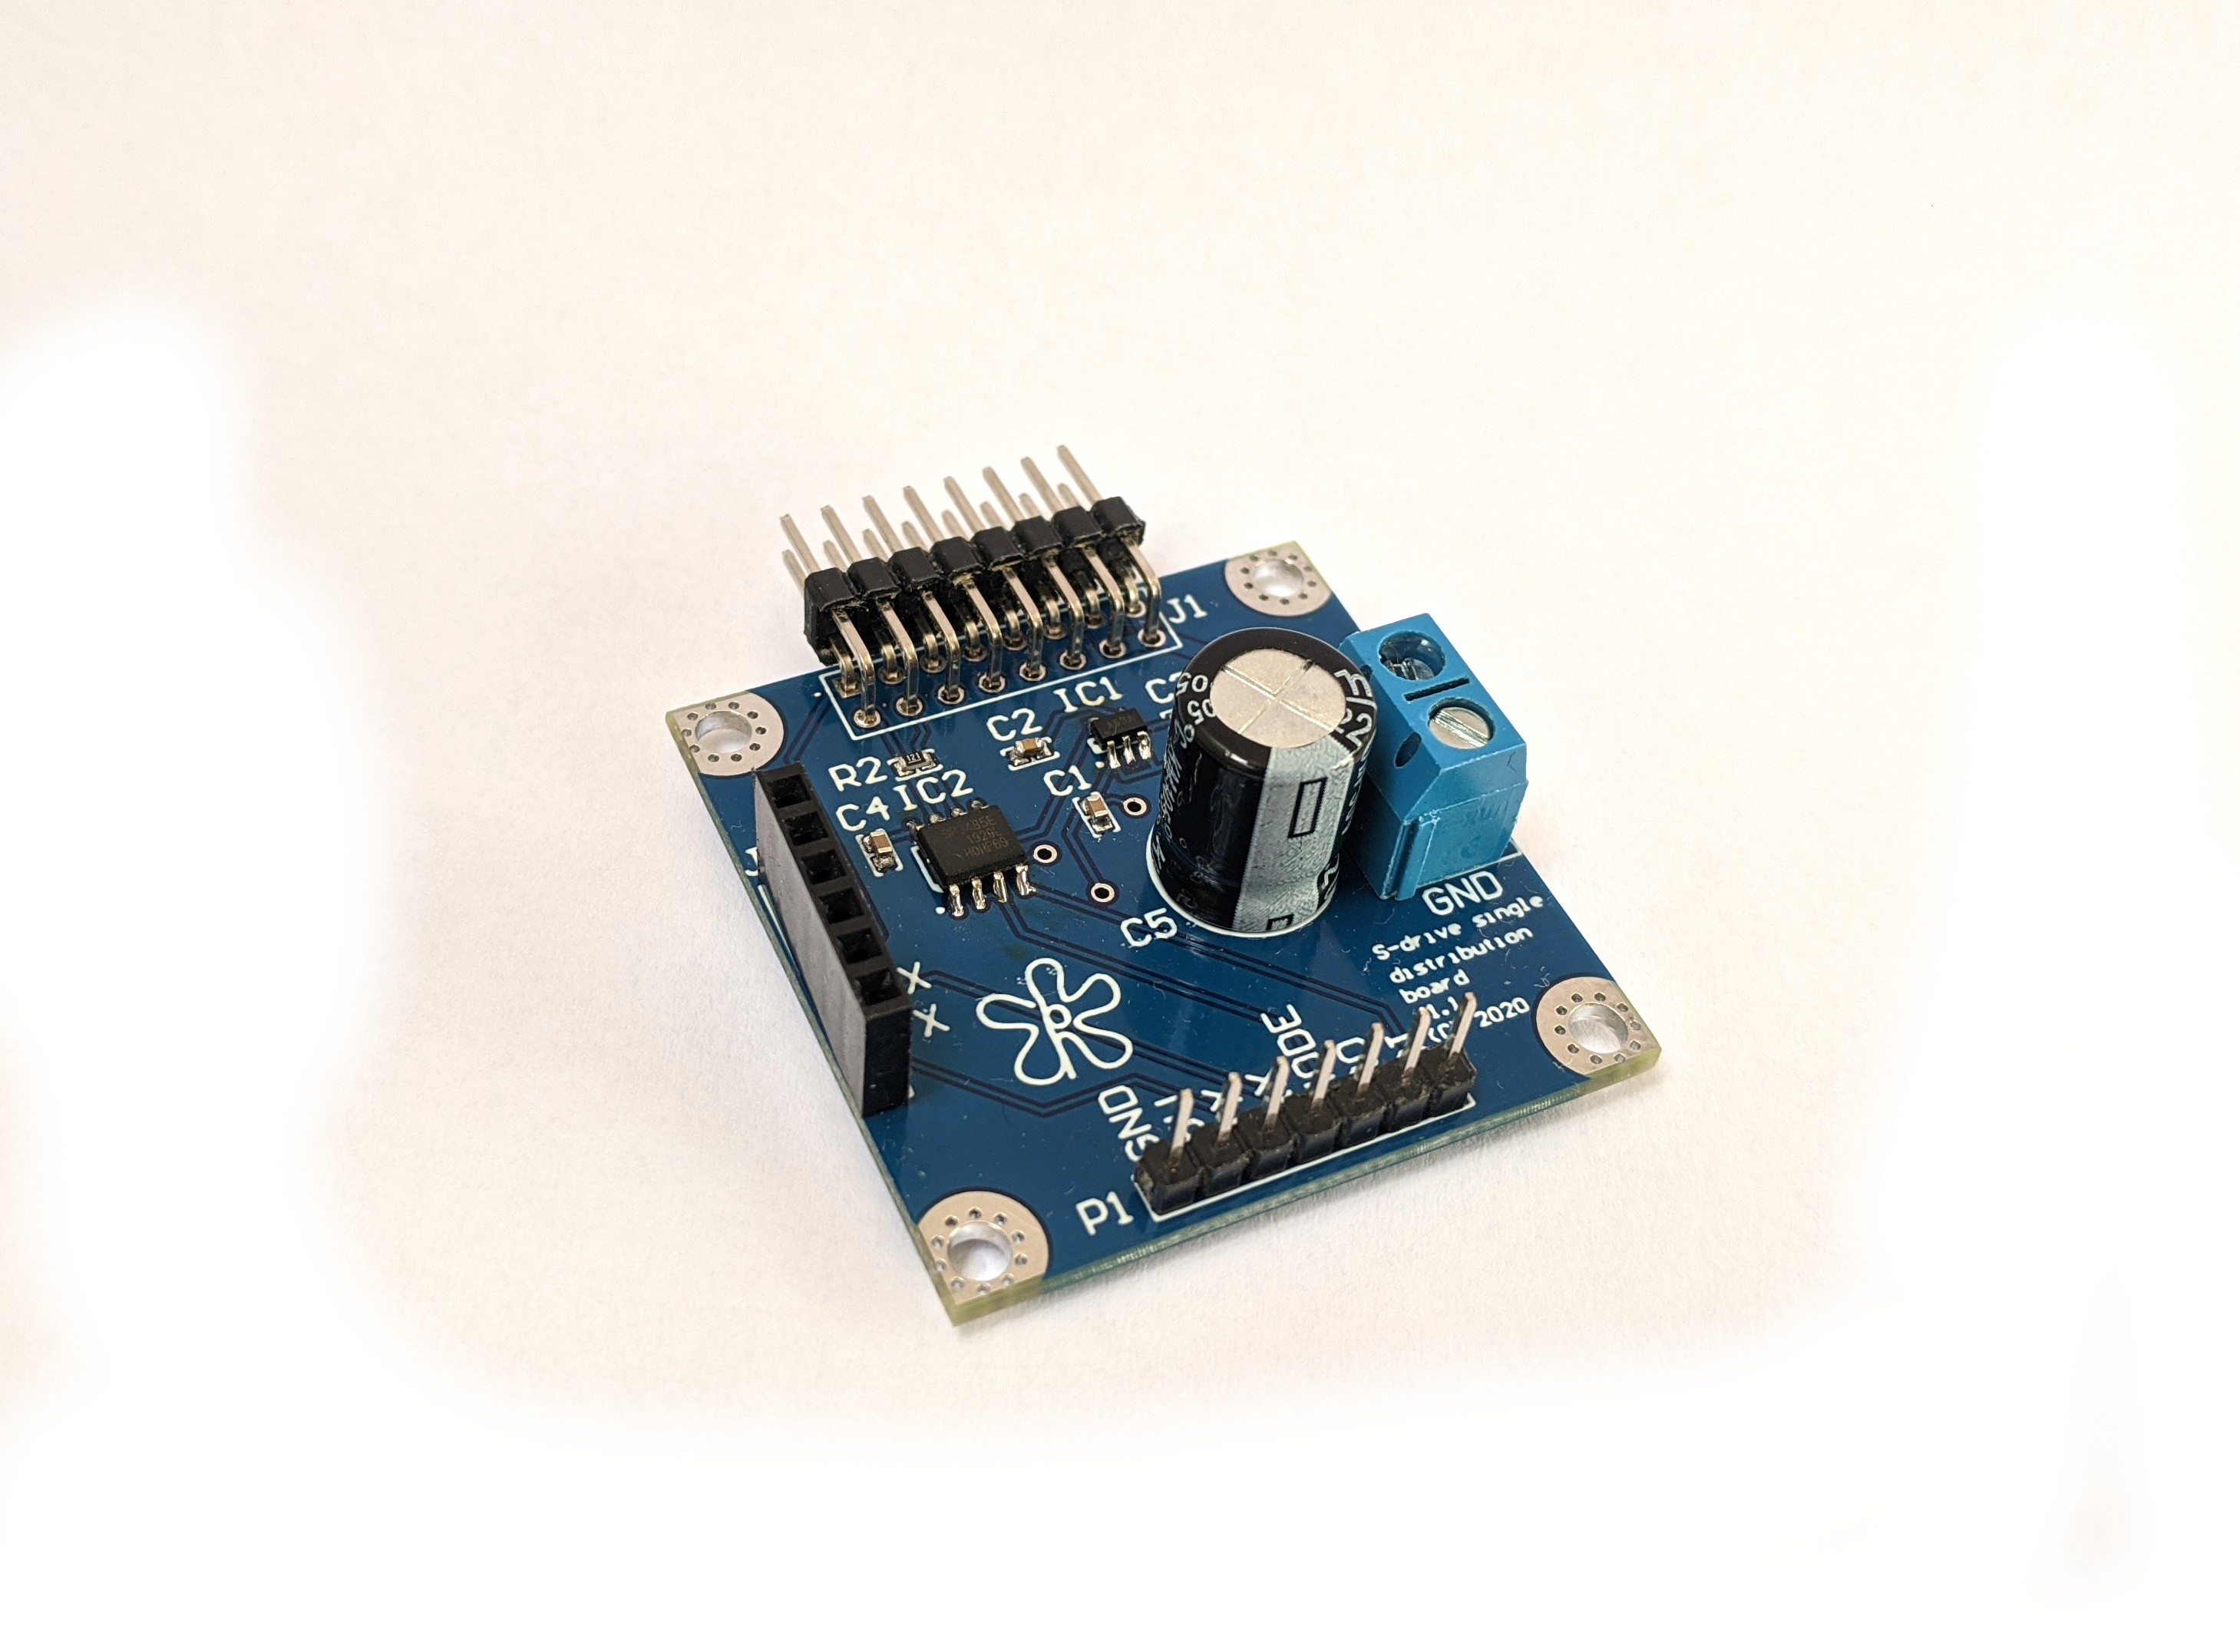
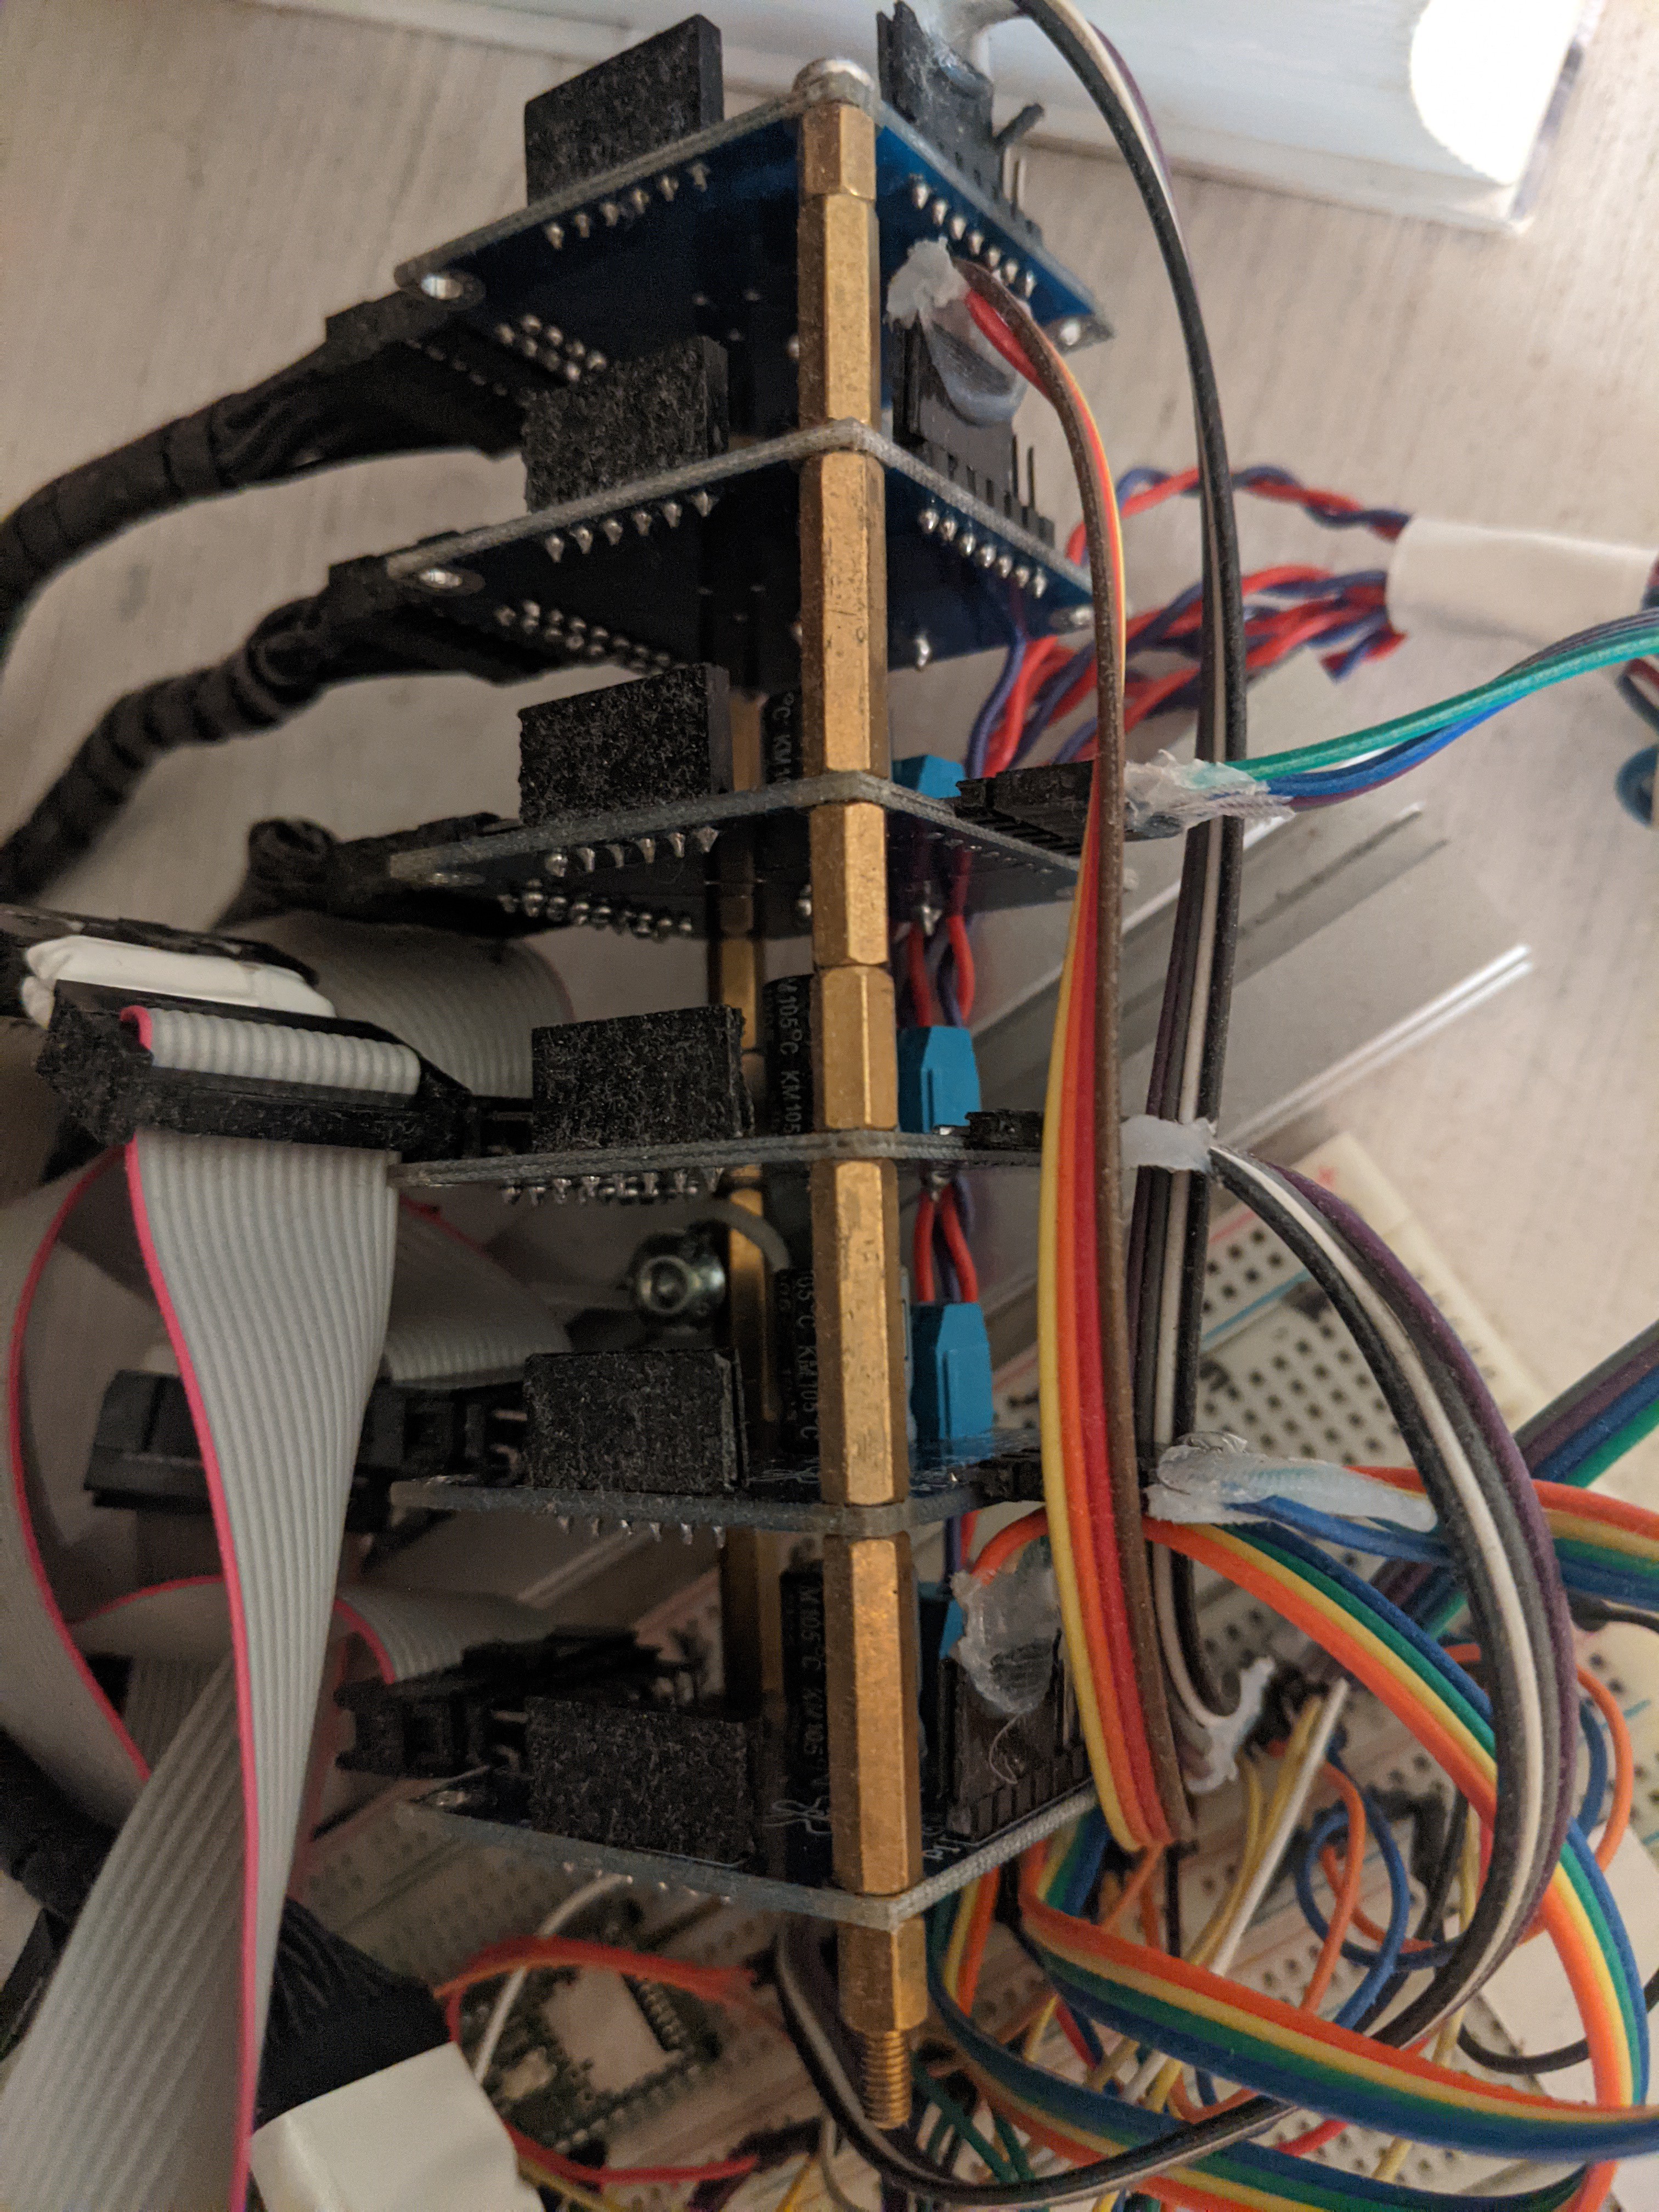
    A Connector board is used to connect the S-drive BLDC driver to the 24 power supply and to the teensy microcontroller.  They are designed to be stacked one on one with brass spacers.

View all 16 project logs

View all instructions

Enjoy this project?

Share

Discussions

Gravis wrote 03/23/2024 at 14:57 point

The first video in the project description is private. Nobody but you can watch it.

  Are you sure? yes | no

Petar Crnjak wrote 03/23/2024 at 15:01 point

Hey thanks for noting that. It is same video as one that is available but with broken sound. Thank you!

  Are you sure? yes | no

Sterling Baird wrote 08/09/2022 at 02:31 point

Has anyone reproduced this? What is the estimated (user) build time? Estimated number of 3D print hours?

  Are you sure? yes | no

cbluepine wrote 11/06/2021 at 18:23 point

I don't know much about robotic arms but am looking into building one. How does this compare to the Haddington Dynamics robot?

  Are you sure? yes | no

Petar Crnjak wrote 11/06/2021 at 20:34 point

Their robot uses more expensive everything and is generally better in every aspect than this arm other than price. Both arms use different technologies so they can not be compared fairly.

  Are you sure? yes | no

Nathann wrote 10/10/2021 at 12:58 point

Hi,

Thanks for this awesome project.

I'm really interested in the BLDC drive. Would you happen to have the price it cost you to build one and the max torque + max speed (a graph would be even betterwith the relation between torque and speed) (i roughly estimated 10-30N/m with an actuator costing 120-150$)

  Are you sure? yes | no

Petar Crnjak wrote 10/10/2021 at 16:52 point

Hey there are 3 different bldc motors used in this robot arm but using same driver. Driver is rated around 100W. It is hard to estimate cost since the chip crisis but when i was building them i was able to make them (with smt assembly) for about 8-10 euros.

  Are you sure? yes | no

Maximilian Schommer wrote 10/10/2021 at 00:52 point

This is great! I've had some problems in the past using 3D printed gears in high-torque applications. How are yours holding up over time? Do you think it might be worth making a configuration using machined delrin or metal gears?

  Are you sure? yes | no

Petar Crnjak wrote 10/10/2021 at 10:39 point

I preload all the gears and that makes them worn out quicker than usual. It would definitely be better to use machined gears. Hell, it would be better to make a whole arm out of metal :D hahaha

  Are you sure? yes | no

Similar Projects

Does this project spark your interest?

Become a member to follow this project and never miss any updates