 Zalmotek
-
1Hardware requirements
For this tutorial, we have decided to use the M5Stack Ecosystem because it enables building such a system without prototyping specific tools, such as a soldering iron or prototyping cables. The brain of this project is the M5Core2, an IoT development kit based on the ESP32 microcontroller. This ecosystem allows you to connect the provided modules through a GROVE port to the M5Core2, allowing fast deployment of hardware.
![M5Core2]()
The modules we’ve picked for this tutorial are M5Stack’s Ultrasonic Distance Unit and PIR Motion Sensor.
![M5Stack’s Ultrasonic Distance Unit and PIR Motion Sensor]()
-
2Wire Connections
- Connect the Ultrasonic Distance Unit to PORT A of the M5Core2 (the red port near the USB-C connector) using the Grove cable. This unit uses the I2C protocol to send data to the M5Core2.
- Take out the CORE2 plate on the back to expose the pins.
- Connect the PIR Motion Sensor using the Grove cable, the Grove to 4 Pin connector and the male to male Dupont wires to the following pins:
BLACK  - GND
RED    - 5V
YELLOW - G36
WHITE  - G26
![]()
-
4Setting up the device
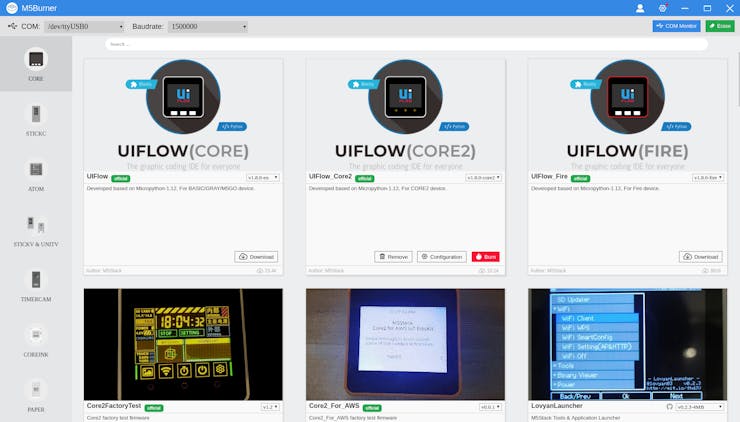
- Connect the M5Stack kit to your PC using the provided USB Type-C cable and launch M5Burner. The port name should appear on the top-left corner of the app (near COM). On Linux, make sure your user is part of the dialout group by running:
sudo adduser $USER dialout
![M5Burner interface]()
- Download the UIFlow(CORE2). Click the Erase button, wait for it to finish, and then press the Burn button to upload the UIFlow(CORE2) firmware on the device. We have used 1.8.1_core2 . You will be prompted for the WiFi details that the device will use to connect to your local network. If the burn fails, change the baud rate to a lower one.
![Burning the firmware]()
- Now click on the Configuration box corresponding to UIFlow(Core2) and select App Mode from the dropdown in the provided screen and add the Wifi details if not present.
- After it finished rebooting, you will be greeted by an initial screen with the UiFlow version in the top right.
![]()
Now let's set go ahead and up the cloud solution!
-
5Setting up the cloud solution
- Register on Waylay IO if you have not already and log in.
- Go to Resources and add a resource. Name it something like
HomeSecurity. This resource is practically your device representation in the cloud where you will send the data. - Add a new property with the
customerkey and theZalmotekvalue. - Add another property with the
tagskey and the[ "HomeSecuritySolution" ]value.
![Creating a resource on Waylay IO]()
- Go to Webscripts in the left main menu and add a new one. Name it something like
HomeSecurityScriptand add the following code in the body:
async function handleRequest (req, res) { if (!req.body) { // No body found return } // Parse body if needed let payload = req.body if (typeof payload === 'string' || payload instanceof String) payload = JSON.parse(payload) /* You can do some processing of the payload over here. */ // Post values to our resource waylay.data.baseUrl = 'https://data-io.waylay.io' await waylay.data.postSeries('replace_with_resource_id', payload, { store: true, forward: true }) .catch(e => console.error(e.message)) res.sendStatus(200) }- Be sure to replace the
replace_with_resource_idplaceholder with the actualresource_idfrom the above step. Navigate to the resource page to get it. Ours is something like9d086585-eb05-46a2-9367-bf4a45679a0c. Press Save once you have pasted the correct details.
![Resource ID on Waylay IO]()
![Webscript on Waylay IO]()
-
6Programming the device
- Go to the GitHub repository of this project (also present in the Code block of this tutorial) and download the zip file containing all necessary code and unpack it in a folder (or use the git command-line interface to do the same thing like a pro.
- Launch Thonny and from Run -> Select interpreter set up the interpreter to MicroPython (ESP32) and while at it pick the device port.
- Make sure the M5Stack is connected and displaying the API screen (or with the hello world program open), click on the Shell text field and press CTRL+C or press on the STOP button to connect to the device. Once you see the >> symbol, you can access the files on the device. Go to View and select Files to set up your workspace. Then go to the temp.py file provided in this tutorial and edit the URL in the SendPOST() function with the URL of your Webscript. You can find it on https://console-io.waylay.io/webscripts, below the name of your Webscript. Click it to copy it to the clipboard (make sure the secret is included).
- Select all the files from the folder downloaded from GitHub by holding Shift and clicking the files (
main.py, and the 2 folders custom, res, files provided in this tutorial, exclude the Readme file, right-click on the menu icon (3 horizontal lines as shown below) and press Upload to /flash, press ok and you are set. Confirm the files being overwritten.
![]()
- At this point be sure to have all the sensors connected as instructed before or else the program will hang on a white screen.
- Reboot the M5Stack by pressing the down-side button, the one near the sd card slot (the screen will shut down and refresh). The device will connect to the WiFi network and automatically run the
main.pyfile. - When the device successfully sends the data to the server you will get a
Data sentmessage on the bottom-left side of the display and the200HTTP status code on the bottom-right side of the display (meaning the request was successfully received, understood, and accepted).
![]()
Here's a demo of the system:
-
7Setting up an alarm
Alarms are a useful function through which you can get notified when the monitored values reach unwanted levels.
- Select the Templates field from your user console and click on the Add Template button.
- To create a basic alarm flow, we will be adding the necessary blocks from the blocks menu and then configure them.
- Add a Stream block, uncheck execute on tick and check execute on data and select your Resource of choice.
- Add a Condition block, uncheck execute on tick and check execute on data and select your Resource of choice. In the condition field write up the condition in the following format:
${nodes.stream_1.rawData.stream.replace_with_your_metric}- In our example, the metrics you can choose from are the ones defined in the
DataMapvariable intemp.py(WindowStatus,DoorStatus). Our conditions look like this:
${nodes.stream_1.rawData.stream.WindowStatus} > 0${nodes.stream_1.rawData.stream.DoorStatus} > 0- Now that you have returned to the Templates menu, select the previously created template and click on Create Task.
![Creating an alarm on Waylay IO]()
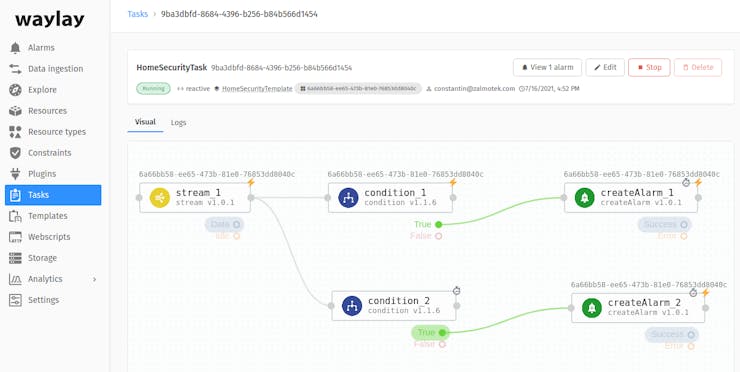
- Chose a name for your task, select the Resource choosing Reactive mode and click on Create Task.
- Now the Task is created and when the condition is met, an alarm will be triggered and it will be displayed in the Alarms field of your console and also in your dashboard linked to the same Resource as the Alarm.
![Creating a task on Waylay IO]()
-
8Creating a dashboard
Now that we managed to consistently send data to our cloud solution, it’s time to set up a dashboard to display it.
- Head to dashboard-io.waylay.io/ and log in with your account data.
- Create an organization by clicking on the + sign. The name of this organization must be identical to the customer name (tag value) you have used when defining your Resource.
- Click on Log in as admin.
- Click on the + sign in the bottom left, click on Query, and in the tag field fill in the value of the tags property you have picked for your Resource, which in our case is
HomeSecuritySolution. - Name your group and finally click on Create group.
- Click on your query and then on your resource name.
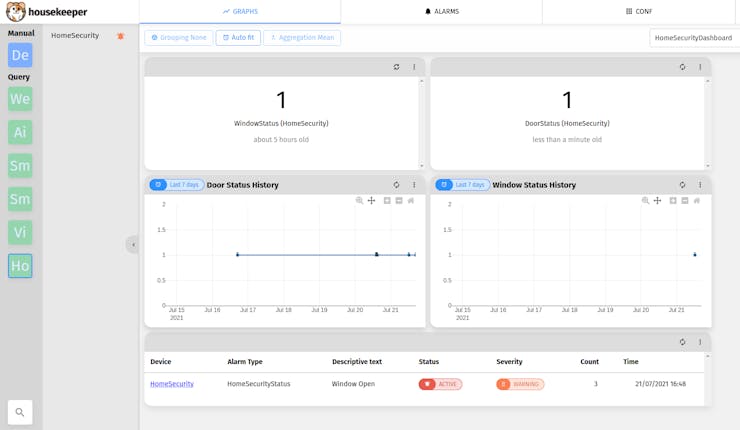
- Click on the + sign next to My dashboard and select the desired representation, select the metric you want to represent and then click Save.
- After adding all widgets, click on the cogwheel next to the + sign and then click Publish.
- Click on My dashboard and select your dashboard (notice that the + sign disappears), click on the cogwheel, click on manage and then select public.
- Now, by clicking on the connectivity button, you can get the link for your public dashboard to share with your friends or to access it from any browser.
![]()
-
9What’s next?
We have a series of tutorials with other use cases that you could learn from and further sharpen your IoT skills or you could start your very own project.
If you need help in deploying this solution or building something similar please contact Waylay.io for the low-code IoT Solution or Zalmotek.com for IoT-enabled hardware prototypes.
If you have any further questions, reach out to us via the comments!
Home Security System - Waylay IO
Home security system using the Waylay IO IoT platform and M5Stack modules.

_TRlu90LzIM.jpeg?auto=compress%2Cformat&w=740&h=555&fit=max)


_PEc9RWjKEe.jpeg?auto=compress%2Cformat&w=740&h=555&fit=max)

Discussions
Become a Hackaday.io Member
Create an account to leave a comment. Already have an account? Log In.