Close
0%
0%

Serial to Parallel Printer Interface

Old school open hardware meets modern-day open hardware. Adding serial to the original ink-jet printer.

Similar projects worth following
As part of a larger retro-computer project (including the retro-LED terminal https://hackaday.io/project/17983-dl1416smarterm-led-computerterminal), I wanted to add an old-school printer. My friend, Christian, gave me a HP 2225C inkjet printer to this end. This printer has the distinction of being in the family of the first ink-jet printers ever. It was one of a family that had different host interfaces (parallel port, serial port, HP-IB and HP-IL). At $495, it was considered inexpensive. The unit that Christian gave me was a HP2225C with a Centronics parallel port interface. My retro-LED terminal had a serial printer output so I designed a quick-and-dirty serial-to-parallel port interface to allow me to use this printer. This design and code should be useful for any old Centronics port printers. The neat thing about this project was the usefulness of the Service Manual.

The Centronics parallel port interface is fairly simple to control in its most basic form - which is useful if you want to drive an old parallel-port printer. This project shows you how to use an Arduino Leonardo (I used an Arduino Pro-Micro clone) to provide a printer with two serial interfaces (CDC-class serial over USB and RS232 over the Arduino's TTL serial port). The Arduino connects directly to the Centronics Parallel port signals as well as taking +5 volts from the printer. In addition to the ability to send character data to the printer, this project adds a few extra features:

  1. XON/XOFF flow control on two serial interfaces (USB Serial or TTL serial converted to RS232)
  2. Command to request power and printer paper status
  3. Command to reset printer and flush buffers
  4. Notification of printer power (on/off)
  5. Notification of printer paper status (paper available/paper out)
  6. Tri-states Arduino signals when printer is not powered but Arduino is powered via USB.

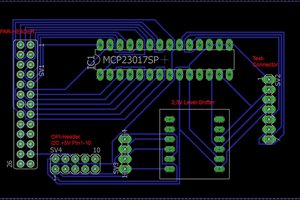
The schematic is very simple. Since the Centronics parallel port is TTL-compatible, we connect the Arduino directly to the 8-bit data bus, the active-low Strobe signal, the active-high BUSY signal, the active-high PAPER EMTPY signal and the active-low RESET/INIT signal. We use a schottky diode to isolate the Arduino (and RS232 interface circuitry) from the printer circuitry. The Arduino can be powered by either an external computer (to load code, for example) or the printer (when using the RS232 interface) without a USB-connected computer back-powering the printer. A resistor-divider provides a sense for the Arduino to know when the printer is powered. Coupled with sensing the paper status signal on the Centronics interface, the Arduino can communicate back to a host system the printer status (powered and paper status).

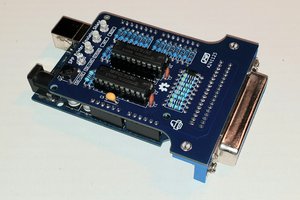
I put the Arduino and RS232 driver circuitry on a proto-board that fit inside the printer (with some slight modifications to the back panel to allow access to the RS232 DB-9 and USB connectors). I used a TTL-RS232 converter board I found at my hackerspace originally designed for some other development board. A cheap ebay board or one hand-built using any one of a number of converter chips can be substituted. I used a ribbon cable to connect to printer port pins + an internal 5V power line in the printer so my board could be powered by the printer through a schottky diode (allowing power from either USB or the printer). One could also build this circuit in an enclosure and use driver chips to interface with a Centronics interface driven over a cable.

The thing that struck me while building this interface was the parallelism between the old service manuals and our current idea of Open Source Hardware. HP provided a manual (scan attached) that described the printer's operation in great detail including full schematics and parts list. The only thing it didn't include was a listing of the firmware running on the custom micro-controller in the printer. Despite this, the service manual was incredibly useful in building my little hack to allow serial access to the printer. By looking at the schematic I could be assured that my electronics would work. I could tell, for example, that i could only sample the BUSY# signal to tell when it was OK to drive a new data byte instead of also looking at the ACK# signal too since I could see that the printer's circuitry used the same signal to clear the BUSY# signal and drive ACK# after each byte my firmware wrote to it. It's too bad that modern proprietary hardware doesn't come with a service manual. Even if the manufacturer decides to keep some parts (for example, the firmware) private, describing the hardware in detail can be incredibly useful for customers.

Anyway, I think this project could be useful to anyone hoping to re-use an old Centronics parallel port printer with a modern device via a serial interface.

serial_2_parallel.zip

Arduino Leonardo sketch. Implemented on an Arduino Pro-Micro with J1 closed (since VIN is the printer's 5V rail). This is version 1.1 that fixes some bugs with flow control and adds a buffer management feature.

application/zip - 4.64 kB - 11/11/2016 at 05:41

Download

02225-90079_ThinkJet_ServiceManual_168pages_Nov86.pdf

HP 2225 Service Manual - Thanks HP Computer Museum (www.hpmuseum.net)

Adobe Portable Document Format - 11.99 MB - 11/11/2016 at 05:06

Preview

schematic.pdf

Diagram/Schematic

Adobe Portable Document Format - 22.89 kB - 11/11/2016 at 05:05

Preview

  • 1 × Arduino Pro Micro Really any Arduino Leonardo-compatible device
  • 1 × TTL - to - RS232 Module An interface between TTL TX/RX serial signals and RS232C-level signals. Many possible solutions from hand-build boards using any number of converter ICs to modules found on ebay, or in my case at my makerspace as part of some obsolete development system.
  • 2 × 10 k-ohm resistor
  • 1 × 0.1 uF capacitor
  • 1 × schottky diode This diode isolates the printer power supply from the Arduino supply. It should have as low of a Vf as you can find. It doesn't have to deal with much current, probably less than 50 mA.

View all 6 components

  • Bug fixes + features

    Dan Julio10/28/2018 at 22:58 0 comments

    As often happens, a new usage for something uncovers issues.  That happened when I went to add the ability to print a banner to my retro-computer.  Up to this point the printer interface had never had to print anything harder than a few Tiny Basic listings.  Although I had tested the XON/XOFF flow control when I originally wrote the sketch, the implementation of banner in the computer ended up refreshing my knowledge of buffer management.  Ultimately the problem was a deep buffer in the computer coupled with a delay seeing the XOFF flow-control from the printer that over-ran the printer's 2 kB buffer (1 kB in the arduino, 1 kB in the HP printer itself).  But debugging the problem uncovered bugs in the printer code too.

    The new, v1.1 code is included in the zip file for this project.  It fixes the following bugs.

    1. Remove a buffer near-full check on incoming data so the printer can continue to receive data (through the Arduino's RX buffer) even after it has requested flow control.
    2. Refactored the code that drove parallel bytes to the printer to not block the main thread waiting for the printer to report ready for writing.
    3. Changed how serial data was read in the main loop to make flow-control generation more accurate.
    4. Decreased the high-water buffer mark to allow for more data to be sent after flow-control has been requested.

    In addition, this code has a new feature where it will echo back the ETB (End of Transmission Block) control character when that character flows through the RX buffer to the printer.  This allows external devices to know when buffered data in the arduino-side of the printer has been exhausted.  The idea is that the external device will include the ETB character as a marker.  When it sees the character echoed back it knows all the buffered data before the character has been loaded into the printer.  I make use of this in the banner functionality to show (more-or-less) on the screen what character is being printed.

View project log

Enjoy this project?

Share

Discussions

anthonymathers2 wrote 12/13/2022 at 07:31 point

One more significant component of the printer's jack is the ICC profile, permitting clients to roll out custom improvements to the printer.

Source: https://www.printersjet.com/best-sublimation-ink

  Are you sure? yes | no

anthonymathers2 wrote 12/13/2022 at 07:30 point

One more significant component of the printer's jack is the ICC profile, permitting clients to roll out custom improvements to the printer.

Source: https://www.printersjet.com/best-sublimation-ink/

  Are you sure? yes | no

Amit Kumar Agrawal wrote 03/28/2022 at 09:42 point

Hello Dan, Loved this Project! It is just currently of what i'm in extremely need of!

Actually I have a Totalizer machine which connects to a thermal printer with only 2 wires (TXD & GND) via serial interface, but I'm in extreme need to replace that mini thermal printer with a full size dot-matrix printer, I have a TVS-E MSP 240 CLASSIC PLUS Printer but it only has a USB & Centronics parallel port in it, so I'm wondering if this Great Project of Your works for me since in place of 9 wires signals of a standard serial port, i only got 2 of then i.e. TXD & GND, So my question is this project will work for me by doing some changes in the arduino coding?

I'm going out to my local marketplace to get all the required components, will gonna let You know if it worked as it is or not.

Thank You Extremely much for this Life Saving Project ;)

  Are you sure? yes | no

Gerard.entius wrote 10/04/2020 at 10:20 point

Hi Dan, I think your project can do what I want, keep on using my old friend HP4100 laser printer. I have a Arduino Mega and Uno laying around to try. I looked for the RAW pin/function to find the Uno/Mega alternative, but I can not find it in any documentation. Can you explain or give me a link?

Thanks.

  Are you sure? yes | no

Andy Preston wrote 03/04/2020 at 09:32 point

I'm working on something very similar (no serial in just parallel out) and I've got a very odd problem. I've hooked a logic analyser up to the parallel interface and the printer is happily raising "busy" and sending "ack" with each character as you would expect but it's not actually printing anything..... Have you ever seen a problem like this?

  Are you sure? yes | no

Dan Julio wrote 03/04/2020 at 14:41 point

Sorry Andy, I haven't.  This is a SWAG, but is it possible that there's an interlock switch or something?  The printer might be buffering the data you send it (so it would acknowledge it on the parallel port) but not outputting it.  

  Are you sure? yes | no

Andy Preston wrote 03/04/2020 at 16:48 point

I don't think so... it prints fine on a USB->parallel converter on my laptop. Thanks for the guess (and teaching me the word SWAG) anyway.

  Are you sure? yes | no

Similar Projects

Does this project spark your interest?

Become a member to follow this project and never miss any updates