 ZaidPirwani
-
1Determine SIZE and Number of DIGITS Needed and create CAD
Create CAD file as per your size and number of digits, it is a good idea to create separate CAD files for different sets of digits, to keep it easy and allows for later change of design as per need.
We created 3 different sets of digits
- 2 sets of 2 LARGE DIGITS for showing SCORE
- 1 set of 4 digits with a COLUN after 2 digits to make TIME, these were slightly smaller
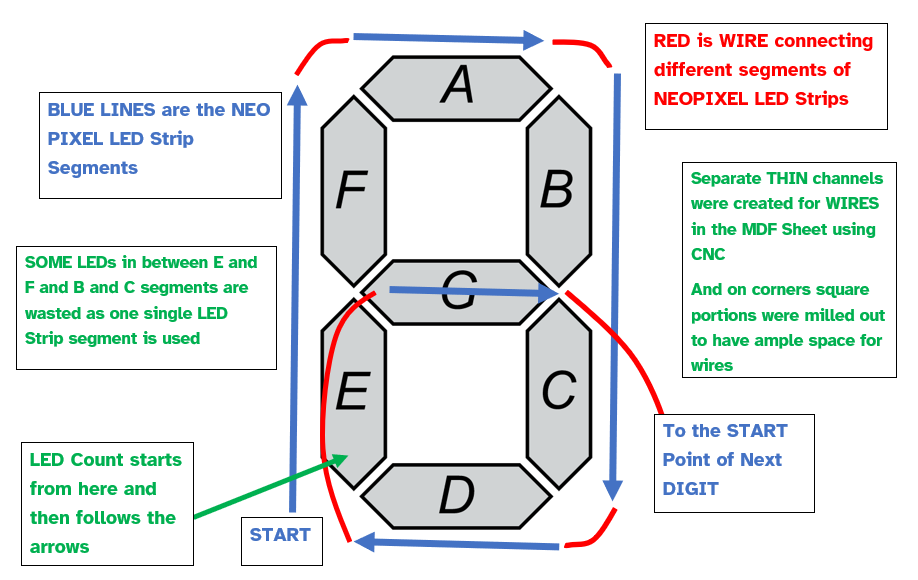
in the CAD file for MILLING, make sure to keep separate space for WIRES
There are 2 CAD Files, one for the bottom panel, where the strips and wires are placed and another for the TOP which has the final digit holes milled
-
2Wiring and Noting the LED Numbers
Wire the LEDs properly, make sure to have separate POWER lines 5V and GND for each segment set so to later connect to power supply, 1 single line to power all digits is NOT a goo idea, we tried, the last 3 digits were not BRIGHT enough on the power supply.
While wiring, we did not follow the seven segment ABC order but created our own, as per the image, this allowed for ease in wiring.
Later, we counted the LED numbers for each segment on a paper and then coded that in the program.
-
3Use a BEEFY Power Supply
We were using a Small Wall Power Adapter, 5V, 3A, but I think the sticker was a lie and it was NOT able to provide 5V and 3A
We ultimately changed that to an old PC Power Supply. and connected the 5V and GND of each set of our 2 and 4 digit displays separately to different POWER lines coming from the power supply.
Remember to attach a SWITCH to the GREEN and BLACK wire on the 20/24 pin cable of the PC Power Supply to give it an ON and OFF signal
-
4TEST Digit / Code Separately
While wiring, we had an Arduino coded wit the STRANDTEST Example file of AdaFruit NEOPIXEL Library, this helped in checking the solder connections and to see if the wiring being done was correct or not.
Then once the seven segment was complete, we had a few functions in the CODE to check the numbering order of segments properly by lighting up each segment one by one and by lighting up each digit from 0 to 9.
These codes are NOT commented in the code files
NEOPIXEL and Arduino Scoreboard for School
a simple scoreboard made with NeoPixels and an Arduino Nano for Basketball and to learn programming
Discussions
Become a Hackaday.io Member
Create an account to leave a comment. Already have an account? Log In.