Klipper 3D Printer Firmware on Malyan M180 Install
I'm trying to install Klipper on my modified Malyan M180 3D Printer. Currently, Marlin is installed but it has loads of performance issues.
I'm trying to install Klipper on my modified Malyan M180 3D Printer. Currently, Marlin is installed but it has loads of performance issues.
To make the experience fit your profile, pick a username and tell us what interests you.
We found and based on your interests.
Recently, I experienced some disconnects mid print, again. Sometimes, I don't print anything for a few weeks and when I come back Fluidd complains that the printer is gone. A sign that I need to do something about this as nothing is worst than an unreliable printer. Imaging printing for a few hours and the print fails because of a disconnect. Painful!
So, in order to make this issue go away, I will attempt two things:
Run the Raspberry Pi off of the printer's power supply or an additional high power DCDC converter that outputs 5.2V from 12V and I will connect the hardware serial port of the RaspberryPi's GPIO pinheader directly to the uart pins of the ATMega256 that powers my printer.
Hopefully, this will resolve the disconnects, as the hardware serial port is much less likely to simply disappear. In theory, it should also consume less CPU cycles as there is no USB driver in between.
If we look at the datasheet, we can see which pins are RXD and TXD:
Conveniently, I already took a photo of the same section on my board and I can see there are two resistors that I can connect to without the need to solder magnet wire directly to the pins of the chip again.
Once the current print is done, I'll go ahead and do that and update progress here accordingly.
I'll follow these instructions to configure the Pi for hardware serial out:
Sometimes, stuff just breaks and becomes unreliable. So did my extruder thermocouple. It was already wonky since I installed the Hemera hotend, but recently, I had a print stop on me with hotend temperature implausible error and the consequent printer emergency shutdown. As you can imagine, I didn't like that much.
This specific thermocouple and reader IC that was chosen by Malyan is supposed to be more precise throughout the entire temperature range but also faster in response to temperature changes. Changing it to a simple thermistor (even though an E3D thermistor) would have an impact on the PID loop for the hotend controller.
Fist, I needed to find the pin I wanted to use for this. The RAMPS 1.4 board, which is still standard for many printers, uses Ardunino analogue pin A13 to measure the thermistor. It needs some additional circuitry to work, too.
On the Arduino Mega 256 that my controller uses, PK5:
So I needed to solder a wire to it. No a trivial task without a proper stereo microscope and a pin pitch of 0.5mm but manageable. Be sure to desoldering wig on hand because pins will be soldered together by accident.
The circuitry needed was build Manhattan-style directly floating over the board. All I needed was a reasonably clean ground (not sure I accomplished that part) and a clean VCC (also no sure how clean this is).
The issue is, I wasn't able to measure the quality of these power lines prior to soldering it as the printer was sitting on its side, disassembled. It's fair to mention that I see some noise in my thermal signal and needed to filter it more that I was expecting.
Everything left to be done was to secure the parts using a few drops of hotglue.
Next, I needed to change the Klipper printer configuration. This, thankfully, is extremely easy since the entire configuration is transferred to the microcontroller on boot and can simply be reloaded using the
restart
command in the fluidd console.
The changes were to the configuration file were very simple. All that needed to be done was change the pin, the thermistor type and deactivate the SPI pins for the thermocouple IC.
However, three more things were needed to make this work:
The issue, especially with point two was that the the power of the heater was too much to with very quick rise times combined with a slow thermistor response. Simply using the PID auto_tune values didn't work. So I opted for an eyeballed trial and error tuning to make PID work. I settled on very small values for P, I, and D that would give me a reasonably quick response with a short time to be stable.
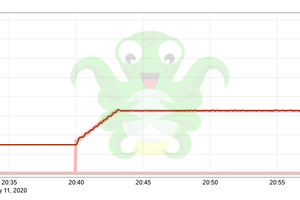
I just ran a quick test for this graph and must say that I'm not yet happy with this. I fired a M109 S235 command to heat the extruder to 235C and WAIT until the PID loop has stabilized and then execure M106 S255 to turn the fan on (to emulate what would happen when the print starts) but it took too long for the fan to come on. Almost four minutes. This might be acceptable but but in reality, it my part only needs 5 minutes to print, I really don't want to wait 5 minutes for the print to even start. More tuning required.
However, the conversion works overall and I'm very happy with this. Also, as a side note, the original circuitry still exists should I ever want to go back to a thermocouple to improve performance.
EDIT:
Some more tuning later (with a much better understanding from yesterdays long tuning session), I was able to get back to 100% power and a...
Read more »During my past couple months with Klipper, Moonraker and Fluidd, I have been reasonably happy with the status and print quality of the machine. There are some stuttering issues I still can’t explain under certain circumstances but all in all, it works. Plus, Fluidd is… well more fluid than OctoPrint, too.
However, every once in a while I would wake up in the morning to start a print only to be presented with a communication error message stating the MCU is disconnected and doesn’t respond.
So I logged into the Raspberry Pi via ssh and “dmesg” revealed that I have indeed a usb2serial converter issue. The CH341 disconnects every so often and comes back up by itself. Turn out, googleing raspberry pi 3 ch341 disconnection has a lot of hits with many people complaining that the issue could never be resolved... Well, I have identified a possible solution....
A quick check using
vcgencmd get_throttled
revealed.... nothing. It's not a power issue. The return is
0x00
which means no throttling due to power happened in the past (probably since the last reboot). So back to square one.
I suspected a driver issue on the linux distribution side. A quick google search confirmed this. The CH341 kernel module that comes standard is no good and needs to be replaced for trouble free operation.
I followed a few tutorials (like this and this), compiled and loaded the new CH34x kernel module and observed the results. Unfortunately, the next day, I was greeted with the same disconnect messages I had seen before. How troublesome! The reason this is so frustrating is, my printer was absolutely stable running Marlin + Octoprint and the serial connection has, or rather should have, absolutely nothing to do with the AVR since it's entirely handled by a different chip: The CH341 USB to Serial Converter. So what's wrong here?
A few weeks later and actually even a few failed prints due to disconnects mid-way, I decided it was time for more drastic measures.
Back when I switched from Marlin + Octoprint to Klipper + Fluidd I took a new SD card on a new Pi3 and installed everything on a separate system so that I could always go back without making any changes at all. In other words, the only thing that could have an impact on the serial connection quality itself is the Pi 3 since I already tried pretty much everything else.
So I pulled the SD card out of one, swapped the Pi3 connected to my printer, plugged the SD card back in and rebooted. You can guess my surprise when I now finally have no issues anymore. The Pi3 itself has an issue likely on the hardware side. Swapping the Pi and do nothing else solved this CH341 serial connection drop issue for me. I hope it stays that way! I'll place a marker on this Pi3 board.
Let's start with the quirk: A bad configuration will not load and a not properly loaded configuration will require the printer to be power cycled.
My Malyan M180 is a bit special in that it has a different extruder and was running full blown Marlin 2.0.x before. So lucky for me, I already did all the hard work figuring out what pins are being used and how the temperatures are being measured.
For the temperatures specifically, I have a (not supported) 10k thermistor for the bed temperature and a MAX6675 thermocouple sensor IC (very different idea from a thermistor) for the hotend which is read via SPI.
Two issues: How do I get the 10k thermistor understood by Klipper and how can I make an SPI interface work that only needs three wires in this case: SCK, MISO, CS and not MOSI. However, Klipper requires the definition of a MOSI pin when the SPI port is used. I needed to find an unused pin on the board so I looked at the picture:
To be honest, I took a wild guess and just chose PB2 aka Digital Pin 51, which is Hardware SPI MOSI. I thought, when Malyan goes through the trouble of using software SPI, the hardware SPI is likely unused.
With the extruder temperature done, I looked at how to integrate the 10k thermistor.
Turns out there is a way to add custom thermistors to Klipper with ease. I dug through the Marlin implementation and found how they define this general purpose thermistor (which really only needs to show a reasonable temperature for the bed and doesn't have to be precise at all).
[thermistor M180_10K]
temperature1: 25
resistance1: 10000
beta: 3950
With that, the thermistor was also done! Thank you Marlin for the reference!
Here is my entire config file for people who want to see what goes into this. I found it surprising that Klipper doesn't use Arduino pin definitions but since it's designed to run on pretty much everything, maybe it's just the logical next step.
# Configuration for: Malyan M180 with Hemera Hotend Modification
# Configuration pins are taken from Marlin - Malyan M180 pin configuration
# Author: Timo Birnschein (timo.birnschein@microforge.de)
# Version: 0.1
# Date: 2021/12/18

[stepper_x]
step_pin: PF1
dir_pin: PF0
enable_pin: !PF2
microsteps: 16
rotation_distance: 34 # 17 teeth * 2mm belt pitch
endstop_pin: ^PL1
position_endstop: 0
position_max: 250
homing_speed: 20.0

[stepper_y]
step_pin: PF5
dir_pin: PF4
enable_pin: !PF6
microsteps: 16
rotation_distance: 34
endstop_pin: ^PL3
position_endstop: 0
position_max: 160
homing_speed: 20.0

[stepper_z]
step_pin: PK1
dir_pin: !PK0
enable_pin: !PK2
microsteps: 16
rotation_distance: 2
endstop_pin: ^PL7
position_endstop: 0
position_max: 165
homing_speed: 8.0

[extruder]
step_pin: PA3
dir_pin: PA2
enable_pin: !PA4
microsteps: 16
rotation_distance: 7.6
nozzle_diameter: 0.400
filament_diameter: 1.75
heater_pin: PH3
sensor_type: MAX6675
sensor_pin: PE3
spi_software_sclk_pin: PE2
spi_software_miso_pin: PE5
spi_software_mosi_pin: PB2
control: pid
pid_Kp: 22.2
pid_Ki: 1.08
pid_Kd: 114
min_temp: 0
max_temp: 320

[thermistor M180_10K]
temperature1: 25
resistance1: 10000
beta: 3950

[heater_bed]
heater_pin: PL4
sensor_type: M180_10K
sensor_pin: PK7
control: watermark
min_temp: 0
max_temp: 110

[fan]
pin: PH4
max_power: 1.0
shutdown_speed: 0
off_below: 0.20

[mcu]
serial: /dev/serial/by-id/usb-1a86_USB2.0-Serial-if00-port0

[printer]
kinematics: cartesian
max_velocity: 200
max_accel: 3000
max_z_velocity: 10
max_z_accel: 30
Overall, the entire process including setting up a completely new Octoprint installation took about 9 full hours. However, I didn't even expect to get this to work today, so I can say that I am extremely happy with the current state.
Next up, I want to get Input Shaper to work and will order an accelerometer from Amazon for this purpose. The rest is really just a tuning exercise get everything dialed in properly.
My first test print was already a huge success. WAY faster than before and definitely nicer to look at for the speed the part popped...
Read more »Install Octoprint from here: https://github.com/guysoft/OctoPi
Clone Klipper: git clone https://github.com/Klipper3d/klipper
Run the install script and run into an error:
./klipper/scripts/install-octopi.sh
Error:
###### Running apt-get update...
[sudo] password for pi:
Hit:1 http://raspbian.raspberrypi.org/raspbian buster InRelease
Get:2 http://archive.raspberrypi.org/debian buster InRelease [32.6 kB]
Reading package lists... Done
E: Repository 'http://archive.raspberrypi.org/debian buster InRelease' changed its 'Suite' value from 'testing'     to 'oldstable'
N: This must be accepted explicitly before updates for this repository can be applied. See apt-secure(8) manpage     for details.
This can be mitigated by running:
sudo apt-get update --allow-releaseinfo-change
Then run
./klipper/scripts/install-octopi.sh
again. This time it should go though as expected. It will download all the dependencies that Klipper needs to run and configure it to load at startup with OctoPi.
Then follow the steps from the Klipper install manual: https://www.klipper3d.org/Installation.html
The install manual will ask you to run make menuconfig, configure the three items and then run make. However, this just resulted in an error for me:
Rempi@octopi-klipper:~/klipper $ make
  Building out/autoconf.h
  Compiling out/src/sched.o
  Compiling out/src/command.o
  Compiling out/src/basecmd.o
  Compiling out/src/debugcmds.o
  Compiling out/src/initial_pins.o
  Compiling out/src/gpiocmds.o
  Compiling out/src/stepper.o
  Compiling out/src/endstop.o
  Compiling out/src/trsync.o
  Compiling out/src/adccmds.o
  Compiling out/src/spicmds.o
  Compiling out/src/thermocouple.o
  Compiling out/src/i2ccmds.o
src/i2ccmds.c:14:23: error: field ‘i2c_config’ has incomplete type
     struct i2c_config i2c_config;
                       ^
src/i2ccmds.c: In function ‘command_config_i2c’:
src/i2ccmds.c:23:23: warning: implicit declaration of function ‘i2c_setup’ [-Wimplicit-function-declaration]
     i2c->i2c_config = i2c_setup(args[1], args[2], addr);
                       ^
src/i2ccmds.c: In function ‘command_i2c_write’:
src/i2ccmds.c:35:5: warning: implicit declaration of function ‘i2c_write’ [-Wimplicit-function-declaration]
     i2c_write(i2c->i2c_config, data_len, data);
     ^
src/i2ccmds.c: In function ‘command_i2c_read’:
src/i2ccmds.c:48:5: warning: implicit declaration of function ‘i2c_read’ [-Wimplicit-function-declaration]
     i2c_read(i2c->i2c_config, reg_len, reg, data_len, data);
     ^
make: *** [Makefile:64: out/src/i2ccmds.o] Error 1
pi@octopi-klipper:~/klipper $
This can be solved by running:
make clean && git pull && make menuconfig
again. Found here: https://github.com/Klipper3d/klipper/issues/4409 . It works.
After this, I just hit
make
again and end up with a hex file.
If you're anything like me, you want to test the upload process on any other controller board that's remotely compatible, first. So I grabbed my trusty Arduino Mega 256 board, plugged it into the Raspberry Pi running the latest OctoPi and....nothing.
The board shows up in dmesg but it does not get a port assigned. This is due to
modprobe cdc-acm
failing as the cdc-acm driver either is not present at all or is broken. I'll be honest: WHAT THE ACTUAL F? This worked well on any other machine I use but this OctoPi installation. Probably Raspberry Pi in general. For some reason, this driver was removed and many prople on the web struggle with this specific issue. As long as your Arduino Mega uses a Mega8U2 for communication and not the cheaper aftermarket versions and serial converters, you're pretty much at the end of the line. Please let me know if you find a solution for this that can be documented here.
At this point, we can flash the machine - obviously I made sure that I have a backup of my original up and running code base and configuration - not like last time - so let's continue...
Let's look for the port with:
ls -la /dev/serial/by-id/
Which results in
pi@octopi-klipper:~...Read more »
Create an account to leave a comment. Already have an account? Log In.
Become a member to follow this project and never miss any updates

 silver2row
 jurc192
 jaromir.sukuba
 clearchris