Close
0%
0%

Recore and PrintrBot Mixtures

This is a Recore Board w/ a PrintrBot 1403 machine printer and...

Now, I am using a Maker Select Plus w/ the Recore A7...

Similar projects worth following
146 views
0 followers
The Recore has many things about it that make it superior to normal operating procedures but please look at the video on an older PrintrBot 1403 coming back to life!

The PrintrBot is done at about 19" * 6" j* 6" for now. I have moved to another build of sorts w/ the Recore A7 and a Monoprice Maker Select Plus printer. Things are working w/ five steppers, a couple enhancements on the build from the older hardware, and it is way faster than the older model PrintrBot 1403.

So, w/out further ado, I would like to post my build if you are indeed for a controller and need a jump start...

https://github.com/silver2row/Recore_Klipper_Configs.git is my github.com account w/ repo for the A6 on the PrintrBot and the Recore A7 on the Maker Select Plus 3D Printer.

Enjoy and share if noteworthy... I have been printing w/ PETG at a fast pace for sometime now. I like the extra build space and how this mostly metal printer is put together. Tough, sturdy, and full of issues. Got to fix it again...bbl!

Here is a small update. The printer, PrintrBot 1403 Simple Metal, has been partially upgraded. It can now print 19.75" * 6" * 6" or roughly 500mm * 152mm * 152mm. I am still working on the Y_Axis, i.e. as it needs to be equipped to handle the bed build environment.

So, the (19.75" ^ 2) and the Z_axis at around 6" is well in the realm of something I have not done before this time. Large build area on X and Y and something simple for Z. I have an either Capacitive Probe or Inductive Probe handling the homing and Klipper configs for the Z_Axis. Klipper is really some nice source for being able to print large build areas w/ large perimeters. 

Although this older printer is very slow and nonmobile at the moment, it can print and to the extent in which I described earlier. I have learned some caveats of the Klipper firmware which has made printing on this printer and others very precise. I have actually been very surprised w/ the assistance of the Klipper people on their discourse and their knowledge of the docs, 3D Printing in general w/ specifics, and all around good service has helped me become more docile when enraged at my lack of understanding.

Okay. So, this is another attempt I have made to incorporate a Monoprice Maker Select Plus w/ Recore A7 controller into a full blown Klipper firmware enabled printer. It is faster than my 1403, e.g. travel and print speeds. It has a larger build environment which has enabled me to print hard to touch prints at such speeds. Now, I am sure there are more able printers w/ better do-dads and gadgets at higher expenses. I am not disregarding this fact. Both printers for me so far are much fun to the point I actually have built them up and outward in parts and so on. 

I reached out to the Slice Engineering and Swiss-Micro. Both companies if not the same have had parts where I can basically tear down my printer, exchange matching parts, and switch some firmware sections in the configs, print, and then enjoy a relaxing beverage. 

Also...

I went and broke some dear parts from Slice Engineering. I contacted them about it. I was not in the mood nor the market to get reimbursed or gyp the system. I wanted them to understand the complexity of my issue as it pertained to their parts. All in all, they listened and sent warm regards. Luckily, I ordered two of the throat-hotend-MK10 attached parts. 

The MK10 seemed to be a popular make and model. Not so much from what I can tell. I have been savagely researching  more and more USA MFG. in 3D Printing, smaller part manufacturing, that tends to learn towards what I have already purchased. Inevitably, I have found Slice and Swiss to handle most of what I already do. 

Outside of those two companies, I found COEX3D. It seems they mfg, here in the states, filament and have access to an older Dupont filament of choice called Hytrel. Anyway, I do not normally handle such rubbery materials, i.e. as I print for rigidness while having a longer-lasting effect to the entire finished part.

For instance, four to six bottom layers, a 45% infill w/ lines, and four to six top layers. Sometimes I double...

Read more »

REcoreOne.png

Portable Network Graphics (PNG) - 880.50 kB - 04/12/2022 at 09:37

Preview

  • Stringy PETG and PLA in a Comparison!

    silver2row07/16/2022 at 03:05 0 comments

    I have finally learned how to print in PETG w/ my older model printrBot 1403. I am using the Recore board still w/ Klipper and OctoPrint. Things are going okay but I find that:

    1. While printing in PETG, unlike w/ PLA, the prints that build incrementally outward w/out a sound base tend to string out. W/ PLA, unlike PETG, the building of new layers outward tend to adhere a bit more. This entails a solid base per layer when building. PETG is stringy and creates a solid foundation but when there is no foundation, the layering builds upward, even w/ a half a layer build upward, at a non-valid use output.

    The output is basically wired in looks and has no real use. Sanding!

    Seth

  • Recore_A5 and Refactor 3.0.3 revision...

    silver2row04/27/2022 at 08:03 0 comments

    # Recore_1403 config
    
    [recore]
    revision: A5
    
    gain_t0: 1
    gain_t1: 1
    gain_t2: 1
    gain_t3: 1
    pullup_t0: 1
    pullup_t1: 1
    pullup_t2: 1
    pullup_t3: 1
    #offset_t0: 0
    #offset_t1: 0
    #offset_t2: 0
    #offset_t3: 0
    
    # The STM32F031 mcu
    [mcu]
    serial: /dev/ttyS4
    baud: 250000
    restart_method: command
    
    # The AR100 mcu
    [mcu ar100]
    serial: /dev/ttyS1
    baud: 1500000
    
    #[static_digital_output endstops_5V_enable]
    #pins: ar100:PG11, ar100:PG8
    
    # pin high = 12V, pin low = 5V
    [static_digital_output endstop_ES0_5V_12V]
    pins: ar100:PG11, ar100:PG8
    
    #[static_digital_output temperature_5V_enable]
    #pins: ar100:PF1
    
    #[static_digital_output over_current_alarm]
    #pins: !ar100:PG1
    
    [static_digital_output user_led_enable]
    pins: PA12
    
    #[static_digital_output enable_high_power]
    #pins: !ar100:PG2
    
    #[static_digital_output thermistor_pullups]
    #pins: ar100:PD6, ar100:PD24, ar100:PF1
    
    # Load "thermocouple" sensor
    #[thermocouple]
    
    [printer]
    kinematics: cartesian
    max_velocity: 500
    max_accel: 3000
    max_z_velocity: 25
    max_z_accel: 10
    
    [tmc2209 stepper_x]
    uart_pin: ar100:PB1
    tx_pin: ar100:PB0
    uart_address: 0
    run_current: 0.700
    #hold_current: 0.500
    #microsteps: 16
    stealthchop_threshold: 250
    driver_internal_rsense: 1
    ref_resistor: 6800
    
    [tmc2209 stepper_y]
    uart_pin: ar100:PB1
    tx_pin: ar100:PB0
    uart_address: 1
    run_current: 0.700
    #hold_current: 0.500
    #microsteps: 16
    stealthchop_threshold: 250
    driver_internal_rsense: 1
    ref_resistor: 6800
    
    [tmc2209 stepper_z]
    uart_pin: ar100:PB1
    tx_pin: ar100:PB0
    uart_address: 2
    run_current: 0.700
    #hold_current: 0.500
    #mircosteps: 16
    stealthchop_threshold: 250
    driver_internal_rsense: 1
    ref_resistor: 6800
    
    [tmc2209 extruder]
    uart_pin: ar100:PB1
    tx_pin: ar100:PB0
    uart_address: 3
    run_current: 0.700
    #hold_current: 0.500
    #microsteps: 16
    stealthchop_threshold: 250
    driver_internal_rsense: 1
    ref_resistor: 6800
    
    [stepper_x]
    step_pin: ar100:PL4
    dir_pin: ar100:PE8
    endstop_pin: ar100:PH5
    rotation_distance: 35
    microsteps: 16
    position_endstop: 0
    position_max: 152
    homing_speed: 15.0
    
    [stepper_y]
    step_pin: ar100:PL5
    dir_pin: ar100:PE9
    endstop_pin: ar100:PH6
    rotation_distance: 35
    microsteps: 16
    position_endstop: 0
    position_max: 152
    homing_speed: 15.0
    
    # probe
    [probe]
    pin: ar100:PH4
    z_offset: 0.20
    x_offset: 0.0
    y_offset: 0.0
    
    [stepper_z]
    step_pin: ar100:PL6
    dir_pin: !ar100:PE10
    endstop_pin: probe:z_virtual_endstop
    #endstop_pin: !ar100:PH6
    rotation_distance: 1.50
    microsteps: 16
    #position_endstop: 0
    position_max: 152.0
    homing_speed: 8.0
    
    [extruder]
    step_pin: ar100:PL7
    dir_pin: ar100:PE11
    heater_pin: PA9
    sensor_type: EPCOS 100K B57560G104F
    sensor_pin: PA1
    rotation_distance: 35
    microsteps: 16
    nozzle_diameter: 0.375
    filament_diameter: 1.75
    control: pid
    pid_Kp: 22.2
    pid_Ki: 1.08
    pid_Kd: 114
    min_extrude_temp: 30
    min_temp: 0
    max_temp: 300
    
    
    #[extruder1]
    #step_pin: ar100:PL8
    #dir_pin: ar100:PE12
    #rotation_distance: 40
    #microsteps: 16
    #nozzle_diameter: 0.400
    #filament_diameter: 1.75
    #heater_pin: PA9
    #sensor_pin: PA1
    #sensor_type: RECORE PT1000
    #control: pid
    #pid_Kp: 22.2
    #pid_Ki: 1.08
    #pid_Kd: 114
    #min_temp: 0
    #max_temp: 300
    
    #[extruder2]
    #step_pin: ar100:PL9
    #dir_pin: ar100:PE13
    #rotation_distance: 40
    #microsteps: 16
    #nozzle_diameter: 0.400
    #filament_diameter: 1.75
    #heater_pin: PA10
    #sensor_pin: PA2
    #sensor_type: PT100 INA826
    #adc_voltage: 3.27
    #control: pid
    #pid_Kp: 22.2
    #pid_Ki: 1.08
    #pid_Kd: 114
    #min_temp: 0
    #max_temp: 300
    
    #[heater_bed]
    #heater_pin: PA11
    #sensor_type: EPCOS 100K B57560G104F
    #sensor_pin: PA3
    #control: watermark
    #min_temp: 0
    #max_temp: 300
    
    [fan]
    pin: PB0
    
    #[output_pin fan1]
    #pin: PB1
    
    #[output_pin fan2]
    #pin: PB5
    
    #[output_pin fan3]
    #pin: PB4
    
    # Set up board voltage, current, temperature.
    
    [temperature_sensor board]
    sensor_type: EPCOS 100K B57560G104F
    sensor_pin: PA6
    max_temp: 110
    gcode_id: Board
    
    [temperature_sensor cold_junction]
    sensor_type: EPCOS 100K B57560G104F
    sensor_pin: PA7
    gcode_id: CJ
    
    # Vout = Vin * 10K/110K = Vin*11
    [adc_temperature v]
    temperature1: 0.35
    voltage1: 0
    temperature2: 36.65
    voltage2: 3.3
    
    [temperature_sensor voltage]
    adc_voltage: 3.3
    sensor_pin:...
    Read more »

View all 2 project logs

  • 1
    CURA Slicer for the Recore, PrintrBot Simple Metal 1403, and Refactor, and now a Maker Select Plus w/ Recore A7!

    Hello...

    I have made the PrintrBot 1403 w/ a bed of 19.75" * 19.75" * 6" from a six inched cubed build environment. Now, that I am done w/ building that overweight beast of a printer, I have sort of moved on to a Monoprice Maker Select Plus...

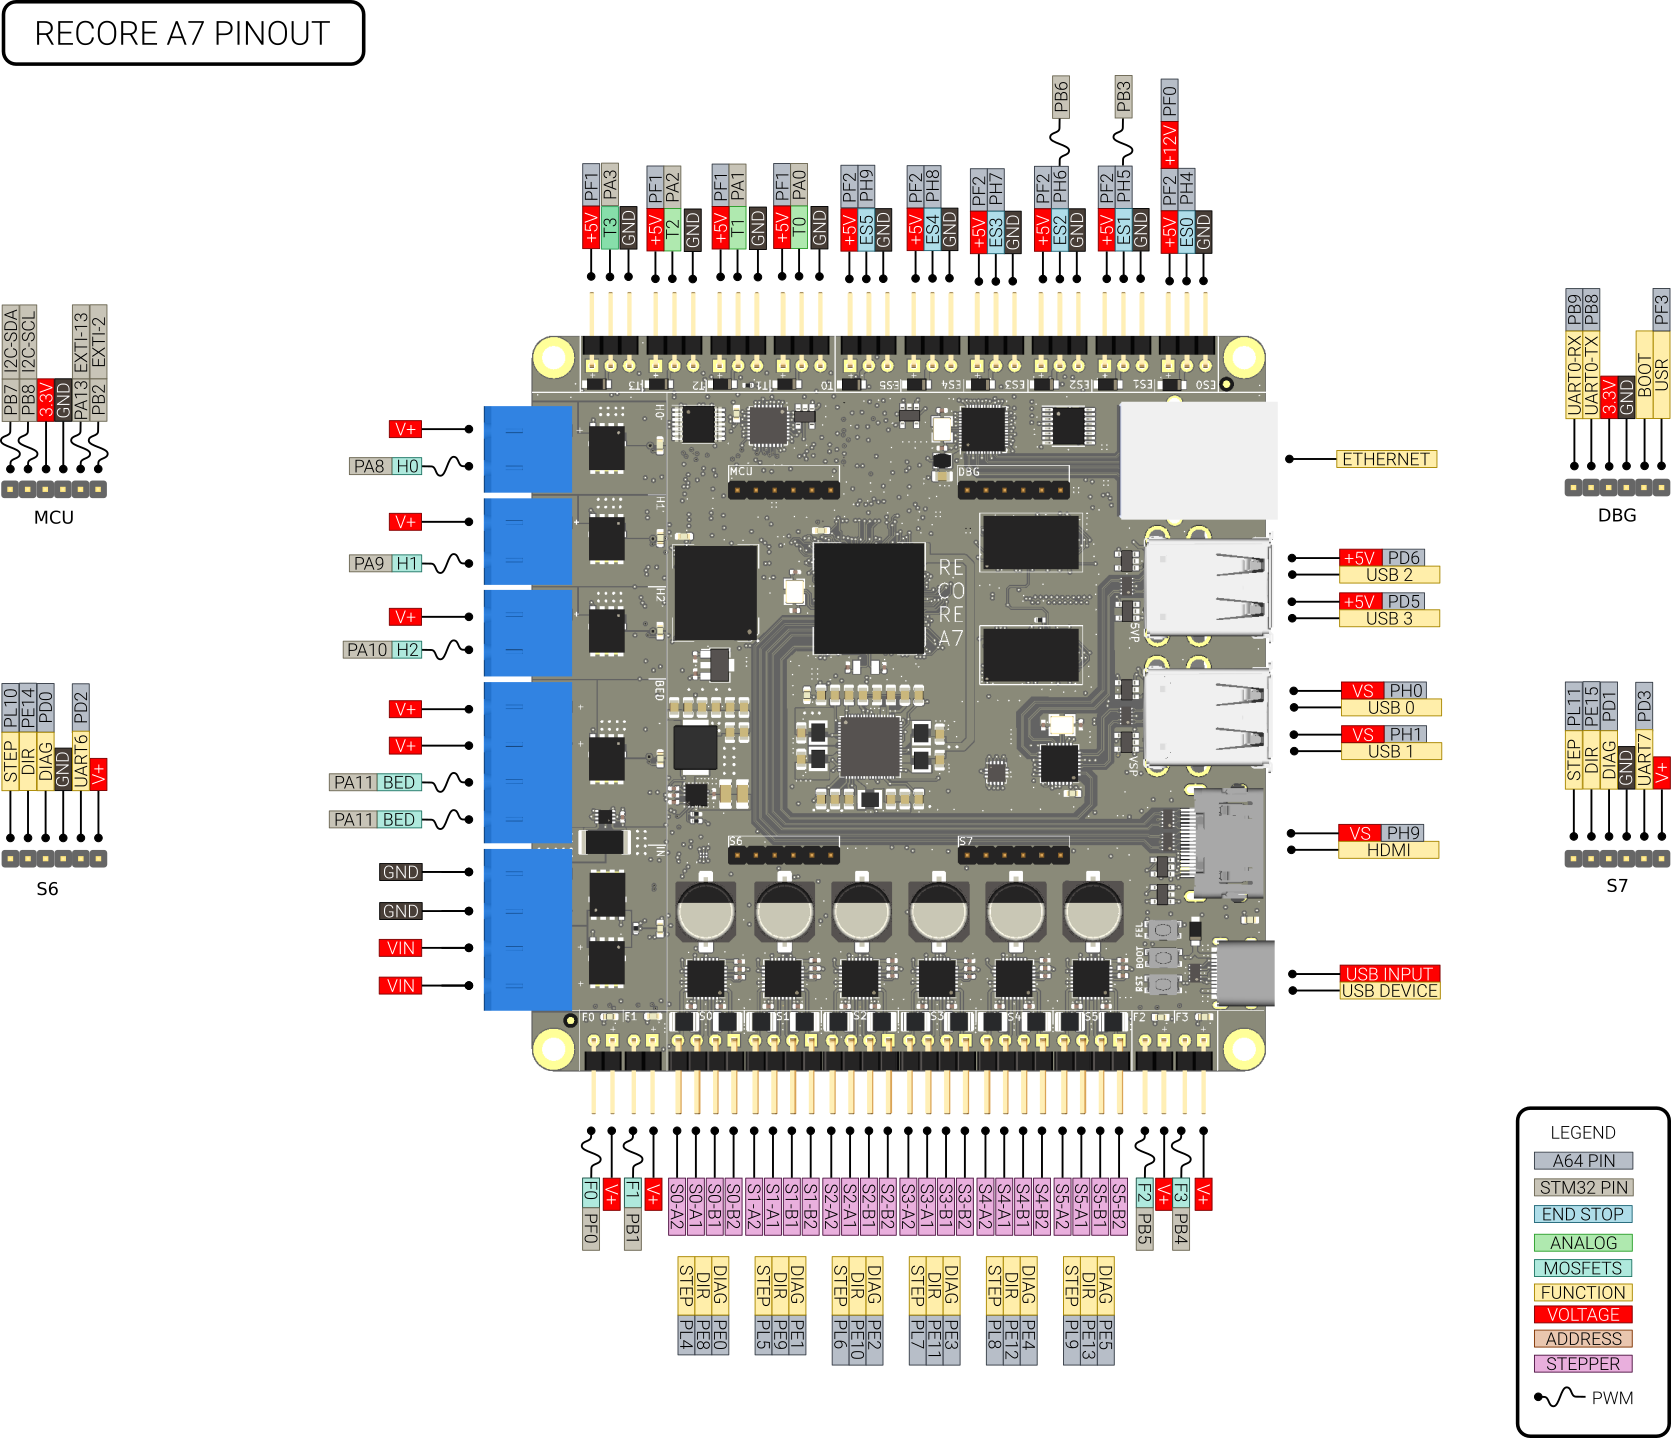
    Since sort of moving on, I have built many things. So, w/out hesitation to build more, I have been messing w/ the slicer, Klipper, and the Recore A7 to handle my build. This model of printer came w/ a board of its own but soon I found it dysfunctional. So, did a switch-a-roo and added the Recore A7 which can be found below:

    Recore A7 - iagent

    Here are a couple photos if you do no plan on looking over their wiki page(s)...

    and...

    Here is the github link for particular source to run Klipper, Mainsail, and additional ideas!

    Refactor - iagent and Releases · intelligent-agent/Refactor (github.com)

    Enjoy... The people at iAgent and the Recore Ax boards can be found on Discord too...

    https://discord.gg/q69M7NRY 

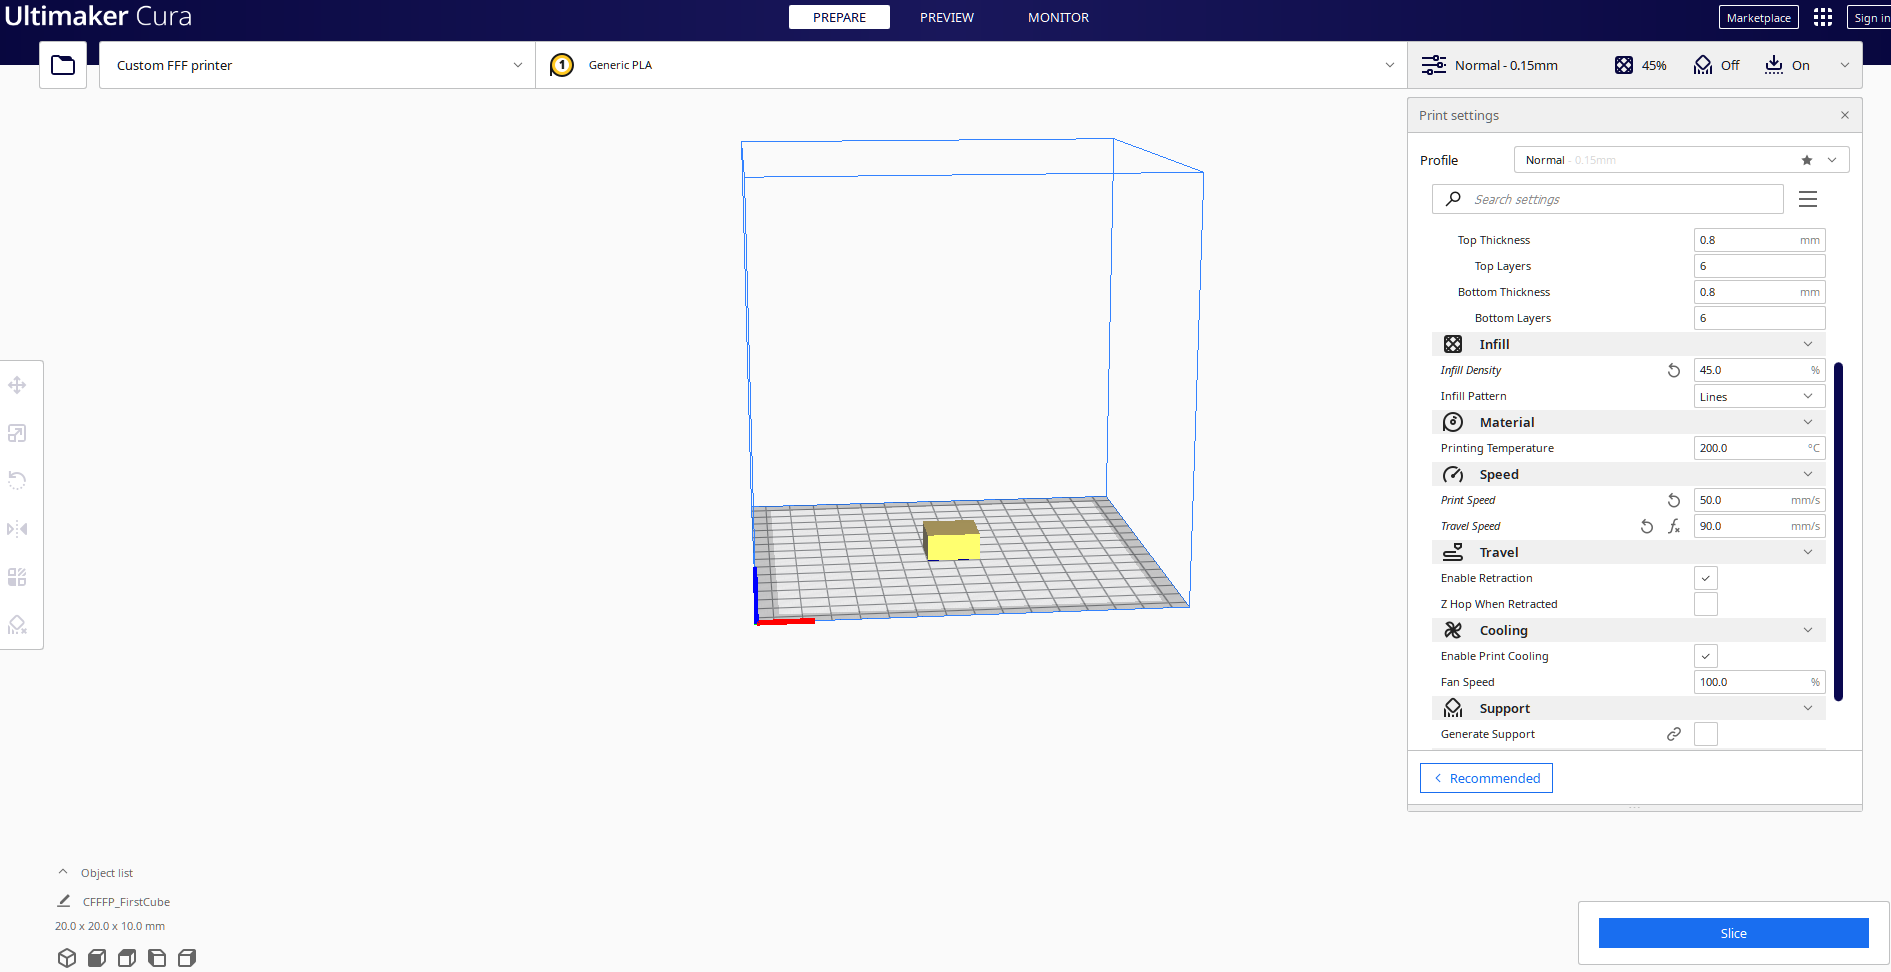
    Use 50mm/s print speed on the CURA slicer with a travel speed of 90mm/s for Refactor 3.0.3 versioning on the Recore A5. Some items have changed in the printer.cfg file that is available/not available any longer.

    So, chose wisely and correct for your particular type of printer. Printers are sometimes strong, fast, slow, and/or weak. But, in the end, the settings and configurations of your target source, slicer, and config. file make or break the print. 

    With CURA, I have learned to test out print speed and travel speed the most while slicing different projects for the Recore. I use the Marlin Flavor in the CURA software along with the custom FFF Printer option. 

    Even though the PrintrBot Simple Metal is an option from the long list of printers, it is a non-working effort with my specific controller(s), software, and slicer. So, I use the FFF option that I can make for a custom version.

    ...

    Building is not always so straight forward and it takes time, patience, and a sort of knack for things if you are new to 3D Printing. What seems to not work at first is not an omen that things will never work. Trust in your excellent methods of note taking, forward progression, and learning abilities. 

    Seth

    P.S. Here are a couple photos. Enjoy.

    The first photo is obviously the CURA slicer getting ready w/ the right side of the photo showcasing the options of that slicer.

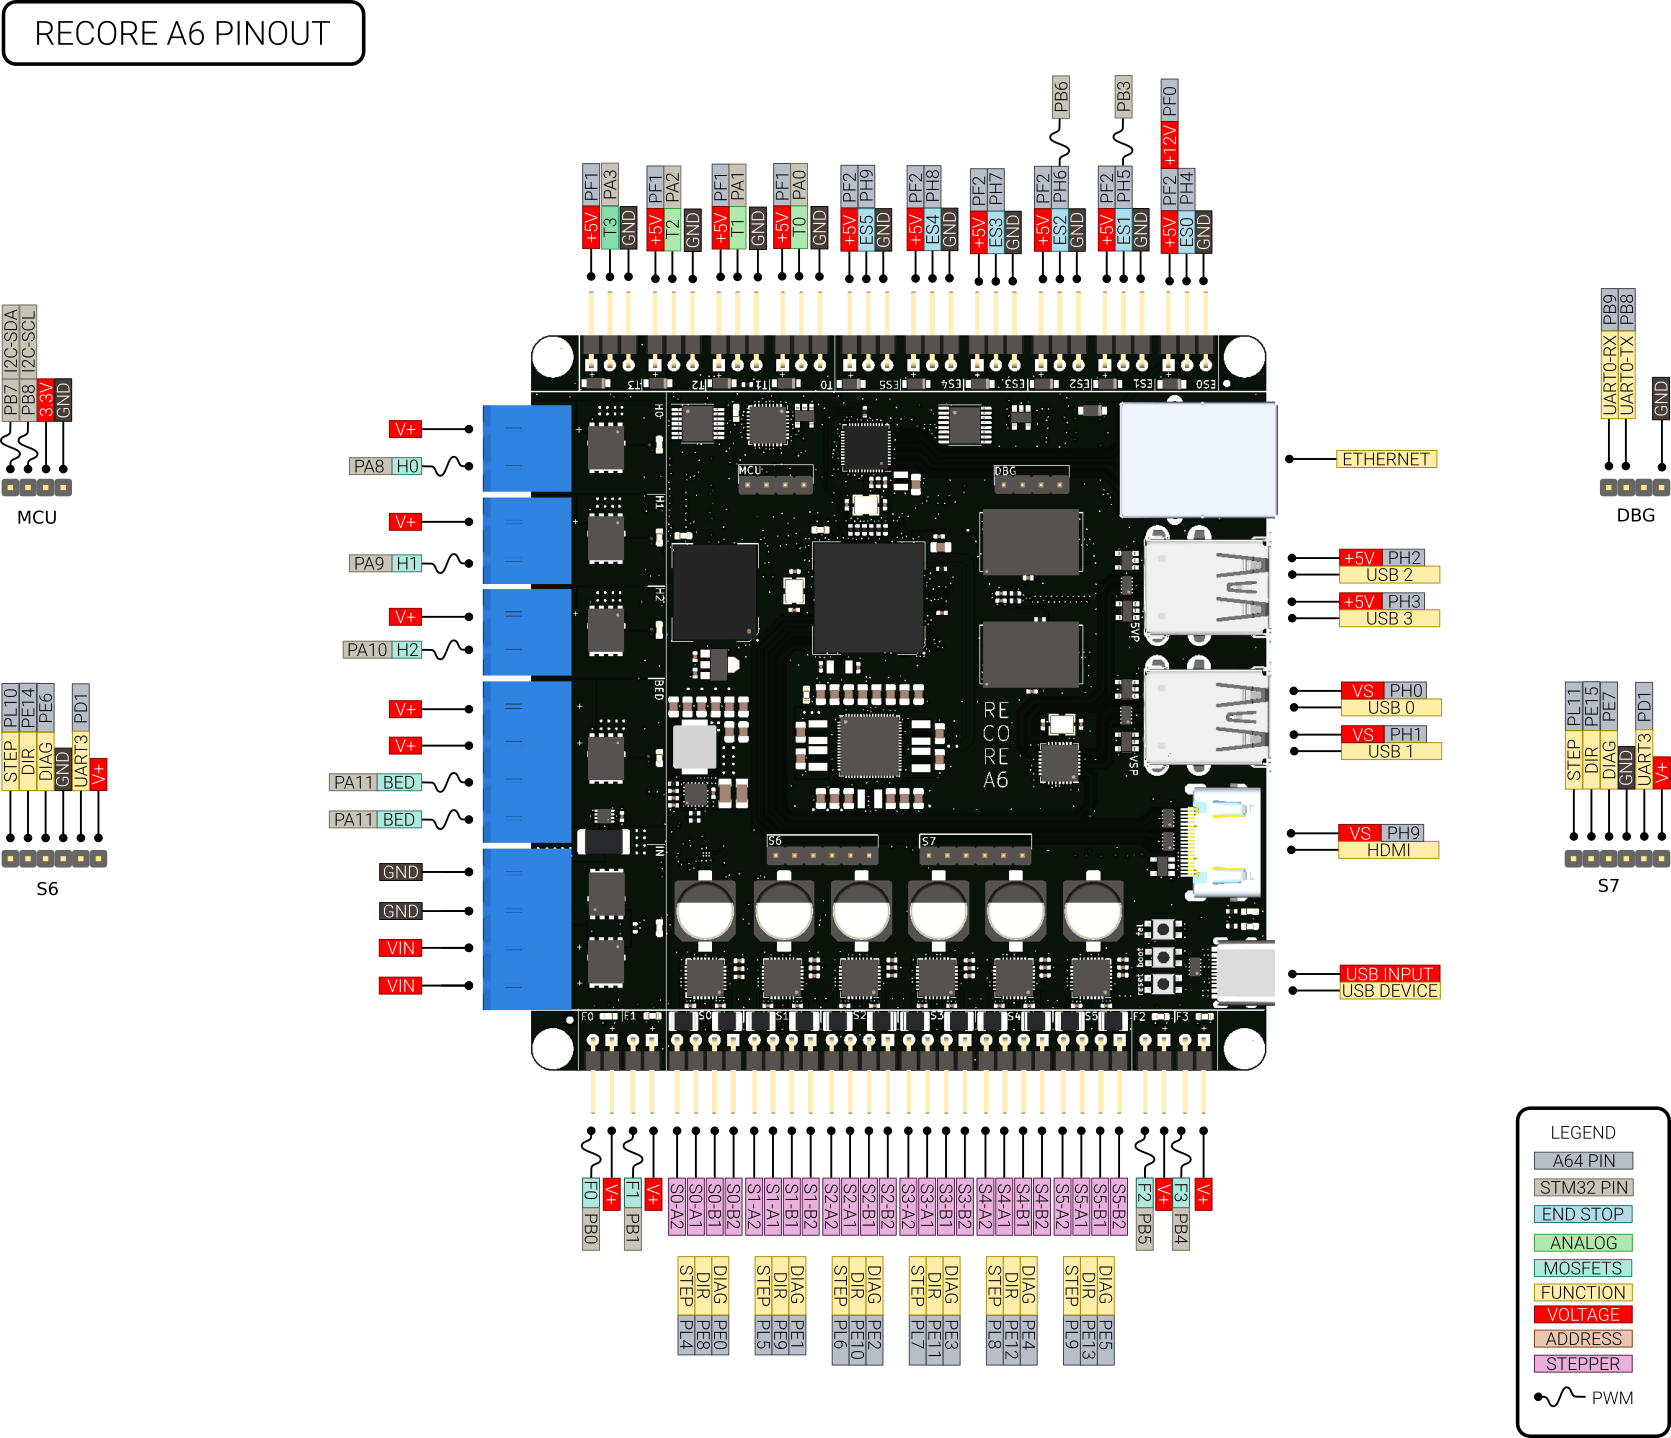
    The second photo is the Recore A6 and its peripherals, location of the pins, and so on...

View all instructions

Enjoy this project?

Share

Discussions

silver2row wrote 04/12/2022 at 23:38 point

Finally tuning adjustments in my slicer CURA source and on the Recore via klipper should make for some wood craving ooze to be made. I have never printed in wood type spools. I cannot wait. Send rations.

  Are you sure? yes | no

Similar Projects

Does this project spark your interest?

Become a member to follow this project and never miss any updates