Michael Graham
-
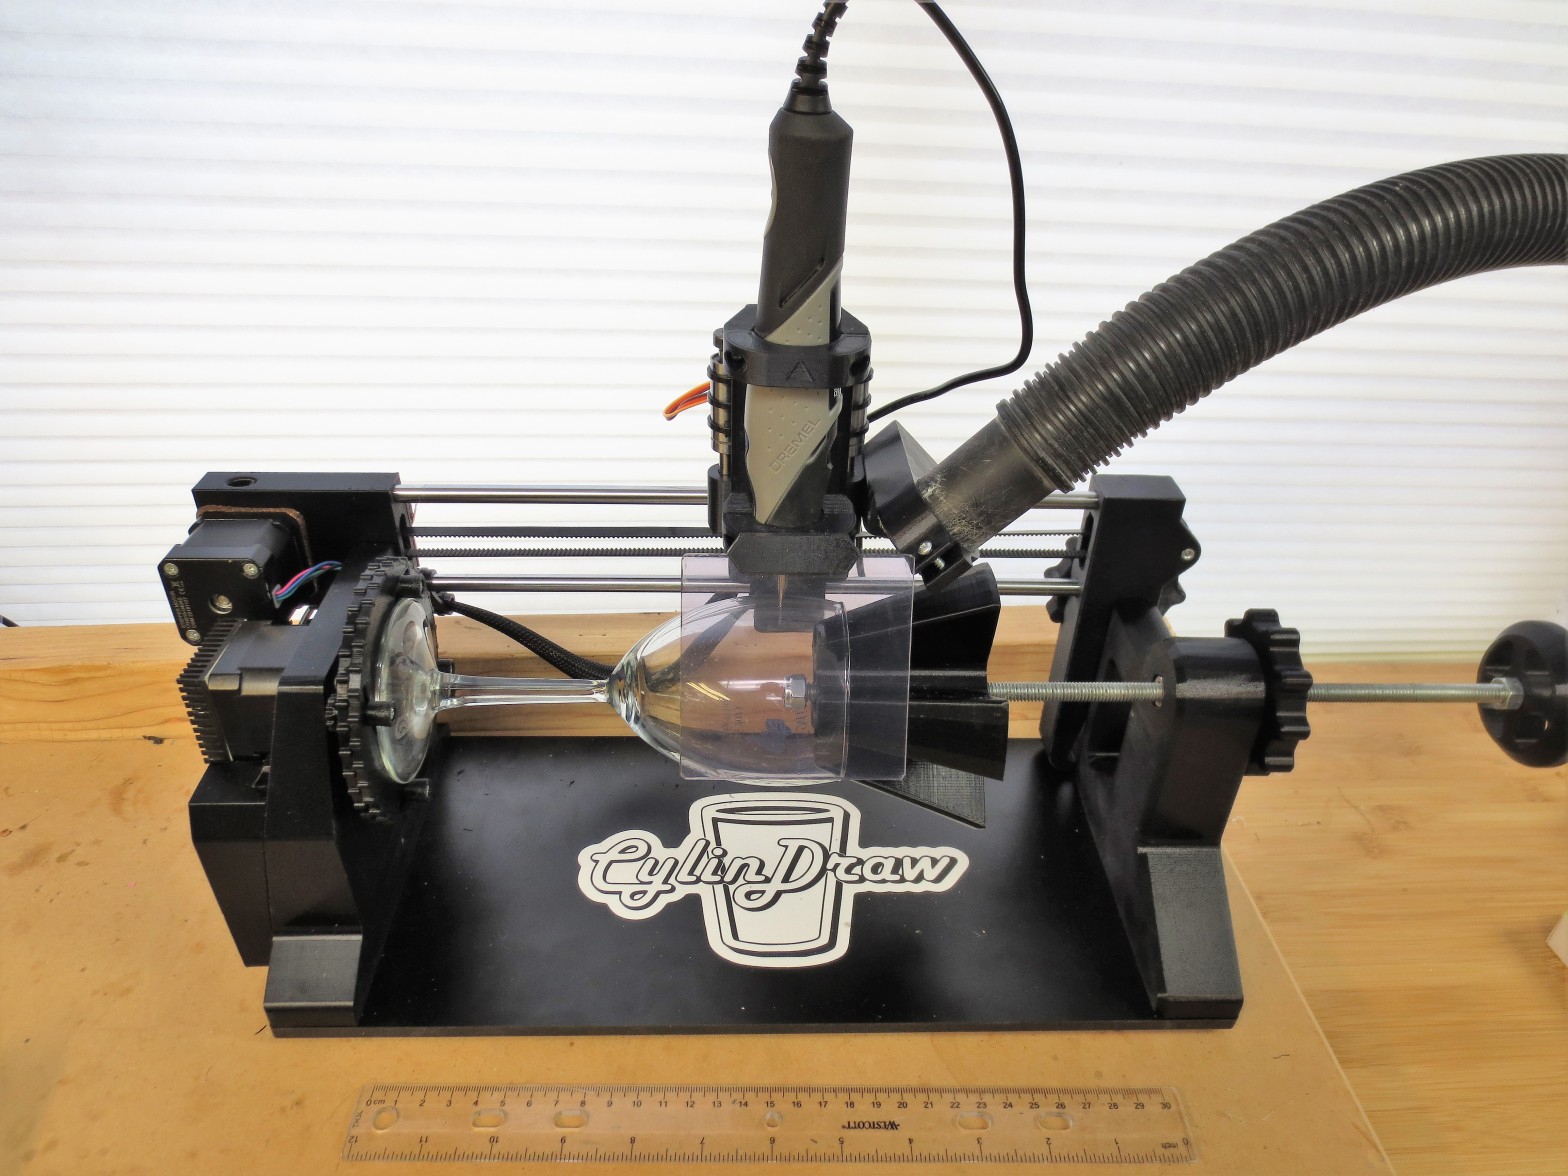
Mechanical vs Laser Engraving Showdown
03/02/2022 at 15:14 • 0 comments![]()
Of the many things a CylinDraw can do, engraving tumblers excites me the most because it is the most disruptive when compared to existing tech.
Our product is so new most people aren’t yet aware of the value our tool brings to this industry, so this article will directly compare the capabilities of a CylinDraw against a laser engraver.
![]()
If you shop online (on say, Etsy) for a custom engraved tumbler there is a 100% chance the seller is making them using a laser engraver with a rotary table add on. That’s just the way it’s done for low volume production.
High volume custom tumblers are usually made with a different process like screen printing, pad printing, heat transfer decals, full color digital printing (can produce gradients), or acid etching. But those processes have a costly labor intensive setup not worthwhile for a one-off tumbler.
In the same way that 3d printing pays off against injection molding for small orders, so does physical engraving compare to the options listed above. What matters most then to a low volume process is unit cost, setup time, and of course how safe the tool is to use. So lets compare with those important criteria in mind:
Safety Concerns:
- Laser Engraver: “Never run the machine unattended” is listed on every laser machine manual ever made for obvious reasons. But burning things is inherently hazardous in more than one way. Lasers produce smoke & soot that must be vented to the outdoors or else filtered inside because it should not be inhaled. Either way the fumes require high cfm fans, noisy enough to call for a dedicated shop to accommodate the tool.
- CylinDraw: Mechanical engraving is a cleaner process since fumes and fire are not a factor. The physical byproduct is microparticles which can be safely contained with a steady flow of water or a shop vac. CylinDraw can readily accommodate either option. (Winner CylinDraw)
![]()
Startup Cost:
- Laser Engraver: Varies greatly but you can expect to pay north of $3000 for a name brand 40W C02 laser plus another $500 for the rotary jig. But the sky is the limit for professional equipment. You can go the cheap route & get a generic K40 from eBay, if you want to trust such a device. I’ve found the hidden costs for direct-from-China CNC equipment to be substantial and usually come in the form of mystery problems with no seller support. A K40 has all the appeal to me as a $600 car from craigslist.
- CylinDraw: At worst its $600 if you buy the machine fully assembled & deck it out with a water pump, a Dremel Stylo, & a Dremel 290. (Winner CylinDraw)
Recurring/Maintenance Costs:
- Laser Engraver: The software is almost always a paid subscription if you want something decent. Expect to pay in the range of ~$500 for a lifetime purchase or ~$20/month for a subscription. If you vent indoors with a filter then you have to replace the consumable filter every so often. (~$50/yr) . The tool requires regular cleaning of soot from the internals to remain safe to operate.
- CylinDraw: CylinDraw is a sturdy little tank with free software! The only thing you’ll be replacing is your (low cost) engraving bits every so often. And perhaps annually the $4 MG-90s lifter servo. (Winner CylinDraw)
Ease of Use:
Laser: Powerful software options come with a harder learning curve. Also lasers take tuning and often have to burn a bunch of bottles getting the tool dialed in.
CylinDraw: The software for the machine was designed to be as easy to use as possible. There aren’t many control parameters required. Just mechanically set the Dremel height, select the speed from a table to match your material & go. Of course using any new software has some learning curve so to counter my own bias I’ll call it a (Tie).
Quality:
Customers buying engraved glasses don’t care how it was made or how long it took. They only care about the quality of the result!
- Laser: Resolution between 0.1-0.5mm. Focus of the laser has to be adjusted to achieve a specific engraving width. Can leave scorch marks at the edges, but if you use masking tape these go away.
- CylinDraw: Resolution between 0.2-0.5mm, depending on the bit you use. (Tie)
Process Speed:
- Laser: (Marginal Winner Laser) Initial setup will take longer but the actual engraving speed is quicker. Expect a few minutes to run a single piece.
- CylinDraw: Takes a few minutes or potentially up to some order of 30 minutes to run a single piece, it varies with the complexity of the work (the reason why has to do with path planning as Ive discussed here). (I’ll add that CylinDraw’s initial cost is low enough that its feasible to buy 2 and run them in parallel to increase your process throughput!)
Overall:
In summary, CylinDraw is an order of magnitude less expensive in terms of upfront/operating/maintenance costs when compared to a rotary laser engraver, while offering an (arguably) much easier to use interface and equivalent output quality. So I am extremely pleased with the overall value offering a CylinDraw rotary engraver represents!
![]()
![]()
![]()
![]()
![]()
![]()
![]()
![]()
![]()
![]()
-
CylinDraw Can Draw on Paper!
02/23/2022 at 15:15 • 0 commentsAnnouncing a major new capability: CylinDraw makes for an excellent paper plotter!
![]()
The hardware needed to enable this capability only requires the addition of a large tube to wrap the paper around and two rubber bands to secure the paper in place.
We won’t sell tubes but you can use any tube 3.5-4″ (89-100mm) outer diameter & 10.5″ long, like this acrylic tube on amazon. Cardboard shipping tubes also work!
We also just released a new software update (V2.01) to facilitate the paper drawing option along with some other nice to have features. (Details listed later).
There are of course a variety of consumer grade paper plotters out there, so let’s use the most popular one as a basis for comparison, the AxiDraw by Evil Mad Scientist Lab
Tabletop Space Required: What desktop footprint does the machine need.
- AxiDraw = 17 × 3.5 inches (430 x 90 mm). The open frame by design has to be twice as deep as the paper.
- CylinDraw = 23″ x 6.5″ (584 x 165mm). The depth of the machine is noticeably smaller on my desk and I can use the bed of the machine to store pens/paper without them being in the way. (Winner)
Maximum Paper Size: The usable drawing space on both machines fits a standard 8.5″ x 11″ paper. This one is a (Tie) for the base version of the machines, though AxiDraw does offer a separate larger version.
Max Drawing Speed: How fast can the machine move.
- AxiDraw = 380 mm/s. (Marginal Winner)
- CylinDraw = 85 mm/s.
Note that pen drawing is typically done at <25mm/sec on both machines, so the top speed is only differentiated while the pen is lifted. Faster moves here shave off a tiny percentage of the overall job time. To CylinDraw’s credit, the rigidity of the machine enables you to make very fast drawing strokes without fear of machine wobble showing up on the paper. Though you would almost never want to draw pen strokes at high speeds because pens can only lay down ink so fast without fading.
Versatility: How many different ways can the machine be used.
- AxiDraw: The open frame design can draw on literally anything flat. Paper, an open notebook, a closed laptop cover, etc. Can use normal pens or fountain pens. Cannot engrave without significant modifications.
- CylinDraw: Can draw on any type of paper you could wrap around a cylinder, but not something like a notebook. It cannot hold a fountain pen currently, but with a new part it easily could. It can readily engrave and it works on any type/size of cup of course! (Call it a Tie as this is unquantifiable)
Drawing Resolution: The smallest controlled move the machine can make.
- AxiDraw: Has a resolution on both axes of .0125 mm/step. (Winner)
- CylinDraw: On paper it has .01 mm/step on the linear axis & .1 mm/step on the rotational axis on the 4″ diameter tube that I used for paper. The resolution on the rotational axis increases proportionally with smaller diameter tubes. Since pens typically draw with a stroke width of 0.1-0.5mm, the resolution is imperceptible is most cases anyway.
Reproducibility: How well successive identical lines overlap.
- AxiDraw: ‘Typically better than 0.005 inches (0.1 mm) at low speeds.’
- CylinDraw: At least as good. The closely packed closed-frame designed for the rigidity needed to engrave makes for extreme reproducibility with a pen. (Call it a Tie because it is hard to measure.)
Price: (prices as of this writing)
- AxiDraw: $475 with free shipping, no assembly required.
- CylinDraw: $260-$500 with free shipping, total out of pocket price depends on if you want to assemble yourself or buy it fully assembled. Most folks have opted to build it themselves from a kit. (Tie, Depends)
Software:
AxiDraw: Open Source ‘Inkscape + extensions’, or a small selection of alternatives like AxiDraw server. Works on Mac, Windows, and Linux computers
CylinDraw: Open Source ‘CylinDraw Control Suite’ only. Currently only works on Window computers but a Linux option is in development. No apple support.
All options are free, open source, & do not require a paid subscription for any level of software access. Both software stacks allow you to convert bitmap images into drawable vector paths, or let you import SVG files purchased from a 3rd party. That AxiDraw functions on more operating systems is a big win though it doesn’t matter to the people who only use windows anyway. Also, being built in Inkscape there is a very deep level of image manipulation control built into the system. In my opinion the AxiDraw workflow is better suited for a tech savvy audience.
In contrast, CylinDraw software was designed primarily to be as easy to use as humanly possible. The workflow requires fewer clicks and less understanding of vector conversion & machine control. CylinDraw also includes a built in path optimizer and I don’t believe Inkscape has that feature. Additionally, for the very few users that want to modify either open source software, I think they would find it easier to modify the source code (arduino + Processing3) of the CylinDraw. This is hard to call without my own bias playing a role and I think the verdict depends on the user. A casual crafter would enjoy the simplicity of CylinDraw, but since most plotter users are tech savvy and would probably vote for Inkscape here I should call it that way. (Winner AxiDraw ) (I’ll add that neither software works for the other machine currently.)
Multicolor Capability:
AxiDraw: To the best of my knowledge multicolor-all-in-one-jobs are not directly supported in the software, though that doesn’t stop artists from making separate consecutive jobs to apply different colors. CylinDraw: The software natively supports multicolor jobs to make 1 color as easy as 12. The software consolidates all same-color strokes together and prompts you to change the pen to the next color & shows you which color it wants. It also automatically sorts the color order by brightness so that light colors aren’t smearing around dark colors already on the workpiece. (CylinDraw Marginal Winner)
Overall:
Both machines bring a completely different approach to the plotting process and their individual appeal varies greatly depending on the user.
People who use Apple products, have stronger tech skills, and/or professional aspirations for making paper plots surely have their needs better met by the AxiDraw. (Their product is great and this article in no way intends to suggest otherwise.)
On the other hand, people who don’t like Inkscape & view software tinkering to be unpleasant, who enjoy building projects from kits to save money, and who enjoy making art on a variety of mediums for hobby purposes will find a compelling value proposition in the CylinDraw.
While the paper drawing capability of CylinDraw is good, it is still of course a tangential benefit to the main attraction of drawing/engraving on cups. Something that no other commercially available plotter on earth can do!
Its fair to say that preferences vary greatly with the end user and both machines have unique qualities, strengths/weaknesses, and that comparison is largely apples to oranges. Doing so was just to provide you with a frame of reference. There’s also no reason a person shouldn’t own BOTH machines.
…
Software Version 2.01 Update:
Firmware: Caps the maximum/minimum speeds so you cannot attempt to move at a rate that would cause the machine to lose steps. Fixed a bug that improperly adjusted speeds in certain cases. (A non-issue for DePixelized SVGs which is why I didn’t notice, but for SVGs from anywhere else you would notice straight lines turning out curved.) (SW is backwards compatible with arduino firmware v2.00 but we still recommend updating your fw to the current rev)
DePixelizer: Added (see Log_DePixelizer.png in the System folder). Added Resolved a bug that created a ghost effect in the GUI after exporting jobs.
Job Creator: Added the gui selectable option to specify that you are drawing on paper. Auto-detect & remove preview from large job files to improve loading time. (Extremely large svg files were formerly causing some users to not be able to open the program.) Updated slicing algorithm to better remove the number of jumps in a given job. Reduced overall slicing time for extra large jobs! (this wasn’t a problem before but now drawing on paper creates much large jobs and so the need came up). Made the path optimization a selection option available in the Help menu. (Because for non-DePixelizer SVGs found on websites such as https://plotterfiles.com I found that trying to optimize them made the jobs take longer.)
Run Mode: Auto-detect & remove preview from large job files to improve loading time when opening the program. (Clicking on the image in the center of the screen still opens CylinDraw JobViewer so you can still see the entire job if you want.) Added the ‘Jump to Line’ button so you can go to any point in the job you want.
![]()
-
Engraving Tips & Tricks #3: How to Engrave Stainless Steel
02/16/2022 at 20:23 • 0 commentsEngraving off the coating from a metal tumbler is one thing, but making any kind of dent in pure stainless steel tumblers is quite another.
Engraving stainless steel is difficult because the material is so hard! This example is the best the Dremel Stylo can do on stainless… It definitely scratches it, but its much more faint than I want since the Stylo leaves behind a smooth finish & there is nothing to catch the light.
![]()
Pure uncoated stainless is difficult to scratch! (Note this picture is of an undesirable finish, read on to see how we improved it) So we brought in the big guns…
The Dremel 290 is a diamond tipped vibratory engraver that can scratch & dent pretty much anything. It leaves behind a textured sort of emboss that feels almost like a finely knurled surface but the result is high contrast and clearly visible even on a shiny all silver cup!
![]()
First Try, I set the stroke width a bit low but immediately I could see the potential for detail of this new tool The tool is cheap, simple, no coolant is necessary, & seemingly it never wears out, however… it is loud! This setup is one for the garage or dedicated workshop because the sound of this tool hitting a metal cup is not ignorable. We recommend the use of ear protection. (It just occurred to me that I might be able to dampen the sound by inserting some foam or paper inside the cup. Of course you could always put a foam box around it too, that would be enough.)
Dremel 290 has a depth control knob on the side, settings 1-5 with 5 being maximum depth. The vibration frequency is a function of your 120VAC frequency, so that is not adjustable. I choose 5 so as to get a strong mark.
![]()
For this tool I recommend slicing images at a 0.2mm line width, then running the job at 15mm/sec @100% vibration intensity.
![]()
An experienced engineers motto: “Slow is Safe, Safe is Fast” The Dremel 290 also works on a regular coated aluminum/steel bottles, again with the tangible texture.
![]()
For reference, the black printed part model name is “ChiselMount_Dremel290_1xOPTIONAL.STL”, found among the other officially released CylinDraw Parts. The tool is held in firmly place to its mount with a couple cable ties.
Next time we will be discussing the details of our value proposition against the established technology. CylinDraw Engraver vs Lasers!
-
Engraving Tips & Tricks #2: Cooling, Feeds, & Speeds
02/16/2022 at 20:22 • 0 commentsThe engraving process produces ultra fine particles that are too small to see which need to be collected for human safety.
Our original design calls for a mounted shop vacuum and a magnetically mounted Lexan shield.
This setup is simple & works great! Though its probably best used in a garage because a shop vac can be noisy. For use in an office or apartment I wanted another option…
![]()
So with the addition of one tiny 3d printed part, a fountain pump, & a 12″x7.5″x2″ aluminum pan I built a water cooling system!
I also added an optional printed shield/cover shown on the left side of the machine as a splash guard just in case!
Its an improvement all around! Its totally silent & the water cools the bit as it contains any airborne particles.
(The appearance of an aluminum foil tray is not our #1 choice to be sure. I’ve got a design for a slick black vacuum formed tray, but I wont pull the trigger until a later time.)
![]()
![]()
![]()
![]()
In addition to new hardware we improved our technique as well.
We learned through iteration to make software V2 smart enough to always keep the motors energized so you never lose your rotational position, even when a job is complete.
Keeping track of your position matters because if you lose power during a job you want to be able to pick up where you left off. But since a cup is round, there is no hard stop to home against. So I think its good practice to make a registration mark at the tool home position. A tiny dot as shown in the next picture, so you can line up your tool exactly where it was, even after powering down & removing/reinserting the cup!
We found this necessary after breaking a few bits during or experimentation process, trying to figure out the best feeds & speeds for different materials. Fortunately, this process will be easy for you since you can copy what we know works well!
![]()
Feeds & Speeds:
- Tool Speed: The rotary speed of the Dremel tool; Controlled by the Dremel.
- Feed Rate: The rate of motion of the machine; Controlled in Run Mode.
The default feed rate is a good value for drawing with a pen, 50mm/sec. That is, the pen will draw a 50mm line (2inches) in one second. Though, short line segments will take slightly longer because the machine also controls acceleration rates.
Acceleration control is necessary because the moving parts (tool & cup) have mass and are moving quite fast. If you try to move full speed then change direction suddenly the motor might stall & lose control of its position. The default acceleration values are adequate for 99% of cases. Though on the large glass stein in the first picture I found that I needed to reduce the acceleration rate by half.
Below are proven save speeds & feeds for engraving different materials.
- Glass & Ceramic: Dremel Speed = 1 Feed = 7mm/sec
- Painted Aluminum/Steel: Dremel Speed = 2.1 Feed = 15mm/sec
- Pure Stainless Steel: Not recommended with this tool.
Real Stainless steel is a very hard material, well known for its resistance to rust and poor machinability. The Dremel Stylo will scratch it though the result can be more faint than would be desired, since there is no contrast as with removing a painted coating. So for this material we recommend a different tool, but that is a topic for next time!
![]()
Feed rate control in software ![]()
Dremel Speed Control -
Tumbler Engraving Tips & Tricks #1: Bit Sizing
02/16/2022 at 20:21 • 0 commentsThis winter we’ve been experimenting with our engraving process to lock down the best methods for different materials & cups. In this series I’ll be sharing some interesting tips we learned along the way in a small easily digestible format.
First enjoy this short teaser clip & these beauties that resulted.
![]()
![]()
How its Done
CylinDraw’s standard engraving attachment is a mount for a corded Dremel Stylo Engraver.
So chosen because the Dremel brand is the highest quality consumer grade rotary tool on the market. (The next step up IMO is dental drills!)
We use the Stylo model specifically because it is so light weight.
![]()
Tool Speed Control:
Dremel Stylo has a rolling dial to adjust speed from “1 to 5”, and the product specifications list the RPM to range from “5,000 to 22,000 RPM”. So we approximated the tool speed at each dial setting:
- dial 1 = 5,000 rpm* (speed may reduce under load @ dial 1)
- dial 2 = 9,250 rpm
- dial 3 = 13,500 rpm
- dial 4 = 17,750 rpm
- dial 5 = 22,000 rpm
This information is helpful for estimating what the appropriate motor feeds and tool speeds should be. (More on that another time, its easy!)
Bit/Burr Sizing:
The Stylo is equipped with a spherical diamond studded engraving burr. It looks like this:
![]()
The smallest burr size we can readily get is a 0.5mm ball end, which can engrave a 0.2mm wide line. (So measured with Mitutoyo calipers & magnifying glass!)
Finer lines always look better, BUT jobs with fine lines take more time because there are simply more paths to travel through.
We tested out larger bits and interestingly found that we could predict the line width using a ratio & known info to predict unknown info.
I.e. a 0.8mm ball end burr was estimated to produce: 0.8/0.5 * 0.2 = 0.32mm line width. The actual line width was measured at 0.35mm!
Since this estimation works so well we can reasonably be sure that a 2mm ball end burr will have an 0.8mm line width (or 2.0/0.5*0.2 = 0.8mm) for example.
We used a 1.0 mm ball end burr on this Mando tumbler because it was so tall I didn’t want it to take forever. Overall I like how it turned out, but I know I can do better!
I think sticking with the smaller bit sizes & spending a bit more time in the DePixelizer software could have make his features pop more. IMO finish quality is more valuable than speed, because after a cup is made no one cares how long it took, only how good it looks! So its best to work at the finest resolutions even if the job takes an hour because of it.
![]()
A
CylinDraw: Rotary Plotter & Engraver
Easily create incredible artwork on any kind of cup!