Michael Gardi
-
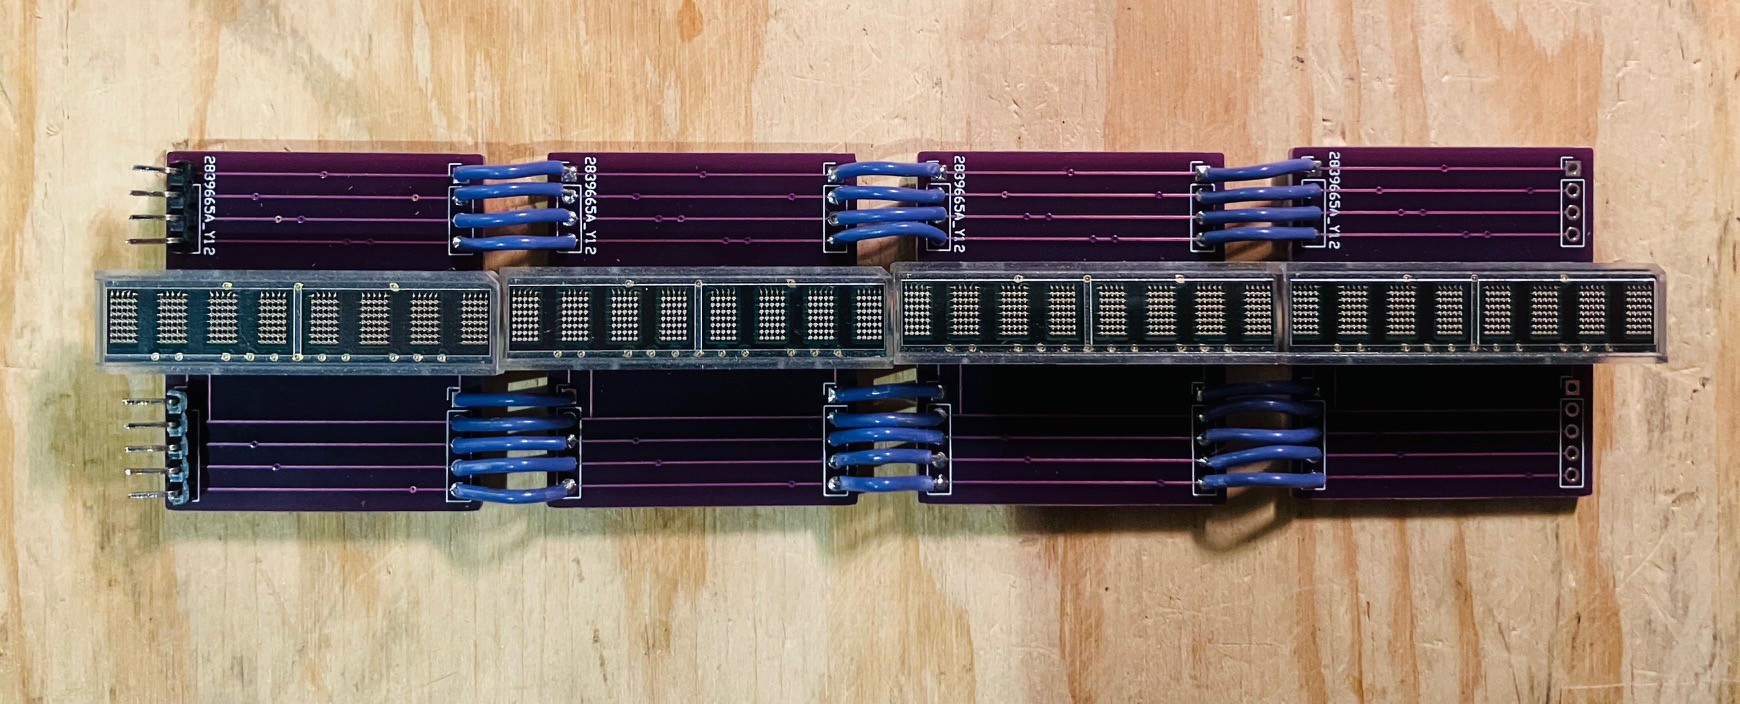
32 Character Display Electronics Completed
04/18/2022 at 20:55 • 0 commentsBased on the Broadcom HCMS-2972 parts and the display carrier board PCBs that I made, I have a working MCM/70 display.
![]()
The carrier boards worked out great. Just had to wire them together.
With the display in hand, I was able to integrate it with the York University MCM/70 emulator. I used the Wiring Pi library to access the Raspberry Pi's GPIO pins. In order to make the library available for use I executed the following commands on the Pi with the emulator software installed.
git clone https://github.com/WiringPi/WiringPi.git
cd WiringPi
./build
The library is referenced in the code through the WiringpPi header file.
#include <wiringPi.h>Also when building the code the wiringPi library needs to be referenced.
gcc mcm.c -lGL -lglut -lwiringPi -o mcmWhen I'm a little further along I'll post the changes I made to the York University code. The HCMS-2972s are pretty easy to work with.
Here is a short video of the display assembly in action.
I had hoped to tackle the keyboard next but I will be a few weeks until I get the OSI keyboard PCBs. Hopefully I can get a start on the MCM/70 case.
-
Display Carrier Board
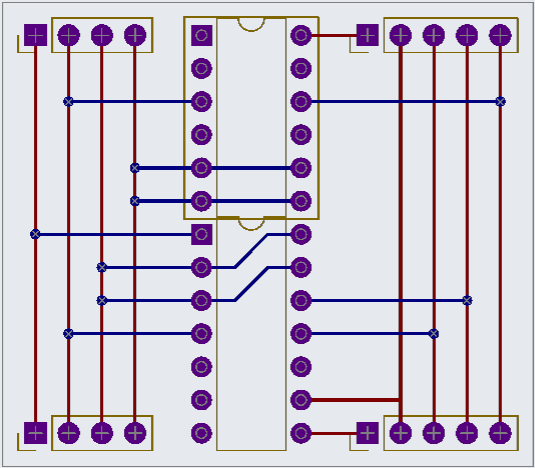
04/05/2022 at 18:33 • 0 commentsI have received all four HCMS-2972s, so it was time to start thinking about how to organize them into a 32 x 1 character display. My original thought was to design a PCB to hold all four parts. Then I realized that JCLPCB is going to ship a minimum of five boards anyway, so I came up with a carrier board for a single HCMS-2972 that can be easily daisy chained together with others.
![]()
Pretty simple. I'll use a couple of IC sockets a 14 pin and a 12 pin to hold the HCMS-2972s in place (these parts are like $60 a piece so I'm not taking any chances with them).
Board files have been sent for manufacturing.
-
The Keyboard
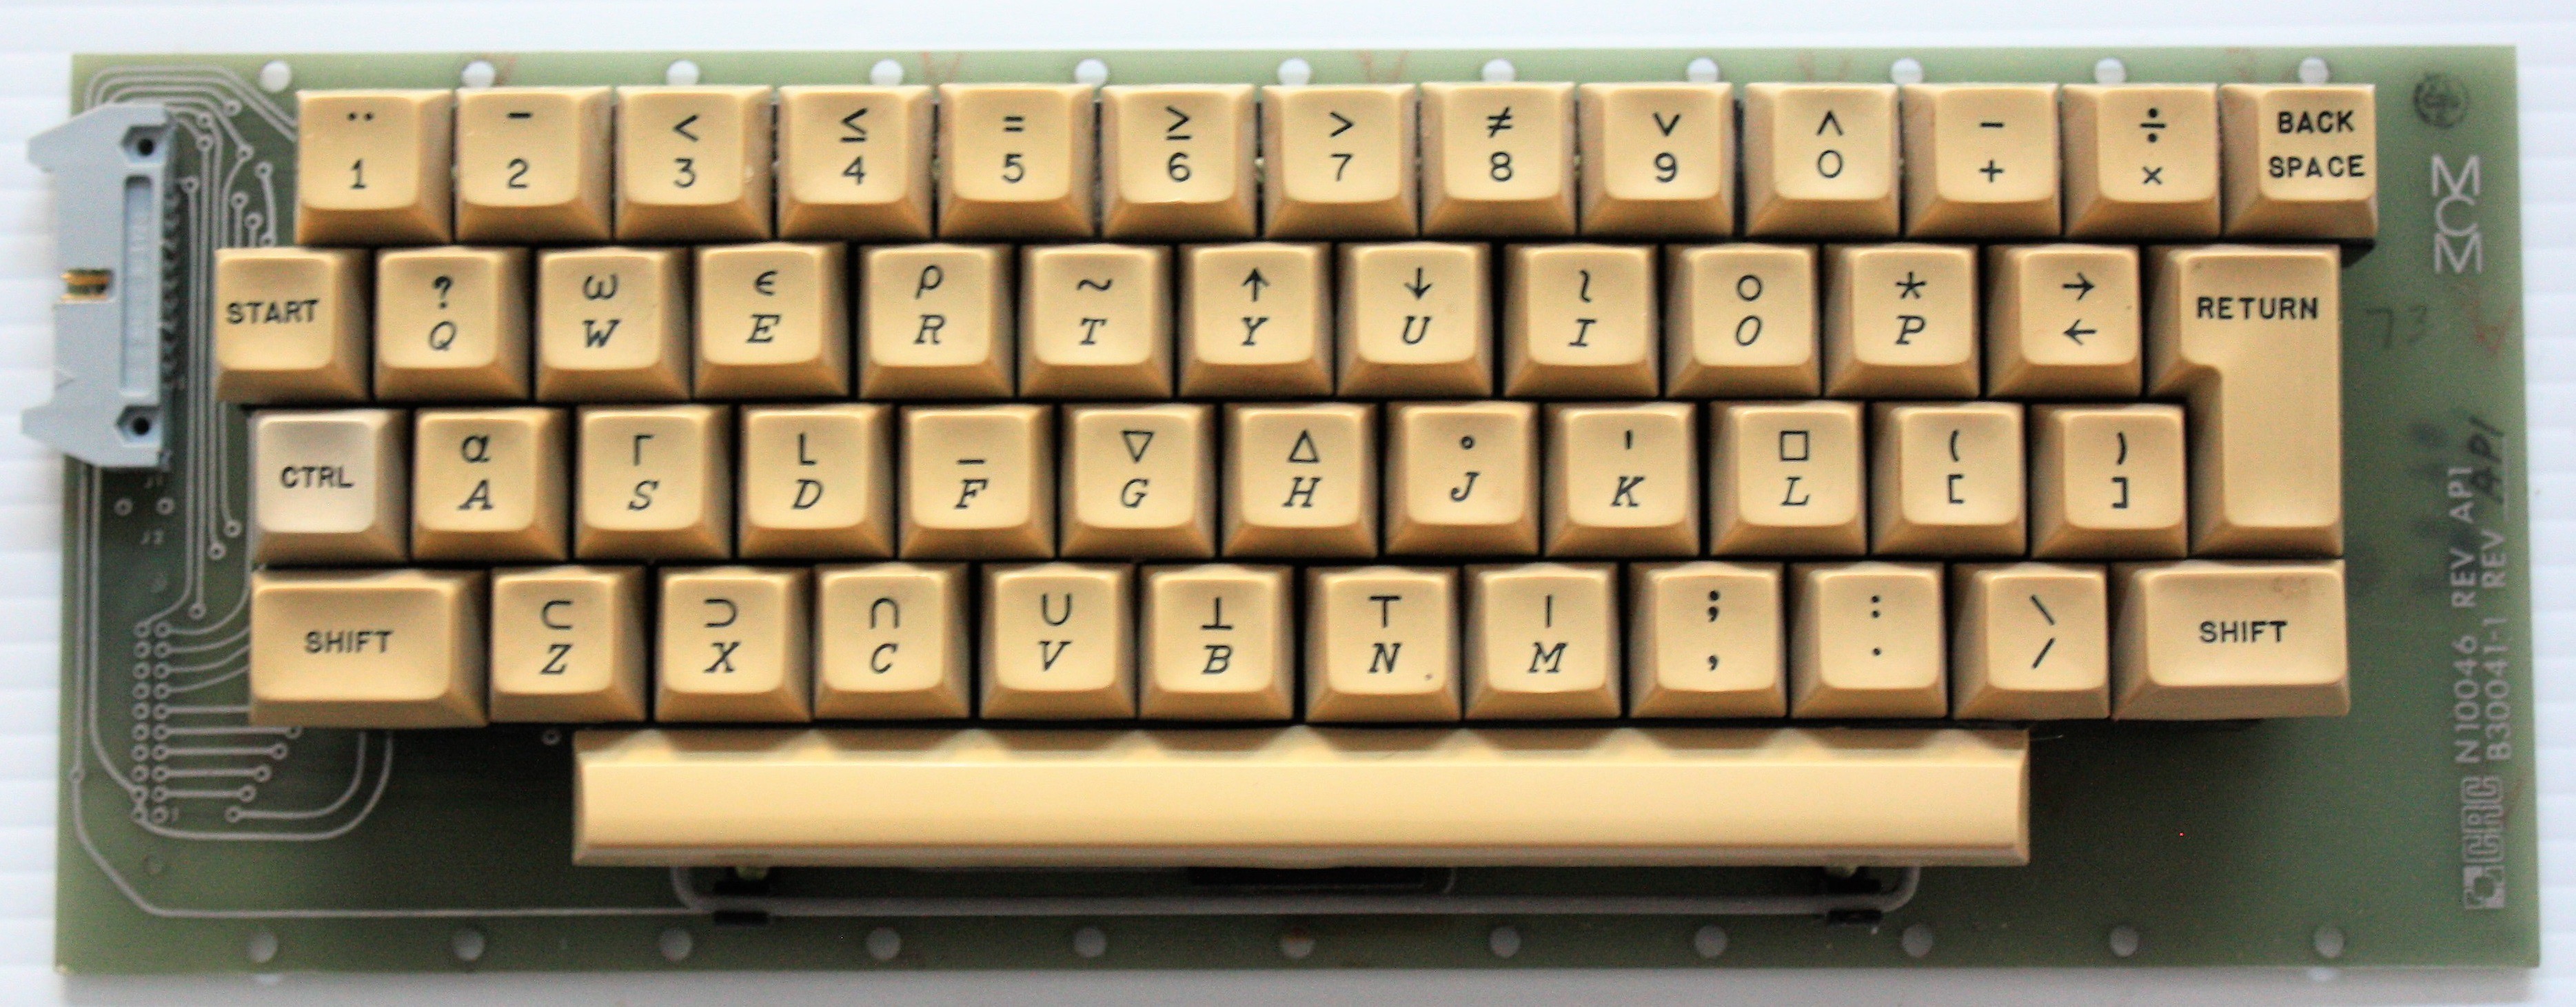
04/03/2022 at 19:22 • 0 commentsI knew that producing an authentic looking keyboard for this project would be a challenge in two parts. First getting the physical keyboard layout right with the MCM/70 keys. The second challenge will be to obtain a keycap set with the special APL symbols (legends). Here is an MCM/70 keyboard.
![]()
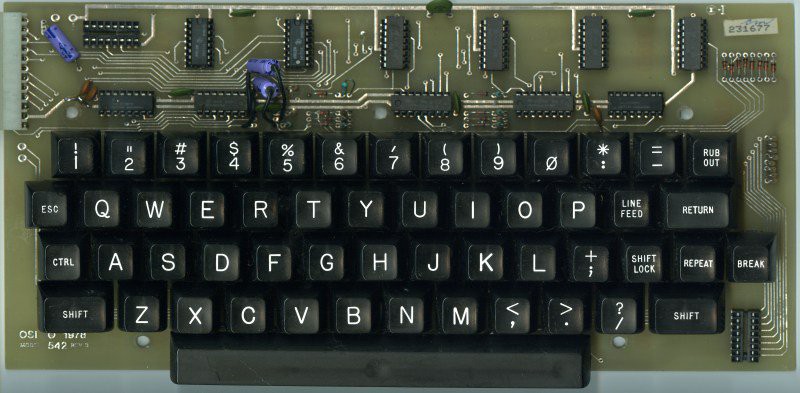
Well I think I have the keyboard layout issue sorted. After looking at many many keyboards online I found the following.
![]()
This is a keyboard for Ohio Scientific (OSI) computers that were popular in the mid to late 70s. It's a very close match layout wise to the MCM/70. One small difference is that the OSI spacebar is only 8U compared to the MCM/70's 9U size. Also the MCM/70 has an ISO style Return (rotated L shaped) key, but if you remove and ignore the OSI's Repeat and Break keys and replace the Return key with the ISO model it's a practically perfect replacement.
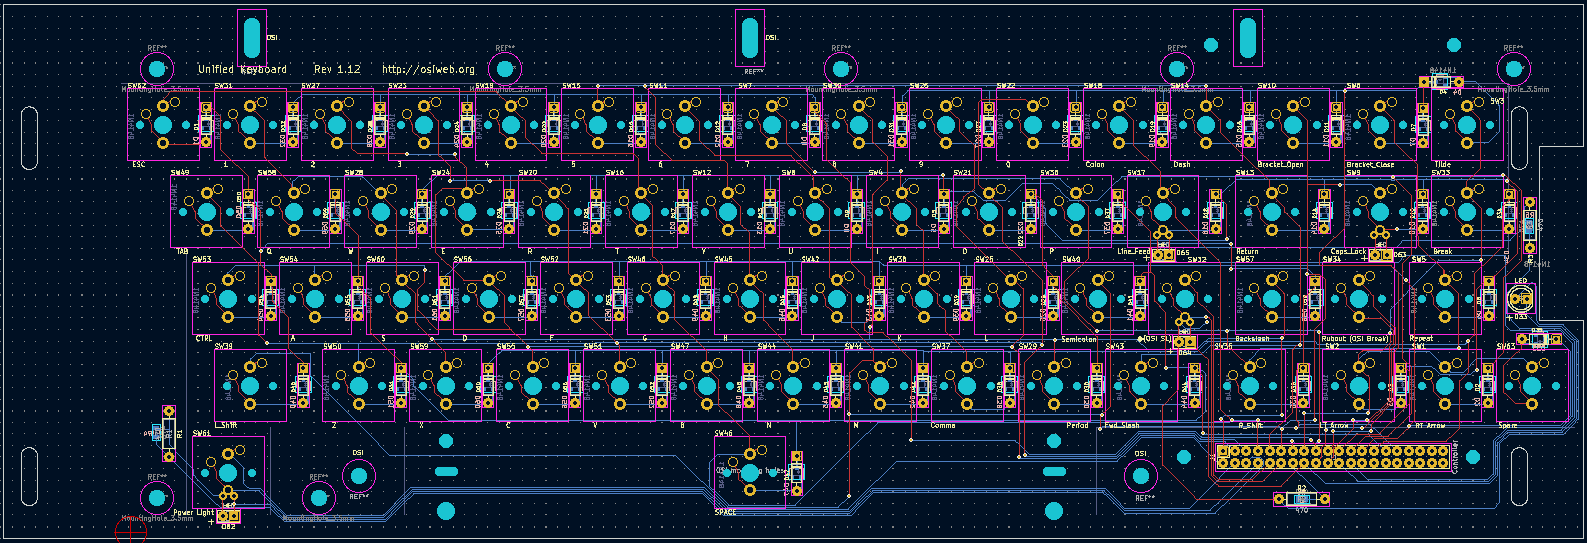
So how does this help? Aren't OSI vintage keyboards just as hard to find as MCM/70 keyboards? Well yes and no. Yes originals are hard to find, but thanks to Dave from osiweb.org replacement keyboards are not. I used Dave's Sol-20 reproduction keyboard for my Sol-20 Reproduction and it worked out great. If you check out Dave's Unified Retrocomputer Keyboard Project on GitHub you will see that he also offers keyboards for Apple I, Apple II/II+, Generic ADM/3A teletypes, and most importantly to me OSI computers. So I have ordered an OSI keyboard PCB and stabilizer, OSI keycaps, and an encoder.
![]()
As for the MCM/70 APL keycaps, well I'm still looking into that. Lots of options. More later.
-
The Display
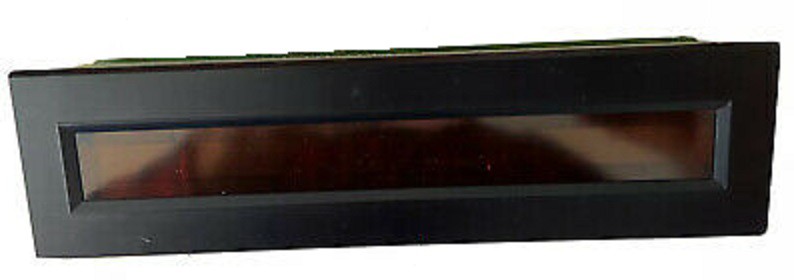
04/01/2022 at 21:10 • 2 commentsFor output the MCM/70 used a Burroughs Self-Scan Model C4047 plasma display. These Self-Scan displays were an important stepping-stone technology between teletype terminals of the 1960s and the widespread use of CRTs from the mid-1970s on.
![]()
The display was arranged as a 222 column by 7 row dot matrix. An MCM/70 would use these dots to render 32 characters of 5x7 dots with two blank columns between each. Now a single line of text with 32 characters doesn't sound like much, but considering that the Altair 8800 released that same year just had front panel blinkenlights out of the box, it was quite a step up.
Here's the problem. These plasma displays are no longer manufactured. You can occasionally find one on eBay but they are pretty expensive. Even if I could source one, to tell you the truth the high voltages required for the plasma elements (250V) scare me a bit (even though I know the amperage is low).
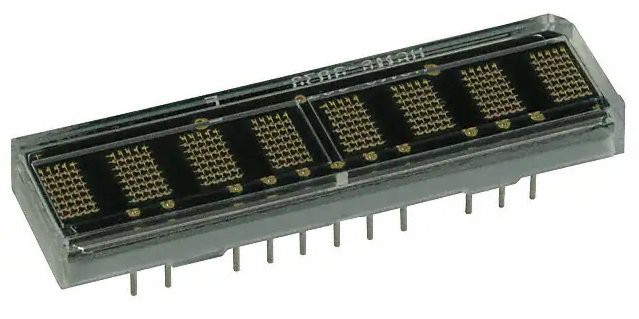
So I spent a lot of time looking for a suitable replacement and think I found one, the Broadcom HCMS-2972.
![]()
Packaged as 8 5x7 dot matrix arrays these modules operate at a nice safe 3.3V and can be cascaded together side by side to create the 32 x 1 character display desired here. Furthermore the viewing area for the 32 characters measures 171.7 mm x 4.57 mm while the Self Scan viewing area is 181.61 mm x 4.98 mm. So very very close.
There is one small drawback to using the HCMS-2972s. The Self-Scan displays form a full 222 x 7 dot matrix. When displaying characters however two columns between each character are turned "off". Four HCMS-2872s side by side are only 160 x 7 dots where there are physical gaps between the characters that happen to be about 2 columns wide. For normal use there will be no difference in the displays since the MCM/70 always keeps characters on a even 7 column boundaries. However when an MCM/70 is executing instructions that do not involve displaying outputs, it uses display memory to store temporary values. Since the hardware is constantly updating the display from this memory, random looking patterns of dots will be displayed. In my implementation these "thinking" patterns of dots will have blank columns between where the characters are. I think I can live with this.
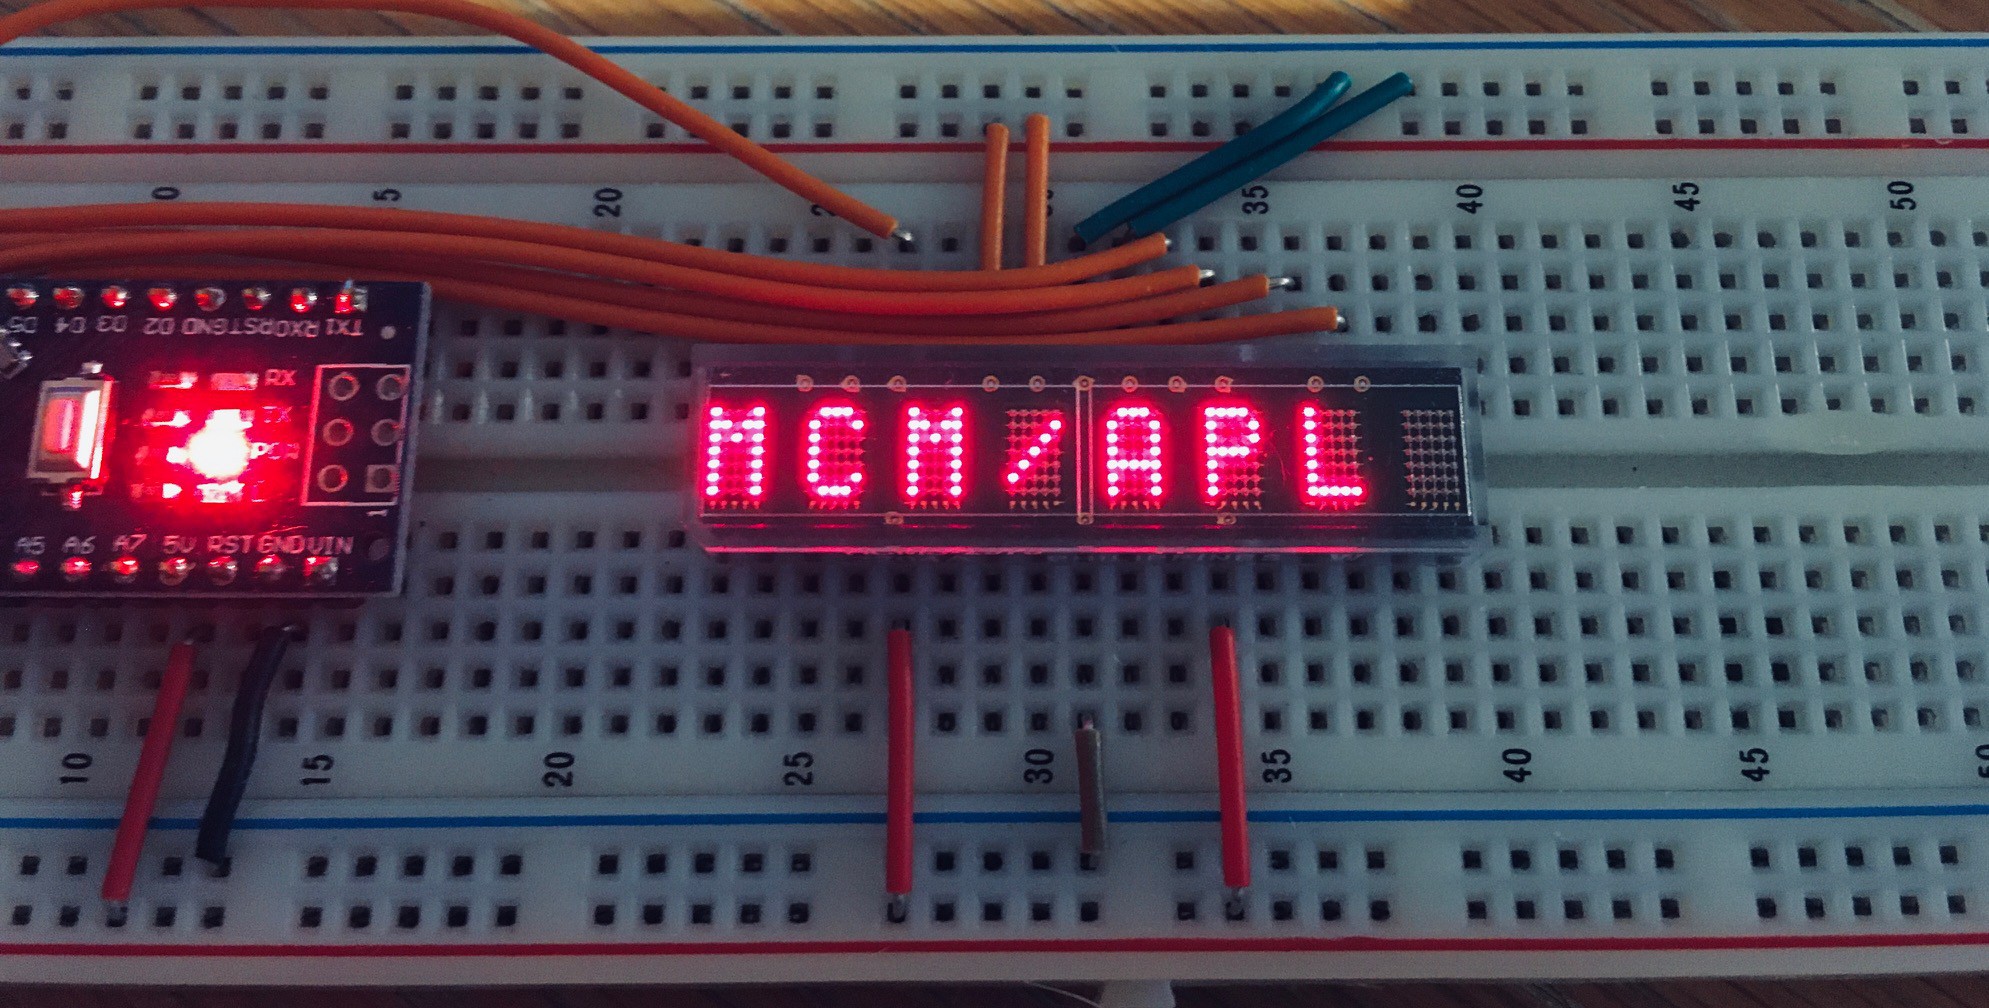
I received a HCMS-2972 earlier this week and setup quick test using an Arduino Nano I had kicking around. Here is what it looks like fired up.
![]()
I have 3 more HCMS-2972s on order now.
-
The York University Computer Museum MCM/70E Emulator
04/01/2022 at 16:06 • 4 commentsSo thanks to the hard working folks at York University, I have a great head start with this project, a working MCM/70 Emulator. Not just working, but because it is intended for research purposes, an emulator "with high historical accuracy". From the MCM/70E web page:
In 2019, YUCoM offered its emulator of the MCM/70 as free software. The emulator is the result of an extensive study of the MCM/70 hardware and of a software recovery project that has preserved MCM software from approximately 100 digital MCM cassettes donated to the museum. It emulates the original MCM/70 hardware with 8Kbytes of RAM with high historical accuracy. In particular, the memory management as well as tape, keyboard, and display functionality are emulated accurately. The emulator operates under the original systems software and is using the original tape storage organization (reconstructed during the above mentioned software preservation project).
There is a great document, the MCM/70E Guide, that accompanies the software that tells you how to install and run the emulator.![]()
MCM/70E is written in C and is available for Linux only at this time. It is delivered as source in a .tgz archive and must be compiled on the target machine. OpenGL and the GLUT utility toolkit are required for the emulator to compile.
My intention is to run the emulator on a Raspberry Pi 4. Unfortunately due to supply shortages it does not look like I will be able to obtain one in the near future (or maybe even longer). So in the interim I dug a Raspberry Pi 2 Model B out of my parts box to give the emulator a try.
I installed the latest Raspberry Pi OS (Version 11 (bullseye)) onto the Model B. I then downloaded and exploded the MCM70E.tgz file that I obtained from York University creating a /MCM70E_v2.1_distr folder. From within that folder I executed the following commands:
sudo apt-get install freeglut3-dev
apt-get install libncurses-dev
gcc mcm.c -lGL -lglut -o mcm
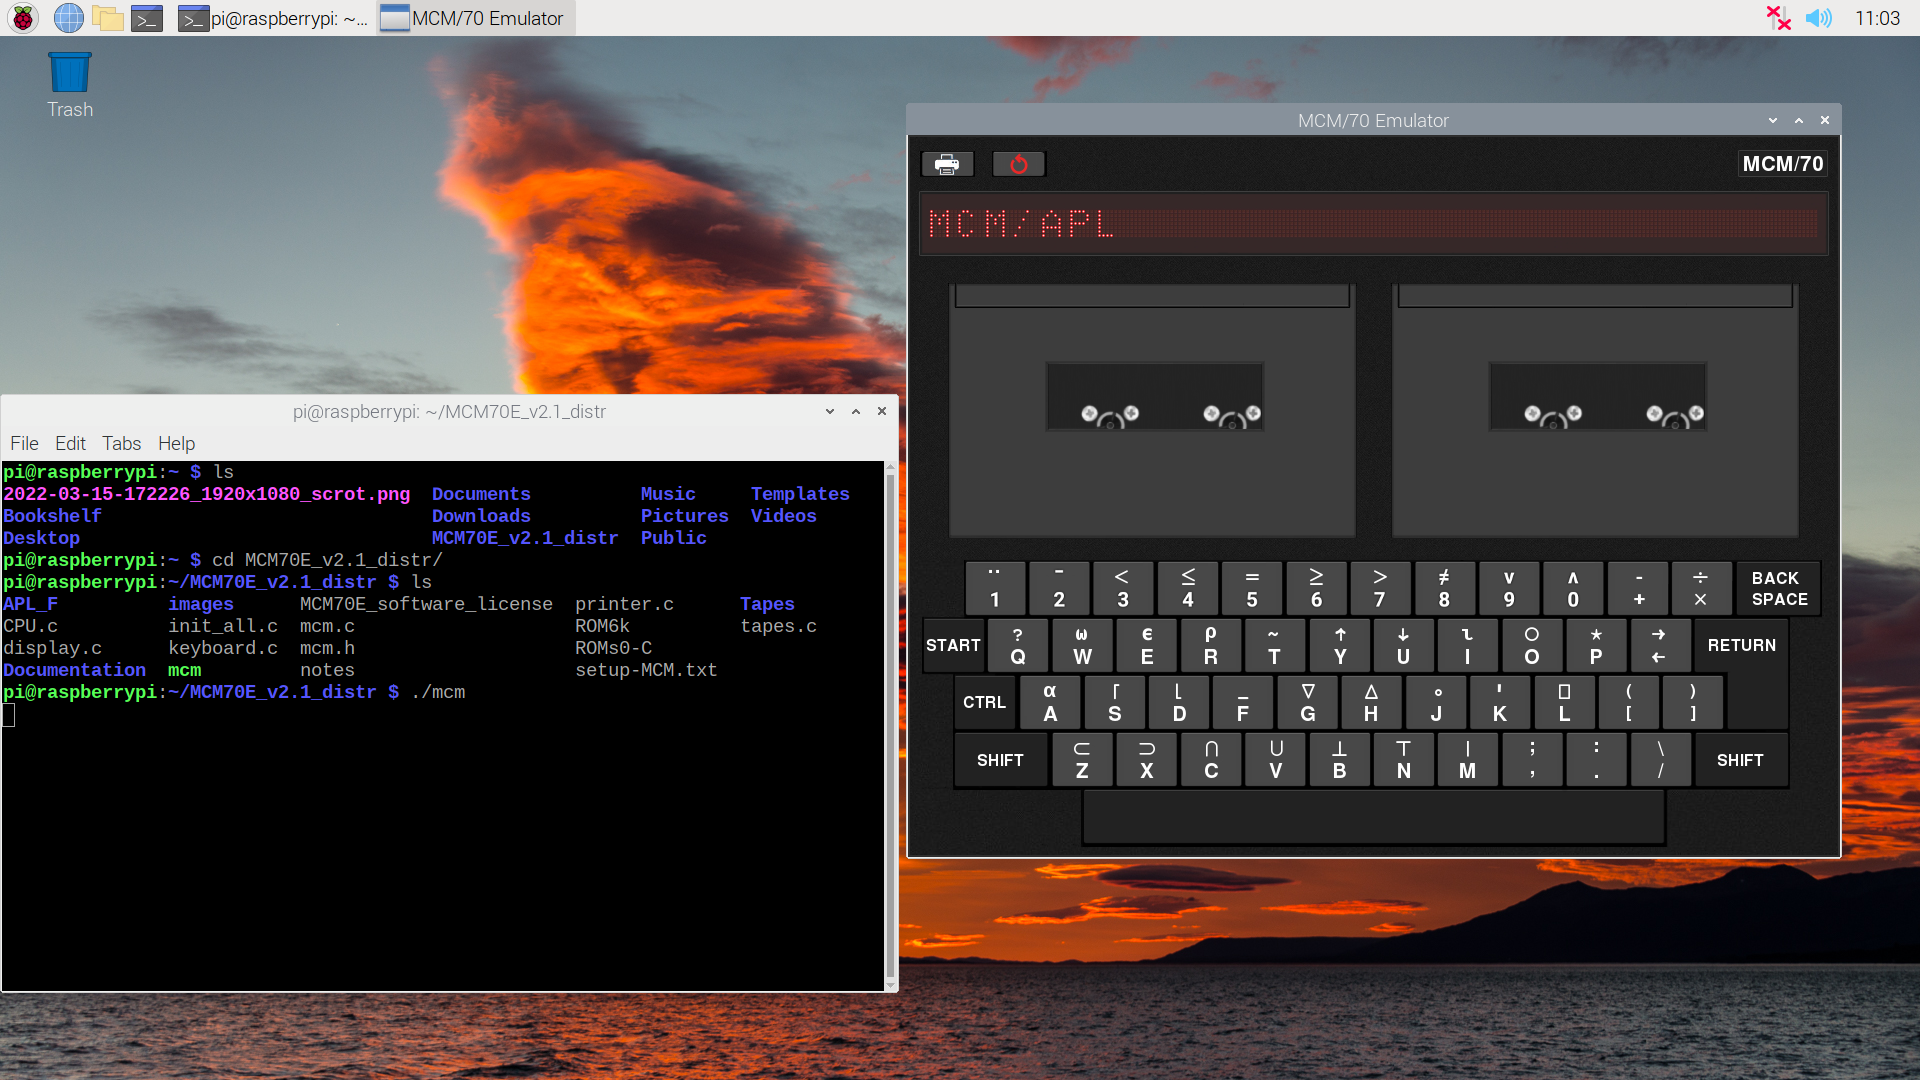
Notice that in order to get the emulator to compile under Raspberry Pi OS I had to install the ncurses library in addition to the GLUT library. Then it's a simple matter of running the emulator.
./mcm
![]()
The emulator runs great with one caveat. On my Raspberry Pi 2 it only runs at about 20% of the speed of an actual MCM/70. At this point I am not too worried about that. On a Raspberry Pi 4 the emulation will run faster. Also I believe that much of the speed loss is due to the overhead of running OpenGL for the emulator's UI. When my reproduction is done there will be no need for the UI or OpenGL so I expect much better performance. If I'm wrong it's a problem for future me to resolve.
Update: I enabled the GL acceleration in Advanced Settings on the Pi but it made little difference. However adding the following gcc options (for the Raspberry Pi 2 specifically):
-mcpu=cortex-a7 -mfpu=neon-vfpv4to the compile did improve the performance to be 33% of the speed of an actual MCM/70. I'm confident that further tweaks can get us up to par.
-
The Game Plan
03/31/2022 at 16:58 • 0 commentsLook. I would like nothing better than to find a dusty old MCM/70 computer for cheap in some thrift shop and restore it to it's former working glory. Realistically we all know how unlikely this is given that relatively few MCM/70s were ever produced and that it has been close to 50 years since the last one was made.
So what about recreating the hardware from scratch. Obtain the original schematics and with luck PCB layouts, source the parts, many of which are vintage now and no longer manufactured, and make a replica. While this is might be possible, the endeavor would be very expensive, certainly well beyond the means of the average enthusiast like myself.
Another possibility is to create an emulation of the MCM/70 in software. This is just what the team at the The York University Computer Museum (YUCoM) did. From their web page:
An alternative approach to the direct use of MCM hardware is to write historically accurate software emulators of this computer destined for modern desktop and laptop computers. Although such emulators do not necessarily reflect the computer's hardware on, say, integrated circuit level, they offer a platform for research of general hardware organization, storage organization, systems and applications software, etc.
Software emulation is great and is certainly an important part of preserving these wonderful old machines, but I have found that nothing beats the feel of typing on a physical keyboard and hearing the sounds of the keys clicking.
So here is where I come in. My plan is to make a full size MCM/70 computer reproduction with a real keyboard and display which I'll integrate into the YUCoM emulator. This physical reproduction will be as accurate as possible but made with modern components and fabrication techniques. For instance, the case will probably be 3D printed. I will add the cassette bays to give an authentic look but at least for my first out they will not be functional, instead using the emulator's virtual cassettes. Ultimately I will produce an Instructable so that others might make their own MCM/70 should they choose to.
MCM/70 Reproduction
I am making a full sized MCM/70 reproduction, a Canadian personal computer from 1974.